
The right word may be effective, but no word was ever as effective as a rightly timed pause. | ||
| --Mark Twain | ||
The Timeline can be considered After Effects’ killer application. More than any other feature, it extends After Effects unique versatility to a wide range of work. With the Timeline at the center of the compositing process, you can time elements and animations precisely as you control their appearance.
The Timeline panel is also a user-friendly part of the application and full of hidden powers. By mastering its usage, you can streamline your workflow a great deal, setting the stage for more advanced work.
One major source of these hidden powers is the Timeline’s set of keyboard shortcuts and context menus. These are not extras to be investigated once you’re a veteran, but small productivity enhancers that you can learn gradually all the time.
The goal here isn’t to keep you organized but to get rid of everything you don’t need and put what you do need right at your fingertips.
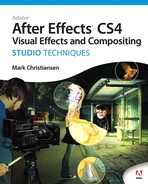
You can context-click on any column heading to see and toggle available columns in the Timeline, or you can start with the minimal setup shown in Figure 2.1 and then augment or change the setup with the following tools:
Lower-left icons
 : Most (but not quite all) of the extra data you need is available via the three toggles found at the lower left of the Timeline.
Layer Switches
 and Transfer Controls
  are the most-used; if you have plenty of horizontal space, leave them both on, but the F4 key has toggled them since the days when 1280 × 960 was an artist-sized display.
Time Stretch
 toggles the space-hogging timing columns. I’m unconvinced they’re needed; the one thing I do with this huge set of controls is stretch time to either double speed or half speed (50% or 200% stretch, respectively), which I can do by context-clicking Time > Time Stretch.
Layer/Source (Alt/Option key toggles): What’s in a name? Nothing until you customize it; clear labels and color (below) boost your workflow.
Parent: This one is so often on when you don’t need it and hidden when you do (see “Spatial Offsets” later in this chapter); use context-clicking to show/hide it.
I can’t see why you would disable AV Features/Keys; it takes effectively no space.
The game is to preserve horizontal space for keyframe data by keeping only the relevant controls visible.
When dissecting something tricky, it can help to use
Solo layers to see what’s what

Locks for layers that should not be edited further

Shy layers to reduce the Timeline to only what’s needed

Color-coded layers and project items

Tags in the comments field
Solo layers hide visible layers that are not solo’d. They are great except that other layers can stay mysteriously hidden in subsequent comps and renders. For this reason, I like to set Solo Switches to All Off in my default Render Settings.
Tip
To unlock a number of layers at once, choose Layer > Switches > Unlock All Layers (Ctrl+Shift+L/Cmd+Shift+L).
I don’t often lock layers, but it makes a heck of a lot of sense particularly for layers that you don’t want “nudged” out of position, such as adjustment layers, track mattes, and background solids (but once they’re locked, you can’t adjust anything until you unlock them). If you’re a super-organized person, you can use layer locks to check layers in and out; the locked ones are completed—for now.
Employing shy layers provides a fantastic workaround for the cluttered Timeline. Layers set to shy disappear from the Timeline (once the Timeline’s own Shy toggle is enabled) but remain visible in the Composition viewer. If you’ve ever worked with an imported 3D track composition from such software as SynthEyes or Boujou, you know that they typically come with hundreds of null layers. I tend to make these shy immediately, leaving only the camera and background plate ready for compositing.
Notes
Shy layers can greatly reduce clutter in the Timeline, but if they ever trick you, study the Index numbers; if any are missing from the sequence, that’s a shy layer.
Colors are automagically assigned to specific types of layers (like Cameras, Lights, and Adjustment Layers) according to Preferences > Label Defaults. I often give unique colors to track matte layers so I remember not to move them. On someone else’s system, the colors may change according to their preferences, although they will correspond.
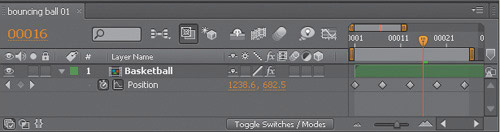
Comments are generally the least used column in the Timeline, but that could change if more people start using a script called “Zorro-The Layer Tagger,” which manages the process of adding tags to layers and using them to create selection sets (Figure 2.2).
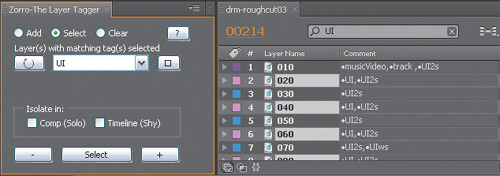
Figure 2.2. Comments have become much more useful with the new Timeline search field in CS4, and the third-party script shown here, “Zorro-The Layer Tagger” (from aescripts.com), makes them even more useful. Zorro not only holds a list of keywords to apply to or remove from selected layers, it even does nifty stuff such as make layers with a given tag instantly solo or shy.
Layer Markers (and, new in CS4, Comp Markers) can hold visible comments. You can add a layer marker for a given point in time with the * key on your numeric keypad, meaning you can add them while looping up a RAM Preview in real time. Comp Markers are added using Shift and the numbers atop your keyboard. I double-click them and make notes, both for timing and when I want to make sure a note won’t get lost in the hidden Comment column.
Keyboard shortcuts make a huge difference in your ability to work speedily and effortlessly in the Timeline.
Many users—particularly editors—learn time navigation shortcuts right away. Others primarily drag the current time indicator, which can quickly become tedious. See if there are any here you don’t already know:
Home, End, Page Up, and Page Down correspond to moving to the first or last frame of the composition, one frame backward, and one frame forward, respectively.
Shift+Page Up and Shift+Page Down skip ten frames backward or forward, respectively.
Shift+Home and Shift+End navigate to the work area In and Out points respectively, and the B and N keys set these points at the current time.
I and O keys navigate to the beginning and end frames of the layer.
Press Alt+Shift+J/Opt+Shift+J or click on the current time status at the upper left of the Timeline to navigate to a specific frame or timecode number. In this dialog, enter +47 to increment 47 frames or −47 to decrement the same number; if you entered −47, that would navigate to a negative time position instead of offsetting by that number.
We were reviewing film-outs of shots in progress from The Day After Tomorrow at The Orphanage when my shot began to loop; it looked out a window at stragglers making their way across a snow-covered plaza and featured a beautiful matte painting by Mike Pangrazio. About two-thirds through the shot came a subtle pop. At some point, the shot had been lengthened, and a layer of noise and dirt I had included at approximately 3% transparency (for the window itself) had remained shorter in a subcomposition.
Tip
The increment/decrement method operates in most number fields throughout After Effects (including Composition Settings).
With power comes responsibility. After Effects allows you to time the entrance and exit of layers in a way that would be excruciating in other compositing applications that have no built-in sense of a layer start or end. To avoid the gotcha where a layer or comp comes up short, it is wise to make everything way longer than you ever expect you’ll need—overengineer in subcomps and trim in the master comp.
To add a layer beginning at a specific time, drag the element to the layer area; a second time indicator appears that moves with your cursor (horizontally). This determines the layer’s start frame. If other layers are present and visible, you can also place it in layer order by dragging it between them.
Here are some other useful tips and shortcuts:
Ctrl+/ (Cmd+/) adds a layer to the active composition.
Ctrl+Alt+/ (Cmd+Opt+/) replaces the selected layer in a composition (as does option dragging one element over another—either in the Timeline or the Project panel—this can be hugely useful).
J and K navigate to the previous or next visible keyframe, layer marker, or work area start/end, respectively.
Ctrl+Alt+B/Cmd+Option+B sets the Work Area to the length of any selected layers. To reset the Work Area to the length of the composition, double-click it.
Numeric keypad numbers select layers with that number.
Ctrl+Up Arrow (Cmd+Up Arrow) selects the next layer up; down works the same.
Ctrl+] (Cmd+]) and Ctrl+[ (Cmd+[) move a layer up or down one level in the stack. Ctrl+Shift+] and Ctrl+Shift+[ move a layer to the top or bottom of the stack.
Context-click > Invert Selection to invert the layers currently selected. (Locked layers are not selected, but shy layers are selected even if invisible.)
Ctrl+D (Cmd+D) to duplicate any layer (or virtually any selected item).
Ctrl+Shift+D (Cmd+Shift+D) splits a layer; the source ends and the duplicate continues from the current time.
[ and ] move the In or Out points of selected layers to the current time. Add Alt (Option) to set the current frame as the In or Out point, trimming the layer.
Double-ended arrow icon over the end of a trimmed layer lets you slide it, preserving the In and Out points while translating the timing and layer markers (but not keyframes).
Alt+PgUp/PgDn (Option+PgUp/PgDn) nudges a layer and its keyframes forward or backward in time. Alt/Option+Home or End moves the layer’s In point to the beginning of the comp, or the Out point to the end.
Layer > Transform (or context-click a layer > Transform) includes three ways to fill a frame with the selected layer:
Ctrl+Alt+F (Cmd+Option+F) centers a layer and fits both horizontal and vertical dimensions of the layer, whether or not this is non-uniform scaling.
Ctrl+Alt+Shift+H/Cmd+Option+Shift+H centers but fits only the width.
Ctrl+Alt+Shift+G/Cmd+Option+Shift+G centers but fits only the height.
Tip
It can be annoying that the Work Area controls both preview and render frame ranges because the two are often used exclusively of one another. By employing a separate “Render Final” composition that contains the Work Area for the final render, you can mess with your other composition Work Areas as much as you want without affecting the render range.
Those shortcuts are a handful; context-clicking the layer for the Transform menu is nearly as easy.
After Effects has a great keyframe workflow. These shortcuts will help you work with timing more quickly, accurately, and confidently:
The ; key toggles all the way in and out on the Timeline: single frame to all frames. The slider at the bottom of the Timeline
 zooms in and out more selectively.
The scroll wheel moves you up and down the layer stack.
Shift+scroll-wheel moves left and right in a zoomed Timeline view.
Alt/Option+scroll zooms dynamically in and out of the Timeline, remaining focused around the cursor location.
The key toggles between a Timeline and its Composition viewer, even if previously closed.
The Comp Marker Bin
 contains markers you can draw out into the Timeline ruler. You can replace their sequential numbers with names.
Transform controls live under every layer’s twirly arrow. There are keyboard shortcuts to each Transform property. For a standard 2D layer these are
P for Position, by default the center of the comp
S for Scale (in percent of source)
R for Rotation (in revolutions and degrees)
T for Opacity, or if it helps, Opaci-“T” (which is not technically spatial transform data but is grouped here anyhow because it’s so essential)
Once you’ve revealed one of these, hold down the Shift key to toggle another (or to hide another one already displayed). This keeps only what you need in front of you. A 3D layer reveals four individual properties under Rotation to allow full animation on all axes.
The Alt/Option key can be used with each of these one-letter shortcuts to add the first keyframe; once there’s one keyframe, any adjustments to that property at any other frame generate another keyframe automatically.
There are selection tools to correspond to Transforms:
V activates the Selection tool, which also moves and scales in a view panel.
Y switches to the Pan-Behind tool, which moves the anchor point.
W stands for “wotate”—it adjusts Rotation.
Once you adjust with any of these tools, an Add Keyframe option for the corresponding Property appears under the Animation menu, so you can set the first keyframe without touching the Timeline at all.
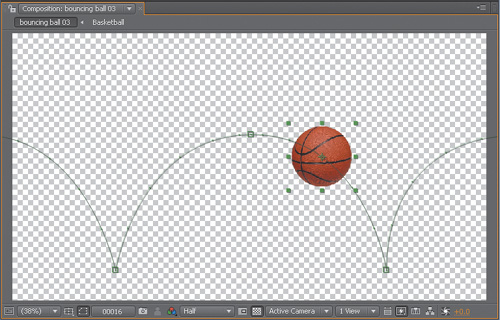
To demonstrate how best to use the Graph Editor, I devised the project 02_graphEditor.aep in the accompanying disc’s Chapter02 directory. It contains a simple animation, “bouncing ball 2d,” which you can create from scratch; you can also see the steps below as individual numbered compositions.
To enable the Graph Editor, click its icon in the Timeline ![]() or use the shortcut Shift+F3. Below the grid that appears in place of the layer stack are the Graph Editor controls (Figure 2.3).
or use the shortcut Shift+F3. Below the grid that appears in place of the layer stack are the Graph Editor controls (Figure 2.3).

By default, if nothing is selected, nothing displays; what you see depends on the settings in the Show Properties menu ![]() . Three toggles in this menu control how animation curves are displayed:
. Three toggles in this menu control how animation curves are displayed:
Show Selected Properties displays animation whatever property names are highlighted.
Show Animated Properties shows everything with keyframes or expressions.
Show Graph Editor Set displays properties with the Graph Editor Set toggle enabled.
Show Selected Properties is the easiest to use, but Show Graph Editor Set gives you the greatest control. You decide which curves need to appear, activate their Graph Editor Set toggle, and after that it no longer matters whether you keep them selected.
To begin my bouncing ball animation, I include Position in the Graph Editor Set by toggling its icon ![]() . Alt/Option+P sets the first Position keyframe at frame 0; after that, any changes to Position are automatically keyframed.
. Alt/Option+P sets the first Position keyframe at frame 0; after that, any changes to Position are automatically keyframed.
Figure 2.4 shows the first step: a very basic animation blocked in using Linear keyframes, evenly spaced. It won’t look like a bouncing ball yet, but it’s a typical way to start when animating, for new and experienced animators alike.

To get to this point
Having set the first keyframe at frame 0, move the ball off left of frame.
At frame 24, move the ball off right of frame, creating a second keyframe.
Now add the bounces: At frame 6 and 18 move the ball straight downward so it touches the bottom of frame.
This leaves five Position keyframes and an extremely unconvincing looking bouncing ball animation. Great—it always helps to get something blocked in so you can clearly see what’s wrong. Also, the default Graph Editor view at this point is not very helpful, because it displays the Speed Graph, and the speed of the layer is completely steady at this point—deliberately so, in fact. That’s why keyframes were created in that order (although in a moment you’ll see how to avoid having to do it that way with a new feature).
To get the view shown in Figure 2.4, make sure Show Reference Graph is enabled in the Graph Options menu ![]() . This is a toggle even advanced users miss, although it is now on by default; in addition to the not-very-helpful Speed Graph you now see the Value Graph in its X (red) and Y (green) values. However, the green values appear upside-down! This is the flipped After Effects Y axis in action; 0 is at the top of frame so that 0,0 is in the top left corner, as it has been since After Effects 1.0, long before 3D animation was added.
. This is a toggle even advanced users miss, although it is now on by default; in addition to the not-very-helpful Speed Graph you now see the Value Graph in its X (red) and Y (green) values. However, the green values appear upside-down! This is the flipped After Effects Y axis in action; 0 is at the top of frame so that 0,0 is in the top left corner, as it has been since After Effects 1.0, long before 3D animation was added.
The simplest way to “fix” an animation that looks too stiff like this is often to add eases. For this purpose After Effects offers the automated Easy Ease functions, although you can also create or adjust eases by hand in the Graph Editor.
Select all of the “up” keyframes—the first, third, and fifth—and click Easy Ease ![]() (F9). When a ball bounces, it slows at the top of each arc, and Easy Ease adds that arc to the pace; what was a flat line Speed Graph now is a series of arcing curves (Figure 2.5).
(F9). When a ball bounces, it slows at the top of each arc, and Easy Ease adds that arc to the pace; what was a flat line Speed Graph now is a series of arcing curves (Figure 2.5).

Warning
Mac users beware: The F9 key is used by the system for the Exposé feature, revealing all open panels in all applications. You can change or disable this feature in System Preferences > Dashboard & Exposé.
Technically, you could have applied Easy Ease Out ![]() (Ctrl/Command+Shift+F9) to the first keyframe and Easy Ease In
(Ctrl/Command+Shift+F9) to the first keyframe and Easy Ease In ![]() (Shift+F9) to the final one, because the ease in each case only goes in one direction. The “in” and “out” versions of Easy Easy are specifically for cases where there are other adjacent keyframes and the ease should only go in one direction (you’ll see one in a moment). In this case it’s not really necessary.
(Shift+F9) to the final one, because the ease in each case only goes in one direction. The “in” and “out” versions of Easy Easy are specifically for cases where there are other adjacent keyframes and the ease should only go in one direction (you’ll see one in a moment). In this case it’s not really necessary.
Meanwhile, there’s a clear problem here: The timing of the motion arcs, but not the motion itself, is still completely linear. Fix this in the Composition viewer by pulling Beziers out of each of the keyframes you just eased:
Deselect all keyframes but leave the layer selected.
Make sure the animation path is displayed (Ctrl/Command+Shift+H toggles).
Click on the first keyframe in the Composition viewer to select it; it should change from hollow to solid in appearance.
Switches to the Pen tool with the G key; in the Composition viewer, drag from the highlighted keyframe to the right, creating a horizontal Bezier handle. Stop before crossing the second keyframe.
Do the same for the third and fifth keyframes (dragging left for the fifth).
The animation path now looks more like you’d expect a ball to bounce (Figure 2.6). Preview the animation, however, and you’ll notice that the ball appears to be riding a pogo stick across the frame, instead of bouncing naturally. Why is that?
The Graph Editor reveals the problem. The red X graph shows an unsteady horizontal motion due to the eases. The problem is that the eases should be applied only to the vertical Y dimension, whereas the X animation travels at a constant rate.
New to After Effects CS4 is the ability to animate X and Y (or, in 3D, X, Y, and Z) animation curves separately. This allows you to add keyframes for one dimension only at a given point in time, or to add keyframes in one dimension at a time.
Select Position and click Separate Dimensions ![]() . Where there was a single Position property, there are now two marked X Position and Y Position. Now try the following:
. Where there was a single Position property, there are now two marked X Position and Y Position. Now try the following:
Disable the Graph Editor Set toggle for Y Position so that only the red X Position graph is displayed.
Select the middle three X Position keyframes—you can draw a selection box around them—and delete them.
Select the two remaining X keyframes and click the Convert Selected Keyframes to Linear button
 .
.
Now take a look in the Composition viewer—the motion is back to linear, although the temporal eases remain on the Y axis. Not only that, but you cannot redraw them as you did before; enabling Separate Dimensions removes this ability.
Instead, you can create them in the Graph Editor itself.
Enable the Graph Editor Set toggle for Y Position, so both dimensions are once again displayed.
Select the middle Y Position keyframe, and you’ll notice two small handles protruding to its left and right. Drag each of these out, holding the Shift key if necessary to keep them flat, and notice the corresponding change in the Composition viewer (Figure 2.7).
Select the first and last Y Position keyframes and click Easy Ease; the handles move outward from each keyframe without affecting the X Position keyframes.
Drag the handles of the first and last Y Position keyframes as far as they will go (right up to the succeeding and preceding keyframes, respectively).

Preview the result and you’ll see that you now have the beginnings of an actual bouncing ball animation; it’s just a little bit too regular and even, so from here you will give it your own organic touch.
The Transform Box lets you edit keyframe values in all kinds of wacky ways. Toggle on Show Transform Box and select more than one keyframe, and a white box with vertices surrounds the selected frames. Drag the handle at the right side left or right to change overall timing; the keyframes remain proportionally arranged.
Notes
There is a whole menu of ![]() options to show items that you might think are only in Layer view: layer In/Out points, audio waveforms, layer markers, and expressions.
options to show items that you might think are only in Layer view: layer In/Out points, audio waveforms, layer markers, and expressions.
So, does the Transform Box help in this case? Well, it could, if you needed to
Scale the animation timing around a particular keyframe: drag the anchor to that frame, then Ctrl-drag/Cmd-drag.
Reverse the animation: Ctrl-drag/Cmd-drag from one edge of the box to the other (or for a straight reversal, simply context-click and choose Keyframe Assistant > Time-Reverse Keyframes).
Add a decay to the animation so that the ball bounces lower each time: Alt-drag (Option-drag) on the lower right corner handle (Figure 2.8).
If you Ctrl+Alt-drag (Cmd+Option-drag) on a corner that will taper values at one end, and if you Ctrl+Alt+ Shift-drag (Cmd+Option+Shift-drag) on a corner, it will skew that end of the box up or down. I don’t do this stuff much, but with a lot of keyframes to scale proportionally, it’s a good one to keep in your back pocket.
At this point you may have a fairly realistic looking bouncing ball; maybe you added a little Rotation animation so the ball spins forward as it bounces, or maybe you hand-adjusted the timing or position keys to give them that extra little organic unevenness.
Hold keyframes won’t help improve this animation, but you could make the ball disappear each time it hits the ground, and reappear at the top of the arc, with no eases. A Hold keyframe ![]() (Ctrl+Alt+H/Cmd+Shift+H) prevents any change to a value until the next keyframe.
(Ctrl+Alt+H/Cmd+Shift+H) prevents any change to a value until the next keyframe.
Add keyframes alternating between 100% and 0% Opacity at the same time as the existing Y Position keyframes. If you leave them as linear keyframes, the ball oscillates between opaque and transparent, but if you toggle them to Hold keyframes, it snaps on and off (Figure 2.9).

In the (possibly likely) case that the need for a bouncing ball animation never comes up, what does this example show you? Let’s recap:
You can control a motion path in the Composition viewer using Bézier tools and the Pen tool (usage detailed in the next chapter).
Realistic motion often requires that you shape the motion path Béziers and add temporal eases; the two actions are performed independently on any given keyframe, and in two different places (in the viewer and Timeline).
Animation can get a little trickier in 3D, but the same basic rules apply (see Chapter 9 for more).
Three preset keyframe transition types are available, each with a shortcut at the bottom of the Graph Editor: Hold ![]() , Linear
, Linear ![]() , and Automatic Bezier
, and Automatic Bezier ![]() . Adjust the handles or apply Easy Ease and the preset becomes a custom Bezier Shape.
. Adjust the handles or apply Easy Ease and the preset becomes a custom Bezier Shape.
Close-Up: Roving Keyframes
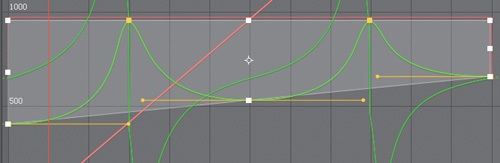
Sometimes an animation must follow an exact path, hitting precise points, but progress steadily, with no variation in the rate of travel. This is the situation for which Roving keyframes were devised. Figure 2.10 shows a before and after view of a roving keyframe; the path of the animation is identical, but the keyframes proceed at a steady rate.

Figure 2.10. Compare this graph with the one in Figure 2.5 (top); the Speed Graph is back to a flat-line because the animation runs at a uniform pace. It’s not helpful to bounce a ball, but it works with any complex animation, and it maintains eases on the start and end frame.
Yes, copy and paste; everyone knows how to do it. Here are some things that aren’t necessarily obvious about copying and pasting keyframe data:
Got Excel or another spreadsheet application? Copy a set of keyframes from After Effects and paste them into a spreadsheet, and the After Effects keyframe format is laid bare.
You can paste from one property to another, so long as the format matches (the units and number of parameters). Copy the source, highlight the target, and paste.
Keyframes respect the position of the current time indicator; the first frame is always pasted at the current time (useful for relocating timing, occasionally a surprise).
There’s a lock on the Effect Controls tab to keep a panel forward even when you select another layer to paste to it.
Copy and paste keyframes from an effect that isn’t applied to the target, and it is added along with the animation, natch; you don’t get any properties you didn’t select and copy, however.
Therefore, pay attention to the current time and what is selected when copying, but in particular, when pasting animation data.
To summarize the distinction between Layer and Graph Editor views, in Layer view you can
Block in keyframes with respect to the overall composition
Establish broad timing (where Linear, Easy Ease, and Auto-Bezier keyframes are sufficient)
The Graph Editor is essential to
With either view you can
Edit expressions
Change keyframe type (Linear, Hold, Ease In, and so on)
Make editorial/compositing decisions regarding layers (start/stop/duration, split layers, order—possible in both, easier in Layer view)
By no means, then, does the Graph Editor make Layer view obsolete; it is still where the majority of compositing and simple animation is accomplished.
The following keyboard shortcuts have broad usage when applied with layers selected in the Timeline:
U toggles all properties with keyframes or expressions applied.
UU (U twice in quick succession) toggles all properties set to any value besides the default; or every Property in the Timeline that has been edited.
E toggles all applied effects.
EE toggles all applied expressions.
When I use the term “toggle” in the above list, I mean that not only do these shortcuts reveal the listed properties, they can also conceal them, or with the Shift key, they can be used in combination with one another and with many of the shortcuts detailed earlier (such as the Transform shortcuts A, P, R, S, and T or the Mask shortcuts M, MM, and F). You want all the changes applied to Masks and Transforms, not Effects? UU, then Shift+E. Lose the Masks? Shift+M.
Notes
The term “überkey” seems to play on Friedrich Nietzsche’s concept of the “übermensch”—it is a shortcut more powerful and important than others.
The U shortcut is a quick way to find keyframes to edit or to locate a keyframe that you suspect is hiding somewhere. But UU—now that is a full-on problem-solving tool all to itself. It allows you to quickly investigate what has been edited on a given layer, is helpful when troubleshooting your own layer settings, and is nearly priceless when investigating an unfamiliar project.
Close-Up: Nerd-Based Compositing
Flowchart, the After Effects nodal view, reveals the truth that all compositing applications are, at their core, nodal in their logic and organization. However, this particular tree/node view is diagnostic and high-level only; you can delete a layer but you can’t create one here.
Highlight all the layers of a Comp and press UU to reveal all edits, enable Switches, Modes, Parent, and Stretch columns, and you see everything in a Comp, with the exception of
Contents of nested compositions, which must be opened (Alt/Option-double-click) and analyzed individually
Locked layers
Shy layers (disable them atop the Timeline to show all)
Comp settings themselves, such as motion blur and frame rate
In other words, this is an effective method to use to understand or troubleshoot a shot.
If you’ve been handed an unfamiliar project and need to make sense of it quickly, there are a couple of other tools that may help.
The new one of these is probably my favorite new feature in After Effects CS4: Miniflow (Shift key toggles with the Timeline, Comp, or Layer view active, Figure 2.11b). It quickly maps any upstream or downstream comps and allows you to open any of them simply by clicking on it.

Figure 2.11. The tree/node interface in Flowchart (a, top) is a diagnostic rather than a creative tool. Click the ![]() icon to switch the view to flow left to right, which fits well on a monitor, or Option-click it to clean up the view. Its usage has largely been superceded by the new Miniflow (b, bottom), which focuses interactively on the current comp.
icon to switch the view to flow left to right, which fits well on a monitor, or Option-click it to clean up the view. Its usage has largely been superceded by the new Miniflow (b, bottom), which focuses interactively on the current comp.
If you’re looking for a whole visual map of the project instead, try Flowchart view (Ctrl+F11/Cmd+F11 or the tree/node icon in the Composition viewer). You have to see it to believe it: a nodal interface in After Effects (Figure 2.11a), perhaps the least nodal of any of the major compositing applications.
This view shows how objects (layers, compositions, and effects) are used, and in what relationship to one another. The + button above a composition reveals its components; for the cleanest view, toggle layers and effects off at the lower left.
You can’t make any edits here, but you can double-click any item to reveal it where you can edit it—back in the Timeline, of course.
Although no shortcut can hold a candle to the überkey, there are several other useful Timeline shortcuts:
J and K keys navigate backward and forward, respectively, through all visible keyframes, layer markers, and Work Area boundaries; hide the properties you don’t want to navigate.
Click Property name to select all keyframes for a property.
Context-click keyframe > Select Previous Keyframes or Select Following Keyframes to avoid difficult drag selections.
Context-click keyframe > Select Equal Keyframes to hit all keyframes with the same setting.
Alt/Option+Shift+Transform shortcut (P, A, S, R, or T) sets a keyframe; no need to click anywhere.
Click a property Stopwatch to set the first keyframe at the current frame (if no keyframe exists), or delete all existing keyframes.
Cntl/Command-click an Effect stopwatch to set a keyframe.
Ctrl+Alt+A/Cmd+Option+A selects all visible keyframes while leaving the source layers, making it easy to delete them when, say, duplicating a layer but changing its animation.
Shift+F2 deselects keyframes only.
Read on; you are not a keyframe Jedi—yet.
To offset the values of multiple keyframes by the same amount in Layer view, select them all, place the current time indicator over a selected keyframe, and drag the setting; all change by the same increment. If instead you type in a new value, or enter an offset, such as +20 or +−47, with a numerical value, all keyframes take on the (identical) new value.
Notes
Keyframe multiselection in standard Layer view (but not Graph Editor) is inconsistent with the rest of the application: you Shift-click to add or subtract a single frame from a group. Ctrl/Cmd-clicking on a keyframes converts it to Auto-Bézier mode.
With multiple keyframes selected you can also
Alt+Right/Left Arrow (Option+Right/Left Arrow) to nudge keyframes forward or backward in time
Context-click > Keyframe Assistant > Time-Reverse Keyframes to run the animation in reverse without changing the duration and start/end point of the selected keyframe sequence
Option-drag the first or last selected keyframe to scale timing proportionally in Layer view (or use the transform box in the Graph Editor)
3D animators will be familiar with the idea that every object (or layer) has a pivot point. In After Effects, there are two fundamental ways to make a layer pivot around a different location: change the layer’s own Anchor Point setting, or parent it to another layer.
After Effects is generally designed to preserve the appearance of the composition when you are merely setting up animation, toggling 3D on, and so forth. Therefore editing an anchor point position with the Pan Behind tool triggers the inverse offset to the Position property. Parent a layer to another layer and the child layer maintains its relative position until you further animate either of them.
It’s typically best to set up your offsets and hierarchy before animating, although this section shows how to go about changing your mind once keyframes are in place. The Option key is key to all options.
The Pan Behind tool (Y) repositions an anchor point in the Composition panel and offsets the Position value to compensate. This prevents the layer from appearing in a different location on the frame in which you’re working.
The Position offset is for that frame only, however, so if there are Position keyframes, the layer may appear offset on other frames if you drag the anchor point this way. To reposition the anchor point without changing Position
Change the Anchor Point value in the Timeline
Use the Pan Behind tool in Layer view instead
Hold the Option key as you drag with the Pan Behind tool
Any of these options lets you reposition the anchor point without messing up an animation by changing one of the Position keyframes.
You can also animate the anchor point, of course; this allows you to rotate as you pan around an image while keeping the view centered. If you’re having trouble seeing the anchor point path as you work, open Layer view and choose Anchor Point Path in the View pop-up menu (Figure 2.12).

Layer parenting, in which all of the Transform settings (except Opacity, which isn’t really a Transform setting) are passed from parent to child, can be set up by revealing the Parent column in the Timeline. There, you can choose a layer’s parent either by selecting it from the list, or by dragging the Pickwhip to the parent layer, and use the setup as follows:
Parenting remains valid even if the parent layer moves, is duplicated, or changes its name.
A parent and all of its children can be selected by context-clicking the parent layer and choosing Select Children.
Parenting can be removed by choosing None from the Parent menu.
Null Objects (Ctrl+Alt/Command+Option+Shift+Y) exist only to be parents; they are actually 100 × 100 pixel layers that do not render.
You probably knew all of that. You might not know what happens when you add the Option key to Parent settings:
Hold Option as you select the None option and the layer reverts to the Transform values it had before being parented (otherwise the offset at the time None is selected remains).
Hold Option as you select a Parent layer and its Transform data at the current frame applied to the child layer prior to parenting.
This last point is a very cool and easily missed method for arraying layers automatically. You duplicate, offset, and parent to create the first layer in a pattern, then duplicate that layer and Option+Parent it to the previous duplicate. It behaves like the Duplicate and Offset option in Illustrator (Figure 2.13).
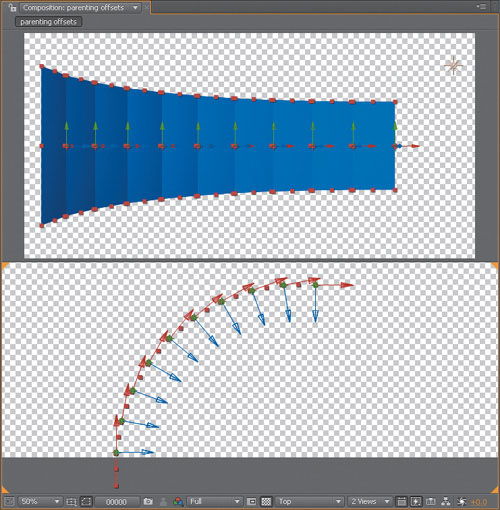
Figure 2.13. Until you know the trick, setting up a series of layers as an array seems like a big pain. The trick is to create the first layer, duplicate, and offset; now you have two. Duplicate the offset layer and—this is the key—Alt/Option+Parent the duplicate to the offset. Repeat this last step with as many layers as you need; each one repeats the offset. (Tip of the hat to Danny Princz!)
Motion blur is obviously essential to a realistic shot with a good amount of motion. It is the natural result of movement that occurs while a camera shutter is open, causing objects in the image to be recorded at every point from the shutter opening to closing. The movement can be individual objects or the camera itself.
Although it essentially smears layers in a composition, motion blur is generally desirable; it adds to persistence of vision, relaxes the eye, and is a natural phenomenon. Aesthetically, it can be quite beautiful.
The typical idea with motion blur in a realistic visual effects shot is to match the amount of blur in the source shot, assuming you have reference; if you lack visual reference, a camera report can also help you set this correctly.
A moving picture camera has a shutter speed setting that controls the amount of motion blur. This is not the camera’s frame rate, although the shutter does obviously have to be fast enough to accommodate the frame rate. A typical film camera shooting 24 frames per second has a shutter that is open half the time, or ![]() of a second.
of a second.
Motion blur occurs in your natural vision, although you might not realize it—stare at a ceiling fan in motion, and then try following an individual blade around instead and you will notice a dramatic difference. There is a trend in recent years to use extremely high-speed electronic shutters, which drastically reduces motion blur and gives the psychological effect of heightened awareness by making your eye feel as if it’s tracking motion in this manner. This seems to have started with live television sports coverage and the use of extremely fast shutters for slow motion replay cameras.
The Advanced tab of Composition Settings (Ctrl/Command+K) contains Motion Blur settings (Figure 2.14):
Shutter Angle controls shutter speed, and thus the amount of blur.
Samples Per Frame applies only to 3D motion blur; it sets the number of slices in time (samples), and thus, smoothness.
Adaptive Sample Limit applies only to 2D motion blur, which automatically uses as many samples as are needed up to this limit (Figure 2.15).

Figure 2.14. These are the default settings; 16 is really too low for good looking blur at high speed but a 180 degree shutter and −90 Shutter Angle match the look of a film camera. Any changes you make here stick and are passed along to the next composition, or even the next project, until you change them.

Figure 2.15. The low default 16 Samples Per Frame setting creates steppy looking blur on a 3D layer only; the same animation and default settings in 2D uses the higher default Adaptive Sample Limit of 128. The reason for the difference is simply performance; 3D blur is costlier, but like many settings it is conservative. Unless your machine is ancient, boost the number; the boosted setting will stay as a preference.
Here’s a bit of a gotcha: the default settings that you see in this panel are simply whatever was set the last time it was adjusted (unless never, in which case there are defaults). It’s theoretically great to reuse settings that work across several projects, but I’ve seen artists faked out by vestigial extreme settings like 2 Samples Per Frame or a 720 degree blur that may have matched perfectly in some unique case.
Shutter Angle refers to an angled mechanical shutter present in some cameras; it is a hemisphere of a given angle that rotates on each frame. The angle is its radius (Figure 2.16). A typical film shutter is 180 degrees—open half the time, or ![]() of a second at 24 frames per second.
of a second at 24 frames per second.
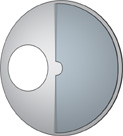
Figure 2.16. The 180° mechanical shutter of a film camera prevents light from exposing film half the time, for an effective exposure of 1/48th of a second. This is the look of film; electronic shutters can have a higher equivalent radius, blurring nearly continuously from one frame to the next, or a very fast shutter, which permits little or no blur.
Electronic shutters are variable but refer to Shutter Angle as a benchmark; they can operate down in the single digits or close to a full 360 degrees. After Effects motion blur goes to 720 degrees simply because sometimes mathematical accuracy is not the name of the game, and you simply want more than 360 degrees.
If you don’t know this setting, you can typically nail it by zooming in and matching background and foreground elements by eye (Figure 2.17). If your camera report includes shutter speed, you can calculate the Shutter Angle setting using the following formula:
shutter speed = 1 / frame rate * (360 / shutter angle)

This isn’t as gnarly as it looks, but if you dislike formulas, think of it like this: If your camera takes 24 frames per second, but Shutter Angle is set at 180 degrees, then the frame is exposed half the time (180/360 = ½) or ![]() of a second. However, if the shutter speed is
of a second. However, if the shutter speed is ![]() per second with this frame rate, Shutter Angle should be 90 degrees. A
per second with this frame rate, Shutter Angle should be 90 degrees. A ![]() per second shutter would have a 9 degree Shutter Angle.
per second shutter would have a 9 degree Shutter Angle.
Shutter Phase determines how the shutter opens relative to the frame, which covers a given fraction of a second beginning at a given point in time. If the shutter is set to 0, it opens at that point in time, and the blur appears to extend forward through the frame, which makes it appear offset.
The default −90 Shutter Phase setting (with a 180° Shutter Angle) causes half the blur to occur before the frame so that blur extends in both directions from the current position. This is how blur appears when taken with a camera, so a setting that is −50% of Shutter Angle is essential when you’re adding motion blur to a motion tracked shot. Otherwise, the track itself appears offset.
Although software may one day be developed to resolve a blurred image, it is much, much harder to sharpen a blurred image elegantly than it is to add blur to a sharp image. Motion Blur comes for free when you keyframe motion in After Effects; what about when there is motion but no blur and no keyframes, as can be the case in pre-exising footage?
If you have imported a 3D element with insufficient blur, or footage shot with too high a shutter speed, you have the options to add the effect of motion blur using
Directional Blur, which can mimic the blur of layers moving in some uniform X and Y direction
Zoom Blur, which can mimic motion in Z depth (or spin)
Timewarp, which can add motion blur without retiming footage
Yes, you read that last one correctly. There’s a full section on Timewarp later in this chapter, but to use it to add procedural motion blur, just set Speed to 100 and toggle Enable Motion Blur, then raise Shutter Angle and Shutter Samples (being aware that the higher you raise them, the longer the render time). The methodology is similar to that of Reel Smart Motion Blur (RE:Vision Effects); try the demo on the book’s disc and compare quality and render time.
Don’t forget motion blur when matching foreground and background elements (Chapter 5). An element perfectly matched for color and lighting will look wrong until its motion blur also matches that of the surrounding scene.
After Effects is more flexible when working with time than most video applications. You can retime footage or mix and match speeds and timing using a variety of methods.
After Effects measures time in absolute seconds, rather than frames, whose timing and number are relative to the number per second. If frames instead of seconds were the measure of time, changing the frame rate on the fly would pose a much greater problem than it does.
Change the frame rate of a comp and the keyframes maintain their position in actual time, so the actual timing of an animation doesn’t change (Figure 2.18), only the position of the keyframes relative to frames. Here’s a haiku:
keyframes reposition falling between retimed frames time remains unchanged

Likewise, footage (or a nested composition) with a mismatched frame rate syncs up at least once a second, but the intervening source frames may fall in between comp frames. Think of a musician playing 3 against 4; one second in After Effects is the down beat of each rhythm.
Time Stretch lets you alter the duration (and thus the speed) of a source clip—but it doesn’t let you animate the retiming itself (that requires Time Remap or Timewarp). The third of the three icons at the lower left of the Timeline reveals the In/Out/Duration/Stretch columns.
I mostly change the Stretch value and find the four-column approach redundant. I also never use a Time Stretch setting that is anything but an integer multiple or division by halves: 200%, 300%, 50% or 25%. You can do without the columns altogether using the Time Stretch dialog (context-click > Time > Time Stretch).
Ctrl+Alt+R (Cmd+Option+R) or Layer > Time > Time-Reverse Layer sets the Stretch value to −100%. The layer’s appearance alters to remind you that it is reversed (Figure 2.19).

Layer > Time > Freeze Frame applies the Time Remap effect with a single Hold keyframe at the current time.
Suppose you don’t use a stretch value that factors evenly into 100% (such as 50% or 200%); footage is likely to lurch in a distracting, inelegant fashion. Enable Frame Blending for the layer and the composition, and After Effects averages the adjacent frames together to create a new image on frames that fall in between the source frames. This also works when you’re adding footage to a comp with a mismatched frame rate. There are two modes:
Frame Mix mode overlays adjoining frames, essentially blurring them together.
Pixel Motion mode uses optical flow techniques to track the motion of actual pixels from frame to frame, creating new frames that are something like a morph of the adjoining frames.
Confusingly, the icons for these modes are the same as Draft and Best layer quality, respectively (Figure 2.20), yet there are cases where Frame Mix may be preferable instead of merely quicker to render. Pixel Motion can often appear too blurry, too distorted, or contain too many noticeable frame artifacts, in which case you can move back to Frame Mix, or move up to the Timewarp effect, with greater control of the same technology (later in this chapter).

Time Stretch (or Time Remap) applies the main composition’s frame rate to a nested composition; animations are not frame-blended, instead the keyframe interpolation is resliced to the new frame rate.
Notes
Effect > Time > Posterize Time can force any layer to take on the specified frame rate, but effects in the Time category should be applied before all other effects in a given layer. Posterize Time often breaks preceding effects.
Most of the time, if you put a comp with a lower frame rate into a master comp, you intended to keep the frame rate of the embedded composition. In such a case, go to the nested comp’s Composition Settings > Advanced panel and toggle Preserve Frame Rate When Nested or in Render Queue (Figure 2.21). This forces After Effects to use only whole frame increments in the underlying composition, just as if the comp were pre-rendered with that frame rate.

Time Remap definitely trumps Time Stretch. The philosophy is elusively simple: Time has a value, just like any other property, so you can keyframe it, ease in and out of it, loop and ping-pong it—basically treat it like any other animation data. All true, but the concept of animating and bending time can become complex.
Tip
The final Time Remap keyframe is one greater than the total timing of the layer (in most cases a nonexistent frame) to guarantee that the final source frame is reached, even when frame rates don’t match.
Ctrl+Alt+T/Cmd+Option+T or Layer > Time > Enable Time Remapping sets two Time Remap keyframes: at the beginning and one frame beyond the end of the layer. Time remapped layers have a theoretically infinite duration, so the final Time Remap frame effectively becomes a Hold keyframe; you can then freely scale the layer length beyond that last frame.
Beware when applying Time Remap to a layer whose first or last frame extends beyond Comp duration; you may not be able to see those keyframes. In such a case, I tend to add keyframes at the comp start and end points, click Time Remap to select all keyframes, Shift-deselect the ones I can see in the Timeline, and delete to get rid of the ones I can’t see.
There is also a Freeze Frame option in After Effects; context-click a layer, or from the Layer menu choose Time > Freeze Frame, which sets Time Remap (if not already set) with a single hold keyframe.
Although The Foundry’s amazing Furnace plug-ins are not, at this writing, available for After Effects, Adobe licensed one component of Furnace, the retiming tool known as Kronos, to provide the technology used in Pixel Motion and Timewarp. Pixel Motion is an automated setting described earlier, and Timewarp adds a set of controls to allow you to improve on its result using the same basic technology.
Timewarp works by calculating the motion in the footage in order to generation motion vectors; these describe how each pixel moves from frame to frame. With an accurate analysis it is then possible to generate an image made up of those same pixels, interpolated along those vectors, with different timing.
Timewarp is just like Time Remap in the following ways:
It can be used to speed up, slow down, or dynamically animate the timing of a clip.
It incorporates the same three Frame Blending modes (Whole Frames, Frame Mix, and Pixel Motion) as are available to Time Remap in the Timeline settings; these live in Timewarp’s Method menu.
Notes

To transfer Time Remap keyframes to Source Frame mode in Timewarp, enable an expression (Chapter 10) for Source Frame and enter the following:
d = thisComp.frameDuration
timeRemap * 1/d
Time Remap keyframes can even be transferred directly to Timewarp, but it requires an expression (see note) because one uses frames and the other seconds to measure time.
However, used with the default Pixel Motion Method setting, Timewarp goes beyond Time Remap plus Frame Blending with the same setting in a couple of ways:
Enable Motion Blur toggle kicks in when footage is sped up to add motion blur.
Tuning section lets you refine the automated results of Pixel Motion.
Timewarp is most typically used to slow footage down, which requires one extra bit of setup or the layer ends short. Enable Time Remapping and extend the layer across your Comp; the Time Remap settings don’t even matter as Timewarp will override them.
Here are some tips to improve on the default Pixel Motion result with Timewarp:
Matte Layer and Matte Channel menus can point to a matte channel used to isolate foreground and background motion, as in Figure 2.22. This can be the source alpha channel, or a matte channel from a separate layer.

Figure 2.22. This sequence was taken Matrix-style, with an array of still cameras firing in sequence around the subject. To transform this into a slow-motion visual effect requires optical-flow retiming, and because the foreground travels in one direction and the background the other, it helps Timewarp to add a matte. (Sequence courtesy of fxphd.com)
Warp Layer control analyzes a separate layer (as specified in the menu) and applies the result. Sometimes you need to adjust footage (contrast, luminance, key) in order to get a better result, but you don’t want those adjustments in your shot; apply them to a duplicate layer instead and set that.
The Tuning section is where you trade render time and accuracy, but don’t assume that greater accuracy always yields a better result—it’s just not so. These tools make use of Local Motion Estimation (LME) technology, which is thoroughly documented in the Furnace User Guide.
The following settings control how Timewarp analyzes footage:
Raising Vector Detail certainly increases accuracy; a setting of 100 assigns one vector per pixel. Not only does this drastically increase render time, it will in some cases simply increase artifacts with fast motion. This is because it is analyzing too much detail, similar to setting a motion track to too small (and noisy) a search region.
Smoothing relates directly to Vector Detail; vectors must join similar pixels of adjacent frames but not be noisy. You can raise Global Smoothness (all vectors), Local Smoothness (individual vectors) and Smoothing Iterations in order to combat the noise, but go very far and lots of detail will be missed. The Foundry claims that the defaults, which are balanced, work best for most sequences.
It typically takes two adjacent images—before and after—to make a vector, but you can choose Build From One Image to use only one if that helps.
LME depends on object brightness remaining consistent throughout the shot. Toggling Correct Luminance Changes on warns Timewarp that there will be fluctuations, whether sudden (image flicker) or gradual (moving highlights).
Error Threshold evaluates each vector before letting it contribute; raise this value and more vectors are eliminated for having too much perceived error.
Block Size determines the width and height of the area each vector tracks; like Smoothing, lower values generate more noise, higher values less detail. The Foundry documentation indicates that this value should “rarely need editing.”
Weighting lets you control how much a given color channel is factored. The defaults may seem odd, but as you’ll learn in Chapter 5 they correspond to how the eye weights each color and so they produce a perfectly monochrome image. If one channel is particularly noisy—usually blue—you might consider lowering its setting.
Filtering applies to the render, not the analysis; it increases the sharpness of the result. It will cost you render time, so if you do enable it, wait until you’re done with your other changes and are ready to render.
Despite that Timewarp is included free, many knowledgeable After Effects artists still depend on Twixtor (RE:Vision Effects); like 3D trackers, keyers, and other automated solutions, this is more a question of what works for you than of one being better than another. A demo of Twixtor can be found on the book’s disc.
Tip
Did you notice back in the Motion Blur section that Timewarp can be used to generate procedural motion blur without retiming footage (Figure 2.23)?
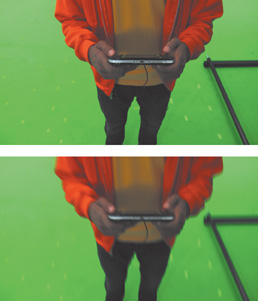
Figure 2.23. Footage that is shot overcranked (at high speed, a) typically lacks sufficient motion blur when retimed. Timewarp can add motion blur to speed up footage; it can even add motion blur to footage with no speed-up at all, in either case using the same optical flow technology that tracks individual pixels. It looks fantastic.
The elegance and logic of the After Effects Timeline is not always evident to the new user, but this chapter taught you that shortcuts and other workflow enhancements help streamline what might otherwise be tedious or exacting edits. The Timeline and Graph Editor, once mastered, give you the control you need over the timing and placement of elements.
If this chapter’s information seems overwhelming on first read, keep coming back to it so that specific tips can sink in once you’ve encountered the right context in which to use them.