
Color keying was devised in the 1950s as a clever means to combine live-action foreground footage and backgrounds that could come from virtually anywhere. What was once a fragile and expensive proposition is now fully mainstream; whole films such as 300, now rely on this technique, while the Colbert Report invites anyone with a computer to try the “Green Screen Challenge” (and runs entries from none less than John Knoll).
The process goes by many names: color keying, blue screening, green screening, pulling a matte, color differencing, and even chroma keying—a term from analog color television, the medium defined by chroma and heavily populated with weather forecasters.
The purpose of this chapter is to help you not only with color keying of blue- and green-screen footage but with all cases in which pixel values (hue, saturation, and/or brightness) stand in for transparency, allowing compositors to effectively separate the foreground from the background based on color data.
All of these methods extract luminance information that is then applied to the alpha channel of a layer (or layers). The black areas become transparent, the white areas opaque, and the gray areas gradations of semi-opacity; it’s the gray areas that matter.
Notes
For those reading nonlinearly, this chapter extends logically from fundamental concepts about mattes and selections in Chapter 3.
Before we get into detail about specific keying methods and when to use them, I’ll share some top-level advice to remember when creating any kind of matte.
Introduce contrast. Use a bright, saturated, contrasting background (Ctrl+Shift+B/Cmd+Shift+B) such as yellow, red, orange, or purple (Figure 6.1). If the foreground is to be added to a dark scene, a dark shade is okay, but in most cases bright colors better reveal matte problems. Solo the foreground over the background you choose.
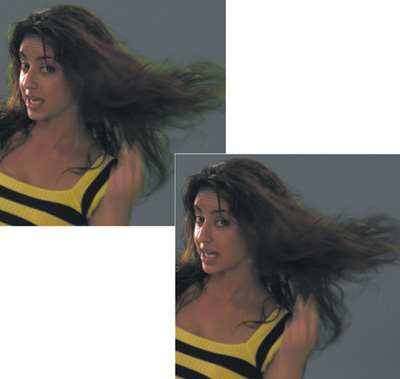
Protect edge detail. This is the name of the game (and the focus of much of this chapter); the key to winning is to isolate edges as much as possible and focus just on them so as to avoid crunchy, chewy mattes (Figure 6.2).
Keep adjustments simple, and be willing to start over. Artists spend hours on keys that could be done more effectively in minutes, simply by beginning in the right place. There are many complex and interdependent steps involved with creating a key; if you’re hung up on one, it’s time to try a different approach.
Constantly scan frames and zoom into detail. When possible, start with a tricky area of a difficult frame; look for motion blur, fine detail, excessive color spill, and so on, and keep checking various areas in various modes (Figure 6.3).
Break it down into multiple passes. This is the single most important concept novices miss. Most mattes will benefit from separate garbage, core, and edge passes—a process detailed later in this chapter—and in many cases it helps to create a separate pass just for delicate edges: hair, a translucent costume, motion blur, and so on.


I encourage you to review this list again once you’ve explored the rest of this chapter.
There are cases in which edge detail is less of a factor because the matte is used to adjust, not layer, an element; for example, you could hold out the highlight areas of an image for adjustment using a high-contrast (hi-con) matte. You might create this matte with a linear keyer.
Linear keyers are relatively simple and define a selection range based on a single channel only. This could be it red, green, or blue, or just overall luminance. They’re useful in a wide variety of cases outside the scope of blue- and green-screen shots, although similar principles apply with Keylight. (Keylight is covered later in this chapter.)
The most useful linear keyers are
Extract
Linear Color Key
The keyers to avoid are
Luma Key
Color Key
because each is limited to a bitmap (black and white) selection. Only by choking and blurring the result with Edge Thin and Edge Feather controls can you add threshold adjustment.
Extract is useful for luminance (luma) keying, because it uses the black and white points of an image or any of its individual channels. Linear Color Key is a more appropriate tool to use to isolate a particular color (or color range).
Close-Up: When, Exactly, Is Linear Keying Useful?
Keying using a single channel (or the average of multiple channels) is useful to matte an element using its own luminance data, in order to hold out specific portions of the element for enhancement. For example, you duplicate a layer and matte its highlights to bloom them (see Chapter 12).
The Extract key includes a histogram to help you isolate thresholds of black and white; these are then graded with black and white softness settings. You can work with averaged RGB luminance, or you can access histogram controls for each of the color channels.
One of the three color channels nearly always has better defined contrast than overall luminance, which is merely an average of the three. Either green or red is typically the brightest and most contrasty channel, while blue generally has higher noise (Figure 6.4).

Close-Up: All Channels Are Not Created Equal
If you set an RGB image as a luma matte, the red, green, and blue channels are averaged together to determine the luminance of the overall image. However, they are not weighted evenly, because that’s not how the eye sees them. Details about how to work with this fact can be found in Chapter 12.
If you find yourself wanting to use a particular channel as a luma matte, use Effect > Channel > Shift Channels; set Take Alpha From as Full On and the other three channels to whichever channel—red, green, or blue—is most effective.
Extract is interactive and easy to use and is a cousin to Levels. Its histogram shows the likely white or black thresholds on each channel. You bring in the White Point or Black Point (the upper of the two small square controls below the histogram) and then threshold (soften) that adjustment with the White Softness or Black Softness controls (the lower of the two small squares).
The Linear Color Key offers direct selection of a key color using an eyedropper tool. The default 10% Matching Softness setting is arbitrary and defines a rather loose range. I often end up with settings closer to 1%.
Note that there are, in fact, three eyedropper tools in the Linear Color Key effect. The top one defines Key Color, and the other two add and subtract Matching Tolerance. I tend not to use these because they don’t work in the Comp viewer; the main Key Color eyedropper and the Matching sliders work for me (Figure 6.5).

There’s a hidden trick to getting better results with Linear Color Key. Because it is linear, it will pick up hues that seem unrelated. To reduce the effect of these, you can add a second instance of Linear Color Key. Under Key Operation, changing the default Key Colors setting to Keep Colors does nothing if it’s the first instance except annul the effect. On the second instance, Keep Colors is unaffected by the first instance and can bring back hues that were already keyed. The one-two punch will often deliver the best result (Figure 6.6).

A difference matte is simple in principle: Frame two shots identically, the first containing the foreground subject, the other without it (commonly called a clean plate). Compare the two images and remove everything that matches identically, leaving only the foreground subject. It sounds like the type of thing a computer was built to do.
In practice, of course, there are all sorts of criteria that preclude this from actually working very well, specifically
Both shots must be locked off or motion stabilized to match, and even then, any offset—even by a fraction of a pixel—can kill a clean key.
The foreground element may be rarely entirely unique from the background; low luminance areas, in particular, tend to be hard for the Difference Matte effect to discern.
Grain, slight changes of lighting, and other real-world variables can cause a mismatch between two otherwise identical shots. Raising the Blur Before Difference setting helps correct for this, but only by introducing inaccuracy.
To try this for yourself, begin with a locked-off shot containing foreground action, ideally one in which a character enters the frame. Duplicate the layer, and lock off an empty frame of the background using Layer > Time > Freeze Frame. Apply Difference Matte to the top layer. Adjust Tolerance and Softness; if the result is noisy, try raising the Blur Before Difference value.
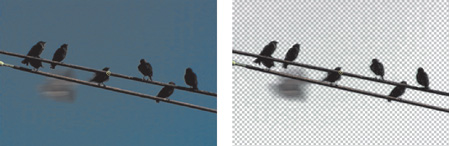
Figure 6.7 shows the likely result of attempting to key this footage using only Difference Matte. It’s not a terrible way to isolate something when clean edges are not critical, but it cannot compare with more sophisticated methods for removing a solid color background.

The honest truth is that I don’t use the above effects very often; there are less immediately obvious but more powerful ways to generate transparency from color data:
Blending modes
Blending modes with color adjustments
Shift channels and levels
In the interest of full disclosure, I often use track mattes (as detailed in Chapter 3) with a duplicate of the layer, instead of luminance keys applied directly to the layer. With a track matte, I can use Levels to work with color ranges on all channels in order to refine transparency. Other artists may consider this approach more cumbersome, preferring to work with a single layer and an effect, so the choice as always is yours.
Keylight is useful in many keying situations, not just studio-created blue- or green-screen shots. For example, you can use Keylight for removal of a murky blue sky (Figure 6.8). You wouldn’t use Keylight to pull a luminance key, however, or when you’re simply trying to isolate a certain color range within the shot; its effectiveness decreases the further you get from the three primary colors.
Keylight is most typically used on footage shot against a uniform, saturated, primary color background, where preservation of edge detail is of utmost importance.
Figure 6.9 outlines the basic keying process detailed in the following pages. No two complex shots are the same, but something like this approach should help you pull a good matte, regardless of the tools used. The next section reviews these steps, specifically using Keylight.

Garbage matte any areas of the background that can easily be masked out. “Easily” means you do not have an articulated matte (you don’t animate individual mask points). As a rule of thumb, limit this to what you can accomplish in about 20 minutes or less (Figure 6.10).
Attempt a first pass quickly, keeping this matte on the loose side (preserving as much edge detail as possible) to be refined later.
Preview this at full resolution, in full motion, against a bright primary color. In rare cases, you’re done, but before you throw up your arms in victory, carefully examine the alpha channel of the toughest frames (usually the ones with the most motion, reflection, or semi-opaque detail). Note any obvious holes in the foreground or areas of the background that have failed to disappear, as well as any noise in the solid areas of the matte (Figure 6.11).
If things look noisy and chaotic in the alpha channel or the edges are clamped and chewy, you can
Start over and try a new pass
Apply noise reduction to the plate, then start over (see “Noise Suppression” later in this chapter)
Articulate or track garbage/holdout mattes to isolate problem portions of the footage (see “Beyond Keylights: Better Mattes,” later in this chapter)
If necessary, separate the plate for multiple passes. At the very least, it’s often useful to create a solid core and a completely transparent background so that you can focus only on the edge (detailed in the next section). You may also need to separate individual parts of a layer for a separate keying pass, such as hair or a fast-moving, motion blurred limb.
Refine the edge. Zoom in on a challenging area of the foreground edge (200% to 400%), and refine the key to try to accommodate it, using strategies outlined in the steps that follow. Challenging areas may include
Fine detail such as hair
Motion blurred foreground elements
Cast shadows
You must also watch out for, and consider rotoscoping, foreground features that can threaten an effective key, such as
Areas of the foreground that reflect the background color
Edge areas whose color nearly matches the background
Areas of poor contrast (typically underlit regions of the shot)
Preview the shot in full motion. Again, note holes and noise that crop up on individual frames, and use the strategies outlined in the section “Beyond Keylights: Better Mattes” to overcome these problems. Approaches you may add at this stage are
More holdout mattes (typically masks), either for the purpose of keying elements individually or rotoscoping them out of the shot (Figure 6.12)
Isolation of the matte edge, for the purpose of refining or blurring it (see “Matte Problems” later in this chapter)


The first decision in Keylight is most important: sampling a color for the Screen Colour setting (Keylight reveals its UK origins at Framestore CFC with that u). Specific tips to do so are up ahead in the section, “Generate the Screen Matte.”
In the best-case scenario, you create any necessary garbage mattes and then follow these steps:
Use the Screen Colour eyedropper to sample a typical background pixel. View defaults to Final Result so you get a matte instantly; set the background to a bright color and solo the plate layer, or examine the alpha channel (Alt+4/Option+4).
Close-Up: The Eyedropper and the Info Panel

With the Info panel active, sample a pixel in After Effects, either using an eyedropper tool or simply by moving your cursor around a viewer. The Info panel then displays the value that belongs to the exact pixel underneath the selection point of the cursor (the lower-left corner of the eyedropper, the upper-left corner of the pointer).
As in Photoshop, the After Effects eyedropper samples only the color state of a pixel; transparency of any given pixel is always evaluated as if 100%.
If in doubt about the Screen Colour setting, turn the effect off and set another instance, repeating as necessary until you have one that eliminates the maximum unwanted background (Figure 6.13); you can then delete the rest.

Figure 6.13. Even with a well-shot, high-definition source (left), it is imperative that you get the Screen Colour setting right to preserve all of the transparent detail in this shot. Choosing a darker background color (center) creates a more solid initial background, but a lighter color selection (right) preserves far more detail. (Source footage courtesy of Pixel Corps.)
Now, as needed, look for areas to refine.
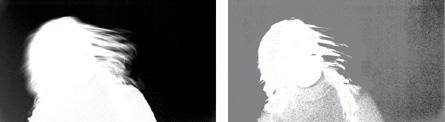
Switch View to Status. Opaque pixels are displayed as white, transparent pixels are black, and those containing any amount of transparency are gray (Figure 6.14). It’s an exaggerated view of the alpha channel matte.
Still in Status view, you have the option to try Screen Balance at settings of 5.0, the default 50.0, and 95.0, although Keylight will preselect it based on your background color selection. This setting controls the weighting between the primary matte color (blue, green, or red) and each of the secondaries.
If the background is not solid black, you can boost Screen Gain until the gray mostly disappears in Status view, although the ideal is not to raise this value at all (the next section explains how). Use this setting as sparingly as possible.
Optionally, set the Despill Bias using the eyedropper. Sample an area of the foreground that has no spill and should remain looking as is (typically a bright and saturated skin tone area). I very rarely do this (see Notes).
The rare perfect footage is now completely keyed. If it isn’t perfect (Figure 6.15), this is a decision point; how can you best divide this matte into multiple passes?

The Apple Shake-based implementation of Keylight adds inputs for a garbage matte and a holdout matte. This method of isolating and focusing on the edge inspired me to devise the following workflow to achieve the same result in an After Effects precomp, with as few extra steps as possible.
This breakdown will work with any software keyer, but it’s especially helpful if you’re trying to get the most out of Keylight.
Rename the Keylight effect by selecting it and pressing the Return key. Rename it Keylight gMatte.
The first goal is to create a background matte that is 100% transparent and outside of all edge detail by several pixels. To do so, follow these steps:
In Keylight Status or Combined Matte view (depending on your preference), raise Clip Black just enough to remove gray pixels from the background in Status view, then lower the Clip White setting just above the same number (Figure 6.16).

Figure 6.16. The garbage matte, or gMatte, has been crushed; Clip Black has been raised just enough to eliminate the noise in the lower-left corner (from 6.14, right), Clip White has been lowered near the same number for a hard matte. This is then spread with a negative Simple Choker setting and the layer blending mode has been set to Stencil Alpha to isolate the exterior of the edge.
Important step: set View to Intermediate Result.
If necessary, choke this matte further to eliminate tracking markers and other small bits of noise. You can lower the Screen Shrink/Grow setting (under Screen Matte in Keylight) or apply a Simple Choker effect and raise the Choke Matte number. Quick and dirty is fine here.
Whether or not you’ve choked the matte, the most essential step is to spread it until it’s well outside the foreground edge. You can apply Simple Choker and lower the Choke Matte setting to a negative value, quite possibly in the double digits, even using a second instance if the maximum setting of −100 is reached without completely exceeding the foreground boundary.
Garbage matte any items in the background that have not disappeared and hand-animate the matte as needed (refer back to Figure 6.12).
You should see a generous blue (or green) buffer around the foreground edge (Figure 6.17).
Duplicate the layer and rename it Core. Reset the Simple Choker effects and solo the layer.
This matte fills in all holes inside the matte edge without coming close to overlapping that edge. To create this layer
In Keylight Status or Combined Matte view (your preference), lower Clip White until the foreground is completely opaque. Raise Clip Black to a value just below the same number.
If necessary, spread this matte to eliminate foreground holes by raising the Screen Shrink/Grow setting (under Screen Matte in Keylight). You can also lower the Choke Matte setting in Simple Choker to a negative value.
Whether or not you’ve spread the matte, choke it until it’s well inside the foreground edge. If there was no spread operation, use Screen Shrink/Grow in Keylight; otherwise, use Simple Choker.
Add a layer and garbage matte; any remaining holes resulting from extra-stubborn shiny, reflective costumes or props.
Soften this layer as needed with a Fast Blur; with all three layers on, toggle the cMatte on and off to make sure it has little or no effect on the edge (Figure 6.18).
Apply a second instance of Keylight on the layer containing the gmatte. If you like, rename this effect Keylight Edge. You have isolated the edge to the maximum extent possible (Figure 6.19).


Now just work on that edge layer—starting over with its key, if you want, because it’s now a much simpler problem that demands the lightest possible touch. Your goal should be to use three controls only to refine it: Screen Colour, Clip Black, and Clip White. If possible, do not adjust Screen Gain.
This is not the furthest you can go to break down a color keyed matte; problematic footage will require further steps, described in the following section.
You’re no doubt familiar with the areas where you want to take a good look when you’re evaluating the quality of a matte:
Hair detail: Are all of the “wispies” coming through? (Figure 6.20a)
Motion blur or, in unusual cases with a defocus, lens blur: Do blurred objects appear chunky or noisy, or do they thin out and partially disappear? (Figure 6.20b)
Screen contamination areas: Do holes remain in the foreground? (Figure 6.20c)
Shadows: Are they keying as desired (usually all or nothing)? (Figure 6.20d)

There may also be fundamental problems, including
Ill-defined foreground/background separation or semitransparency throughout the foreground or background
Crunchy, chewy, or sizzling edges (other terms include boiling, which is more often applied to roto, and chunky or clumpy fine detail)
Noise
Excessive fringing or choking
Errors in the spill suppression
There are specific tools to deal with these; before getting to those, it’s a good idea to make sure you’re not fighting the fundamentals.
A few decisions are absolutely essential in Keylight and the rest are essentially compensatory. I have seen artists spend literally days on keys that sadly could be improved in under an hour with a different approach.
The core of Keylight is screen matte generation, and the most essential step is choosing the exact color to key. From that, Keylight makes weighted comparisons between its saturation and hue and that of each pixel, as detailed in Table 6.1. From this, you see that the ideal background is distinct and saturated.
Table 6.1. How Keylight Makes Its Key Decisions
COMPARED TO SCREEN COLOR, PIXEL IS | KEYLIGHT WILL |
|---|---|
Of a different hue | Consider it foreground, making it opaque |
Of a similar hue and more saturated | Key it out completely, making it transparent |
Of a similar hue, but less saturated | Subtract a mathematically weighted amount of the screen color and make it semitransparent |
This section details the other tools that contribute to the screen matte:
Screen Gain emphasizes the saturation of the background pixels
Screen Balance delineates the background hue from the other primary colors.
Bias is for color-correction.
Notes
The controls atop Keylight (from Screen Colour down to Alpha Bias) differ fundamentally from the rest; they work together to generate the actual matte, while the rest adjust the result of that operation.
Before I describe Screen Gain, a disclaimer: The ideal Screen Gain setting is 100, no change to the default. This adjustment is compensation for a poorly lit matte, and while raising it may make the matte channel look better, you are also likely to see increased color grain and lost edge detail with values above the default.
A clear symptom that the background lacks sufficient intensity is that areas of the background are of a consistent hue yet fail to key easily. Similarly, a clear symptom that your foreground is contaminated with reflected color from the background is that it appears semi-opaque. Screen Gain is designed to help in these cases.
Screen Gain boosts (or reduces, although I’ve never used a setting lower than the default) the saturation of each pixel before comparing it to the screen color. This effectively brings more desaturated background pixels into the keying range.
Notes
A Rosco Ultimatte Blue screen contains quite a bit of green—much more than red, unless improperly lit. Ultimatte Green screens, meanwhile, are nearly pure green (Figure 6.21).

Figure 6.21. The Rosco colors: Ultimatte Blue, Ultimatte Green, and Ultimatte Super Blue. Blue is not pure blue, but double the amount of green, which in turn is double the amount of red. Ultimatte Green is more pure, with only a quarter the amount of red and no blue whatsoever. Lighting can change their hue (as does converting them for print in this book).
A major point of holding out the edge using the three-pass method described above is to avoid having to use Screen Gain whatsoever; it can be useful to quickly refine a crude one-pass key.
Keylight is designed to expect one of the three RGB color values to be the dominant background color. It is even more effective, however, if it knows whether one of the two remaining colors is more prevalent, and if so, which. Screen Balance compensates for a dominant secondary background color.
On this theory, you would employ a balance of 95% with blue screens and leave it at 50% for green screens, and in version 1.2 of Keylight, that is exactly how the plug-in sets Screen Balance depending on whether you choose a blue or green Screen Colour setting. I hardly touch this control because Keylight added this automatic adjustment in version 1.1.
The generalized recommendation from The Foundry is to set it “near 0, near 100, and compare” these to the default setting of 50 to evaluate which one works best. In other words, imagine there are three settings (instead of 100) and try 5%, 50%, and 95%.
The Bias settings are Despill Bias and Alpha Bias. These color correct the image in the process of keying by scaling the primary color component up or down (enhancing or reducing its difference from the other two components).
The Foundry recommends that in most cases you leave Alpha Bias at the default and that you click the Despill Bias eyedropper on a well-lit skin tone that you wish to preserve; despill pivots around this value.
Like Screen Gain, Bias has an unpleasant side effect: it can significantly increase the graininess of keyed footage. There are other despill methods available (later in this chapter) that don’t add this complication.
When you spot an area that looks like a candidate for refinement, save (to hold an undo point should you need to use File > Revert), zoom in, and create a region of interest around the area in question.
Now take a look at the tools provided by Keylight to address some common problems.
The double-matte method (core and edge) shortcuts a lot of the tug of war that otherwise exists between a solid foreground and subtle edges. Even with this advantage, both mattes may require adjustments to the Clip White or Clip Black controls.
Keep the largest possible difference (or delta, if you prefer) between these two settings, as this is where all of your gray, semitransparent alpha pixels live. The closer the two numbers get, the closer you are to a bitmap alpha channel, in which each pixel is pure black or white—a very bad thing indeed (Figure 6.22).

If you push too far, you can try restoring back toward the initial matte with Clip Rollback. Its value is the number of pixels from the edge that are rolled back relative to the original, unclipped screen matte. So if your edges were subtle but sizzling on the first pass, but removing noise from the matte hardened them, then this tool may restore subtlety.
For seriously sizzling mattes, Keylight includes a Screen Pre-blur option that I would reserve for footage with a clearly evident noise problem, such as heavy compression. Blurring source footage before keying adds inaccuracy and is something of a desperation move. The footage itself does not appear blurred, but the matte does.
A better alternative for a fundamentally sound matte is Screen Softness, under the Screen Matte controls. This control blurs the screen matte itself, so it has a much better chance of retaining detail than a pre-blur approach. As was shown in Chapter 3, edges in nature are slightly soft, and a modest amount of softness is appropriate even with a perfectly healthy matte.
Close-Up: Chroma Subsampling: The 411 on 4:1:1, 4:2:2, and 4:2:0
Video images are RGB on your computer, but video devices themselves use Y’CrCb, the digital equivalent of YUV. Y’ is the luminance or brightness signal (or “luma”); Cr and Cb are color-difference signals (roughly corresponding to red-cyan and blue-yellow)—you could call them chrominance or “chroma.”
It turns out that the human eye is much more particular about gradations in luma than chroma, as is amply demonstrated in Figure 6.23.
The standard types of digital video compression take advantage of this fact. Figure 6.24 shows the difference between straight RGB and 4:2:2 compression, which is common to popular formats including DVCPRO HD and DVCPRO50, ProRes 422 and cameras such as the Sony F900, as well as 4:1:1, which is used by DVCPRO and NTSC DV. Almost as bad for keying purposes is 4:2:0, the MPEG-2 (DVD), HDV, and PAL DV format.
As you might imagine, chromatic compression is far less than ideal for color keying (Figure 6.25), hence the workarounds in this section.
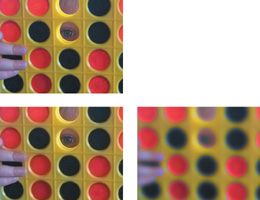
Figure 6.23. The source (top-left image) is then converted to YUV and blurred 100 pixels, first just the UV or chroma (lower-left image) and then just the Y or luma (right). Even very heavy Chroma Blur can be accepted by the eye—it even adds a softness to the highlights—whereas heavy luma blur is completely unacceptable.


The Despot cleanup tools are meant to fill matte holes, but at sufficiently high levels they add blobbiness, so they are rarely useful. An alternative approach, particularly with DV formats (which, by the way, are guaranteed to add compression noise and are not recommended for blue-screen and green-screen work), is to
Convert the footage to YUV using Channel Combiner (the From pop-up menu). This will make the clip look very strange, because your monitor displays images as RGB. Do not be alarmed (Figure 6.26).
Apply Channel Blur to the green and blue channels only, at modest amounts (to gauge this, examine each channel as you work—press Alt+2/Option+2 or Alt+3/Option+3 while zoomed in on a noisy area). Make sure Repeat Edge Pixels is checked.
Notes

YUV is the digital version of the broadcast video color space. It is used in component PAL television and is functionally similar to YIQ, the NTSC variant. In After Effects YUV, the red channel displays the luminance value (Y) of the shot, while the green and blue channels display blue and red weighted against green (U and V).
Round-trip back from YUV to RGB, using a second instance of Channel Combiner.
Apply Keylight.

Fringing (excess edge opacity) and choking (lost edge detail) are the ultimate tests of an otherwise problem-free matte.
Screen Grow/Shrink deals with this issue directly; ideally this control would be used for Garbage and Core passes (described earlier) but not the Edge itself; otherwise it may be a symptom of a more fundamental problem, an indication that it’s time to start over.
It’s also not the last resort for choking and spreading a matte; alternatives follow in “Beyond Keylights: Better Mattes.”
Keylight suppresses color spill (foreground pixels contaminated by reflected color from the background) as part of the keying operation. Thus spill-kill can be practically automatic if you pull a good initial key.
There are a surprising number of cases in which Keylight’s spill suppression is not what you want, for the following reasons:
Dramatic hue shifts occur to items whose colors are anywhere near green (for example, cyan) or opposite green (for example, magenta). It’s challenging enough to keep green off of a green set, let alone its neighboring and opposite hues.
These hue shifts can also add graininess, even to footage that was shot uncompressed and has little or no source grain.
In Figure 6.27, notice how the whole shape of the girl’s face seems to change due to the removal of highlights via spill suppression.

Figure 6.27. Her face doesn’t even look the same without the highlights reflected with the green. Even worse, at this magnification, it’s easy to see that the amount of grain noise has increased significantly. It’s a definite case for pulling the matte on one pass and applying spill suppression separately.
Should Keylight’s spill suppression become unwieldy or otherwise useless for the preceding reasons, there is an easy out: ordinarily View is set to Final Result, but set it to Intermediate Result for the matte applied to the Alpha without any change to RGB. The CC Composite effect does the same thing, eliminating all RGB changes from preceding effects but keeping the alpha.
Keylight itself also includes spill suppression tools, under Edge Colour Correction, that influence only the edge pixels. Enable its checkbox and adjust the controls below, softening or growing the edge as needed to increase the area of influence. Sometimes adjusting Luminance or Saturation of edges is a quick fix.
There are better ways than Keylight to kill spill, detailed in the next section, which moves beyond this tool.
So, to recap, the number one thing you can do to improve a matte is to break it down into component parts:
All other tricks fall short if you’re not willing to take the trouble to do this. Here are other steps to take to ensure a good matte.
Your time is often considered cheaper than that of a full crew on set—in many cases, justifiably so. That means—shocking, I know—you’ll be fixing things in post that shoulda coulda woulda been handled differently on set. If, on the other hand, you have the opportunity to supervise on set, knowledge is power.
A hard cyclorama, or cyc (pronounced like “psych”) is far preferable to soft materials, especially if the floor is in shot. If you can’t rent a stage that has one, the next best thing might be to invest in a roll of floor covering and paint it, to get the smooth transition from floor to wall, as in Figure 6.28 (assuming the floor is in shot).

Figure 6.28. On a set with no hard cyclorama, you can create the effect of one—the curve where the wall meets the floor—using a soft blue-screen instead. It doesn’t behave as well (note the hotspot on the curve), but it will certainly do in a pinch and is much preferable to removing the seam caused by the corner between the wall and floor.
Regarding the floor, don’t let anyone walk across it in street shoes, which will quickly contaminate it with very visible dust. There are white shoe-cover booties often used specifically to avoid this, and you can also lay down big pieces of cardboard for the crew to use setting up. Be pedantic about this if you’re planning to key shadows.
Lighting is, of course, best left to an experienced Director of Photography (D.P.) or gaffer (one who has shot effects before is hugely helpful), and any kind of recommendations for a physical lighting setup are beyond the scope of this book. Because you’ll spend more time examining this footage than anyone else, here are a few things to watch for on set:
Light levels on the foreground and background should have matching intensity. A spot light meter tells you if they do.
Diffuse lights are great for the background (often a set of large 1 K, 2 K, or 5 K lights with a silk sock covering them, Figure 6.29), but fluorescent lights will do in a pinch, on a smaller set. With fluorescents you just need more instruments to light the same space. Kino Flo lights are a popular option for smaller sets as well.
Close-Up: The Right Color
The digital age lets shooters play fast and loose with what they consider a keyable background. You will likely be asked (or attempt) to pull mattes from a blue sky, from a blue swimming pool (like I did for Pirates of the Caribbean), or from other monochrome backgrounds.
How different must the background color be from the foreground? The answer is “not as much as you probably think.” I have had little trouble keying a girl in a light blue dress or a soldier in a dress blue uniform. This is where it can be hugely helpful to have any type of capture device on set—even a point and shoot camera—and pull a test matte.
Maintain space between the foreground and background. Ten feet is ideal.
Avoid unintentional shadows, but by all means light for shadows if you can get them and the floor is clean. Note that this works only when the final shot also has a flat floor.
Where possible, avoid having talent sit, kneel, or lie down directly on the floor or any other keyable surface; not only does an astonishing wash of shadow and reflection result, but there is no realistic interaction with the surface, which is especially noticeable if they are to end up on carpet, or grass, or the beach. If possible, use real surfaces and furniture in these cases.
Here’s a novel idea: Shoot exteriors outside where possible, forgoing the cyc and controlled lighting environment for chromatic tarps and the sun, which is a hard lighting source to fake.
Record as close to uncompressed as possible. Even prosumer HD cameras these days almost always have an HDMI port that outputs live, uncompressed signal; pair this with a workstation or laptop containing a video capture card and high-speed storage and you can get 4:2:2 or better practically for free.
Notes
Shoot a lot of reference of the set, anything and everything you can think of. If you plan to recreate the lighting, it’s also a great idea to take HDR images using bracketed exposures—the same image shot at various f-stops. Photoshop includes the File > Automate > Merge to HDR function to combine these into a 32 bpc linear light image.
Shoot clean plate: a few frames of the set only, particularly on a locked-off shot and each time a new set-up occurs.

In this day and age of quick camera to laptop transfer, it’s great to have the means on-set to pull test comps; they not only help ensure that the result will key properly, they give the D.P. and talent a better idea of where they are, and where they can lead to more motivated light from the D.P. and more motivated action from the talent, who otherwise must work in a void.
There are specific tools to help you manipulate transparency once a matte exists.
Minimax is powerful but imprecise, operating as it does in whole pixel increments. It provides a quick way to spread or choke pixel data, even without alpha channel information (it can also operate on individual channels of luminance).
Simple Choker allows you to choke or spread alpha channel data (via a positive or negative number, respectively) at the sub-pixel level (in other words, use decimal values). That’s all it does. You can push it hard and even use more than one instance if the 100 pixel limit gets in your way, as it can with garbage mattes.
Matte Choker looks and even sounds more deluxe than Simple Choker (something about that that “Simple” label) but it merely adds softness controls that can just complicate a bad key. I use Simple Choker most of the time, and I don’t feel like a simpleton for doing so.
Earlier in this chapter the three-pass method for deriving a matte was introduced; using this method is one way to derive an edge matte. However, the simplest means to this end is probably as follows:
Apply Shift Channels. Set Take Alpha From to Full On and all three color channels to Alpha.
Apply Find Edges (often mistaken for a useless psychedelic effect because, as with Photoshop, it appears in the Stylize menu). Check the Invert box for an edge highlighted in white.
Tip

A useful third-party alternative to Minimax is Erodilation from ObviousFX (www.obviousfx.com). It can help do heavier choking (eroding) and hole-filling (dilating), and its controls are simple and intuitive (choose Erode or Dilate from the Operation menu and the channel—typically Alpha).
Minimax is useful to help choke or spread this edge matte. The default setting under Operation in this effect is Maximum, which spreads the white edge pixels by the amount specified in the Radius setting. Minimum chokes the edge in the same manner. If the result appears a little crude, an additional Fast Blur will soften it (Figure 6.30).
Apply the result via a luma matte to an adjustment layer. You should not need to precomp before doing so.

You can then use Fast Blur to soften the blend area between the foreground and background, which often works better than simply softening a chewy matte. A Levels adjustment will darken or brighten the composited edge to better blend it. Hue/Saturation can be used to desaturate the edge, similar to using a gray edge replacement color in Keylight.
When holes open up in your foreground or background, the best fix is usually to take care of these in the individual Garbage and Core passes; in fact, hole-closing is the main point of the three-pass method described earlier. The basic method is as follows:
Choke (Garbage matte) or Spread (Core matte) the holes until they disappear.
Spread or Choke (the opposite of the previous step) an equivalent or greater amount.
This will of course destroy all edge subtlety, which is why it only works well on a matte intended to be crude and inside or outside the delicate foreground edges.
Alpha Cleaner, part of the Key Correct set from Red Giant Software, has an automated tool to do this without destroying edges, but it can have unintended consequences, filling small gaps that should remain transparent (Figure 6.31).

Therefore, there are occasions where you have to rotoscope, usually because the holes are too close to the edge. It can help to create an animated mask (Chapter 7) or track in a paint stroke (Chapter 8).
If Keylight (or another tool) is not doing spill suppression as you would like, the following alternatives are available:
Effect > Keying > Spill Suppressor uses a simple channel multiplication formula to pull the background color out of the foreground pixels. All you need to do is select a sample from the background color (you can sample the Keylight Screen Colour selection) and leave the setting at 100%.
Effect > Color Correction > Hue/Saturation is the option I use most nowadays. It takes practice, which can easily be done; try the following on a source blue or green screen image (no key—just so you can see everything):
Apply Effect > Color > Hue/Saturation.
Under Channel Control, choose your primary (Greens or Blues—plural for some reason).
Lower the Saturation value for that channel to zero.
Use the Channel Range sliders to eliminate the key color.
Boost Saturation to 100% to see if other colors are being desaturated that should be kept; adjust accordingly.
Now with the key applied, try some mixture of the following to eliminate spill:
Lower Saturation (still on the individual color channel).
Shift Hue between about 30 and 90 degrees to either direction (depending on your target background).
Some combination of desaturation and hue shift with a carefully targeted range usually does the trick; the worst that will happen is that other color artifacts will appear, in which case the trick is usually to go back and adjust the range again.
The Channel Range is the most important part of this, which is why I suggest cranking Saturation all the way down and all the way up to see it clearly. The inside rectangular sliders are the range, the outside, triangular sliders are the threshold area; I tend to be generous with the latter (Figure 6.32).

Figure 6.32. Isolate the Greens channel in Hue/Saturation to avoid killing neighboring colors along with green spill suppression. Expand the core and threshold hash marks to a wider range, and then both hue-shift and desaturate the result. Desaturation affects the core colors, and the hue shifts those in the threshold, which are thrown more to the range that would otherwise be missing.
There may be cases where it is difficult or impossible to avoid affecting some part of a costume or set with spill suppression; for example, a cyan colored shirt will change color when the actor is corrected for green. The above method should let you work around this better than most of the automated tools, especially Keylight itself, but there are cases where you might have to use loose roto to isolate the costume and bring its color back.
To correct only the edges, see the section above about how to isolate the edge and use it as a track matte.
Primatte Keyer (included as a demo in the book’s disc) is a viable alternative to Keylight, especially because it uses an entirely different internal model to create a key. Whereas Keylight must, by design, be used only for blue, green or red, Primatte is a geometric keyer that treats R, G and B (or H, S and B) internally as a three-dimensional array of color—a box of hues. As you add and subtract from the key selection, a geometric blob grows and shrinks inside that box. You can’t see this “blob” but the colors fully within it are keyed, and it has an outer threshold region as well. It takes some practice to master, but once you do, you should find more success getting a good key on one pass (forgoing the three-pass method discussed earlier) with Primatte than with Keylight.
The next chapter offers hands-on advice for situations where procedural matte generation must be abandoned in favor of hand matte generation, also known as rotoscoping.