
Good surfing is power, speed, and flow. The rest of it doesn’t matter to me at all. | ||
| --Gary Elkerton, Australian surfer | ||
This is a book about visual effects compositing. If you use Adobe After Effects, the goal is to help you create believable, fantastic moving images from elements that were not shot together, and to do it with the least possible effort. This first section of the book focuses on effortlessness, offering a jump-start (if you’re new) or a refresher (if you’re already an After Effects artist) on the After Effects workflow.
To be an outstanding compositor, you need to employ your best skills as both an artist and an engineer. As an artist, you make creative and aesthetic decisions, but if you are not also able to understand how to put those decisions together and how the process works, the artistry of your work will suffer. Artists and engineers have much in common: both understand and respect the tools, both know that the tools themselves don’t make you a great designer, and in both roles, iteration—multiple refinements—are often what separates a great effort from mediocrity.
This chapter and the rest of Section I focus on how to get things done in After Effects as effortlessly as possible. It is assumed that you already know your way around the basics of After Effects and are ready to learn to work smarter.
Notes
If this book opens at too advanced a level for you, check out Adobe After Effects CS4 Classroom in a Book (Adobe Press), a helpful beginner’s resource.
Figure 1.1 is one way of looking at the most generic of projects: it shows the Standard workspace that appears when you first open After Effects CS4, broken down into its component parts. The interface consists of
The main application window contains some panel groups—six of them by default (the Standard workspace), as few as two (Minimal workspace), or as many as 17 (All Panels workspace).
Each group contains one or more panels each with a tab in the upper left.
Separating the panel groups are dividers; panels and dividers are dragged to customize the workspace (more on that in a moment).
Some panels are viewers, with a pop-up menu in the tab listing available clips.
At the top is the Tools panel, which can be hidden but only appears atop the application window (and thus has no tab).
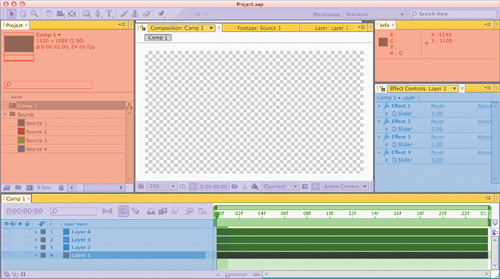
Figure 1.1. The Standard workspace layout, diagrammed in color. The top areas in red are informational only, while the purple areas contain tools and settings. The blue areas of the Timeline and Effect panel contain stacks whose order will change compositing order. Panel tabs, in yellow, can be grabbed to reorder the interface and contain menus at the upper right to adjust their appearance. The layer stack, in green, is modal and can be swapped for the Graph Editor.
I call these out here to be done identifying them and to reassure you that this, along with a bunch of menus and a bunch more twirly arrows, is all there is to the After Effects user interface.
Are you a Zen roshi? Reveal the core essence of After Effects with the Minimal workspace (via the Workspace menu in Tools or Window > Workspace). Two of the most important three panels in After Effects are
The Composition panel, a viewer where you examine a shot
The Timeline panel, the true heart of After Effects, where elements are layered and timed for individual compositions (or shots). You will typically have many of these open at any given time.
For the third, choose Window > Project (Cmd/Ctrl+0) to add the Project panel. This is the Finder or Windows Explorer of After Effects—nothing more than files and folders representing the contents of your project.
At some point even a Zen roshi will assumedly need at least two more panels. A completed composition typically goes to the Render Queue (Cmd/Ctrl+Alt/Option+0) for final output (details about this important hub are found at the end of the chapter), and you are likely to add layer effects which are best adjusted in the Effect Controls (with a layer selected, F3 or Cmd/Ctrl+Shift+T), although most the same controls can be found by twirling open the layer with that essential little triangle to the left of the layer name.
Tip
Prefer your workspace customizations to the defaults? Choose New Workspace in the Workspace menu and enter an existing name to overwrite it; now After Effects will reset to your customized version.
Other panels (found in other workspaces, or by selecting them under the Window menu) contain controls for specific tools such as paint (Paint and Brush Tips), the most significant of which are covered in detail later in the book.
Simply by choosing the Minimal workspace and adding the Project panel, you’ve customized the workspace; switch to another workspace and back and you’ll see that the Project panel remains until you choose Reset “Minimal” in the Workspace menu. Want to keep your new configuration? Save the Workspace under the same menu.
You can freely move any panel around the UI. To do so, click and drag its tab around the screen. As you move one panel over another, purple geometric shapes like those in Figure 1.2 appear. These are the drop zones. The docking zones along the edges let you place a panel adjacent—for example, to the left of the Composition panel. The grouping zones in the center group panels together in one frame.

Close-Up: Maximize the Screen
Many After Effects artists like two HD-resolution displays side by side (Figure 1.3, top), although a single display can be optimal if it’s large enough (Figure 1.3, bottom)
However, you may notice that a floating panel (Ctrl/Cmd-drag the tab to make it float) lacks the Zoom button along the top to send the window to full screen. The shortcut Ctrl+ (Cmd+) maximizes and centers any window. Press it again and even the top menu bar toggles off, filling the entire screen.
If you’re stuck with a single small display you can press Tilde (~) to maximize a single panel and RAM Preview in full-screen mode by checking the Full Screen box in the Preview panel.

Drag a panel to one edge of the application window and aqua colored bands appear along the edge; when dropped the panel will occupy that entire side.
Double-arrow icons appear when you move the cursor between two or more panel groups, allowing you to resize adjacent panels. I don’t do this much thanks to one of my favorite After Effects shortcuts, the Tilde key (~), which toggles the panel under the cursor to full-screen.
Which is best for After Effects, one big monitor or two smaller ones? I think the jury is somewhat out—my studio currently includes both setups, and although most artists are used to a pair of 24″ screens, many prefer a single 30″.
To my mind, the ideal workflow is an effortless one. Here’s how to begin reducing steps you will take many, many times in a normal After Effects workday.
Tip
You can tear off any panel and make it float by holding down the Ctrl/Cmd key as you drag it away; I like to tear off the Render Queue and toggle it on and off via its shortcut (Alt+Ctrl+0/Opt+Cmd+0).
Figure 1.4 charts the nondestructive workflow of After Effects: from source files to comps made up of layers, which can contain settings, all of which are represented in a project file that never touches those source files.

Getting a source file from a disk or server into After Effects is no big deal. You can use File > Import > File (or Multiple Files), or just drag footage directly from the Finder or Windows Explorer into the Project panel. You can also double-click in an empty area of the Project panel.
Image sequences have a couple of specific extra rules. I strongly advocate working with a sequence instead of QuickTime in production for the following reasons:
An image sequence is less fragile than a QuickTime movie; if there is a bad frame in a sequence, it can be replaced, but it will corrupt an entire movie.
You can interrupt and restart an image sequence render without then having to splice together multiple movies.
QuickTime in particular has its own form of color management that isn’t entirely compatible even with Apple’s own applications, let alone the Adobe color management pipeline (explained in depth in Chapter 11).
Unfortunately, none of the Adobe applications (in particular, Bridge, which should know better) has ever become smart about recognizing sequences.
If you have a single sequence in a folder, just drag it in, but if it’s the first one for this project, leave it selected for a moment in the Project panel and check its fps setting at the top; if it’s not correct, see “Project, Footage, and Composition Settings” later in this chapter for how to fix this, both for that clip and for others just like it. If you really meant to bring in that folder’s contents as individual files, hold down the Option/Alt key as you drag it in.
Things get more complicated if you are dealing with multiple image sequences in a single folder. If you’ve never run into this or can simply keep the practice of one sequence per folder, great, skip ahead. Otherwise, it’s better to use the Import dialog.
With the Import dialog, it doesn’t matter which specific image in a sequence you select; they are all imported provided you select only one. By holding the Shift or Ctrl (Cmd) key as you select more than one frame, however, you can
Specify a subset of frames to be imported instead of an entire a sequence
Select frames from more than one sequence in the same folder; a Multiple Sequences checkbox appears to make certain this is really what you want to do
Specify sets of frames from multiple sequences (a combination of the above two modes)
This is, in many ways, a work-around for the fact that the After Effects importer doesn’t group a frame sequence together the way other compositing applications do.
By default, if a sequence has missing frames (anywhere the count doesn’t increment by 1), a color bar pattern is inserted with the name of the file presumed missing, which helps you track it down (see “Missing Footage,” later in this chapter).
Tip
Waiting for a long 3D render? Render the first and last 3D frames only, with their correct final sequence numbers, and import them using the Import dialog with Force Alphabetical Order unchecked. You now have a placeholder of the correct length that is fully set up as soon as the file is rendered.
The Force Alphabetical Order checkbox in the Import dialog is for cases where the frame does not increment by 1. Say you rendered “on twos,” creating every other frame from a 3D app; check this box and you avoid color bars on every other frame.
Want to be rehired repeatedly as a freelancer or be the hero on your project? Make it easy for someone to open your project cold and understand how it’s organized.
An ordinary project can be set up like the one shown in Figure 1.5; I often leave only the main composition in the root area of the project and place everything else in an appropriate subfolder.

Figure 1.5. Consider how best to organize source into folders to keep things as well organized in the Project as you would want them on the source drive. Once you have a structure you like, you can reuse it. (Chapter 4 says more about how you might design it.)
On a more ambitious project, it’s worth organizing a project template so that items are easy to find in predictable locations. Chapter 4 offers suggestions.
Stay away from the bar—the top menu bar, that is. I often refer to context-clicking on interface items. This is “right-clicking” unless you’re on a Mac laptop or have an ancient one-button mouse, in which case you can hold down the Control key. Here’s what happens:
Context-click a layer in the Timeline for access to the full Layer menu, minus a few less useful items, such as the Adobe Encore submenu, and with killer additions such as Reveal Layer Source in Project and Reveal Expression Errors.
Context-click on a layer in a Composition viewer for many of the same items, plus the Select option at the bottom of the menu, which gives you all of the items below your pointer (Figure 1.6).

Figure 1.6. One of the biggest productivity boosts in After Effects comes from using the right mouse button of a two- (or more) button mouse, as context menus exist throughout After Effects and are always right under your cursor. This Layer context menu contains everything you’d want from the Layer menu, plus extra Timeline-specific commands.
Context-click a panel tab to reveal the panel’s menu (also found at the upper right), where a bunch of options that even advanced After Effects users hardly know exist can be found, such as the View Options for a Composition viewer.
Context-click an item in the Project panel to, among other things, reveal it in the Finder or Explorer.
Having these kinds of options right under cursor keeps you focused.
After Effects will link to any source footage file that can be found on your system or network, source which can easily become unlinked if anything moves or changes. To relink an item, find it in the Project panel and double-click it (or Ctrl+H/Cmd+H), or context-click and choose Replace Footage > File.
Tip
When you context-click a Project item and choose Replace Footage, you get a couple of extra options—Placeholder and Solid—in case the footage won’t be available until later.
This is also a surreptitious way to replace a source file without any fuss or bother. If instead you need only to reload or update a source, context-click and choose Reload Footage (Ctrl+Alt+L/Cmd+Option+L). You can even edit a file in its source application and update it automatically in After Effects with Edit > Edit Original (Ctrl+E/Cmd+E), as long as you don’t try anything tricky like saving it as a new file.
Sometimes it’s difficult to locate a missing file or frame in your project. You may have used the Find Missing Footage checkbox in previous versions, and you may wonder where it has gone. You’re not alone.
To search for particular types of footage in your project, including missing source, use search (Ctrl+F/Cmd+F) in the Project panel and the following commands (Figure 1.7):
missingis the replacement for the Find Missing Footage checkboxunusedgets you all of the source that isn’t in any compusedText strings that appear in the Project panel (say,
tiforAug 26)
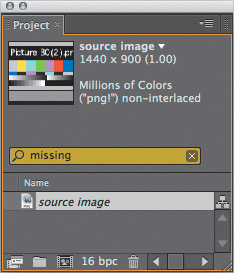
Make sure to check out that last one; it’s a totally new option in After Effects CS4. The date column in the Project panel may be hidden by default; context-click to reveal it, then type in yesterday’s date using a three-letter month abbreviation; the Project panel now displays only the items that were introduced or updated yesterday.
Unrecognized file formats are grayed out in the After Effect Import dialog. Typically, adding a missing three-character extension solves this, although some obscure formats simply do not work cross-platform (for example, Mac-generated PICT on Windows); see the “Source Formats” section later in this chapter for the most useful and universal file types to use.
Because every project is likely to be moved or archived at some point (you are making backups, right?), it’s best to keep all source material in one master folder; this helps After Effects automatically relink all of the related files it finds there at once, thus avoiding a lot of tedium for you.
At some point you probably will want to know how to
Move an entire After Effects project, including its source, or archive it
Merge or combine two projects
Clean up a project, getting rid of what’s not used or extra instances of a single file
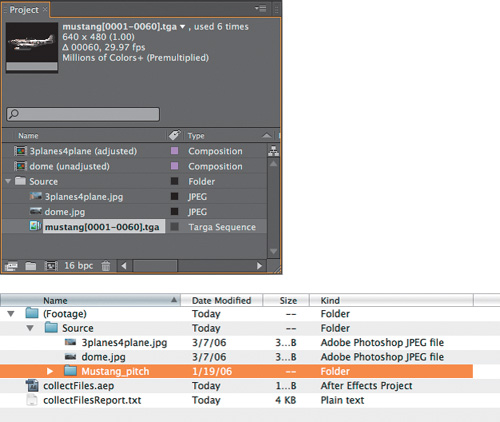
To move or archive a project with only its linked source, choose File > Collect Files. This command was designed to enable multimachine Watch Folder rendering (see Chapter 4) but is also useful for backup, as it allows you to create a new folder that contains a copy of the project and all of its source files. The source files are reorganized with a directory structure that directly replicates the one in the Project panel (Figure 1.8).
Let the computer do what it does best and automate a clean up of your source. Choose Collect Source Files: For Selected Comps; After Effects collects only the footage needed to create that comp. If you check Reduce Project as well, the unused source is also removed from the collected project.
File > Reduce Project removes excess items from the project itself. Select the master compositions in your project and choose File > Reduce Project; After Effects eliminates project items not used in the selected comps. You even get a warning dialog telling you how many items were removed—not from the disk, only from your project.
You can instead clean out only the source footage (but keep the comps and solids) with File > Remove Unused Footage, which deletes from the project any footage that hasn’t made its way into a comp. If the same clips have been imported more than once, File > Consolidate All Footage looks for the extra instances and combines them, choosing the first instance, top to bottom, in the project.
Tip
Gridiron Flow, which is in late beta as of the writing of this chapter, is a third-party application that tracks your entire image pipeline, inside and outside After Effects, and maps what happens to each file used in a project.
Need to combine two or more projects? Import one into the other (just drag it in), or drag several into a new project. The imported project appears in its own folder, and if the projects being combined are organized using the same set of subfolders, you can merge them with the script rd_MergeProjects.jsx, which is included on the book’s disc (Figure 1.9).

Figure 1.9. Load the highly useful rd_MergeProjects.jsx script from the redefinery folder on the book’s disc into Adobe After Effects CS4 > Scripts > ScriptUIPanels, and you can then reveal it at any time from the bottom of the Window menu. This script takes nested folders with the same name as those closer to the root and merges them, while consolidating duplicate footage. It’s great for importing a project and maintaining a tidy structure.
File > Consolidate All Footage looks for two or more instances of a source file and combines them, choosing the first instance, top to bottom, in the project. File > Remove Unused Footage rids a project of footage not included in any composition (but the files do remain on your drive).
After Effects projects are saved completely separate from the elements they contain. They tend to be small, making it easier to save a lot of them so that you don’t lose your work.
File > Increment and Save attaches a version number to your saved project or increments whatever number is already there, at the end of the file name before the .aep extension.
Tip
Use Increment and Save when you reach a point where you’re happy with a project and ready to move on to the next step; you can then choose File > Revert to get back there in one step instead of using a series of undos.
Preferences > Auto-Save fills in the spaces between incremented versions; toggle it on and you’ll never lose more than the number of minutes you specify (Save Every 20 Minutes is the default), and you’ll have whatever number of most recent versions you prefer (Figure 1.10).
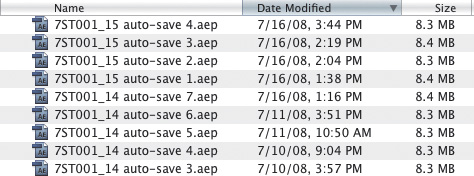
Figure 1.10. Auto-Save must be enabled, then at the default settings it creates 5 versions, writing a new one after each 20 minutes that you work (but not if your system sits idle). When number 5 is reached, 1 is deleted and 6 is written. When you increment the project, a new set of 5 is written. Here, each project is about 8 MB, which is large for an After Effects project but no problem compared to source file sizes.
After Effects includes a bunch of settings that you need to understand or you will waste time and effort fighting them. These have to do with essentials like how time, color depth, transparency, pixel aspect, and field data are handled.
As shown in Figure 1.11, the Project Settings dialog (Ctrl+Alt+Shift+K/Cmd+Option+Shift+K) contains three basic sections:
Display Style determines how time is displayed—predominantly whether a comp’s frame count is kept in integers (frames) or in timecode. Broadly, film projects tend to work in frames, broadcast video projects in timecode. This won’t effect the frame rates of your footage or comps, only how they appear.
The Color Settings section includes the project-wide color depth (8, 16, or 32 bits per channel), as well as color management and blend settings. Chapter 11 covers this in ample depth.
Audio Settings affects only how audio is previewed; lowering the rate can save RAM. I never touch this.
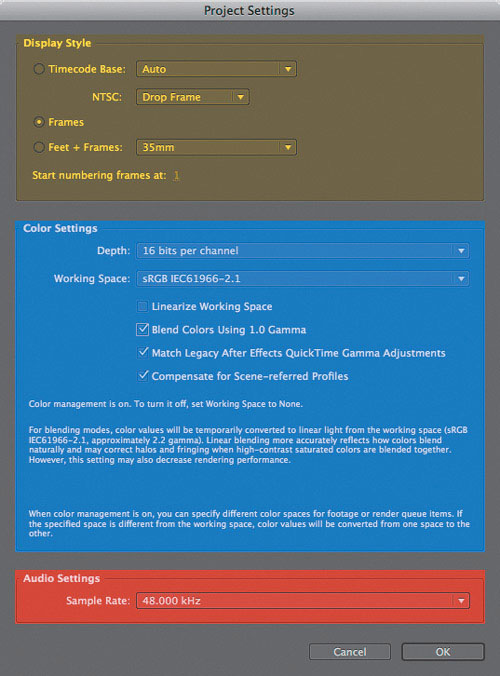
Figure 1.11. Project Settings are brought up here in Chapter 1 because they are essential, but only the biggest and most complicated section (Color Settings, in blue) doesn’t get a full explanation until Chapter 11.
If you’re displaying timecode, you’ll almost never want to change the default Auto setting unless you’re working with footage containing more than one frame rate and need to conform everything to a particular standard.
If you’re working with frames, it’s typical to start numbering them at 1, although the default is 0. This applies to imported image sequences, not comps. Numbering in a comp is determined by the Start Frame number in Composition Settings (Ctrl+K/Cmd+K).
This book generally eschews the practice of walking through After Effects menus, but a well-designed UI helps you think. Decisions about how footage is interpreted are both vital and somewhat tedious. This makes the Interpret Footage dialog (Figure 1.12), where you can specify for any source clip, even more vital as a pre-flight checklist for source footage:
Alpha interpretation
Frame Rate
Fields and Pulldown
Pixel Aspect Ratio (under Other Options)
Color Management (under More Options with certain file types and the new Color Management tab)
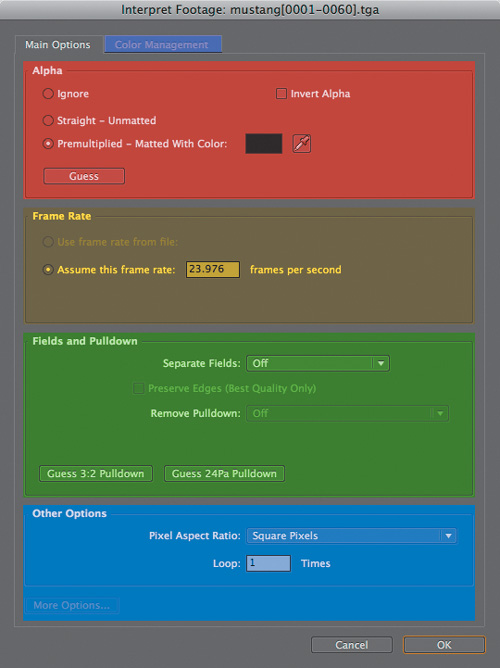
Figure 1.12. The Interpret Footage dialog is a checklist for getting footage settings correct before you ever assemble a comp. Alpha (red) determines transparency settings, Frame Rate (yellow) is particularly essential with an image sequence, Fields and Pulldown (green) and Pixel Aspect Ratio (under Other Options, blue) convert footage optimized for playback. The Color Management tab (purple) gets a complete treatment in Chapter 11.
To bring up the Interpret Footage dialog for a given clip, select it in the Project panel and press Ctrl+Shift+G/Cmd+ Shift+G or context-click and select Interpret Footage > Main. The Interpret Footage icon in the Project panel ![]() is a new shortcut to open this dialog.
is a new shortcut to open this dialog.
To composite effectively you must thoroughly understand alpha channels. Figure 1.13 shows the most visible symptom of a misinterpreted alpha channel: fringing.

You can easily avoid these types of problems:
If the alpha channel type is unclear, click Guess in the mini Interpretation dialog that appears when importing footage with alpha. This often (not always) yields a correct setting.
Preferences > Import contains a default alpha channel preference, which is fine to set on a project with consistent alpha handling. If you are in any doubt about that, set it to Ask User to avoid forgetting to set it properly.
More information on alpha channels and how they operate is in Chapter 3.
I have known experienced artists to make careless errors with frame rate. Misinterpreted frame rate is typically an issue with image sequences only, because unlike QuickTime, the files themselves contain no embedded frame rate. You can also override the QuickTime frame rate, which is exactly what After Effects does with footage containing any sort of pulldown (see next section).
Tip
You can change the default Frames Per Second setting for Sequence Footage under Preferences > Import. This should be the first thing you check when you are starting a new project so you don’t have to continually change it.
The following two statements are both true:
After Effects is more flexible than just about any video application in letting you mix clips with varying frame rates and letting you change the frame rate of a clip that’s already in a comp.
However, After Effects is very precise about how those timing settings are handled, so it is essential that your settings themselves be precise. If your true frame rate is 23.976 fps or 29.97 fps, don’t round those to 24 and 30, or strange things are bound to happen: motion tracks that don’t stick, steppy playback, and more.
Close-Up: Why Sequences?

Movie formats, in particular QuickTime (.mov), are like fast food in a regular diet – bound to cause problems sooner or later when compared with the healthier image sequence option:
A bad frame in a rendered sequence can typically be quickly isolated and replaced; a bad frame will sink an entire QuickTime movie, sometimes costing hours.
It’s easy to swap out a section of an image sequence precisely, overwriting frames instead of cutting and pasting footage.
Still image formats have more predictable color management settings than QuickTime.
If QuickTime is a burger—convenient but potentially bad for the health of your project, causing bloat and slowness—then image sequences are a home cooked meal, involving more steps but offering more control over how they are made and consumed.
It’s not always practical, particularly when making quick edits to video footage, to convert everything to sequences, which don’t play back so easily on your system or in your nonlinear editor. Nonetheless, sequences are the best choice for larger or longer-form projects.
The current frame rate and duration as well as other interpretation information is displayed at the top of the Project panel when you select a source clip (Figure 1.14).

One surprise for the novice is that moving images are often not made up of whole frames containing square pixels like stills. A video frame, and in particular one shot for broadcast, is often interlaced into two fields, and its pixels are stored non-square, for the purpose of faster and more efficient capture and delivery.
Fields combine two frames into one by interlacing them together, vertically alternating one horizontal line of pixels from the first with one from the second. The result is half the image detail but twice the motion detail. Figure 1.15 shows this principle in action.

Figure 1.15. If a perfect ellipse traveled left to right at high speed, the interlaced result would look like this on a single frame. This contains two fields’ worth of motion, alternating on vertical pixels of a single frame. If you see something like this in your comp, it hasn’t been removed on import.
If you’re doing any compositing, transformation, paint/masking, or distortion—pretty much anything beyond basic color correction—it’s best to match the Separate Fields setting to that of the footage, causing After Effects to recognize the interlace frame as two separate frames of video.
Pulldown uses fields to run 24 fps film footage smoothly at 29.97 fps by repeating one field every five frames. This creates a pattern that After Effects can accurately guess if there is sufficient motion in the first few frames of the footage. If not, the backup option (which still works) is trial-and-error, trying each initial pattern listed under Remove Pulldown until the field artifacts disappear in a 23.976 fps comp. There are two basic types of pulldown (3:2 and 24 Pa), each with five potential initial patterns.
Pixel aspect ratio (PAR) is another compromise intended to maximize image detail while minimizing frame size. The pixels in the image are displayed nonsquare on the broadcast monitor, with extra detail on one axis compensating for its lack on the other.
Notes
3:2 pulldown is the traditional format designed to make footage that originated at 24 fps play smoothly at 29.97 fps; telecine conversions from film to television use this. 24P Advance Pulldown was introduced to reduce field artifacts by grouping 24 whole frames with 6 interlaced frames, which are essentially filler and can be discarded on removal (see the diagram in Figure 1.16).

Your computer monitor, of course, displays square pixels, so any clip with a non-square PAR will look odd if displayed without compensating for the difference. Therefore, After Effects includes a toggle below the viewer panels to stretch the footage so that its proportions look correct (Figure 1.17) although the footage or composition itself isn’t changed.

With some digital formats such as DV, field order and pixel aspect are standardized and set automatically in After Effects. With other formats, it’s best to know the correct field order and pixel aspect as specified by the camera or software that generated the image.
After Effects is capable of importing and exporting a wide array of footage formats, yet only a small subset of these recur regularly in production. Table 1.1 contains a rundown of common raster image formats and some advantages and disadvantages of each.
Table 1.1. Raster Image Formats and Their Advantages
FORMAT | BIT DEPTH | LOSSLESS COMPRESSION | LOSSY COMPRESSION | ALPHA CHANNEL | OUTPUT FORMAT |
|---|---|---|---|---|---|
TIFF | 8/16/32 bit | Y | N | Y (multiple via layers) | Y |
PNG | 8/16 | Y | N | Y (Straight only) | Y |
CIN/DPX | 10 | N | N | N | Y (Cineon 4.5 or DPX, see Cineon Settings) |
CRW | 12 | N | N | N | N |
EXR (now native in CS4) | 16/32 | Y | N | Y | Y |
JPG | 8 | N | Y | N | Y |
Which formats will you use most? Probably TIFF or DPX for source, and JPEG (with a Quality setting of 7 or higher) for temporary storage when file space is at a premium.
Notes
One oddity of the PNG format is that it specifies that an alpha channel is saved and interpreted as Straight, with no explicit option to change the default.
TIFF offers lossless LZW compression, giving it an advantage over Adobe Photoshop, especially when you consider that TIFF can even store multiple layers, each with its own transparency. Other formats with lossless compression, such as TGA, don’t support multiple bit-depths and layers like TIFF does. PNG is more limited and slower, but the file sizes are smaller.
For film and computer graphics, it is normal to pass around CIN and DPX files (essentially the same format) and EXR, designed (and open-sourced) by ILM specifically to handle HDR renders with multiple channels of data (and these can be customized to contain useful information such as Z depth and motion data). More on these formats is found in Chapters 11 and 12, which also include information on working with Camera Raw CRW images.
Although the PSD format does not offer any type of compression, it offers a few unique advantages when used with After Effects. Specifically, PSD files
Can be imported directly as identical After Effects compositions; all of the data is preserved and most of it, including blending modes and even layer styles and text, remains editable in After Effects. In the Import File dialog, choose Composition or Composition – Cropped Layers using the Import Kind pop-up menu (Figure 1.18).

Figure 1.18. Holy Twisted Terminology, Batman! Composition Cropped Layers means “just like in Photoshop.” The other option, Composition, reframes everything to the image area—and crops any pixels that fall outside frame! Choose the Cropped Layers option to ensure that each layer has its own unique Anchor Point—and is not cropped.
Can be created from After Effects (File > New > Adobe Photoshop File or even Layer > New > Adobe Photoshop File).
Can include moving footage. More about why you might want to work with video in Photoshop (for its paint tools) is included in Chapter 7.
Can include Live 3D layers: 3D models with lighting, material, and surface characteristics created in Photoshop that can be manipulated in After Effects. More about this new feature is found in Chapter 9.
Once your source footage is imported and organized (Chapter 4), the next step is to place it in a composition.
My advice is to begin with your plate: the main footage, whether a background shot or a foreground yet to be keyed. To ensure that composition settings are exactly as they should be with the least effort, try one of the following:
Use a prebuilt project template that includes compositions whose settings match the intended output; you can even create and save your own.
Create a new composition by dragging the plate footage (often the background plate) to the Create a New Composition icon
 . This automatically matches pixel dimensions, Pixel Aspect Ratio, Frame Rate, and Duration, all of which are crucial.
Notes
The term “plate” stretches back to the earliest days of optical compositing (and indeed, of photography itself) and refers to the source footage, typically the background onto which foreground elements are composited.
Composition Settings also contains an Advanced tab. This pertains to temporal and spatial settings (Chapter 4) and motion blur and 3D (Chapter 9).
How exactly does a professional work with footage in After Effects? I’ve noticed some good habits that experienced pros tend to share.
Notes
A 2K plate is the minimum typical horizontal film resolution: approximately 2000 pixels, or more precisely 2048 pixels in width. HD video is 1920 pixels horizontal resolution.
First, keep in mind that you should almost never work at Full resolution, but you should almost always leave layers at Best quality. There are several effective ways to speed up previews and interactivity without ever setting a layer to Draft quality, which creates inaccurate previews by rounding off crucial values.
In rough order of preference, you can
Lower viewer Resolution to Half, or in extreme cases, Quarter (see Note)
Set a Region of Interest (ROI) to isolate only the area that needs to be previewed
Use Shift+RAM Preview to skip frames (default setting of 1 skips every second frame—details in “Caching and Previewing,” later in this chapter)
Notes
One very cool new CS4 feature is the Auto setting under the Resolution menu in the Comp viewer. This downsamples the image so that resolution is never higher than magnification; this guarantees that when you work smaller, you work faster.
Half resolution allows four times as much data to fill a RAM preview, and Shift+RAM Preview can reduce overhead further by skipping every nth frame (according to the Skip setting in the Preview panel). The default setting of 1 plays every other frame (Figure 1.19).

Figure 1.19. Highlighted in yellow are a few easy-to-miss options (from the top): loop options let you ping-pong footage, Shift+RAM Preview is a secondary previewing option with unique settings, the default difference is a Skip setting of 1 which previews every other frame but can be raised to any number you like, and you can preview From Current Time instead of the full Work Area.
To quickly change the display resolution in the Composition panel, use the keyboard shortcuts shown in Table 1.2.
Hold down the Spacebar or activate the Hand tool (H, Spacebar, or Middle Mouse Button) to move your view of a clip around. To zoom in and out, you can use
Ctrl+=/Cmd+= and Ctrl+-/Cmd+-
Zoom tool (Z); press Alt/Option to zoom out
Comma and period keys
A mouse with a scroll wheel
Ever notice yourself focusing only on a particular section of a huge image? Use the Region of Interest (ROI) tool (Figure 1.20), to define a rectangular preview region. Only the layer data needed to render that area is calculated and buffered, lengthening RAM previews.
Has your After Effects UI slowed to crawl as you work on a big shot? Here’s a quick triage you can try:
Deactivate Live Update (Figure 1.21a). On by default, this toggle enables real-time update in the viewers as you adjust controls. Deactivate it and updates occur only when you release the mouse.

Figure 1.21. Disabling Live Update (a) and enabling Caps Lock (b) could be seen as desperation moves when interactivity becomes unacceptable, but the former is rarely necessary (you can do it temporarily with Option/Alt) and the latter can actually be a handy way to do setup as quickly as possible without worrying about previews.
Hold Option/Alt as you make adjustments. With Live Update on, this prevents views from updating. Deactivate Live Update and the behavior is inverted; the modifier keys instead enable real-time updates.
Activate Caps Lock. If you don’t mind working “blind” for periods of time, the Caps Lock key prevents updates to any viewer (Figure 1.21b).
Enable OpenGL. Preferences > Previews includes the Enable OpenGL option, off by default (and unavailable with older graphics cards). Enable it, and OpenGL-Interactive mode in a View panel is accelerated in certain cases, for example when positioning layers in 3D space. There are two OpenGL options, Interactive and Always On; the former will help you with fast scene setup, especially in a complicated 3D scene, and the latter will give you the look of OpenGL at all times as you work.
In general, the more responsive you can make your user interface, the better will be the result because you can make more decisions in a shorter period of time. Just leave time to double-check the result if you are in the habit of disabling viewers.
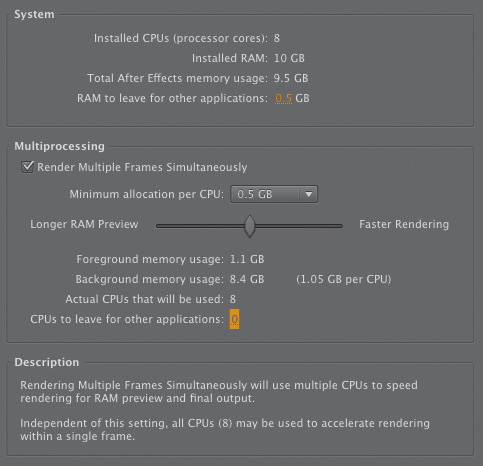
Multiprocessing, which allows After Effects to use all of the processor cores on your system, is disabled by default; this does not mean that After Effects doesn’t use all of your procs, just that by default it doesn’t work on more than one frame at a time, and thus it doesn’t maximize usage of your system.
The Preferences > Memory & Multiprocessing dialog contains dynamically updated information related to your particular system; it is designed to help you make maximum use of processing power without maxing out the system for other applications. The decision of how to balance it is yours. By default, After Effects leaves a given amount of RAM for other applications, and you can control this amount in this dialog.
Most users miss the main feature here, the Render Multiple Frame Simultaneously checkbox, which is disabled by default. Check this box and After Effects no longer waits for one frame to render before starting the next; instead it looks for available memory and CPU to render as many frames as your system can handle simultaneously.
How much multiprocessing can your system handle? Once you enable multiprocessing, you can tune how it is handled:
Raise the minimum allocation per CPU to help background processes: 1.0 GB for HD footage below 32 bpc, 2.0 GB for larger than HD and 32 bpc projects (Chapter 11 tells you more about those).
Weight memory more toward RAM Previews (a foreground process, so you wait for it) or faster background renders (while you continue to work).
Spare whole CPUs for other applications.
The controls and descriptive text in this dialog, along with the features they describe have been enhanced for CS4 (Figure 1.22).
After Effects automatically caches footage as you navigate from frame to frame (Page Up/Page Down) or load a RAM preview (0 on the numeric keypad). The green line atop the Timeline shows which frames are stored for instant playback.
Given that After Effects tops out at a bit less than 3 GB of physical memory per session (due to limitations in system memory allocation), you can do better. To extend the cache from physical memory (RAM) to physical media (ideally a high-speed local drive), enable Disk Cache in Preferences > Memory & Cache. This locks away a portion of your drive for use only by After Effects. A blue line shows frames loaded in the Disk Cache (Figure 1.23).

When you activate Enable Disk Cache, you must also specify a disk location; if in doubt just create a local folder with an intuitive name such as AE Scratch. Even the default 2 GB (2000 MB) setting greatly extends available cache without occupying permanent disk space.
Disk Cache saves the time required to re-render a frame but doesn’t necessarily deliver real-time playback and often is not invoked when you might think it should be. The cache is not saved between After Effects sessions.
Tip
The shortcut for Shift+RAM Preview is, naturally enough, Shift+0 (on the numeric keypad). To set the Work Area to the length of any highlighted layers, use Ctrl+Alt+B/Cmd+Option+B.
If refined motion is not critical, use Shift+RAM Preview.
Here’s some cool stuff you do to customize a RAM Preview:
Loop options (Preview panel). Hidden among the playback icons atop Preview is a toggle controlling how previews loop. Use this to disable looping, or amaze your friends with the ping-pong option.
From Current Time (Preview panel). Tired of resetting the work area? Toggle this on and previews begin at the current time and roll through to the end of the comp.
Full Screen (Preview panel). Self-explanatory and rarely used.
Preferences > Video Preview lets you specify Output Device and how it is used. If you have an external video device attached with its own monitor, you can use it to preview. Third-party output devices, such as Kona and Blackmagic cards, are supported as well.
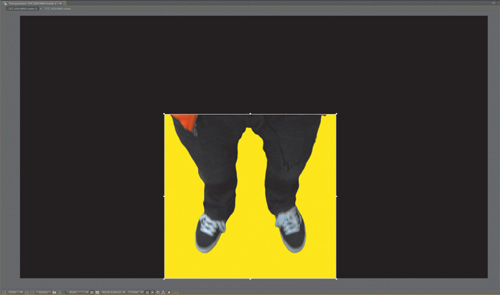
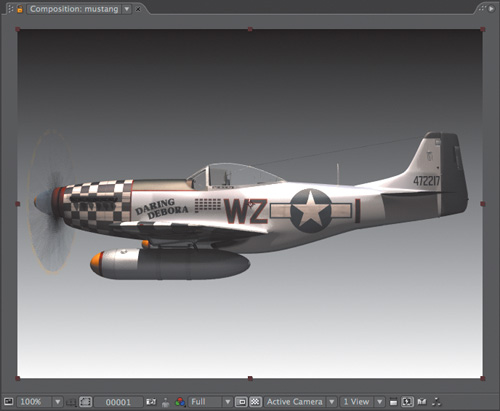
You need to see what you’re doing, and when you use a contrasting background it is like shining a light behind layer edges. You can customize the background color of the Composition viewer (Ctrl+Shift+B/Cmd+Shift+B or Composition > Background Color) or toggle the Transparency Grid icon beneath the Composition panel to evaluate edges in sharp relief.
I even insert background or reference footage or a custom gradient background that I create (Figure 1.24). If it’s set as a Guide Layer ![]() (Layer > Guide Layer or context-click the layer), it does not show up when rendered or nested in another comp.
(Layer > Guide Layer or context-click the layer), it does not show up when rendered or nested in another comp.
Several other modes and toggles are available in the viewer panels. Some are familiar from other Adobe applications:
Title/Action Safe overlays determine the boundaries of the frame as well as its center point.
View > Show Grid (Ctrl+”/Cmd+”) displays an overlay grid.
View > Show Rulers (Ctrl+R/Cmd+R) displays not only pixel measurements of the viewer, but allows you to add guides as you can in Photoshop.
All of these are toggled via a single menu beneath the viewer panel (the one that looks like a crosshair). To pull out a guide, choose Show Rulers and then drag from either the horizontal or vertical ruler. To change the origin point (0 on each ruler), drag the crosshair from the corner between the two rulers.
Masks, keyframes, and motion paths can get in the way. You can
Hide them all using View > Hide Layer Controls (Ctrl+Shift+H/Cmd+Shift+H)
Use the Toggle Mask and Shape Path Visibility button at the bottom of the Comp panel
Customize what is shown and hidden with View > View Options (Ctrl+Alt+U/Cmd+Option+U)
Beginning in Chapter 5 you’ll be encouraged to study images one color channel at a time. The Show Channel icon exists for this purpose (keyboard shortcuts Alt/Option+1 through Alt/Option+4 map to R, G, B, and A, respectively). An outline in the color of the selected channel reminds you which channel is displayed (Figure 1.25).

After Effects contains about 200 effects plug-ins that ship with the application, and far more than that from third parties. Personally, I use less than 10% of these effects around 80–90% of the time, so my opinion is that you don’t need to understand them all in order to use the most powerful ones.
And even cooler, once you thoroughly understand the core effects, you can use them together to do things with After Effects that you might have thought required third-party plug-ins.
To apply an effect to a layer, my advice is to avoid the Effect menu and either context-click that layer, then use the Effect context menu, or double-click it in the Effects & Presets panel.
The Effects & Presets panel is a versatile tool when problem-solving. It has options to display effects alphabetically, without their categories, as well as a search field to help you look for a specific effect by name, or for all the effects whose names include a specific word, such as “blur” or “channel” (Figure 1.26).

Animation Presets allow you to save specific configurations of layer properties and animations, including keyframes, effects, and expressions. They’re particularly useful when working with others and sharing standardized practices. Save your own by selecting the effects and properties you want to save and choose Animation > Save Animation Preset; save it to the Presets folder (the default location) to have it show up when After Effects is started.
As you well know, the way to get completed footage out of After Effects is to render it. Here are a few things you might not already know about the process of outputting your work.
Tip
Convert raw footage by dragging it directly to the Render Queue, no comp required (one is made for you). This is a quick and easy way to convert an image sequence to a QuickTime movie, or vice versa.
To place an item in the Render Queue, it’s simplest either to use a shortcut (Ctrl+M/Cmd+M) or to drag items from the Project panel.
There are two key sections for each Render Queue item: Render Settings and Output Module.
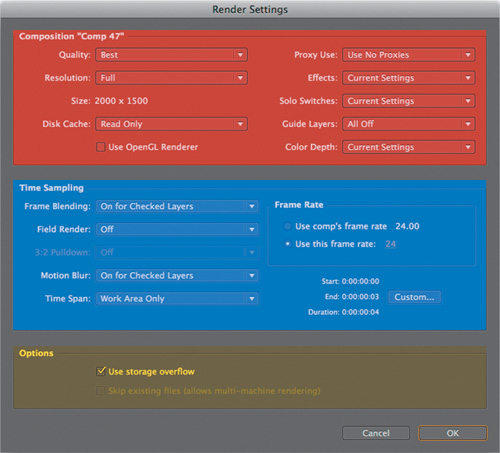
Render Settings breaks down to three basic sections (Figure 1.27):
Composition corresponds directly to settings in the Timeline; here you choose whether to keep or override them. The more complex options, such as Proxy Use, are described in Chapter 4.
Time Sampling gives you control over the timing of the render; not just frame rate and duration but the ability to add pulldown and fields—say when rendering a 24 fps film comp for 29.97 video—as well as motion blur and frame blending (Chapter 2).
Options contains one super important feature: “Skip existing files,” which checks for the existence of a file before rendering it. This is useful for splitting sequences between sessions (see Chapter 4 for details on how to use it).
Tip
Need to render several items to one location? Set up one item, and only thereafter, add the rest. The location of the first becomes the default.
If you find that rendered output doesn’t match your expectations, Render Settings is generally the place to look (unless it involves color management, compression, or audio). The Output Modules handle writing that output to a file.
Output Modules convert the rendered frame into an actual file. The main decisions here concern
Format
Size
Audio
Color management
Tip
Want the best looking half-resolution render? Use a Stretch setting in the Output Module, instead of half resolution in Render Settings (which typically renders faster).
Several elegant and easily missed problem-solving tools are embedded in Output Modules:
Multiple Output Modules per Render Queue item avoid the need for multiple passes (Figure 1.28).
Separate Output Modules can be edited together by Shift-selecting the modules themselves (not the Render Queue items that contain them).
A numbered sequence can start with any number you like (Figure 1.29).
Scaling can be nonuniform to change the pixel aspect ratio.
Post-Render Actions automate bringing the result back into After Effects. Chapter 4 tells all.
Close-Up: Naming Conventions
Part of growing a studio is devising a naming scheme that keeps projects and renders organized. It’s generally considered good form to
Use standard Unix naming conventions (replacing spaces with underscores, intercaps, dashes, or dots).
Put the version number at the end of the project name and the output file, and have them match. To add a version number to a numbered sequence, you can name the image sequence file something like foo_bar_[####]_v01.tif for version 1.
Pad sequential numbers (adding zeros at the beginning) to keep things in order as the overall number moves into multiple digits.
And remember After Effects itself doesn’t like file names above 32 digits, so find a system that is concise or risk having key information, toward the end of the name, truncated in the Project panel.
A numbered image sequence must contain a string in the format [###] somewhere within its name. Each # sign corresponds to a digit, for padding.
The Color Management tab is in effect with many still image formats. Chapter 11 tells all.
Rendered files can include XMP metadata (if toggled on, as by default); this includes information that the file came from After Effects.


Save Output Modules early and often using the Make Template option at the bottom of the pop-up menu. If you intend to render with the same settings even once more, it saves time. Unfortunately these cannot be easily sent to another user.
Following are some suggested output settings (Render Settings and Output Modules) for specific situations:
Final output should match the delivery format; it’s usually an editor who decides this. Merely choosing the default Lossless setting is not sufficient if, for example, you’ve been working in 16 bpc to render a 10-bit final (Lossless is only 8 bit). For sending files internally, TIFF with lossless LZW compression is solid and can handle higher bit depths and color management.
Low-loss output is mostly up to you; QuickTime with Photo-JPEG at around 75% is an old standby, but all QuickTime formats may display inconsistent gamma, depending on version and platform.
Notes

Photo-JPEG is universally available, even in older versions of QuickTime. Plus, at 100%, it provides 4:4:4 chroma sampling, and at 75%, 4:2:2 (see Chapters 6 and 11 for more on chroma).
Online review typically should be compressed outside of After Effects; such aggressive compression formats as H.264 are most successful on multiple passes.
Notes
Chapter 4 tells more about how to send your project to Adobe Media Encoder for multipass encoding; this requires Adobe CS4 Production Premium.
After Effects offers a number of output formats and can be useful for simple file conversion; you need only import source and drag it directly to the Render Queue, then add settings and press Render.
Seasoned visual effects supervisors miss nothing. Fully trained eyes do not even require two takes, although in the highest end facilities, a shot loops for several minutes while the team picks it apart.
Close-Up: The Trials and Tribulations of QuickTime
QuickTime is the most ubiquitous and universal playback format among video professionals, despite that it is proprietary. There are design decisions behind QuickTime that don’t change unless Apple decides to change them.
Some of these amount to a gotcha:
Color management of QuickTime remains (at this writing) a moving target, with MOV files appearing differently when they are moved from one platform, software, or even monitor, to another. When I say “software” I even mean Apple applications, which don’t always seem to agree on how to display the format.
High Quality toggle in QuickTime Player is unchecked by default. The client is screaming about why the shot looks fuzzy and you have to direct them to Window > Show Movie Properties > Video Track > Visual Settings and the little toggle to the lower right.
Many useful formats are Mac-only, such as Uncompressed 10-bit 4:2:2, an Apple format.
The notorious QuickTime 7.2 caused After Effects renders to fail with a write-error.
Failed or corrupted QuickTime files are typically unplayable, and the larger they are, the more susceptible they seem to be to being taken down by a spurious frame or two.
Most larger facilities rely on QuickTime only for client delivery and in the edit suite. It’s inconvenient to deal with sequences when there’s no free standalone player for them of the quality of FrameCycler, but sequences cause fewer of these types of problems in exchange for the overall inconvenience.
This process, though occasionally hard on the ego, makes shots look good.
You can and should scrutinize your shot just as carefully in After Effects. Specifically, throughout this book I encourage you to get in the following habits:
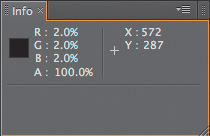
Keep an eye on the Info palette (Figure 1.30).
Loop or rock and roll previews.
Zoom in to the pixel level, especially around edges.
Examine footage channel by channel (Chapter 5).
Turn the Exposure control in the comp viewer up and down to make sure everything still matches (Chapter 5).
Assume there’s a flaw in your shot; it’s the only way around getting too attached to your intentions.
Approach your project like a computer programmer and minimize the possibility of bugs (careless errors). Aspire to design in modules that anticipate what might change or be tweaked.