

This chapter examines how image data flows through an After Effects project in detail. That may not sound gripping until you realize how much your creativity is hampered by remaining ignorant of this stuff.
Sometimes you take the attitude of a master chef—you know what can be prepped and considered “done” before the guests are in the restaurant and it’s time to assemble the piece de resistance. At other times, you’re more like a programmer, isolating and debugging elements of a project, even creating controlled tests to figure out how things are working. This chapter helps you artistically and technically, as if the two can be separated.
Once you
Understand how to use multiple compositions
Know when to precompose
Know how to optimize rendering time
you may find the After Effects experience closer to what you might call “real-time.” Efficient rendering, however, depends on well-organized compositions and the ability to plan for bottlenecks and other complications.
It’s easy to lose track of stuff when projects get complicated. This section demonstrates
How and why to create a project template
How to keep a complex, multiple-composition pipeline organized
Shortcuts to help orient you quickly
These tips are especially useful if you’re someone who knows compositing well but find After Effects disorienting at times.
I’m always happiest with a project that is well organized, even if I’m the only one likely ever to work on it. Keeping the Project panel well organized and tidy can clarify your ability to think about the project itself.
Figure 4.1 shows a couple of typical project templates containing multiple compositions to create one final shot, although these could certainly be adapted for a group of similar shots or a sequence. When you need to return to a project over the course of days or weeks, this level of organization can be a lifesaver.

Figure 4.1. The template on the left is based on how a film shot might be generically organized, including numbering that reflects pipeline order and Output comps in two formats. The template on the right is the minimum I would use on any project; you need a folder for Source and one for Precomps to keep things tidy even if the main comp stays at the root level.
Here are some criteria to use when creating your own:
Create folders to group specific types of elements, such as Source, Precomps, and Reference.
Use numbering to reflect comp and sequence order so that it’s easy to see that order in the Project panel.
Create a unique Final Output comp that has the format and length of the final shot, particularly if the format is at all different from what you’re using to work (because it’s scaled, cropped, or uses a different frame rate or color profile).
Use guide layers and comments as needed to help artists set up the comp (Figure 4.2).
Organize Source folders for all footage, broken down as is most logical for your project.

The basic elements of a Master comp, source comps, and a render comp seem useful on a shot of just about any complexity, but the template can include a lot more than that: custom expressions, camera rigs, Color Management settings, and recurring effects setups.
The Timeline is great for timing, but the bane of the Timeline is precomping. There are many times where there is no way around sending a set of layers into their own Timeline, yet most artists will do anything to avoid this step because it locks those layers and controls out of the main Timeline. In the past, precomping also made it harder simply to find where everything was; it is standard for an After Effects artist working on a complex comp to be left with the “where did I do that” feeling at one time or another.
That’s now less the case, thanks to CS4’s Mini-Flowchart, or Miniflow. You can access it via a button in the Timeline ![]() , but you may have already discovered that simply tapping the Shift key with the Timeline forward enables it.
, but you may have already discovered that simply tapping the Shift key with the Timeline forward enables it.
By default, the comp order is shown flowing right to left. The reason for this is probably that if you open subcomps from a master comp, the tabs open to the right; however, a convincing argument can and has been made to choose Flow Left to Right in the panel menu of the Mini Flowchart. Try it and see if you breathe a little sigh of relief.
Either direction, Miniflow is the best workflow addition to After Effects CS4. It shows only the nearest neighbor comps (Figure 4.3) but click on the flow arrows at either end and you navigate up or down one level in the hierarchy. Click on any arrows or items in between the ends and that level is brought forward.

Miniflow does not display the entire compositing tree like Flowchart view does, but it’s much more useful. The most complicated it gets is in multiple one-to-many relationships, because you can only trace your way down one flow at a time, but that turns out not to be such a big deal. It’s much simpler to open a comp and see where it’s used than the previously existing alternatives.
Miniflow makes it even more possible to close all the Timelines when you’re done with a set of changes (Ctrl+Alt+W/Command+Option+W) and reopen only the ones you need, starting with the master comp.
The Lock icon ![]() at the upper left of the Composition viewer lets you keep that Composition viewer forward while you open another Timeline. Typically, you would lock the master comp and double-click a nested comp to open its Timeline; as you make adjustments in that Timeline, you see their effect on the overall comp.
at the upper left of the Composition viewer lets you keep that Composition viewer forward while you open another Timeline. Typically, you would lock the master comp and double-click a nested comp to open its Timeline; as you make adjustments in that Timeline, you see their effect on the overall comp.
The Always Preview this View toggle ![]() lets you instead work entirely in a precomp, but preview the result automatically in the master comp (if this is toggled in that comp) without having to switch to it. Use it if you’re only interested in how changes look in your final.
lets you instead work entirely in a precomp, but preview the result automatically in the master comp (if this is toggled in that comp) without having to switch to it. Use it if you’re only interested in how changes look in your final.
Ctrl+Alt+Shift+N (Cmd+Option+Shift+N) creates two Composition viewers side-by-side, and locks one of them, for any artist with ample screen real estate who wants the best of both worlds.
To locate comps in the Project panel, you can
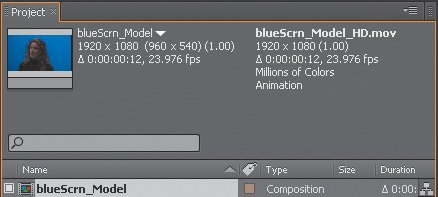
Select an item in the Project panel; adjacent to its name by the thumbnail at the top of the panel is a small pulldown caret, along with the number of times, if any, the item is used in a comp (Figure 4.4).
Context-click an item in the Project panel and choose Reveal in Composition; choose a composition and that comp is opened with the item selected (Figure 4.5).
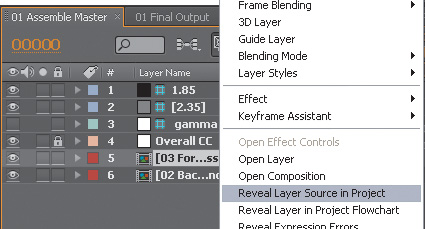
Context-click a layer in the Timeline and choose Reveal Layer Source in Project to highlight the item in the Project panel (Figure 4.6).
Context-click in the empty area of a Timeline and choose Reveal Composition in Project to highlight the comp in the Project panel (Figure 4.7).


Precomping is often regarded as the major downside of compositing in After Effects, because it obscures vital information from view. Artists will let a composition become completely unwieldy, with dozens of layers, rather than bite the bullet and precomp. Yet precomping is an effective way to solve problems and optimize a project, provided you plan things out a little.
Just to get our terms straight, precomping is the action of selecting a set of layers in a composition and assigning them to a new subcomp. Closely related to this is composition nesting, the action of placing one already created composition inside of another.
Typically, you precomp by selecting the layers of a composition that can and should be grouped together and choosing Precompose from the Layer menu (keyboard shortcut Ctrl+Shift+C/Cmd+Shift+C).
Two options are presented, the second one unavailable if multiple layers are selected: to leave attributes (effects, transforms, masks, paint, blending modes) in place or transfer them into the new composition.
Precomping prevents a composition from containing too many layers to be seen and managed in one Timeline, but it also allows you to do the following:
Reuse a set of elements and manage them from one place.
Fix render order problems, for example apply an effect first, then a mask.
Organize your project; grouping elements that are interrelated is a good idea in a nodal application such as Nuke or Shake too, because it influences how you think about the composite.
Consider an element or set of layers “done” (and even prerender them as proxies, as discussed later in this chapter).
If you’re already comfortable with the idea of precomping, focus on the last point. This chapter describes the advantages to finishing an element, if only for the time being, instead of always keeping options open. It’s a secret of most “real-time” compositing systems that they rely heavily on the equivalent of prerendered subcomps (they just don’t call them that).
Precomping several layers together can solve problems, but it can also create new ones. Common gotchas include
You want some but not all properties to be precomped.
It can be a pain to undo in order to restore precomped layers to the master composition.
You must deal with the all-or-nothing behavior of blending modes and 3D layers, depending on the Collapse Transformations setting.
It can be unclear how motion blur, frame blending, and collapsed transformation switches in the master composition affect nested comps.
Layer timing (duration, In and Out points) and dimensions can become constraints.
Tip
The script preCompToLayerDur.jsx from Dan Ebberts is included on the disk; even if a layer to be precomped doesn’t start at frame 0, the precomp does.
If you recognize any of these problems and haven’t solved them, check out the following useful strategies.
Each composition in After Effects contains its own fixed timing and pixel dimensions, which a couple of strategies help navigate:
Make source compositions longer than the shot is ever anticipated to be to avoid truncating timing.
Enable Collapse Transformations for the nested composition to ignore its boundaries (Figure 4.8).

These two simple rules will cover many situations, but Collapse Transformations has extra benefits and limitations of its own.
Switches Affect Nested Comps is enabled by default in General Preferences. Enable frame blending or motion blur in a master composition and those switches are passed through to any nested composition. 3D position data and blending modes, on the other hand, are ignored if Collapse Transformations is not enabled (Figure 4.9). Enable it and it is as if the precomposed layers resided in the Master comp.
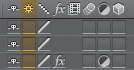
Figure 4.9. The highlighted switch has two roles (and two names): Collapse Transformations passes through blending modes and 3D positions from nested comps as if not precomped; Continuous Rasterization maintains vector source without rasterizing until final render and applies to source in formats such as Adobe Illustrator.
Collapse Transformations prevents the application of a blending mode on the collapsed layer. Apply any effect to the layer (even disable it) and After Effects must render the collapsed layer (making it what the Adobe developers call a parenthesized comp, one that has qualities of being both rendered and live). You can then apply a Blending mode, but 3D data is not passed through.
Close-Up: Grow Bounds
Sometimes enabling Collapse Transformations is not desirable—for example, if you set up 3D layers in a subcomp and don’t want their position to be changed by a camera in the Master comp. The Grow Bounds effect overcomes one specific (and fairly rare) problem, where layers in a nested comp are cut off by the comp boundary.
Thus if you want to collapse transformations but not 3D data, applying any effect—even one of the Expression Controls effects that don’t by themselves do anything—will parenthesize the comp. It’s a good trick to keep in your pocket.
After Effects is less rigid than most digital video applications when working with time. All compositions in a given project need not use the same frame rate, and as has been shown, you can change the frame rate of an existing composition on the fly, and keyframes retain placement relative to overall time.
With power comes responsibility, of course, so pay particular attention when you
Import an image sequence.
Create a new composition from scratch.
Embed a composition with a given frame rate into another with a different frame rate.
In the first two cases you’re just watching out for careless errors, but in the third, you might have reason to maintain different frame rates in subcomps, in which case you must set it deliberately on the Advanced tab of the Composition Settings dialog, or apply the Posterize Time effect set to the desired rate.
In addition to the Motion Blur settings introduced in Chapter 2 and detailed in Chapter 8, Composition Settings: Advanced contains two Preserve toggles that influence how time and space are handled when the composition is nested into another.
Preserve Frame Rate maintains the frame rate of the composition wherever it goes—into another composition with a different frame rate or into the Render Queue with different frame rate settings. So if a simple animation cycle looks right at 4 frames per second (fps), it won’t be expanded across the higher frame rate but will preserve the look of 4 fps.
Preserve Resolution When Nested controls what is called concatenation. Typically, if an element is scaled down in a precomp and the entire composition is nested into another comp and scaled up, the two operations are treated as one, so that no data loss occurs via quantization. This is concatenation, and it’s usually a good thing. If the data in the subcomp is to appear pixilated, as if it were scaled up from a lower-resolution element, this toggle preserves the big pixel look.
Two special types of layers that don’t render, adjustment and guide layers, offer extra benefits that might not be immediately apparent.
An adjustment layer is itself invisible, but its effects are applied to all layers below it. It is a fundamentally simple feature with many uses. To create one, context-click in an empty area of the Timeline, and choose New > Adjustment Layer (Ctrl+Alt+Y/Command+Option+Y) (Figure 4.10).

Adjustment layers allow you to apply effects to an entire composition without precomping it. That by itself is pretty cool, but there’s more:
Move the adjustment layer down the stack and layers above it are unaffected.
Change its timing and the effects appear only on frames within the adjustment layer’s In/Out points.
Time any effect in an adjustment layer by setting layer In/Out points.
Use Opacity to attenuate the amount effects are applied. Many effects do not themselves include so direct a control, even when it makes perfect sense to “dial it back 50%,” which you can do by setting Opacity to 50%.
Apply a matte to an adjustment layer to apply an effect to one area of the image.
Add a blending mode and the adjustment layer is first applied and then blended back into the result (Figure 4.11).

Figure 4.11. The ball on the top left was created with a Shape layer. To the right is the ball with a Glow effect applied (default settings), and with the Blending mode set to Normal. The bottom image shows what occurs when the Blending mode is changed to Add: The result of the second ball has been added to the first.
It’s a good idea 99% of the time to make sure that an adjustment layer remains 2D and at the size and length of the comp, as when applied; it’s rare that you would ever want to transform an adjustment layer in 2D or 3D, but it is possible, so don’t let it happen by accident. If you enlarge the composition, you must resize the adjustment layers as well.
Like adjustment layers, guide layers are normal layers with special status. A guide layer appears in the current composition but not in any subsequent compositions or the final render (unless you specifically override this functionality in Render Settings, which kind of defeats the purpose). Common uses include
Foreground reference clips
Temporary backgrounds to check edge transparency
Text reminders (Specific render instructions? Add a text layer with a bullet-pointed list in the render comp and set it as a guide layer.)
Adjustment layers that are used only to check images (described further in the next chapter); a layer can be both an adjustment and a guide layer
Any image layer can be made a guide layer either by context-clicking it or by choosing Guide Layer from the Layer menu. Within the current comp, you’ll notice no difference (Figure 4.12). You can still apply effects to this layer or have other layers refer to it, and it is fully visible. Nest this composition in another composition, however, and the guide layer disappears.

To become an expert compositor is to precisely understand the order in which actions are performed on an image, also known as the render pipeline. For the most part render order is plainly displayed in the Timeline and follows consistent rules:
2D layers are calculated from bottom to top of the layer stack.
Layer properties (masks, effects, transforms, paint, and type) are calculated from top to bottom (twirl down to see the order).
3D layers are of course calculated based on distance from the camera; coplanar 3D layers respect stacking order and behave—relative to one another—like 2D layers.
In a 2D composition, After Effects starts at the bottom layer and calculates any adjustments to it in the order that properties are shown, top to bottom. Then, it calculates adjustments to the layer above it, composites the two of them together, and continues up to the top layer of the stack, while the properties of an individual layer render top to bottom (Figure 4.13).

Tip
The Transform effect allows you to transform before other effects are applied to avoid precomping for this purpose.
So, although effects within layers always calculate prior to transforms, by applying an effect to an adjustment layer above, you guarantee that it is rendered after the transforms of all layers below it.
Tip
Although the UI doesn’t prohibit you from doing so, don’t apply a track matte to another track matte and expect consistent results. Sometimes it works, sometimes it doesn’t.
Track mattes (and blending modes) are applied last, after all other layer properties (masks, effects, and transforms) have been calculated, and after their own mask, effect, and transform data are applied. Therefore, you don’t generally need to pre-render a track matte just because you’ve edited it.
As I work, I organize portions of my master comp that I consider finished into their own subcomps, and if they require any render cycles at all, I prerender them. Failure to commit to decisions—keeping options open—costs time and efficiency. It’s as true in After Effects as it is in life as a whole.
Tip
Preferences > Display > Show Rendering in Process in Info Panel and Flowchart shows what is happening on your system. It is disabled by default because it requires extra processing power; I leave it on because it costs more time not to know.
Pre-rendering a subcomp does, however, lead to a decision about what happens after you render it.
Tucked away in the Render Queue panel, but easily visible if you twirl down the arrow next to Output Module, is a menu of three post-render actions. After the render is complete, you can choose
Import: Simply imports the result
Import & Replace Usage: Keeps the source comp but replaces its use—or that of any other element you choose instead—in the project
Set Proxy: Adds a proxy to the source comp (or any other item you specify)
With either of the latter two, the Pickwhip icon adjacent to the menu can be clicked and dragged to whatever item in the Project panel needs replacement so that if you’ve already created a pre-render or proxy, you can replace it (Figure 4.14).

Proxies have the best potential to speed up your work on a heavy project, but not everyone likes them because their implementation complicates the rendering process.
Any visual item in your Project panel can be set with a proxy, which is an imported image or sequence that stands in for that item. Its pixel dimensions, color space, compression, and even its length can differ from the item it replaces; for example, you can use a low-resolution, JPEG-compressed still image to stand in for a full-resolution, moving image background.
To create a proxy, context-click an item in the Project panel and choose Create Proxy > Movie (or Still). A render queue item is created and automatically renders at Draft quality and half-resolution; the Output Module settings create a video file with alpha, so that transparency is preserved, and the Post-Render Action uses the Set Proxy setting.
Figure 4.15 shows how a proxy appears in the Project panel. Although the scale of the proxy differs from that of the source item, transform settings within the comps that use this item remain consistent with those of the source item so that it can be swapped in for final at any time. This is what proxies were designed to do, to allow a low-resolution file to stand in, temporarily and nondestructively, for the high-resolution final.
By default, the source file or composition is used to render unless specifically set otherwise in Render Settings > Proxy Use. Choosing Use Comp Proxies Only, Use All Proxies, or Current Settings options (Figure 4.16) allows proxies to be used in the final render. To remove them from a project, select items with proxies, context-click (or go to the File menu), and choose Set Proxy > None.

Similar to proxies, but with a different intended use, are pre-rendered elements. With a composition selected, choose Composition > Pre-render and a moving image file is set to render at Best quality, full resolution; the Import and Replace Usage is set for the Output Module.
You don’t have to follow this usage; I have made proxies behave as pre-rendered elements and set my Render Settings to Current so I can choose whether to use the proxy or re-render. Managing that process, however, adds an extra set of steps.
One way to get a lot more power out of After Effects is to improve upon the standard method of rendering, which ties up the application itself, and most of the machine’s processing power, for as long as is needed to output footage.
Almost any production system these days has multiple processors and cores, and this has opened the possibility of background rendering, which allows a render to occur in the background while you continue to work in the foreground.
The last edition of this book mentioned using the command line (in Terminal Unix shell on Mac or the DOS shell in Windows) to run aerender; to do this, you can locate it in your After Effects CS4 folder and drag it into the shell window; then press Enter to get the manual. Arguments in quotes can be added to the command aerender and the location string of the project file.
However, that’s a little complicated and involves typing in commands, not the favorite activity of most visual artist types. For that reason I highly recommend loading a free script from aescripts.com called BG Renderer into the Script UI Panels folder, also in the After Effects CS4 folder. This script automatically sets up the command line not only to render in the background, freeing the open application to be used for more work, but using extra commands such as nice to set the priority and number of processors that you specify.
The aerender command is also key to third-party rendering solutions such as Rush Render Queue (http://seriss.com/rush/). These programs run scripts that manage the process of running aerender on multiple machines (Figure 4.17). The better applications among them, Rush included, are capable of far more than just straight-ahead renders; you can, for example, have one render wait until a certain time or for another one to complete before commencing, and you can automatically requeue renders that fail for any reason.

This type of software is not generally even implemented via a standard installer; required instead are the implementation skills of a system administrator or equivalent technical expert. Most larger facilities have just such a “geek” on staff, and many advanced After Effects users are themselves capable of setting this up in smaller studios.
Alternatively, you can open multiple versions of After Effects including the UI. Although memory intensive, this allows you to actually investigate, compare, and edit two projects at once, which is occasionally handy.
On a Mac, all you need to do is locate Adobe After Effects CS4.app in the Finder (most likely in Applications/Adobe After Effects CS4) and duplicate it (Cmd+D). You now have two versions of the application that will open separately, and you are free to render a project in one version while continuing to work in the other. Give one of them a unique name so you can tell them apart.
On Windows, you can open a second version of After Effects from the command line. From the Start menu, choose Run, type cmd, and click OK. In the DOS shell that opens, drag in AfterFX.exe from your Programs folder and then add “-m” (that’s a space, a dash, and m as in multiple). Voilà, a second version initializes. Write a .bat file and you can do all of this with a double-click. The same basic trick even works in the Mac Terminal.
The slightly senile grandaddy of network rendering on After Effects is Watch Folder. File > Watch Folder looks in a given folder for projects ready to be rendered; these are set up using the Collect Files option. The help topic “Rendering on the Network: Using a Watch Folder” page includes everything you need to know, so there’s no reason to reiterate setup here.
Watch Folder is okay on small, intimate networks, but it has to be set up manually on each machine, and if anything goes wrong, it has to be re-queued. A single machine has so much rendering power these days, it is years since I’ve bothered using it even though my studio is about the right size for it: big enough to have several systems, small enough to have them all in the same physical space.
Adobe Media Encoder is a dedicated render application for certain video formats, including Flash Video, H.264, MPEG-2, and Adobe Clip Notes. Choose one of these in Output Module settings and the Encoder reveals many specialized options having to do with that particular format.
Owners of Adobe Production Premium or Master Collection can also access Media Encoder from Premiere Pro, where it can perform multipass encoding (essential for the best quality compression) and Speech Search, this new ability to convert spoken words on the soundtrack to timed text. Each word shows up as a layer marker, theoretically making it easy to time footage that includes speech, a very cool concept.
Finally, to finish Section I of this book, here’s a clean sweep of preferences, memory management settings, and what do to if After Effects crashes.
The preference defaults have changed in version CS4 and you may be happy with most of them. Here, however, are a few you might want to adjust that haven’t been mentioned yet:
Preferences > General > Levels of Undo: The default is 32, which may be geared toward a system with less RAM than yours. Setting it to the maximum value of 99 won’t bring the application to a grinding halt, but it may shorten the amount of time available in RAM Previews.
Preferences General: Check the options Allow Scripts to Write Files and Access Network to use some of the scripts included with this book. Most advanced users also prefer Default Spatial Interpolation to Linear (Chapter 2).
Preferences > Display: I tend to check all three boxes; I don’t need to wait for thumbnails to update from some network location each time I select a source file, I like to see rendering progress even though it costs processing time (as I said earlier), and I have a good OpenGL card so I hardware accelerate the UI.
Preferences > User Interface Colors: The default UI is darker than it used to be, so I am often fine with its shade. If you like it darker, consider enabling Affects Label Colors so they darken too. Either way, Cycle Mask Colors so that multiple masks applied to a layer automatically have different colors (I have no idea why that’s disabled by default).
After Effects Shortcuts and Preferences are saved as text files that are fully editable and relatively easy to understand, although if you’re not comfortable with basic hacking (learning how code works by looking at other bits of code) I don’t recommend it. The files are located as follows:
Windows: Documents and Settings[user profile]Application DataAdobeAfter Effects8.0
Mac OS: Users/[user profile]/Library/Preferences/Adobe/Adobe After Effects/8.0/
The names of the files are
Adobe After Effects 8.0 Prefs
Adobe After Effects 8.0 Shortcuts
These can be opened with any text editor that doesn’t add its own formatting and works with Unicode. The default applications, TextEdit on the Mac and Notepad on Windows, are acceptable, although there are more full-featured alternatives. Make a safety copy before editing by simply duplicating the file (any variation in the file name causes it not to be recognized by After Effects). Revert to the safety by giving it the original file name should anything start to go haywire after the edit.
The Shortcuts file includes a bunch of comments at the top (each line begins with a # sign). The Shortcuts themselves are arranged in a very specific order that must be preserved, and if you add anything, it must be added in the right place. You can add the line
"NewEffectsLayer" = "(Cmd+Option+Y)"
or on Windows
"NewEffectsLayer" = "(Ctrl+Alt+Y)"
between NewDebugComp and NewLight—this gives you a shortcut to create a new adjustment layer. If you understand this basic format, you can change other shortcuts to be what you like. For example, if you don’t like the fact that Go To Time was changed in CS3 (apparently to align it with other Adobe applications), search for GoToTime and make your changes to the shortcut in quotes after the = sign; "(Alt+Shift+J)" becomes "(Ctrl+G)" on Windows, "(Opt+Shift+J)" becomes "(Cmd+G)" on Mac (but make sure to change the Group shortcut to something else).
Be extra careful when editing Preferences—a stray character in this file can make After Effects unstable. Most of the contents should not be touched, but here’s one example of a simple and useful edit (for studios where a dot is preferred before the number prefix instead of the underscore): change
"Sequence number prefix" = "_"
to
"Sequence number prefix" = "."
In other cases, a simple and easily comprehensible numerical value can be changed:
"Eye Dropper Sample Size No Modifier" = "1"
"Eye Dropper Sample Size With Modifier" = "5"
In many cases the value after the = is a binary yes/no value, expressed as 0 for no or 1 for yes, so if you’re nostalgic for how the After Effects render chime sounded in its first several versions, find
"Play classic render chime" = "0"
and change the 0 to a 1. Save the file, restart After Effects, and invoke nostalgic memories of past renders.
After Effects CS4 projects can be saved as .aepx files. These are identical to use, but are written in plain Unicode text; you can edit them with an ordinary text editor. Most of what is in these files is untouchable, but a few strings, such as source file locations, are easily recognizable.
This feature was added for one reason only: scriptability. Anyone capable of writing scripts to, say, swap source files procedurally (and you know who you are) now has a way to get at this data without having to open After Effects in order to do it.
This feature may open the door to more easily editable properties appearing in an .aepx file in future versions of After Effects, but these files are far from the equivalent of, say, a Shake script, in which every virtually line is easily understood and potentially editable.
Close-Up: On the Mac: Force a Crash
One benefit of After Effects has historically been that it is among the most stable applications in its category, and when it does crash, it attempts to do so gracefully, offering the option to save before it exits. The new auto-save options, if used properly, further diminish the likelihood that you are ever likely in danger of losing project data.
For OS X users, there is an extra feature that may come in handy if the application becomes unresponsive but does not actually crash.
Open Terminal, and enter ps -x (then press Return) to list all processes. Scan the resulting list for After Effects and note its PID (Process ID) value.
Now enter kill -SEGV ### where “###” is replaced by the After Effects PID value. This causes the application to crash with a save opportunity.
In OS X, After Effects can see and use up to 3.5 GB of physical memory. Your machine may have more total RAM than this, but most applications on a Mac are still limited to 32-bit 4 GB address spaces.
On Windows XP, the maximum amount of memory supported for a single application is 4 GB (again, using 32-bit 4 GB address spaces). According to Microsoft, however, “The virtual address space of processes and applications is still limited to 2 GB unless the /3GB switch is used in the Boot.ini file.” Editing this file is out of the scope for this book, so check out microsoft.com for specific information.
Extra memory is most helpful for multiprocessing, because each process has the just described memory potential. With multiprocessing, you could use the maximum memory on an 8 core (or more—only rumored at this writing) system.
You’ve reached the end of Section I (assuming you’re reading this book linearly, that is) and should now have a firm grasp on getting the most out of the After Effects workflow. Now it’s time to focus more specifically on the art of visual effects. Section II, “Effects Compositing Essentials,” will teach you the techniques, and Section III, “Creative Explorations,” will show you how they work in specific effects situations.
Now comes the fun part.