
Chapter 5. Data binding in ASP.NET Web Forms
Data binding plays a central role in ASP.NET Web Forms model. As you’ve seen in previous chapters, ASP.NET Web Forms are based on the notion of server controls. Server controls are objects placed on the page and programmed to offer a result. You can write specific code to intercept events and develop your pages using an event-driven methodology.
Data binding is essential in the ASP.NET ecosystem because web pages are often a gateway to display data coming from different sources, like a database, web service, or object. Data binding offers a simple way to implement the action to bind the data to the form and display the visual results easily.
Data binding itself hasn’t changed in the last few versions of ASP.NET, but server controls and data access strategies have. As you learned in chapters 2 and 3, the past few years have seen the adoption of strongly typed collections versus the initial DataSet approach. New trends, like service-oriented applications and cloud computing, have amplified the notion of data and changed the way we think about storage. Plus, AJAX techniques are considered standard today. The initial concept of data binding has evolved because the environment has also evolved.
This chapter contains all you need to know about data binding in ASP.NET, with a focus on real-world techniques.
5.1. Displaying data
If you’re not familiar with data binding, this section is for you. To understand how data binding influences ASP.NET, take a look at figure 5.1.
Figure 5.1. Data binding is tied into ASP.NET controls. When it’s invoked, the data source is enumerated and its content is associated with the corresponding control.

Data binding is integrated in both pages and controls life cycles, and is specifically tied to some magic performed under the hood by ASP.NET Page Parser.
Data binding-capable controls, often referred to as data controls, are special controls that provide a fast way to display data coming from different sources. From the control perspective, the source must implement an interface from the IList, IEnumerable, or ICollection interface. This requirement is always true for custom collections, data coming from a database using ADO.NET, and generally for LINQ expressions, too.
By setting the DataSource property of these controls, you can programmatically specify the source to be displayed. To avoid errors and simplify your work, these controls generally perform many of the tasks related to displaying data for you. They check for data, cycle through the items, and provide output. These controls are usually based on different templates that render different parts. These templates provide a simple way to personalize the markup to be generated.
Now that you’ve got some background, let’s see how data binding works by looking at our first example.
Technique 26: How to display data using Repeater
Repeater is the simplest data control you’ll find. As its name suggests, it can only repeat the templates specified in the markup. In this scenario, we’ll display a set of customers coming from the Northwind database, mapped using Entity Framework.
Problem
Displaying data from a database is probably the most common action that you’ll perform while coding your applications. ASP.NET data binding can help you be more productive. Let’s discover how this feature works.
Solution
Before starting, let’s take a step back to talk about how templates work. Templates are generally defined in markup, as shown in the following listing.
Listing 5.1. A simple Repeater with templates at work
<asp:Repeater id="MyView" runat="server">
  <HeaderTemplate>
    [Header markup goes here]
  </HeaderTemplate>
  <FooterTemplate>
    [Footers markup goes here]
  </FooterTemplate>
  <ItemTemplate>
    [Items markup goes here]
  </ItemTemplate>
</asp:Repeater>
When the ASP.NET Page Parser finds one of these templates, it automatically converts it at runtime to an instance of System.Web.UI.CompiledTemplateBuilder. (Note that templates are implemented by a generic ITemplate interface.) Later, every time the template is referenced to display the items inside the data source, the same template will be used. This setup has the advantage of letting you define the template via markup, instead of using code.
More About Templates in ASP.NET
We’re going to address templates again in chapter 7, when we talk about custom controls. If you want to know even more about templates, you can take a look at the MSDN documentation at http://mng.bz/1g9v.
To simplify data binding, ASP.NET introduces a specific syntax, which is automatically converted to include an event handler for the DataBinding event:
<%# "Some text"%>
This sequence of characters is interpreted by the Page Parser so that the contained function is called only when the DataBinding event occurs. This event is called only when the DataBind method is explicitly called on the container control. In a simple form, you’ll use the Eval method to extract the data. This method is exposed by the page itself, via the TemplateControl class:
<%#Eval("MyProperty")%>
Eval is a shortcut method that was introduced in ASP.NET 2.0. It maps to Data-Binder.Eval. In this case, the code will look similar to this:
<%#DataBinder.Eval(Container.DataItem, "MyProperty")%>
Both methods automatically retrieve the property MyProperty from the associated data source, via the Container property type IDataItemContainer.
Eval, Databinder.Eval, and Formatting
You can specify a format string to be applied to the property specified by Eval/DataBinder.Eval by simply passing the format as the last parameter:
<%#Eval("Date", "{0:D}")%>
This code will format the Date property, of DateTime type, using the 0:D format (long date). You can find more information about string formatting on MSDN at http://mng.bz/t8xK.
Per convention, the IDataItemContainer interface is implemented by all the templates. The properties of this interface are listed in table 5.1.
Table 5.1. IDataItemContainer interface members
|
Member |
Description |
|---|---|
| DataItem | An Object that contains the reference to the current element, which is taken from the data source. |
| DataItemIndex | The current element index in the data source. |
| DisplayIndex | The current element index in the rendering. Some controls can change the rendering and arrange items horizontally or vertically. |
If you need to display a property from a specific class, you can also use this syntax:
C#:
<%#((MyClass)Container.DataItem).MyProperty%>
VB:
<%#DirectCast(Container.DataItem, MyClass).MyProperty%>
You should choose this syntax over the previous one (Eval/DataBinder.Eval) most of the time. It doesn’t use reflection and it performs better. You don’t need to perform casting because you’re accessing the object directly. This syntax has a true compile-time syntax check, whereas the other will be controlled only at runtime. And runtime errors are a problem because you have less control over their testability.
You can adapt the code in listing 5.1 to show the customers as an unordered list, as shown in the following listing.
Listing 5.2. Adapting the Repeater to display a different layout

The code to retrieve the data using Entity Framework is easy to understand. The code in listing 5.3 is an example so it’s simplified, but you can do the same thing we did in chapter 3: wrap the ObjectContext so it can be shared easily by different pieces of your page. The code that performs the data binding is shown in the following listing.
Listing 5.3. ObjectContext inside the page gets data and performs data binding
C#:
CustomerView.DataSource = ApplicationObjectContext.Current.Customers;
CustomerView.DataBind();
VB:
CustomerView.DataSource = ApplicationObjectContext.Current.Customers
CustomerView.DataBind()
If you run this code inside a browser, it produces a result similar to what’s displayed in figure 5.2.
Figure 5.2. The Repeater produces a list after data binding. You can control the visual layout using the templates.

Because a Repeater has the ability to let you decide what your rendering strategy is and doesn’t add any markup to what you specify, you can adapt the output to your needs.
Discussion
Data binding in ASP.NET is so easy to understand. The power behind this simple syntax is that you can make it universally available without needing to provide different behavior when the data source types change. Repeater is the simplest control you can choose, but ASP.NET 4.0 also has new features for ListView. ListView is a control introduced by ASP.NET 3.5 and represents a complete solution to data binding in ASP.NET.
Technique 27: ListView in ASP.NET 4.0
ListView was first introduced in ASP.NET 3.5 to simplify the problem of choosing a data control. Previously, if you needed to have maximum flexibility, you’d have to choose a Repeater. But this flexibility is limited. Repeaters don’t support editing, inserting, paging, or sorting. If you needed any of those things, you’d need to choose a GridView instead, but that doesn’t support a truly free template; you can use only its columns representation. ListView provides you with maximum flexibility, combining the advantages of the Repeater and GridView.
Problem
Flexibility and control over markup is important. ListView in ASP.NET 4.0 has new features that make it even more useful when you require both. Let’s take a look at them.
Solution
ListView provides more flexibility in defining templates, and, at the same time, adds more support for advanced scenarios than Repeater gives you. This control supports paging, sorting, editing, inserting, and selecting. Generally speaking, it has templates for all the specific states. Support for template types is described in table 5.2.
Table 5.2. Templates supported by ListView
|
Template |
Description |
|---|---|
| ItemTemplate and AlternatingItemTemplate | Represents the templates associated with the item and the alternating item. Generally, the alternating item is omitted because the difference between odd and even items is handled via CSS. |
| EditItemTemplate | Contains the templates to handle the editing process. |
| EmptyDataTemplate | Represents the template used when the data source has no data to display. |
| EmptyItemTemplate | Displays a specific template when the current item is empty. |
| GroupTemplate and GroupSeparatorTemplate | Used to display a specific template when the control is used with the ListView group feature. |
| InsertItemTemplate | Includes a template to be used when inserting a new item. |
| LayoutTemplate | Represents the global template. This control has no specific templates for a footer and header, but uses a global template instead. |
| SelectedItemTemplate | Displays a specific template when an item is selected. |
The simplest implementation that you could use in ASP.NET 3.5 is shown in the following listing.
Listing 5.4. The simplest implementation of ListView in ASP.NET 3.5
<asp:ListView ID="CustomerView" runat="server">
  <LayoutTemplate>
    <ul>
      <li ID="ItemPlaceHolder" runat="server" />
    </ul>
  </LayoutTemplate>
  <ItemTemplate>
    <li runat="server">
       <%#((Customer)Container.DataItem).ContactName%></li>
  </ItemTemplate>
</asp:ListView>
In ASP.NET 4.0, this implementation was simplified, and you don’t need to specify a LayoutTemplate anymore. Omitting the LayoutTemplate can be useful when you’re repeating different kinds of layout, as a series of divs or images. This solution is shown in the following listing.
Listing 5.5. Default implementation of ListView in ASP.NET 4.0
<asp:ListView ID="CustomerView" runat="server">
  <ItemTemplate>
    <div class="customer">
       <%#((Customer)Container.DataItem).CustomerName%>
    </div>
  </ItemTemplate>
</asp:ListView>
Figure 5.3 is the visual result of the markup in listing 5.5, enhanced using CSS.
Figure 5.3. The minimum layout of ListView can produce interesting results. You can combine CSS styles to visually enhance the result.

You can use ListView in advanced scenarios, such as editing or paging. We’ll discuss these features in section 5.2.
Discussion
Even though ListView hasn’t changed much in ASP.NET 4.0, this recap was useful to point out some of its features. If you’re coming from ASP.NET 2.0, you can probably see why ListView is considered the premiere choice among ASP.NET developers when dealing with data binding.
5.2. Modifying data
Displaying data is important, but editing also plays a central role in modern web applications. In the last versions of ASP.NET, editing became easier to implement in Web Forms, thanks to a specific family of controls called data source controls. These controls offer the basic features of data binding, but they implement these features automatically. The idea behind these controls is to avoid writing code so you can concentrate on other aspects of your applications.
Let’s look at how data source controls work so that you can better understand when this kind of control is valuable for your application.
Technique 28: Using data source controls
Data source controls are web server controls, so you have to specify them in markup. To leverage this kind of feature, you don’t have to write C# or VB code.
Problem
We tend to write a lot of repetitive code. When the application is really data intensive, automation that speeds up development might increase your productivity. More productivity with less work? It is possible—read on!
Solution
Data source controls were introduced to simplify two of the most common tasks in web applications: displaying and editing data.
Figure 5.4 shows a schematic overview of how data source controls work. ASP.NET 4.0 contains different data source controls, listed in table 5.3.
Figure 5.4. Data source controls automatically perform calls that instruct the data control. You don’t need to write any code to implement the common scenarios.

Table 5.3. ASP.NET 4.0 data source controls
|
Template |
Description |
|---|---|
| EntityDataSource | Simplifies the use of Entity Framework’s object context. |
| LinqDataSource | Automatically uses LINQ to SQL DataContext or any LINQ-enabled provider. |
| ObjectDataSource | Used with custom entities and collections, against a specific business logic. |
| SiteMapDataSource | Wraps the access to SiteMap, a feature introduced in ASP.NET 2.0 to represent a site structure. |
| SqlDataSource | Can be used with any compatible database provider, such as SQL Server, Oracle, or MySQL. Some providers must be downloaded from the vendor websites. |
| XmlDataSource | Lets you associate an XML document to a data control. |
Of the controls in table 5.3, completely avoid using SqlDataSource. It will embed the queries directly in your markup. Although this will initially speed up your development, you’ll pay the price when maintaining this solution. Because the queries are embedded into the page, you don’t have the business logic. No business logic is a problem from a design perspective because you’re linking together the page and the database.
ObjectDataSource is useful when you have your own business logic, with your defined object model, and you want to use it. EntityDataSource and LinqData-Source, on the other hand, let you automatically leverage Entity Framework’s Object-Context or LINQ to SQL’s DataContext. You can add this control using the Visual Studio designer by simply accessing the smart task list, and then selecting the Configure Data Source option. Figure 5.5 shows the wizard associated with Entity Framework data sources.
Figure 5.5. When you select EntityDataSource, a wizard starts. You can choose which entity and properties you want to display, and enable insert, update, or delete.

All these controls are defined in markup, and you’ll need to use the DataSourceID property of the data control to link them and get the data from the data source. Example markup is shown in the following listing.
Listing 5.6. Using the DataSourceID property to link EntityDataSource to ListView

When you run this code, the results are similar to the example shown in figure 5.3. We changed only the code to retrieve the data, not the template to display it.
Discussion
We personally believe that writing code in most situations is the best option: you’ll have more control over what happens under the hood and spend less time hacking the data source controls to suit your needs. That said, the data source and GridView controls are useful when you’re editing or inserting data, which we’ll talk about next.
Technique 29: EntityDataSource and Entity Framework
In situations where all you need is a simple CRUD (Create, Read, Update, and Delete) GUI over your data, data source controls come to the rescue. Next, we’re going to look at the Entity Framework support offered by the ASP.NET 4.0 data-binding controls.
Problem
Data entry is one of the most used—and most boring to implement—features you have to deal with in modern web applications. You can use EntityDataSource and Entity Framework together to mitigate this problem.
Solution
Entity Framework is our preferred technology to implement data access logic. As an ORM, it has powerful features and the ability to treat the same kinds of operations (create, update, read, and delete) in the same way, with different mapped entities. This ability means that we can be sure that the same logical operational, say, inserting, is performed the same way for all the different entities that we’ve mapped. The magic, as we outlined in chapters 2 and 3, is performed by the Entity Framework engine itself, so we don’t need to handle it manually.
This feature is quite handy when you’re dealing with repetitive code. You’re just repeating the same code again and again, changing only the entity that’s used each time. You’re not really adding anything that’s different from the previous time.
EntityDataSource is specifically designed to work with the Entity Data Model (EDM) and with the newly introduced support for POCO entities.
You need to enable only the following properties to get the respective support from the data source:
- EnableDelete supports deleting
- EnableInsert creates new entities
- EnableUpdate updates existing entities
The following listing contains a simple example of using EntityDataSource (a Grid-View is used for brevity only).
Listing 5.7. Automatically enabling edit, insert, and delete with EntityDataSource
<asp:GridView ID="CustomerView" runat="server"
     AutoGenerateEditButton="true"
     AutoGenerateDeleteButton="true"
     AllowPaging="true"
     AllowSorting="true"
     DataKeyNames="CustomerID"
     DataSourceID="CustomerSource" />

<asp:EntityDataSource ID="CustomerSource" runat="server"
    ConnectionString="name=NorthwindEntities"
    DefaultContainerName="NorthwindEntities"
    EnableInsert="true" EnableDelete="true" EnableUpdate="true"
    EntitySetName="Customers" />
At runtime, the code in this listing produces a grid in which you can edit, sort, page, and work with Entity Framework without writing any code. This grid is shown in figure 5.6.
Figure 5.6. EntityDataSource automatically handles editing, deleting, sorting, and paging. You have to enable the corresponding data control feature; in this scenario, we used GridView.

This solution is extremely powerful. You don’t need to write any code; all you have to do is change the EntitySetName property on the EntityDataSource instance to display (and manipulate) data coming from another table and map it to an entity. This solution also produces the best SQL code possible because it’s converted before being executed. This behavior is contrary to that of SqlDataSource, which performs most of these operations in memory.
Discussion
EntityDataSource supports all the typical features you need: paging, sorting, filtering, and CRUD. Even so, we understand that this solution isn’t optimal in every situation. You gain a lot in terms of productivity, but you lose control over what’s performed behind the scenes. You can use EDM extensibility (especially with POCO entities and n-layers architecture support) to further enforce your logic, but this solution will remain coupled with Entity Framework. If this outcome is acceptable to you, your mileage will be very good.
This feature is one of the most useful ones in ASP.NET when you have to deal with a simple interface to perform data entry operations. These benefits are expanded in Dynamic Data controls, which we’ll address in section 5.4. Before we get to that though, we need to take a look at what’s new in ASP.NET 4.0 for data controls.
Technique 30: What’s new in GridView, FormView, and ListView
Although not revolutionary, ASP.NET 4.0 contains some important tweaks and enhancements over previous versions. Specifically, GridView, FormView, and ListView now contain new features that produce better markup for implementing new scenarios.
Problem
Let’s suppose you’re coming from ASP.NET 2.0/3.5, and you just want to understand what’s new for these controls. If that’s your situation, this scenario is for you.
Solution
GridView, FormView, and ListView appear to be similar. They all display data coming from a data source, but each uses a different layout mechanism:
- GridView, as its name suggests, lets you arrange your data in a grid
- FormView gives you a free template, but supports only one item at time
- ListView is new to ASP.NET 3.5 and simplifies most of the annoyance of the other data controls
Each one has his own strategy; you can find a comprehensive guide to them on MSDN at http://mng.bz/7v8g.
To better understand the new features, let’s look at them now.
Formview
FormView in ASP.NET 4.0 produces better markup than it used to by using the Render-OuterTable property, which is available on other controls, too. (We talked about the RenderOuterTable property in chapter 4.)
With this property set to false, you can remove the outer markup (usually a table) and render only your template code:
<asp:FormView ... RenderOuteTable="false">
...
</asp:FormView>
The default value for this property is true, which avoids compatibility issues.
GridView and ListView
When you select a row in the GridView and ListView controls, the item index is persisted on page change. So, if you selected the first item on the first page, the item remains selected when switching to another page.
To avoid this behavior, ASP.NET 4.0 introduces a new property for these controls, called EnablePersistedSelection. If you set it to true, it doesn’t select the same row index on other pages, but maintains the correct selection across pages.
This behavior is off by default to maintain compatibility, so you have to explicitly set it.
GridView
GridView in ASP.NET 4.0 introduces new support for sorting styles. In previous versions, it was difficult to provide a specific style for the two statuses (ascending and descending). You can now specify a CSS class (or inline style) using two TableItem-Style properties, SortedAscendingHeaderStyle and SortedDescendingHeader-Style, to respectively indicate a style for ascending and descending sorting:
<asp:GridView ID="CustomerList" runat="server"
  AllowSorting="true"
  ...
  SortedAscendingHeaderStyle-CssClass="sortedAsc"
  SortedDescendingHeaderStyle-CssClass="sortedDesc">
  ...
</asp:GridView>
You can then provide an arrow, for example, by simply registering it in your CSS:
.sortedAsc a {
   background:url(asc.gif) right center no-repeat;
}

.sortedDesc a {
   background:url(desc.gif) right center no-repeat;
}
You can also specify the SortedAscendingCellStyle and SortedDescendingCell-Style properties to associate a specific style with a given sorted column:
<asp:GridView ID="CustomerList" runat="server"
  AllowSorting="true"
  ...
  SortedAscendingCellStyle-CssClass="sortdeCellAsc"
  SortedDescendingCellStyle-CssClass="sortedCellDesc">
...
</asp:GridView>
Take a look at the results in figure 5.7.
Figure 5.7. GridView in ASP.NET 4.0 supports a new visual style for sorting. You can use CSS to highlight the column, as shown.

These enhancements to GridView are relatively minor over previous versions, but you can write less code to accomplish the same tasks.
Discussion
These features are merely improvements of existing ones. They’ll make your life easier though, because now you don’t need to manually implement them or leverage some hacks to adapt them to your needs.
Now that you’re ready to display and modify data, the next step is to filter data using some more new ASP.NET 4.0 features.
5.3. Filtering and sorting data
You can filter and sort data by simply modifying the selection routine. With emerging technologies like LINQ, the way we think about filtering and sorting has dramatically changed. Now that we’re accustomed to manipulating data using query expressions in LINQ, the EntityDataSource and LinqDataSource controls can come to the rescue in many scenarios.
ASP.NET 4.0 introduces a new kind of control, called QueryExtender, which unifies and simplifies both data filtering and sorting.
Technique 31: The QueryExtender control
The simplest way to understand how the QueryExtender control works is to use it. This control extends what you can do with filtering and sorting capabilities by using EntityDataSource and LinqDataSource. It also makes these controls similar to use.
Problem
Filtering and sorting are tasks that get repeated in a lot of applications. Our aim in this example is to show you how to simplify them whenever possible.
Solution
Data source controls aren’t terribly flexible when you’re dealing with runtime filtering. These controls are designed to be productive in the design-time world. You have to specify custom parameters using the specific filtering controls. If you want to specify custom filtering strategies, you can’t use a declarative option because there isn’t one.
The QueryExtender control, on the other hand, simplifies this kind of scenario. To use it, you declare it on your page with options, link it to a data source control, and that’s it—you’re done. This kind of control is called a control extender, because it extends another control’s features. You specify the control to be extended using the TargetControlID property. Figure 5.8 contains a schema of this process.
Figure 5.8. QueryExtender is a control extender. It extends the features of the specified control. In this case, the control to be extended is the data source control.

This control works with the IQueryableDataSource interface. This interface is implemented by data source controls in the System.Web.UI.WebControls namespace, such as EntityDataSource and LinqDataSource. If you’re writing custom controls and want to support these features, you must implement this interface.
Basic filtering
The simplest form of the QueryExtender control sorts an existing EntityDataSource. This kind of sorting is shown in the following listing.
Listing 5.8. QueryExtender ties to a GridView to order the results

The markup used here is similar to the corresponding LINQ expression. Note that when you’re dealing with multiple order by clauses, you have to use the ThenBy control, nested inside a main OrderByExpression control.
Design-Time Support for Queryextender
At the time of this writing, Query-Extender doesn’t have design-time support in VS 2010.
From a practical perspective, the controls used to represent the expressions are similar to the corresponding LINQ operators.
Filtering using properties
Filtering is a little more complicated than sorting. The simplest way to filter a data source is to specify a fixed value for a given property.
To filter the customer data source to retrieve only values where the Country property is Italy, you have to write this markup:
<asp:QueryExtender ID="CustomerQueryExtender" runat="server"
  TargetControlID="CustomerDataSource">
  <asp:PropertyExpression>
    <asp:Parameter Name="Country" Type="String" DefaultValue="Italy" />
  </asp:PropertyExpression>
</asp:QueryExtender>
Filtering by a single value couldn’t be easier, could it?
Filtering using a range
With the RangeExpression control you can apply a range filter. You can use two ControlParameter controls in this kind of scenario to tie the high and low values to two controls. In the following listing, we’ll retrieve all the products that have a UnitsIn-Stock property value that’s between the specified values.
Listing 5.9. Specifying a range using the RangeExpression control to filter results

You can see the resulting page in figure 5.9.
Figure 5.9. The RangeExpression data control displays only items whose property matches the range. This control makes this kind of scenario simple—you can use markup instead of code.

If you’ve used the declarative control filters offered by ObjectDataSource, you might’ve found this approach familiar.
In the next example, we’ll take a look at how easy it can be to apply filters using custom methods.
Filtering using custom methods
The truth is that you’ll probably need filters that are more advanced than a simple range. When you do, you can use the MethodExpression controls that work against a classic LINQ query.
To filter using your own method, you have to provide markup similar to that shown in the following listing.
Listing 5.10. Using a custom method and the MethodExpression control to filter data

You have to define the method in your page code, or define it externally by setting the Type property on the MethodExpression declaration:
C#:
public static IQueryable<Customer> GetFilter(IQueryable<Customer>
                                            customers, string companyName)
{
  return customers.Where(c => c.CompanyName.Contains(companyName));
}
Public Shared Function GetFilter(ByVal customers As IQueryable(Of
     NorthwindModel.Customer), ByVal companyNameAs String) As IQueryable(Of
     NorthwindModel.Customer)
  Return customers.Where(
    Function(c)
     c.CompanyName.Contains(companyName)
    End Function)
As you can see, this is a standard LINQ query expression where you can apply all the filtering you need. The important things here are the parameter name and the return type, which must be identical to those defined in markup. You can see the results in figure 5.10.
Figure 5.10. You can add a simple search to your page using a MethodExpression control. Using this control, you can define your own filtering rule quickly.

This example works with strings, but you can also use it to implement complex filtering rules. If you just need to work with strings, you can use a specific control, which we’ll talk about next.
Working with strings
If you need to search strings, you can use the SearchExpression control. The Search-Type property can assume a value that’s between Contains, StartsWith, and EndsWith. This value will influence the operator to be used. The rest of the markup is similar to the previous example:
<asp:QueryExtender ID="CustomerQueryExtender" runat="server"
  TargetControlID="CustomerDataSource">
  <asp:SearchExpression
    ComparisonType="InvariantCultureIgnoreCase"
    DataFields="CompanyName"
    SearchType="Contains
    <asp:ControlParameter Name="customerName"
      ControlID="CustomerName" PropertyName="Text"
      Type="String" />
  </asp:SearchExpression>
</asp:QueryExtender>
Normally, empty values are ignored, unless you set the ConvertEmptyStringToNull property on the filter element to true. If you run this example, you’ll notice that all the customers are shown the first time you run it.
The controls defined inside the SearchExpression are the same ones that you can specify in other filtering scenarios: you can filter by querystring, session, profile, route, controls, and so on. You can even write custom parameters if you need to accomplish specific tasks!
Discussion
You’ve got to be able to filter and sort your data. If you like to write declarative controls to query your objects, the query extender mechanism will fill a gap found in previous versions. If you prefer more control over what’s happening under the covers, you can achieve the same results with code.
In the next part of this chapter, we’ll cover Dynamic Data controls. This feature was introduced in ASP.NET 3.5 SP1. It simplifies common data-entry tasks by using Entity Framework or LINQ to SQL models to automatically generate all the masks used to display, alter, or insert data.
5.4. Working with Dynamic Data controls
Dynamic Data controls are a new wave of declarative controls that enable you to develop simpler data-based applications. Many applications are essentially data oriented; instead of relying on the typical n-layer architecture, they directly manipulate data. The idea behind Dynamic Data controls is to dynamically build the view and editing masks, using Entity Framework’s ObjectContext or LINQ to SQL’s Data-Context. ASP.NET 4.0 supports custom providers using the typical Provider Model design pattern.
If you need to quickly compose an editable area over your mapped objects, Dynamic Data controls are the best answer in terms of productivity. You can literally build an admin area for your sites in seconds.
Technique 32: The first application
Visual Studio 2010 contains two templates specifically targeted to Dynamic Data controls. Choose the right one, depending on whether you’ll use LINQ to SQL or Entity Framework. If you want to build your own provider, which is supported in version 4.0, the route you take might be different.
Dynamic Data controls are a group of controls (both custom and user controls) that leverage some of the most interesting new features of ASP.NET 4.0 (such as URL routing, or query extender).
Problem
The problem that this scenario will solve is simple: provide a dynamic way to display, filter, sort, and manipulate data efficiently. Dynamic Data controls certainly fit the bill.
Solution
To begin your first application based on this feature, you need to create a new project in Visual Studio 2010. The available options are shown in figure 5.11.
Figure 5.11. ASP.NET Dynamic Data controls have two templates in VS 2010. You must choose between a model based on Entity Framework or LINQ to SQL.
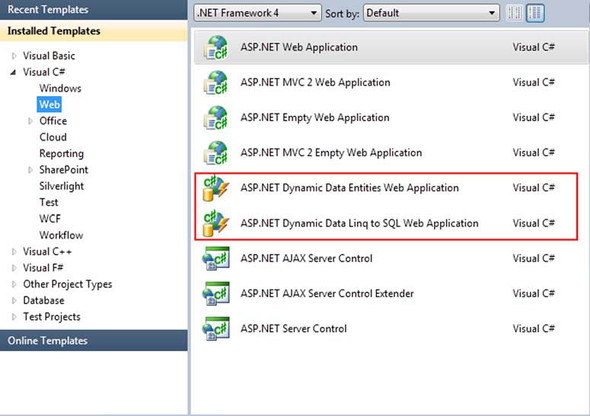
Our application will be based on Entity Framework (using the mapping you created in technique 26, based on Northwind, and that we analyzed in technique 31). Keep in mind that although the templates are similar, you can’t switch from Entity Framework to LINQ to SQL (or vice versa) after you’ve created the project.
A typical Dynamic Data control application is based on the following concepts:
- MetaModel—Represents the logical model
- MetaTable—Contains the representation of the logical table, inside the Meta-Model
- MetaColumn—Represents the logical column, inside the MetaTable
Each MetaTable is inside a MetaModel, which holds all the information about the tables. Each MetaTable contains information about the columns, represented by an instance of MetaColumn. This information is registered at runtime, generally using the RegisterContext method of MetaModel. By default, all the tables and the columns are visible, but you can change that; we’ll tell you how later.
It’s not mandatory to register the model in global.asax, but that’s the default behavior. You have to register the model at startup, and global.asax is the default option. You’ll see code similar to that shown in the following listing.
Listing 5.11. Registering the model in global.asax


In this example, we’re using Entity Framework, but with LINQ to SQL both the code and the concepts are identical. The ScaffoldAllTables property is important because by default its value is false. By setting it to true, you’ll automatically show all the tables in the first page.
When you create a new application based on this project, you’ll notice that all the code is already in place, and you don’t need to write it! A new route is also registered:
C#:
routes.Add(new DynamicDataRoute ("{table}/{action}.aspx")
{
  Constraints = new RouteValueDictionary(new {
                                action = "List|Details|Edit|Insert" }),
  Model = DefaultModel
});
VB:
routes.Add(New DynamicDataRoute("{table}/{action}.aspx") With
{
  .Constraints = New RouteValueDictionary(New With {
                                .Action = "List|Details|Edit|Insert"}),
  .Model = DefaultModel
})
Dynamic Data controls work with a friendly URL, such as /Products/List.aspx. You can change the generated URL to reflect your needs. You can protect these URLs using standard authorization and authentication features from ASP.NET, such as UrlAuthorization and FormsAuthentication. When you’re running the project, you’ll receive a list of tables, shown in figure 5.12.
Figure 5.12. The default page in Dynamic Data will display the list of mapped entities. In Dynamic Data, mapped entities are called tables.
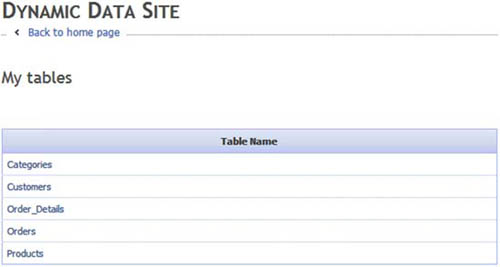
If you navigate to each table, you can see how the controls perform in different situations, such as filtering, paging, or inserting.
From a technical point of view, the page templates are defined under the Dynamic-Data/PageTemplates directory. The magic is performed by a special control, DynamicControl, which works with GridView and DetailsView to display fields dynamically. Traditionally, you had to use these controls with hard-coded fields, which limits the possibility of providing flexible masks. These controls have been adapted to work easily with these new features provided by Dynamic Data. You can also use other controls, like ListView or FormView, using the same approach.
Integrating Dynamic Data Controls in Existing Sites
If you need to integrate this feature in existing applications, you need to copy the DynamicData directory and global.asax. You can set a different directory for the template using the DynamicDataFolderVirtualPath property on ContextConfiguration, as explained on MSDN at http://mng.bz/nNS4. You can read more about adding Dynamic Data to an existing website at http://mng.bz/uQn7.
The interesting part is that DynamicControl works with invisible, but useful, information called metadata. You can use the data annotations features from the System.ComponentModel.DataAnnonations namespace to decorate the classes and to provide additional information that Dynamic Data controls can read to understand how a column is composed, which type it holds, and so on. Data annotation is a transversal concept, and can be used outside Dynamic Data controls. For example, ASP.NET MVC uses it to automatically build the UI associated with a given model.
Discussion
Dynamic Data controls present a powerful technology that simplifies data entry, where your data strategy coincides with your mapped model. Thanks to data annotations, Dynamic Data controls automatically provide form validation, based on the metadata available. The rendering is associated with specific controls, depending on the data type.
Believe it or not, you can extend this behavior even further. You’re going to see that in the next scenario.
Technique 33: Working with metadata and templates
Dynamic Data controls work with templates, for both views and data types. Each column is rendered according to its type, using a simple mechanism. You can alter this behavior to achieve different results.
Problem
When you’re dealing with mapped entities coming from a database, the database schema infers some metadata information, such as data type, maximum length, and so on. When data is being displayed, the column name, the validation, or the UI data type might differ from the underlying database schema. Sometimes, you might need different templates.
Solution
Dynamic Data templates are grouped by type. Page templates are in the Dynamic-Data/PageTemplates folder, where each page represents a different action:
- List.aspx —Contains a GridView, used to display data. You can specify foreign keys, boolean values, and custom filters using a special control, called DynamicFilter.
- Edit.aspx —Contains a DetailsView, used to display the data while in editing.
- Insert.aspx —Used to insert a new item, using a DetailsView.
- ListDetails.aspx —Can be used to override List.aspx behavior. Provides, on the same page, both a list and edit panel, using a master/detail approach.
All the templates share a common base, using a DynamicDataManager to instruct the data controls, a ValidationSummary to display validation errors, and an UpdatePanel to provide AJAX capabilities, using ASP.NET AJAX (see chapter 12).
Changing the display behavior
Each column is rendered according to its data type, using the appropriate template in the DynamicData/FieldTemplates directory. Table 5.4 describes the types that are supported.
Table 5.4. Default field templates in Dynamic Data
When the type of a column is a non-primitive data type, data annotations come to the rescue. Using the DataTypeAttribute attribute from System.ComponentModel.DataAnnotations, you can specify a type that’s more specific than the CLR type. Using the templates listed in table 5.4, you could map a string property to be represented by the Url template, or by MultilineText. The CLR type, in this kind of situation, remains System.String, but for display purposes you would use a more specific one.
Because we’re working with autogenerated entities, we need to use an attribute called MetadataType to tell Dynamic Data which class contains metadata information. If you’re using Entity Framework’s POCO support (see chapters 2 and 3), you can use the attribute directly. An example of using MetadataType is shown in the following listing.
Listing 5.12. Extending the Customer entity with custom attributes

Generally, the DataTypeAttribute holds one of the values from the DataType enum. (You can fine more information about this enum on MSDN at http://mng.bz/7d3n.) You can specify a string, which forces Dynamic Data to use the corresponding custom template. We’ll talk about custom templates in technique 34.
To just control the selected control, without altering the data type, you can use UIHintAttribute, which is specifically targeted at visual rendering. When you specify this attribute, Dynamic Data bypasses the DataTypeAttribute value, which can be accessed in the corresponding custom field template.
Changing the display format
If you need to change how the value is handled at display time, you need to use DisplayFormatAttribute. This attribute has interesting properties that handle the format string, null display text, and whether the display should be applied in editing:
C#:
public class ProductMetadata
{
  [DisplayFormat(ApplyFormatInEditMode = false,
                 DataFormatString = "{0:C}",
                 NullDisplayText = "not set")]
  public decimal UnitPrice {get; set;}
}
VB:
Public Class ProductMetadata
    <DisplayFormat(ApplyFormatInEditMode := False,
                   DataFormatString := "{0:C}",
                   NullDisplayText := "not set")>
    Public Property UnitPrice As Decimal
End Class
You can see an example in figure 5.13.
Figure 5.13. A custom display format is applied to the UnitPrice property. The results will influence how the data is rendered.

This attribute is useful because it provides an advanced format specific to the corresponding attribute and column combination.
Changing the display name
The model is used to represent the entities, which aren’t directly exposed to your users. For this reason, you can specify a display name that’s used to provide a better display name, using DisplayNameAttribute. You can find the results in figure 5.14.
Figure 5.14. You can specify a custom display name (in this example, Price instead of UnitPrice). Using custom names makes your page more user-friendly.

The corresponding code is simple:
C#:
public class ProductMetadata
{
  [DisplayName("Price")]
  public decimal UnitPrice {get; set;}
}
VB:
Public Class ProductMetadata
    <DisplayName("Price")>
    Public Property UnitPrice As Decimal
End Class
If you need to specify a description, you can use DescriptionAttribute.
Hiding tables and columns
You can hide tables and columns from the layout completely by setting the Scaffold-Table or ScaffoldColumn property. To hide the Product table, you can use this code:
C#:
[ScaffoldTable(false)]
public class ProductMetadata
{
}
VB:
<ScaffoldTable(false)
Public Class ProductMetadata
End Class
If you need to hide a column, the code is similar.
Discussion
Dynamic Data controls are designed to be extensible. You can control every aspect of page layout and data manipulation, using the data annotations to add specific meaning to tables and columns. If you need to extend its capabilities even more, read on. We’re going to talk about address validation, custom templates, and searching.
Technique 34: Extending Dynamic Data
It’s easy to extend Dynamic Data and use advanced features, such as validation or searching. You can achieve interesting results by leveraging specific attributes.
Problem
In a typical application, you need to validate user input, use a custom template, and integrate your own search criteria. Let’s see how you can integrate these features into Dynamic Data.
Solution
Validation is probably the most requested feature in data entry. You can’t simply trust the user input; you need to provide a validation mechanism. We’ll start our solution with this problem.
Validation
Dynamic Data uses the attributes of data annotations to perform validation. You can find more information about all the attributes at http://mng.bz/nqz1.
The most interesting attributes for validation are presented in table 5.5.
Table 5.5. Data annotation attributes used in validation
|
Template |
Description |
|---|---|
| CustomValidationAttribute | New in ASP.NET 4.0. Using this attribute, you can define rules attached to the entity. |
| RangeAttribute | Can be used to specify the valid value range. |
| RegularExpressionAttribute | Contains a regular expression to validate the property value. |
| RequiredAttribute | Marks the property as required. |
| StringLengthAttribute | Defines the string length. |
| ValidationResult | Used in custom validation attributes to represent the validation result. |
If you want to specify that the UnitPrice property on Product is mandatory and that its value must be between 0 and 100, you’ll write the following code:
C#:
public class ProductMetadata
{
  [Required]
  [Range(0, 100, ErrorMessage="Valid only between 0 and 100")]
  public decimal UnitPrice;
}
Public Class ProductMetadata
  <Required>
  <Range(0, 100, ErrorMessage := "Valid only between 0 and 100")]
  Public UnitPrice As Decimal
End Class
If you run the Dynamic Data site using this modified property, you’ll get the result shown in figure 5.15.
Figure 5.15. Dynamic Data validation is based on data annotations. You can use attributes to specify custom rules that maintain data consistency.

You can also provide validation using LINQ to SQL or Entity Framework extensibility. Data annotations use attributes and are easier to use in simple scenarios like this one.
Building a custom template
To build a custom template, you need to create a new user control under the DynamicDataField-Templates directory. The control must derive from System.Web.DynamicData.FieldTemplateUserControl, which is the base class used by Dynamic Data to define custom templates.
You can define two custom templates: one for the display status and the other for the editing. The edit template must include _edit after the template name and before the .ascx extension. If you omit the edit template, the default one for the type will be used.
To specify a custom template, you must use the UIHintAttribute attribute:
C#:
[UIHintAttribute("Phone")]
public string Phone { get; set; }
VB:
<UIHintAttribute("Phone")
Public Property Address As String
Save the Phone template inside Dynamic Data’s template directory. To create a simple template, you can use one of the existing ones as a starting point. In our case, the most similar is the Url template, so our new template code will be similar to that shown in the following listing.
Listing 5.13. Defining a custom field template to display phone number


In our example, the Phone property will be rendered as a hyperlink, using the callto protocol to automatically initiate a Voice over Internet Protocol (VoIP) conversation by clicking on the phone number. The resulting page is shown in figure 5.16.
Figure 5.16. The custom template for the phone number in action. You can specify custom behaviors and provide better usability for your users.

You can extend this approach even further to use it on a complex type. You can use it to attach a WYSIWYG (What You See Is What You Get) editor to specific properties or to provide custom behavior for your application. By inspecting the existing template, you can learn a lot and create your own implementations.
Custom filter templates
You can customize the search mechanism by writing filter templates. Similar to display templates, you save a filter template under DynamicDataFilters, and the user control must inherit from System.Web.DynamicData.QueryableFilterUserControl.
To implement this behavior, you must understand how IQueryable works and know something about LINQ, lambda, and Func<T>. You can read more about this topic on MSDN at http://mng.bz/YKP4.
Discussion
You can enhance and customize Dynamic Data controls to suit your needs. The new version available with ASP.NET 4.0 introduces some new, long-awaited features, like custom filters, custom page templates, new templates, and better integration with existing and custom providers.
If you need to provide a dynamic data entry interface, you can do it easily with Dynamic Data controls.
5.5. Summary
Data binding is a central topic in every ASP.NET application. Data binding isn’t necessarily tied to a database as a data source. You can, in fact, get data from different kinds of sources, and perform the same step to display the data. This is the first advantage of using data binding: you can use the same techniques to display data coming from different sources.
ASP.NET supports data binding in different ways, by providing specific controls to display data (called data controls) and other controls to get data without writing code (called data source controls). You’ll find that using controls to get data is useful in some situations, and you can always write code if you prefer more control over the results. The important thing to remember is that the data controls can display data, and provide sorting, paging, and editing capabilities. You choose whether you want to automate ASP.NET data source controls, or if you just want to write code.
Dynamic Data controls have a new, exciting platform that you can use to build powerful, visually rich data entry forms without writing code. Instead, you use the power behind Entity Framework and LINQ to SQL, which you can extend in ASP.NET 4.0 to custom providers. You can enhance the platform by writing specific code and achieve interesting and useful results.
We’ll continue our examination of ASP.NET Web Forms by looking at how you can use custom controls to enhance componentization. Let’s get to it.