
Chapter 13. State
Web applications are stateless by nature, which means that you don’t have a native way to handle state. If you’re familiar with desktop applications, you know that state plays a central role in a typical application. For example, you can save your users’ preferences and let them find their preferences again next time they use the application. Even though no native way exists to handle state as per the HTTP protocol, modern application frameworks (like ASP.NET) provide a lot of features in this area. Depending on your needs, you can manage state at different levels—on the client or on the server. Generally, state handling is performed server side, where the data is stored.
The objectives of handling state are disparate: you can store user settings or save frequently requested objects to avoid the cost associated with fetching them every time. The objects can be stored with a lifetime that varies, depending on the approach that you choose, but typically, you have a lot of possibilities.
This chapter contains an overview of the most frequent scenarios, and the next one analyzes caching strategies, which are often treated as a special kind of state. We decided to separate these topics so that we can cover all these techniques in depth.
13.1. Handling state
The typical ASP.NET application contains different state management techniques that are related to different scopes. Some data needs to be volatile but available for the entire request lifecycle, on a single-user basis; other kinds of information need to be available to all users.
13.1.1. What is state?
To make things clear and to ensure that we approach the problems presented in this chapter with the right background, you need to understand some basic concepts. First of all, state is the ability to manage the lifetime of an object in a given interval. When we manage an object’s state, we can make it persistent to gain speed. In fact, most of the time this object needs to be retrieved from a source (like a database); retrieving the data is the most expensive part of the process. On the other hand, modern hardware has a lot of memory, so it’s possible to store these objects in memory, ready to be used. Storing objects in memory is the preferred way to store them, but they can also be stored on disk. Disk access has a more negative impact on performance than memory access does, but disk storage is useful in situations where the object materialization is expensive and an adequate amount of free memory isn’t available.
Generally, we’ll approach this problem by splitting state handling into three main scenarios, depending on how we want to span the object’s lifetime. In this chapter, we’re going to analyze the following kinds of state:
- Per-request
- Per-session
- Per-application
ASP.NET provides different answers to the questions related to these scenarios. We’re going to take a look at each of them, but per-application state is analyzed in chapter 14, in the context of caching.
Technique 80: Per-request state
Per-request state is the simplest form of state handling. The state of an object is saved across the entire request for a given page. You can share the instance of an object for the request and re-create it on subsequent requests.
Typically, you handle per-request state using ViewState, which we introduced in chapter 1. ViewState is important in ASP.NET Web Forms and acts as a bag in which to store information across the same group of requests performed on a page. It’s not a true per-request state bag because it’s available after the request itself, but neither is it a per-session bag because its scope is limited to a given page. If you need to store values that can be accessed in the same request, other options are available. Eventually, we’ll talk about all of them.
Problem
ViewState is both a joy and a pain for ASP.NET developers. You can use it to maintain the status across the different requests on a given page, but because it’s saved in a hidden field, it consumes bandwidth if it’s not used correctly. In this scenario, we’ll take a look at how to save an object’s state using ViewState and avoid re-creating the object.
Solution
ASP.NET 4.0 introduces a new ViewState feature that minimizes the impact ViewState has. Before ASP.NET 4.0, the best practice in terms of ViewState was simple: disable it on every control that doesn’t need it. Figure 13.1 shows the ViewState behavior.
Figure 13.1. How ViewState works. LoadViewState and SaveViewState events are raised between Init, Load, and Render states. This process is repeated by every control on the page (and by the page itself).

The reality is that this best practice is quite often ignored, and a lot of bandwidth is wasted because developers don’t follow it. Before ASP.NET 4.0, ViewState couldn’t be disabled on a parent control because doing so would impact the children controls. This behavior wasn’t flexible enough because each container control has to be handled carefully.
ViewState in ASP.NET 4.0
ASP.NET 4.0 introduces a new property called ViewStateMode that’s defined in System.Web.UI.Control. The ViewStateMode property requires that the ViewState attribute be set to true to work; otherwise, its content is ignored. You can set this property to the following values:
- Inherit
- Enabled
- Disabled
The first option is the default and inherits the container setting, but the last two are more interesting. When the value is set to Disabled, the control stops using the ViewState, but its children can override this behavior and explicitly set it to Enabled. By doing so, the nested controls can have their own state, even if the container has it disabled. Because the property is defined by Control, the page itself has this ability. You can define this property on the page and enable it only when it’s used. Enabling the property only when you need it is a much better practice than having it on all the time.
As in previous versions, you can use a lot of controls without ViewState if you can get their value directly after a PostBack. Such controls include TextBox, DropDown-List, and similar controls, when their value is accessed after the initial load of the page. The following snippet shows an example of this scenario:
<%@ Page ViewStateMode="Disabled" ... %>
<asp:Label runat="server" ID="DisabledText" />
<asp:Label runat="server" ID="EnabledText" ViewStateMode="Enabled" /  >
<asp:Button runat="server" ID="SubmitButton" Text="Submit" />
If you want to optimize your application, remember that ViewState can be your best friend if you use it correctly and your worst enemy if you abuse it.
Context.Items
Another useful container in per-request scenarios is Context.Items. This container is especially useful when you want to store information that can be accessed by all the actors in a typical request: HttpHandlers, HttpModules, the page, and its controls. It acts as a state bag that can be shared easily, by simply accessing HttpContext:
C#:
HttpContext.Current.Items["siteName"] = "My Site";
VB:
HttpContext.Current.Items("siteName") = "My Site"
Context.Items is often used to instantiate—and handle—an object per-request, like it does for the Entity Framework’s object context, which we talked about in chapters 2 and 3. But it’s also useful when you simply want to share a value along the entire request pipeline.
Discussion
Per-request state has the limitation of being useful only in simpler scenarios where you need to store a value for the request (or a group of requests to the same page, as with ViewState and PostBack). This approach works for the typical flow of a data entry page, to save the objects’ state across different requests.
In other cases, you’ll find it more useful to save the state across a group of requests that are not linked to each other. In this kind of situation, per-session state is the answer to your questions.
Technique 81: Per-session state
As its name suggests, per-session state can save the state across a session. Depending on what technique you use, the notion of session might vary. To be generic, a session starts with the first request made by a user and ends with his last one. Because we’re in a stateless environment (HTTP as a protocol is, in fact, stateless), the last request can’t be estimated so a timeout from the current request is used. If, after that amount of time, no other requests are made, the session is considered closed. In other situations, however, closing the browser has the same effect. Let’s take a look at how ASP.NET supports these scenarios.
Problem
Per-session state can be handled in different ways; your strategy will vary, depending on the data type used and its sensitivity. Per-session state can also be impacted by your application architecture. By handling per-session state, you’ll be able to span the object’s lifetime across multiple requests made by the same user.
Solution
The most common form of per-session state is called session state. If you’re not familiar with ASP.NET, the concept is simple: the state bag is available only to the same user, during that user’s session. After the session closes, the state bag is automatically destroyed. The data in the state bag can’t be stored automatically, but you can write code to perform this action if you need to. Figure 13.2 contains a schema that shows how this mechanism works.
Figure 13.2. Session state works by saving different users’ data into separated storage. The data is available for the user’s entire session.

Session can be accessed via Page or HttpContext, depending on the location of your code. By default, when the session starts, the SessionStart event is fired; at the end, the SessionEnd event is invoked. You can intercept them using a custom Http-Module or with the global.asax.
Session state implements the Provider Model design pattern, so you can write a custom provider to save it to a location other than memory. ASP.NET includes support for SQL Server and State Server.
Sessionend with Out-of-Process Providers
SQL Server, State Server, and custom out-of-process providers are designed to work in distributed scenarios where a cluster of two or more servers exist. In this kind of situation, the SessionEnd event won’t fire because different requests can be executed by different servers, and a synchronization mechanism doesn’t exist. To avoid multiple execution of this event, the event is simply not fired at all.
Generally, session state is maintained using a cookie that contains a special key called ASP.NET_SessionID. This cookie is sent between all the requests made by a given user. ASP.NET also supports a cookieless mode, in which browsers without cookie support receive the ID in the URL. If you configure your site using the AutoDetect option, ASP.NET tries to generate a cookie on the first request and, if that’s not supported, it automatically switches to the cookieless mode. To take advantage of this feature, you need to enter this configuration in your web.config:
<configuration>
  <system.web>
    <sessionState cookieless="AutoDetect" />
  </system.web>
</configuration>
More generally, you can set additional properties in your web.config, like the cookie name, a custom timeout, and the providers (via the mode and customProvider attributes).
Values saved in session consume memory (if you use the default InProc provider, it consumes the server’s memory). For this reason, you must use session state carefully. Because there’s virtually no limit to object size, session state is often used in complex scenarios to make an object available across multiple requests. Session state can contain any serializable object and its content is secure because only the SessionID is sent to the client.
Session compression in ASP.NET 4.0
ASP.NET 4.0 has a new feature that minimizes the amount of space that the session state bag occupies. When you’re dealing with a complex application and out-of-process providers, session state’s global dimension can grow quickly and slow down your application. When you’re using the two out-of-process providers (for SQL Server and State Server), you can enable the compression by setting the compressionEnable attribute in web.config to true.
Enabling compression will serialize (and deserialize) objects from session state and will compress (and decompress) them using the System.IO.Compression.GZip-Stream class, which applies a gzip algorithm. This feature will add a little overhead in terms of CPU cycles, but it will minimize the amount of space that the session state takes up, in terms of memory consumed. If you’re using a custom provider, you can add the same behavior by using a similar approach.
Using Windows Server AppFabric session provider
When we were writing this book, Windows Server AppFabric was released in version 1. AppFabric is a distributed caching engine that consists of a set of features that can support cache sharing across multiple, different servers. Because session state is a form of cache, you can use AppFabric in this scenario, too. You can use it so that the same session state is synchronized across different web servers in the same cluster (even geographically, if you need to go that far).
You can download a provider for session state from http://www.mng.bz/oD7O. You can also use AppFabric Caching APIs directly if you need to (this provider is an implementation of these APIs).
We’ll cover this aspect of Windows Server AppFabric, as well as the configuration needed to start, in the next chapter. For now, we’re going to turn to cookies.
The alternative: cookies
If you don’t want to impact your server’s memory, or if you prefer to support a cluster, the only real alternative that you have is to store your data in cookies. A cookie can be made persistent by adding an explicit expire date or made valid until the browser is closed if the expire date is omitted.
Generally, using a cookie is a good idea if you just need to represent simple data: strings, objects, date, and so on. But, when you’re dealing with complex objects, its size limitation (4096 bytes) can be an issue. Don’t use cookies to store sensitive information unless you’re encrypting them. Cookies can be accessed using the Cookies properties on the HttpRequest class. More information is available on MSDN at http://www.mng.bz/3Q0T.
Cookies represent a feasible alternative when the data can be represented in strings and you don’t need to handle complex scenarios.
Discussion
Per-session state is important because it lets you easily share the same state across different requests. You can use it to handle different needs: from storing user information to spanning the lifetime of an object instance. You can implement different techniques to support these different scenarios, each with pros and cons over the others. When you’re dealing with session state, for example, the memory impact on the server and the need for synchronization over a cluster are important issues that you need to target specifically. ASP.NET supports different options for implementing per-session state, but most of them can’t span across multiple sessions. In these scenarios, you’ve got to use a specific feature: the Profile API.
13.2. Advanced user state
Session state is considered the simplest form of per-session state handling. In advanced scenarios, you’ll need more features, like the ability to store the state and have it available for different sessions performed by the same user. Session state is limited in this area, but ASP.NET has a specific feature that addresses this problem.
The Profile API was first introduced with ASP.NET version 2.0, as part of the Provider Model, which brings more extensibility to the platform. We took a look at the Provider Model in chapter 5, when we discussed the Membership and Roles APIs. The same concepts apply to the Profile API. This API is composed of two pieces:
- The API itself, which is called by the user
- A base class, used to implement the provider
Because all the providers share the same base class, the API can be safely used as a façade to access the real implementation.
The idea behind the Profile API is simple: it’s a user-defined storage, which can be persisted across different sessions. Depending on the provider implementation, the storage might be a system-defined SQL Server database or a different container. By implementing a custom provider, you can decide how to store information in the database.
To use the Profile API, you need to first set up the environment. Let’s do that now.
Technique 82: Using the Profile API
The Profile API is easy to use because, as for the Membership and Roles APIs, a default provider exists. This provider will work against a system-defined SQL Server schema, which you can’t extend. Before we talk about customer providers, we’re going to introduce the API itself and show you how to use it.
Problem
You need to save information across multiple sessions, in complex forms, with less effort. We’re talking about user properties, like full name, preferences, and so on. You also want to be able to change the provider easily, in order to have new storage ready to use, by leveraging the Provider Model.
Solution
The Profile API is your best bet in this situation. To start with, the default provider, as outlined in chapter 5, you need to launch the aspnet_regsql.exe from C:WindowsMicrosoft.NETFrameworkv4.0.30319. The wizard will create all the tables and stored procedures used by the Membership, Roles, and Profile APIs; if you’ve previously executed it (maybe you’ve already configured the Membership API), you’re ready to start.
The next step is to configure the provider in web.config, as shown in the following listing (the node is located under configurationsystem.web).
Listing 13.1. Profile API configuration is made in web.config

Now that the provider is configured, you need to define the Profile properties.
Adding properties
The Profile API, in a nutshell, is a strongly typed interface where the properties must be specified before they can be used. You have two options for accomplishing this task:
- Define your properties in the web.config
- Create a class that inherits from ProfileBase, in the System.Web.Profile namespace
The Profile API for Anonymous User
The Profile API can also be used with an anonymous user. This feature, called anonymous identification, is covered on MSDN at http://www.mng.bz/YD2e.
If you opt for the first option, you need to define the properties in web.config, using the syntax contained in the following listing.
Listing 13.2. Defining the profile’s properties in web.config
<profile>
  <properties>
    <add name="FavoriteSkin" type="string" serializeAs="String" />
     <group name="UserProfile">
      <add name="FirstName"/>
      <add name="LastName"/>
      <add name="BirthDate" type="DateTime"/>
    </group>
  </properties>
</profile>
You can also use a custom type for your properties, but keep in mind that the types need to be serializable. You can control the serialization mechanism used by defining the serializeAs attribute, which you can set to Binary, String, Xml, or ProviderSpecific.
The Profile API and Web Projects
The definition of the properties in web.config can’t be used with a web project, but only with a website. If you need to use the Profile API in a web project, you need to opt for the definition on a class that inherits from ProfileBase.
After you’ve configured the provider, Visual Studio will automatically let you access the properties, using the Profile class, while you’re in Page or UserControl. If you take a look at Page properties, you might notice that a Profile property doesn’t exist. It is, in fact, what is often referred to as syntactic sugar: the compiler (and Visual Studio) knows that, at runtime, a special class will be created, using the options defined in web.config.
If you opt for the base class, you need to define a class (as already noted) and register it with the inherits attribute under configurationsystem.webprofile:
<profile... inherits="ProfileAPI.MyProfile">
Now that you’ve added your properties, you need to learn how to access the user profile and save the related properties.
Retrieving and saving the properties
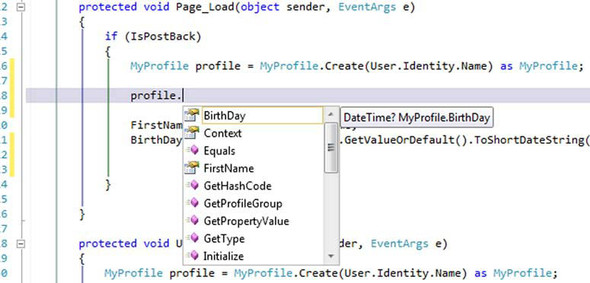
If you take a look at Visual Studio, the result at this point is quite interesting because IntelliSense shows the property, mapped with its defined type. You can take a look at figure 13.3 to understand what we’re talking about.
Figure 13.3. The Profile API’s properties are visible via IntelliSense. Because they’re strongly typed, IntelliSense will show this information, too.
You’ll be able to see the properties, whether you define your properties in web.config or create a class that inherits from ProfileBase.
To retrieve a value, you just need to write this simple and straightforward code:
C#:
string skin = Profile.FavoriteSkin;
string firstName = Profile.UserProfile.FirstName;
VB:
Dim skin as String = Profile.FavoriteSkin
Dim firstName as String = Profile.UserProfile.FirstName
If you previously defined a group property in your configuration, a complex type is automatically generated for you; the inner properties must be accessed using the specific syntax shown in the previous snippet.
If you need to save a value, the code isn’t much different:
C#:
Profile.FavoriteSkin = "ocean";
Profile.UserProfile.FirstName = "Daniele";
Profile.Save();
VB:
Profile.FavoriteSkin = "ocean"
Profile.UserProfile.FirstName = "Daniele"
Profile.Save()
The result for a similar page, in which the user can enter the values, and then the Profile API saves them, is shown in figure 13.4.
Figure 13.4. Profile properties can be read and saved easily. They’re persisted across future requests, so the user will find the properties when they return to the website.

By default, a property is saved when its value is assigned. You would do better to disable this behavior (as we did) by setting the automaticSaveEnabled property to false; you’ll improve performance if you do. If you go this route, you need to manually call the Save method to ensure that all the properties are saved correctly. Be sure you remember to do so; otherwise, you won’t save the data that’s in the user profile.
Working with the Profile API and web projects
If you’re using a web project instead of a website, or if you’re outside a page, the previous code snippets won’t work. In these scenarios, you need to directly reference the Profile property on HttpContext.Current. If you’re using a custom class, you need to cast to that; otherwise, you can cast to ProfileCommon, which is a special type built for you by ASP.NET that also inherits from ProfileBase.
Let’s imagine that we built a custom type for our profile, like the one in the next listing.
Listing 13.3. A custom profile implemented in code

Dim firstName as string = DirectCast(HttpContext.Current.Profile,
                                     MyProfile).FirstName
Except for the type we’re using, this code is the same as what you need to use when you’re using a website.
Discussion
The Profile API is simple to use, but it’s powerful. You can map the properties in web.config if you’re using a website, or you can define a custom class (which is mandatory if you’re using a web project). The power behind the Profile API makes using this approach interesting because you can easily integrate it into existing applications. A user profile takes a membership profile to the next level: it contains additional information about the user. This information isn’t vital to the identification of the user, but it completes the user’s navigation experience.
Although the default provider is configured to support any type of profile properties, it’s of limited use in real-world scenarios. Because it uses a single column to contain all the properties, you’ll run into problems if you need to perform statistics or use this information outside the web application. In such a situation, a custom provider is a better idea.
Technique 83: A custom provider for the Profile API
We’ve already analyzed the implications of building a custom provider in chapter 5, when we introduced the Membership and Roles API. Because the Profile API is also implemented using the Provider Model pattern, you can easily change the implementation, without touching the rest of the code. In this scenario, we’ll show you how to do that.
Problem
The Profile API’s default provider (called SqlProfileProvider), included in ASP.NET, has a table structure that isn’t normalized. In fact, it uses two fields: one containing the property names and another with the corresponding values. This structure is flexible enough to be used in virtually any project without changing the database schema, but it has a major limitation: it mixes different properties together. This limitation makes it virtually impossible to query the data from outside the provider. We need to implement a provider that lets you do that.
Solution
The Provider Model is useful because you can write all the code and then replace the implementation. When your site grows and you want to change the inner implementation, you’ll find your life is a lot simpler. In the previous scenario, you learned how to use the API; this time, the scope is to change the storage implementation and save the information in a custom table, in which each property is mapped to a table column.
The table schema from the built-in provider and our custom table schema are shown in figure 13.5.
Figure 13.5. On the left is the default database schema. On the right is our custom one. Our provider is based on one column per property that’s defined in the user profile. With this setup, we can query the data directly because it’s normalized.

This provider, in contrast with our custom Membership and Roles providers, will use ADO.NET directly because the query will be generated dynamically. For brevity, the provider will use the SQL Server managed provider directly, often referred to as SqlClient (because its namespace is System.Data.SqlCient). If you need to target another database or write a generic implementation, you’ll need to rewrite some parts of it.
The idea behind this provider is quite simple: given the properties specified by the profile, it will generate the best query to get the result from the database and then load it into the profile itself. When it’s saved, the provider will check for modified properties via the IsDirty property exposed by the property itself and save only what’s needed. To make everything ultra-secure, as you learned in chapter 10, we’ll compose the query using a parametric query, avoiding SQL injection.
Loading a profile
To load a profile, you need to override the GetPropertyValues method from ProfileProvider, which is the base class used by the Profile API providers. This method gets the data from the database and loads it into an instance of the SettingsPropertyValueCollection class. This class represents a generic property container; the properties are represented by a string key and a generic object value. To ensure that the load is performed only one time per page, we’ll implement the per-request pattern, which we’ve already described, using the Context.Items collection to cache the results. You can find the code in the following listing
Listing 13.4. Code for loading a user profile


The magic is performed by the GetProfileData method, which gets the information from the profile and dynamically composes the query. You can find the most important piece of code in the following listing.
Listing 13.5. The query that gets the user profile is composed dynamically


The result is that the profile will be loaded from the specified table, and the generated query will fetch only the mapped properties, maximizing performance.
Saving a profile
If you understood how to load a profile, then saving it will be a piece of cake. The code is long because you have to check for null values and modified or read-only properties, but it’s simple to analyze. We’re basically cycling all the properties and assigning their values from the database.
The next listing contains the part where the single property is loaded, which is included in a foreach cycle. This snippet is similar to what’s included in listing 13.5.
Listing 13.6. The most important part when saving a user profile


The query will be executed, checking for the profile’s existence. Depending on whether the profile exists, the query will issue an UPDATE or INSERT command. We’re using a helper function (which is available in the downloadable samples) to convert from the CLR type to a SqlDbType enum value. This conversion will ensure that the database receives the correct data type and adds another layer of type safety check before the correct query executes.
Making it all work
Now that the provider is ready, we have to register it in our web.config (under configurationsystem.web):
<profile ... defaultProvider="SqlProfileProvider">
  <providers>
    <clear />
    <add name="SqlProfileProvider"
         type="ProfileAPI.CustomerProviders.SqlProfileProvider"
         tableName="Profiles"
         connectionStringName="Profiles" />
  </providers>
</profile>
The profile can be used from any page, just like the one we prepared with the default provider (see figure 13.3). The capability to use any page is one of the fundamental aspects of the Provider Model that lets you be more productive and re-use more code between projects.
Discussion
The Profile API is the best way to implement your solution when you need to store user preferences. It’s easy to use, simple to extend using the Provider Model, and can grow with your application’s needs.
Even though it might seem difficult to create a custom provider, in reality it’s not terribly complex, as we’ve shown you with this scenario. Keep in mind that, if you prefer, you can implement the same approach using a stored procedure. If you have different information stored in different tables, a stored procedure can encapsulate the logic to retrieve—and save—different properties to different tables, without working with multiple providers or implementing complex logic. The custom provider you built in this section is a first step in the right direction, though it will probably need a couple of additional features to be usable in every situation.
13.3. Summary
In this chapter, we analyzed different aspects of the most common patterns you’ll use to handle state. First we presented the per-request solutions, then we moved on to per-session ones. We also took a look at common techniques: we analyzed how cookies and session state work and how to use them in different scenarios.
We looked closely at the Profile API, which is specifically designed to simplify actions related to a user profile. Creating and accessing a profile’s information is easier, thanks to a common infrastructure and the Provider Model pattern. Each approach has its own pros and cons; you’ll need to choose one based on what your application needs. The good news is that ASP.NET offers you a wide range of possibilities in this particular area.
Now that we’ve covered the most common techniques, you’re ready to take a look at the most effective way to boost application performance: caching. You can easily use caching to save data for all the requests. Read on to find out how.