
Chapter 9. Customizing and extending ASP.NET MVC
Chapter 8 introduced you to the pillars of ASP.NET MVC: controllers, views, models, and routing. These concepts are the basic ones you have to master to start writing applications with this new web development platform. But when we move to real-world contexts, things tend to get a bit more complicated.
So far, you’ve learned a lot. You know how to handle a web request by using an appropriate combination of a controller, a model, and a view, but in more complex scenarios, these notions alone aren’t usually enough. In fact, enterprise-level applications are often made of multifaceted pages, which are difficult to build and maintain unless you can split them into simpler and discrete components. Sometimes things get even harder, requiring you to plug your own custom logic into the framework itself to make it tie in to your specific needs.
ASP.NET MVC has several entry points you can use to inject your own code to extend and customize it. In this chapter, we’re going to explore some of these features, specifically the ones shown in figure 9.1.
Figure 9.1. The areas of ASP.NET MVC customization we’re going to explore in this chapter. These features are the key ones you’ll need in real-world application design. You can build discrete components, each one with its own responsibilities, and reuse them throughout the whole project.

As usual, we’ll cover these topics starting with typical issues you’ll face while building a real-world application. An improved version of CoolMVCBlog will once again be our guest on this journey. Markup and code componentization, transparent interaction with ADO.NET Entity Framework, and routes optimized for search engines are common needs. They’re perfect for explaining how, in ASP.NET MVC, writing the right code in the right place can push your product’s quality one step further. So, let’s get started!
9.1. Building reusable elements in ASP.NET MVC
When you’re building a big web application, you’ll often come across situations in which pages share the same functionalities and UI elements. In these cases, it’s important to have features that allow you to build reusable components, so that you can avoid code and markup duplication. Reusable components mean you don’t waste time building the same functionalities again.
In ASP.NET Web Forms, we typically address these needs by building custom controls, but as you’ve learned, one key difference between Web Forms and ASP.NET MVC is that the latter lacks the notion of a server control; we need to find something else to build reusable components. It goes without saying that this isn’t a weakness of ASP.NET MVC, but rather that the programming model is different. In the upcoming pages, you’re going to discover the tools it provides to achieve similar results.
9.1.1. Using templates to represent data
In the previous chapter, and specifically in section 8.4, you saw how ASP.NET MVC provides an EditorFor HTML helper that you can leverage to build input forms easily. We barely touched on how this method is able to produce different HTML elements based on the data type of the property you’re going to edit, as figure 9.2 schematizes.
Figure 9.2. The Html.EditorFor helper can render different editors for object properties, based on their type.

This feature is part of a bigger picture that helps you to componentize how a view renders data. When you build a view, you must write the HTML elements that will represent the data on the actual page. Because the same data types will hopefully be rendered similarly across many views, the idea behind data templates is to define these elements once for all and reference them by using just two distinct HTML helpers:
C#:
<%: Html.DisplayFor (model => model.myProperty)%>
<%: Html.EditorFor(model => model.myProperty)%>
VB:
<%: Html.DisplayFor(function(model) model.myProperty)%>
<%: Html.EditorFor(function(model) model.myProperty)%>
The engine itself then takes care of analyzing what myProperty is and selects the correct template for its representation.
ASP.NET MVC already provides some templates that render common data types such as booleans or strings, although there are actually just a few and they’re quite basic. The good news is that you can easily customize them or provide new ones. You’re going to learn how in the next section.
Technique 52: Building customized data templates
A common requirement when you’re building large web applications is to have the same kind of data rendered consistently in every page. If you want to address this issue with minimal effort, you should concentrate your efforts on building a data template to handle it.
A data template is no more than a partial view bound to a particular data type. When the ASP.NET MVC view engine encounters an EditorFor or a DisplayFor statement for a property of a certain type, if you’ve provided a data template for it, it’s automatically instantiated. Let’s see how all this works in a common scenario.
Problem
You just downloaded the jQuery UI Datepicker, and you want to automatically plug it in throughout your whole website so that you can use it each time a date object must be edited.
Solution
The jQuery UI Datepicker is a great piece of JavaScript code that leverages jQuery to display a fancy calendar to input a date, as shown in figure 9.3.
Figure 9.3. The jQuery UI Datepicker applied to a text box shows a calendar when focused. Showing a calendar makes selecting a date easier.

We’re not going to deeply explore Datepicker features or how jQuery works; despite being dramatically interesting, these concepts are unfortunately beyond the scope of this book.
Interested in Knowing More About Jquery?
If you want to expand your knowledge of jQuery, you’ll find jQuery in Action, part of Manning’s In Action book series, to be a great reference guide. This book provides in-depth coverage of this powerful JavaScript library.
All you need to know for our purposes is that you have to follow a couple of steps for a datepicker to be displayed automatically when a user clicks on an input box:
- Reference jQuery and jQuery UI scripts.
- Select all the date input boxes on the page and activate the datepicker functionality.
Because we’re going to need this functionality in our whole web application, a good idea is to place this code in the master page file, like in the following listing.
Listing 9.1. Master page code that activates jQuery UI Datepicker

Because this code applies to every page, we don’t know how many input boxes there will be. A good way to proceed is to leverage
the jQuery selector flexibility to pick elements by their CSS class (dateInput in our case) and then invoke the datepicker JavaScript method ![]() to activate the calendar on them. Note that dateInput isn’t an actual style defined somewhere in a CSS file, but just a marker that lets us identify the elements for which all
this has to happen.
to activate the calendar on them. Note that dateInput isn’t an actual style defined somewhere in a CSS file, but just a marker that lets us identify the elements for which all
this has to happen.
Now that everything has been set up on the jQuery side, we can turn our attention to our application’s views; we still have to make every date’s input box reference that CSS class. We can obviously do this by manually specifying it each time we come across a date editor, or we can define a custom editor template for the System.DateTime type. To use a custom editor template, we must add an EditorTemplates subfolder under the Shared views folder and then create a new partial view with the same name of the type we want to edit (DateTime for our example). Figure 9.4 shows the final folder structure.
Figure 9.4. The location of DateTime.ascx in the folder structure of an ASP.NET MVC project

The following listing shows how the code we have to write in the view is trivial.
Listing 9.2. DateTime editor template


Our DateTime.ascx view uses an internal property ![]() to produce the string representation of the corresponding date. Then it leverages the TextBox HTML helper
to produce the string representation of the corresponding date. Then it leverages the TextBox HTML helper ![]() to render an input box styled with the dateInput CSS class, which is what we originally wanted.
to render an input box styled with the dateInput CSS class, which is what we originally wanted.
Now that all this is in place, we just have to use the EditorFor HTML helper to get ASP.NET MVC to resolve the newly created custom template and to use it to render the editor. So, for example, if we wanted to edit the date of publishing in the Edit Post view of CoolMVCBlog, we could write:
C#:
<%: Html.EditorFor(model => model.DatePublished)%>
VB:
<%: Html.EditorFor(Function(model) model.DatePublished)%>
Display templates let you design data-type-specific templates to define how this kind of data has to be visualized. They work exactly the same way as Editor templates, except that they must be stored in the DisplayTemplates subfolder and are triggered by using the DisplayFor HTML helper.
This example shows how easy is to create a custom template and bind it to a particular CLR type: it’s just a matter of building a partial view with the same name and putting it in a carefully named folder.
Sometimes properties of the same CLR type require different templates because the data they represent is different. Think about a Post entity for our CoolMVCBlog; although its Title and Text properties are both of type string, we might want to have different templates to edit them, perhaps a plain text box for Title and a multiline text editor for Text (if not a WYSIWYG editor such as CKEditor). In other words, we might need to handle types at a higher level of abstraction and use a more expressive way to tell the framework that they represent different kinds of data, as shown in figure 9.5
Figure 9.5. Although Title and Text are both strings, we need EditorFor to produce different templates because each has a different business meaning.

To define these custom data types, you can mark the corresponding properties with DataTypeAttribute or UIHintAttribute (their use is equivalent), like in listing 9.3.
Listing 9.3. Marking property type with UIHintAttribute

When it comes across properties marked like those at ![]() and
and ![]() , the ASP.NET MVC view engine looks in the Shared View folder for data templates that have the same names. If it finds any
such templates, it renders them.
, the ASP.NET MVC view engine looks in the Shared View folder for data templates that have the same names. If it finds any
such templates, it renders them.
Discussion
Modern development platforms provide features that help us build consistent and maintainable UIs. Web Forms, for example, uses the abstraction of custom server controls to let the developer build discrete and reusable interface portions. ASP.NET MVC provides a different model, called data templates, which is based on the data type you want to represent or edit in your page. Anytime you realize there’s a particular object among your models that appears many times in many pages, and you want to componentize how it gets displayed or how its editor looks when it’s placed in a form, reach for a custom data template.
Think about how many times you’ve built a drop-down list to let the user choose a customer. It doesn’t matter whether that user is going to associate it with an order or an invoice, a property of type Customer is always going to be there to fill; building a single editor template for it is enough to automatically have it injected wherever it’s needed.
Even though they’re powerful, templates almost always require an association to a specific data type, but this isn’t always the rule. Consider items like buttons, hyperlinks, or pop ups, just to name a few: although they aren’t necessarily bound to a DateTime or Customer object, you might still want to build discrete components and avoid writing the same markup again and again in your pages. HTML helpers are much more helpful in these situations, as you’re going to see in the next section.
Technique 53: Componentized markup through HTML helpers
Data templates are an extremely smart solution when you must quickly build input forms, or when you need to display complex data. On the other hand, sometimes you need to include a bunch of markup code in something that must be as easily reusable as templates, but not necessarily bound to a particular model type.
Let’s think about what happens every time we have to insert a link into a view. The link can come from data of different types, involve more than just one property of an object, or even originate from hardcoded values such as the Back To Index link on the post edit page of CoolMVCBlog. In all these cases, you’ll find that using an HTML helper called ActionLink is a solution you’ll be satisfied with. Besides generating markup, this solution also holds the logic to determine a target URL, given action, and controller names.
Similar situations are common in real-world applications, and having a library of customized HTML helpers can surely make the difference for how consistent and maintainable your product will be. For that reason, it’s worth trying to learn to build some of your own.
Problem
Our application allows registered users to perform login and logout operations using the corresponding actions of SecurityController. We want to build a custom component that we can re-use to easily build a form to insert login credentials or, if the user is already authenticated, to show a welcome message to the user.
Solution
HTML helpers are methods you can call from within a view to generate HTML, encapsulating all the logic needed to render it. Every time we used the ActionLink extension method in chapter 8, we used it not only because we didn’t want to manually write a hyperlink like <a href="someURL" ...>Link text</a>, but also because it allowed us to reason in terms of controller and actions, and, fortunately, it also translates it to actual URLs, as in figure 9.6.
Figure 9.6. ActionLink can generate URLs consistent with application routing settings.

The idea we’ll use to solve our problem is to create a new HTML helper that can evaluate the request authentication status and generate a login form or welcome message, whichever is appropriate. We could easily include the helper in a view, or perhaps in the master page with just this code:
C# and VB:
<%: Html.Login("Security", "Login", "Logout") %>
Building such an HTML helper is the same as writing a method like the one in the next listing. This method accepts actions and a controller name that we want to use when the user is logging in or out.
Listing 9.4. Main code of Login HTML helper


Our Login HTML helper is an extension method for the HtmlHelper class ![]() , whose main code checks whether the current user is authenticated. It also chooses whether it must render a welcome message
or a login form
, whose main code checks whether the current user is authenticated. It also chooses whether it must render a welcome message
or a login form ![]() . The implementation of the first option is trivial, because WelcomeMessage just builds the output by concatenating some strings
. The implementation of the first option is trivial, because WelcomeMessage just builds the output by concatenating some strings ![]() .
.
Notice how we leverage another HTML helper, ActionLink, to build the hyperlink. Then we wrap the whole result using an HtmlString class. This class represents a string that contains already encoded HTML, which won’t be affected when it’s displayed in a <%: %> tag.
Conversely, when the user isn’t authenticated, our helper invokes a LoginInput method. This method is slightly more complex, because it must use the code shown in the following listing to build an actual HTML form.
Listing 9.5. Building an HTML form via code

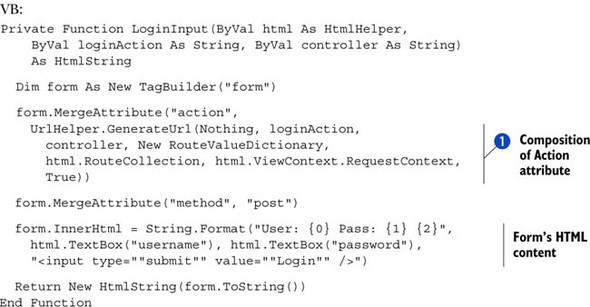
This code takes advantage of an object called TagBuilder, which eases the task of building HTML tags and decorating them with the attributes we need. For an HTML form, for example,
we must indicate that we want to post it to a certain destination URL, which we can obtain from the controller and loginInput parameters through ASP.NET MVC’s UrlHelper class ![]() .
.
Discussion
HTML helpers are a simple way to include in a method the logic required to generate HTML code, so that we can easily replicate it when we need it. Building them is only a matter of creating an extension method for the HtmlHelper type and returning an HtmlString instance (although the return type can be also a plain string).
Given its extremely versatile nature, these tools give you a great advantage when you’re developing applications in ASP.NET MVC. Even though everything you make with an HTML helper can also be made using partial views, HTML helpers are usually more immediate and easy to use; after all, you just have to invoke a method, and you don’t have to deal with models and types like you do with views and templates. Moreover, they’re just code, so you can build class libraries and reuse them across many projects.
Of course, there’s always a downside to every great solution. You want to be careful not to overuse HTML helpers; they’re usually a bit verbose and tend to replace the actual markup. You don’t want to bury the logic that generates the markup because that lessens your control over the HTML—one of the key advantages of using ASP.NET MVC in the first place.
In summary, HTML helpers and data templates are two key features of ASP.NET MVC that you can leverage to avoid duplicating the same markup over and over in your views. But these techniques cover only half the problem—code duplication often happens in controllers, too. The next section will show you a useful trick for avoiding it.
Technique 54: Inject logic using action filters
The previous section was about componentizing markup, but sometimes markup requires code on the controller side to render correctly. If you were forced to replicate the code each time you wanted to use an HTML helper, a partial view, or a data template, you would lose almost all the advantages of building these reusable components.
Let’s recall for a moment the homepage we built in chapter 8. It should look like the one in figure 9.7, which highlights a particular portion of it.
Figure 9.7. Our blog engine’s homepage; it contains a tag cloud that will likely be shared among multiple pages.

When we built the corresponding view, we thought the tag cloud would be a shared UI element, which was supposed to be present in multiple pages; this was one of the reasons we decided to design it as a partial view. Unfortunately, although the template is actually reusable, we still need some code on the controller to populate the model with the data the cloud will represent. The HomePageController did it by invoking a TagCloudService, as shown in the following listing. If things remain as they are, we’ll have to replicate this code for each action that ultimately shows a tag cloud.
Listing 9.6. HomeController fetching tag cloud items
C#:
public ActionResult Index()
{
  // more code here

  var service = new TagCloudService(ctx);
  model.TagCloudItems = service.GetTagCloudItems();

  return View(model);
}
VB:
Public Function Index() As ActionResult
  ' more code here

  Dim service = New TagCloudService(ctx)
  model.TagCloudItems = service.GetTagCloudItems()

  Return View(model)
End Function
It goes without saying that we definitely want to avoid replicating all this. We can do it by using a powerful ASP.NET MVC feature: action filters.
Problem
We want to show our blog’s tag cloud in multiple pages, but we don’t want to replicate the code required to fetch its items on every action of every controller that references it.
Solution
Action filters are classes that inherit from the infrastructural ActionFilterAttribute class and provide entry points to inject logic during the execution of an action. Their base class exposes four virtual methods, listed in Table 9.1, which are automatically triggered by the ASP.NET MVC execution engine while processing a request.
Table 9.1. Overridable methods of the ActionFilterAttribute class
|
Name |
Description |
|---|---|
| OnActionExecuting | Runs before the controller action is triggered. |
| OnActionExecuted | Runs just after the action concludes its execution, but before the ActionResult it returned starts up. |
| OnResultExecuting | This method is triggered just before the execution of the current ActionResult. |
| OnResultExecuted | The last method you can intercept. It runs after the result has been executed. |
If you override these methods from within a custom filter class, you can inject personalized logic into one or more of the well-defined phases highlighted in figure 9.8. Then you can associate that filter with individual actions or with entire controllers—in which case it will be bound to every action it holds. The end result is a reusable component and no code duplication.
Figure 9.8. Entry points for action filters to inject code during the request flow

For our specific needs, our LoadTagCloudAttribute has to fetch the tag cloud data from the database (as you saw in chapter 8) and store it in the model. Because we want it to be applicable to many views, and, in turn, to the different models that those views will refer to, the idea is to create the IHasTagCloud interface to mark the models that provide a TagCloudItems property, as in the following listing.
Listing 9.7. IHasTagCloud and its implementation in HomepageModel
C#:
internal interface IHasTagCloud
{
  List<TagCloudItem> TagCloudItems { get; set; }
}

public class HomepageModel : IHasTagCloud
{
  public List<Post> Posts { get; set; }
  public List<TagCloudItem> TagCloudItems { get; set; }
}
VB:
Friend Interface IHasTagCloud
  Property TagCloudItems As List(Of TagCloudItem)
End Interface

Public Class HomepageModel
    Implements IHasTagCloud

    Public Property Posts As List(Of Post)
    Public Property TagCloudItems As List(Of TagCloudItem)
        Implements IHasTagCloud.TagCloudItems

End Class
Now it’s time to turn our gaze to the actual action filter. We need to decide which of the four provided entry points better suits our needs. We want to integrate the model content, so we need a model instance that’s already created and a filter that runs after the action executes. However, we have to do our job before the view is created; otherwise, it wouldn’t have any data to render.
Guess what? Both OnActionExecuted and OnResultExecuting will work. For our needs, they’re almost equivalent, so we can pick either one. We’ll choose OnResult-Executing (the reason will be unveiled shortly). The following listing shows the filter’s code.
Listing 9.8. Complete LoadTagCloudAttribute code
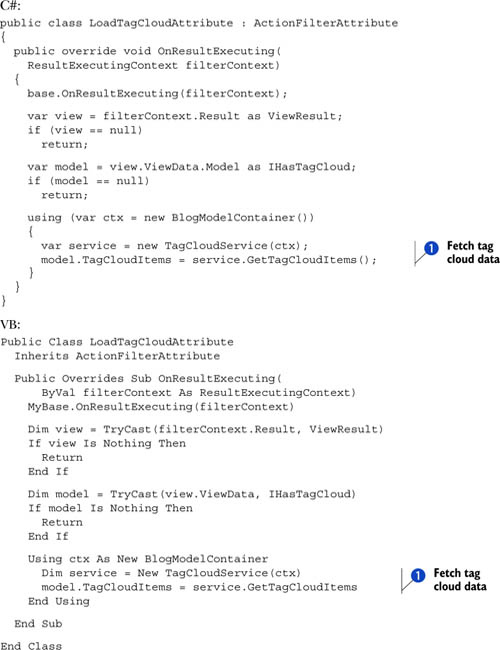
The code we just showed you is pretty easy to understand. Our override of the OnResult-Executing method checks whether the result returned by the action is actually a view and whether the model implements the IHasTagCloud interface. If both those checks succeed, the service we built in chapter 8 loads the data from the database and then stores it into the model ![]() .
.
One feature of our filter is that it runs only if the result is a view. Limiting the result avoids unnecessary (and expensive, although we could probably cache all the stuff) roundtrips to the database in cases when the action, for example, returns a RedirectResult. The code we just wrote would have worked exactly the same way if we placed it in the OnActionExecuted method. But what if another action filter hooked that event and changed the result type? Doing our task after that phase keeps our code up-to-date, with the ultimate result returned by the action pipeline.
One key aspect we should point out is that we could’ve just stored the tag cloud items in the ViewData dictionary, without worrying about building an additional interface. But, with some negligible additional effort, we managed to keep our views and code strongly typed, while still being able to easily support this functionality for every model we need.
With our new LoadTagCloudAttribute action filter ready, all we have to do now to let an action load the tag cloud data is to decorate it. The code is shown in the following listing.
Listing 9.9. Homepage’s Index action leveraging LoadTagCloudAttribute
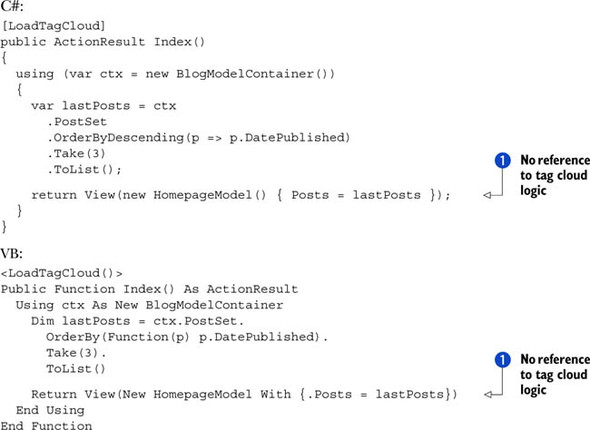
With the LoadTagCloud attribute in place, this new version of the action is a lot simpler and strictly involves just the homepage-specific code.
The code loads the last three posts and assigns them to the model ![]() ; the custom filter takes care of everything that concerns the tag cloud data.
; the custom filter takes care of everything that concerns the tag cloud data.
Discussion
Action filters are an extremely powerful tool, not just because they allow you to avoid code duplication, but also because they contribute to keeping your action code simple and maintainable. Ending up with simple code is a key factor of developing good ASP.NET MVC applications. This outcome is so important that it’s worth more discussion; let’s focus for a moment on the result we’ve been able to achieve with the previous example.
We’ve built an action filter to fetch tag cloud data and used it to decorate the homepage’s Index action. Doing that allowed us to have the code in the Index method, doing the specific task it was built for—fetching the most recent three posts. Displaying the tag cloud is a side requirement, potentially shared across multiple actions, which we isolated in a dedicated class and activated in a declarative manner when we decorated the action with an attribute. We did all that without polluting the action code with any logic related to the tag cloud.
Every time you’re building a controller and you find that you’re writing code that isn’t specific to the particular request you’re handling, you should evaluate the possibility of building an action filter for that situation. The same ASP.NET MVC framework exposes a lot of logic via action filters, like the controller’s caching primitives you’ll see in chapter 14.
In conclusion, keeping your action code simple is one of the most effective ways to write good applications. Besides what you just learned, ASP.NET MVC provides multiple entry points that you can customize to reach this ultimate goal—model binders are one of them. Let’s look at those next.
9.2. User input handling made smart
So far in this chapter, you’ve seen how you can handle user input in an ASP.NET MVC application. ASP.NET MVC can translate everything that comes with the HTTP request into .NET objects, allowing you to work at a high level of abstraction without having to take care of the single items posted in an HTML form or coming as query string parameters.
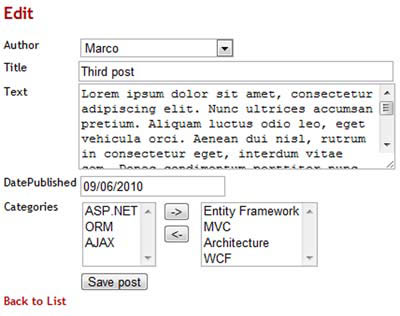
Let’s stay with our CoolMVCBlog application and take a look at figure 9.9; it shows a page we can use to edit blog posts.
Figure 9.9. A screenshot from CoolMVCBlog’s Backoffice. We can use this page to create and edit a post.
As our application stands now, when it responds to a request for updating a blog post, it triggers an action similar to the one shown in the following listing.
Listing 9.10. Action updating a Post
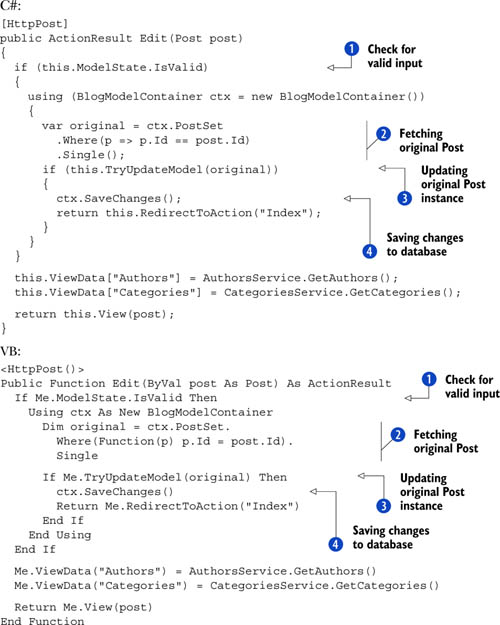
The code is rather easy to understand. If the model is valid ![]() , it fetches the post from PostSet by using its Id
, it fetches the post from PostSet by using its Id ![]() , and then applies the changes coming from the form using the TryUpdateModel helper
, and then applies the changes coming from the form using the TryUpdateModel helper ![]() . The last step is to save it to the database
. The last step is to save it to the database ![]() .
.
Although everything seems to be working in a straightforward way, the code in listing 9.10 suffers from two main problems:
- Every time we have an action that modifies an entity, we’re going to replicate the same logic of loading the old version, updating it, and then saving it after checking for its correctness.
- Complex entities can’t be automatically handled by the default infrastructure. The previous action, for example, can’t actually understand the categories editor as we implemented it, so the collection won’t be successfully populated.
In this section, you’re going to learn how you can customize the logic ASP.NET MVC uses to handle the HTTP request to solve these two problems.
Technique 55: Custom model binders for domain entities
When we wrote the Edit action in listing 9.10, we coded a method that accepts a Post object as an argument:
public ActionResult Edit(Post post)
VB:
Public Function Edit(ByVal post As Post) As ActionResult
Unfortunately, that Post object isn’t an actual entity recognized by ADO.NET Entity Framework, and it can’t be directly used to manage its lifecycle and persistence; it’s just an instance of the same .NET type, which has never been part of an EntitySet and is unknown to any ObjectContext. For this reason, we had to write some code to refetch a post and update it.
Wouldn’t it be awesome if we could put our hands onto a valid Entity Framework object at the beginning, one that’s connected to an object context and already updated with the user input? To do this, we must customize the way ASP.NET MVC translates the HTTP form to a .NET object—more precisely, we must build our own model binder. Let’s see how.
Problem
Our application uses ADO.NET Entity Framework as a persistence layer. We want our actions parameters to be directly usable with an object context in order to save them to the database.
Solution
When ASP.NET MVC transforms the HTTP request’s content into a .NET instance, it leverages a particular object called a model binder. A model binder usually retrieves input data from the form and interprets it to instantiate objects. Figure 9.10 schematizes the whole process.
Figure 9.10. The model binder acts as a mediator between the HTML form and the controller, translating the input coming from the browser into a .NET object.

Building a model binder is just a matter of creating a new class that implements the IModelBinder interface and writing some code for its BindModel method:
C#:
public object BindModel(ControllerContext controllerContext,
  ModelBindingContext bindingContext)
VB:
Public Function BindModel(ByVal controllerContext As ControllerContext,
  ByVal bindingContext As ModelBindingContext) As Object
That method receives the following input parameters that represent the particular request context it’s being executed into:
- A ControllerContext holds information related to the current request, like the HttpContext, the specific controller in charge of handling it or the routing data
- A ModelBindingContext is specific to the binding operation and allows access to the model being built or to the request data
The BindModel method returns an instance of object—no type is specified—which is forwarded to the executing action, in order to represent the input’s alter-ego in the ASP.NET MVC world.
The idea is to customize the process by which this instance is built, creating a new model binder. The new model binder will be activated each time the action parameter involves a Post type and will use the form content to retrieve a Post entity from the database and update it before delivering it to the controller. Figure 9.11 shows the whole process.
Figure 9.11. When ASP.NET MVC receives a form with a Post, it uses a custom model binder to get the original post from the database and update it with the data so the controller can easily persist it.

The workflow in figure 9.11 is supposed to have both the model binder and the action sharing the same ObjectContext instance; that’s the only way to let ADO. NET Entity Framework track all the changes both actors make to the post entity and to generate the correct UPDATE query when the action finally calls its Save-Changes method.
What we ultimately need is an object context to be active along the whole request. We can achieve this by using the HTTP module shown in the following listing.
Listing 9.11. ObjectContextModule takes care of creating an ObjectContext
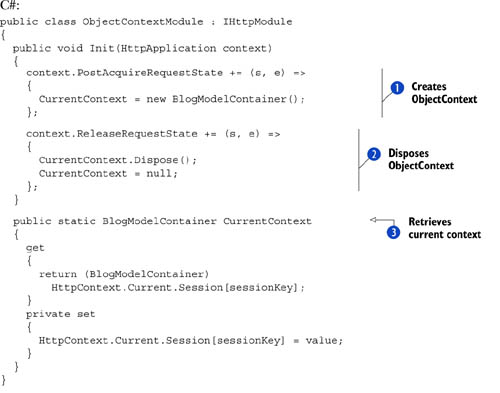

ObjectContextModule’s goal is to create a new BlogModelContainer instance when the request state is acquired and store it in a session variable ![]() . Then, when the request terminates, ObjectContextModule releases the BlogModelContainer instance by calling its Dispose method
. Then, when the request terminates, ObjectContextModule releases the BlogModelContainer instance by calling its Dispose method ![]() . With our HTTP module up and running, we don’t have to worry anymore about building an object context when we’re accessing
the database: there’s always one associated with each request, and we can retrieve it using the static CurrentContext property
. With our HTTP module up and running, we don’t have to worry anymore about building an object context when we’re accessing
the database: there’s always one associated with each request, and we can retrieve it using the static CurrentContext property ![]() :
:
C#:
var ctx = ObjectContextModule.CurrentContext;
VB:
Dim ctx = ObjectContextModule.CurrentContext
Now we have all we need to start building our custom model binder. ASP.NET MVC already provides a DefaultModelBinder that is so versatile it can map many default types:
- Native types, like string, double or DateTime
- .NET objects, including our Post class
- Collections of objects
Rather than starting from scratch, it might be worth leveraging all those DefaultModelBinder built-in features. What we’re going to do is build a PostModelBinder that inherits from DefaultModelBinder and customizes its BindModel method, as in the next listing.
Listing 9.12. PostModelBinder’s implementation of BindModel

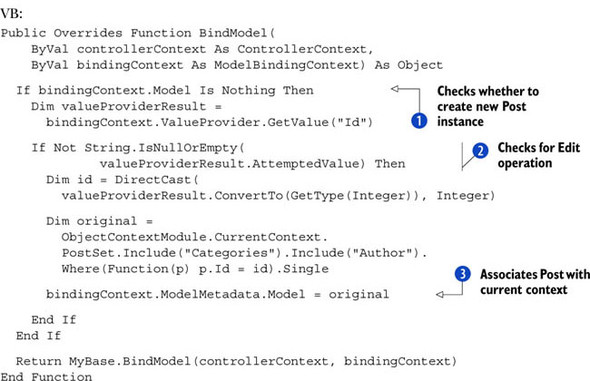
Let’s recall for a moment what we’re aiming to do: we have an Edit action that accepts a Post object and we want that Post object to be retrieved from the database and populated. In other words, our custom logic must start up when there’s a new
Post instance to build ![]() and when a not null Id tells us we’re in an edit context
and when a not null Id tells us we’re in an edit context ![]() . When that happens, we’re going to go to the database and fetch the entity, setting it as the Model for the current BindingContext
. When that happens, we’re going to go to the database and fetch the entity, setting it as the Model for the current BindingContext ![]() . Then it’s DefaultModelBinder’s turn: in the last step, we invoke the original BindModel implementation, grabbing the values posted from the browser and putting them into the Post properties.
. Then it’s DefaultModelBinder’s turn: in the last step, we invoke the original BindModel implementation, grabbing the values posted from the browser and putting them into the Post properties.
Thanks to all this work, our controller won’t get a simple Post instance, but a real entity, already attached to the current Entity Framework’s context. Our action will become much simpler—almost trivial—like the one in the following listing.
Listing 9.13. Edit action code after PostModelBinder
C#:
[HttpPost]
public ActionResult Edit(Post post)
{
  if (this.ModelState.IsValid)
  {
    ObjectContextModule.CurrentContext.SaveChanges();
    return this.RedirectToAction("Index");
  }

  // ... more code here ...
}
<HttpPost()>
Public Function Edit(ByVal post As Post) As ActionResult
  If Me.ModelState.IsValid Then
    ObjectContextModule.CurrentContext.SaveChanges()
    Return Me.RedirectToAction("Index")
  End If

  ' more code here
End Function
To get everything to work, there’s one last step to do: register the new model binder and instruct ASP.NET MVC to use it every time it has to build a Post instance. We’re doing this in the global.asax file with the following code.
C#:
ModelBinders.Binders[typeof(Post)] = new PostModelBinder();
VB:
ModelBinders.Binders(GetType(Post)) = New PostModelBinder()
Discussion
In the example we just went through, we customized the logic according to which ASP.NET builds the parameters passed to our actions. Specifically, we provided a workaround for a big limitation that was forcing us to write a lot of code in the controller to persist changes with Entity Framework.
Thanks to the new PostModelBinder, our action has become simpler or, better said, it works at a higher level of abstraction. The infrastructure automatically takes care of realizing when there’s an update in progress and a Post must be retrieved from the database.
The implementation we made is simple, and so suffers from some limitations:
- It’s not wise to query the database so often. It would be better to cache the data, temporarily storing it elsewhere.
- The model binder is specific to the Post class, but with a little more effort, we can build a more general version that can work with all entity types.
ASP.NET MVC applies object inheritance rules to determine which model binder must execute. With this in mind, we could, for example, build an EntityModelBinder that can retrieve any known entity type from the database. If we then registered it for the EntityObject base class, the runtime would automatically execute it each time it encountered a class generated by Entity Framework, easily extending the behavior we discussed to all the entities in our application.
We didn’t worry about these weak points in this example because they would’ve made the code pointlessly more complex, with the risk of losing sight of the main task: plug our custom logic into the ASP.NET MVC runtime when it comes to parse user input and translate it into .NET objects. We managed this superbly by reusing a lot of built-in code, thanks to the DefaultModelBinder.
Some cases are so specific that DefaultModelBinder can’t correctly interpret the data, and we need to build a new model binder from scratch. The next section will show how you can accomplish even more, using this kind of customization.
Technique 56: Building a new model binder from scratch
DefaultModelBinder does its job pretty well if data is coming from a standard form that includes only simple elements (like text boxes, drop-down lists, or check boxes) for editing the object properties. But if we move to something slightly more complex, like the category editor in figure 9.12, everything comes to a grinding halt.
Figure 9.12. To modify the categories associated with a post, we use a custom editor that ASP.NET MVC cannot interpret with any built-in model binder.
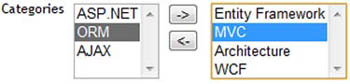
Categories.ascx is a custom editor template for the IEnumerable<Category> type; it shows two list boxes and a couple of buttons to move the categories from one list box to the other. Going into too much detail about how this template works would be a bit off-topic—you can check it out on the included samples and read its actual code. For our purposes, you just need to know that because list box content isn’t posted with the HTML form, we wrote a bunch of JavaScript to populate a hidden field called values with the IDs of the categories the user selected:
function updateHiddenField() {
    var string = '';
    $('.target option').each(function (index, item) {
        if (string != '')
            string += ';';
        string += item.value;
    });

    $('.hidden').attr('value', string);
}
Once the form gets posted to the server, the selected categories are represented by a list of numbers separated by semicolons, which our application should interpret correctly:
1;2;5;7
ASP.NET MVC can’t do this on its own (remember, we implemented customized logic for our categories editor), but we can once again leverage the model binders’ infrastructure to hide all the details about how this kind of data travels back to the server from the browser. Let’s see how.
Problem
When we create or edit a Post, we want its Categories collection to be automatically populated with true Entity Framework entities, based on a list of IDs we receive from the request in a hidden field.
Solution
For this kind of task, model binders will again be a great help in encapsulating the logic needed to translate a specific kind of input in a .NET object. Unfortunately, this time we can’t re-use any infrastructural code like we did in technique 55 because we’re using a customized way to encode the selected categories (which DefaultModelBinder obviously can’t interpret). That means we have to build a new binder from scratch, with just the IModelBinder interface as a starting point for our CategoriesModelBinder:
C#:
public class CategoriesModelBinder : IModelBinder
{
  ...
}
VB:
Public Class CategoriesModelBinder
  Implements IModelBinder

  ...
End Class
This time, the implementation of the BindModel method works differently than it did in the previous example. As figure 9.13 shows, it works by taking an existing Category collection (probably coming from a given Post instance, but this isn’t a requirement) and modifying its content by removing or adding instances of Category objects, according to a given list of IDs.
Figure 9.13. A custom category binder gathers the IDs coming from the request and uses them to populate an existing collection of categories accordingly.

The next listing puts that logic into actual code.
Listing 9.14. Overview of BindModel code

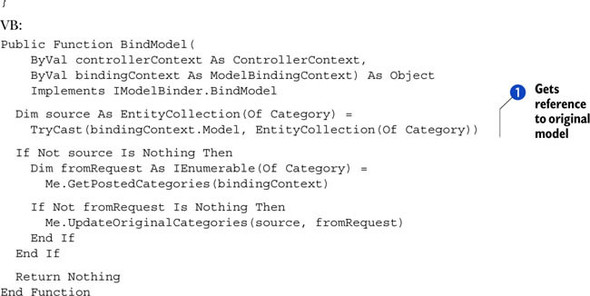
We start by acquiring a reference to the existing model that we want to update ![]() . In fact, CategoriesModelBinder can’t create a new collection on its own. This isn’t a limitation, though, because we’re ultimately working on a Post instance, which always provides a not-null categories list.
. In fact, CategoriesModelBinder can’t create a new collection on its own. This isn’t a limitation, though, because we’re ultimately working on a Post instance, which always provides a not-null categories list.
Then we move our attention to the posted data, which we retrieve via a GetPosted-Categories method (more on this shortly) and use them to update the original collection. At this point, we’ve already updated the content of the original collection, so there’s no need of a result; the last step is to return a null (Nothing in Visual Basic) value.
Now that you have an overall picture of how CategoriesModelBinder works, we can take a closer look at how we manage to retrieve the categories from the request in GetPostedCategories, whose code is shown in the following listing.
Listing 9.15. Retrieving Categories from the Request


This code doesn’t contain much that’s strictly ASP.NET MVC; this framework comes up just to read the string of IDs from the
request ![]() . In fact, once we have the string, it’s just a matter of translating it into actual Category instances
. In fact, once we have the string, it’s just a matter of translating it into actual Category instances ![]() . GetCategoriesFrom-String accomplishes this task, splitting the sequence of IDs
. GetCategoriesFrom-String accomplishes this task, splitting the sequence of IDs ![]() and, in turn, retrieving them using the current active Entity Framework context
and, in turn, retrieving them using the current active Entity Framework context ![]() .
.
One last step is still separating us from our ultimate goal—updating the original collection with the code shown in the following listing.
Although it might be possible to manually inspect the request content using the HttpContext.Request property, ASP.NET MVC value providers help to shield you from that dependency. For example, value providers theoretically allow the same code that’s in listing 9.15 to work in a different context, where values are not coming from an HttpRequest.
Listing 9.16. Updating the original categories collection

Once again, no ASP.NET MVC here, but just some logic to find out which categories we have to remove ![]() and which ones we want to add
and which ones we want to add ![]() , and logic to apply the changes we calculated to the original collection
, and logic to apply the changes we calculated to the original collection ![]() .
.
As in technique 55, for ASP.NET MVC to use our custom model binder when it comes across a collection of categories, we must register it in global.asax, whose Application_start method becomes like the one in the following listing.
Listing 9.17. Model binders setup in global.asax
C#:
protected void Application_Start()
{
    AreaRegistration.RegisterAllAreas();

    RegisterRoutes(RouteTable.Routes);

    ModelBinders.Binders [typeof(Post)] =
        new PostModelBinder();

    ModelBinders.Binders[typeof(EntityCollection<Category>)] =
        new CategoriesModelBinder();
}
VB:
Sub Application_Start()
  AreaRegistration.RegisterAllAreas()

  RegisterRoutes(RouteTable.Routes)

  ModelBinders.Binders(GetType(Post)) =
    New PostModelBinder

  ModelBinders.Binders(GetType(EntityCollection(Of Category))) =
    New CategoriesModelBinder

End Sub
From the controller’s point of view, nothing changes and the code remains exactly the same as we’ve seen before:
C#:
[HttpPost]
public ActionResult Edit(Post post)
{
    if (this.ModelState.IsValid)
     {
        ObjectContextModule.CurrentContext.SaveChanges();
        return this.RedirectToAction("Index");
     }

    // ..a bit of more code here..
}
VB:
<HttpPost()>
Public Function Edit(ByVal post As Post) As ActionResult
  If Me.ModelState.IsValid Then
    ObjectContextModule.CurrentContext.SaveChanges()
    Return Me.RedirectToAction("Index")
  End If

  ' more code here
End Function
ASP.NET MVC will take care of invoking our new model binders while it’s building the Post instance and, thanks to the new CategoriesModelBinder, its Categories collection will automatically be modified according to the user input.
Discussion
What we’ve built in this last example, together with the one in the previous section, lets us handle the creation of a complex entity instance, plugging the whole logic into the ASP.NET MVC infrastructure. We managed to create re-usable and independent components. Thanks to them, we kept our actions code simple and focused on controllers’ requirements (like checking whether the input is valid, redirecting to a particular view, or persisting changes to the database).
When you’re working on a complex application, writing the logic in the correct place is important. With editor templates, you can define how an editor for a certain type looks, and with model binders you can bridge the gap between the request that editor produces and the actual .NET objects your controllers will receive.
Thanks to these notions, integrating an ASP.NET MVC application with ADO.NET Entity Framework (or another persistence layer) should be easier. Now, though we’ll remain in the field of ASP.NET MVC customizations, we’re definitely going to change topics. We’ll explore how you can optimize the default routing infrastructure to improve search engine indexing of your web sites.
9.3. Improving ASP.NET MVC routing
We introduced routing in ASP.NET MVC in chapter 8. In that chapter, you discovered the central role it plays in this web development technology in mapping URLs to actions and controllers.
Routes are a great and effective way to improve URL readability, and ASP.NET MVC natively sets up a routing scheme that avoids query string parameters where possible, giving the application URLs a static look. Unfortunately, the standard functionality has a weak point, but we can correct it to significantly improve the search engine ranking of our pages. In this section, you’ll discover how.
Technique 57: Routes with consistent URL termination
ASP.NET routing is robust when it’s parsing URLs to determine which controller will handle the request and what parameters it will receive. For example, it doesn’t impose any rule for how the address has to be terminated. If we’re using the default {control-ler}/{action}/{id} schema, it will successfully tokenize URLs like the following as if they were the same one:
- Home/Post/3
- Home/Post/3/
This feature makes it easy to avoid schema proliferation because both these URLs are valid and both need to be supported, but it raises a problem when it comes time to improve page rankings: they are different URLs, and this causes all the visits to be split among the two.
Problem
You want to raise your web site search engine rank, so you have to avoid link duplication. You’re going to add a trailing slash to your links and flag the ones that lack it as invalid.
Solution
The first point we’re going to address is adding a trailing slash at the end of each URL. When we create a link using the ActionLink or RouteLink HTML helpers, as we did in the previous section, we generate links that don’t terminate with a slash. We could consider building custom helpers to fix this, but it wouldn’t be a wise choice because it would require manually modifying every view in our application to use our new helpers.
These methods are there to build links starting from the parameters on the routing settings and internally delegate to application routes the task of calculating the resulting path. Figure 9.14 shows this process.
Figure 9.14. ActionLink queries the collection of all the application routes to retrieve the proper one based on the data provided; then it uses its GetVirtualPath method to generate the actual URL.

The idea is to build a custom route that will be responsible for building the path with the trailing slash. The next listing shows its code.
Listing 9.18. Custom SEO-friendly routing


The SEORoute class inherits from the default ASP.NET Route class and overrides its GetVirtualPath method ![]() . The new implementation is absolutely trivial and does nothing more than retrieve the default path and add the trailing slash
where needed by using an extension method called AppendTrailingSlash
. The new implementation is absolutely trivial and does nothing more than retrieve the default path and add the trailing slash
where needed by using an extension method called AppendTrailingSlash ![]() . This last method belongs to a static RouteHelpers class
. This last method belongs to a static RouteHelpers class ![]() and leverages the VirtualPathUtility class to do its job after splitting the actual path from the query string.
and leverages the VirtualPathUtility class to do its job after splitting the actual path from the query string.
We need to add this new route to the application’s route collection in place of the default ASP.NET route. It can be useful to have a MapSEORoute extension method like the one in the following listing to help us in that task.
Listing 9.19. MapSEORoute extension method definition
C#:
public static class RouteHelpers
{
  // .. more code here ..

  public static Route MapSEORoute(this RouteCollection routes,
    string name,  string url, object defaults, object constraints)
  {
     var route = new SEORoute(
      url, new RouteValueDictionary(defaults),
      new RouteValueDictionary(constraints),
      new MvcRouteHandler());

    routes.Add(name, route);

    return route;
  }
}
VB:
Public Module RouteHelpers
  '.. more code here..

  <Extension()>
  Public Function MapSEORoute(
    ByVal routes As RouteCollection, ByVal name As String,
    ByVal url As String, ByVal defaults As Object,
    ByVal constraints As Object) As Route

    Dim route = New SEORoute(
      url, New RouteValueDictionary(defaults),
      New RouteValueDictionary(constraints),
      New MvcRouteHandler())

    routes.Add(name, route)

    Return route
  End Function
End Module
The method is simple: it builds an instance of SEORoute based on the routing parameter and then returns it. Even though it’s simple, this method is useful because it lets us keep the code in global.asax similar to the code we typically use to declare routes, as you can see in the following listing.
Listing 9.20. Mapping the custom SEORoute
C#:
public static void RegisterRoutes(RouteCollection routes)
{
  // .. more code here ..

  routes.MapSEORoute(
    "Default", // Route name
    "{controller}/{action}/{id}", // URL with parameters
    new
    {
      controller = "Home", action = "Index", id = UrlParameter.Optional
    } // Parameter defaults
  );

}
VB:
Shared Sub RegisterRoutes(ByVal routes As RouteCollection)

  '.. more code here ..

  routes.MapSEORoute( _
    "Default", _
    "{controller}/{action}/{id}", _
    New With
     {
      .controller = "Home",
      .action = "Index",
      .id = UrlParameter.Optional
     }
  )

End Sub
What we’ve done up to now allows us to generate SEO-friendly URLs, but this solves just half the problem. If we’re adding this optimization to a website that’s already live, search engine bots might have already crawled our pages and stored the old URLs without the trailing slash. To solve this problem, we must permanently redirect them to the correct schema. If we want to do it transparently for every page, the right tool to leverage is the HttpModule shown in the following listing.
Listing 9.21. HttpModule that permanently redirects invalid URLs


This listing shows how SEORedirectModule is defined: it gets plugged into the runtime pipeline during the BeginRequest phase ![]() and acts as a filter, checking whether a path is correctly terminated; if it’s not, SEORedirectModule uses Redirect-Permanent
and acts as a filter, checking whether a path is correctly terminated; if it’s not, SEORedirectModule uses Redirect-Permanent ![]() to return an HTTP 301 status code, which means Redirect Permanent. This kind of response, besides sending the browser to
the correct address, is also correctly interpreted by a search engine, which will accordingly (and hopefully!) update its
stored indexes. Obviously this logic makes sense only when a URL has a folder-like structure; redirecting http://www.mysite.com/style.css to http://www.mysite.com/style.css/ could be misinterpreted. SEORedirectModule does no processing at all if the request URL has an extension
to return an HTTP 301 status code, which means Redirect Permanent. This kind of response, besides sending the browser to
the correct address, is also correctly interpreted by a search engine, which will accordingly (and hopefully!) update its
stored indexes. Obviously this logic makes sense only when a URL has a folder-like structure; redirecting http://www.mysite.com/style.css to http://www.mysite.com/style.css/ could be misinterpreted. SEORedirectModule does no processing at all if the request URL has an extension ![]() or contains a filename. Figure 9.15 summarizes how all this works.
or contains a filename. Figure 9.15 summarizes how all this works.
Figure 9.15. When a request comes from a URL that lacks the trailing slash, the SEO Redirect Module component issues an HTTP 301 status code to permanently redirect it to the correct URL. This outcome applies just to folders and not to filenames.

Discussion
One key point for optimizing your pages for search engine indexers is to have consistent URL terminations throughout the whole website. Having a trailing slash at the end of each path ensures that links aren’t split between two equally valid addresses, which could dramatically improve your page rank. To that end, we fixed a couple of flaws in the default ASP.NET routing infrastructure.
First of all, we created a custom route class, called SEORoute, which produces correctly terminated paths when invoked by ActionLink or RouteLink HTML helpers. But this doesn’t prevent manually generated URLs or other websites from having the wrong format. For this reason, we also built a custom HTTP module that catches these invalid requests and permanently redirects them to the correct URLs by issuing a 301 HTTP Status Code, allowing search engines to update their indexes.
9.4. Summary
When you develop real-world applications in ASP.NET MVC, you often have to deal with the same issues again and again. In this chapter, we tried to provide practical solutions for some of them. Although they’re separate, distinct topics, they all highlight an extremely important and powerful feature of this web development technology: its expandability, thanks to which the framework can be customized to suit your specific needs.
Despite the fact that at a first sight ASP.NET MVC might seem more verbose than Web Forms, we showed how you can leverage, with a little effort, data templates and HTML helpers to minimize the amount of markup you manually write. You can build batteries of reusable components that result in websites with a more consistent look and feel.
At the same time, you want to keep your actions as simple as possible so that you have less code to maintain and debug. That means moving your own infrastructural or repetitive logic outside the controller. Action filters and model binders are a great help to meeting this requirement because they let you plug into the ASP.NET MVC response flow and customize it to your own will.
The last part of the chapter was about routing, which plays a key role in ASP.NET MVC. We showed how you can improve its URL generation logic so that your website is indexed more efficiently. Good indexing often results in a dramatically higher page rank.
This chapter concludes the third part of this book, which was entirely dedicated to ASP.NET MVC. The next chapters will change the topic, because we’re going to look into security. Security is the main requirement your applications must meet to be ready for a production environment.