
Chapter 4. Building the user interface with ASP.NET Web Forms
All the chapters before this one have been about fundamentals: how ASP.NET works and how to access data. Now that we’ve addressed the basics, it’s time to focus on other matters. This chapter begins the part of the book dedicated to topics related to the user interface (UI).
The approach that’s most used to build a user interface with ASP.NET is to use a Web Form. The Web Form was the first abstraction introduced to create the UI for the ASP.NET application and has its roots in its integration with Visual Studio.
As its name suggests, Web Forms are the result of some tentative steps made by Microsoft in the early 2000s to apply the typical Windows development paradigm to web applications. Windows developers are used to dragging objects on the UI surface and programming them accordingly. This approach is useful for implementing event-based development because each component on the design surface can be programmed that way. Event-based programming is common in a lot of development technologies; from VB 6 to Delphi, generations of developers had been programming this way to increase productivity.
So, what’s a Web Form? It’s an abstraction layer built on top of the ASP.NET core infrastructure that lets the developer build the UI without needing to understand HTTP (the transfer protocol used in the Internet for web pages) or HTML (the markup language).
The ASP.NET team tried to achieve a full abstraction; in reality, a full abstraction isn’t so easy to achieve. It’s important to understand both HTTP and HTML, and Web Forms can help you increase productivity, but productivity comes at the cost of less control on markup output. To give you back some of this control, ASP.NET 4.0 provides a better markup engine and the most advanced techniques to mitigate the issues of previous Web Form incarnations.
This chapter is dedicated mainly to the new features available in ASP.NET 4.0, with some mention of existing ones. Some features that were present in previous versions can be useful in your day-to-day work, so we want to touch on those as well. We should mention here that to preserve compatibility with previous versions, you have to opt in the new features.
If you’re not familiar with Web Forms, go back and look at chapter 1 to get some background. This chapter is based on specific topics and doesn’t include basic information.
4.1. The UI and Web Forms
Web Forms are the most common paradigm used to create ASP.NET pages. They’ve been available since version 1.0, and they’re based totally on an event-driven approach. The name recalls the characteristic of an ASP.NET page: to be composed of a maximum of one server form at a time. You can embed non-server forms at your discretion, but only one of them is the server form. You can also have a page that doesn’t have a server form. You need one only if you’re planning to include a server control that needs PostBack (or that explicitly requires it). (If all this sounds strange to you, take some time and review chapter 1).
Most developers use Web Forms to build the GUI in a web application. Even if you decide to opt for MVC (outlined in chapter 8), many of the ideas we’ll present here will still be valid. Remember, though, that the reason behind the success of ASP.NET is, without a doubt, Web Forms and their simplicity. ASP.NET MVC looks cool and promising (and it is), but it’s relatively new. Although the Web Form model is fully extensible, it’s not designed to be used in scenarios where you need 100% markup control or testability. In those cases, ASP.NET MVC is the better choice.
ASP.NET 4.0 includes new features related to Web Forms, especially in the area of markup. Beginning with this version, server controls can produce better markup—leading to better adherence to web standards—and they play nicely in environments where accessibility is a requirement (mostly in the public sector). This section focuses specifically on new features offered by ASP.NET 4.0.
4.1.1. New features in Web Forms 4.0
ASP.NET 4.0 isn’t a revolutionary release, but it contains many innovations in the area of markup generation. Before we talk about these innovations, let’s review how markup generation works.
When you place a server control in the page, the control markup is generated as part of the Render method, which is called recursively from the page, until the last nested server control has been reached. This action produces the final output, which is sent to the browser. You can see this process at work in figure 4.1.
Figure 4.1. Markup generation is done by server controls. Each control has its own generation strategy; the page requests that each control generate its markup. If the page has inner controls, each one repeats this action with its own child controls.

You have little control over how a server control generates its output because generally you enter an XML fragment that isn’t closed to the final HTML markup. Lack of control is the price you pay for the benefit of the abstraction provided by ASP.NET.
Although they differ in some key ways, we tend to consider HTML and XHTML to be similar in meaning. XHTML is considered a stricter implementation, where the final markup composing the page must be a valid XML document. HTML is considered easier to deal with. Even though you have to produce a valid XML document in the latest versions, producing one requires only that you obey some simple rules (tags can’t be nested and must be closed, special characters must be escaped, and so on).
HTML 5 promises to be a synthesis, combining the pros of the two. In this book, we’ll generally use HTML to refer to the markup because much of our discussion can be applied to both HTML and XHTML. HTML 5 is not yet supported directly by ASP.NET.
You can find more information about HTML 5 at http://www.w3.org/TR/html5/.
ASP.NET 4.0 produces markup that’s compatible with HTML 4.01 or XHTML 1.0 Strict, and markup that’s mostly compatible with XHTML 1.1. ASP.NET 4.0 doesn’t target HTML 5 directly, but it’s possible to produce specific markup in some situations by writing custom controls or by writing the corresponding markup for a specific feature, like for the new <audio /> or <video /> tags.
Getting back to what’s happening in figure 4.1, the rendering is controlled by a simple attribute that’s set on the page section, in the web.config file:
<system.web>
  <pages
     controlRenderingCompatibilityVersion="4.0"/>
</system.web>
By default, the value of this attribute is 3.5, but if you set it to 4.0, the rendering engine behaves differently:
- XHTML 1.0 Strict markup is produced, and the xhtmlConformance section in web.config is ignored.
- The enabled attribute is rendered only by tags that support it (for example, <input />). When this attribute is applied to other controls, such as Label, it’s not rendered in the markup (represented by a <span /> tag), but a CSS style attribute is added so that you can customize this behavior.
- The <div /> tags created inside hidden input fields that ASP.NET generates are output with <div class="aspNetHidden">...</div> around them. This output makes it easier to hide these types of controls by using a CSS.
- All the controls that inherit from Table or Image don’t render the border attribute.
- Validation controls don’t render any inline style. In previous versions, the red color was hard coded, and if you needed to specify another color, the CSS rules did take effect because the local value overrode the style definition.
The Menu and TreeView controls produce more correct markup, to better comply with accessibility and semantic markup. In general, a lot of other controls have taken minor steps in the same direction, to improve adherence to web standards. You’ll find new features for ViewState handling, but we’ll cover those in detail in chapter 13.
Since ASP.NET 3.5 Service Pack 1 (SP1), the action attribute on a Web Form is honored and is reflected in the generated markup. If you’ve skipped version 3.5 SP1, take a look at your pages to ensure that you don’t include this attribute, unless you want to redirect the PostBack to another URL.
ASP.NET 4.0 introduces a new set of opt-in features, not available in version 3.5, that provide better markup generation. Let’s look at those now.
Technique 19: Better markup generation in ASP.NET 4.0
In the previous section, we talked about the new features for markup generation. Other controls also benefit from this new effort, but to avoid conflicts with existing applications, you have to opt them in.
Problem
You want to adhere to web standards. Maybe you want better accessibility or to produce correct markup. Your objective is to take advantage of the new feature offered by ASP.NET 4.0 and to opt-in for better markup generation.
Solution
To improve site markup, part of the problem with certain controls in ASP.NET 3.5 is that <table /> tags are rendered around them, which controls the visual style of the control. The truth is that you don’t need tables to control appearance. You can use <div /> tags to do that, and with good results.
Previous versions of ASP.NET weren’t designed with control over markup in mind. If you needed real control over markup, you had to use basic controls or reproduce some of the advanced behavior of the controls by hand. This situation meant that useful controls with flexible features, like Login or FormView, weren’t used often because they didn’t generate good markup.
It’s true that you can write a control adapter to modify the control output, but this isn’t easy to do and has some drawbacks. Using a control adapter keeps you from using adaptive rendering in the way it was designed.
Adaptive Rendering in ASP.NET
You can alter markup control, but it’s not easy—you’ll need advanced knowledge of building custom controls. We’ll cover adaptive rendering control adapters in chapter 7.
Version 4.0 introduces a new attribute named RenderOuterTable that modifies the control output. The default value of RenderOuterTable is true. When it’s set to false, a specific set of controls doesn’t output a <table /> tag, but a <div /> tag instead (or it results in no container at all, depending on the control). The controls that implement this attribute are listed in table 4.1.
Table 4.1. Server controls that implement the new markup generation
|
Name |
Description |
|---|---|
| ChangePassword | Used with the Membership API to change the user password (see chapter 11). |
| CreateUserWizard | Used with the Membership API to register a new user (see chapter 11). |
| FormView | Used to display data coming from a database (see chapter 5). |
| Login | Used with the Membership API to log in a user (see chapter 11). |
| PasswordRecovery | Used with the Membership API to recover the user password (see chapter 11). |
| Wizard | Displays a generic wizard, composed of steps and a final summary. |
You can modify the control output by using code like this:
  <asp:Wizard runat="server" RenderOuterTable="false">
</asp:Wizard>
We’ve used the Wizard control in this example. The Wizard control in version 4.0 gives you full control over markup that’s generated for each step. You use a Layout-Template, which has been available in the ListView control since ASP.NET 3.5 SP1. The code is shown in the following listing. This approach is applicable to the Create-UserWizard control too, which inherits from Wizard.
Listing 4.1. Using the new Wizard control features to enhance markup
<asp:Wizard ID="MyWizard" runat="server"
     RenderOuterTable="false" DisplaySideBar="false">
  <LayoutTemplate>
    <asp:PlaceHolder ID="headerPlaceholder" runat="server" />
    <asp:PlaceHolder ID="sideBarPlaceholder" runat="server" />
    <asp:PlaceHolder ID="wizardStepPlaceholder" runat="server" />
    <asp:PlaceHolder ID="navigationPlaceholder" runat="server" />
  </LayoutTemplate>
  <StartNavigationTemplate>
      <p><asp:LinkButton ID="StartNextButton" runat="server"
              CommandName="MoveNext" Text="Next" /></p>
  </StartNavigationTemplate>
  <WizardSteps>
    <asp:WizardStep ID="WizardStep1" runat="server" Title="Step 1">
      Step 1
    </asp:WizardStep>
    <asp:WizardStep ID="WizardStep2" runat="server" Title="End">
      End!
    </asp:WizardStep>
  </WizardSteps>
</asp:Wizard>
If you browse the resulting page with one of the previous versions of ASP.NET, you’ll see markup similar to this:
<table cellspacing="0" cellpadding="0" id="MyWizard"
    style="border-collapse:collapse;">
  <tr>
...
  </tr>
</table>
In version 4.0, literally no markup is generated by the control because only the templates are rendered. The visual result, using CSS, is similar to what you would see in previous versions, as shown in figure 4.2
Figure 4.2. The appearance of the Wizard control markup is similar in ASP.NET versions 3.5SP1 and 4.0. The 4.0 markup is much cleaner, though.

This new feature is provided by a new LayoutTemplate property. You can specify the markup of the steps as in previous versions, but you can also indicate the template that’s used by the common layout. The results are the exact reflection of the HTML fragment we wrote, and you’ve got great control over the generated markup.
Discussion
We picked Wizard to use in this scenario because in version 3.5 it provided probably one of the worst examples of generated markup. Now, in version 4.0, it shines with great flexibility and gives you tremendous control over the generated markup.
Keep in mind that many of the controls that we’re not specifically discussing here have made minor tweaks in the current version and that every control has its own story in terms of flexibility. In the majority of cases, the new features presented here can help you achieve better adherence to web standards and accessibility.
The next scenario covers a different aspect of this problem, more related to combining ASP.NET with client-side JavaScript code: how to control the IDs that server controls generate. This issue is related to controlling markup, but is more specifically about working |with JavaScript.
Technique 20: Controlling ClientID generation
Prior to ASP.NET 4.0, playing well with JavaScript wasn’t easy. Server controls automatically generated the ID that’s associated with tags. This autogenerated ID differed from the original one that was applied to the tag. Version 4.0 has a new feature specifically designed to take control over ID generation.
This feature is especially useful when you’re dealing with container controls, which influence the child IDs. The generated ID is composed such that conflicts are avoided, much like what happens if you use ContentPlaceHolder in master pages.
Problem
When you’re referencing a server control in JavaScript, you can’t use the designated server-side ID. Frequently, the corresponding ClientID that’s generated at runtime is different than the server-side ID, depending on its containers. For generic JavaScript routines, you need a solution to simplify this behavior.
Solution
This solution isn’t limited specifically to JavaScript; it’s applicable to CSS styles, too. Even though it’s not always a good idea to apply a style directly to a control ID, it might be helpful in specific cases. Maybe you can’t modify the CSS, or you want to reuse the same style in different kinds of applications (where ASP.NET ones are only part of the picture).
Here’s a basic example of the problem:
<p><asp:Label ID="MyLabel" runat="server" /></p>

<p>ClientID of MyLabel is: <%=MyLabel.ClientID %></p>
In this situation (as in previous versions of ASP.NET) a control ID will be autogene-rated by default and will be similar to this markup:
<span id="ctl00_Body_MyLabel"></span>
The ID is composed by concatenating the different container IDs: ctl000 is the page ID, Body is the ContentPlaceHolder ID, and MyLabel is the real control ID.
Tip
You can read more about how the ClientID is composed on naming containers at http://mng.bz/397U.
It’s clear that the ID will vary, depending on the final hierarchy of controls in the page. This behavior isn’t flexible for our client-side code. To take care of this problem, ASP.NET 4.0 introduces a new property, called ClientIDMode. The different values it can take are listed in table 4.2.
Table 4.2. ClientIDMode property values
|
Value |
Description |
|---|---|
| AutoID | The default value for a page. Indicates that the same generation algorithm as in ASP.NET 3.5 SP1 should be used. |
| Static | This value forces the control to use the specified ID, ignoring the containers. This value isn’t intended for data-bound controls with multiple children because it will generate duplicated IDs. |
| Predictable | Useful in data-bound controls, the ID is generated by concatenating the ClientID value of the parent naming container with the ID value of the control. |
| If the controls generate multiple children, you can specify a ClientIDRowSuffix property. This property specifies text that’s appended at the end of the generated ID. If the property value is left blank, a sequential number is used. | |
| Inherit | As the name suggests, this value causes the ID that is generated to inherit the behavior of the container. This value is the default for server controls (which continue to work as in ASP.NET 3.5 SP1). |
Let’s change our previous snippet to include the following one:
<p><asp:Label ID="MyLabel" runat="server" ClientIDMode="Static" /></p>
Now the value will be rendered differently:
<span id="MyLabel"></span>
As you can imagine, the ClientIDMode property is helpful when you’re dealing with JavaScript code or you need to enforce CSS in specific scenarios. Note that the name attribute isn’t influenced by this property and remains the same, as in this example of an <input /> tag:
<input name="ctl00$Body$MyName"type="text" id="MyName" />
You can use the ClientIDMode property whenever you need to take full control of the real IDs that are generated at runtime, with no limitations. AutoID is the default value for pages and Inherit is the default for controls. Your pages and controls will behave as they did in ASP.NET 3.5 SP1 and you won’t break your code. We’re going to cover the Predictable value in chapter 5. This value is used in data-bound scenarios.
Discussion
Being able to control the generation of the ClientID is one of the most anticipated—and useful—features in ASP.NET 4.0 Web Forms. It gives you, the developer, real control over markup. Another common pitfall of Web Forms has disappeared.
Not limited to ASP.NET Web Forms, but built for the first time for this architecture, master pages maintain a common look in a web application. We’re going to explore their features in the next section.
4.2. Defining a common UI: using master pages
Master pages can be used by both Web Forms and ASP.NET MVC, and provide a common design surface for different pages. Their purpose is to simplify the sharing of a given UI across the same application by letting the developer compose different pages with a common base.
The magic behind master pages is performed by a set of entities:
- The master page file (.master)
- The ContentPlaceHolder control, used to represent the content placeholder in a master page
- The Content control, which contains the local page content that will be substituted in the generated page by combining the master page ContentPlace-Holder with the local Content controls
You can have multiple master pages in a given application. You can set them in the following ways:
- Directly in the @Page directive, using the MasterPageFile attribute
- Programmatically, in the PreInit event of Page
- In web.config, under configurationsystem.webpages
Figure 4.3 shows a schema of how master page substitution works against a page.
Figure 4.3. Master page behavior and architecture. The master page contains blocks of information that are substituted from the page. The result is a page that contains both the master page structure and the page content.

Most of the difficulties involved in master page substitution are taken care of by Visual Studio, so our focus will be on two more advanced and interesting techniques: using nested master pages and setting them programmatically.
Technique 21: Using nested master pages
When you’re dealing with a complex solution, you typically separate a site into different sections, where every section has specific features. Nested master pages come to the rescue in this kind of scenario. They let you componentize your solution, but at the same time maintain the exact look-and-feel across the various parts of your site.
Nested master pages have been supported in the runtime since ASP.NET 2.0 and by Visual Studio since version 2008 (with ASP.NET 3.5). Visual Studio 2010 increases the usability of nested master pages, and ASP.NET 4.0 provides the same features as previous versions did. Nesting master pages is a hot topic among developers, so we’ve decided to include this scenario in the book even though it’s not entirely new to 4.0. Nested master pages componentize your application, differentiate the UI based on the section the user is in, and maintain the same behavior across sections.
Problem
Our objective is to use a main master page that’s shared by other master pages. Each master page will be specific to a different section. We also need to differentiate them in some way, across sections.
Solution
If you want to nest a master page inside another one, you have to take care of some details. Let’s take a deeper look to understand the possibilities.
First of all, a master page can itself have a master page. Practically speaking, you can assign the MasterPageFile property of the @Master directive to another master page, as you’ll do for the @Page one.
To start, build a common master page. We’ll call this master page the root master page. The root page is the lowest common denominator for all sections. Other pages can use it directly, so we’ll keep it simple and usable.
The rule to obey is simple: you must give your ContentPlaceHolder controls inside the nested master page names that are identical to the names of the ContentPlace-Holder controls inside the root master page. You’ll be able to switch easily from one master page to another and maintain the same features across them. The first master page is shown in the following listing.
Listing 4.2. Markup for Root.Master
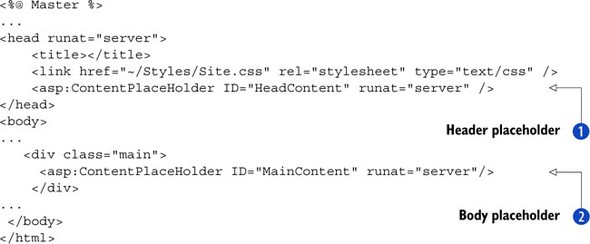
The idea behind this master page is to host as many entry points as possible ![]()
![]() to increase flexibility over specific nested master pages. Listing 4.3 contains a nested master page specifically designed for a hypothetical article section of a website, where the area on the
right side of the layout is fixed across the application and the central part (the body) can be overwritten from the root
master page.
to increase flexibility over specific nested master pages. Listing 4.3 contains a nested master page specifically designed for a hypothetical article section of a website, where the area on the
right side of the layout is fixed across the application and the central part (the body) can be overwritten from the root
master page.
Listing 4.3. Articles.Master enhances Root.Master layout
<%@ Master MasterPageFile="Root.master" %>

<asp:Content ContentPlaceHolderID="MainContent" runat="server">
    <h2>Articles</h2>

    <asp:ContentPlaceHolder ID="MainContent" runat="server" />

    <div class="rightCol">
        <h2>This is the right container</h2>
        <p>Some stuff here</p>
    </div>
</asp:Content>
In this master page, we’re providing some specific content for the local master page (a menu and a header), but we’re leaving the ContentPlaceHolder controls exactly the way they’re defined in the root master page. This trick lets you change the master page more easily because the placeholders maintain the same name across different master pages. Notice that the ID and the ContentPlaceholderID are identical, as they must be.
Figure 4.4 shows what Visual Studio 2010 looks like at design time. As you can see, using master pages in this way is fully supported.
Figure 4.4. Visual Studio 2010 fully supports nested master pages at design time. The master page content is grayed, so you can visually identify the page content.

You can nest more than two master pages, using the same technique. Obviously, it’s better to limit the total number of nested master pages so the Page Parser can avoid doing extra work.
This feature is useful and has no limits except your own needs and creativity.
Discussion
This solution isn’t difficult to implement, but it shows you the power of master pages. You can easily apply a basic user interface design to the whole site, but differentiate it from section to section, with minimal effort. There’s nothing more to add to complete this solution; the results are clear and the code is simple.
On a similar note, the next scenario is dedicated to a side issue you’ll encounter when you’re dealing with master pages: how to apply them programmatically, in response to specific needs.
Technique 22: Setting a master page programmatically
One of the common problems in modern applications is that users demand more control over the application, typically using a control panel to manage the organization of the UI. Programmatically setting the master page can help you implement this feature.
Problem
You want to implement a simple control panel to programmatically define the master page used at runtime by choosing from a list of available master pages.
Solution
You can specify master pages programmatically by setting the MasterPageFile property of the Page class. Because the master page changes the page’s control tree, you need to apply it before the Init event, using the PreInit event. This special event was added in ASP.NET 2.0 to perform this kind of action. Even though it’s not new to ASP.NET 4.0, it is useful and we decided to include it here to complete the discussion.
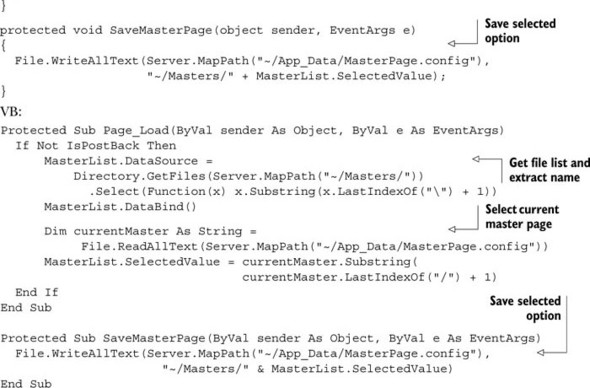
To begin implementing this feature, define a base class to represent the common page behavior. The code is shown in the following listing.
Listing 4.4. The base page reads from .config of the master pages and applies it


The MasterPage is read from the special .config file ![]() , then it’s assigned to the MasterPage (.Code in Text) property of the current Page (.Code in Text) instance. You’ll associate
this simple code with every page in the application by replacing the default inherited class System.Web.UI.Page with this one. In figure 4.5 you can see the running page.
, then it’s assigned to the MasterPage (.Code in Text) property of the current Page (.Code in Text) instance. You’ll associate
this simple code with every page in the application by replacing the default inherited class System.Web.UI.Page with this one. In figure 4.5 you can see the running page.
Figure 4.5. When you programmatically set the master page, the page automatically reads the correct value from the configuration and applies the master page at runtime.

To specify the master page, you need to write a simple page that can extract the file list. To simplify development, we’re going to save the master pages under a common directory named Masters, which is under the root. To save the value, all you need is to get the path and save the file to a place from which the code in listing 4.4 will read it. In a production application, you can enhance this feature by saving the value in a database and adding a caching system. You’ll learn how to do that in chapter 14.
The following listing shows you both the markup and the code used to programmatically change the master page.
Listing 4.5. Markup and code that saves the master page from the list

This solution is relatively simple, but it shows you how you can implement a common scenario (especially in content management systems [CMS] or community systems) with little effort. It also shows you how open ASP.NET is in terms of customization.
Discussion
Master pages are fundamental in every application: they simplify the process of maintaining the same user interface across the whole application. The basics are simple, but the scenarios proposed in this chapter will cover your most advanced needs for everyday applications.
Moving right along, we’re going to cover a relatively new feature of ASP.NET that was first introduced in ASP.NET 3.5 SP1 and further enhanced in the current release. URL routing, along with URL rewriting, is much diffused among modern web applications. They let you give vanity URLs to pages easily.
4.3. URL rewriting and routing with ASP.NET
Search engine optimization (SEO) techniques are quite popular in web applications these days because part of the traffic a public web site receives is based on search engines. How well a site performs against a search engine crawler can influence the success of a service or render it dead.
As a leading technology to build web applications, ASP.NET has several features related to SEO. One of the most important things to pay attention to is probably the URL of a page. The URL helps drive traffic by increasing your link value in a search engine index. It should also be easy for your users to remember. As you might have noticed, modern web browsers include a special search feature in the address bar: when you type something, the search history is searched, so a key word in the URL might help your site usability, too.
As an example of this issue, we’ll use a basic CMS where articles are saved in a database for ease of use. In this kind of situation, typical URLs are something like this: http://mysite/content.aspx?ID=15. For better results, our aim is to convert them to something like this: http://mysite/books/ASP.NET-4.0-in-practice/. Good-looking URLs like these can be supported in different ways, primarily using two techniques known as URL routing and URL rewriting.
ASP.NET 4.0 introduces full support to URL routing for Web Forms, too. Originally designed to be used by ASP.NET MVC, they officially became part of ASP.NET in version 3.5 SP1, under the System.Web.Routing.dll assembly. In ASP.NET 4.0, the classes have been moved from their previous location to System.Web.dll, the assembly where the ASP.NET core is contained.
To get the most from these two techniques, you need to understand their pros and cons by analyzing different implementations.
4.3.1. URL rewriting versus URL routing
Both rewriting and routing are devoted to presenting clean URLs to the clients, so what’s the difference between these techniques? Both are invisible to the client. As far as the browser is concerned, the URL is the rewritten one, not the real executed URL.
URL rewriting
URL rewriting is simple. When a client makes a request to a given URL, the rewriting component intercepts this request, based on a predetermined pattern, and changes the flow to execute a different URL on the same server.
URL routing
URL routing is a dispatching mechanism. You can bind a different set of URLs with a specific handler (an ASP.NET page) that will process the requests made to these URLs. Routing is managed by registering the routes in the application, linking together the path to be handled, and invoking the HttpHandler.
Differences between URL rewriting and routing
From a technical point of view, the main difference between URL rewriting and routing is that rewriting generates a new, transparent, and invisible request to a different resource (with its own flow), whereas routing invokes the corresponding handler. ASP.NET URL routing is implemented as an HttpModule that plugs into the pipeline before the Map Handler stage. Generally, rewriting is performed by a module that intercepts the request in the Begin Request stage, well before any other event has taken place. In some applications, rewriting is also performed by implementing an HttpHandler. Implementing HttpHandler avoids the extra overhead associated with HttpModules, which are executed for every request.
Figure 4.6 shows the different behavior of routing and rewriting.
Figure 4.6. URL routing vs. rewriting, head-to-head. Rewriting takes place at the very beginning of a request. Routing is handled after the MapHandler event, at the Handler stage.

Rewriting can be used by every type of application and isn’t limited to just ASP.NET ones. Thanks to the managed pipeline of IIS 7.x, you can easily use URL rewriting to rewrite PHP, ASP, or static pages. When you’re using Classic mode, URL routing needs to be associated with specific file extensions already mapped to ASP.NET, unless wildcard mapping (*) exists.
URL rewriting can be performed using advanced rules. You can base rewriting on the request status, the user status, the HTTP header, and so on; routing is less flexible.
Using Extensionless URLs
Traditionally, extensionless URLs are used to represent rewritten or routed URLs. To maximize performance, ASP.NET 4.0 includes a new *. mapping, created for specific scenarios. You don’t need to map *.*, as in previous versions, to use extensionless URLs. You also make gains in performance because static files won’t be handled by these modules. You can find more information about IIS prerequisites at http://support.microsoft.com/kb/980368.
You’ll use routing in new projects because it’s fully supported by emerging technologies like ASP.NET MVC and Dynamic Data controls. You’ll probably limit rewriting to existing ASP.NET applications. We decided to mention rewriting anyway because this book is focused on good advice for ASP.NET 4.0. Even though rewriting isn’t new to this version, this information might help you take your application to a higher level.
Technique 23: URL routing with Web Forms
The first scenario we’re going to talk about deals with a new web application or an existing one where clean URLs weren’t used previously. ASP.NET URL routing with Web Forms represents a great addition to ASP.NET because it’s fully integrated in the runtime and is available for both ASP.NET Web Forms and MVC. In this scenario, we’ll focus on Web Forms specifically, but the basic considerations are the same.
Problem
An ugly URL isn’t necessarily bad, but it’s not useful to your users and to your site ranking in the search engines. To be clear: bad URLs aren’t a technical issue, but an aesthetic one. A clean URL means that you care about your users to the same degree that you care about the site design: you want both to be simple and usable.
Our objective is to gain control over this relatively new feature in ASP.NET by implementing a simple routing mechanism for a fictitious content management web site.
Solution
To understand ASP.NET URL routing, we’ll take a deeper look at its implementation.
During the PostMapRequestHandler phase of HttpApplication, the routing module changes the Handler property of the current HttpContext. At execution time, ASP.NET executes the handler that was selected by this module. Consequently, if this information isn’t set, the module doesn’t interfere with the normal flow; a file from disk, if it exists, is served for non-routed requests.
Using URL Routing in Existing Applications
If you’re migrating from ASP.NET 2.0 or 3.5, you can use URL routing with no modifications. This feature is available automatically when you run your application with the ASP.NET 4.0 runtime. In ASP.NET 3.5 SP1, you had to manually register the HttpModule in web.config.
To register a route, you have to add a new RouteValueDictionary to the Routes property of the RouteTable class from the System.Web.Routing namespace. Typically, you can do that in global.asax or, if you prefer, in an HttpModule. The code is shown in listing 4.6.
ASP.NET 4.0 differs from ASP.NET 3.5 SP1 with respect to registering routes. Version 4.0 includes a special route handler, PageRouteHandler, designed to work with Web Forms. You can find more information about this new class on MSDN at http://mng.bz/5ENS.
Listing 4.6. Registering a route in your application
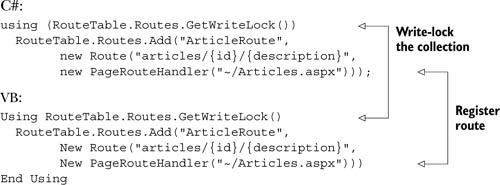
In this listing, a new route was registered for a path that contains articles/, text that represents the ID, and free text that represents the clean URL. You can also use a similar URL without specifying the ID. This example serves as a general footprint that you can modify to better suite your needs.
As you’ll see in technique 24, you can modify the RouteHandler to manage additional details about the request. The new PageRouteHandler class hides some of the details to increase usability. In fact, you can simply retrieve the route parameter by accessing the new RouteData property on Page. The following listing shows you how to access the parameters in your pages.
Listing 4.7. Easily accessing the parameters in local pages
C#:
protected int Id { get; set; }
protected string Description { get; set; }

protected void Page_Load(object sender, EventArgs e)
{
  Id = Convert.ToInt32(Page.RouteData.Values["id"]);
  Description = Page.RouteData.Values["description"] as string;
}
VB:
Protected Property Id() As Integer
Protected Property Description() As String

Protected Sub Page_Load(ByVal sender As Object, ByVal e As EventArgs)
    Id = Convert.ToInt32(Page.RouteData.Values("id"))
    Description = TryCast(Page.RouteData.Values("description"), String)
End Sub
You can access parameters easily in typical scenarios where you need to pass simple values. If you need to specify different parameters (like an ID and a page number), but the last one is not mandatory, you can do one of the following things:
- Define a default value for a parameter and register it with the route (using this method involves overloading
- Define multiple routes and check for null parameters in the page
If you opt for the last way, keep in mind that the more routes you have, the more time ASP.NET will consume to identify the right one. Registration order is also important because the first matching route will be used.
Some situations require you to have more control over the parameters. The following listing shows you a more advanced route registration.
Listing 4.8. Registering a route with advanced parameters
C#:
Route articlesWithPageRoute =
   new Route("articles/{id}/{description}/page{page}",
       new PageRouteHandler("~/Articles.aspx"));

articlesWithPageRoute.Constraints = new RouteValueDictionary {
   { "id", @"d{1,5}" },
   { "page", @"d{1,5}" }
};

RouteTable.Routes.Add("ArticleRoutePaged", articlesWithPageRoute);
Dim articlesWithPageRoute As Route =
   New Route("articles/{id}/{description}/page{page}",
     New PageRouteHandler("~/Articles.aspx"))

articlesWithPageRoute.Constraints = New RouteValueDictionary
        From {{"id", "d{1,5}"}, {"page", "d{1,5}"}}

RouteTable.Routes.Add("ArticleRoutePaged", articlesWithPageRoute)
In this listing, a new route is created by adding a new pattern and registering two constraints on the id and page parameters to accept only integer values. We’ve chosen to implement a new route because the patterns aren’t similar (there’s a string [page] in the new one). After registering this new route, you can automatically pass the corresponding values to the page and read them in the same way. The advantage is that now non-numeric values won’t be passed to the page, which restricts the allowed requests. You still can’t forget to validate the parameters; it’s always a best practice to do that.
If you run this example, you’ll achieve a result similar to the one shown in figure 4.7.
Figure 4.7. Notice the address bar on the browser: it’s a sign that routing has been used. The real page that was requested is different from the one displayed in the address bar.

Later on, we’re going to discuss how you can define routes with granularity and precisely control their behavior.
Discussion
URL routing in ASP.NET 4.0 introduces new features to the consolidated ones available since ASP.NET 3.5 SP1. Now routing is a more mature feature, with a new native integration with Web Forms, and more brand-new scenarios are accounted for.
Clean URLs are a hot topic these days among web developers, so it’s important to understand how URL routing can help your application gain more accessibility and achieve better search-engine indexing.
So that you can fully appreciate URL routing, now we’re going to cover some advanced situations that you might encounter during your work.
Technique 24: Advanced URL routing scenarios
The URL routing mechanism in ASP.NET supports advanced scenarios, such as constraints, default values, and adding additional data to the route. URL routing isn’t limited to just Web Forms and can generally be applied to IHttpHandler, too.
Problem
URL routing is flexible enough to be applied to most of the common routing strategies. But how do you implement advanced routing scenarios like validating the route parameters or providing default values? We’re going to address these problems in this section.
Solution
Let’s go back to listing 4.8 for a moment. In that example, we showed you how to add custom data while registering a route. We defined two constraints to limit the number of values that would be considered valid for the parameters. Listing 4.9 shows you more advanced options. This listing specifies a default value for the description parameter, defines a new constraint to limit requests to GET ones, and passes an arbitrary value with the route.
Listing 4.9. Using more advanced options when registering a route
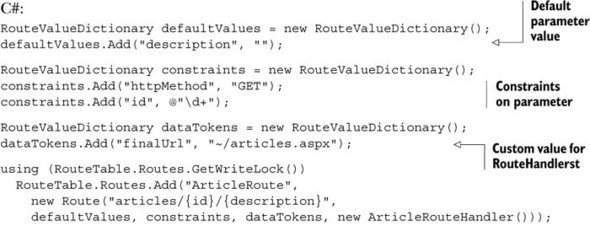

In listing 4.9, we didn’t use PageRouteHandler, but defined a new RouteHandler to handle the request. This new route handler is defined in listing 4.10; it receives the request and provides the effective response.
If you need a / character in the route name to specify multiple categories, you can define a route URL like Categories/{*Category}. The * character allows a / character in the route parameter so that you can further define your pattern.
During route registration, we provided additional information via a custom value, which is passed to the route handler. Using a custom value is especially useful if you want to use a single route handler to manage different behaviors. By defining a new route handler, you can implement custom logic, such as providing a custom authorization mechanism or validating user input, even before the page is requested. The following listing shows you how to do that.
Listing 4.10. A simple route handler to manage routing


To use this new route handler, we created a new interface, IArticlePage. This interface will be used by the pages that execute the final request. You can also use this interface in scenarios where you prefer to have control over parameters. You won’t directly access the RouteData property of System.Web.Page, but instead you’ll rely on a strongly typed property. The next listing contains the code used in the Web Form.
Listing 4.11. A Web Form using the custom route handler
C#:
public partial class Articles : System.Web.UI.Page, IArticlePage
{
  public int Id { get; set; }
  public string Description { get; set; }

  protected void Page_Load(object sender, EventArgs e)
  {
    IDValue.Text = Id.ToString();
    DescriptionValue.Text = Description;
  }
}
VB:
Public Partial Class Articles
  Inherits System.Web.UI.Page
  Implements IArticlePage

  Protected Property Id() As Integer Implements IArticlePage.Id
  Protected Property Description() As String Implements IArticlePage.Description
  Protected Sub Page_Load(ByVal sender As Object, ByVal e As EventArgs)
    IDValue.Text = Id.ToString()
    DescriptionValue.Text = Description
  End Sub
End Class
You can use this approach with IHttpHandler in general, so it’s applicable when you’re dealing with non-HTML responses, such as images or documents.
One problem related to routing is how to generate URLs in markup without hard-coding them. ASP.NET 4.0 introduces a helper function that you can use to safely generate a routed URL, which internally calls the GetVirtualPath method from Routes in RouteTable:
C#:
string url = Page.GetRouteUrl ("ArticleRoute",
  new RouteValueDictionary {
                            { "Id", 5 },
                 { "Description", "Test-URL" } });
VB:
Dim url As String = Page.GetRouteUrl("ArticleRoute",
        New RouteValueDictionary() From {
                            {"Id", "5"},
                 {"Description", "Test-URL"}})
If you prefer to define the links in markup and not in code, a new Expression Builder is supported. Expression Builders are specially defined expressions that can use custom classes to generate code at runtime by using a markup expression. You can add a link in your page by simply using this snippet:
<asp:HyperLink
   NavigateUrl="<%$ RouteUrl:RouteName=ArticleRoute,id=5, Description=Test-Url %>" Text="View #5 article" runat="server" />
Note the <%$...%> syntax that’s designated for the Expression Builder. This approach has the same results as the previous example in listing 4.11, but is more useful to include in markup. At runtime, both these snippets generate the correct routed URL. If you change part of the path, the results remain the same: the routing engine generates the correct routed URL for you.
You can also redirect by using Response.RedirectToRoute. Like the Page.GetRouteUrl method, this method accepts the same parameters and then redirects to the appropriate generated URL:
C#:
Response.RedirectToRoute("ArticleRoute",
          new RouteValueDictionary {
              { "Id", 5 },
              { "Description", "Test-URL" } });
VB:
Response.RedirectToRoute("ArticleRoute",
          new RouteValueDictionary from {
              { "Id", 5 },
              { "Description", "Test-URL" }
          })
If you need to use a 301 HTTP Status Code, use the equivalent RedirectToRoutePermanent method.
Implementing Custom Route Constraints
You can implement custom constraints by writing a class that implements the IRouteConstraint interface. Using its Match method, you can validate complex parameters, such as date or email. You can find more information in the MSDN documentation at http://mng.bz/2BtB.
URL routing was built with customization in mind, so you can implement additional features if the default ones don’t fit your needs. In this scenario, we took a look at the more common advanced features. For additional details about how to customize ASP.NET URL routing, consult the MSDN documentation at http://mng.bz/8DDI.
Discussion
ASP.NET 4.0 URL routing offers interesting features, mixing some new and existing stuff together to simplify building nice-looking URLs in your applications. URL routing has a strong link with ASP.NET, and, because you can use it in both ASP.NET Web Forms and MVC, it’s definitely a topic you want to follow.
To continue our examination of routing and rewriting, the next topic we’ll address is probably the most diffused among ASP.NET developers coming from ASP.NET 2.0 or 3.5. UrlRewriting.NET is in fact considered the de-facto solution when dealing with URL rewriting in previous versions of ASP.NET.
Technique 25: Rewriting in practice: UrlRewriting.NET
URL rewriting might be able to help you when you need to control access to resources, not just ASP.NET pages (in general, when we refer to rewriting, we’re referring to both Web Form pages and MVC actions).
The de-facto class library used in ASP.NET applications is UrlRewriting.NET. You can freely download it at http://urlrewriting.net/. Using it is free, even in commercial projects. A similar alternative exists at http://www.urlrewriter.net/. They have similar features, but UrlRewriter.NET probably has more features that are similar to the Apache mod_rewrite module.
Problem
URL routing is scoped to ASP.NET pages, so if you need to rewrite non-ASP.NET resources or perform redirections, you can’t use routing. UrlRewriting.NET can help you solve these specific problems.
Solution
UrlRewriting.NET contains an assembly that you can reference in your application. After you reference the assembly, you can start using its features.
The rules are mapped in the configuration files, using a regular expression. The following listing contains an image rewritten to the real path.
Listing 4.12. Rewriting an image to a real path

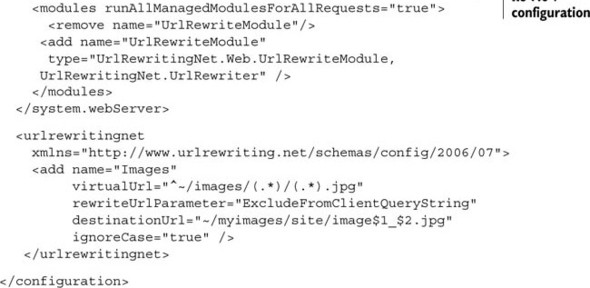
In this listing, we’re rewriting requests to a path like this one:
/images/150/home.jpg
to a path like this one:
/myimages/site/image150_home.jpg
Rewriting paths in this way can be especially useful if you need to provide a better-looking URL for automatically generated images.
If you prefer, you can define the rules in an external file, using the web.config delegation feature:
<urlrewritingnet configSource="Rewrite.config" />
Note that to use this module, you have to map the extension you want to ASP.NET if you’re using IIS 6.0+ or IIS 7.0+ in Classic mode, or move the module declaration under system.WebServer section if you’re using IIS 7.0+ in Integrated mode.
You can use UrlRewriting.NET with ASP.NET pages, and you’ll get the same URL routing behavior; PostBacks are fully supported, too.
You can also use UrlRewriting.NET to perform redirects. When you’re adding a rule, you have to specify the redirectMode attributes, as in this snippet:
<add name="FromHTMLToASPX"
  virtualUrl="ˆ~/(.+).htm(.*)"
  redirectMode="Permanent"
  rewriteUrlParameter="ExcludeFromClientQueryString"
  destinationUrl="~/$1.aspx"
  ignoreCase="true" />
This rule automatically redirects the request to HTML static pages to ASP.NET ones, maintaining the same base URL. When you’re dealing with a massive site refresh, you’ll want to use this technique because you can continue to maintain the old URLs. And, thanks to the Permanent value in the redirectMode attribute, an HTTP 301 Moved Permanently status code will be sent, so search engine spiders update the referenced page URL automatically.
Permanent Redirection with ASP.NET 4.0
ASP.NET 4.0 introduces a new method on the HttpResponse class from the System.Web namespace called RedirectPermanent. You can use it to emit a 301 HTTP status code where you need to do it in code.
UrlRewriting.NET fully supports providers, so you can extend the rule engine. You can also add the rules programmatically (via code) if you need to take control of rules using a control panel and assign them at runtime. You can find more information about this topic in the corresponding documentation at http://www.urlrewriter.net/.
Discussion
URL rewriting is similar to URL routing, but lets you take more control over the results. You can even perform redirections using this technique.
URL routing and rewriting can help you increase both usability and search engine optimization. You can produce a better application, so you should definitely use them. If you only need to provide clean URLs in ASP.NET pages, consider URL routing; it’s fully integrated in the runtime and provides you with advanced features, like an Expression Builder and a specific class to help you build correct URLs programmatically.
4.4. Summary
ASP.NET 4.0 introduces new features in Web Forms that will bridge the gap between better control over markup and ease of use. This chapter contained a brief overview of master pages, whose support has been improved both in the runtime and the VS 2010 IDE. Using master pages, you can manage the site layout easily. By nesting them, you’ll have more control over different sections. By setting them programmatically, you’ll get even more control over the results.
Web Form fundamentals remain the same as in previous versions, but in ASP.NET 4.0, standards compliance is a driving factor. New features in this area give you greater control over generated markup by removing automatically added HTML tags. The new ClientID mode will simplify your JavaScript code because you can refer to server control in an easier way.
Last, but not least, URL routing is now fully integrated in ASP.NET. You don’t need to register anything. You can start using these good-looking (and SEO-friendly) URLs with little effort.
In general, though it’s not revolutionary, Web Forms 4.0 introduces a lot of goodies for you as a developer. These improvements will continue to simplify your day-today work and assist you in creating great ASP.NET applications.
Moving on, but in the same general direction, the next chapter will cover a key aspect of web applications (and Web Forms in particular): how to display data from your sources (such as a database) in a page.