
Chapter 11. ASP.NET authentication and authorization
The previous chapter was about code security and common threats in web applications. At this point, you have a clear understanding of what security is and how to avoid problems by analyzing user input. Now it’s time to talk about two important and somewhat related topics—authentication and authorization.
ASP.NET has great flexibility in terms of authentication and authorization, which let you control access to web resources based on a different matrix of permissions by using usernames and roles. By protecting an application from unwanted access, you can add special features that designated users can use to maximize the usability of the site. An administrator, for example, can just log in and perform tasks like adding new content, modifying the site settings, or navigating the user list. On the other hand, a user can log in and participate more actively in the life of the site, adding comments, writing new posts in a forum, or giving feedback about the content. All these scenarios are regulated by authentication and authorization, which are fully integrated and supported by the ASP.NET infrastructure. Before moving on, you need to fully understand how ASP.NET implements their support so that you can gain control of and customize the default behavior to reflect your needs.
This chapter will focus on how to use authentication to perform common actions, like user registration, prompting for a password, or logging in. The bulk of the chapter is dedicated to authorization and authentication, which will help you protect special features for normal or anonymous users. A smaller part of the chapter is devoted to customizing the whole process, which involves replacing the default behavior with your own business rules.
The idea behind this chapter is to show you how to add a secure section to your website by following a simple list of steps. You’ll be able to authorize the right users to have access to a reserved part of your website. The topics included in this chapter are valid for both Web Form- and MVC-based applications.
11.1. Authentication and authorization basics
ASP.NET has complete support for both authentication and authorization. We’re going to start by clarifying what authentication and authorization are in the ASP.NET infrastructure. A clear definition will help you understand how to change the default mechanisms to better suite your needs.
The terms authentication and authorization do not represent the same concept. Authentication is the action associated with determining the identity of the user. Authorization is the step necessary to grant a user (who could also be anonymous) access to a requested resource. Both these features are implemented in ASP.NET with HTTP modules (described in chapter 1), using the events AuthenticateRequest and AuthorizeRequest from HttpApplication. ASP.NET provides great flexibility and allows you to fully change the default behavior. You’ll find more information on extending ASP.NET in chapter 14, where we look at some more advanced scenarios.
Authentication and authorization are commonly associated with security because their function is to protect resources from unwanted access. You can find the options available in ASP.NET in tables 11.1 and 11.2.
Table 11.1. Authentication options in ASP.NET
|
Name |
Description |
|---|---|
| FormsAuthentication | Authentication is performed using a form, and the identity is stored in a cookie or in the URL. This authentication type is the most common. |
| WindowsAuthentication | This option is used in intranets because it requires Windows. credentials to be sent by the browser. |
Table 11.2. Authorization options in ASP.NET.
|
Name |
Description |
|---|---|
| UrlAuthorization | Authorization is performed using UrlAuthorizationModule, which checks web.config for authorized users and checks roles against a specified set of URLs. |
| FileAuthorization | Authorization is performed using the FileAuthorizationModule, by checking the file ACLs of the requested file. The current thread identity is used. |
You can use any combination of these options. Figure 11.1 shows how the options are integrated in the ASP.NET pipeline.
Figure 11.1. Authentication and authorization modules are integrated in the ASP.NET pipeline. This figure shows how they interact with the request and response flows.

In a public web site, the most common options that are used are FormsAuthentication and UrlAuthorization. FormsAuthentication has the advantage of being useful when WindowsAuthentication is not. The latter can be used only in intranets, where the Windows token can be sent by the browser and the need for another validation mechanism doesn’t add anything to the application. The login is, in fact, performed when the user is logging in to the operating system, using centralized authentication storage like Active Directory (AD). WindowsAuthentication is useful only in an extremely limited set of situations, when the site is internal only.
On the other hand, FormsAuthentication is used when the authentication token from the operating system can’t be sent across the boundaries, (which are what firewalls and the internet are). It’s also much more flexible because the user storage can be changed, and you don’t need to create a user in AD.
You don’t use FileAuthorization unless you want to grant access to resources by simply using Windows ACLs (by setting permissions on users and groups on the disk). In 100% of the situations you’ll encounter, you’ll end up using UrlAuthorization, which lets you map users and roles to a URL inside the application.
Our next step is to analyze how you can use FormsAuthentication and UrlAuthorization in a common scenario to protect the application from unwanted access.
Technique 65: Using FormsAuthentication and UrlAuthorization
When you’re dealing with a secure section of your website, you need to authenticate the user with a corresponding pair of username and password inserted in a Web Form.
As we previously noted, FormsAuthentication gives its name to the corresponding class from the System.Web.Security namespace. This class has some helper methods that you use to initialize the corresponding elements. The best way to learn how to use FormsAuthentication is to set up a simple example. At the end of this section, you’ll have mastered this kind of authentication.
Problem
You want to build a system to let users authenticate themselves and access only a part of your website when they’re logged in. This feature is a common one to implement and is available in the majority of websites. You also want to let the user sign out to complete the authentication flow.
Solution
FormsAuthentication supports cookie-based authentication and cookieless authentication by embedding the token in the URL. The configuration is done via web.config, under the configurationsystem.webformsAuthentication section.
Before we move forward, we need to configure this section. The following listing shows a common configuration.
Listing 11.1. A common authorization configuration

When the cookieless attribute is set to AutoDetect, ASP.NET decides whether to use cookie or cookieless support, based on the capabilities of the requesting client. The name attribute contains the name of the corresponding cookie. defaultUrl and loginUrl are used to specify the default page after the login and the login page itself. The timeout attribute, expressed in minutes, is used to control the timeout, and slidingExpiration lets you renew the ticket every time it’s accessed if it’s set to true.
When the authentication is performed, a security ticket is issued, using the FormsAuthenticationTicket class. In figure 11.2, you can see how the FormsAuthentication’s HttpModule works.
Figure 11.2. The FormsAuthenticationModule issues a new ticket, plus a new principal with the correct user credentials. The ticket will be used for the rest of the requests.

The next step is to build a basic interface to collect the username and password. For now, we won’t check for this combination in a database (which is a completely different topic that we’ll address later in this chapter); right now, we want to focus on authentication, which is an architectural aspect of your application, not an implementation detail.
To start granting access to a given resource, we have to call the RedirectFromLoginPage method from the FormsAuthentication class. The configuration is read from web.config, so no other actions are required. The following snippet shows how to do this:
C#:
FormsAuthentication.RedirectFromLoginPage("username", false);
VB:
FormsAuthentication.RedirectFromLoginPage("username", False)
The first parameter represents the username, and the last one specifies whether the ticket must be created as persistent. If this value is set to true, you’ll achieve the “remember me” feature available in most applications.
When a user is authenticated, ASP.NET associates an instance of the GenericPrincipal class to the corresponding User property on HttpContext. This instance is of type IPrincipal. IPrincipal is a special interface used to represent different identity types inside ASP.NET. It holds an IIdentity that represents the user identity plus its roles as an array of strings. In the case of FormsAuthentication, the identity is an instance of FormsIdentity, specifically created for this kind of authentication.
Accessing the Current Principal
You can access the current principal, holding both the identity and roles, via the User property of the HttpContext singleton class (using the Current property), or directly via the User property on the Page class.
To display the current username, all you have to do is use code like this:
C#:
string username = HttpContext.Current.User.Identity.Name;
bool isAuth = HttpContext.Current.User.Identity.IsAuthenticated;
VB:
Dim username as String = HttpContext.Current.User.Identity.Name
Dim isAuth as Boolean = HttpContext.Current.User.Identity.IsAuthenticated
Now it’s time to make our default page secure. To specify this rule, we have to add a special configuration fragment to our web.config because URL authorization will check the configurationsystem.webauthorization section for the fragment. A sample configuration is available in the following listing.
Listing 11.2. The authorization configuration element
<authorization>
  <allow users="daniele,stefano,marco" />
  <deny roles="normaluser" />
  <deny verbs="POST" />
</authorization>
URL authorization supports allow or deny policies, plus the type of resource to be secured: users, roles, or HTTP verbs. By default, ASP.NET contains an allow policy for * users, and if the authorization isn’t granted, a 401 HTTP status code is returned.
For users, * means every user, and ? represents an anonymous one. Note that the rules are applied using a short-circuiting mechanism: the first true rule will exit, and the others will not be evaluated.
To protect a single page or directory from anonymous user access, you have to use a configuration like the one in the following listing.
Listing 11.3. Configuration to prevent anonymous access from default.aspx
<configuration>
  <location path="default.aspx">
    <system.web>
      <authorization>
        <deny users="?" />
      </authorization>
       </system.web>
     </location>
</configuration>
Local rules will always be evaluated before the general ones, so be careful when you set them.
When a user accesses the default. aspx page as anonymous, the UrlAuthorizationModule intercepts the request and automatically redirects the user to the login page, passing the return URL via the ReturnUrl query-string parameter. After the login, the user is redirected to the requested page; if the parameter is empty, the defaultUrl attribute from web.config is used. You can see this mechanism in action in figure 11.3.
Figure 11.3. The login page displays username as the current user after the user login. You can customize this page so the user can find the most relevant stuff when they’re logged in.

More Flexibility in Authentication and Signout
If you need more flexibility (you don’t want to automatically redirect the user), you can use the SetAuth-Cookie () method on the FormsAuthentication class. Despite its name, it works with cookieless authentication, too.
To clear the authentication cookie and sign out the user, you can use the SignOut method.
By using FormsAuthentication, you don’t need to take care of the code associated with creating a ticket, validating it, or destroying it. With UrlAuthorization, the entire infrastructure regulates access to available pages to designated groups of users only.
You need to understand that in an ASP.NET application it doesn’t make sense to write your own authentication and authorization mechanism; you can customize the behavior of these building blocks for your own needs.
Discussion
FormsAuthentication and UrlAuthorization are fundamental when you’re dealing with application security in ASP.NET. The example shown in this section doesn’t contain anything other than the core code necessary to handle authentication and authorization. In a typical application, you’ll need to authenticate a user against a database, but this task is repetitive and can lead to code duplications, or worse, bugs.
When you need to authenticate against a database, the Membership API and Roles API come to the rescue so that you can focus on the application features. In the next section, you’re going to learn about these APIs, using FormsAuthentication and Url-Authorization as the pillars for your implementation.
11.2. Handling user authentication: introducing the Membership API
The Membership API is a set of programming APIs used to interact with membership features inside an ASP.NET application. The Membership API is based on the Provider Model design pattern.
Provider Model is a variant of the Strategy pattern, whereby the implementation details can be selected at runtime. As shown in figure 11.4, Strategy is an abstract type declaring a common interface, used by the ConcreteStrategy (the algorithm implementation). Context uses the common interface to execute the algorithm implementation given by ConcreteStrategy and holds a reference to this concrete object.
Figure 11.4. The Provider Model design pattern is based on the Strategy pattern, so their diagrams are similar. For each Strategy, one or more ConcreteStrategies exist.

In the Membership API, the Membership class from System.Web.Security corresponds to the Context, and the MembershipProvider class is the Strategy. Depending on the concrete implementation (the storage you want to query for membership information), you’ll have a specific class for the ConcreteStrategy; for SQL Server, this class is SqlMembershipProvider.
The advantage of this approach is that the API will never change and neither will the provider-base class (the interface). You can swap concrete implementations (the providers themselves) without changing anything else. This approach is especially useful when you’re building your application from scratch because it lets you concentrate on other aspects of your design. You’ll have a building block ready to be used to implement a repetitive task.
Under the hood, the Membership API is built on the ASP.NET pipeline, so it leverages both FormsAuthentication and UrlAuthorization
To move on with our step-by-step guide to building a secure section in our website, we need to start implementing a simple application using the Membership API to grant access to a user who’s logged in. We’re going to implement two of the most common features in an application: registration and login. At the end of this section, you will have added a working, secure section to your website.
Technique 66: Implementing a user login using the Membership API
The Membership API is what we need to use to add a login feature to our site. Because we’re using the Provider Model design pattern, you just need to understand how to leverage this model to use the providers already available with ASP.NET and build a simple login system. The aim of the Membership API is to make you productive by letting you change the inner logic using a simple provider mechanism.
Problem
We want to build a secured section on our site, using the Membership API to grant access to our reserved area to authenticated users only. We want to provide a complete experience, so we’ll build user registration, password reminder/reset, and user login.
Solution
Thanks to Provider Model, which was introduced in version 2.0, the login process in ASP.NET is easy to implement. The Membership API uses a dependency injection to read the configuration from the web.config configurationsystem.webmember-shipproviders section, so you can change the provider without changing the code. If you need to change the implementation, all you need to do is change the default provider used in web.config. Neither the API nor the interface will change, and you don’t need to alter any part of your code to reflect a different implementation.
This feature is important when you’re building applications that target different customers. You can change the provider that’s used from SQL Server to Oracle if your customer needs it, and you’re done; you don’t have to change anything else to implement this particular feature.
The Membership API ships in ASP.NET with two providers:
- SqlMembershipProvider supports SQL Server 7, 2000, 2005, and 2008 (even in Express/MSDE flavors)
- ActiveDirectoryMembershipProvider is specific for AD use in an intranet
For our example, we’ll use SqlMembershipProvider to store the users in a SQL Server database because it’s more common than using AD. Either way, the approach is identical because they both share the same base.
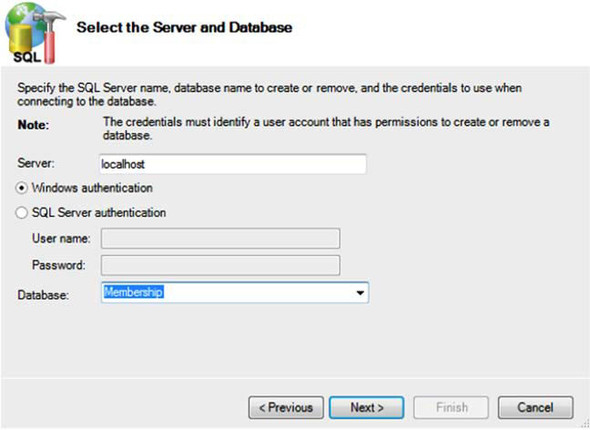
To start, you need to launch the aspnet_regsql.exe command-line tool under the .NET Framework directory (C:WindowsMicrosoft.NETFrameworkv4.0.30319). This tool builds the database for you, so you can store the users in SQL Server. Figure 11.5 shows the wizard in action.
Figure 11.5. The aspnet_regsql.exe tool, when launched without other parameters, has a graphical wizard for configuring the database. You can also launch it programmatically with parameters to create the schema in unattended mode.
The typical user configuration in web.config that enables the SQL Server provider for the Membership API is shown in the following listing.
Listing 11.4. The SqlMembershipProvider web.config configuration
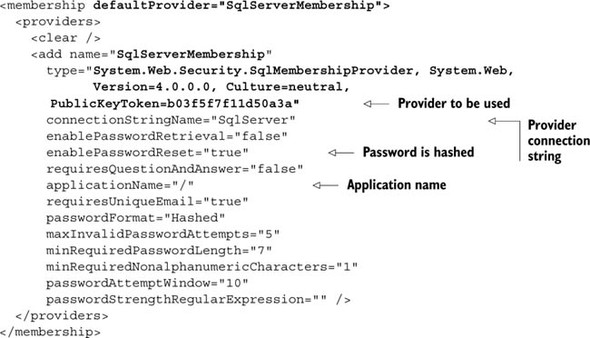
The default Membership provider for SQL Server uses a custom set of stored procedures and tables. If you already have a database in place, you need to use a custom provider, which is addressed later in this chapter.
The applicationName attribute is important because the default provider for SQL Server supports multiple applications in the same database; this attribute indicates the name of the current application. If you omit this value, the default virtual directory path is used. Table 11.3 lists the methods that are most often used with the Membership class.
Table 11.3. Methods most often used with the Membership class
|
Name |
Description |
|---|---|
| ChangePassword | Changes the password of the specified user. |
| CreateUser | Creates a new MembershipUser. |
| DeleteUser | Deletes the specified user. |
| GetUser | Gets the specified MembershipUser, given the username. |
| ValidateUser | Validates the username and password with a Boolean response. |
The class members in the Membership API are not directly called in your code; because they’re part of the Framework, they’ll remain the same. They use the defined Membership provider specified in web.config, so the code can be predetermined. For that reason, ASP.NET contains a number of custom controls that automate the corresponding scenarios, so you can take advantage of them without explicitly writing any code.
Let’s take a look at some common scenarios with corresponding solutions that use ASP.NET controls and Membership API features.
Registering a new user
If you need to create a new user, you can use the CreateUserWizard control, as in the following listing.
Listing 11.5. Using the CreateUserWizard to create a new user
<asp:CreateUserWizard ID="CreateUserWizard1" runat="server">
  <WizardSteps>
    <asp:CreateUserWizardStep runat="server" />
    <asp:CompleteWizardStep runat="server" />
  </WizardSteps>
</asp:CreateUserWizard>
The CreateUserWizard control adds a simple wizard to create the user, as shown in figure 11.6.
Figure 11.6. The CreateUserWizard control displays a list of fields that let the user register in your application. You can customize this control using a template.

The Membership API is Just For... Membership!
Membership information is about collecting a username, an email address, and a password. So the Membership API (and providers) supports only this kind of information. If you need to append more properties to a user, you don’t need to extend the Membership API; instead, you use a new provider-based feature called the Profile API. We’ll cover this API in detail in chapter 13.
You literally don’t need to write a single line of code to implement user registration; the magic is performed by the CreateUserWizard control, which automatically invokes the CreateUser method of the Membership class (that will use the corresponding concrete provider specified in web.config).
Implementing user login
As in the previous example, the login is performed by a specific control: the Login control. Behind the scenes, this control uses the authentication settings in web.config, which in this case is FormsAuthentication. The following snippet contains the corresponding markup used to display a login form:
<asp:Login ID="Login1" runat="server" />
This control is simple to use, and it’s powerful—it automatically performs the associated action. A screenshot of the control is shown in figure 11.7.
Figure 11.7. The Login control renders a simple pair of fields. The user enters a username and password; if they’re correct, the user is logged in to the application.
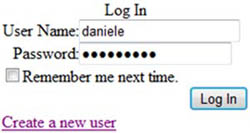
In its simplicity and power, this control is probably the most tangible sign of the force of the Membership API: just write a single line of markup in your page, and it automatically takes care of tasks like validating user input, performing calls to the provider, and notifying the user.
Recovering or changing the user password
If you need to reset the user password, you use the PasswordRecovery control. To change the user password while the user is logged in, a ChangePassword control is available. The following snippet contains the markup necessary to implement the password recovery feature:
<asp:PasswordRecovery ID="PasswordRecovery1" runat="server" />
PasswordRecovery control supports body and subject personalization for the generated email. You’ll find more information in the documentation on MSDN at http://www.mng.bz/NK3v.
Discussion
The Membership API lets you take advantage of the controls that ASP.NET provides. The default providers will work in many situations, but even if you need to target different storage or a complex logic, the approach remains the same: thanks to Provider Model, all you need to do is change the concrete implementation (the provider) and not the rest of the code.
If you’re comfortable with the default providers, you can insert this type of feature in your applications with little effort, and with no code at all, in just a couple of minutes. Not only that, this code is tested and developed by Microsoft to be safe, robust, and scalable. How cool is that?
Next up, we’re going to look at some other controls to complete the picture we’re making of ASP.NET security.
Other security controls
You can use other security controls to enhance the features related to authentication and authorization in ASP.NET, and increase your productivity at the same time. Table 11.4 contains a list of the security controls you can use in ASP.NET. Using these controls, you can write less code to implement the corresponding features.
Table 11.4. ASP.NET security controls
|
Name |
Description |
|---|---|
| ChangePassword | Changes the password of the user who is currently logged in. |
| CreateUserWizard | Creates a new user. |
| Login | Provides the login form and authenticates the user. |
| LoginName | Displays the current username. |
| LoginStatus | Shows a login link when the user is anonymous, or a logout link when the user is logged in. |
| LoginView | Provides an alternate view for anonymous and logged-in users. |
| PasswordRecovery | Recovers a user password. |
The Membership API lets you quickly implement all you need to use security in your application, but sometimes you just need to group users to simplify policy management. If this is what you need to do, the Roles API was invented for you.
11.3. Adding support to roles using the Roles API
In real-world applications, it’s often useful—and necessary—to divide users into groups. By using groups, you specify a common set of rules to all users in the group and assign the group to roles. In this way, you can assign an entire group of users who perform similar actions to a particular role.
Using groups of users lets you easily define your security policy. You can specify, for example, that the Editor group is the one in which the users with editing permissions on your application will reside. You can protect your resources using a specific role. When someone needs to be added to this role, you don’t need to specifically map this new user to the set of pages that implements this feature; instead, you simply add that user to the corresponding role. This process can greatly simplify your work, especially in large applications where it’s difficult (if not impossible) to work with explicit permissions on individual users, but it’s more pragmatic to work using groups.
Roles are fully supported in ASP.NET by the Roles API and Roles providers. Let’s take a look at how to implement role-based authentication and authorization to our existing secured site section.
Technique 67: Implementing a role-enabled login using Roles API
The Roles API is similar to the Membership API in terms of simplicity and power. To implement a role-enabled login, you need to leverage the Membership API; the Roles API is only about roles, not user management. This scenario is based on the login system we worked on in section 11.2. After you’ve completed the code, the user can log in, and you’ll be able to assign users to roles.
Problem
You need to grant only administrative users access to a given directory (named admin). You’re going to configure the Roles API to use the SQL Server provider and specify the related authorization rules.
Solution
Let’s take a step back to technique 65. Just like every authentication mechanism in ASP.NET, FormsAuthentication is based on concrete IPrincipal and IIdentity implementations. As we’ve already discussed, the security principal is composed of the Identity and the user roles.
The Roles API is composed of the providers and the API itself, plus a special Http-Module: the RoleManagerModule in System.Web.Security. This module is responsible for handling the PostAuthenticateRequest event on HttpApplication and for generating a new RolePrincipal instance that’s associated with the current thread principal. The result is the ability to use roles via the User property on HttpContext, which you saw in technique 65. The current Identity is preserved, so you can use the Roles API with all types of authentications, not just forms-based ones. Figure 11.8 shows how the RoleManager’s HttpModule works.
Figure 11.8. The RoleManager module changes the current principal to inject the user roles. The user ticket is renewed and the roles are added.

Roles API features are handled by the RoleManager, which is disabled by default. You have to enable it and register a corresponding provider in the web.config file.
The Roles API uses the Provider Model design pattern, just like the Membership API does (see section 11.2 for more information about this design pattern). A typical configuration is shown in the following listing.
Listing 11.6. Roles API configuration
<roleManager enabled="true" defaultProvider="SqlServerRoles"
             cacheRolesInCookie="true" cookieProtection="All">
  <providers>
    <add name="SqlServerRoles"
         connectionStringName="SqlServer"
         applicationName="/"
         type="System.Web.Security.SqlRoleProvider, System.Web,
               Version=4.0.0.0, Culture=neutral,
         PublicKeyToken=b03f5f7f11d50a3a" />
  </providers>
</roleManager>
Similar to what we did to create a Membership provider, we need to declare a connection string. The attribute cacheRolesInCookie is useful here; when this attribute is set to true, the roles are cached in a cookie and a query isn’t performed every time the roles associated with the user are requested.
Compared to the Membership API, the Roles API is quite invisible. No controls take direct advantage of its features (except for LoginView, which can provide different views based on roles).
A Role provider is based on the abstract class RoleProvider, from System.Web.Security. ASP.NET includes support for SQL Server via the SqlRoleProvider class and via WindowsTokenRoleProvider for Windows-based authentication. In table 11.5, you’ll find the methods in the RoleProvider class that are used most often.
Table 11.5. Roles API most-used methods
|
Name |
Description |
|---|---|
| AddUsersToRoles | Adds the specified usernames to the passed roles. |
| CreateRole | Creates a new role. |
| DeleteRole | Deletes an existing role. |
| FindUsersInRole | Finds all users in a given role. |
| GetAllRoles | Retrieves the complete list of roles. |
| GetRolesForUser | Gets the roles for the specified username. |
| IsUserInRole | Determines whether the user is in the specified role. |
| RemoveUsersFromRoles | Removes the users from the passed roles. |
| RoleExists | Checks whether a role already exists. |
Even though it’s legitimate to check for user roles using IPrincipal and its IsInRole method (if you need to do that programmatically), it’s more common to use UrlAuthorization to grant access to selected pages only. You can do this by using the configuration shown in the following listing.
Listing 11.7. Policy to allow only adminstrators to the admin directory
<location path="admin">
  <system.web>
    <authorization>
      <allow roles="administrators" />
      <deny users="*" />
      <deny users="?" />
    </authorization>
  </system.web>
</location>
To programmatically add a user to a given role, we have to implement a series of checks, as in the next listing.
Listing 11.8. Create a role and add a user to it
C#:
string roleName = "administrators";
if (!Roles.RoleExists(roleName))
  Roles.CreateRole(roleName);

if (!Roles.IsUserInRole(roleName))
  Roles.AddUserToRole(User.Identity.Name, roleName);
VB:
Dim roleName As String = "administrators"
If Not Roles.RoleExists(roleName) Then
  Roles.CreateRole(roleName)
End If

If Not Roles.IsUserInRole(roleName) Then
  Roles.AddUserToRole(User.Identity.Name, roleName)
End If
You have to check whether a role exists before you create it; otherwise, you’ll get an exception. This same consideration applies to mapping a user to a role.
If a user without the requested role is accessing your protected page, that user will be redirected to the login page. To ensure that the user understands why they’re being redirected to the login page even though they’re logged in, you can show a specific message similar to that shown in figure 11.9 using the LoginView control, as in the following listing.
Figure 11.9. You can display a personalized message when a user is denied access because their role doesn’t permit it. You can further personalize this page to offer more instruction to your user.
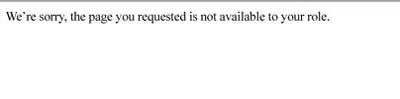
Listing 11.9. Message for why access is denied to a protected area
<asp:LoginView runat="server">
   <AnonymousTemplate>
     <asp:Login ID="Login1" runat="server" />
   </AnonymousTemplate>
   <LoggedInTemplate>
     We're sorry, the page you requested is not available to your role.
   </LoggedInTemplate>
</asp:LoginView>
You’ve implemented roles support, so your solution is ready. Contrary to the Membership API example, you had to write some code to accomplish your task. Roles API features are mostly used in administration pages, so you don’t have to use any controls, except the LoginView control. You’ve added roles support to an existing application with few modifications; by doing so, you’ve gained more control over authorization.
Discussion
With the Roles API in place, authentication is complete, and you can take full advantage of ASP.NET security mechanisms to grant or deny access to your resources.
A Roles provider doesn’t need to work with the corresponding Membership provider. You can combine different strategies, even if you’ll probably end up using the same storage. The same considerations apply to both the Membership API and the Roles API. The example we used in this section is based on the SQL Server provider, but given the nature of the Provider Model pattern, you only need to change the provider to make these features work with other forms of storage (database, XML, or whatever custom system you have).
The next section is about custom providers for authentication and roles. We’ll cover everything from building them from scratch to using third-party providers. When you need to use a different database, or you simply want more control over the provider’s inner data storage strategy, you need a custom provider.
11.4. Custom providers for the Membership and Roles APIs
When you’re building an application from scratch, using the default schema provided by ASP.NET isn’t a problem. If you need to take additional steps because you need to control your database schema, you have specific logic behind your users, or you simply want to target a different kind of storage, what you need is a custom provider.
Both the Membership and Roles APIs are built with extensibility in mind, so developing a provider is not terribly difficult: you just need to overwrite a couple of methods in the respective abstract base classes. Because this scenario is based on the example we used in the previous section, you can use the same code as before. And the results you’ll get will be interesting.
Technique 68: Other providers
ASP.NET doesn’t include providers other than the ones for SQL Server and AD. But in most scenarios, you’ll want to provide the same functionalities using a different kind of storage. You’ll be glad to hear that you can indeed have a provider ready for other kinds of storage. You can find them easily and quickly start building your application. In this section, you’ll learn the most common solutions to this issue.
Problem
Different kinds of storage need different providers. Because they’re not distributed with ASP.NET, the following sections present the best providers for the most widely used authentication stores. You can freely download all of these from the internet.
Solution 1: SQL SERVER
SQL Server providers are supported directly by the ASP.NET Class Library itself. The SqlMembershipProvider and SqlRoleProvider classes are in the System.Web.Security namespace. For more information, see technique 66.
Source code is available under a permissive license (for both commercial and noncommercial use) at http://www.mng.bz/uIY7. You’ll find the source code useful if you need to alter the provider behavior but still want to use its database schema, or you just want to start using SQL Server with different tables for the storage.
Solution 2: ACTIVE DIRECTORY
Support for AD is offered by the ActiveDirectoryMembershipProvider class in the System.Web.Security namespace. When developers use AD, they most often use Windows authentication; the AspNetWindowsTokenRoleProvider class provides support for the Roles API via the Windows authentication token, which is shown in the following listing.
Listing 11.10. Active Directory provider configuration
<connectionStrings>
  <add connectionString="LDAP://bochicchio.local/CN=Users,
                       DC=bochicchio,DC=local" name="ActiveDirectory"/>
</connectionStrings>
...
<membership defaultProvider="ActiveDirectory">
  <providers>
    <add name="ActiveDirectory"
      type="System.Web.Security.ActiveDirectoryMembershipProvider,
            System.Web, Version=2.0.3600.0, Culture=neutral,
            PublicKeyToken=b03f5f7f11d50a3a"
      attributeMapUsername="SAMAccountName"
      connectionStringName="ActiveDirectory"
      connectionUsername="bochicchio.localSAUser"
      connectionPassword="password" />
  </providers>
</membership>

<roleManager enabled="true"
             defaultProvider="AspNetWindowsTokenRoleProvider" />
You don’t need to modify anything else to use this provider; the configuration is done via the web.config file.
Solution 3: ACCESS
Access is quite popular, especially in applications deployed to shared hosting, where SQL Server is not always available. You can download the Access provider from the Microsoft website at http://www.mng.bz/mEW7.
This provider is distributed with code (C# only), and needs to be compiled. Configuration information is provided in the download file. If you have a VB solution, you can compile the C# source code and reference the compiled version directly in your project.
Solution 4: ORACLE
Oracle providers are created by Oracle Corporation, and they’re available at http://www.mng.bz/1OD6. They’re free and they support versions 9.2, 10.1, 10.2, and 11g.
Solution 5: MYSQL
MySQL providers are available as part of MySQL Connector/Net 6.3.6 (or later) at http://www.mng.bz/54k7 (under a GPL license).
You need to add a reference to MySql.Web.dll, located under the installation path. You also need to set the autogenerateschema attribute on the provider configuration to true so that the provider builds the corresponding schema in your database the first time you run it.
Solution 6: A GENERIC ODBC IMPLEMENTATION
If you need a generic Open Database Connectivity (ODBC) solution (one that works with any database that supports ODBC drivers), you can find one at http://www.mng.bz/0APS. You’ll probably need to adapt the SQL queries to your engine dialect.
Discussion
There are so many providers out there that you’re sure to find one that meets your specific needs. The list we provided for you in this section includes the databases that are used the most. You’ll probably find that one of these or one of the other ones that exist will serve you well, but just in case you can’t find a provider ready for your authentication (and role) needs, take a look at the next section to learn how to build a custom provider. You’ll be able to adapt your own logic to use in the standard ASP.NET flow for authentication and authorization. You’ll use the same features, but you’ll perform a customized set of actions.
Technique 69: Building custom Membership and Role providers
The default schema used by the Membership and Role providers for SQL Server is flexible, but it’s not designed for a specific purpose. These providers have redundant data to support globalization and a GUID key for the user table to support replication. They also support multiple applications in a single database, but that isn’t necessarily useful in our scenario.
In everyday applications, you don’t need this much flexibility because you generally know what your constraints are. More likely, you’ll need a subset of the previous features, and by realizing a custom strategy, you can achieve better performance and totally control the database schema. Or, you might prefer to use something else to store you user credentials and roles; you’re limited only by the code that you’ll write in the providers.
It’s easy to build a custom provider, so let’s get down to business. This solution will better fit our needs, and you’ll have a customized experience. At the end of this section, you’ll be able to completely customize the actions related to authenticating and authorizing user access to your secure application.
Problem
To gain flexibility and ease of use, we want to use the Entity Framework (see chapters 2 and 3 for more details) and map our tables in an easy way; we already have the users in a database table and we don’t want to change our database schema. To accomplish this task, we need to build two custom providers: one for the Membership API and one for the Roles API.
Solution
When you’re building these kinds of custom providers, you’re trying to apply your own rules to authenticate the users and load their roles. To start writing your own provider, you need to implement the base abstract classes MembershipProvider and RoleProvider from the System.Web.Security namespace.
Because both of these classes are abstract, you have to manually implement every single method and property to fully compile them. That doesn’t mean that you have to explicitly provide working code in every method; if you don’t need to perform a specific action, all you have to do is throw an exception to notify a third-party developer working on your project that the method they’re trying to use isn’t being implemented.
To make things easy, in this example we’ll use a database similar to the one in figure 11.10.
Figure 11.10. The database schema we’ll use for our custom providers. This schema is simpler than the one used by the default providers.

The schema is simple and is composed of the following tables:
- Users—Contains the users
- Roles—Contains the roles
- UsersInRoles—Maps the users to the roles
To start, we can use the example from technique 66 and add two new classes: one implements the Membership provider and the other implements the Roles provider.
MembershipProvider has a lot of properties and methods. For our implementation, we’ll provide a constant value for properties and implement only the method necessary to validate the user, create a new user, and get the user details. If you plan to use this provider for your own database schema, you’ll need to read the configuration from the web.config file, which is a more flexible way to do it. For our simple starting example, we don’t need to do that.
To speed up development, we’re choosing the Entity Framework to map our tables to objects and to realize our object model. The results are shown in figure 11.11.
Figure 11.11. The object model in the Entity Framework is similar to the database schema, except for the UsersInRoles table; that table is used to map the many-to-many relationship.

The Entity Framework is hiding the UsersInRoles table used for the relationships, so both the User and Role entities have a relationship to provide the associated roles to a user, or the associated users to a role, respectively.
The Membership provider
The schema we’ve used in this example is quite simple and lets us concentrate on the implementation. In a working solution, you’ll probably need to add advanced features, such as account lockout or user registration date. The Membership API does support these features, but our provider doesn’t implement them so we can concentrate on the main problem. You can add them by simply extending the database schema and writing the appropriate code.
With the schema in place and the mapping completed, the provider code will be similar to that shown in the following listing. (The code we’ve included isn’t complete; only the relevant parts are included.)
Listing 11.11. The custom Membership provider code


The code in this listing performs a basic step in the provider by logging in the user. The rest of the code is omitted, but you can appreciate how the custom provider will work. For example, if you need to control the user registration, you can use this code:


Similarly, to retrieve the user information, you have to use the Entity Framework in the GetUser method of your provider:

The rest of the code will implement the mandatory properties and methods. If you don’t want to use a specific method, you can throw a NotImplementException. Doing so will notify the developer who will use the provider that only specific features are implemented. The following snippet contains an example:

We can now use our custom code to authenticate the user by just changing the provider in web.config, without modifying the rest of the application.
To register the provider, you need to add this snippet to your web.config:
<membership defaultProvider="DBServerMembership">
  <providers>
    <clear />
    <add name="DBServerMembership" type="DBMembershipProvider, App_Code" />
  </providers>
</membership>
The Membership API is invoked by the controls, so you don’t need to do anything else to change the implementation. This example highlights the true power of the Provider Model pattern in action!
The Role provider
To complete our task, we have to create the Role provider. The code is similar to the code for the Membership provider, but we need to implement the method related to creating a role, check for role availability, assign a user to a role, and check for a user in a given role. These features are the minimum requirements for experimenting with the Roles API.
The only difficult part to implement for the Role provider is the relation. To load the roles for a particular user, you have to use the SelectMany extension method. This method can generate a flat view from a relation like the one we used in our object model.
The next listing contains the code for the Roles API custom provider.
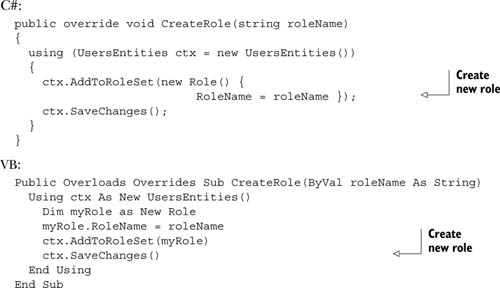
Listing 11.12. The custom Role provider code


If you need to create a new role, the Entity Framework will come handy. You can use a snippet similar to this:
Similarly, to check whether a user is in a given role, we have to use the Entity Framework SelectMany extension method to make the resulting role list flat, starting with the users:

And, again, if you don’t want to implement a particular feature (in this case, the DeleteRole method), simply throw a new NotImplementException:
C#
  public override bool DeleteRole(string roleName,
                                  bool throwOnPopulatedRole)
  {
    throw new NotImplementedException();
  }
...
VB:
Public Overloads Overrides Function DeleteRole(ByVal roleName As String,
                          ByVal throwOnPopulatedRole As Boolean) As Boolean
  Throw New NotImplementedException()
End Function
To register the provider, you have to add the following code to your web.config:
<roleManager enabled="true" defaultProvider="DBServerRoles" ...>
  <providers>
    <add name="DBServerRoles" type="DBRoleProvider, App_Code" />
  </providers>
</roleManager>
In this example, you can find all you need to implement a custom strategy for both membership and roles management, using the APIs from ASP.NET. To complete the steps and start using these providers if you already have an application using the Membership and Roles APIs, all you have to do is configure them in web.config, like we’ve shown you already.
Now our secure website can use a custom strategy to store and retrieve both users and roles.
Discussion
A custom provider is useful when you want to preserve a cleaner database schema or when you already have a database to start with. It’s not difficult to implement a provider, but you’ll probably have to write some code for it to be fully in place.
By leveraging the Provider Model pattern, you can modify the inner details of your application without changing the code or the web controls used in the UI. This situation is ideal because you can concentrate on the implementation of the rules and let the ASP.NET infrastructure provide the support for the repetitive stuff.
You can easily use custom providers to implement different kinds of storage for your identities. In the next section, we’ll take a look at a custom set of providers based on Windows Live ID, the popular authentication service from Microsoft. By implementing a custom provider with Live ID support, you can integrate one of the most popular systems with your application and attract more users.
Technique 70: Integrating Windows Live ID with your application
Windows Live ID is the well-known, federated authentication service provided by Microsoft that’s used by millions of people. Live ID accounts are everywhere and the authentication mechanism is well established. Best of all, you can use it in your applications at no cost.
A couple of alternatives exist to Live ID, even though Live ID remains the most popular authentication service in the world.
If you prefer to leverage the Facebook website, you can use Facebook Connect, which is still free. You can access information like the profile picture, data about friends, and much more. Facebook Connect is primarily based on JavaScript, and you can find more information at http://developers.facebook.com/
OpenID is an open alternative for providing a federated login. It’s not based on a single vendor implementation, but everyone can be a provider, and the implementation details are the same and use a common format. OpenID is supported by Google, Yahoo, AOL, and others. You can find more information at http://openid.net/.
The average user tends to trust well-known brands, so Windows Live ID is a good choice. By adding support for this federated authentication service to your application, you can speed user authentication to your site, while continuing to keep your security bar high. Because your users are probably familiar with Live ID, they’ll be able to log in with less effort and enjoy using your website that much more.
Problem
You want to include Live ID as an alternate way for your users to log in, so they can use a well-known provider that they trust. Using Live ID will also simplify login for users.
Solution
Windows Live ID authentication is based on token generation and a couple of redirects between the external application and Windows Live ID servers. An SDK is available at http://dev.live.com/liveid/. Specific Membership and Role providers are available, based on the SQL Server providers. You can find more technical information about the system when you download the SDK.
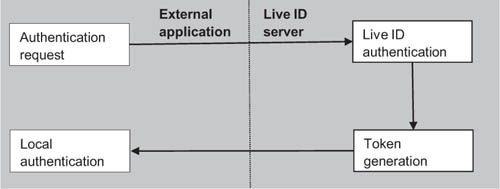
In figure 11.12, you can see a simple architectural schema of using Live ID.
Figure 11.12. Windows Live ID architecture for federated authentication is based on a token exchange between Microsoft servers and the federating sites. Your application needs to store the unique token that the Live ID server generates for your user so that the user is recognized the next time they log in.
Even though the SDK provides some custom controls and providers for you to start with, the most common situation is the opposite one: you already have your custom providers (or the default ones) in place and you want to add this new authentication mechanism, not replace the ones you already have.
First, you have to apply for an account ID via the Azure Services Developer Portal at https://msm.live.com/app/manage.aspx. Like we said before, registration is free. You have to enter an application name, the return URL, and a server name. In return, you’ll receive an application ID and a secret key.
Because Live ID uses redirects via the browser and not server-to-server requests, you can use a temporary domain name. Or, if you prefer, you can map your host via the hosts file in Windows.
Our implementation assumes the following scenario:
- The user is registered with a normal account on our site.
- Our site is using the Membership API and we want minimum impact.
- The user wants to log in without needing to remember another pair of credentials, but by simply using Live ID.
Unfortunately, the Membership API cannot be extended, so we need a different approach to include an alternate login mechanism. You can opt for a custom system, based on, for example, Entity Framework, and just query the database; or you can go for an alternative, trouble-free way and consider the Live ID account association as a special role for the user. This role will be unique because Live ID servers send a unique token for each registered user. Each option has its own pros and cons, but the second one is more flexible for an existing application. (Although, if you have a high-traffic website, a specific engine might work better and provide better performance.)
For more information about how to implement a Windows Live ID authentication, you’ll find the correct token documentation at http://www.mng.bz/gToP. As noted in the documentation, the system supports the following actions:
- SignIn—When the user requests login
- SignOut—When the user explicitly requests logout
- ClearCookie—When the Live ID service is demanding transparent signout (remember, you can be signed in at multiple websites at the same time)
SignIn and SignOut can reply with anything you want (a page or a redirect), but ClearCookie has the mandatory reply of a 1x1 transparent GIF image.
To start coding, we can use the WindowsLiveLogin class, which is available as part of the SDK and is attached to this example. This class encapsulates the inner logic and is useful for implementing the code. First of all, set the key in web.config, as in this snippet:
<appSettings>
  <add key="wll_appid" value="your_key_here"/>
  <add key="wll_secret" value="01234567890123456789"/>
  <add key="wll_securityalgorithm" value="wsignin1.0"/>
</appSettings>
The login button presented on the login page is created by using an iframe and passing the corresponding application ID to it. Because the redirect is performed automatically and the token is encrypted using the secret key, this system is secure and cannot be used to illegally spoof a user account. The following listing shows the common markup that inserts the login/logout link using an iframe. When displayed in a web browser, the results are similar to what’s shown in figure 11.13.
Figure 11.13. The new login page has a new link for performing the login using Windows Live ID. Users can continue to perform a classic login if they want to.

Listing 11.13. Listing 11.13 Windows Live ID code that generates the login URL
<iframe
  src="http://login.live.com/controls/WebAuth.htm?mkt=en-us&appid=<%=AppID%>&
context=<%=Server.UrlEncode(Request["ReturnUrl"])%>&style=font-size%3A+10pt%3B+font-family%3A+verdana%3B+background%3A+white%3B"
  width="80px"
  height="20px"
  marginwidth="0"
  marginheight="0"
  align="middle"
  frameborder="0"
  scrolling="no"
  style="border-style: hidden; border-width:
     0">
</iframe>
We have to configure our application to reply to Live ID servers on a page named live.aspx. This page will receive the data from Windows Live ID, use the WindowsLiveLogin class from the SDK to decrypt the value, and populate a new instance of the WindowsLiveLogin.User class.
The action to be performed is specified in the parameters, so the important part is in the association of the returned token to our database. As we mentioned before, we’ll create a specific role if there’s a need for one, or simply authenticate the user if the association is already performed. The code is shown in the following listing.
Listing 11.14. The login and user association code


At this point, we need to check whether the user is authenticated, and, if he is, associate the Live ID with the account. The code is shown in the following listing.
Listing 11.15. The user is added to the specified role
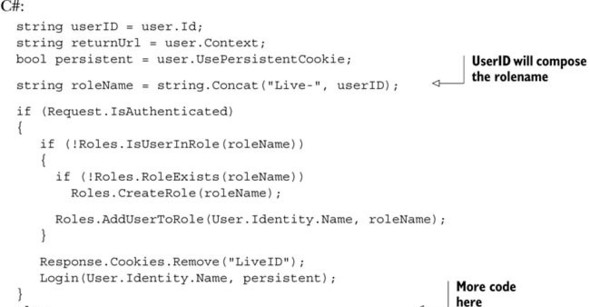

If the user isn’t authenticated, we need to check whether the role exists; if it does, we grant access to the user:

The SignOut and ClearCookie actions are omitted because both will perform the logout using the SignOut method on the FormsAuthentication class.
The first time the user requests the login via Live ID, the page checks for the role in the database. If the role isn’t found, a valid Live ID token is issued, the user is authenticated, the new role is created, and the user is associated with it. If the user isn’t logged in and a Live ID user ID is sent, the user that corresponds to the role created by using the unique user ID is retrieved, and the FormsAuthentication class is used to perform the login. The flow is explained in figure 11.14.
Figure 11.14. The authentication flow is modified when the user’s Windows Live ID is associated for the first time. If the Live ID is associated, the user is automatically authenticated.

Figure 11.14 shows the flow used to associate the Windows Live ID to your account. First of all, the Live ID credentials are required. Then the user is asked to associate the site user to the Live ID. Next time, the user can use Live ID to authenticate himself because the two accounts are now linked. This process is simple to implement and simple for the user to follow.
From our point of view, we’re adding more features to our secure website without changing the inner workings of our security strategy. This is another advantage over using APIs instead of custom implementations.
Discussion
Supporting Windows Live ID is advantageous, especially if you have a website with varied traffic, because the service is well known in both consumer and professional audiences.
Using the approach presented in this example, you can continue to use your own Membership and Roles providers. This integration page uses only the Roles API (but not the provider directly) and can be integrated with every application.
This example shows the power of using APIs instead of direct code. You can simply alter some behavior by adding code that leverages only the public face of that feature, and, thanks to Provider Model, you can use it in many situations because it’s not linked to a particular implementation.
11.5. Summary
Security in the UI is so important that developers tend to spend a lot of their time fully implementing it. The effects of code security, as we discussed in this chapter, are invisible, but dangerous. Authentication and authorization are important for you to gain more control over application features. Often an application needs its user to be authenticated to access advanced features. You can provide different levels of power to different types of users, who are grouped together to simplify policy management.
ASP.NET implements support for authentication and authorization in its core. As you’ll learn in the rest of this book with regard to other features, you can adapt these features to your needs by simply changing the default implementation provider.
The Membership and Roles APIs, on the other hand, use the Provider Model to provide an extremely powerful approach to repetitive tasks, which is what user and role management are. Thanks to the built-in security controls in ASP.NET, you can easily integrate this kind of solution in applications because all the work is performed behind the scenes. If you want more control over every aspect of your application, you can manually call Membership and Roles APIs methods, as we did in the last example of this chapter, by implementing a custom mechanism for letting users authenticate. The result is a secure and versatile website, built step-by-step by adding more features.
In the next chapter, we’ll start to take a deeper look at ASP.NET, exploring advanced scenarios like state, caching, customization, and performance tuning.