![3. Setting Up Your Ableton Live [Home] Studio](https://imgdetail.ebookreading.net/cover/cover/design/EB9781598638196.jpg)
At this point, you’ve informed yourself to the n th degree. You’ve thoroughly examined your computer situation, learning about key components and some essential hardware peripherals and how they pertain to digital-music production. And you may have made various upgrades as a result of your newfound knowledge. After careful assessment, you’ve attained a copy of Ableton Live in one of its three current forms. Finally, you’ve explored myriad studio hardware components that will be needed in your Ableton Live studio, including an audio interface, studio monitors, headphones, and microphones, as well as all the essential trinkets such as cables all the way to what type of batteries to have handy. Heck, you’ve even looked into small refrigerators. Now it’s time to set up your Ableton Live studio.
This chapter is meant to hip you to some tried-and-true approaches to studio assembly as well as must-know concepts that you should be aware of when setting up your Ableton Live–based home studio. From room attributes to proper powering to computer maintenance and more—it all contributes to the sound and overall success of your studio. With a little patience and perseverance, and the information in this chapter, you can make your workspace come to life.
This chapter assumes your situation is like most people’s: You’re just starting out. Building secondary floating walls or sub-floors may not be in the cards just yet (especially if you live in an apartment). This chapter takes that to heart, presenting you with options that can realistically be done with little trouble and no demolition!
To best understand many of the concepts in this chapter, it’s important to have a solid grasp on some fundamental properties of sound and how sound will exist in your studio’s surroundings. As you probably know, sound is composed of waves that emanate from a moving (vibrating) object, but let’s take this a little further. These waves travel through the air into our ears at varying frequencies, which is the main determinant as to how that wave is perceived pitch-wise. The slower the vibration, the lower the pitch; conversely the faster the vibration, the higher the pitch. These frequencies are measured in hertz (Hz). Most every sound we hear is not just one wave, but a blend of frequencies made up of a basic, foundational wave called the fundamental and many additional waves that measure above the fundamental called overtones (also referred to as partials and harmonics). The force at which sound waves travel determines how loudly or softly the sound is heard. These levels are also referred to as pressure—specifically, sound pressure level, or SPL for short—and are measured in decibels (dB). The overall study of sound—production, transmission, reception, and control—especially within the confines of four walls is known as acoustics. A room’s acoustical properties (or lack thereof) are what all studio owners obsess over—and rightfully so. A room’s acoustics play a huge role in how your music will sound. Let’s start to see why.…
When it comes to sound and the subject of room acoustics, it’s all about what happens when the aforementioned waves hit your studio’s walls (see Figure 3.1). The three things that can and will happen in varying degrees are as follows:
The waves will reflect off the walls.
The walls will absorb some of the waves.
The waves will pass through the walls.
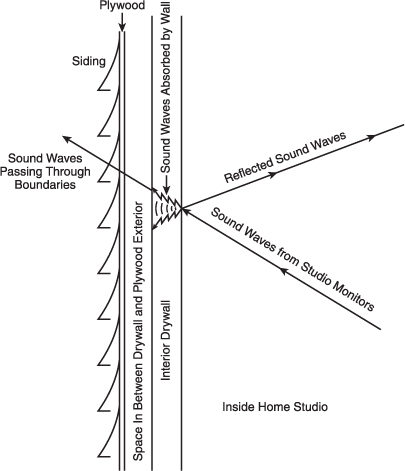
Figure 3.1. When sound waves make contact with your home studio walls, one of three things happens in varying degrees: They reflect off the walls back in the room, are absorbed by the wall, or pass through the wall and can be heard outside the studio enclosure.
Let’s start with the reflections part. The room reflections heard by our ears are known as reverberation (see the upcoming sidebar for more information on reverberation). Considering what’s being said here—that is, room reflections are waves bouncing off walls to be heard by you more than once—it could be said reverberation is a form of echo. But these room reflections (and sound overall, for that matter) are extremely fast, making it impossible to perceive them as discrete, separate instances (repeats or echoes). Instead, our brains process this acoustical phenomenon as thickening and/or enhancement of the original sound in varying degrees. For instance, in a large room such as a church’s main worship area, the reverberation is perceived as a wash of frequencies that come together, compounding into a glorious cloud of sound. This heavenly description is not to imply that all reverberation is good. Too much reverberation can make what you’re trying to hear unintelligible. But when applied correctly (naturally or by hardware and/or software processing), reverberation is indeed a beautiful thing.
Rooms with an abundance of reflections producing reverberant qualities are described as being live. In contrast, rooms that absorb waves and therefore produce fewer reflections are known as dead. However, both types of rooms will have some level of passthrough most, likely in the 300Hz and below range. So, what is the ideal scenario? For recording purposes you’ll need to keep reflections down to a minimum, so a dead room is what you’re looking for. And, of course, the better you can keep those passing low frequencies at bay, the happier your neighbors will be. That’s not to say a completely dead and isolated room is a good thing. Outside of a dedicated vocal booth or an environment where you need to test your gear, your studio should have some reflective qualities. In fact, if you find a way to contain those lows within your four (or more) walls, you’ll end with too many boomy reflections. They are ways to liven and deaden a room, as well as isolate it, and they will be discussed in the upcoming section titled “Room Treatments.” That all said, your goal is to create an environment that will sound good for the type of music production you plan to do.
A home studio is a music-production environment in the comforts of your own home. What a concept! This section covers many aspects in transforming an existing room in your humble abode into just that. You’ll learn about how the material used to construct the room you plan to occupy will affect the overall sound and what you can do to manipulate the room to sound its best. From choosing the room (if your living quarters haven’t already done so for you by process of elimination) to doing a little handiwork, you’ll have the knowledge to create a great-sounding Ableton Live home studio.
Unless you have no choice but to use a certain room in your house for your Ableton Live studio, there’re a few considerations to keep in mind when choosing where to set up. With these facts in mind, you may even consider switching your home’s room assignments around to take advantage of the positive attributes an occupied room may possess with regard to music production. (If you live with others, namely a spouse, good luck selling this one!) You can also use the garage, the basement, and, if the ceiling permits, the attic. (You’ll know the places you’ll be looking into after the talk with your home’s co-owner.) Following are a few points to consider when scoping things out:
As previously mentioned, sound waves bounce or reflect off solid objects. The most obvious ones in your prospective room are the four (or more) walls that make it up. If you have a room with non-parallel walls or partial partitions, use it, as these attributes can aid in controlling adverse room reflections. Most rooms in a home, however, are constructed with parallel walls, sometimes in a square formation. This geometric configuration can cause problems such as standing waves. This is not to say that if you’re faced with a scenario where the only room in the house that is available for audio production is that cubed-shaped spare bedroom, you’re done before you even got started. Relax! There’re ways to remedy the situation without ripping walls down. For instance, in addition to installing various acoustically designed wall panels and the like (which you’ll learn about in the upcoming “Room Treatments” section), you can simply angle your workstation desk so that your studio monitors are not sending waves out at the walls in a straight line.
When it comes to size, look for a room with a lot of space if possible. If you want a number to go by, 2,500 cubic feet is optimal. Larger rooms allow for a more accurate listening environment; the sound waves have more space to propagate, resulting in an overall flatter room frequency response. More space will also afford you more room (and options) to place your studio’s various fixtures such as your workstation desk, shelving, amplifiers, etc. It’s important you have ample space for such things as monitor placement and, of course, you. It’s no fun trying to work in a cramped area. Another size consideration is ceiling height. Look for a room with high ceilings—although given the fact that most residential home ceilings are built to the 8-foot height standard, it will be hard for you to find a room with anything higher that still serves as a possible candidate for your Ableton Live studio. Any parts of the house that boast taller walls than that are most likely hallways and general living areas, not spare bedrooms.
Assess whether or not the neighboring rooms will produce noise that can be heard through the shared walls. If so, assess this prospective room’s isolation qualities. Know this from the start: Every room in your house is going to have isolation issues because they were not designed for the level of isolation you’re now looking for. While bedrooms are a great choice for your studio, and perhaps the best when weighing all the options, they score the lowest in the category of isolation. This is due to the fact that they’re typically enclosed in drywall—a material not known for its isolating properties. And while the block and cement that make up walls of your basement will do well to keep the sounds of the outside world out, that wood floor above will not. The same goes for the garage; it may also be constructed of cementblock walls, but the elevated ceilings will get you with regard to overall isolation.
If there are indeed concrete or brick walls (this is the norm for a garage or basement, but it could also be the case for a bedroom, especially if you’re in an apartment) in the mix, you’ll be faced with a related pro and con. The pro is that concrete is an effective sound isolator, letting nary a wave escape or enter from the outside to interfere with your work. The con is that because sound waves are not allowed to escape, the result is an overabundance of trapped frequencies, making for an overall muddy-sounding room. This will be especially tough to deal with when recording loud sources (e.g., guitar amps, drums, etc.).
Then there’s the subject of windows. Although sunlight can be inspirational and refreshing, the window element can be a problem when it comes to isolating unwanted outside noises. Plus, windows do a poor job of isolating you from the outside world, leaking what you’re doing inside out to unsuspecting neighbors who may be less than pleased with the racket no matter how good your creations are.
Climate control is of course a must, not only for you but for your gear as well. For example, if you live in the northeast United States, the humidity in the summer becomes a factor. Along with the high temperatures, the added moisture will take its toll on the many pieces of sensitive gear in your studio. If you have a window-mounted AC unit, you have to consider the noise it produces and the fact that you’ll have to shut it down at times to record with microphones. On the other side of the climate coin, if you have baseboard heat, the dry air emanating from it can create problems, such as a vocalist’s throat getting dry and hoarse or wood-based instruments shrinking.
Obviously, there’s going to be some unavoidable give and take. The only way to guarantee yourself a near-perfect studio environment is to build your room from scratch (see the upcoming sidebar). But near-perfect is not an imperative to produce quality music from your home studio. There’s plenty you can do to transform the room you choose into a great-sounding environment without any major construction. This is where acoustic treatments come into play, and that’s what the next section is all about.
After figuring out what room you’re going to assemble your Ableton Live studio in, it will be time to take some doable steps to make it sound as best it can. While it’s true you’ll have to make concessions any audiophile would find revolting, you’re not up against impossible odds. With some strategically placed room treatments, you can transform most any room in your house into a suitable music-production environment that churns out great-sounding results. Without these acoustic treatments, it will be difficult to hear what you’re doing clearly, making it difficult to create your music on many, if not all, levels. Even if you’ve spent mucho dollars on the most accurate studio monitors, the frequency response of your home studio untreated will distort what you’re hearing, thus negatively affecting your finished products. With the right acoustic treatment, a muddy-sounding room with not-so-good midrange definition and out-of-control bass response can be made to sound clear, even, and tight. Additionally, acoustically treating your studio also helps isolate (soundproof) your room from the outside world, and that’s always a good thing.
Acoustic treatments are primarily designed for the following:
Preventing standing waves and acoustic interference from affecting the frequency response of your studio
Reducing the adverse affects of small rooms as well as larger rooms
Absorbing or diffusing sound in your studio
Keeping sound from leaking into or out of your studio, helping prevent any unwanted noise outside from being part of your recordings as well as preventing noise-disturbance calls being made to local law enforcement
The two main types of room treatment are as follows:
Absorbers. These come in two different types: one for controlling midrange and high-frequency reflections and the other aimed at controlling low-frequency reflections (called bass traps). Together, these absorbers are designed to prevent standing waves and acoustic interference from affecting the frequency response of your studio. These standing waves create irregular peaks and dips, and the only real way to get rid of them is to avoid, or at least reduce, the reflections that cause them.
Diffusers. These treatments are somewhat opposite to absorbers. Diffusers are used to reduce or eliminate repetitive echoes that occur in those rooms that have parallel walls and flat ceilings by sending the waves in various directions as opposed to in the same direction.
Absorbers and diffusers made of various foam materials can be purchased from companies like Auralex and Sonex, among others (see Figure 3.2). After tallying up the cost of treating a room with these products, many home-studio owners will try to put up various alternative treatments to save a little money. Some notable substitutes are packing foam, bed rolls, and egg cartons. Although there is merit in these approaches with regard to mid- and high-range frequencies, they do basically nothing to control-low frequency reflections, which are the real bad guys inside and outside your studio.

Figure 3.2. Acoustic wall treatments such as absorbers (outside) and diffusers (inside) are designed to control adverse room reflections in the mid- and high-frequency range that can cause standing waves and acoustic interference.
The absorbers aimed at controlling mid- and high-frequency reflections are mounted on the walls, while the one for the lows (bass traps) are mounted in the corners and ceilings (see Figure 3.3). Bass traps can also be mounted to the walls if need be. The main difference between a bass trap and other types of absorbers is the thickness of the panels. This makes sense given that low frequencies are larger and more powerful. While it’s definitely possible to make a room too dead at midrange and high frequencies, most rooms need as many bass traps as you can fit and afford. The effectiveness of bass traps is related to how much of the room’s surface area you treat, which includes the walls, floor, and the ceiling. If you’re on a tight budget, bass traps should be mounted in all the corners at the very least. From there, when budget permits, put additional traps on the walls and then progress to the ceiling.

Figure 3.3. The corner pieces making contact with the walls and ceiling are absorbers called bass traps, which are used to control low frequencies. They’re placed as such because the corners of your studio are havens for that range. See if you can locate the traps in Figure 3.2 as well.
As clearly stated in the previous chapter, it’s imperative that you spring for studiograde monitors. In addition, it would be to your advantage to acquire isolation pads specifically designed for mounting monitors and/or monitor stands in order to reap the full benefits. While your monitors are painstakingly designed to deliver the most accurate reproduction possible, you’re not truly hearing what your Live project sounds like until you’ve isolated your monitors from their environment by a process called decoupling. The term in this instance refers to a combination of two of its inherent meanings: separation and absorption.
The first step to decoupling your monitors from the room is to obtain foam-based isolation pads (see Figure 3.4), which provide separation from whatever it is your monitors are resting on—your workstation, for instance. To further decouple the monitors, you can go for a pair of monitor stands (also shown in Figure 3.4), which not only help isolate your monitors to cut down on unwanted sound-wave transference (vibrations) but also clear up much-needed desktop-workstation space. In some cases, they even provide a means to separate power cables from speaker cables to cut down on possible noise as well tidy up your work area. Furthermore, monitor stands allow you to more precisely position your monitors (see the “Room Layout” section for more details on monitor placement).

Figure 3.4. To hear the most accurate reproduction of your Live projects, you’ll need to employ monitor isolators such as MoPADs from Auralex to fully decouple your loudspeakers from the rest of the room. Placing your monitors on stands not only helps decouple your monitors from the rest of the studio environment but also provides a sturdy platform on which to place your monitors, clearing much-needed desktop space.
Opening your hallway closet will reveal various room-treatment items that will prove to quite effective. For a studio in the beginning stages, the following list contains some cost-effective solutions that will save you some much-needed dough until you can get the capital up for more proper solutions. (Although to be fair, you may find yourself grabbing these items well after your formative stage, as they’re widely used in studios of all levels.)
Carpets. Carpets are an easy solution for controlling over-reflective wood or tile floors. Also, a carpet will cut down on noise associated with these floor types like audible shoe tapping from musicians trying to keep time or vibrations in the floor from, say, a large kick drum or powerful bass rig. Carpets are not just for the floor, however; many studios hang decorative rugs on the wall as mid- and high-frequency absorbers.
Heavy blankets. In addition to replacing the more expensive decorative rug for such duties as hanging wall treatments, heavy blankets are great for when you need to cover a drum set that may be rattling while you’re recording another instrument. Another application for heavy blankets is to help isolate sources from bleeding into each other while they’re recording simultaneously—for example, if you’re recording multiple guitar and/or bass amps, try covering the amp and mic.
Pillows. Before you toss that throw pillow that you spilled a milkshake on, thereby permanently staining it, consider the uses it can serve in your studio. The most common use is stuffing a kick drum that has an opening in the front head, effectively tightening the sound of an otherwise floppy-sounding kick. Another application could be stuffing a basement window to help keep sound from escaping out into the world.
Yo, Gobo!
Speaking of isolation, though not a bona-fide room treatment, a more suitable solution for isolating sources such as multiple guitar amps with heavy blankets is to use actual structures called gobos (see Figure 3.5), which are built specifically for this application. More often than not, studio owners build their own gobos since it requires only minimal materials—some wood, heavy foam, and fabric—and it’s cost effective.

After considering how to best treat your room for optimum sonic results, it will be time to bring in the goods. Having a game plan as to where you’re going to put all this stuff is a good idea especially when it comes to certain items, which will benefit from being placed in a specific location that’s intended to garner the best results. Here’re some considerations to keep in mind when mapping out your room and setting it up:
First, take a good look at the room and try to visualize where the big pieces such as your workstation desk and shelving will go. Make sure you’ll have ample room to do what you have to do. If you’re going to be playing and recording an instrument often, you want to make sure you’ll have room to do so. Be sure you can get in and out of your chair comfortably without hitting anything.
Consider the room symmetrically, especially in terms of monitor placement. Positioning your studio monitors symmetrically will ensure even projection of sound and the best possible stereo imaging (see Figure 3.6). Make sure any control devices you’ll be using with Live as well as your captain’s chair are right in the middle of the monitors. This puts your ears the same distance from each speaker, also ensuring optimal stereo imaging. The same goes for the room treatments: Try to place them symmetrically throughout your studio.
While there’s been much talk about parallel walls and cube-shaped rooms, one easy solution to help remedy their adverse effects is to set your workstation up on an angle (see Figure 3.7). This will create a scenario where your reflections will hit the wall on an angle and thus have less of a chance to create standing waves and acoustic interferences.
No matter where you place your workstation, be sure to leave some distance between it and the wall. This is mostly to do with your monitors, since a lot of low end resonates from the back. If your monitors are too close to the walls or another hard surface, you’ll be sending those lows right into it, and that will create various results that are less than pleasing. Another advantage to some furniture breathing room is having access to what’s going on back there, namely with regard to the plethora of wires. You may need to change out a failed cable or have to make some other change, and it’s no fun when you’re forced to assume a Twister-like position to do so or have to move several components to get at the one you need. Finally, if you’re using a computer and it’s going to be placed in the same room on the workstation, you don’t want it too close to the wall. More often than not, the fans used to cool down the processors are located in the back, and if you put them up against a wall, you compromise their effectiveness. You don’t want to let your processor’s core hit critical mass heat-wise.
When it comes to cables, you’ll want to map out a scheme where, if you can help it, power cables never make contact with audio cables. Power cables emit electromagnetic interference (EMI), which your audio cables will be more than happy to amplify via your studio monitors.


As you can see, a lot goes into the creation of a music-production studio. What you’ll soon find out is there’s even more involved with keeping it going. There are certain measures you can take to ensure the continual success of your Ableton Live studio that have nothing to do with music making but are no less important. In fact, these are some of the most important measures you can take in caring for your hard-earned space. The following list is a collection of some smooth moves that will surely help you out in the long run:
Keep it secure. If the room your studio lives in has a lock, use it. Even better, change it. It will give you peace of mind knowing that you and you alone have a key to get in. With regard to a spare: Only give one person you absolutely trust a backup key. You may also want to consider an alarm system of some sort, be it just for the room your studio is in or something that protects the entire premises.
Insurance. Look into insuring your studio. Before shopping around, find out what your homeowner’s (or renter’s) insurance will cover. You may or may not need to carry additional coverage and/or a separate policy. Be on top of updating whatever policy you end up using by taking inventory within reasonable time intervals, and make sure you keep every last receipt when you purchase new gear. You never know when you might need it.
Keep it on the DL. If you’re not planning to make your studio a commercial venture, where you have artists coming in regularly, then don’t advertise your studio to people you don’t know and trust or to neighbors who may be quick to dial 911 at the hint of a noise violation.
Chances are, you have already plugged in some items in your Ableton Live. But wait! Don’t plug another thing in until you read the information contained within this brief yet important section on powering your studio. In addition to taking steps to prevent and/or rid your Ableton Live studio of unwanted hums, there are safety precautions to consider.
With so many electrical components plugged in, there’s a good chance your studio will contract a hum problem. The most common type is what’s called a ground loop. To combat this problem in a sensible way, it’s important to understand what electrical grounding is. Knowing and understanding the concepts of grounding will not only help you deal with the possibilities of unwanted noise, but also ensure your safety. Let’s start with grounding itself, then move on to ground loops, and end with how to safely remedy the situation.
The incoming electrical current drawn from the wall outlets in your Ableton Live studio (as well as your entire house) needs a common return path, which is referred to as a ground. The name is derived from the fact some of these return paths are physically placed in our beloved Mother Earth. More than likely, your home’s connection is located outside in an electrical panel that contains all the household’s circuits. Whether the connection is a service box or connected to a copper rod dug into the ground, all electric circuits must have a return destination of some type to prevent the potential for contact with dangerous voltages. If there’s no return path for voltages, you become the next best thing. Rest assured, there is indeed a return path; it’s the bottom terminal of a three-prong electrical wall outlet. It is those terminals that are hardwired to whatever grounding solution your home makes use of. But that’s not always the case; to be safe, always have an outlet tester handy. They’re only a couple of bucks and can be purchased from any hardware store large or small.
A ground loop occurs when there is more than one ground connection path between two components in your studio. To best understand how this happens, see Figure 3.8 while you read about a potential ground-loop scenario you may have already created.

Figure 3.8. Plugging devices that will in some way connect with each other into separate outlets could create a ground loop, which will produce a 60Hz hum in your system that will need to be remedied.
Say you have your computer plugged into one outlet and your studio monitors plugged into another outlet with balanced ¼-inch cables connecting the speakers to the system via the audio interface. The problem lies in the fact the shield inside the ¼-inch cable carries the ground path from the computer to the monitors through the interface. (This assumes the interface is bus powered, although this situation is more likely to occur if the interface is also plugged into the same outlet). That same ground path from the monitors continues into the wall outlet, through the electrical ground wire in the wall, and back to the computer through the wall plug it’s plugged into. The loop that now exists within the grounding wires acts as an antenna that picks up unwanted noise and hum, which is amplified by the audio gear (namely the monitors). While ground loops can sometimes be tricky to identify, isolate, and eliminate, a simple way to avoid them is to plug all components into the same wall outlet. Most likely, your home features dual outlets, which quickly fill up, so it will become necessary to employ a device that offers more outlet options. See the next section for details.
Unfortunately, many people think it’s a good idea to combat ground loops using a three-to-two-prong adapter. Aptly referred to as a ground lift, this type of adapter cuts off the bottom-most pole that plugs into the ground terminal of your wall adapter, breaking the loop. Makes sense, right? Not if you remember the next thing your home’s electrical current will choose to use as a return path—you, silly. Put simply, this not a smart move. If you go this route you’re asking for trouble—some of which can be of the life-ending type. Dig?
What you can do is employ a quality surge protector (see Figure 3.9) that allows you to plug multiple sources into a single device that plugs into one outlet, therefore cutting out the possibility of a ground loop. Be sure to do some research on these items and look for specs such as electromagnetic interference (EMI) and radio frequency interference (RFI) filtering, which helps ensure the integrity of electricity flowing to your studio components.

Figure 3.9. A surge protector not only organizes your power cords, it also provides a single destination for you to plug in multiple components, cutting down the possibility of a ground-loop problem. Take note of the very cool side ports for wall warts.
As your studio grows, you will need to upgrade your power matrix to a pro-level power conditioner. Units like the Furman PL-8C (see Figure 3.10) provide balanced power and stable voltage distribution, making a lower noise floor throughout your system possible. Another safety measure you can take not just for you but for your work is to invest in a battery backup system such as the Furman F1000-UPS (see Figure 3.11). If there’s a sudden power outage and your hard drive crashes as a result, you could lose whatever you’re working on as well as any other data stored on the drive. A battery backup ensures that your project will not be affected by such an occurrence by supplying your computer and whatever else is plugged into it with remote power.


With room considerations in check and your power setup intact, it’s time to prepare your computer for battle. Digital music production asks a lot of even the most powerful computers. Consider this: At all times, your computer is running an operating system and various other processes in the background that are necessary for the machine to function. Combined with that, you’re about to tax that same processor big time by running an application like Ableton Live, which requires some serious number crunching (binary, that is) in real time. What’s more, the computer has to play middle-man between the OS, Live, and several hardware peripherals (audio interface, MIDI keyboard and/or mixer-style controller, etc.). So it’s important to get informed as to what you can do to best set up your computer for the many tasks at hand. This section will help you map out an effective setup regimen that includes key preliminary steps that will help ensure your computer is ready for the mission. Not only do these tasks aptly get you started, they also serve you well as routine maintenance procedures, so pay close attention. In addition there are useful configuration tips that will both help your workflow and ensure there continues to be a flow! Lastly, the concept of drivers is explored with a focus on timely installation as well as some thoughts on installing and authorizing Live.
Assuming your computer is up for the task at hand (refer to Chapter 1, “The Shopping List: The Big Three,” for a review of computer specs), there are several steps you can take to best prepare your machine for installing and running Live. Following are tasks you should perform before taking out those install discs that will surely help you get your studio up and running to a good start. These useful actions go beyond simply cleaning out the trash, and should become a part of your regular routine with regard to normal maintenance. A timely maintenance schedule is something all experienced digital music producers have in place, and so should you.
An easy first step is to uninstall unused programs. Having the least amount of data to slog through and cutting down on potential running processes is good thing when running a DAW as potentially intensive as Live. On a Mac, this is done by perusing the Application folder and simply dragging the program files you deem old news to the Trash icon in the Dock. Alternatively, once in the Applications folder, you can click on the program icons and press Cmd+Delete. On a PC, you will not go where the program files and/or folders are installed and stored; instead, you’ll navigate to Control Panel > Add/Remove Programs. The bonus here is Windows takes this opportunity to tell you how much you’ve been using the program, making it easier for you to access whether or not it stays or goes (see Figure 3.12). On either platform, it’s always best to utilize a program’s own uninstaller if one is available. Before you go dragging Mac apps to the trash or navigate to the Add/Remove Programs zone on your PC, check to see what you have to work with.

In a perfect world, your Ableton Live studio computer would be used solely for music-making purposes. Among the many advantages of that scenario, the list-topper is you would not have to put that machine online for anything other than scanning for and installing software updates. But the reality is that for many of us, our studio computers are the only computers in the house, which as a result means they are surfing the Web like mad. With the Internet at (most) times being a cesspool of malicious intent, this requires you to perform routine checks on your beloved workhorse. Yes, both platforms offer a built-in firewall, and we’ll even assume you have some sort of antivirus program installed (you do, right?), but there’s more to be done, especially for the PC user. (But be aware, Mac users: Although extremely rare, your shining device with the slightly bitten apple is not completely impenetrable.) In addition to anti-virus system scans that you should have scheduled to initiate every night at an hour you’re surely sleeping, you should have freeware programs such as the highly regarded Spybot Search & Destroy and the often-used Ad-Aware installed that you routinely call upon to run their respective scans on a weekly basis. This is very real stuff, and you need to be on top of it if indeed your Ableton Live studio computer is not just that. With respect to the anti-virus software, you should have installed and running: While working with Live, it would be wise to shut down those apps as they not only take away precious system resources, they may think your session is an instance they need to “frisk” and could interrupt your work with a warning message—total buzzkill.
Installing Live on a hard disk that may have errors is the beginning of trouble. Fortunately, both Windows and OS X offer built-in applications to sniff out any existing disk abnormalities. For Mac users, there’s a program called Disk Utility (located in Applications > Utilities) that, among other useful tasks, performs an operation called Repair Disk Permissions (see Figure 3.13). Simply put, this helps a Mac of any kind run more smoothly and should be performed weekly. If it turns out there’s a problem, you’ll see it in the report after Disk Utilities repairs permissions; from there, you can click the Repair Disc button, next to the Repair Disk Permissions button, to repair any problems.

Figure 3.13. Prior to the installation of Live, it’s a good idea to verify and, if necessary, repair permissions on a Mac. In fact, it’s a good idea to do the same after the install and, even more importantly, to get in the habit of regularly performing this simple yet beneficial task.
In Windows you can use a utility nested in the Properties dialog box of the drive on which you plan to install Live, which is most likely your C: drive. To get there, open the My Computer or Computer folder, right-click the drive in question, choose Properties, and click the Tools tab. From there, click the Check Now button in the Error-Checking pane (see Figure 3.14). Once you have the “OK” from Windows, you’re ready to move to the next phase.

Once your disk of choice for install has passed the test (PC) or has had its permissions verified and/or repaired (Mac), the next step is to deal with a common problem to which all hard drives are susceptible: fragmentation. When files are written to free space, they’re done so contiguously. This enables your computer to read and write data at optimum speeds and works great—that is, until existing files are removed or changed in size or new files are added. Whatever the case, this is what fragments the drive, leaving behind holes of various sizes (mostly small). When a new file is written, or when an existing file is extended, the new data is scattered and written in segmented fragments into these holes. This slows down your computer. Indeed, depending on the severity, it can be extremely debilitating as well as affect storage efficiency. The remedy for this unavoidable problem is to defragment the drive. While Windows has a utility built in (Start > All Programs > System Tools > Disk Defragment), OS X does not due to the more efficient Journaled formats it employs. If you use a Mac and you just have a burning desire for defragmentation, you’ll have to seek out a third-party solution. One popular go-to program for defragging a Mac is the proven Mac multi-purpose utility Disk Warrior. If you’re on a budget, opt for the free Carbon Copy Cloner. (If you find the app useful, consider making a donation to its creators.)
While defragmenting your hard disks is a necessary evil and should be done periodically, if you really want to set the record straight, you can reformat the drive. Reformatting is a process where everything is erased from the drive (yes, everything), allowing you to start fresh. This is a bit extreme but could prove to be a smart move if you’re about to start working with audio on an older computer for the first time—especially one that may have had some prior issues.
To be clear: This process completely wipes out the hard drive, leaving nothing behind, so it goes without saying that before you engage in such a practice, you will have to create a backup of anything you want or need to keep (documents, pictures, videos, music, etc.). You will also require all the install files for the software you want or need to reinstall. (Don’t forget the authorization codes!) In both Mac and PC environments this can be simply done by reinstalling the operating system. Once you load the respective install disc, just follow the prompts. Just remember: Once the process starts, there’s no turning back. Be sure you’ve backed everything up and you have the means to reconstruct your system. After you’ve gone through the reformatting process, you should be good until you either want to upgrade the OS or you suspect something is up that require drastic measures.
In addition to performing some key system-maintenance tasks, there are a few things you can configure on your computer to help things run, and run smoothly. As for where you’re making these adjustments, once again, you’ll be in the Control Panel (PC) and System Preferences (Mac)—unless the adjustments are made directly within a certain program.
Tip
Because you’ll be using these windows often, it’s a good idea to create a shortcut on the desktop or taskbar (PC) or drag the program file to the Dock (Mac) if you’ve haven’t already. On a PC, it’s as easy as clicking the Start button, locating the Control Panel option, and simply dragging it onto the desktop. It’s just as painless on a Mac: Navigate to your Applications folder, locate the System Preferences icon, click and drag it to your Dock, and drop it anywhere you want just (as long as it’s not underneath or to the right of your Trash can).
Both Microsoft and Apple routinely make upgrades to their respective operating systems as well as release new versions from time to time. With regard to the former, these updates can be set to automatically install. While that sounds convenient, the truth is that it could unknowingly shut down your studio. This is because when an operating system is upgraded, there’s a chance it may become incompatible with the version of Live you’re running at that time. What’s more, this SNAFU is almost guaranteed to occur if you install a new version of the OS, such as going from Windows Vista to Windows 7 or from Leopard to Snow Leopard. The safe approach is to never upgrade an existing version of an OS or upgrade to a new version until you’ve confirmed that Live will run without a hiccup or that Ableton has issued an upgrade of its own. (If it comes down to Ableton having to release an upgrade of its own to coincide with an OS enhancement, rest assured Ableton will make it known and it will be a free download.) With this in mind, it’s important to turn off these automatic updates. Here’s how:
On a Mac, you’ll need to go into System Preferences > Software Update (located in the fourth pane down, marked “System”) and deselect the Check for Updates option.
For Windows, go to Control Panel > Automatic Updates and select the Turn Off Automatic Updates option.
To be clear, this is not intended to make you think these updates are all bad. While they’re not absent of needless content, they contain a lot of essential enhancements that have to do with important matters such as security issues, bug fixes, and more. So, after you’ve confirmed that an update won’t disturb your system, you can and should download and install the updates yourself. For Mac owners, these OS enhancements can be downloaded from the Apple support page on the company’s Web site (http://www.apple.com/support). For Windows users, they can be found on Microsoft’s dedicated updates Web site (http://www.windowsupdate.com).
While you’re working on a Live Set (a Live session file), there may be times when the screen saver comes on—say, during a long playback. Although your computer is just doing what it’s designed do with regard to conserving energy and it may seem trivial, it’s a needless workflow hindrance. To prevent this from happening on a Mac, simply go into System Preferences > Energy Saver (located in the second pane down, marked “Hardware”) and click on Sleep. From there, set the computer and display sleep settings to Never and deselect the Put the Hard Disk to Sleep When Possible option (see Figure 3.15). PC users need to tell Windows not to power down various resources when it thinks it should. To do so, go to Control Panel > Power Options and click the Power Schemes Tab. From the pop-up menu, select Always On, and then click OK. This automatically sets System Standby, System Hibernate, and Turn Off Hard Disks to Never.

Figure 3.15. To help make sure your computer doesn’t shut off the lights while you’re working, you can make adjustments to its energy settings, as shown here in OS X. If the warning message with regard to shortening the life of your display has you concerned, change the setting back when not running Live so that it will indeed nod off when necessary.
In addition to preventing any sudden pics from your last vacation from popping up in the middle of a session, it’s a good idea to squash any possibilities that some random, built-in operating-system sound will infiltrate that perfect take or worse crash your system. To silence things in your Mac, either press the Mute button on your computer’s keyboard or go to System Preferences > Sounds (located in the second pane down, marked “Hardware”) and click on Sound Effects. From there, you’ll see options for silencing some or all system sounds. For a PC, go to Control Panel > Sounds and Audio Devices and make your adjustments there.
Drivers are software applications that allow your computer’s operating system to communicate with any external hardware peripherals. Back in Chapter 1, the first (and perhaps most important) hardware peripheral your studio will need was introduced: the audio interface. In order for your computer to communicate with whatever audio interface you choose, commands from the OS must be translated into specific commands the interface can understand. (This is also true for just about anything you hook to your computer.) Obviously, with the vast array of interfaces on the market (not to mention everything else), there’s no way an operating system could possibly have the ability to effectively control them all. If that were the case, they would be bloated beyond comprehension with needless data. Instead, every interface manufacturer writes its own driver software to do the job.
As you shop around for an audio interface, you may hear the phrase “plug-and-play” or the more studious-sounding “class compliant.” What these phrases refer to is the fact that both Windows and Mac computer platforms come with generic drivers built in that allow some degree of communication with an audio interface, albeit limited. While many interfaces are indeed class compliant with a Mac, you will most likely need the drivers that were specifically written by the device’s manufacturer to have an interface function with a PC.
Regardless, to be safe always install the drivers before you plug and play anything, regardless of platform! While it may be hard to contain yourself when you’re hooking everything up, this is something you have to keep in mind. In some instances, if you don’t initially install the manufacturer’s drivers and you plug in the interface cold, letting your OS install generic drivers such as the native Windows WDM drivers, you might run into functionality problems. This may be the case even after you install the intended drivers. What’s more, it may not be easy to reverse the native drivers. So be sure to install the real drivers before you do anything else.
Also, to be safe, don’t install them from the disc that came with the interface, as they are likely to be outdated. Instead, download the latest drivers straight from the manufacturer’s Web site.
While I’m on the subject: Keep your drivers updated! Remember those OS updates I talked about out earlier in the chapter? Those will have adverse effects on the drivers, too—probably more so than Live. Also, you need to also consider the changes Live might go through. They too could result in the driver developers having to go back to the drawing board and code another update.
At this point, your studio is plenty ready, so…well…what are you waiting for?! Whip out those install discs (or unzip that freshly downloaded install file if that’s the case) and load up your respective version of Ableton Live!
Installing Live is no different from installing any other program. Just follow the prompts and let Live do the rest. Be sure before going onto Chapter 4, “The GUI Insides of Ableton Live,” that you authorize Live so you can have the program open while reading through the chapter. It will prompt you to do so the first time you open it, so have your authorization code ready. If you have a boxed version, after getting Live installed and authorized, go ahead and install any additional content. In all cases, make it a point to register your copy and create an account on Ableton’s Web site so you can get updates on software upgrades, get product information, and stay connected with the Live community. Speaking of, absolutely join the Ableton forum as fast as you can; an incredibly supportive and informative world awaits you. Jump in, and welcome to the world of Ableton Live.