After accessorizing your Ableton Live studio with some hardware goodies, you may want to continue with your expansion plans by adding software extensions into Live itself. You can do this with both Ableton-designed add-on instruments and/or the gargantuan array of third-party applications called plug-ins. Both offer incredible options and will help make an already formidable digital audio production environment that much more powerful. And it doesn’t end there—not by a long shot. After getting the skinny on what Ableton has to offer and how to best work with and manage the inevitable throng of plug-ins you will gladly acquire, you’ll discover the power of ReWire, by which Live can be directly connected to another workstation as if you physically patched them together to work in tandem. As you can well imagine, the possibilities are vast. To seal the deal, Ableton came up with a way for its users to create their own Live devices with the help of a pioneering visual programming environment.
Even as you get lost in the production prospects, stay focused. Try to make smart, informed decisions when making purchases. Master Live beyond the novice stage. Learn how to use the devices it has to offer, as they are immensely useful in their own right. From there, you will have a much better outlook as to what you need and where you want to go with your studio when it comes to adding (or creating!) more software.
Ableton offers a collection of inspiring and highly versatile instruments for you to accessorize your Live-based studio. Split into two subcategories—software and samples—this section offers a look into the delicious possibilities that await you. Both types are exclusive to Live users; they are not available for use outside the Live environment. Any one of the 11 instruments covered here may be purchased separately, or you can scoop them all up (excluding the Orchestral Instruments Collection) in one shot if you spring for Suite 8. Regardless of how many of these instruments you acquire, each one will positively bolster your studio’s potential—which in turn boosts your creative potential.
Also known as a virtual instrument or the more aptly titled softsynth, software-based instruments are just that: computer programs that can create sounds. Whether they are emulations of classic hardware synths or unique designs all their own, there are many advantages to software-based instruments. For starters, they take up a lot less room in your studio, which is especially important if you’re setting up camp in a small space. Perhaps the biggest plus for a computer-based recording studio is that software-based instruments are easier to interface with your DAW. That said, what could be more stable than interfacing an instrument designed by the same people who created your recording program? Let’s take a look at the six currently available software-based instruments from Ableton, exclusively made for Suite 8 and Live 8.
Sampler. This über-sampling instrument is one of Ableton’s crowning achievements. It not only affords traditional sampling features, but also contains upper-level sound-design and synthesis capabilities. If you already have sample libraries in various formats—one of the many Akai formats, Tascam’s GigaStudio, Apple Logic’s EXS, or even SoundFonts—fret not. Sampler can load them all.
Operator. While there are gobs of outstanding softsynths on the market, you may not want to look any further than Operator, Ableton’s simple—yet vastly deep—frequency-modulation synthesizer. With a recent overhaul to the innards of Operator as of Live 8, including new filter types, deeper modulation-routing options, and the newly added additive wavetable synthesis with drawable partials, Operator is poised to be the synth to beat.
Collision/Corpus. This virtual percussion instrument provides authentic mallet sounds as well as creative alternative percussion elements. Some of the real-world percussion sounds modeled were xylophones, marimbas, and instruments as esoteric as a balaphone! Sown from the seeds of Collision is Corpus, a separate effecter that replicates Collision’s resonator section. It can be used independent of Collision to add cool, otherwise-impossible characteristics to any audio material by adding complex resonances.
Electric. It’s no secret that vintage instruments are grossly overpriced. But thanks to physical-modeling technology, the power and allure of these antique jewels can be contained within code for you to harness in your binary-powered studio. Electric gives you the phat sounds of classic Fender Rhodes and Wurlitzer electric pianos while giving you options not possible in the real world, such as tweaking the meat of the instruments. In Electric, you can go deep and wrestle the mallets, filter the tines, even adjust the symmetry of the pickups.
Tension. This instrument models stringed instruments ranging from a cello to a nylon string guitar. As with Electric, you can tweak until your heart and mind are exhausted, with options like deciding how large or small the instrument body should be, adjusting the decay of a string’s vibration, or even controlling the interaction heard between the finger, fret, and string of fretted instruments.
Analog. Perhaps the coolest electronic instrument is the analog synthesizer. Analog captures that vibe while giving you more than its real-world subject could ever offer. Gone are the days of hoping the oscillators will stay in tune under humid conditions or praying that parts are still available for your prized (read: ridiculously expensive) possession. From the filters to the LFO engines to the noise generators—it’s all here, but without the hassles.
Sample-based instruments are softsynths that play back digital files (samples) of pre-recorded audio. This audio can range from every last sound that can be produced on a real-world instrument such as a Steinway piano (which would otherwise be out of reach for most of us, let alone too big for a city apartment) to a collection of random noises organized into a tidy package just for you. When it comes to the many benefits that software-based instruments provide, sample-based softsynths far outweigh their real-world counterparts, including hardware-based synths that work from samples. For instance, hardware-based synths that produce sound by way of samples have restrictions such as memory capacity. With softsynths, you’re working from the host computer’s RAM and hard drive, both of which can be increased when necessary. Following is a list of the current sample-based instruments Ableton offers for Suite 8 and Live 8.
Essential Instrument Collection 2. This mega library consisting of gigabytes of carefully sampled instruments will expand your already-packed Live library with even more content for you to make the music in your head. It includes real-world samples of electric pianos, guitars, bass, and drums, along with orchestral textures like strings, brass, woodwinds, and more! The EIC is available only on disc and cannot be downloaded, although it’s included in the price of whatever version of Live you purchase. To get your mitts on it, you either have to purchase a boxed version of whatever version of Live you choose—which contains an EIC disc—or be prepared to shell out the extra cash to have it delivered in its own.
Session Drums. Session Drums is a vast library of multi-sampled acoustic drum sounds that aim to give you all-encompassing power over the minute nuances of a session drummer at your fingertips. From close miking of each and every drum to overhead and room mic sounds, the Session Drum library will enable you to create authentic-sounding beats without the incredible hassle of recording a live drummer. Like the EIC, Session Drums is a commodity only distributed on disc; all rules from the preceding bullet apply.
Drum Machines. If you’ve ever looked into purchasing a vintage drum machine such one of the iconic Roland or Roger Linn units, you’ll quickly see the immense value in Ableton’s Drum Machines sample-based instrument. This package offers sampled sounds from legendary drum machines such as the Roland 606, 707, 808, and 909; the Linndrum; and the Oberheim DMX, to name a few. What’s more, the GUI gives you added parameters not included on the original machines as well as presets to get you off on the right foot. This instrument comes with either version of Suite 8 (boxed or downloaded). In addition, it can be purchased separately and used as long as you are running Live 7 or higher.
Latin Percussion. Just like the Session Drums sample instrument, the Latin Percussion sample instrument conveniently brings real-world percussion sounds into the Live environment. Some acoustic drums featured include congas, timbales, claves, and shakers, all hearkening back to the sounds heard in Brazilian, Afro-Cuban, and African music. With these sounds at your disposal, you’ll be able to aptly create grooves fit for authentic salsa, meringue, mambo—even Latin jazz vibes like bossa nova. The same holds true for Latin Percussion as with Drum Machines with regard to acquisition (see the preceding bullet).
Orchestral Instrument Collection. Weighing in at a hefty 24GB, the OIC is a massive library consisting of four individual Ableton sample-based instruments—Orchestral Strings, Orchestral Brass, Orchestral Woodwinds, and Orchestral Percussion. All of these can be purchased individually, and selections of various instruments are included as part of the EIC2 sample library, but are not included with any version of Suite 8 as a whole. Each one of these meticulously sampled collections features endless samples of multiple velocities and articulations of orchestral instruments played by world-class musicians. The range of instrumentation is staggering. It includes bowed instruments like violin, viola, cello, and double bass; brass sounds including trumpet, trombone, and tuba; woodwinds like clarinet, flute, bassoon, and oboe; and classical percussion timbres such as vibraphone, marimba, timpani, xylophone—even crotales and glockenspiel! As you can imagine, this gigantic library is only available on disc; a download option would be sheer lunacy—at least by today’s standards!
Be sure to visit Ableton’s Web site and navigate to each of these instruments’ pages. There you will find not only more detailed information about their capabilities, but also sets of demo files for your listening pleasure. While you’re there, check out even more sample-based instruments designed by an array of forward-thinking creators, including Puremagnetik, SonArte, and Soniccouture. The samples contained within these partner instruments run the gamut from electronic to classical to IDM to ambient to avant-garde to glitch to cinematic to D’n’B to dubstep, all the way to just plain bizarre! The added bonus here is that this collection of custom-made instruments is compatible not only with Suite 8 and Live 8, but Intro, too!
While it may seem as if Live’s built-in effects and instruments offer more power than you could possibly imagine, there will soon come a time when you’ll want to expand Live’s capabilities by using software instruments as well as effects made by other manufacturers (third party). Commonly referred to as plug-ins (see Figure 8.1), these auxiliary software add-on modules are separate programs designed to enhance the functionality of a host application. Plug-ins significantly bolster Ableton Live studio by providing a means for additional processing options within your Live Set at every step. Plug-ins—some of which are free, and some of which have a hefty price tag—can range from emulations of vintage synthesizers and high-end studio processors to strange sound manglers and utilities. They can even serve as virtual guitar amplifiers!

Figure 8.1. Plug-ins are auxiliary software add-on modules designed to enhance Live’s functionality. You can drag them to the desired location from the Plug-In Device Browser, located below the Live Devices Browser.
This section introduces the two main plug-in formats—VST and AU. From there, it covers how to install both formats, even when there’s no installation program to do it for you. After revisiting Live’s Preferences dialog box and making some essential tweaks, you’ll be hipped to some organizing techniques as well as key differences between Live’s built-in devices and third-party plug-ins so you can best work with the horde of add-ons that’s about emerge.
The world of third-party plug-ins is enormous, to say the least. It may take you some time to inform yourself enough to wade through the myriad choices. But there’s no need to run out and buy the latest and greatest plug-in just yet; Live’s built-in devices are more than usable on their own. That all said, most Ableton Live studio mavens have at least a few plug-ins that they can’t imagine living without, and eventually you will too. These next few pages are meant to provide you with a strong foundation in the basics of plug-ins so that when you do venture into shopping for plug-ins to accessorize your Ableton Live studio, you’re armed and ready for the task.
Much like most other DAWs, Live supports the two main plug-in formats in use today. They are as follows:
VST. In 1996, German-based Steinberg (makers of another popular DAW, Cubase) released the interface specification for their Virtual Sound Technology (VST), which enabled effect plug-ins as well as virtual instruments to be to be used within a DAW host. The three types of VSTs—VST instruments known as VSTi, VST plug-ins, and VST MIDI effects—exist for both PC and Mac operating systems, although there are cases when a particular plug-in exists for one platform and not the other. Many other DAWs besides Live support the VST format, such as Sony’s ACID Pro, Cakewalk’s Sonar, and the ever-popular freeware audio editor Audacity. This makes VST a versatile, cross-compatible technology, as well as a smart buy if you’re planning to include other workstations in your studio.
AU. Given the fact the Audio Units (AU) plug-in format was developed by Apple as part of the Core Audio extensions in OS X, it should come as no surprise that AU is a Mac-only affair. Because plug-ins from major manufacturers almost always come in both AU and VST, Mac users are faced with a choice of which one to use. The good news is that for the most part, it doesn’t really matter. The only differences to consider are some minor interface characteristics as well as a few technical details that many users never encounter at all.
As stated, a major plug-in plus is that once installed on your system, if compatible, it can be shared between a wide variety of audio host programs. In contrast, Live’s built-in instruments and effects can be used only within Live. But with every plus comes a minus or two. Consider this: If you create a production that uses third-party VST and/or AU plug-ins, you run the risk of it becoming less portable. In other words, if you try to open the Live Set file on a different machine and that computer doesn’t have the same plug-ins installed, the Live Set will fail to open properly. While there are work-arounds for this, it’s important to be aware of this potential roadblock. Also, plug-ins occasionally cause instability. This could be attributed to the fact that they’re developed by a wide variety of software developers, which, just like with other programs on your computer, have varying degrees of quality control. Unfortunately, there’s a chance that a given plug-in that works swimmingly in one sequencer can cause another to crash. Or you may find some work just fine for the most part, but then start to do bizarre things when you try to automate them. In the end, there’s no reason to be afraid of using plug-ins; just be sure to save your work before trying out a new one.
To get started using VST and AU plug-ins you’ll have to install them on your computer and enable them in Live. So, without any further ado, let’s get your system plug-in ready!
Like any other program, you’ll need to install whatever third-party plug-ins you acquire. When doing so, you’ll typically encounter a standard installation program that places the necessary files on your hard drive (see Figure 8.2) in the correct locations.

Figure 8.2. Plug-ins are programs and programs need to be installed. To do so you’ll encounter a standard installation program such as the one above that’s ready to install the Ohm Force Quad-Frohmage plug-in.
Note
Before running an installer, it’s a good idea (although not imperative) to quit Live and then restart it when your installation is complete.
With some plug-ins—especially shareware and freeware plug-ins—you may have to take matters into your own hands and perform the installation manually. Fortunately, this is an easy process; simply copy the plug-in file to your hard drive. The added bonus is you’ll discover exactly where these files live on your hard drive. Not only will this help if you end up doing some additional customization of your system down the line, but more importantly, you’ll know how to get rid of buggy or unused plug-ins cluttering up your system. Plug-in locations vary between formats and platforms, as you’ll discover as you read the following two sections.
AU files have the extension .component, and live inside the Macintosh HDLibrary AudioPlug-InsComponents folder. To install AU plug-ins that do not come with an installer program and require manual installation, navigate to the Components folder; then drag the .component file to that destination. It’s that simple—with one caveat. (Isn’t there always!) Your Mac has more than one Library folder—one for the system as a whole, which is by default labeled “Macintosh HD,” as shown under your desktop folder icon, and one inside each user’s home folder (the default folder that opens when you open a Finder window). Live will find the AU files in either location; there’s no one better place to install them. That said, it makes the most sense to store them all in your main system Library folder, where your VSTs go (covered next).
On Macs, VST files have the extension .vst and are installed by default in the Macintosh HDLibraryAudioPlug-InsVST folder. If you acquire a VST that comes sans installer, navigate to the VST folder via the aforementioned path and drop it in. If you look at the File/Folder tab in Live’s Preferences dialog box, you’ll notice a VST Plug-In System Folder entry (see Figure 8.3). By default, that’s where VSTs will be installed.
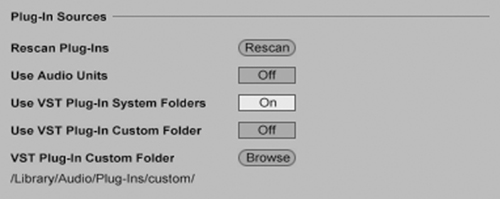
Figure 8.3. In the File/Folder tab of the Preferences dialog box, you’ll find various plug-in settings, including settings for enabling the two types of supported plug-ins and folder assignments.
Like AUs, VSTs can be placed in an alternative folder of your choosing after installation. This alternate location is called the VST plug-in custom folder, and the setting for it can be seen right under the VST Plug-In System Folder setting in the Preferences dialog box. Although the option is there, many users simply go with the system folder and call it a day. But the custom folder does offer some additional flexibility. For example, you could store all the plug-ins you’ve tested and use regularly in your system folder, while using the custom folder as your testing ground for new ones since Live will recognize VSTs in both locations. This could prove to be a wise move since plug-ins that turn out to be incompatible can potentially cause Live to crash. If you suspect that a crash was caused by a new plug-in, just open the Live Preferences dialog box and turn off the Custom Folder option to disable any suspect VSTs in one shot. Then, when you’re not in the throes of creation, go back to the secondary VST folder and drag the offending plug-ins to the Trash.
On a PC, VST files have a .dll extension. They are stored in a variety of locations on your hard drive, which may cause a little confusion. Many hosts have a dedicated VST folder, where you must copy the VST files you want available to it. Therefore, it’s not uncommon for a PC workstation to have multiple copies of these .dll files—one copy for each host that uses it. The Windows Registry also has an entry that can specify a system location for VSTs, although the exact path depends on your system and prior software installations you may have performed. For VSTs that install via an installation program, this path is usually suggested as the installation location, although you can override that if you wish. Live requires that you specify a path for it to find VSTs: the VST Plug-In Custom Folder setting (see the upcoming section, “Plug-In Preference Duties,” for more details). Like the installers, Live will suggest the default path from the Registry if it exists. Try to keep tabs on your VSTs. If you’re not using one (or more), be sure to uninstall it for better system performance.
After successfully installing your plug-ins, you need to visit Live’s Preferences dialog box—press Cmd+, (Mac) or Ctrl+, (PC)—and make some required adjustments, such as enabling your VST and AU plug-ins. Here are some other options and distinctions that may need your attention:
Before you can start using your third-party plug-ins within Live, you’ll have to enable them. Failing to do so will make your plug-ins inaccessible. You do this in the File/Folder tab in Live’s Preferences dialog box. Under the Plug-In Sources section (refer to Figure 8.3), you’ll see options to turn AU (Mac only) and VST sources on and off. Simply click the buttons to the right to toggle between On and Off states.
As mentioned, you have the option to choose a custom VST folder location. If you relocate all your VSTs, you can inform Live by clicking the Browse button, navigating to the folder into which you’ve moved your VSTs, and click Open.
The Rescan button comes in handy in a few VST plug-in scenarios. First, if you install a VST while Live is running, you’ll need to click the Rescan button to make it available within Live. Similarly, if you uninstall a plug-in that was giving you problems while Live was running and you don’t want to restart, you can click Rescan to let Live know that walking papers were served. About that, try clicking Rescan before you un-install a suspicious plug-in; it’s possible your plug-in database somehow became corrupted. Going the extra mile, hold down the Opt (Mac) or Alt (PC) key while pressing Rescan to delete the plug-in database altogether. This will enable you to run a clean scan and may garner better results.
Once you have your VST and AU plug-ins correctly installed and enabled, it’s time to put them to work. The first step is to click the Plug-in Devices Browser button (refer to Figure 8.1) so you can view all your VSTs and AUs (Mac only).
When you look at the Plug-in Devices Browser, you’ll notice that unlike with devices in Live, plug-in instruments and effects are not separated into folders according to effect or instrument type. At the root level there are but two folders: one for VSTs and one for AUs. Luckily for you, telling the difference between effects and instruments is as easy as looking at the corresponding icons. In Figure 8.4, you’ll notice the icon for the Native Instruments Absynth 4 AU instrument has a piano keyboard along the bottom, while the icon representing the Absynth 4 FX AU does not.

Figure 8.4. See the icon to the left of the plug-in’s name to see what type of plug-in it is. If you see a tiny piano keyboard, it’s a virtual instrument plug-in (VSTi). If not, it’s an effect plug-in. Here, the Native Instruments Absynth has both an effect and an instrument version, making the differentiating icons essential.
As you build an arsenal of plug-ins within your system, finding what you need in the Browser can become a little challenging. To remedy this with respect to VSTs, simply use Windows Explorer or the Mac Finder to create subfolders within your VST plug-in folder. For example, you might house your EQs in one folder, place a collection of compressors in another, etc. Any folders you create will appear in Live’s Plug-In Device Browser. AUs cannot be organized in this way, but no worries—they come with a built-in organizational system. Live has you covered by automatically displaying a folder for each individual manufacturer and displaying the associated plug-in(s) within it.
To insert a plug-in into your Live Set, you’ll employ the same moves you would with one of Live’s built-in devices: Simply drag one from the Plug-In Device Browser into a track (or into the Track View, if it’s displayed), and you’re off and running. Once you have inserted a plug-in, it behaves much like an Ableton device. You can turn it on or off, place it in an instrument or effect rack, or drag it around to change its placement. One difference you’ll immediately notice, however, is that instead of an interface for adjusting the plug-in’s parameters, you’ll be presented with a generic X/Y controller interface featuring a few toolbar buttons and a pair of drop-down menus. If you’re looking for a more visual GUI, click the Plug-In Edit button in the plug-in’s title bar (see Figure 8.5) to access the plug-in’s custom editor (see Figure 8.6). Alternatively, open the Preferences dialog box’s Look/Feel tab and enable the Auto-Open Plug-In Custom Editor option (see Figure 8.7) to save a step.
Figure 8.5. If the generic X/Y-style interface leaves you cold when it comes to tweaking your plug-ins, click a device’s Plug-In Edit button in its title bar to access its custom editor.

Figure 8.6. Looking at the Quad Frohmage custom editor window, you can see why you might want for Live to open these views automatically—at least when working in the studio. They give you access to so much more control. Besides, most plug-ins have really cool-looking GUIs!

Figure 8.7. If you find yourself always reaching for the wrench—er, the Plug-In Edit icon—you can instruct Live to automatically open a plug-in’s custom editor by enabling the bottom-most option in the Preference’s dialog box’s Look/Feel tab.
Once you’ve opened the custom interface, you’re ready to rock. While it’s next to impossible not to go nuts and start knob twiddling, to get the most from each and every plug-in it’s best to read their respective manuals to learn about the plug-ins controls. Another good way to get started with a plug-in is to load up some presets and see what they sound like. Presets are another area where plug-ins differ from Live’s built-in devices and you may need a few tips to get started.
Plug-ins have several ways of managing presets. Some use their own individual interface for preset management. These range from hardware-style numbered buttons to fully searchable browsers (see Figure 8.8 and Figure 8.9).

Figure 8.8. Ohm Force Quad Frohmage enables you to load banks of eight presets by way of numbered buttons located within the plug-in’s custom editor GUI.
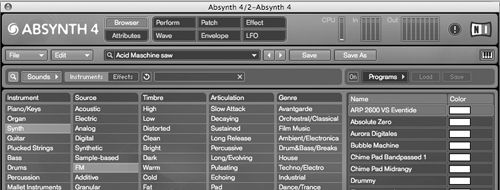
Figure 8.9. Some of the deeper plug-ins—namely, virtual synths—come equipped with a vast array of presets for you to dig into. For example, the Native Instruments Absynth features a searchable browser to help you more easily navigate the mound of sounds that await your perusal.
On the other hand, some plug-ins will have you managing presets (and banks) without utilizing its interface at all. VSTs and AUs have their own respective approaches, explained here:
VST plug-ins feature a pair of Load and Save Preset or Bank buttons below the device’s title bar (see Figure 8.10). Clicking either of these buttons opens a standard dialog box for browsing your hard drive. With VSTs, you can also save presets or load them from any location on your hard drive.
With some AUs, you can manage presets much like you do Ableton’s built-in devices: using the Browser. Clicking the Save icon in the device’s title bar creates a new preset file in the Browser (see Figure 8.11). From there, you type a name for the preset and press Enter or Return. Also, as with Live devices, you can use the Hot-Swap switch to audition and load presets; alternatively, they can be dragged from the Browser directly into a track. AU presets have the file extension .aupreset and are stored in the user home folderLibraryAudioPresets folder.


As discussed in Chapter 6, “Working with Ableton Live,” automation is a powerful tool, offering myriad advantages in music production. For instance, you can use automation to record parameter changes to a device into your arrangement so the sound of a track evolves over time. In addition, you can use automation for all sorts of simple utilitarian chores like fading tracks in or turning devices on and off at different points in a song. In short, automation is key.
Note
This section assumes you’ve read and understand the section “All About Automation” in Chapter 6. If not, you may want to do so now!
While you certainly can automate and remotely control third-party plug-ins via MIDI, as with preset management, you’ll find they behave differently from Live’s built-in suite of devices. One key difference is how automation parameters and MIDI control assignments are doled out. In the upper-left corner of any third-party plug-in’s generic X/Y interface, you’ll see the triangular Unfold Device Parameters icon next to the Device Activator (see Figure 8.12). Clicking it unfolds the device parameters area. This area contains an array of horizontal sliders (also shown in Figure 8.12) plus the occasional menu or message reading. You can use these sliders and menus to control the parameters of the plug-in just like the controls that show up in the custom editor. The obvious difference is, they are much less pleasant to look at. What’s more, due to names being abbreviated or appearing in baffling computer-programmer terminology, it’s sometimes a bit trickier to figure out just what they meant to control! The good news—aside from making sure that any parameter you want to automate or control remotely appears in this area—you won’t need to spend much time staring at this view.

Figure 8.12. This ClassicTone-PEV plug-in has only seven parameters; therefore, they automatically appear in the device parameters area. For plug-ins with more than 32 parameters, you’ll need to configure this area manually.
When it comes to automation, you’ll need to be aware of some key factors. First, if you do not see a certain parameter in this area, you can’t automate it, period. If you see nothing at all, don’t go into a tizzy thinking you can’t automate a thing. Plug-in devices with more than 32 parameters leave the device parameter area empty, forcing you to configure it yourself. While this adds a potentially aggravating extra step, try to imagine how confusing it would be to navigate this area and the Automation Control Chooser in Arrangement View if a complex plug-in automatically populated it with 800 sliders! Fortunately, adding parameters is a breeze. Simply click the Configure button that appears in the device’s title bar after you unfold the device parameters area; then click any controls in the custom editor to add them to the device parameter area.
If you need to map a plug-in’s controls to a MIDI controller, you do this, too, in the device’s parameters area. Just press Cmd+M (Mac) or Ctrl+M (PC) to switch Live into MIDI map mode and click the parameter you want mapped. From there, move whatever control—a button or knob on your controller—and it will assign that parameter to that corresponding hardware control. It’s important to note that while you have the plug-in in Configure mode, you can delete parameters you don’t need to see in this area by clicking them and pressing Delete. You can also rearrange them with a little click-and-drag action.
Adding a plug-in to Live is a lot like adding a new piece of hardware to your studio. But instead of screwing your nifty new processor into a rack space and wiring it up, you drop a file onto your hard drive.
This section looks at an add-on protocol called ReWire. It’s automatically installed on your computer when you install Live. This virtual connectivity conduit takes your Ableton Live studio to a whole other level, adding the power of another DAW to Live so they can temporarily work together. The result: one big music-making metropolis! Put another way, using ReWire is like knocking out the wall that separates two neighboring real-world studios and wiring them together. You can utilize the power of both, but control them from one central command post. In case this isn’t sinking in, let me spell it out for you: If you’ve taken the plunge and accessorized your Ableton Live studio with yet another DAW powerhouse, you can send audio and MIDI between the applications while controlling all the action from one set of controls. What’s more, ReWire can automatically communicate tempo information and transport commands so both DAWs’ sequencer engines are always in sync.
This section looks at using ReWire to connect Live with Propellerhead’s all-the-rage MIDI workstation, Reason. (Propellerhead is also the creator of the ReWire interface that makes all this happen.) Even if you don’t have Reason, you’ll find that the principles and techniques described here apply across the board, regardless of what application you are using. Besides, it’s only a matter of time before you’ll want to look into the incredible-sounding synths contained within Reason!
When ReWire is used, one program is designated the master, and the other program the slave. The ReWire master handles communication with audio hardware, while the slave program sends its audio directly into the master. You don’t designate the master and slave through some mysterious control panel; instead, it’s done by the order in which you launch the programs. For example, if you want Live to act as a ReWire master to Reason, you launch Live first. (Make sure no other ReWire master application is running, or what is about to happen to Reason will happen to Live!) Then, when you launch Reason, it will check for the existence of a master application. When it finds one, it will start itself in ReWire mode.
After you start both programs, you’ll find that Live is functioning normally—with one major change: Whenever you click Play in Live, Reason automatically begins playing back as well, and vice versa. But even though Reason is playing back, you won’t hear any audio from it. That’s because Reason is sending its audio to ReWire instead of to your audio hardware, and it’s up to Live to handle it. Let’s take a look at how that’s done:
Create a new audio track in Live. (For a refresher on how to do this, refer to the section titled “Recording Audio in Session View” in Chapter 5, “Making Music with Ableton Live.”)
Confirm that Live’s In/Out settings are visible (see Figure 8.13).

Figure 8.13. For an audio track to route incoming ReWire audio from the slave application (in this case, Reason), the In/Out and Monitor sections need to configured as shown here. If the In/ Out section doesn’t appear in your track, select In/Out from the View menu or click the Show/ Hide In/Out Section switch to the right of the main Live screen.
Open the Audio From menu and click Reason. This tells Live to receive the ReWire audio stream from Reason.
Arm the audio track for recording or set the Monitor switch to In (refer to Figure 8.13).
With those steps complete, you’re free to create new parts in Reason; these will be perfectly synced to Live. From there, you can record those parts and immediately create audio clips. This cuts down the otherwise arduous task of working in Reason, rendering the newly created riffs, and importing them into Live.
But what about MIDI? Wouldn’t it be cool if you could sequence Reason’s synthesizers and samplers directly from MIDI clips in Live? Well, you can. There are a couple ways to do this, but the easiest is to use Live’s External Instrument device. Here’s how:
Create a new MIDI track in Live. (For a refresher on how to do this, refer to the section titled “Sequencing MIDI with Live” in Chapter 5.)
Open the Live Device Browser.
Open the Instruments folder.
Click and drag an External Instrument device into a MIDI track.
Taking a close look at the External Instrument device (see Figure 8.14), you’ll see that it enables you to route MIDI into any device in the current Reason song (via the MIDI To menu) and receive an audio stream in return (via the Audio From menu). It’s that easy.

Figure 8.14. The External Instrument device allows you to send MIDI to a specific Reason instrument and receive its audio output right back into Live. Is ReWire cool or what?!
In both these examples, you’ll notice that the audio that Live receives from Reason is the main L/R mix. This is like the Master track in Live in that it contains a stereo mix of everything going on in Reason. As you may have noticed if you’re trying this in your system, when you click the Audio From menu, it shows 32 different stereo pairs (or 64 mono outputs) as possible audio sources from Reason. What this means is that it’s possible to have many instruments in Reason assigned to their own unique outputs, and to pipe these outputs into individual channels in Live. While that’s a bit deeper than this book is designed to delve, that should give you a solid idea as to just how involved a ReWire setup can get!
For some producers, Live works wonders as a slave application. For example, some folks use Pro Tools as their main work environment but use Live’s Session View as a quick and easy way to mix and match loops. To set up Live as a slave, you must first launch the master application then launch Live. Just like Reason, Live will find the master when it loads and start itself in ReWire mode. From there, just as you did in Live when it was the master, you’ll have to configure a channel (or channels) in the master application to handle Live’s audio. This process varies depending on the application you are using. Fortunately, Ableton has been kind enough to post a guide to common ReWire setups here: http://www.ableton.com/pages/rewire/home.
The latest addition to the world according to Ableton may be the ultimate accessorizing opportunity for an Ableton Live studio zealot. As a result of a fruitful collaboration with Cycling ’74, the makers of the lauded Max/MSP, an add-on called Max for Live (M4L) was born. Calling M4L an add-on is a bit of an understatement, since it comes with most of the power of Max/MSP—a visual programming environment for creating audio and MIDI tools that allows you to create your own Live-centric audio and/or MIDI devices.
For you non-programming types, on the surface, Max for Live is an ever-expanding plug-in suite, similar to Native Instruments Reaktor. It comes with 43 built-in devices, with many more that can be downloaded free of charge. In use, these Max devices are a lot like Live’s built-in devices. They sit in the Track View along with third-party plug-ins and Live devices and process audio and MIDI signals (see Figure 8.15).

Figure 8.15. Max for Live devices such as Buffer Shuffler are fashioned with a GUI that’s directly in line with Ableton’s own native devices because that’s exactly what you’re creating—your own palette of unique Ableton-centric plug-ins.
For those who dabble in programming, M4L offers the unusual opportunity to work with instruments and effects that can be opened up and customized. For real-deal programmers, M4L is a dream come true that allows you to extend Live’s functionality in ways that were previously impossible.
Once installed, Max for Live devices and programming tools are accessed through Live’s Browser. These appear there as three new devices: Max Audio Effect (see Figure 8.16), Max MIDI Effect, and Max Instrument. If you load any of these onto a corresponding track in their “clean slate” form, you’ll be presented with a simple template for programming a device from scratch. If you need to take smaller steps, you can just unfold one of the 43 prebaked Max devices and look at what’s inside (see Figure 8.17).

Figure 8.16. You access Max for Live within Live itself. One way to do it is to open the Device Browser and look for Max Audio Effect in the Audio Effects directory. In addition to the Buffer Shuffler device shown here, Max for Live also includes many devices originally programmed for Cycling ’74’s Pluggo, a powerful plug-in suite beloved by many sound designers for its strange and unique effects.

Figure 8.17. Even the simplest Max for Live devices reveal themselves to be fairly complex when opened in Edit mode.
Before you dismiss coding your own plug-ins as too complex, know that Max for Live was designed so most any Live user can one day construct that one plug-in they wish someone would make. At the same time, it would be misleading to say there isn’t a steep learning curve. In the end, the time you put in will be paid back in ways that are hard to convey in these few paragraphs. The depth of what you have before you with Max for Live in your studio is subject for a book itself!
That about wraps up building your Ableton Live home studio, which leaves us with but one thing to do: Build a mobile studio! The final part of this book walks you through the process. At the same time, it reinforces many of the concepts already discussed, since they’re common to both scenarios.