In Part 2, “Getting Down with Ableton Live,” you took a good look at Ableton Live, from a tour of the interface to getting your hands dirty making music and further refining that music through editing and mixing techniques. At this point, you have the basic knowledge needed to get your Ableton Live studio off the ground. It’s time to take your studio to the next level.
A great way to start accessorizing your studio is to add a dedicated MIDI controller that will do just that—control Live. In Chapter 2, “More Must-Haves,” you discovered the many types of MIDI controllers available. While Chapter 5, “Making Music with Ableton Live,” covered how to set up a MIDI track and sequence a MIDI performance, this chapter will hip you to the awesome power of taking over Live with hardware controllers that were specifically designed to work with Live. What’s more, you’ll discover some alternative controller options that are just plain cool.
Further accessorizing your Ableton Live studio, you’ll learn about outboard processors and the vast world of third-party content. As you start to branch off from the core components that make up a home-based music production situation, you can really start to develop your studio into your studio.
Let’s kick things off with two MIDI controllers that had the entire Ableton community on the edge of their seats, waiting for their release.
As you know by now, Ableton Live is a unique software environment. The Session View alone, with its clip and scenes architecture as well as ease of use and flexibility, has forever changed the way music is produced and performed. What better way to complement such an innovative and pro-creative production and live performance environment than with its own unique controller? The folks at Ableton must have thought so too, as they went into the design shed with two of the world’s leading music-production hardware manufacturers to create a pair of smartly made-for-Live controllers. The results of these collaborations are the Akai Ableton Performance Controller, more commonly known as the APC40, and the Novation Launchpad. While both are different in their overall design approach, they share a commonality in that they were created to be a link between you and your computer that balances analytical control with creative expression. Whether you’re a guitar player, laptop producer, big-band leader, or remix DJ, you’ll find accessorizing your Ableton Live studio with one or both of these units will significantly bolster your—and your studio’s—potential.
In this section, you’ll take a look at both the APC40 and the Launchpad from top to bottom, giving you an opportunity to make an informed decision as to which one you might consider adding to your own rig. Before closing things out, there will be some discussion as to which controller is better for you. But first, there’s a bit of business to be taken care of in Live’s Preferences to ensure your controller will be able to properly communicate with Live.
No matter what MIDI controller you choose to use, you’ll need to take a quick trip back to the Preferences dialog box and make it over to the MIDI/Sync tab (Figure 7.1) to set things up properly. If not, your controller will control nothing at all. Once there, draw your attention to the MIDI Ports section, where you’ll see whatever controller you’re looking to use to control Live (in this case, the Novation Launchpad). There, you click the Track and Remote buttons that correspond with the controller’s input and output port assignments to toggle them on. In the section above, check to make sure your controller of choice is selected in the drop-down list of supported control surfaces as well as in the Input and Output sections; if not, select it. While you’re there, change the Takeover Mode setting to Value Scaling. If there’s a difference between where the hardware control is set at the time you touch it compared to where the control is set in Live, this preference will ensure Live scales the difference accordingly for the smoothest parameter changes. This last preference adjustment—changing the Takeover Mode setting to Value Scaling—pertains more to actual movements of knobs and sliders, as seen on a controller like the APC40, than to the button approach the Launchpad takes, as you’ll soon see.

Figure 7.1. In the MIDI/Sync tab in Live’s Preferences dialog box, you’ll need to turn on the Track and Remote switches that correspond with the input/output ports of the controller(s) you wish to use as well choose said controller(s) in the drop-down menus in the top section.
More often than not, after taking these steps to set up a MIDI controller to work in conjunction with Live, you’d have to map the controls one by one and then save them to a template file by using the Save Current Set as Template command in the File/Folder tab of Live’s Preferences dialog box. When it comes to the upcoming pair of made-for-Live controllers, however, that’s not the case. Because they were both designed specifically for Ableton Live, this is already done for you. After installing the necessary drivers (Launchpad only), it will just be a matter of connecting whichever controller you’re working with to your computer via USB, turning it on (APC40 only), and then launching Live. Done.
The first of the two made-for-Live controllers on the market was the Akai APC40 (see Figure 7.2). After reading Chapter 4, “The GUI Insides of Ableton Live,” you can no doubt appreciate the APC40’s layout as being a physical replication of Live put right in front of you. Let’s split up the layout into left and right halves and take a good look at each, starting with the left. Then we’ll have a look at the back.

Figure 7.2. The APC40 is considered the ultimate Ableton Live controller, with its physical-duplication approach of the Live GUI.
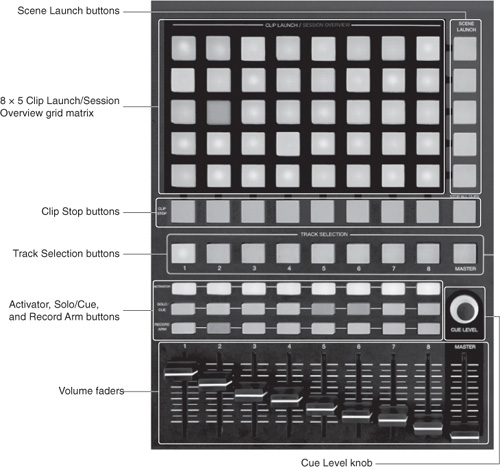
On the left side of the APC40 is a series of controls that directly resemble Live’s Session View. Take a look at Figure 7.3 as you read the following list:
8 × 5 Clip Launch/Session Overview grid matrix. This consists of backlit soft buttons that light up in varying colors, indicating what a clip or scene is up to (more on that coming up).
Scene Launch buttons. These buttons are directly related to the Scene Launchers in the Session View. They enable you to fire off scenes quickly and easily.
Clip Stop buttons. Like Live, which features a series of Clip Stop buttons right below the clip slot grid in the Track Status Display, the APC40 has a row of buttons for the same function—including the Stop All Clips button, located below the Scene Launch buttons.
Track Selection buttons. These allow quick and easy mouseless navigation of tracks, including the Master track.
Activator, Solo/Cue, and Record Arm buttons. These three rows of rectangular backlit buttons appear right below the Track Selection buttons, again mirroring the Live GUI. They give you control over track on/off (Activator), soloing (Solo/Cue), and recording status (Record Arm). It’s as if the three controls from the bottom portion of the Mixer section were lifted right from Live and placed on the face of the APC40!
Cue Level knob. To the right of the rectangle button section is the lone knob on this side of the APC40, for controlling the cue output and the volume of the sample auditioning done in the Browser.
Volume faders. At the bottom of the APC40’s left side is a series of volume faders, which correspond to each of the eight tracks you’re currently controlling and the Master track.
Half of 40 Is 20
If you’re digging the APC40 so far but you’re thinking it might be too big for your limited space, then you’re in luck. Not too long after the emergence of the APC40 came the APC20 (see Figure 7.4)—a smaller footprint that features the exact controls just described. If you’re worried about cutting yourself too short in terms of hardware control, dig this: The APC20’s Shift button allows the faders to access many of the controls found on the APC40.

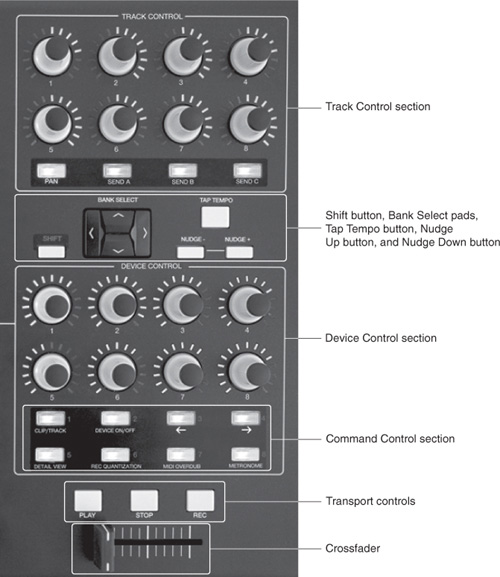
Shifting over to the right side of the APC40, you’ll find an array of endless encoders and buttons for further control over Live sans mouse that gladly invites you to tweak to your heart’s content—and then some. Look at Figure 7.5 as you read the following list:
Track Control section. The eight knobs in this section represent pan and sends A–C control of the eight tracks in focus (see the next section). You specify exactly what function each knob will perform with the row of four buttons directly below, which are labeled accordingly.
Shift button, Bank Select pads, Tap Tempo button, Nudge Up button, and Nudge Down button. The Shift button allows access to second-level controller features, listed in red on the face of the unit (explained in a moment). The Bank Select pads enable you to easily navigate your Live Set, no matter how big it is. The Tap Tempo button, which appears at the apex of the triangle of buttons in this area, is directly linked with Live’s Tap Tempo function. The Nudge Up and Nudge Down buttons, which comprise the base of the triangle, allow you direct access to Live’s Nudge controls, which you can use to slightly shift the tempo up or down for beat-matching action.
Device Control section. This section gives you tactile control of eight parameters of the currently selected device.
Command Control section. Of course, many devices will have many more parameters to tweak, so that’s where these eight buttons come in. While holding the Shift key, you can press any one these eight buttons (labeled 1–8 in red) to access an additional eight banks. That gives you a total of 64 controls! The first-level controls of these eight buttons make up the Live Command Control section, whose functions are labeled below each button. Going in typewriter fashion, they are as follows:
Clip/Track button. This toggles between Clip View and Track View.
Device On/Off. This turns the currently selected device on or off.
. This selects the previous device.
→. This selects the next device.
Detail View. This turns Detail View on and off.
Rec Quantization. This turns Record Quantization on and off.
MIDI Overdub. This turns MIDI Overdub (OVR) on and off.
Metronome. This turns the Metronome on and off.
Transport controls. These include the basics: Play, Stop, and Record.
Crossfader. This enables you to crossfade between crossfader assignments A and B, as seen in Live. (Akai made sure this particular control can be easily replaced, as this is usually the first to go due to normal wear and tear.)
Looking at the rear panel of the APC40 (see Figure 7.6), you’ll see a few items of note. From right to left, they are as follows:
On/off switch. Unlike many other MIDI controllers, the APC40 does indeed have an on/off switch.
DC power adapter input. This is where you plug in the included 12V-2A DC wall-wart. If you want to be a little extra careful, you can make use of the cable restraint to the left of the USB port to wrap the excess power adapter cabling around it.
USB port. This is where all that MIDI data flows in and out of the APC40 to and from your computer.
FS1 and FS2 jacks. These two jacks are for connecting ¼-inch tip-sleeve foot-switches for hands-free control. If you do end up using these, be sure the footswitch is set to off when you connect them to ensure the polarity is correct.

As stated, looking at the APC40 is like having Live jump out of your computer screen and plant itself in hardware form on your workstation desktop. In addition to the resemblance of the physical layout of the APC40 to Live’s GUI, there’s a direct two-way conversation between the controller and Live. Within this bi-directional communication is data that literally lights up the APC40, telling you the status of clips, whether a track is armed for recording, where a certain knob is positioned, and more. The basic premise is to get to a point where you don’t need to look at the screen, only the grid and the control sections!
Before we look at how the APC40 displays what’s going on in Live, it’s important to know how Live displays what part of the clip slot grid the APC40 is controlling. This is done with a red rectangle that surrounds the 8 × 5 section you have the APC40 set to control (see Figure 7.7). You move around the clip slot grid with the Bank Select pads found on the right side of the APC40, below the Track Control section. You can move in any direction in one-by-one increments by pressing the corresponding directional button. Left and right movements correspond to the tracks, while up and down movements correspond to scenes. For faster navigation, use the Shift button to move the red rectangle by eight tracks or five scenes. Another navigational function of the Shift button is that pressing it changes the Clip Launch section of the APC40 to Session Overview (as shown labeled in red), which works great for those gargantuan sets. In Session Overview, each button now represents its own 8 × 5 grid, enabling you to jump over to a new Clip Launch region, if you will.

Figure 7.7. The red rectangle tells you what 8 × 5 part of the grid in the clip slot grid of Session View the APC40 is set to control.
When it comes to the light show the APC40 puts on, you’re always aware of what’s going on in Live. Eventually, you won’t need to look at the computer screen at all. Here’s what you’ll experience:
All 40 buttons in the 8 × 5 grid light up according to what’s going on in Live. The color-status setup is as follows:
No light means that clip slot is empty.
Amber tells you a clip is loaded, but not playing.
Green tells you a loaded clip is playing.
Red tells you a clip is being recorded.
If you hold down the Shift button, the Clip Launch section changes to Session Overview. This changes the color statuses a bit. Now they will be as follows:
No light indicates there are no clips present in that 8 × 5 grid.
Amber represents the currently selected 8 × 5 grid.
Green tells you there is at least one clip currently playing in that 8 × 5 grid.
Red tells you there are clips in that 8 × 5 grid, but none of them are playing.
The lights around the endless encoders—sometimes called halos—tell you where the knob’s exact position is in Live so you’re always aware before tweaking anything. If you change banks—for instance, going from send A to send B in the Track Control section or from bank 1 to bank 6 in the Device Control section—the halos will immediately shift to the new settings.
As you can see, the Akai APC40 would be an extremely powerful accessory for your Ableton Live home studio and could very well be a contender for your mobile studio as well. Having a physical snapshot of Ableton Live at your fingertips with bi-directional communication is incredible to say the least.
Next up is the second made-for-Live controller, which might give the APC40 a run for its money or could just be the perfect companion. You decide. On to the Novation Launchpad….
The second of the two made-for Live controllers is the Novation Launchpad (see Figure 7.8). Coming only a few months after the release of the Akai APC40, the arrival of the Launchpad was met immediately with comparison chatter—not only to the APC40, but also to other grid-based controllers such as the venerable Monome. The fact is, the Launchpad stands on its own two feet. This section takes a good look into the Launchpad’s mojo; later, we’ll compare these two made-for-Live units before moving on to some alternative controller options.

Figure 7.8. The Novation Launchpad is a made-for-Live controller that stands on its own as an extremely portable and versatile unit at an incredible price point.
The basic architecture of the Launchpad involves something of a more-than-meets-the-eye approach. Aside from the USB port found on the upper-right side, the unit contains nothing more than a series of front-panel buttons. The main, 64-button grid matrix of square backlit buttons is partially surrounded by one top-side horizontal row of round backlit buttons and one right-side column of eight buttons of the same nature. The trick here is the Launchpad functions in four main modes, which you call up using the mode buttons in the top-right corner (see Figure 7.9).

Figure 7.9. In the top-right corner of the Launchpad are four Mode buttons, which let you quickly get from one mode to another.
Pressing the Session Mode button sets up the layout as follows:
The front panel turns into an 8 × 8 grid matrix that mirrors Live’s clip slot grid. The same red rectangle will appear in your Live Set in Session View when the Launch-pad is connected—this time covering an additional three scenes’ worth of clip real estate.
The top-left directional arrow buttons are what you use to navigate Live’s clip slot grid. The up- and down-arrow buttons will have you traveling by scene, while the left- and right-arrow buttons will move you through the tracks.
By holding down the Session button, you can put the pad matrix into a 64 × 64 grid resolution, allowing you to quickly shift to another 8 × 8 matrix—much like holding down the Shift button on the APC40. The color assignments in this resolution are the same as the APC40 as well.
The eight buttons on the far right launch their corresponding scenes, as you’d expect.
In Mixer mode, the Launchpad has the ability to control virtually every area of the Live mixer—which, as you may expect, completely changes the layout. In this mode, the Launchpad’s front panel is split in half. Here’s what you’ll have:
The top four rows of the 8 × 8 matrix act as status indicators for the corresponding track’s volume, pan, and sends A and B, and act as reset buttons. From here, you can set volume levels to unity gain, pan controls to the center, and send levels to their minimum.
The top four circular buttons on the far right call up the Secondary Mixer modes, which enable you to tweak volume, pan, and sends A and B controls on each of the currently selected tracks’ vertical column buttons.
The bottom four rows of the 8 × 8 matrix give you direct access to track controls in the same order as seen in the Live GUI. From top to bottom, they are Stop, Track Activator, Solo, and Track Arm.
The bottom four circular buttons on the far right affect all tracks, enabling you to stop all clips, disengage all mutes, turn off all solos, and disarm all tracks.
As for the two buttons in the middle, User 1 and User 2, they put the Launchpad into corresponding User modes, which you can assign to do anything you like through MIDI mapping. Out of the box, User 1 is set up for playing Live’s drum racks, while User 2 is set to allow access to Max for Live device presets. (You’ll learn about Max for Live in the next chapter.)
Conceptually, the Launchpad has a few similarities with the APC40. First, they both have a direct two-way conversation with Live when connected. The bi-directional communication data passed back and forth between Live and the Launchpad creates its own light show, conveying the expected information such as clip status, volume levels, etc. The 64 buttons in the 8 × 8 matrix take the same color approach as well. No light means that clip slot is empty. Hitting an empty pad will stop whatever clip is playing in that track unless the track is armed for recording. When a track is armed for recording, pressing an unlit pad in that track will turn it red, indicating that recording has begun. Amber tells you that clip slot contains a clip, while green tells you a clip is playing. But the similarities stop there, as the Launchpad does what it does without a single knob or fader/slider.
To make control changes that would ordinarily be made with a knob, fader, or slider, the Launchpad is set up so you can swipe across a range of pads both vertically and horizontally, depending on what you’re controlling and how the Launchpad is mapped. For example, when in the Secondary Mixer modes, you make control changes by swiping up or down along the currently selected tracks’ vertical column buttons. To zero out a control, you press the bottom pad in the column (or the left pad in a horizontal-row control setup). To max out a control, you hit the top pad (or the right pad in a horizontal-row control setup). This enables you to make all the same gestures other hardware controls allow for, from conventional volume adjustments all the way up to abrupt kills. While this may sound like it could feel clumsy, you’ll be surprised at how smooth it is. It is this part of the Launchpad’s overall architecture that makes it so easy to transport, as you don’t have to worry any breaking any protruding buttons or faders when stuffing it into a bag.
Mapping controls in the Launchpad’s User 1 and 2 modes is as easy as with the APC40. Just get Live into MIDI Map mode, click one of the many highlighted parameters with Live (including loaded devices), and simply press one of the pads. Because Live supports multiple mappings to the same control, you could assign one button to control more than one parameter. To assign a continuous control to a row or column of buttons, all you have to do is hold down the first button and then press the last one. If you so desire, you could also remap Session and Mixer mode pad and circular button assignments, overriding the out-of-the-box preset controls to further tailor the Launch-pad to your unique setup. If you’re concerned that’s taking things too far or have the APC40’s multiple bank warning in the back of your head, don’t fret; these mappings are unique to the Live Set, and the default mappings will be there again when you open another Live Set. Lastly, if you want to deactivate a pad, just assign it to a parameter on a device that’s turned off. This will help ensure you don’t activate anything by mistake.
Now that you have been clued into the APC40’s and Launchpad’s abilities, let’s see how they measure up against one another.
Having two dedicated Ableton Live controllers on the market inevitably brings up the question: Which one is better? But the best way to approach the unavoidable pitting of the two against each other is to ask the question: Which one is better for you? In the end, it’s up to you to decide by spending time with both units any way you can. Whether you borrow each one from a fellow Live enthusiast or purchase both from a dealer who has an extended return policy, try to give yourself some time to really dig in to both at the same time. While doing so, keep the following thoughts in mind. Also, be sure to jot down some of your own so you can make the most informed of informed decisions. If you find yourself agreeing with all these points in favor of both the APC40 and the Launchpad, well, then, you gotta do what you gotta do: Get them both!
The APC40 is a rock-solid piece of gear, while the Launchpad is primarily made of lighter plastic materials. That’s not to say the Launchpad is flimsy; it’s just that the APC40 feels more like a real piece of pro audio equipment. That said, if studio production is your main gig, then look toward the APC40. If you’re more about planes, trains, and automobiles, go for the Launchpad.
Further touting the Launchpad as the go-to mobile controller is the fact it’s bus powered. In contrast, the APC40 requires a wall-wart. And although this may seem trivial, just the same you gotta love that L-shaped USB end that goes into the Launchpad as compared to the straight-head end that worryingly hangs out of the APC40.
The APC40 is Ableton Live in hardware form, period. For many, it’s the ultimate Ableton studio tool. If your production needs are developing into some serious business, then the APC40 is your man, er, machine.
If beat production is your forté, then you might be eyeing the Launchpad, as it offers native support for Live’s drum rack while the APC40 does not. Plus, the Launchpad buttons are a bit larger and more comfortably spaced, which plays well for finger-drumming. However, neither unit supports velocity control, so that might be game over for both for the serious controller-based percussionist.
If you’re of the “more is better” ethos, then you may lean toward the Launchpad’s 8 × 8 grid as opposed to the APC40’s 8 × 5 grid. If you’ve been sweating a Monome, Tenori-On, or a Livid Ohm64, but like many others just can’t seem to fit one into the budget, then that makes that Novation 8 × 8 grid even more enticing.
When it comes to tactile feel, the APC40 may be the ticket; it has real sliders and endless encoders that you can grab onto. The Launchpad deals with volume, pan, and send controls by splitting out the range of control over a column of eight buttons—and that could be totally alien to many. Say you want to sweep a cutoff filter; nothing feels as good as a real knob. Besides, much of the play sometimes can be within a small range of a knob, which may be in an area that’s not available to you on the Launchpad, given its segmentation of range.
A point may be awarded for the Launchpad’s vertical parameter control approach when it comes to abrupt volume cuts. You can easily achieve analog crossfader-like cuts by quickly toggling between the top and bottom buttons, which is something a MIDI-crossfader fader just can compete with no matter how low you get the latency.
When it comes to overall integration, the APC40 wins hands down—not just for the obvious dedicated knobs, faders, and transport controls, but also the Track Select and Clip Stop buttons. To perform a similar function—say, to stop a clip or even just solo a track—you have to push the Mixer button first, adding a step to a process that shouldn’t have an added step at all. While on the subject, to set a track, pan, or send level, you have to push a button to get into that view. To be fair, the APC40 does require you to choose between sends and pans and device and clip controls with a button push, but still.
If at the end of the day it comes down to your budget, the Launchpad seems like a bargain compared to the APC40, not to mention most other controllers with this level of power and usability.
All things considered, one might say the APC40 is the Ableton Live studio tool, and the Launchpad is a great live-performance tool at an incredible price. But your call is the one that matters. Don’t be surprised if the call is for both!
Between Chapter 2 and the previous section on the APC40 and Launchpad, you’ve been introduced to a collection of useful controllers that, depending on your music-production goals, will serve your Ableton Live studio well. But what if you still haven’t found what you’re looking for? Whether you’re a DJ looking to integrate Live into your home production and live performances or you’re merely a forward-thinking techie looking for something to satisfy your inner geek, the accessories in the form of controllers in this section will surely do the trick.
Over the last 10 years or so, advances in music technology have blurred the line between traditional DJ and modern producer gear. With the right tools, you can push way beyond what you thought your rig could do. Take the two made-for-Live controllers you just read about and reflect on what you thought you could do before you got hipped to them. Prepare to do the same when looking into DJ-centric controllers working in conjunction with your Ableton Live studio, such as the M-Audio controllers featured in this section.
With the right DJ-centric interface/controller and Live, you can create some serious mixes. Take the M-Audio Torq Conectiv (see Figure 7.10), which features DJ-friendly 4 × 4 RCA I/O, a 16-bit/48kHz USB interface, a mic input, a headphone out with cross-fadable cue-sourcing abilities, and more. You can use the Conectiv as a central hub for a dual turntable/Ableton Live rig where you can mix between your digital audio and vinyl records and capture everything in an Arrangement View session for further editing. Stepping it up a notch, you can go for a controller such as the M-Audio Xponent (see Figure 7.11), which boasts a pair of vertical volume slider controls, a cross-fader, a pair of 3-band EQ control knobs, pitch-adjust controls, eight assignable knobs for effects tweaking, 64 MIDI-assignable backlit buttons, and more. But most notably, the Xponent gives you two touch-sensitive scratch wheels for manipulating your digital files and a built-in touchpad/assignable X/Y control surface for even more effects control!

Figure 7.10. Interface/controllers like the M-Audio Torq Conectiv enable you to connect two turntables so they can be played in conjunction with a computer and Ableton Live.

Figure 7.11. You can have a full-on DJ-centric production rig with an interface/controller like the Torq Xponent, which features super-cool controls like a touch-sensitive scratch wheel and a built-in touchpad/assignable X/Y control surface.
The Torq Xponent is actually one half of a hardware/software DJ system that comes with its own software application—Torq 1.5—that delivers a variety of real-time creative tools. Through something called ReWire (discussed in the next chapter), you can actually interface Torq with Ableton Live, which routes the output of Torq into Live as well as syncs its tempo engine. As you can well imagine, this is yet another way to push far ahead of what you thought your rig could do. That said, in Part 4, “Your Ableton Live [Mobile] Studio,” you’ll put together a mobile studio package that not only enables you to record outside your four walls, but more importantly sets you up with a rig so you can hit the stage for live performance. You can do some serious damage with a controller like the Xponent on a lighted stage. While vinyl will always have its rightful place in DJ culture, music technology does offer alternatives; with these offerings, you can further accessorize both your home and mobile Ableton Live studios to great effect.
The next control-related accessory for your Ableton Live studio might be something you already have: an iPad. With the help of a few innovative apps, you can turn your Apple tablet device into a powerful wireless Live controller for both Mac and Windows computers. What sets the iPad apart from many other controllers is the touchscreen approach to hands-on control much like the JazzMutant Lemur offers, but in a smaller package and at a more affordable price. Plus, the wireless part of this setup eliminates any cabling issues and frees up a USB port. If you prefer a more tactile controller, an iPad may not be for you—but at the very least, it merits investigation, as it offers control options that are impossible on hardware controllers.
Let’s take a look at two apps that are sure to get you scurrying for the app store, one of which makes use of a more powerful alternative to MIDI known as Open Sound Control (OSC). But first, you’ll need to connect your iPad to your computer so they’re talking to each other.
No matter what iPad app you choose for controlling Live, you’ll need to get the iPad and your computer talking to each other. Let’s take a look at how to do this on a Mac, as that’s the more likely platform for an iPad owner/music producer. First, on your Mac, do the following:
Click the wireless radar icon in the toolbar near the time display (see Figure 7.12).
The Computer-to-Computer dialog box opens. Type a name for the network you’re creating between your Mac and your iPad in the Name field.
Click OK.

Then, on your iPad, follow these steps:
Open the Settings application.
Touch the Wi-Fi tab.
In the Choose a Network section, which appears shortly after the WiFi preference section loads, touch the network you just created.
Once the iPad is talking to the computer that’s hosting Live, you’ll be able to explore the following controller apps. Prepare to love this.
Designed by two avid Live users, French producer Le K and Berlin-based producer Christian Blomert, the TouchAble app for iPad is an affordable and extremely powerful control option for your Ableton Live studio that, for some, may be all you need (see Figure 7.13). You can easily navigate your Live Set, tweak mix and effects controls, change clip parameters, and a lot more, just using your fingertips. Taking full advantage of the iPad’s touchscreen capabilities, the designers made it so you can easily scroll anywhere and everywhere with simple gestures. And if you need to speed up the action, you just need to use more fingers. You get an 8 × 15 clip grid matrix—that’s more clip-action real estate than with most control surfaces, including the APC40 and the Launchpad! What’s more, you can play built-in Live devices as well as your VST and AU (Mac only) with a unique double keyboard. There’s even a 16-pad drum sequencer that features five velocity steps and octave selectors. And if you need to rearrange the app’s module layout, you can through an intuitive menu system that just begs you to toy with it. An essential attribute of any GUI-based remote-control solution is the back-and-forth communication between your device and the computer running Live; TouchAble is all over that, with full name and color feedback for clips and scenes, for instance.

While the TouchAble app is ready to control Live right out the box, the TouchOSC app for iPad—there’s also a version for iPod Touch and the iPhone—requires you to create the controller for your particular device. While this does require some know-how on your part, it comes with some extraordinary benefits—the top one on the list being you can create exactly the controller you want and change it at any time. For example, say you need to add an effects control assignment to your hardware controller but your controller is already maxed out with assignments. Instead of dumping one effect for another or adding another controller into the mix and potentially creating a MIDI latency problem due to the overflow of data going back and forth, with TouchOSC, shown in Figure 7.14, you can just add a new screen with whatever controls you like and you’re good to go.

Figure 7.14. TouchOSC is an outstanding, flexible iPad (as well as iPod Touch and iPhone) app that enables you to create your own wireless controller interface.
With TouchOSC, you can create a bi-directional communication platform between your iPad and your computer running Live with a variety of touch controls such as faders; rotary, push, and toggle buttons; X/Y pads; multi-faders and toggles; LEDs; and labels. It supports multi-touch operation with up to five controls at one time as well as Accelerometer data. In addition, it comes with template layouts for you to get started designing your own controller scheme.
Unlike with the TouchAble app, you’ll need a couple of extras beyond just your iPad and a computer running Live that’s set up for wireless communication to get TouchOSC up and running. Additionally, you’ll need a conduit application, called OSCulator, to transform the OSC data coming out of TouchOSC into MIDI data that Live can understand. Plus, you’ll need the TouchOSC Editor application (see Figure 7.15), which runs on your computer, to create layouts from prebaked templates or, when you’re ready, to create your own custom layouts from scratch.
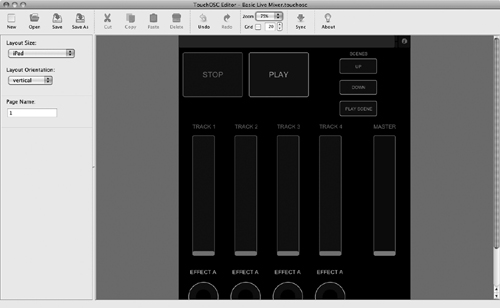
Figure 7.15. TouchOSC comes with an editor program, aptly named TouchOSC Editor, that enables you to design custom layouts for your iPad on your computer.
Note
For a more in-depth look at this subject, visit the Dubspot blog at http://blog.dubspot.com and search for TouchOSC. This directs you to a four-part video series created by fellow Dubspot instructor Tony Grund on the ins and outs of getting TouchOSC up and running with Live and Native Instruments Traktor.
After you decide how you want to control Live, a logical next step in accessorizing your Ableton-based studio is adding peripheral hardware components, known as outboard gear. What falls under this moniker is a wide range of rack-mounted units that can serve a multitude of purposes. From outboard effects processors such as reverb units to all-in-one multi-effects processors to handmade tube mic preamps to utility-based units like the popular Furman Power Conditioners, these rack-mounted machines offer you added flexibility—but not without some headaches.
When it comes to flexibility, outboard effects processors, for example, take care of processing effects so your computer doesn’t have to. This frees up the CPU to deal with the plethora of remaining tasks that come with audio production. Plus, it enables you to run more effects at the same time. And often, the outboard processor produces superior results compared to its software equivalents. (Speaking of superiority, in the case of vintage analog outboard gear—especially units that feature vacuum tubes—sometimes there’s just no beating the real thing.) The price you pay is the inevitable signal coloration—and often signal loss—that outboard pieces bring into the signal chain. But with regard to the former, often the coloration is what makes a particular piece valuable to the chain!
Chapter 6 introduced the concept of processing audio with effects through Live’s built-in suite of devices and racks seen in Track View. Many of the devices found in the Device Browser are digital emulations of gear that started out in the physical world as outboard processors. You’ll find uses in both realms, and there’s nothing to stop you from going one way or the other. At the same time, you can combine both worlds within one set—in the same track, no less. Live makes it easy with its External Audio Effect device (see Figure 7.16), which provides a connection system to patch in whatever outboard gear you want. Using the Audio To and Audio From choosers, you can select available I/O on your audio interface to connect an outboard delay unit into the track’s signal chain where the External Audio Effect device is loaded. Other essential controls include Gain knobs that adjust the levels traveling out and back into Live; a Dry/Wet control that enables you to control the balance between the incoming processed audio and dry signals within Live; and an Invert button that flips the phase of processed audio coming back into Live. To handle the latency introduced by outboard gear patched into Live, there’s a Latency control in the form of a numeric slider that enables you to adjust to taste.

Among the most important accessories are third-party content libraries. Be they loops, multi-sample packages, collections of a cappella performances, or your own found sounds, you can never have enough additional audio content. Even if your production goals are more about producing your own content, there will be times where you’ll reach for some prerecorded fodder—even if it’s just to get started on an idea or simply to get out of a rut. Whatever the case, a solid library of third-party content will play an important role in your Ableton Live studio.
Whatever third-party content you’re considering, it’s important you’re clear on what, exactly, it is. Following are concise descriptions of the various types of content you’ll most likely deal with in your productions:
Loops. As you work with digital audio, you’re going to hear the term loop over and over again, so it’s important you know exactly what it is. As the term suggests, a loop is a fragment of digital audio—usually short in length (two or four bars, for instance)—that is designed to play over and over again in a flowing, endless sequence. Loops can be derived from prerecorded audio. In this scenario, you capture a specific portion of a song (a sample in digital form) and trim the starting and ending points. Then, when the file reaches its ending point, it smoothly loops around to its starting point; that way, it can play again and again and again. Alternatively, anyone from musicians to producers to sound designers can create audio loops from scratch by recording content on their own—as is the case with the multitude of content providers listed later in this chapter. No matter what the origin, a loop’s most important attribute is how accurately it was edited so that when it plays through its cycle, it sounds smooth when transitioning back to the beginning. To say loop-based production has become part of the mainstream is the under-statement of the millennium. For some users, much of what Ableton Live, as well as other DAWs such as ACID or FL Studio, is all about is working with loops. At some point in everyone’s workflow, there will be instances when they’ll be working with loops in varying degrees—including yours.
Multi-samples. Some digital audio file packages are collections of meticulous recordings of real-world instruments designed specifically to load into a hardware or software sampler instrument for playback. Known as multi-samples, they enable you to construct—or, rather, reconstruct—the instrument that was sampled so that you have a convincing emulation. The emulation turns out to be considerably cheaper than the actual instrument—not to mention lighter, more portable, and most importantly, more reliable. Take for instance the highly regarded Mellotron (which, by the way, was one of the first sample-playback keyboards). Although amazing sounds emanate from this magnetic tape-based behemoth, it’s a nightmare to deal with on all levels. Nowadays, unless you’re a zealot vintage keyboard collector with deep pockets, you’d be much better off with a Mellotron multi-sample package that you can load into your favorite sampler for much less money and agony. It’s important to note that many multi-sample libraries come embedded in their own virtual instrument plug-in format; these are discussed in Chapter 8, “Accessorizing Ableton Live with….” What’s more, you’ll learn about Ableton’s own preloaded software and sample-based instruments.
A cappella. Another valuable category of content is a cappella files, which are unaccompanied vocal performances meant for you to layer over instrumental productions at will. A quick Google search will garner multiple results of sites that offer a cappella files for your use. Live gives you the ability to easily transpose a cappella files up or down to whatever key your production is in right in the clip’s Sample Display area, making it simple to add an a cappella performance into your production.
Found sounds. A great way to build up content without digging into your wallet is to go out and hunt down your own. With a portable recorder in the palm of your hand, you can capture just about anything, and with incredible results. We’re not talking about a pocket tape recorder you use to record class lectures here—more like a pro audio–level digital recording device like the M-Audio MicroTrack II (see Figure 7.17), which can capture the world around you at 24bit/96kHz! Found sounds can be anything from running water to subway trains to a bouncing ball and beyond. You can also gather audio files of famous quotes from historic speeches, comedic one-liners from cartoon characters, or clips from classic commercials or cheesy infomercials by sampling them from the source, perusing the Internet for files, or literally holding up your recorder to the TV. (Just be mindful of copyright laws if you’re planning to release your work commercially.) Other sounds that can fall into this category are sound effects and ambient soundscapes—whatever you can find! Content such as this can be used not just for firing away one-shots within a performance or a loop-/beat-making production of your own but also as starting points for further manipulation in samplers such as Ableton’s Simpler, the more advanced Sampler, or simply within a clip through Warp marker tweaking.

Since audio loops are most likely the type of third-party content you’ll be dealing with at first, let’s take a look into some important attributes you’ll need to be aware of to make the best possible informed decisions when shopping for content.
Before the advent of packages containing gigabytes of perfectly prepared loop files, and of software solutions such as Ableton Live to further refine them, the way to build a library of loops was to load sample CDs into a hardware sampler and manually cut them into loop files that were meant to repeat smoothly. To put it bluntly, the process was rife with errors, resulting in less-than-stellar results. Then, programs such as ACID and Apple’s Soundtrack came onto the scene; these utilized special types of WAV and AIFF files that contain additional information to enable easy manipulation of pitch and time. Taking it a step further was a program called ReCycle from Propellerhead, makers of the mighty Reason and the ReWire standard (which you’ll learn about in the next chapter), which chops audio files up into small, discrete files called REX loops (hold that thought). When played back, the feel of a REX loop is maintained even more so than with ACID and Apple Loops files (although you should not jump to the conclusion that REX files are superior, as all three formats have their inherent pros and cons). All this was nothing short of a revolution; as a result, sample loop CDs began appearing that supported these formats.
These formats differ in how they deal with something called slicing. Audio that is referred to as a loop and is said to be in these file formats has a component of data within it called metadata that defines a series of markers. These slices point to a file’s transient point, which is the onset of an audio event—most often seen as a spike in level. A good example of a transient point is the very start of a drum hit. These transient points are used to mark positions in time. These markers, called slices, become a map of time positions that enable you to not only successfully manipulate the tempo of a loop but also quantize it, derive marker templates through extraction called groove templates, as well as perform other editing tasks. The more transients in the file, the more slices the file may possess—and therefore, the easier it is to work with.
While the stir that slice-based file formats caused was surely a positive one, so was the introduction of Live’s Warp markers, which are based on the same basic concepts of stretching pitch and time. With that in mind, the question becomes: Are the aforementioned formats compatible with Live? Yes and no. Live enables you to load ACID and Apple Loops files but will not make use of the loop tag metadata. With regard to REX files, as of Live 7, you can import REX and REX2 files and they will play at whatever tempo is set in Live. More importantly, given the architecture of REX files, they can take advantage of Live’s Slice to New MIDI Track command, found in the Create menu or within a context menu that appears when you right-click the file. In the end, your Ableton Live studio offers several options when it comes to working with loops, giving you a few workable alternatives to choose from. All this should be considered when you go on your library-of-sound shopping spree….
Shopping for content libraries, especially loop-based and multi-sample packages (see Figure 7.18), can be downright scary. The choices are vast and many libraries come with gigabytes of content, making it near impossible to preview a product from top to bottom. At the same time, you can get a feel for what a collection has to offer by glossing over the main sections, especially when the libraries contain several sets of slight variations on a basic idea. When perusing catalogs, try not to write off a collection just because the first few samples don’t grab you. There might be gold somewhere in the middle or toward the end. In the end, it will be up to you to make the call if a particular collection is not to your liking all the way through. If you hear a good amount of files that you know will do the trick and then some, go for it. Plus, you never know—with a little sound design of your own, you may find that what you thought was lacking at first makes for a great starting point for your own sound-design tweaking and could garner some seriously fresh content.

Figure 7.18. Loop packages like this offering from Beta Monkey can provide you with hundreds of audio files for myriad applications such as sequencing drum parts to loading a sampling instrument for recording or live performance.
Following is a list of some content creators to watch for when browsing the Net for sounds. Ableton has partnered with many these over the years to provide content for their own software-based instruments, which are presented in the next chapter. Be aware that some companies make content only for specific products or only make virtual instruments to power their content specifically; be sure to confirm you’ll be able to utilize whatever you’re purchasing with Live or a certain software or hardware sampler.
Native Instruments
Propellerhead
Puremagnetik
Garritan
Beta Monkey
Sample Logic
Galbanum
Loopmasters
Groove Monkee
Ueberschall
e-instruments
FlatPack
SonArte
Soniccouture
Toontrack
SONiVOX
ChocolateAudio
Big Fish Audio
Discrete Drums
Sony
East West
Sonic Implants
New Atlantis Audio
Goldbaby
Prime Loops
VIPZONE
Something Else Music
Future Loops
Nine Volt Audio
Bitshift Audio
Zero G
With all this talk of sample packages, it’s time to check out the amazing software-and sample-based instruments Ableton has to offer as well as even more third-party products—this time in the form of host-dependent add-on applications known as plug-ins. That and more await you in the next chapter, so turn that page!