Once your computer situation is squared away, you’ve decided on what version of Live to start with, and you have an audio interface that suits your needs, it’s time to consider the rest of the peripheral hardware that is essential to any music-production studio. All the items discussed in this chapter make up the backbone of your studio. But just like your computer and interface—even your copy of Live—they will be either replaced or upgraded as you and your studio grow. Regardless, it’s always smart to investigate what’s out there so you can make solid, informed decisions when making your first purchases in each category. After reading through each item, I urge you to hit the Net to explore what’s out there; also, be sure to ask fellow studio mavens for recommendations. As you hunt for and gather information, definitely consider the positives and negatives, but in the end don’t be afraid to go against the grain. Making great music is all about breaking the rules!
The items discussed in the previous chapter are the mind (computer), body (audio interface), and soul (Live) of your Ableton Live–based studio, but there are several other pieces of gear needed to complete the beast. This section takes a look at other essential hardware, including studio monitors, headphones, microphones, and MIDI controllers. With regard to the latter, the true power of Live in both home and mobile situations isn’t fully realized until you get your hands on some tactile hardware such as one (or both) of the Ableton-approved control surfaces: the Akai APC40 and Novation Launchpad.
Your audio interface will ensure that sounds going into and coming out of your computer will be delivered with professional results. In order to hear what’s traveling to and fro at optimum levels, you’ll need at least one pair of professional-grade near-field monitors (see Figure 2.1). At the top of the list of reasons why monitors of this level (also referred to as reference or studio monitors) are required is the fact these enclosures will deliver your work with a flat response—meaning that these monitors will not in any way color your production by reproducing a distorted (negatively altered) version of your work or by adding or subtracting any frequencies in an attempt to enhance it. Instead, you’ll get an accurate reproduction of your production with minimal distortion (not the cool-guy guitar-player kind, just the absence of inaccurate changes to frequency content or amplitude levels). When shopping for a pair (or two) of monitors, bring along something you can plug into them that you’re acutely familiar with in terms of the frequency content. For instance, pack your iPod loaded with an MP3 that you can use as reference. Just make sure the iPod’s EQ setting is set flat and that you have the correct cabling to plug a single ⅛-inch stereo out to a pair of mono ¼-inch ins. This may require a Y cable and an ⅛-inch–¼-inch adapter, which can be easily found at your local Radio Shack (now called The Shack) or may even be on hand at the store that carries the monitors.

Figure 2.1. If you think the speakers that came with your computer will accurately reflect your Ableton Live studio efforts, think again. A pair of studio-grade near-field monitors is what you need, such as this set of Studiophile BX8a Deluxe monitors from M-Audio.
Other notable features found in studio-grade monitors include the following:
Multiple built-in power amps dedicated to the high and low frequencies, making up what’s called a tuned system. This is facilitated by a component called an active crossover, which divides the incoming signal into these two parts and then routes them to their appropriate drivers—woofers for the lows and tweeters for the highs.
They usually come in compact enclosures, making it possible to integrate them into studio spaces that don’t have much of just that.
Shielding of some sort to prevent noise most likely related to your computer monitor.
A robust design that allows for the consistent, stable reproduction of your inconsistent, un-mastered tracks, which will be inherently riddled with sudden volume bursts and sporadic moments of intense frequency explosions.
When sussing out power requirements in your studio, be sure to include some extra plugs in your plans for your monitors. More than likely, the monitors you choose will be active, which means they contain one or more components inside their enclosure that require AC power. The aforementioned tuned system—also known as a bi-amplified system—is active as it contains an array of power amps that need, well, power. All these attributes combined are what ensure a clean, accurate reproduction of the overall sound.
Who’s Driving This Thing, Anyway?
Before exiting the realm of studio monitors, and in keeping with our “informed decision” mantra, it’s important to consider a key component: the driver. As you read through the specifications while shopping for your first pair of monitors, you’ll find that knowledge of this component will serve you well.
The driver is the spherical apparatus staring you in the face from inside the monitor enclosure. The various components that make up a driver are on display in Figure 2.2, which will serve as a much-needed visual aid as you read through this brief explanation.

Figure 2.2. The spherical apparatus called the driver eyeballing you at every turn is actually doing the bulk of the work within your studio monitor. To discover how the driver does what it does, consult this cross-section as you read on.
What you have is a lightweight, cylindrical voice coil comprised of fine copper wire that’s mounted as such and can move freely within a magnetic field. The magnetic field is provided by the substantial permanent magnet at the base of the driver, which has a pole piece protruding from the center that is surrounded by voice coil. The speaker cone or diaphragm is attached to the voice coil and also to the outer frame or basket and has a dark center circle called the dust cap. To get this whole thing working, an electrical current is sent to the voice coil via the lead wires, making it electromagnetic. Once this happens, the voice coil and the magnet interact with each other through mechanical force, causing the coil to move back and forth, thus moving the connected diaphragm. The movement of this diaphragm creates the sound waves that travel through the air and deliver audio information to our ears. This is how sound is reproduced once it has been converted back to analog by the DAC in your audio interface and sent out the main outs via speaker cables.
It’s a safe bet that you already have a pair (or more) of headphones in your possession. Be it the earbuds (yes, those are headphones) that came with your iPod or that ubiquitous black set that seems to pop up at every turn, another safe bet is you probably haven’t put much thought (or money) into them. As you may have already guessed, that needs to change. It’s imperative that your Ableton Live studio have at least one pair of studio-grade headphones, and here are some reasons why:
Starting with the obvious: They’re a portable, discreet listening device. Whether you’re using them as a part of your mobile studio or to work on your tracks in another studio, they give you the peace of mind that you’re equipped with a listening device you’re familiar with. Headphones easily go where you go, and their for-your-ears-only design is handy for those many times you’ll need to isolate your work in progress from your co-inhabitants or neighbors who actually sleep at night while you’re mixing your next opus.
Speaking of isolation it’s standard protocol to whip out a pair of headphones when recording overdubs (secondary tracks) if you have no other way to isolate miked sources.
You may be listening to a mix and think you hear something that isn’t right, something deep within the mix that’s too tough to identify while listening to your near-fields. Fear not: A pair of closed-back (explained in a moment) headphones will help shine an audible floodlight on whatever anomaly is lurking in the sonic shadows.
Many music lovers, including you, listen to music with some sort of speaker system attached to their heads—probably more so than ever before, considering all the digital toys we have to play with. So, if you’re planning to bring your music to the people—especially people who use headphones often—it makes sense to create and review your mixes and mastered works with that very same apparatus.
While it should now be obvious that you need a pair of headphones for home and mobile-studio use, let’s look at some facts that will explain what makes a pair of headphones serious, pro-level cans (see Figure 2.3). Knowing and understanding these facts will help soften the blow when you first gaze upon the seemingly inflated price tags you’ll encounter when shopping for your first set.

Figure 2.3. After you realize the headphones with the curly connecting cable your Dad has tucked away in a box with his 8-track tape player don’t work anymore (did you really think they would?), it’s time to consider big-league cans such as these Ultrasone PRO 900 closed-backs.
One standout difference between headphones is the drivers (see the preceding sidebar on drivers). Pro-level headphones are made with such desirable materials as Mylar, gold-plated Mylar, and even titanium to help deliver pristine reproductions of your productions that are superior to consumer-grade cans.
Another factor is in the advanced design with regard to driver placement. For instance, the Ultrasones shown in Figure 2.3 have their drivers placed slightly below your ear and angled away from your eardrum as opposed to sitting in the center of the earcup. This helps decrease the sound pressure level (SPL) by up to 40 percent, enabling you to work longer and safer.
Speaking of safety: Pro-level headphones feature shielding to cut down on low-frequency magnetic fields, which can be associated with ailments ranging from fatigue to serious disease.
These factors, along with better overall construction for longer-lasting performance and the use of more comfortable materials on the parts that actually touch your head and ears, contribute to the price of big-league cans. With proper care on your part, what seems like a sizable investment will be a sound and smart one that you need to carefully consider.
Open-Back Versus Closed-Back
When you’re looking into a pair of headphones, there are two basic design types to consider: open-back and closed-back. Open-back phones sport a grill (see Figure 2.4) on the outer shell that exposes the driver and allows sound waves to escape the enclosure. That’s not necessarily a bad thing; open-back headphones are less susceptible to distortion caused by earcup resonances and allow sound waves to propagate away from your skull, making for a safer listening experience (see the next sidebar). Of course those propagating waves will be heard by anyone in the general vicinity, so some of the respectful isolation that headphones provide is compromised with open backs. Open backs also afford you the ability to hear what’s going on around you, which can be a good thing or a bad thing.

Figure 2.4. Taking a look on the outer shell of the earcup, you’ll be able to easily tell whether a pair of headphones is open-back. Just look for a circular series of openings known as a grill, as shown on this pair of Ultrasone HFI-2400s.
Closed-back headphones, on the other hand, have no grill (refer to Figure 2.3) and instead have a sealed backing, which aids in cutting down the amount of audio heard by others as well as isolating your ears from what’s going on around you. Just as the open-backs are a give-and-take situation, so are the closed-backs: The isolation you take back gives way to possible earcup resonance producing distortion, but at the same time you get increased bass response.
While many Ableton Live users work with loop-based, pre-recorded, or MIDI-generated material, there will always be a need for recording real-world sounds. To do this, you will need a microphone or two (or more). In this section, we’ll take a look at the main types as well as some common applications so you can get an idea of what mics you may require for whatever it is you’re looking to do with Live and your studio.
First, it’s important to understand some basic principles. A microphone is a device that transduces (change of one form of energy into another) sound waves (acoustic energy) into a voltage-based signal (electric energy). The transduction works via magnetism (this will be explained in the following two sections). A mic’s job is to hear or capture whatever sound is within its proximity and transform that sound into voltages that will travel through the connecting mic cable (called an XLR cable) to your audio interface. As you know from Chapter 1, “The Shopping List: The Big Three,” those voltages, which are analogous to the real-world sound waves, are then converted into digital audio in the form of binary code (there’s those zeroes and ones again) by the ADC converter. In the end, if you’re looking to make music from scratch, then you’ll definitely need some good mics. So let’s get informed.
Because talking about microphones opens a sizeable Pandora’s box that includes myriad miking techniques, polar patterns, impedance matching, and more, this section is going to get right to the heart of the matter by exploring three major types of mics: the dynamic, the condenser, and a type of condenser known as an electret. We’ll consider how each mic type works and why you might choose to use one type over another. Be aware: There are plenty more types, such as ribbon, piezoelectric, carbon, fiber-optic, PZM, etc., but it is the three types described in this section that you’ll find most useful in the beginning.
Note
For some basic microphone setup talk, jump over to Chapter 5, “Making Music with Ableton Live.” For more in-depth information on recording techniques that involve microphones, please visit the Course Technology Web site (www.courseptr.com) and peruse the Music Technology section. There, you’ll find titles that thoroughly examine this technology, any of which will be fine companions to this book.
If there’s one type of microphone you’ll definitely need in your Ableton Live studio, it’s a dynamic mic. A dynamic microphone consists of a diaphragm attached to a small movable induction coil that’s situated in a permanent magnetic field provided by an internal magnet. All these components are located at the top of the mic, inside a component called the capsule. As sound waves enter the capsule, they cause the diaphragm to move, causing the coil to move within the magnetic field. The coil’s movements within the magnetic field produce the aforementioned voltages. Dynamic mics are preferred in many instances because their design allows you to capture signals at very high decibel levels without damage. So if you’re miking a Marshall stack, for example, be sure to use a dynamic. When you start shopping for dynamic mics, you’ll quickly realize there are a lot to choose from. But there’s one model that is found in every studio on Planet Rock: the Shure SM-57 (see Figure 2.5)—and for good reason. The Shure SM-57 sounds great in myriad applications (especially when miking guitar amps), they’re built to last, and they’re affordable (about $100). Get one.

Figure 2.5. There are some things you just gotta have in your studio, and the Shure SM-57 is one of them. If you only need a mic here and there for various applications or you’re buying your first one, it’s a good idea to get a durable dynamic mic; the SM-57 is a great choice—and a legendary one at that.
A close second in the ranks of must-have mics is the condenser mic. Known for their warmth, condenser mics are a different animal altogether from their dynamic brethren, beginning with the fact that they require a power source. Like dynamic mic, condensers have a diaphragm, but this one is made up of two plates that hold a fixed charge between them. This charge is provided by the power source (usually called phantom power), via a cable or internal battery. The sound waves entering the condenser’s capsule cause the sensitive plates to move, thus changing the voltage between them. Condensers sound amazing and are great for recording frequency-rich sources such as vocals and acoustic guitars. For even better results, look for condensers that are designed with an internal vacuum tube (as shown in Figure 2.6), which add warmth and clarity to the sounds they capture. While condenser mics are fairly rugged as compared to some others, they can’t take the same punishment dynamic mics can.

Figure 2.6. Condenser mics are known for their warmth and clarity and are an essential part of any recording studio. The vacuum tube–loaded M-Audio Sputnik shown here is an example of a next-level condenser that comes with its own separate phantom-power source as well as a shock mount, 7-pin cable, and flight case.
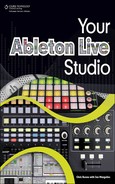
A type of condenser mic, the electret microphone, has a constant charge between the plates, eliminating the need for phantom power. Another part of their charm is that electrets are quite small compared to their phantom-dependant siblings, making them perfect accessories for high-quality hand-held recording devices such as the M-Audio MicroTrack II (see Figure 2.7). When it comes to gathering unique audio content for your Ableton Live studio, you’ll quickly get addicted to the world of “found sounds,” where you set out into the world and literally hunt, gather, record, and assemble your own sound library. What better way to capture this type of audio than by using one of these compact recording solutions equipped with a great-sounding condenser mic? The entire recording outfit can fit in your pocket!
When it comes to working with microphones, there are some controls you’ll run into on both the mics themselves and the devices they’re patched into—audio interface and/or mixing console—that you should be aware of when starting to build your arsenal. They are listed in the order you’ll most likely have to deal with them. They are as follows:
Phantom power. As stated in the section on condenser mics, phantom power is needed to provide a fixed charge between the plates that make up the mic’s diaphragm. You’ll find a button marked “phantom power,” 48v (v = volts), or the like on your audio interface and/or mixing console (see Figure 2.8) for mics that require it. (Along with electrets that do not require phantom power, some condensers work on batteries.) If you know you’re going to be using a condenser for recording, be sure to activate the phantom power function before you connect the mic to prevent any sudden pops in the system that could damage your monitors. That said, also make sure the master volume on your interface is all the way down. This is a good habit to get into whenever switching any hardware in and out of your system.
Polar pattern. This is a function that sets up the mic’s directionality in relation to the capsule. While most dynamic mics are only capable of one polar pattern, if the mic is a multi-pattern unit, this control will be in the form of a small switch (see Figure 2.9) that will have small icons shaped like the patterns offered. The most common polar pattern is cardioid, but other useful patterns are omni-directional and bi-directional (see Figure 2.9 for a visual reference of all three patterns). If you need the mic to specifically hone in on a source, then use a cardioid-type pattern. (There are also hyper- and super-cardioid patterns, which offer more acute directionality.) If you need a mic to simultaneously record from its opposing sides, then engage the bi-directional pattern (also shown in Figure 2.9). For focusing on everything around the capsule, omni-directional is the way to go.

Figure 2.9. If a mic offers more than one polar pattern, you’ll be able to choose which one you want to use by way of a tiny switch that’s adorned with images of the patterns offered, like with this Audio-Technica AT4047MP multi-pattern condenser. The patterns shown here are as follows: omni-directional, cardioid, and bi-directional.
Pad. This is a device that can be found not only on microphones (see Figure 2.10) but also on audio interfaces and mixing consoles. In all cases, a pad attenuates (decreases) an incoming signal that is too hot (loud) for the device to handle. Pads usually come in the form of —10 or —20dB. Word to the wise: Before you go flipping the pad switch whenever the red light flashes, consider whether the source needs to be that loud or whether the microphone is placed too close to the source.
Bass roll-off. A simple function, but an essential one nonetheless, a bass roll-off (see Figure 2.11) simply cuts off a mic’s frequency response below a certain frequency (usually 80Hz) and comes in especially handy when recording vocals. This control is usually a small, two-position toggle switch with an icon at each end of the switch’s throw indicating flat response (straight line) or roll-off (straight line with a downward slope at the end toward the right side). This is useful when the source you’re recording has some sonic qualities that produce low frequencies that prove to be too much to capture without muddying up the take or there’s simply a rumble in the range of the mic’s polar pattern not caused by the source itself that cannot be eliminated. Another instance where a roll-off is a great quick fix is when you’re faced with the proximity effect, in which a mic’s placement causes a sudden increase in the low range. While simply moving the mic will most likely solve the problem, that may also result in losing a great sound that just needs some slight attenuation (decrease) in the bottom end.


Because this is the first mention of MIDI, and because many of you may have little or no knowledge of what MIDI is, let’s take a brief look at this powerful tool. What MIDI is not is a sound-making device or application of any kind. MIDI—an acronym for musical instrument digital interface—is a communications protocol that was created in the early 1980s so that the emerging digital instruments of the era could communicate with each other. MIDI passes both performance information (e.g., “Play this note at this moment at this volume”) and control information (e.g., “Switch to this program”) from one instrument or device to another. It is MIDI that allows us to synchronize and control electronic instruments as well as instruct them to do our musical bidding. Thankfully, the leading manufacturers, including Roland and Yamaha, were in on it from the beginning, and it was adopted across the board. As a result, it was able to take off, and take off it did. Spreading like a virus, this positively awesome pandemic is with us today. As you’ll soon discover, MIDI plays a substantial role in all facets of Ableton Live, and it will do the same in your studio with Live at the epicenter. From sequencing MIDI performance data to application control, MIDI and Live are very much like New Jersey and you—perfect together. While working with MIDI in the Live environment will receive ample examination throughout Your Ableton Live Studio, this section continues our focus on the “must-have” list we’ve been building thus far. Here, we will take a look at some hardware MIDI controller options, including units that were specifically designed for use with Ableton Live, such as the Akai APC40 and the Novation Launchpad.
A MIDI controller is just that: a device that controls another device (or, in this case, software) via MIDI. To make MIDI control within Live even more attractive, Live makes it incredibly easy to assign hardware controls to just about anything you see in the GUI. To be clear: Unless your MIDI controller is a hybrid controller/instrument with an internal sound module, it will not produce any sound. Remember: MIDI is a computer language with no waveforms in sight.
When it comes to MIDI controllers, the song remains the same: As your studio, knowledge, and audio-production skills develop, so will your MIDI hardware preferences. What is the absolute must-have MIDI piece for your production needs today may be something completely different a year from now. That said, don’t think you have to spend a lot of time planning your musical future; you can’t. Nor can you know what controller will be perfect for you. You just have to follow where your muse takes you. Once you get your head around the sheer power that MIDI sequencing and hardware controllers offer when it comes to Live, you’ll see why there is so much emphasis put on them in the Live culture. Finally, be warned: Once you get a gander at what’s available, you’re gonna want it all. Here is just a taste to whet your appetite.
Prior to computers, the center of any recording studio was the mixing console (see Figure 2.12), where (almost) total control of all aspects of the recording and mixing process was at your fingertips. While mixers are very much still a vital part of the recording studio and its activities, the computer, as well as digital audio workstation (DAW) software, has stolen its thunder in recent years. The primary purpose of these hardware wonders was/is mixing, which refers to combining multiple audio components into a final product whose volume levels and frequency content have been adjusted for an optimum listening experience. For the most part, volume adjustments are made with track faders, and frequency-related tweaks are done with knobs. Of course, this is a gross generalization, but an accurate one nonetheless.

Seeing that we’re building your Ableton Live studio, a good first MIDI controller would be an affordable mixer-style unit that has the feel of an analog mixer but communicates with Live and your computer through MIDI, such as the ultra-compact Korg Nano Kontrol (see Figure 2.13). Featuring nine faders, nine knobs, and 18 buttons, as well as transport controls that can be assigned to tweak anything that requires the twist of an encoder, you can comfortably control Live with minimal use of the mouse. If you’ve already been toying with Live via a mouse, you’ll quickly come to appreciate not having to rely on it for everything.

Those who suffer from GAS (gear-acquisition syndrome) will be pleased to know it’s not uncommon to have more than one MIDI controller. At the very least, you’ll need one mixer-style controller and one keyboard-style controller in your studio. Keyboard-centric controllers such as the M-Audio Keystation 61es (see Figure 2.14) work great when you want to actually play the data you need to input into a MIDI track.

Figure 2.14. Right up there on, if not at the top of, the list of MIDI controllers is a bare-bones keyboard-style controller that allows you to actually play MIDI performances into a MIDI track as well as perform other tasks like triggering samples (in the case of Ableton Live, that would be clips) such as this M-Audio Keystation 61es.
Now, don’t let the keyboard aspect of it throw you. There’s more to be played than just keyboard parts. Capturing MIDI data through performance started out on keyboards and that meant any sound, or rather synthesized sound, was “played” on them. If you’re looking at a compromised desktop real-estate situation or just want to consolidate hardware, there are plenty of compact keyboard-style controllers that feature mixer-like controls such as knobs, sliders (closely related to faders), and more, including the delicious-looking Novation SL Mk II (see Figure 2.15).

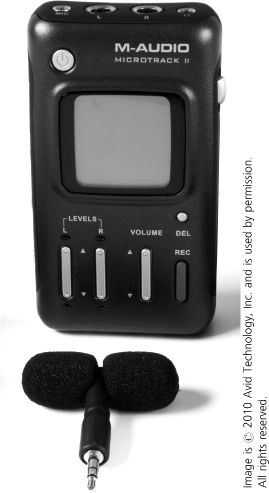
While inputting data with keys on a piano/synth–style keyboard controller will work great for myriad scenarios including drum sequencing, some may find having a controller that’s more percussion-centric better suited for beat making. Controllers such as the Akai MPD 18 (see Figure 2.16) feature touch-sensitive trigger pads that feel more natural when inputting data percussively.
Figure 2.16. MIDI controllers such as this compact Akai MPD 18 feature touch-sensitive pads that are perfect for beat production as well as triggering.
Stepping up from trigger pads and inputting data with your fingertips, there are percussion-style controllers that are designed with larger pads, allowing you to hit them with sticks, such as the Yamaha DTX-Multi 12 (see Figure 2.17). While controllers like the MPD 18 or M-Audio’s venerable Trigger Finger can be seen on plenty of stages, it’s controllers like the DTX-Multi 12 or the legendary DrumKAT that will come in handy for drummers who have some chops to burn. With regard to sound production, it’s important to note the Yamaha unit also makes some noise of its own, with more than 1,000 built-in voices among other attributes. In the spirit of desktop economy, go back and take another look at the Novation SL Mk II in Figure 2.15, and you’ll see a line of eight pads right above the joystick controller.

Taking the performance aspect of MIDI controllers beyond the standard keyboard- and percussion-style controllers, there are MIDI devices modeled after other real-world instruments. For instance, if you’re a drummer and you want even more than what the aforementioned percussion-style controllers offer, then check out one of the Roland V-Drums kits (see Figure 2.18). Also featuring major sound-producing capabilities, every V-Drums kit is equipped to send out not only audio through its sound module but also MIDI performance data for you to work with in Live.

Figure 2.18. While controllers that feature touch-sensitive pads provide a great way to produce beats with MIDI, if you’re a drummer, a kit like one of the Roland V-Drums setups may be exactly what you’re looking for.
For guitarists, there are some eye-catching instrument-style controllers to fuss over, like the too-cool Misa Digital Guitar (see Figure 2.19) with its innovative touch-screen LCD or one of Starr Labs’ Ztar guitar-like MIDI controllers. If you’re too attached to your own axe, then just throw on a Roland GK-3 Divided Pickup (see Figure 2.20) and interface with either compatible synth modules or a Roland GI-20 (see Figure 2.21) to send raw MIDI to wherever you want, including Live. There are even options for horn players, with the groundbreaking EWI (electronic wind instrument) USB from Akai (see Figure 2.22).

Figure 2.19. If you’re a guitarist with iPod Touch or Korg Kaoss Pad chops you’ll be excited about the Misa Digital Guitar for your diabolical MIDI-driven creations and/or performances.

Figure 2.20. For the guitar purist, there’s a MIDI solution that will allow you to play the old wood ‘n steel. By using a noninvasive add-on hex pickup like this Roland GK-3, you can set up a rig that allows you to play a conventional guitar and have each string’s vibration individually picked up and sent off to a pitch-to-MIDI converter. From there, your guitar signal is converted into digital in the form of MIDI messages and functions much the same as any other MIDI controller.

Figure 2.21. The Roland GI-20 is the go-to pitch-to-MIDI converter. If you’re using a hex pickup like the GK-3 (see Figure 2.20), you would use a 13-pin connector cable to connect the pickup to the GI-20 so the separated analog signals can travel into the unit for conversion.

It’s no secret that Ableton Live is a DJ/producer’s dream application. What better way to further the euphoria than adding a DJ-style MIDI controller that allows you to control Live from the perspective of a traditional DJ mixer? Given the fact the digital DJ has long-since arrived and live dance music is hotter than ever, it should come as no surprise that there are plenty of controllers to choose from, including delicious-looking units from usual and not-so-usual suspects. These include the following:
Native Instruments
M-Audio
Allen & Heath (see Figure 2.23)
Denon
Numark
Rane
Pioneer
Vestax

With a crossfader being the prime giveaway a unit is Jam Master Jay–ready (the pro-Ableton Akai APC40 being a notable exception), DJ-style controllers feature a double-sided array of controls such as knobs, faders, buttons, and whatever else it takes for the user to get that party started.
As you’ll soon discover, Ableton Live is all about its clips. Clips contain sounds—loops, one-shots, entire songs—and are loaded into slots that are stacked within vertical track strips that resemble a grid and can be triggered by clicking on their start buttons. Wouldn’t it be great if there were a way to launch those clips with the push of a button via MIDI? Enter grid-based controllers, with the most capable being the very Ableton-ready Akai APC40 and Novation Launchpad (see Figures 2.24 and 2.25).

Figure 2.24. At the heart of the all-encompassing APC40 is a 5 × 8 grid of soft buttons that can be used for clip triggering, among many other applications. Ableton and Akai teamed up to create a MIDI controller that basically puts Live on your desktop. For a more desktop–real-estate friendly version, check out the 40’s little brother, the APC20.

Figure 2.25. The Novation Launchpad is another stellar collaboration between Ableton and a hardware manufacturer. As you can see, this controller is all about the grid.
There are a handful of controllers that offer a completely different way to approach working and performing with Live. While there are controllers that feature an array of mostly (if not all) buttons such as the Faderfox LX2, the key component is its visual-feedback aspect. Grid-based controllers are designed for bi-directional talkback, which simply means the device not only sends messages to the software it’s controlling but also receives them. This allows MIDI messages to be sent to the controller that instructs the button grid to light up in myriad ways, making for an incredible interactive experience. Some others examples are the Flame Six-In-A-Row, the Livid Block, and of course any one of the pioneering Monome units.
For the adventurous, there is a handful of cool controllers that defy category, from innovative touch-screen controls like the Lemur by JazzMutant, which features the Max for Live generated Mu interface, to the perplexing AudioCubes from Percussa, to the near-genius DIY creations like the Mojo (see Figure 2.26), designed by Ableton Live super-user Moldover.

Figure 2.26. If you can’t beat ’em, build your own! That’s exactly what controllerism pioneer Moldover did when he just couldn’t find a controller that had all the attributes he desired in one unit—not to mention features that no manufacturer was offering. After creating his fair share of Frankenstein controllers through hacking, he designed the Mojo controller. Tricked out with top-shelf arcade buttons, a plethora of ribbon controls, and faders arranged in the shape of the human hand, the Mojo is a feat of human excellence and one cool MIDI controller.
Keep in mind that this section on MIDI was only a raindrop compared to the perfect storm that awaits you. MIDI has so many ways to help you make music, and it’s so easy to get started with it in the Live environment. In Chapters 5, “Making Music with Ableton Live,” and 6, “Working with Ableton Live,” you’ll learn about working with this incredible tool through sequencing, MIDI mapping, editing, and more.
At this point, the core components of your Ableton Live studio have been revealed (and possibly obtained by you). While you can surely go ahead and start getting your hands dirty in setup procedures (skip to Chapter 3, “Setting Up Your Ableton Live [Home] Studio” if you can’t wait another minute), there’s a truckload of little things you will need sooner or later as you start to work in your newfound studio environment. The following sections feature numerous items—enough to make your head explode—accompanied by short descriptions. Keep in mind as you read through these lists that there will be topics mentioned that may sail over your head, and at this point that’s okay. By the time you finish Your Ableton Live Studio, you will have the knowledge to do what you gotta do to get your studio up and running.
In order to connect all this gear, you will need cables—a lot of them. Aside from the obvious ¼-inch tipped types, there are myriad cables that will see action in your Able-ton Live studio—albeit some more than others. As you slowly gather this spaghetti army, you might think, “Do I really need all these?” The short answer is, yes!
A good way to establish your cable collection is to gather them as you go along. For instance, you don’t necessarily need a 75-ohm coaxial S/PDIF cable or its TOSLink brethren just yet. When you do, get one. And after you do so, save it. If Murphy’s Law has its way, the day you clean house and get rid of all those cables you never use, you can bet you’ll be wishing you hadn’t in the not-so-distant future (the next day) when a situation arises that needs that not-so-common cable you just snickered at as you sold it for a $1 at a yard sale.
Try not to go running for the cheapies to stock your pile. Stick with names like Hosa (see the upcoming sidebar) and ProCo in the beginning, and you’ll be okay. As your studio (and ears) develops, you can upgrade as you progress. All that said, the following list comprises, in no particular order, the cabling you must have to get your Ableton Live studio off the ground.
Computer cables. Be they USB or FireWire, it’s always a good idea to have multiples of each in varying lengths in a computer-based music-production studio. And that goes for the various types of each cable, such as USB cables that feature smaller connectors and FireWire cables that work with the different transfer types (i.e., FW400 and FW800).
¼-inch instrument. The ¼-inch cable is the most common audio cable. It comes in two basic types: TS and TRS. The pointed end is called the tip (T). Below the tip is a small black ring that separates it from the sleeve (S), which is the shaft that makes up the remainder of the jack. A jack with one black ring can be called a TS cable, although it’s usually known as a “¼-inch” or “instrument” cable. These cable types feature a single conductor (connected to the tip, while the sleeve is the ground) and are used to connect one device to another in mono. If the jack has two plastic black rings, it’s a TRS (tip-ring-sleeve) cable. For the most part, these cable types also carry a mono signal, but one that is balanced. The extra ring is connected to a second conductor whose polarity is reversed, which provides a means for unwanted noise cancellation when running long cable lengths and/or exposing the cable to noisy electrical fields. Then you have some form of a tip-ring-sleeve (TRS) with the middle portion being the ring and the outer portions following the nomenclature just explained. These types of ¼-inch cables can also be used for carrying stereo signals (one channel per conductor) or for carrying two signals in opposite directions (one direction per conductor). Be sure you know which type of TRS you’re working with, as using the wrong one will result in varying degrees of failure.
Speaker. These cable types are designed to connect your monitoring systems to whatever device is last in the signal chain that’s passing the audio along. They come in three different connector types: ¼-inch, banana plug, and Neutrik Speakon, with ¼-inch being the most common. Given that fact, it’s very important not to mistakenly mix speaker and instrument cables (more so with speaker cable being used as instrument cable, as this will produce a lot of noise). More times than not, ¼-inch cables of all types are marked as such near the jacks right near the sleeve.
XLR. These are the cables you use to connect any microphone worth its salt to its destination device. XLR cables always have a male and female end that always make the same connection. The female end is the one that plugs into the mic itself, while the male end always plugs into the connecting device such as an audio interface, mixing console, or snake. You can never have enough XLR cables, and it’s a smart move to have them in varying lengths. If you need an extraordinarily long XLR, you can always connect two of them together!
Patch cords. If you’ll be using outboard processors and/or a patch bay (see Chapter 8, “Accessorizing Your Studio With…”), you’ll quickly appreciate the existence of compact ¼-inch cables known as patch cables. Usually coming in bulk packages in an array of colors, these cables are similar to instrument cables with the noticeable difference being they range from a few inches to a foot in length.
MIDI. Cables with a round, hollow connector that have five pins inside are the ones used for connecting MIDI devices. Unlike XLR connections, there are no female MIDI connectors, only male ends that connect into the female jacks on all MIDI-compatible gear.
RCA. If you partake in modern media at even the most elementary level, you’ve come across RCA cables—the rounded-end cables that connect most every piece of consumer-level A/V equipment, including your stereo and entertainment system. You’ll find these plug types on audio interfaces in the form of main outs and on DJ mixers to connect turntables, to name a few. With regard to the former, they’re considered a lower-grade connection system as they are unbalanced and thus susceptible to noise and interference, but at the same time they help keep costs down and are usually used on more compact units.
This list is by no means complete; you’ll likely work with several other types of cables over the course of your music-making career. But these are the essentials. When it comes to cost, it may not be within your budget nor your immediate needs to get the best of the best, but try not to be too prudent, as cheap cables are just that. They will deliver sub-par results and will fail much sooner than higher-quality ones.
For every cable listed in the preceding section, if there’s an adapter available to convert one type to another, get it! Make that two, because you will lose them and/or they’ll grow legs and walk out of your studio. Dedicate a drawer to these items (see the upcoming “Organizers” section) so you’ll always know where they are. Following is a list of a few adapters that will surely come up much sooner than later. Take note: When viewing the list, think “vice versa” on the adapters that are displayed as x-to-x.
¼-inch-to-⅛-inch. There are many cabling scenarios that use the smaller ⅛-inch jack (also known as 3.5 mm, while ¼-inch jacks are 6.35 mm); these adapters are used to make the larger ¼-inch types fit into the smaller plugs. Make sure out of the two types—mono and stereo—you have multiple stereo adapters, as these will be used way more often. Most commonly used for making sure your headphone jack will connect with whatever device you need to plug into, if you don’t have one of these adapters and have headphones that have the opposite jack, that late-night session is toast if you have a home studio that’s not substantially soundproofed.
Low-Z/High-Z. That’s the nickname for an adapter that serves as an impedance (Z) transformer that is one part female XLR (Low Z) and one part TS ¼-inch (High Z). These are great for when you just have to connect an XLR cable into a ¼-inch jack. At the same time, try not to find yourself in this scenario unless it’s completely unavoidable, as it delivers compromised results.
USB adapters. The rectangular end of a USB cable is called Type A, and it’s always the connection needed to plug into the computer itself. It’s the other end that has variables that may call for an adapter. The almost squared-off Type B connector is the most commonly used type to plug into the devices that are being patched into your computer. But there are alternative, smaller mini- and micro-type connectors for, well, smaller devices. For example, the compact Korg Nano Kontrol (refer to Figure 2.13) discussed back in the “MIDI Controllers” section uses the more compact Mini-A connector.
RCA-to-¼-inch. There will be plenty of times when you look to see what the connection type is on a piece of hardware (probably an interface) and you’ll discover it’s RCA instead of the expected ¼-inch. This adapter will save the day (and a schlep to the music store, wasting precious studio time).
Y-adapters. If you have an instance where stereo signals are involved but one of the devices has only one stereo plug, you may need a Y-adapter of some type. Aptly named, these adapters have two separate wires that come together into one jack. They could be two RCA female to one ¼-inch male or two ¼-inch female to one ⅛-inch male. There are many possibilities, but if you had to start somewhere, these two are safe bets.
If you’re starting to think this list will never end, you’re right—it won’t! Just remember: The more you put into your studio, the greater the return. When you have the goods to make your music come to life, it makes all the time, effort, and investment more than worth it. Before we close things out with some furniture talk, here’s a quick list of some odds and ends that every studio should have. Many of these items are inexpensive and probably won’t exceed $200 (excluding the DIs, bulk orders of gaffer’s tape, and refrigerator), but are no less important than the “big” purchases.
Stands. Make sure you not only have mic stands but music stands as well. With regard to the latter, it’s not always a matter of reading music per se, but a matter of having somewhere to put notes, lyrics, pictures, etc. You never know what you or someone you’re working with will need to make the magic happen.
Mic clips. Most mic stands do not come with the clamp-type apparatus known as a clip that’s used to hold the microphone in place. While some mics come with their own proprietary clips and shock mounts, a handful of generic clips are a must.
Batteries. At the top of the list are 9-volt batteries, with AA being a close second. You may not see too many instances of the other types, but it never hurts to have a small quantity of C, D, and AAAs in the drawer (with a slight emphasis on AAAs).
Sharpies. These markers are great for writing on myriad surfaces, especially CDs and DVDs. You’ll often need to jot down a quick description after burning a fresh copy of your latest mix.
Gaffer’s tape. Hands down, a studio must. Whether it be for taping cables down to ensure no one will trip on them or taping down adapters in a surge protector, gaffer’s tape is the go-to studio tape because it holds incredibly well while leaving almost no residue when you remove it.
Refrigerator. Depending on where your studio is located, (or, if it’s in your house, like most project studios, how far it is from the kitchen), you may need to invest in a small fridge. During long, tedious editing sessions or taxing tracking sessions, it’s a good idea to have liquids nearby so you can keep yourself hydrated. While you’re at it, stocking that mini-fridge with some fruit and other high-energy food is a smart move as well.
DI boxes. When plugging an instrument directly into an audio interface and/or mixing console, you will need what’s called a direct box, or DI for short (which stands for direct input). This allows you to connect a high-impedance, line-level, and/or unbalanced incoming signal to a low-impedance, microphone-level input that is balanced—the most common scenario being a ¼-inch source going into the DI and an XLR cable coming out to the destination device of choice. And, don’t get just one!
Blank CDs/DVDs. A spool of at least 50 of each should be on hand at all times.
Tuner. Never depend on someone else to have a tuner. While many virtual modeling apps feature built-in tuners, nothing beats the convenience of a portable hardware tuner to quickly plug into. Try to get one with a big, bright LCD so you can use it live, too.
Metronome. While Live has its own built-in metronome, having a standalone will come in handy when you need one and Live is busy doing something else (rendering, for instance). Make sure whatever one you choose has a tap tempo function where you can tap a pulse to reveal a tempo.
Strings/picks. No matter what type of music you’ll be producing, a guitar and bass will surely be involved at some point. Aside from breaking strings and having to be forced to replace them on an as-needed basis, a fresh set of strings can be exactly what a lifeless-sounding guitar track could use. As for picks, they’re just like adapters: They grow legs. Also, different picks have different tonal properties and afford different techniques. Get a handful of varying types to have on hand.
While Chapter 3, “Setting Up Your Ableton Live [Home] Studio,” will cover many aspects pertaining to the actual room(s) your studio will inhabit, this section discusses some preliminary studio furnishings to add to the must-have list. If you’ve even acquired a quarter of what has been discussed thus far, you’ve already realized that the coffee table you were thinking of resurrecting from the garage isn’t going to cut it—not by a long shot—and neither will that folding chair the catering company left at your house after that high-school–graduation party your family had a few years ago. What’s more, you will soon be building a sizable collection of myriad ancillary items discussed in the previous section (many of which are pretty darned small and therefore easily lost) that need an organized place to live. Strongly consider the following three items as you scope out your studio’s location in the next chapter.
Your Ableton Live studio will really start to take shape when you have its centerpiece in place: the workstation. Similar to a home computer desk in philosophy, a workstation (see Figure 2.27) is an ergonomic, highly functional piece furniture specifically designed for music-studio needs. While these units have the prerequisite desktop space, a pullout tray for your computer keyboard, and multiple tiers for placing various hardware such as your tower and monitors, the similarities end there. Taking it to the next level, music workstations offer the following features to make your studio environment that much more effective:

Figure 2.27. At the center of it all, the workstation will be where you make the magic happen. Make sure you go for a station designed specifically for music production, such as this Omnirax Force 36. From expanded shelving and compartments to casters allowing you to move your world around the room at will, you’ll be thankful you made the investment in the seemingly insignificant category.
Expanded shelving. As you’ll soon see, there’s a great deal of strategy that goes into what goes where with regard to smooth workflow and, more importantly, sonic projection. A good workstation should provide ample shelving and desktop real estate for placing your core hardware—computers monitor(s), studio monitors, MIDI control surface and/or keyboard controller, etc.—in places where you can work most comfortably while at the same time allowing you to place components such as monitors in positions where they’re most effective for a discerning listening environment. In addition, you’re going to need many items at close hand as you work no matter what the project calls for. These items need to be within arm’s reach without cluttering your workspace. Be sure to map out what you think you will need to live on the workstation so you can make a smart, informed decision when pondering this important purchase. While you’re at it, look for a piece of furniture that is a bit more than you need and affords you room to grow. You will, and that’s a fact—albeit a fun one.
Rackbays. At some point, your Ableton Live studio will surely include a few (if not many) pieces of outboard processors, often called “rack gear.” The reason for this nickname can be found on the front panel of these powerful rectangular DSP units, where there are winged extensions, or ears, on both sides that are used for mounting (see Figure 2.28). Any workstation worth its wheels will have at least a pair of two-space rackbays for mounting these processors, making for convenient positioning. In case you’re wondering whether the rack piece you have or will obtain will fit into the rackbays, no worries. The dimensions for all outboard processors of this ilk are a standard 19 inches wide, and the mounting slots are guaranteed to line up with the workstations.
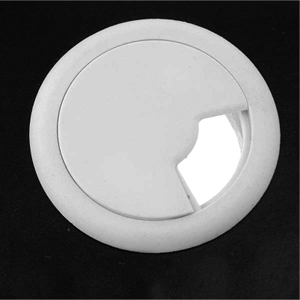
Advanced wire management. When it comes to cables, if you build it (i.e., your studio), they will come. It’s a good idea to organize your wires right from the beginning. Fortunately, your workstation can provide several means in which to do so. Below each rackbay and other smartly placed locations, you’ll find cabling grommets (see Figure 2.29), which are plastic cylindrical pieces used for wire management that are meant to fit snuggly into circular cuts made into the desktop area and/or side walls. On more involved workstations, you may also find larger openings in the back walls that are meant for larger bundles of cabling. These openings will also have some sort of plastic border such as PVC T-molding to cut down on any chances the wires may become damaged due to hanging over potentially sharp wood edges that may cut into a cable’s outer casing.
Sturdy construction. The combination of computer hardware, rack gear, MIDI gear, a mixing console, and more will be hefty in weight to say the least. A dedicated music workstation should be built with sturdy materials such as furniture-grade oak plywood to ensure a long-lasting existence. The station may be covered with high-pressure laminate surfaces such as thermo-fused melamine or Formica as well to best take on the punishment you will surely dish out on the desktop and shelving areas as you work.
Casters. There may be times when you’ll need to move things around in your Ableton Live studio. Be it an impromptu live recording session or a mixdown that calls for some extra gear—say, an old analog ½-inch tape machine to warm things up—you may need to rearrange your room’s current setup. Luckily for you, most workstations come equipped with appropriately weighted casters (wheels), allowing you to easily roll the apex of your studio wherever you need it to go.

Think of your studio as a complex vessel that you alone are the captain of. It is you who commands this Ableton Live Enterprise from top to bottom—and considering the sizable investment involved, it is you who will go down with her if she sinks!
Naturally, every captain, including James Tiberius Kirk, has a chair in which they alone rest their bottom, and so should you. Kidding aside, your chair is a huge deal. Think about it: No one piece of gear in your Ableton Live studio will be used more. It will be the first apparatus you go for upon entering and the last one you touch before leaving, not to mention the one you will use most when not making music. It is in the captain’s chair that you will spend countless hours slaving over your creations, so take this search seriously. When setting sail for the ultimate studio chair, keep these thoughts at the bow of you brain:
At the top of all considerations should be comfort. Do not settle for anything less than perfect. Make sure there’s ample back support, too. Remember: Only you can make this call. Unless you can sit in the chair your forum buddy swears is the best, don’t even think about ordering a chair online sight un-sat! Trying it before buying it is of paramount importance.
It has to be adjustable. The more options, the better.
Absolutely no noise can emanate from your chair—at least any that you determine cannot be eliminated with a quick spray of WD-40.
Mobility in the form being able to spin freely (with no squeaks, of course) and being able to smoothly glide across the room on the casters is a big one.
If you play an instrument, especially a fretted one like a guitar or bass, make sure you can remove any arms that you think may impede playing of said axes.
While there do exist dedicated manufacturers of chairs designed for studio use such as Bob Hall & Company (they make the MusicComfort Studio model), a trip to any one of the major office retailers such as Staples or OfficeMax will do the trick. Usually set up in the back, you’ll find upwards of 30 different chairs of all sizes and shapes assembled for your seating pleasure. What’s more, you’ll most likely get the best deal going, finding a chair around $100 give or take a few dollars. Be sure to make the journey during a time when you know the store will be empty to ensure you can sit on every last chair, multiple times, while at the same time minimizing the inevitable stares you will attract as you air-position yourself in music-studio mode.
Before you know it, your studio is going to be inundated with stuff. You name it: computers, speakers, cables, guitars, mics, McDonald’s—everything. Though it may be hard to predict exactly what you’ll need, it’s a good idea to budget in a series of organizing apparati such as the following:
Shelves. You’re going to accumulate countless items of medium size—controllers, guitar effects, headphones, sample CDs, manuals, and of course Cengage Learning texts including this book to name a few—that will need a place to go when not in use. Standalone pieces of furniture and/or wall-mounted types will do just fine and help clear the studio of unnecessary clutter resulting from very necessary things that have nowhere to go.
Storage containers. Just take a quick trip to the nearest Target or any major retailer that stocks home goods and you will have an incredible array of storage containers before you. From pieces that feature stacks of removable, skinny drawers with flip-tops to massive tubs you can probably sleep in—you’ll be hard pressed not to find a container to fit your needs.
Incidental wall-mounted items. Be it hooks, a dry-erase board, or something as simple as thumb tacks to hang a calendar as opposed to having one sitting on your workstation desktop, burglarizing precious space, elevating miscellaneous items in your studio will organize things greatly. As an added bonus, they may provide some cost-effective room treatments to combat common sound-wave challenges that are inherent with four-walled enclosures.
Filing cabinet. With a studio comes a paper trail composed of warranty cards, manuals, receipts, charts, and yes, take-out menus. Having a filing cabinet is so elementary, you just might overlook obtaining one. Don’t.
At this point, there may be what seems like an overabundance of cardboard gathering at your front doorstep thanks to frequent visits from the UPS guy. In the next chapter, we break open the boxes and start setting up your Ableton Live studio!