A logical first step to take when initially assembling your Ableton Live studio is to purchase the actual gear that will make up that studio, including a copy of Live.
Freeze! Don’t make another move. Before bolting out the door with cash in hand or sitting down at your computer, credit card drawn, like a caffeinated cowboy at high noon, I implore you to carefully read these first two chapters. Purchasing the wrong gear—or, put another way, gear that’s not well suited for accomplishing your musical goals—could set you back in ways you may not fully realize until it’s too late. That is, it may require some ample studio exploration to discover that a piece of equipment you bought in the beginning stages is holding you back from getting off the runway, so to speak. On top of that, the time period in which you’re allowed to return the item may expire before you come to understand you’ve made the wrong choice. This rings especially true for those of you who are new to Live and/or digital audio production altogether.
Conversely, it’s important to accept the fact you need to start somewhere, and that some or even most of the gear you purchase at the onset will eventually be replaced for one reason or another. Be it due to normal wear and tear, software/hardware upgrades, or your developing needs, some, if not all, of the gear you purchase now will go bye-bye in some way, shape, or form. The trick is to make smart, informed decisions and acquire what’s best for you so you can get started making music. And the best way to make informed decisions is to, well, get informed—and that’s exactly what this chapter aims to help you do.
While learning about what you need in your emerging Ableton Live studio, it’s a good idea to create a shopping list of prioritized items that you can refer to as you make your purchases. With the obvious chart topper being one of the three currently available versions of Live, check out the order of items in this and the next chapter; use that as an example to go by. For instance, this book assumes you already own a computer, but that may not be the case for everyone. If you’re in fact computer-less, then a computer should appear at the top of the list; after all, without a computer, you can’t run Live. Oh, and if, after reading the following section on computer-related items, you determine that an upgrade is in order, do it—you’ll be happy you did.
As brilliantly designed as Ableton Live is, it still needs a little something called a computer to run—and a powerful one at that. While Your Ableton Live Studio assumes you currently own a computer, the following information could easily be used if you are in fact going to buy a computer for the first time or upgrade the computer you already own. That said, this section is by no means meant to be an all-inclusive buyers guide; that would be futile. Not only does such a guide involve a cavernous vault of considerations, it’s constantly changing at a dizzying rate, making it impossible to document such information in this type of medium and have it stay relevant while it resides on the shelves of Barnes & Noble. Rather, this section will provide vital information about your computer’s performance potential when it comes to digital music production that you should be aware of as you put your Ableton Live studio together. If you suspect there are certain items missing, wait; Chapters 2, “More Must-Haves,” and 3, “Setting Up Your Ableton Live [Home] Studio,” will most likely fill in the holes. If you’re looking for more in-depth information on laptops, then jump over to Part 4, “Your Ableton Live [Mobile] Studio.”
The moment you decide to enter the world of computers beyond word processing or e-mailing, the dilemma as to what platform, or operating system (OS), you choose to use is bound to come up. In some circles, to engage in this relentless debate as to whether you’re a Mac (see Figure 1.1) or a PC (see Figure 1.2) is to enter the lion’s den basted in BBQ sauce. For the purpose of this book, we will ride the wave of this simple thought: Go with what you like. The majority of you reading this book are just starting out, and it’s to your advantage to work with what you know and love. Also, be aware that Live will behave identically on both platforms with the exception of using different keyboard shortcuts and the presence of a few shuffled menu items.

Figure 1.1. Given the fact Macs are designed from the ground up to be an all-inclusive hardware/software environment, the mighty Apple MacPro stands as a pillar of reliability.

Figure 1.2. If you already have a computer in your home, you most likely have a Windows-based PC (or two), eagerly waiting transformation into a music-making machine.
That all said, there are certainly pros and cons to each platform, as seen in the following list:
For most, the subject of price is at the top of the consideration list. Doing even a passing price comparison online will make PCs seem like the way to go; you just get more for your buck. Or put another way, you can get the same power for less as compared to a Mac.
One reason PCs are cheaper is because there’s a variety of PC manufacturers, meaning there’s competition in the marketplace, which for you means price wars! In fact, you could even build your own custom system from component parts if you’re that guy or gal.
With the aforementioned pro comes a con: With so many hands in the PC pot (so to speak), there’s trouble on the horizon in form of reliability. Macs win hands down in this category for the simple fact that they are an all-in-one hardware/software environment designed from the ground up to be just that.
Another Mac attribute that aids in their lauded reliability is a native feature built into their OS X operating system: the CoreAudio drivers. Drivers are software applications that translate commands between your OS and peripheral hardware so they can communicate with each other properly. Both Windows and Mac computers have native drivers built into their operating system, but Macs win with their proven CoreAudio drivers.
To counteract some of these PC cons with a PC pro: With so many PC-based manufacturers come many PC-based hardware upgrades, enabling you to augment your Windows computer more easily than a Mac. Better yet, you can build your own super-PC from scratch and even come out ahead of the game financially.
When it comes to installing and uninstalling applications (software), Macs are a cinch. It seems trivial, but in a Live environment, you’re going to be installing and uninstalling plug-ins often for various reasons, as well as switching out hardware, which means swapping drivers, etc.
While Macs may manage apps better, to add to the list of PC pros is the sheer enormity of software available for Windows-based machines. This becomes especially true when combing the Net for (legal) freeware plug-ins. When you start this quest, you will quickly notice Windows users have a much larger pool to choose from. But…
…Windows computers are much more susceptible to viruses and the like as a result of surfing the Web. Due to the open-ended architecture of the Windows OS, it’s pretty easy for malicious computer demons to conjure up ways to infiltrate your PC for whatever deviant reason.
The Mac OS is a closed affair, but while that’s a pro in the battle against computer viruses, it’s a con if you are the tinkering type. If you like to explore what makes your computer tick or want to hot-rod your machine for better performance under audio fire, it’s much easier on a Windows PC.
The Windows OS comes with more built-in system tools to help manage your machine, including disk cleanup and defragmenting utilities (another term for software), saving you the extra money you’ll need to spend to get a utility suite for your Mac.
These are just a few basic, yet important, considerations to keep in mind if you find yourself having to choose between a Mac and PC. It’s okay if some of the aforementioned pros and cons are beyond you at this point. Just remember: Choose what you want based on your needs and not the needs of a computer know-it-all fueling his or her own Hatfield versus McCoy–style war vicariously through you. You are the one who has to spend countless hours with your machine. If you just absolutely love the Mac OS—it is a sight to behold—then by all means, engage in that affair. If you use a PC for every task imaginable, then it’s smart to go with building your studio on Windows. That said, as you progress with working with digital audio and hone your Live skills you will be more informed (there’s the magic word once again) when it comes to possibly switching to a platform that you may think will suit you better. In the end, as mentioned, you need to start somewhere. The fact is, you can surely experience outstanding results on either platform; if that were not the case, there wouldn’t be any need for a debate, now would there?
No matter what computer you have or upgrade to, they all share the same basic architecture. Whether it’s a Mac or a PC, the overall specification concerns are the same. In this section, we will look at some of the more important specs to be aware of when considering whether your existing machine is up to the task of handling the demands of working with digital audio or whether you’ll need to either upgrade or buy a new computer altogether. While there’re certainly more factors to consider, such as optical drives, fans, or graphics cards, the four listed here—processor speed, RAM, hard drive, and ports—are often deal breakers when it comes to how the computer will measure up running a music production studio.
Processor speed, known in the computer world as clock rate, refers to the rate at which a computer’s central processing unit (CPU) crunches all those cycles of zeroes and ones. Measured in gigahertz (GHz), this is often the first set of specs one would look at when shopping around. And for good reason, this is the most expensive part of the machine. As of the writing of this book, processor speeds of 3.0GHz and higher are available—even in laptops. While this level of power may come as a shock to someone who hasn’t worked with computers for, say, the last 10 years, it will be just as shocking to see how much faster they will be five years from now.
These days, computers are running on dual- and quad-core processors, which are CPUs made up of two or four independent processors. At this point, the Ableton Web site recommends using at least a 1.5GHz processor for a PC and the use of the newer Intel-based Macs over the PowerPC G4 processors. While this is of course sound advice, it’s always good to go higher than any manufacturer’s minimum requirements (remember, the key word here is minimum). When trying to decide what that is, especially when trying to gauge within a Mac and PC comparison, the answer is far simpler these days because both PC builders and Apple are using Intel-based processors. (PCs can also be designed to run on AMD processors.) Try making sure your computer is running no less than 2.0GHz of processing speed for Live on both Mac and PCs—which, by the time you read this, may even be hard to come by as the minimum speeds you’ll see on the retail shelves will surely be higher.
This soon-to-be-well-known acronym stands for random access memory. Without getting overly technical, this is where your applications, including Live, are loaded when you open them up to work with them. Simply put, the more RAM, the better your workflow potential will be. These days, RAM is measured in gigabytes, which refers to the amount of available space. This differs from the CPU, measured in gigahertz, which refers to a rate. The Ableton site currently cites a 1GB minimum but recommends 2GB; you’d be doing yourself a major solid by going right to 2GB—at least. With the proliferation of 4GB machines coming onto the market that can be upgraded to upwards of 8GB or more, 2GB should be within anyone’s reach.
If you’re considering an upgrade in the form of RAM to your Mac or PC, as always, it’s extremely important to be informed—more so here than with almost any other component discussed in this chapter. Some factors to consider are as follows:
All computers have a limit as to how much RAM can be installed. What’s more, operating systems can play a role in limiting how much RAM they can run.
Not all RAM is compatible with every computer. You’ll need to do the research to find out what type of RAM your computer requires. If you have a new computer, such as a Mac, using the wrong type of RAM could void your warranty.
RAM may be sold one chip at a time or in pairs. If you purchase a pair of chips and you only install one, there’s no guarantee it will work properly.
With regard to buying RAM in pairs, when upgrading existing RAM, it may be necessary to buy a pair of sticks even when it seems as if you only need one. For instance, if you have an older tower that has one 512MB RAM stick installed and has another slot empty, and you want to upgrade to the current standard of 2GB, you would need to purchase two 1GB sticks. This is due to the fact there’s no such configuration of RAM that could supplement your 512MB stick to equal the desired 2GB. Also, more than likely, that machine will be maxed out anyway, making it useless to go for a single 2GB stick and leave that second slot empty.
One advantage to RAM is that it’s relatively easy to install and, assuming you’ve done your homework, can be purchased after the fact—often at much cheaper prices than if you had it installed as an upgrade to an original purchase. That means you can buy a computer with 2GB of RAM that allows for up to 4GB and shop around the Net until you find the right price and then save the money on the install by doing it yourself.
While RAM is the memory source from which you work, it’s the hard drive, or HD, that stores your precious projects as well as your operating system and other applications. In fact, it’s the unsung hero of your computer, as it’s the one single component that plays a role in just about every task you’ll ever perform. Hard drives may be internal (inside the tower) or external (see the upcoming section “External Hard Drives”); regardless of the type, you will need to be aware of a few HD facts in order to ensure the best possible performance for working with Live.
Like RAM, HD size is measured in bytes. Generally speaking, bigger is better, but there are some caveats to consider. First, the pros: Digital music eats up space fast. One mono track of CD-quality digital audio (16-bit/44.1kHz) uses 5MB. Seems small? Try 600MB for five minutes of 24 mono tracks. That’s only mono tracks, no stereo tracks—and it’s not even at 24-bit (the concept of bits is discussed in the upcoming section on audio interfaces). That said, shoot for having an internal HD of at least 250GB. Although computers are coming with 500GB and higher drives installed, keep in mind that larger drives require deeper searches and are more susceptible to defragmentation. That means slower performance and more frequent downtime performing maintenance tasks.
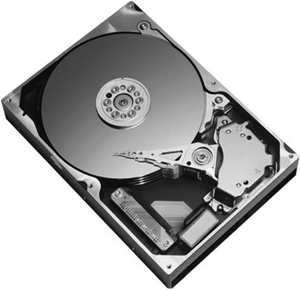
Hard drives are made of various parts that work together to spin a collection of magnetic platters that are written to and read from (see Figure 1.3). The speed at which this spinning occurs is another important spec to keep an eye on. You want an HD that spins at least 7,200 revolutions per minute (RPM), as anything slower will be just that and that will wreak havoc on your entire system. Slower drives—5,400 RPM, for example—will have a hard time keeping up with the demands of running complex sessions, and you’ll experience frustrating system latencies and possible system-overload errors. With 10,000 RPM Raptor drives coming into play, it looks as if things will only get better once these drives can be offered in even larger storage capacities.
In addition to the speed of the drive is the speed at which it transfers the data. This is called—you guessed it—the data transfer rate, and it’s actually a more accurate way to describe how fast a drive is for obvious reasons. If the drive isn’t transferring data quickly, then it’s a moot point how fast the platters are spinning. There are two different stages to watch for: disk-to-buffer and buffer-to-computer. Look for drives that transfer at 70MB to 1GB per second at both junctures.
All the specs in the world don’t mean a thing if that hard drive ain’t got that thang—that “thang” being reliability. While Ableton does not provide any advice on its Web site as to what HDs may be more reliable than others (how could they?), it’s a good idea for you to hit message boards, forums, and/or any other Net-based community environment where you can read user reviews. One thing to keep in mind, especially for internal drives, is the up-and-coming solid-state hard drive. Basically, these are hard drives with no moving parts, thus cutting down the possibilities of mechanical failure. Other added benefits are their penchant for silence if no cooling fan is needed—something you’ll come to quickly appreciate in a music studio—and the fact that they are void of mechanical delays aids in faster performance all around.
Your computer is going to have several hardware peripherals plugged into it, and you’ll need to have the ports to make that happen. You shouldn’t have to put too much thought into this part, as it’s standard issue for any computer tower worth its salt to come equipped with at least a few USB 2.0 ports, a FireWire 400 port (maybe even an 800 port if you’re getting a Mac), an Ethernet port, ⅛-inch stereo outs and line ins, as well as each machine’s respective video-connection type. (PCs use VGA and Macs use DVI.) With that in mind, don’t put much weight into the audio connections; you’ll be skipping the computer’s sound card altogether and using an external pro audio-grade interface. (This is covered in-depth in the upcoming “Audio Interfaces” section.) After careful, informed shopping, you should have whatever I/O (in and out) you need to do your thing.
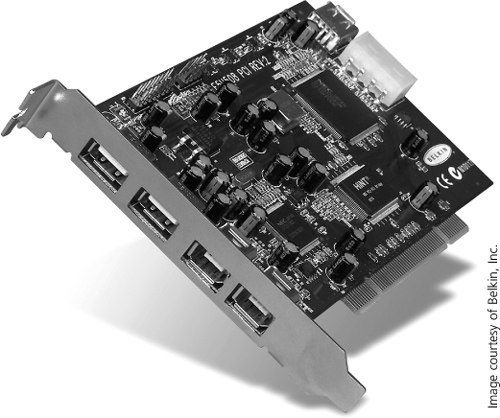
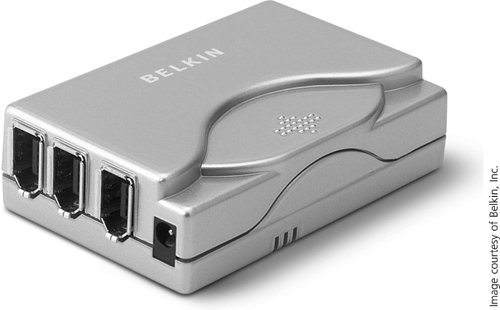
If you don’t have one of the standard connection ports (PCs often lack FireWire ports) or you find yourself needing more computer connection options such as additional USB or FireWire ports, you can install additional PCI card slots (see Figure 1.4) that connect right to the motherboard or obtain an external hub (see Figure 1.5). While both will provide the extra ports you’re looking for, go with PCI cards for connecting the important pieces such as an audio interface whenever possible as they provide a more stable connection. To add, most manufacturers of pro audio gear that plugs into your computer will advise you not to use a hub of any kind when patching in their gear.
Having at least one internal hard drive is essential; it will store the operating system as well as your applications. As mentioned previously, hard drives can also be housed in external enclosures (see Figure 1.6) separate from the tower. Here’s the skinny.

Figure 1.6. External hard drives such as this Seagate FreeAgent drive will serve myriad purposes in your Ableton Live studio, including the ever-crucial backup system.
All the attributes discussed in the previous section on hard drives apply to external hard drives as well: storage capacity, speed, data-transfer rate, etc. But there are a few important advantages your studio will benefit from by having one external hard drive, if not more. Having an external hard drive in your system allows you to ease the load on the CPU having to deal with running the OS and Live and simultaneously writing and playing back the audio from the same internal drive while you record your Ableton projects.
At the same time, this creates a home for your Ableton project files (as well as all other files created by you) outside the computer tower. If there were ever to be a system failure within your main computer, your external hard drive and its contents would be safe. Of course, that safety depends on a few variables, including whether the external hard drive is plugged into the same outlet or surge protector if, for example, there is a spike in the grid. Regardless, there are definitely security advantages to be reaped when using an external hard drive.
Speaking of power, the fact that an external hard drive is drawing its own power helps the main computer work more efficiently. If you do in fact end up tracking to the internal drive, make sure you purchase at least one external hard drive to serve as a backup not only for the sessions, but your entire system. Take this advice very seriously; do not end up as one of the many who learn this after their first crash or HD failure. While saving your work as you go is a habit of paramount importance to get into, backing up is even more important. Do it.
When it comes to external hard drives, there are two ways to connect them to your tower regardless of the platform you’re using. You can either go with FireWire or USB. Besides the physical differences, the main determinant between the two is USB 2.0 transfers data at 480Mbps while FireWire 400 transfers at 400Mbps (hence the name). Before you jump to conclusions and run out to get your hands on an external drive that solely offers USB ports, know this: FireWire drives are preferred among digital audio producers because they deliver a better, more consistent performance when it comes to sustained data transfer. This is huge with regard to working with audio given the fact you’re accessing data from the platters at every turn in your workflow. That all said, most external hard drives on the market today offer both connection types as well as FireWire 800, which is quickly becoming more and more common.
With a computer in your arsenal, the next order of business is to get your hands on your very own copy of Ableton Live. When visiting Ableton’s stylishly simple yet extremely effective Python-generated Web site, http://www.ableton.com, you’ll find the three currently available versions of Live to review (see Figure 1.7). These three versions are not to be confused with Max for Live, a separate application co-developed with Cycling ’74 that opens inside Live and serves as a toolkit for making new Live devices. From sleek to robust you have:

Figure 1.7. Ableton’s streamlined Web site is an effectual combination of simplicity and style that always effectively exudes the vibe of Live culture. Shown here are the three versions of Live currently available, all of which offer a free trial period that allows you to experience the full power of whatever version you choose to take for a test drive.
Ableton Live Intro
Ableton Live 8
Ableton Suite 8
As you will soon experience, Ableton has created a completely awesome product in Live, and the power of this awesomeness can be felt in all three versions (as well as in Live 8 Demo, a free version of Live that retains the basic architecture regardless of its severely compromised nature). While this Jack Black-esque decree may border on juvenile, make no mistake: An overwhelming giddy feeling will take hold of you when you dive into Live and your burgeoning studio.
To help you decide what version to purchase, this section will break down and compare the first two varieties—Live Intro and Live 8—as these are the likely choices for those reading a book such as this. This is not to say purchasing Suite 8 should be ruled out. In fact, the next section focuses solely on its offerings; you may just decide to take the ultimate plunge. But having the inside scoop as to how Live Intro and Live 8 compare will enable you to zero in on what’s best for you while getting your studio off the ground. If you in fact decide to go with the Live Intro version, know that you can always upgrade to either of the more enhanced versions at any time.
Whichever way you choose, you will still be able to get the most out of Your Ableton Live Studio, although it should be noted that some components discussed throughout the book are found only in Live 8 and Suite 8, while others are exclusive to Suite 8 and/or an add-on that can purchased separately.
When comparing the two slimmer versions of Live, you’ll quickly notice that although both are jam-packed with incredible features such as a bevy of Ableton-engineered devices and instruments like Impulse (a drum sequencer) and Simpler (a sample-based synth instrument), Live Intro is just that: an introductory version of Live. With that in mind, in the coming chapters you’ll be able to appreciate this factoid: The core architecture behind what makes Live so attractive and that propelled it to becoming the go-to app for many modern artists absolutely is contained within Live Intro, making it a viable choice that will serve myriad production needs. (For more, see the upcoming sidebar, “To LE or Not to LE.”)
If you’re new to digital audio altogether and feeling overly motivated and/or are lucky enough to have deep pockets, consider this: Just because you have the funding to obtain the more expensive Live 8 does not mean Live 8 is the right version for you. If, after reviewing the upcoming table comparing Live Intro and Live 8, you realize that Live Intro is indeed all you need for now, save the money and invest in the many other components your studio will require. It’s important to realize this simple truth: It never ends. Translation: Something always comes up where you’ll need this or that (or both!) for your studio, whether it’s more mic stands, a specific cable you swore you had at one time or another, better monitors—the list goes on. When the need arises, it’s a little less stressful when you have the capital to make the necessary purchase(s) instead of reluctantly amassing debt. Plus, as stated, if you find your needs surpassing what Live Intro offers, you can upgrade at any time to Live 8 or Suite 8.
On the flip side, whether you have the funds for Live 8 or not, do not purchase Live Intro solely because it’s cheaper. The differences between the two are significant even at an elementary level, so unless you’re completely new to digital audio production, strongly consider making the investment in Live 8. If not, you may make that infamous “wrong decision” discussed earlier, leaving you with a studio that’s limited in capabilities.
Table 1.1 lists all the differences between Live Intro and Live 8 along with additional commentary and/or brief descriptions so you can consider your options with the knowledge needed to make that ever-so-crucial informed decision. Take note: Some of the information provided will more than likely go over your head. Don’t worry. As Robert Plant melodiously reminds us in “Kashmir,” “All will be reve-e-e-e-e-e-aled.”
Table 1.1. Key Differences Between Live Intro and Live 8
As you can see, there’re many options on the table, and some may be impossible to consider at this stage if you have limited or no experience with Live or digital music production. The key things to remember are as follows:
You’re not locked into anything, since you can upgrade from Live Intro to Live 8 at any time.
What may seem overwhelming or over the top now will soon become second hand and completely essential as you and your studio develop.
It never ends. You’ll always want/need software upgrades, new hardware, a better chair, etc.
While Live Intro will aptly guide you into the powerful world of Ableton Live and while Live 8 will facilitate almost any digital audio production task one could desire and so much more, Suite 8 gives you all that plus 10 powerful add-on instruments (see Chapter 7, “Accessorizing Ableton Live With...,” for details on each instrument) and a jam-packed library of completely inspiring content. With regard to the latter, the sounds contained within Suite 8’s library are worth the price of admission by itself. This vast collection of digital glory is made up of the following:
Synthesis
Real-world sound objects
Presets
Loop libraries from Cycling ’74 and Zero G
Song templates
Construction kits for drum sequencing
In addition, there’s a sizable collection of sounds contained within the Suite 8 library that was created by some of today’s leading sound designers. You could spend hours trolling these collected works alone and start countless projects while doing so. All these sounds are organized into racks that contain a combination of Ableton effects and instruments that come with Suite 8. (Although Live 8 users can purchase these instruments at any time, they cannot obtain the actual racks discussed here unless Suite 8 is acquired.) What’s more, the library boasts effect racks that can be used for pro-level mixing, mastering, and advanced sound processing.
As for the aforementioned instruments, Ableton hooks you up when you spring for the full monty, with incredible offerings ranging from powerful sample-/sound-design tools to software-based versions of rare and highly sought after real-world instruments that were meticulously modeled. While Chapter 7 gets into what’s contained in these instruments, here’s a list of what’s comes inside Suite 8:
Sampler
Operator
Collision
Corpus
Electric
Tension
Analog
Session Drums
Drum Machines
Latin Percussion
While these instruments can indeed be purchased separately and used in Live 8, doing so will cost you more in the long run as compared to the bulk-priced mega-package known as Suite 8. In fact, if you were to purchase, say, all the software-based instruments separately, the cost would be more than Suite 8 in its boxed version. (See the upcoming sidebar on the advantages associated with boxed versions.)
In the end, remember this: The functionality of Suite 8 is identical to Live 8. There’re no advanced commands or augmentations to the GUI, just the added library goodies and the included instruments that can be purchased separately—albeit at a much higher cost. That said, with all components in check, Suite 8 is an all-encompassing environment for all things music creation.
While you theoretically could make music with just your computer, a copy of Live, and the speaker system that came with your machine, your studio’s potential will be severely inhibited with just that. Many factors contribute to this fact, but none more so than the sound card—a hardware component pre-installed in your computer for handling all the audio that will travel in and out of your system. Similar to buying a car and knowing you’ll need to upgrade the stereo system, if you’re purchasing a new computer or are planning on using an existing computer for your studio, you will absolutely need to replace or bypass the sound card that comes installed with a professional-level card designed for music production. More commonly known as an audio interface, these after-market units are the heart of your studio; they not only handle all the audio going in and out of Live, but also determine your studio’s potential with regard to what you can do. From having the ability to record more than one source at a time to being able to route audio for further processing outside of Live, it all starts and stops with your audio interface.
To fully appreciate the concept and understand the need for an after-market sound card, a little background on the basic properties of digital audio is required. Read on carefully.
Turn on the radio, flip on your TV on, log on to your favorite band’s Web site. If the audio you hear in any of these forms of media was originally vibrations traveling through the air (i.e., sound waves), it had to have been captured through a process called transduction for you to be able to hear it now. (Check out the section on microphones in Chapter 2 for more discussion of transduction.) In this process, sound waves are converted into electrical energy that is said to be analogous (similar) to its original form. Sound in this state is known as analog audio. No matter how nicely you ask it to, your computer will not deal with analog audio. This type of audio is made up of real-world electrical content (alternating current), which is totally alien as compared to the binary code (zeroes and ones) your computer functions on. So, yet another conversion needs to happen, this time from analog to digital audio (those zeroes and ones again). That’s where a computer’s sound card comes in. Every sound card has not one but two converters for handling these conversion tasks. They are as follows:
Analog-to-digital converter (ADC)
Digital-to-analog converter (DAC)
As audio enters your system, the ADC prepares the voltage-derived medium for number crunching by converting the analog audio to binary code. From there, it’s off to Ableton Live for your newly converted digital audio so it may do your bidding. After the computer has done what it needs to do as instructed by you, the DAC will convert it back to analog audio so those voltages can be sent to your speaker system where the process of transduction happens once more. This time, though, it’s to convert the analog audio once more into the vibrations (sound waves) ours ears require in order to hear it.
Because these converters are the heart of any sound card, it should come as no surprise that if they’re not up to snuff, nothing you produce in your studio will be either. Like most built-in components, the quality of these converters is compromised to offset the total cost of a computer so you’ll find it more enticing to buy the total package. Stock sound cards work great for the average music lover, but not you. This is where a pro-level audio interface is imperative. In addition to superior-sounding converters, you’ll soon learn about how the conversion process requires a certain amount of stability and consistency, too. An audio interface designed for what it is you’re embarking on will do that and more.
Now that you’re familiar with the basic function of an audio interface, let’s start to look into the many specs you’ll need to be aware when choosing as well as using them. The first order of business is a brief look at the two most basic specifications: sample rate and bit depth. These will be the initial specs to roll off anyone’s tongue when describing any interface, and must be understood in order to work with them (not to mention work with digital audio in general as well as applications such as Ableton Live).
In the conversion process discussed earlier, analog signal is changed into binary code by a converter. Think of the converter as a camera taking snapshots of the audio at a certain rate per second. In audio-production speak, these snapshots are called samples. The sample rate expresses how many times the audio is sampled per second. Conveyed in hertz (Hz), the sample rate plays an important role in the overall conversion process. Think about it: The more times your signal is sampled by the converter, the more accurate the representation is of the original analog version that is to be recorded digitally. And the more accurate your recorded audio is, the more accurate the playback of what it is you recorded will be.
The standard sampling rate of 44.1kHz (the sample rate of consumer CDs and what their players are capable of playing back) tells you the incoming audio has been sampled 44,100 times a second. That’s 44,100 snapshots per second! If that sounds fast, you’re right—it is. But it gets even faster—as high as 192kHz.
While faster may seem better, keep in mind that it creates more samples, which means larger files sizes (more on that later) and of course a higher price tag. At this point, it’s better to spend the money on deeper I/O features (see the next section) because every audio interface’s minimum sampling rate is the CD standard. If you had to choose, go for one that also offers up to 48kHz sampling, as this will come in handy when working with video.
The most basic components of sound can be broken down into two main concepts: pitch (frequency) and volume (amplitude). The sample rate determines the quality of the overall frequency content in the conversion process, leaving the volume aspect up to the bit depth. Remembering this is all zeroes and ones (bits), the more bits available to construct the data that is now your audio in digital form (the sample), the more dynamic range there will be. The other side of the standard spec for commercial CDs is 16-bit, which is how many bits make up each individual sample. Just like the sampling rate, the more bits available, the more accurate the recorded audio will be in playback—and yes, the larger the file size will be. These days, interfaces feature 16- and 24-bit capabilities. If you can swing it, you should shoot for one that is capable of both so you have the option to record at the higher bit depth.
Now that you have a fundamental understanding as to why you need an audio interface and how it basically functions, you can look into deciding what interface will be right for your studio. Beyond the two main specs—sample rate and bit depth—the next defining features are the type and the I/O.
There are two main categories of audio interfaces, and they offer two types each. First, you have to decide whether you want an internal or external unit. Internal sound cards are slot-style components called PCI cards (there’s also PCI-X) or, in the case of laptops, PCMCIA or CardBus. (Laptop options are discussed further in Part 4.) In the case of external options, you have the choice between USB 2.0 and FireWire. With regard to USB, if you’re looking into a 1.x interface, you should know that although the cheaper price may be attractive now, you’ll find that the compromised I/O will quickly be an issue, meaning you’ll be spending more money sooner than you’d like. If you’re looking for maximum reliability, then PCI cards are the way to go because they deliver higher bus speeds and superior data transfer. This is attributed to the fact that they connect directly to the motherboard from the rear of the tower. If you’re looking for flexibility and the option to take your interface out of the confines of your studio, then USB and/or FireWire (see Figures 1.8 and 1.9) is what you should be looking at. When it comes to features, unless a card-slot–style sound card features a break-out box (see Figure 1.10), USB and FireWire interfaces will have more to offer, including the ever-important I/O (see the next section).

Figure 1.8. External audio interfaces such as the USB Novation Nio 2/4 allow you added flexibility as well as tactile control.
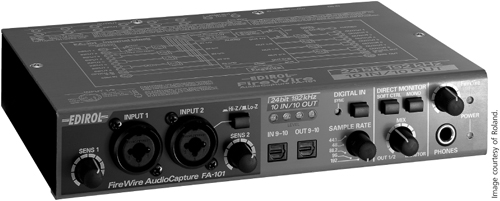

The I/O—short for in and out—is the sum total of possible paths as well as types of audio (and other elements such as MIDI data) that can travel in and out of your computer via the audio interface. As you read through the following items, refer to Figures 1.11 and 1.12 and check out the feature-rich M-Audio Fast Track Pro USB audio interface.
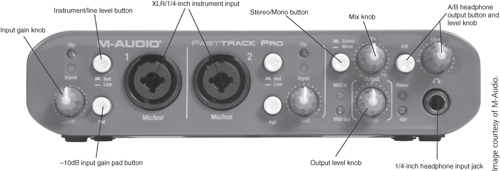
Figure 1.11. The M-Audio Fast Track Pro is a feature-rich USB interface that offers just about every I/O option one could need in an emerging studio.

Figure 1.12. Taking a peek at the rear of the Fast Track Pro, you can see the many different types of I/O, such as MIDI, S/PDIF, RCA, and ¼-inch line-level outputs.
USB versus FireWire. Given the fact that most of you will probably go for an external interface, the first I/O consideration has to be how you’re connecting to your computer. Unlike the Mac versus PC debate, whether you go with USB or FireWire is far less of an issue, but it is one that merits consideration nonetheless. As stated in the previous section on external hard drives, USB 2.0 transfers data at a higher rate (480Mbps) than FireWire 400 (400Mbps), but it’s important to note that the latter is considered to have superior characteristics when it comes to sustained data transfer, which is the essence of working with audio. This may soon become a moot point as FireWire 800 (800Mbps) hardware and connection ports are popping up more frequently, which will be markedly faster than USB 2.0—but don’t count out USB just yet, as USB 3.0 (4,800Mbps) is coming! Sometimes, it may simply come down to how many USB and FireWire ports your computer offers. If you’re mapping out your hardware and know that you’ll be using a certain number of USB devices, you may want to go with a FireWire interface as many peripheral control devices only come with a USB option. Conversely, it’s strongly not recommended to use a USB external hard drive for working with audio, so if you only have one FireWire port, it should be for a FireWire drive as opposed to a FireWire interface. With that in mind, know that most interfaces and some external hard drives come with dual FireWire ports, allowing for the daisy-chaining of FireWire interfaces and hard drives into one FireWire port. Lastly, if you’re thinking that a hub will solve all your connectivity woes, just keep in mind that you never want to connect your interface or external hard drive through one of these bottlenecks. It won’t work well. Save the hubbing for dongles, MIDI controllers, and the like.
XLR ins. Although there’s no “O” when it comes to XLR ports, depending on what type of work you plan to do within your Ableton Live studio, this spec could hold significant weight if your productions often involve microphones. XLR jacks are where you’ll plug in microphones via XLR cables (also known as mic cables) to bring captured (recorded) signals into Live. How many XLR jacks you have will determine how many miked sources you can record at one time. If you have aspirations of recording multiple musicians, the sessions will start and stop according to how many XLR ins you have. On many units, you may see XLR jacks ganged with ¼-inch jacks (see Figure 1.11), which will allow for the inputting of instrument-level and line-level sources (see the next bullet). These multi-port configurations will save space, making the interface more compact and at the same time affording it more room for more features! A solution for XLR-deficient interfaces would be to insert a mixer (everyone always seems to have one lying around) that features more XLR ins (as well as ¼-inch inputs, which would come in handy if your interface doesn’t feature the ganged inputs) before the interface. Just come out of an auxiliary out for mono signals or pair bus outputs for stereo signals of the mixer and connect to your interface’s ¼-inch ins (if your interface has them) and you’re golden!
Line-level I/O. The term line level refers to the strength of an audio signal and is displayed as +4dBu. Line-level jacks are in the form of ¼-inch sockets and are used for various duties such as recording line-level instruments like keyboards and hardware drum machines, patching in outboard effects, and connecting studio monitors as well as headphones for playback. As mentioned in the previous bullet, more often than not, the ¼-inch input is combined with the XLR jack while the line-level outputs are usually just ¼-inch. With regard to the former, next to the ganged XLR/¼-inch socket you’ll find a button for switching between line-level and instrument-level (—10dBV) sources (see Figure 1.11), allowing you to easily toggle between the signal strengths.
MIDI I/O. The power of MIDI will play a huge role in your work with Ableton Live as well as in digital audio production as a whole, so it’s important to make sure you have some way to connect hardware MIDI devices to your computer. Using a 5-pin DIN (see Figure 1.12) connection, the MIDI protocol is set up so that it can travel in, out, and through (thru) hardware components including audio interfaces, making it possible to see three separate jacks on one unit. When considering what interface to choose as well as mapping out I/O schemes, it’s important to know that MIDI data can be transferred through USB as well as FireWire, and that many hardware MIDI devices come equipped to do so (more often USB, as mentioned in the “USB versus FireWire” bullet). So in many instances, whether a particular interface has actual MIDI ports may not matter. Also, much like USB hubs, there are separate hardware MIDI hubs that can be purchased to augment and/or provide MIDI interfacing.
Digital I/O. There will be times when you will want or need to transfer audio that is already in digital form. To do so, you’ll need to utilize protocols designed for these actions, and they have their own connections. The most common is S/PDIF (see Figure 1.12). An acronym that stands for Sony/Philips Digital Interface Format and often pronounced like it’s spelled, this type utilizes RCA plugs (ones with orange and/or black rings instead of the common red and white ones) and 75-ohm coaxial cable to transfer digital audio through your interface to digital storage mediums like MiniDisc or DAT. You can also use S/PDIF to link interfaces to facilitate additional simultaneous inputs.
The number of audio interfaces to choose from is staggering to say the least. In addition to the brands we’ve already seen in this chapter, here’s a list of some other audio interface manufacturers out there:
Apogee
ART
Alesis
Behringer
Digiram
Echo Audio
E-MU
Focusrite
Lynx Studio Technology
Maya
Metric Halo
MOTU
Numark
ProSonus
RME
Rolls
SSL
TC Electronic
Tascam
Yamaha
These are just a few of many options you have to choose from. One of the best things you can do to narrow things down is get recommendations from people who have hands-on experience doing what it is (or similar to what it is) you want to do with your studio. Keeping with this chapter’s mantra, an informed decision can make all the difference in the world. This chapter is only meant to introduce the essentials; it’s up to you to do the homework so you can best inform yourself and start to assemble your Ableton Live studio.
While these are indeed the big three, there’s certainly more to explore with regard to essential gear. In the next chapter, we will look into just what they may be.