
Chapter 1: Controlling the Start Screen
In This Chapter
![]() Stop worrying and start loving that tiled Metro Start screen
Stop worrying and start loving that tiled Metro Start screen
![]() Changing tiles and the background on the Start screen
Changing tiles and the background on the Start screen
![]() Making the Start screen yours
Making the Start screen yours
![]() Behind the scenes with Tiled Metro Snap
Behind the scenes with Tiled Metro Snap
If you’re an experienced Windows user, chances are good the first time you saw the Metro Start screen, you wondered who put an iPad on it. However, if you’re an experienced iPad user, chances are good the first time you worked with the Start screen, you went screaming for your iPad.
The Metro Start screen — the first screen you see in Windows when you get past the login, and the screen you’ll come back to over and over again — defines and anchors Windows. Like it or not.
 As much as I like to kvetch about Metro Start, the screen’s, uh, starting to grow on me. More than a few times I’ve strayed back to a Windows 7 machine and found myself wondering why pressing the Windows key doesn’t bring up Start.
My advice, if you’re Start-adverse, is to give it a real workout for a month or two. I don’t expect you’ll end up singing hosannas about Microsoft’s new interface. But I do expect you’ll learn to live with it — and, like me, you may even miss it when you go back to Windows 7. That goes double if you can use the tiled Metro interface on a touch-friendly tablet.
 In this chapter, I take you through the Start screen, from beginning to end. Some of the material in this chapter overlaps discussions in Book VI, particularly in Chapter 3. That’s okay. Book VI, Chapter 3 focuses specifically on changing the Metro Start screen so it feeds into the desktop as easily as possible, and it’s very mouse-centric. In this chapter, I look at the larger picture and explain ways to modify the Start screen that may help even if you intend to shun the old-fashioned desktop and spend most of your time on the tiled side of the Windows street. In this chapter, I also have a more touch-friendly slant, just in case you’re thinking of abandoning that giant rodent perched on your desk and putting your screen in a more recumbent position.
Hey, if you can get your thumb and all your pinkies on the screen simultaneously, touch has the mouse beat five to one. Sorta.
Touring the Start Screen
The very first screen you see when you start Windows, the Start screen (see Figure 1-1), is designed to be at the center of your Windows universe. Don’t let the fact that it’s intentionally made to look like a smartphone screen deter you in the least.
You’ve probably sworn at the Start screen a few times already, but if you can keep a civil tongue, permit me to expound a bit:
![]() Tiles (the squares on the screen) appear in four sizes, Large, Wide, Medium, and Small (rocket science). In Figure 1-1, the weather report is a large tile, the stock report is wide, Internet Explorer is medium, and the teeny-tiny headphones for the Metro Music app is small. Most tiles that come from Microsoft are live tiles, with active content (latest news, stock prices, date, temperature, e-mail messages) that changes the face of the tile.
Tiles (the squares on the screen) appear in four sizes, Large, Wide, Medium, and Small (rocket science). In Figure 1-1, the weather report is a large tile, the stock report is wide, Internet Explorer is medium, and the teeny-tiny headphones for the Metro Music app is small. Most tiles that come from Microsoft are live tiles, with active content (latest news, stock prices, date, temperature, e-mail messages) that changes the face of the tile.
![]() Tiles are bunched into groups, which may or may not have group names.
Tiles are bunched into groups, which may or may not have group names.
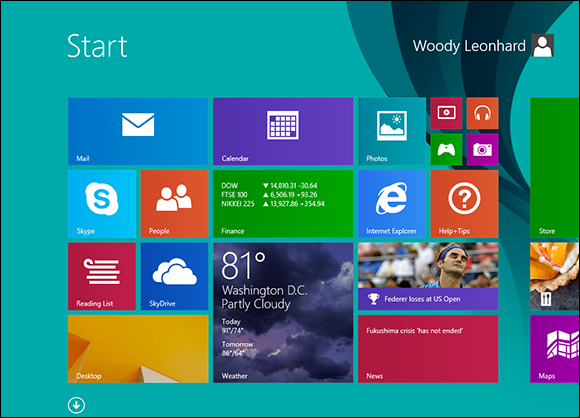
Figure 1-1: The Metro Start screen.
![]() The Start screen has a background color (the color below the tiles) and a background design (a pattern below the tiles) — the latter of which is confusingly called just Background. If you can’t see the background design, don’t worry. Sometimes it takes a microscope. Sometimes the background design is no design. Did I say something about rocket science?
The Start screen has a background color (the color below the tiles) and a background design (a pattern below the tiles) — the latter of which is confusingly called just Background. If you can’t see the background design, don’t worry. Sometimes it takes a microscope. Sometimes the background design is no design. Did I say something about rocket science?
![]() In the upper-right corner, you see either your Windows user name or (if you’re logged on with a Microsoft account) your full name. For a description of the Microsoft account and the pros and cons of using one, see Book II, Chapter 5.
In the upper-right corner, you see either your Windows user name or (if you’re logged on with a Microsoft account) your full name. For a description of the Microsoft account and the pros and cons of using one, see Book II, Chapter 5.
The most important tip for using the Metro Start screen? How to bring it up. Windows packs at least a half-dozen ways to get to the Start screen, but the two simplest are
![]() If your PC has a Windows button on it, press the button.
If your PC has a Windows button on it, press the button.
![]() Otherwise, press the Windows key on your keyboard.
Otherwise, press the Windows key on your keyboard.
 You can go straight to the Start screen quickly in two more ways, depending on where your hands are located. (I know, I know, they’re at the end of your arms. Wiseacre. You know what I mean.) Try this:
![]() Tappers, if it’s too hard to press the Windows key, swipe from the right and choose the middle charm, which is Start.
Tappers, if it’s too hard to press the Windows key, swipe from the right and choose the middle charm, which is Start.
![]() Mousers, if you’re looking at the old-fashioned Windows 7–style desktop, click on the Windows icon in the lower-left corner of the screen.
Mousers, if you’re looking at the old-fashioned Windows 7–style desktop, click on the Windows icon in the lower-left corner of the screen.
Now that you have the lay of the land, take a minute to explore the edges of the Metro Start screen. That’s where the action is.
Here’s how to walk around the fringe. Think of these steps as a Microsoft demo, without the hard sell:
1. Start a few programs.
a. Tap or click, oh, Calendar.
b. Go back to the Start screen, tap or click Travel, and go back to the Start screen.
c. Tap or click Weather and then go back to the Start screen.
d. Get the desktop going, too — tap or click Desktop and then go back to the Start screen.
That gives you a few programs (er, apps — they mean exactly the same thing) to bounce around.
2a. If you’re using your finger, swipe slowly on the left edge and keep your finger pressed down.
2b. If you have a mouse, hover in the upper-left corner.
Windows shows you a thumbnail of the last program you ran, as shown in Figure 1-2.

Figure 1-2: A thumbnail of the last-run program appears in the upper left when you use a mouse.
The desktop counts as one program. Even if you have ten programs running on the desktop, there’s only one thumbnail for them all.
You can bring up the last-run program by either clicking the thumbnail, or slowly sliding farther out from the left, toward the center of the screen. This maneuver is pulling, and it can take a while to get used to it. Some screens respond better than others, and the grease on your fingers can make a difference.
If you drag an app to the right and it snaps into place beside the running app, drag the dotted line between the apps to the left. That gets rid of the split screen. I look at Tiled Metro Snap — the ability to display two (or more) running Metro programs side by side — in the last section in this chapter.
3a. If you’re using your finger, pull slowly from the left, and when the thumbnail appears, pull back just a bit.
This, too, is a difficult gesture with your finger(s), and it’s highly dependent on the touch sensitivity of your tablet. If you can’t get this gesture to work with a finger, try your thumb; if you can’t get it to work with your thumb, press and hold down the Windows button on your tablet. One way or another, you get to the right place.
3b. With your mouse hovering in the upper-left corner, slide it down the left edge of the screen but don’t click.
Windows rolls out a black carpet and puts thumbnails of all the other currently running programs on the left edge, as shown in Figure 1-3. The thumbnails and carpet are dubbed the Switcher.

Figure 1-3: Slide down the left to see thumbnails of all running programs.
Some subtleties are at work. If you’re looking at the Start screen when you slide your mouse along the left edge, there’s no thumbnail for the Start screen (as is the case in Figure 1-3). That’s what you’d expect. But if you slide on the left side while looking at any other app, a thumbnail for the Start screen appears at the bottom of the list. That makes it easy to get to the Start screen — it’s always on the bottom. But that also explains the behavior you see in the next step.
If you have a keyboard handy, there’s a much better way to look at program thumbnails and cycle through them. Hold down the Alt key and press Tab. If you’ve used earlier versions of Windows, you may know that’s the old CoolSwitch (see Figure 1-4), which has been switching Windows apps, er, programs, since Windows 3.0. Works like a charm, er, champ in Windows 8.1.

Figure 1-4: The old Alt+Tab Windows CoolSwitch still works.
The CoolSwitch has one distinct advantage over the slide-mouse-down-the-left approach: It treats each running desktop program as a separate program. If you slide on the left, the desktop as a whole appears as a single program.
4a. Use your finger or thumb to pull from the bottom-left edge of the screen toward the right. If you can get the black carpet thumbnail Switcher to appear, pull back just a touch to lock it in place.
4b. Hover your mouse in the lower-left corner and for added excitement, slide the mouse up on the left side of the screen.
If you’re looking at the Start screen when you hover your mouse in the lower left, you see a thumbnail for the last app that ran. In every other instance, when you hover the mouse in the lower-left corner, a thumbnail for the Start screen appears, as shown in Figure 1-5.
If you hover in the lower left, slide your mouse up the left side, or if you can get your screen to cooperate with the analogous pull and pullback gesture, you see the same black carpet and thumbnails of running programs — the Switcher — that you see in Figure 1-3.

Figure 1-5: Hover in the lower left to jump to the Start screen.
5. With a mouse, hover in the lower-left corner of the screen, and when the Windows icon appears, right-click.
The Advanced System menu or WinX menu (so-called because you can bring up the same menu from the keyboard by holding down the Windows key and tapping X) appears, as shown in Figure 1-6.

Figure 1-6: The Advanced System menu (or WinX menu) gives you quick access to many system functions, notably including many Control Panel applets.
6a. If you’re using your pinkies, swipe in from the right side of the screen.
6b. If you’re using a mouse, hover in the upper-right corner and then move your mouse down the right side of the screen.
In either case, you see another black carpet with the five so-called Windows charms icons: Search, Share, Start, Devices, and Settings, as shown in Figure 1-7.

Figure 1-7: Windows charms appear on the right side of the screen.
When you use a mouse, hovering in the upper right brings up silhouettes of the charms (I call them ghost charms, but never mind), which solidify only when you move your mouse down on the right.
As soon as the black carpet appears, Windows also shows you the time and date, and the current status of all the notification icons that appear on the lock screen (see Book II, Chapter 2).
As I mention in Book II, Chapter 1, the Start charm takes you to the Start screen. I talk about the other charms in detail in Book III, Chapters 2 (Search), 3 (Share), and 4 (Settings and Devices).
7a. Flip into Semantic Zoom by pinching the Start screen with your fingers and move back out by unpinching it.
7b. Perform the following with a mouse:
a. Click the tiny, tiny icon that looks like a minus sign, in the lower-right corner of your Start screen.
Your Start screen transmogrifies with Semantic Zoom.
b. Click an unoccupied piece of the Start screen to go back to regular zoom.
I talk about Semantic Zoom in the section “Organizing Your Start Screen” later in this chapter.
That concludes this portion of the ongoing Windows 8.1 tile demo. Please fasten your seatbelt and return your seat back to the fully upright position.
The Metro Start screen has one more action you can perform — bring up the App bar. You can bring up the App bar in any tiled application by sliding down from the top with your finger or up from the bottom, or right-clicking it.
The App bar on the Metro Start screen gives you the gateway to naming groups of apps. I talk about it in the next section.
Changing Tiles on the Start Screen
You can click and drag tiles anyplace you like on the Start screen. Drag a tile way off to the right, and you start a new group. Pin a new program to the Start screen (see the last section in this chapter), and its tile magically appears in the rightmost group on the Start screen.
You can change every tile, too. The actions available depend on what the creator of the tile permits. Here’s how to mangle a tile:
1. If you’re using your fingers, slide the tile down just slightly and then let go. If you have a mouse, right-click the tile you want to change.
In Figure 1-8, I selected the Metro Mail tile. A check mark appears in the upper-right corner of the tile, and an App bar for the tile appears at the bottom.
2. See Table 1-1 to determine which action(s) you want to take and then select the desired action.
3. If you would like to put a name above any of the groups of tiles, simply type it in the indicated spot.
4. To get rid of the App bar, tap or click on any blank spot on the Metro Start screen.
You immediately revert back to the Start screen in its original form, plus or minus the actions you’ve taken.

Figure 1-8: Control tiles individually.
Table 1-1 Tile Actions
|
Tile Action Name |
What the Action Does |
|
Unpin from Start |
Removes the tile from the Metro Start screen. Doesn’t affect the app itself. If you later change your mind, see the section “Organizing Your Start Screen” for details on how to bring back the tile. |
|
Uninstall |
Removes all vestiges of the program, using the desktop Control Panel’s Remove Programs. |
|
Resize |
Makes the tile icon large (four times the size of a normal tile, such as the IE tile in the figure), wide (same as the Mail tile), Medium (size of the IE tile), or small (size of the earphone tile for Metro Music). |
|
Pin to Taskbar |
Puts an icon for the app on the desktop’s taskbar (see Book VI, Chapter 2). This option is only available for programs that run on the old-fashioned desktop |
|
Turn Live Tile Off/On |
Stops/starts the animation that’s displayed on the tile. Stopping the active content can help reduce battery drain, but the big benefit is stifling obnoxious flickering tiles — of which there are many. |
Changing the Start Screen Background
Changing the color and pattern of the Start screen background couldn’t be simpler — if you know where to look. Here’s how:
1. Go to the Metro Start screen. Swipe from the right or hover your mouse in the upper-right corner to bring up the Charms bar, and then at the bottom, choose the Settings charm.
2. At the top of the Settings pane, tap or click the link that says Personalize.
The Personalize pane, as shown in Figure 1-9, appears.
Before you ask: I don’t have the beginning of a clue why Microsoft put the Metro Start screen settings here, when just about every other setting is in the Change PC Settings window. But I digress.

Figure 1-9: Change the Metro Start screen background here.
3. Select a background pattern from the patterns offered on the top.
Yes, I know they’re hard to see. Squint. If you want a solid color, click or tap the box on the bottom row, second from the right.
If you want the Metro Start screen background to match your old-fashioned desktop background, click the square in the lower-right corner. After you’ve made this selection, any time you change your old-fashioned desktop background, the Metro Start screen background will change as well.
Before you ask: I don’t have the beginning of a clue why Microsoft made syncing the backgrounds so incredibly inscrutable, buried in a tiny picture on an obscure pane.
Unless you find an add-in package that does this a little better, those are your only choices: The bizarre patterns, a solid color, or a copy of your old-fashioned desktop wallpaper.
4. Slide the Change Background Color slider to a color you can live with, and then drag the check mark to the specific shade that you would like. Do the same thing with the Accent color.
5. When you’re done, use your favorite method to go back to the Start screen.
The changes take effect immediately; you don’t need to click OK or Apply.
Organizing Your Start Screen
The beauty of the Start screen is that, within strictly defined limits, you can customize it like crazy. As long as you’re happy working with the basic building blocks — four sizes of tiles, and groups — you can slice and dice ’til the cows come home.
The hard part about corralling the Start screen is figuring out what works best for you.
Changing your picture
I start with an easy change to the Start screen: changing the picture in the upper-right corner.
Here’s how to change your picture:
1. Tap or click your name and then select Change Account Picture.
Windows takes you to a familiar-looking place in the PC Settings hierarchy, as shown in Figure 1-10.

Figure 1-10: Change your picture in PC Settings.
2. If you already have a picture in mind, follow these steps (if you’d rather take a picture, continue to Step 3):
a. Choose Browse and navigate to the picture.
You may need to choose Files, in order to navigate to the location.
b. When you find the picture you want, select it, and then tap or click Choose Image.
You return to the PC Settings location shown in Figure 1-10, with your new picture in place.
3. If you’d rather take a picture with your computer’s webcam, comb your hair, pluck your eyebrows, and tap or click Webcam (in that order).
In any case, however you create your new picture, it takes effect immediately — no need to click OK or anything of the sort.
Want a weird picture? Don’t have an avatar-generating source, like the Xbox? Try re-using an avatar that somebody’s posted on the Internet. Here’s the easy way:
1. In your favorite web browser, search for avatars and then switch to the image-viewing mode in your search engine, where you find tons and tons of them.
I found a picture I like in the Wikimedia Commons library on the web (see Figure 1-11).

Figure 1-11: The avatar from AJ Gonzalez that I want to grab.
2. Take a screen shot. When you find the picture you want, make sure the whole picture appears on the screen. Then hold down the Windows key and press Print Screen.
Windows puts a copy of the screen shot in your Pictures library.
3. On the Start screen, tap or click the Desktop tile. Over on the desktop, on the Taskbar at the bottom, tap or click the File Explorer icon — the one that looks like a bunch of file folders. Then go to your Pictures library, and select the screen shot you just made (it will have a name like Screenshot (1).png).
4a. With your fingers, tap the Home tab at the top, tap the Open icon in the Open section of the Explorer Ribbon, and choose Paint.
4b. With a mouse, right-click the picture and choose Open With⇒Paint.
You need to crop your picture, to take away all of the stuff in the screen shot except the avatar. Windows Paint is more than up to the task.
5. Tap or click the Select icon on the Ribbon and then draw a rectangle around the picture you want to use for your Start screen.
If you don’t get the rectangle the way you like the first time, don’t worry. Start over and try Step 5 again. When you start again, your old rectangle disappears.
6. When you have the picture framed properly, tap or click the Crop icon on the Paint Ribbon.
Your cropped picture takes over the whole Paint area.
7. Tap or click the Save icon — the tiny icon that looks like a floppy disk (eh, what’s THAT?) at the very top of the screen — and save the cropped picture in your Pictures library.
8. On the Start screen (press the Windows key on the keyboard, or the Windows button on your computer to bring it up), tap or click your name, and then choose Change Account Picture.
9. Tap or click Browse, and then choose Files⇒Pictures⇒Screenshots. Find your cropped picture, select it, and tap or click Choose Image.
There you go. You’ve just successfully perpetrated identity theft on a defenseless avatar.
Showing All Apps
Windows 8.1 introduces the ability to show all of your apps in one massive blob. It also has a couple of tricks for organizing the list of All Apps. Here’s how to approach it:
1. On the Metro Start screen, click or tap the funny down-arrow floating in the lower-left corner of the screen.
You may have to wave your mouse around the lower-left corner before the down-arrow appears.
Windows shows you a complete list of all of the programs (er, apps) on your computer, organized in alphabetical order, grouped according to the general category of app. Apps with tiles on the Metro Start screen come first, as in Figure 1-12.
2. Click or tap the down-arrow next to By Name at the top and choose By Category.
You see the same apps, but this time they’re grouped in a truly inscrutable hodge-podge.
3. Pick one of the apps — my favorite is the old Windows Calculator, which appears at the top of the Windows Accessories group — and either tap and slide it downward or right-click it.
You see the App Bar options shown in Figure 1-13.

Figure 1-12: The All Apps list.

Figure 1-13: Actions for apps that appear in the All Apps list. Say that ten times real fast.
4. If you want to put this particular program on your Metro Start screen, choose Pin to Start. If you want it to appear on the old-fashioned desktop’s Taskbar, choose Pin to Taskbar.
There’s no OK to click; the action takes place immediately.
Tiles that are pinned to the Metro Start screen appear on the far-right side of the screen. From there, you can click and drag them anywhere you like.
When you install a program in Windows 8.1, the installer sticks tiles for the program on this All Apps screen. For example, if you install Office 2010, the installer puts a new category on the All Apps screen called Microsoft Office, and sticks dozens of tiles (most of them useless) under that category. It’s up to you to go into the All Apps list, select the tiles that you want to appear on the Start screen and, for each, choose Pin to Start.
You’re supposed to be smart enough to know that you have to manually stick each tile that you want on the Metro Start screen.
Forming and naming your groups
After you have all of your tiles on the Metro Start screen, it’s easy to get your Metro Start screen organized. Try this:
1. Tap and drag (or click and drag) your tiles so similar tiles are in the same group.
For example, if you use Mail, Messaging, People, and Calendar all day long, put them in the same group. If you have Office installed, go through the procedure described in the preceding section to move the tiles you want over to the Metro Start screen.
Don’t worry just yet if the groups are in the wrong sequence: There are easy ways to move entire groups. Just concentrate on getting your similar tiles into the same group.
If you have programs that you look at constantly because they have important information — stock market results, your music playlist, Messenger notifications, or new Mail — keep them in one or two groups.
If you need to create a new group, drag a tile all the way over to the right. You see a faint vertical bar, which indicates that a new group has just been formed. Drop the tile to the right of the bar.
2. To give your groups names, on the Metro Start screen, right click or tap and drag down any tile.
Windows grays the screen a bit, and puts blocks above each group that say Name Group.
3. Type in each group’s name in the indicated box.
4. Click or tap anywhere on the screen.
The graying goes away, and your Metro Start screen suddenly has names for its groups, as in Figure 1-14.

Figure 1-14: It’s easy to add names for each of your groups of tiles.
Moving groups with Semantic Zoom
You may have discovered that, while you can move tiles around ’till the cows come home, you can’t move entire groups. In order to re-arrange the groups, you have to pop in to Semantic Zoom. Here’s how:
1. Switch to Semantic Zoom, where it’s easy to rearrange groups.
If you use a touch screen, pinch the screen.
If you have a mouse, click way, way down in the lower-right corner of the Start screen. (There’s a tiny icon that looks like a minus sign down there just waiting for you to find it.)
With a click or a pinch, you end up in a zoomed-out view of the Start screen that Microsoft dubs Semantic Zoom. (See Figure 1-15.)
While in Semantic Zoom, you can’t move tiles around or create new groups. But you can move the groups you have so they appear in any order.
2. Click and drag or tap and drag groups until they’re lined up the way you want them.

Figure 1-15: The Semantic Zoom view of your Start screen.
3. When you’re done rearranging groups, tap or click any empty place on the Start screen.
Sit back and enjoy your newly organized Start screen.
If you use the old-fashioned desktop more than the tiled side of Windows, I have a series of recommended steps for turning your Start screen into a lean, mean, not-quite-as-good-as-a-Win7-Start-menu machine, in Book VI, Chapter 3.
Don’t hesitate to go back and change the tiles and groups around. It’s easy, and you can fine-tune it to your heart’s content.
Working with Tiled Metro Snap
Windows has a new, odd way of running two — and possibly more — programs side by side. I call it Tiled Metro snap to distinguish it from Aero Snap (also known as Windows Snap). The easiest way to explain the difference, I think, is to show you what they look like.
Aero Snap has been around for several years; it involves snapping a desktop program to either the left or the right side of the desktop screen, by clicking and dragging the program’s window to the left or right edge of the screen. After an old-fashioned Windows “legacy” program has been Aero Snapped, it takes up exactly half of the screen. The resized window behaves just like any other window on the old-fashioned desktop: It can be resized, moved, maximized to take up the whole screen, and so on. Figure 1-16 shows an old-fashioned Windows program that’s been snapped to the right half of the screen.

Figure 1-16: Aero Snap is a quick way to resize an old-fashioned Windows program so it takes up half the screen.
Tiled Metro snap is similar to Aero Snap, but more rigid:
![]() Maximum number of snapped apps: To calculate how many apps you can Metro snap, take the width of your screen in pixels and divide by 500. Throw away the remainder. Thus, a screen that’s 1024 pixels wide can Metro snap two programs. A 1680 screen can handle three.
Maximum number of snapped apps: To calculate how many apps you can Metro snap, take the width of your screen in pixels and divide by 500. Throw away the remainder. Thus, a screen that’s 1024 pixels wide can Metro snap two programs. A 1680 screen can handle three.
![]() Cumbersome resizing: Tiled Metro snapped apps have a vertical bar between them. Click or tap and drag on the bar, and you increase the width of one app while decreasing the width of the other. Drag the bar far enough, and the pinched app closes. Visually, it looks like Figure 1-17.
Cumbersome resizing: Tiled Metro snapped apps have a vertical bar between them. Click or tap and drag on the bar, and you increase the width of one app while decreasing the width of the other. Drag the bar far enough, and the pinched app closes. Visually, it looks like Figure 1-17.
![]() No interactivity: Whereas apps snapped on the old-fashioned desktop can interact with each other — you can click and drag files or text from one to the other, for example — the apps in a Tiled Metro snap arrangement cannot. There’s no interaction between them, other than through the Share charm.
No interactivity: Whereas apps snapped on the old-fashioned desktop can interact with each other — you can click and drag files or text from one to the other, for example — the apps in a Tiled Metro snap arrangement cannot. There’s no interaction between them, other than through the Share charm.
Many apps don’t do well in a small space, although some may surprise you. Solitaire, for example, turns the card deck on its side — and the gameplay is good! The Music app, which looks horrible full screen, retreats into a reasonably usable playlist view if you Tile snap it.
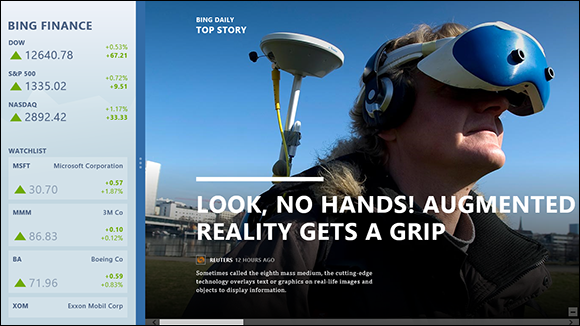
Figure 1-17: Two snapped tiled apps — read the Bing News while you watch your stocks on Bing Finance.
Here are the many ways to Tile snap a tiled app:
![]() Swipe or drag from the left side of the screen to bring up the most recently run program, and slowly drag it to the right. When the Tiled snap vertical bar appears, release the thumbnail. The thumbnail’s program gets Tile snapped on the left.
Swipe or drag from the left side of the screen to bring up the most recently run program, and slowly drag it to the right. When the Tiled snap vertical bar appears, release the thumbnail. The thumbnail’s program gets Tile snapped on the left.
![]() Bring up the running program thumbnails, in the black carpet Switcher I describe in the section “Touring the Start Screen” at the beginning of this chapter. There are many ways to show the Switcher. Tap or click one of the thumbnails and slowly drag the thumbnail to the right. When the Tiled snap vertical bar appears, release the thumbnail.
Bring up the running program thumbnails, in the black carpet Switcher I describe in the section “Touring the Start Screen” at the beginning of this chapter. There are many ways to show the Switcher. Tap or click one of the thumbnails and slowly drag the thumbnail to the right. When the Tiled snap vertical bar appears, release the thumbnail.
![]() With a mouse, click at the very top of a tiled app or at the very top of the desktop. Slowly pull the top down toward the middle of the screen. When the app turns into a big thumbnail, drag it to the left or right and then release. The app gets snapped next to the last-running program. You can do the same thing with your finger, swiping down slowly from the top.
With a mouse, click at the very top of a tiled app or at the very top of the desktop. Slowly pull the top down toward the middle of the screen. When the app turns into a big thumbnail, drag it to the left or right and then release. The app gets snapped next to the last-running program. You can do the same thing with your finger, swiping down slowly from the top.
![]() Bring up the running program thumbnails in the black carpet Switcher described earlier. Right-click the thumbnail you want to Tile snap and choose either Snap Left or Snap Right.
Bring up the running program thumbnails in the black carpet Switcher described earlier. Right-click the thumbnail you want to Tile snap and choose either Snap Left or Snap Right.
![]() If you have a keyboard, when you’re running a tiled app or when you’re working on the desktop, press down the Windows key and tap the period. The current app (or the desktop) gets snapped to the right.
If you have a keyboard, when you’re running a tiled app or when you’re working on the desktop, press down the Windows key and tap the period. The current app (or the desktop) gets snapped to the right.
To close out this section on Tiled snap, here are a few handy tips:
![]() You can’t Tile Metro snap the Start screen.
You can’t Tile Metro snap the Start screen.
![]() When you Tile snap the desktop into one of the small spaces, individual programs running on the desktop have their own thumbnails on the snapped screen. See Figure 1-18.
When you Tile snap the desktop into one of the small spaces, individual programs running on the desktop have their own thumbnails on the snapped screen. See Figure 1-18.
![]() You can make the apps switch sides (so the wide one is on the left or on the right) by dragging the vertical separating bar. If you drag the vertical separating bar all the way to the edge of the screen, the snapped app disappears, and the main app takes over the whole screen.
You can make the apps switch sides (so the wide one is on the left or on the right) by dragging the vertical separating bar. If you drag the vertical separating bar all the way to the edge of the screen, the snapped app disappears, and the main app takes over the whole screen.

Figure 1-18: The Tile snapped desktop shows each running program in its own small thumbnail.
Showing All Apps View All the Time
You can tell Windows that every time it jumps to the Metro Start screen, it should instead show the All Apps list. That may make some sense for you, if you don’t like the pretty tiles and would prefer to just deal with programs.
The big problem is that you could look for years and not find where that setting is hidden.
I haven’t the beginning of a clue (starting to sound familiar, eh?) why Microsoft put a Metro-only setting on the old-fashioned desktop, but that’s what we’ve got.
Microsoft took a lot of (well deserved!) flak for getting rid of the Windows 7 Start menu in Windows 8. In Windows 8.1, Microsoft pretended to mend its wayward ways by giving us the “next best thing” to a Start menu. Yeah, sure.
To set Windows so it shows the All Apps list when you would normally expect it to show the Metro Start screen, do this:
1. Go to the old-fashioned desktop.
If you’re looking at the Metro Start screen, tap or click the Desktop tile.
2. Right-click (or tap and hold) the taskbar at the bottom of the screen and choose Properties. Choose the Navigation tab.
The old-fashioned, tired, legacy Windows desktop (ahem!) brings up the Taskbar and Navigation Properties dialog box shown in Figure 1-19.

Figure 1-19: Roll over, Metro Start, the All Apps list is movin’ in.
3. Check the box marked Show the Apps View Automatically When I Go To Start.
That tells Metro to stop showing the Start screen automatically and instead show the All Apps list.
4. Click OK.
The change should be apparent immediately.
You may’ve noticed that I made a few changes to the default settings in Figure 1-19. Patience, grasshopper. I talk about them in Book VI, Chapter 3.
That’s the whole shtick.