
Chapter 4: Settings, Settings, More Settings, and Devices
In This Chapter
![]() Using common settings
Using common settings
![]() Diving in to the Settings page
Diving in to the Settings page
![]() How Settings works in the apps
How Settings works in the apps
![]() Taking control of your devices
Taking control of your devices
Windows has settings. Boy howdy, does it have settings.
 The desktop’s Control Panel — long the bastion of Windows settings, through many generations of Windows — controls the lion’s share of settings on a Windows PC. The new Settings charm controls several hundred settings. And — get this — there’s a bit of overlap between the two, but some settings can only be made on the Metro tiled side of the fence, and other settings can only be made on the old-fashioned desktop side.
More confounding: Some of the settings that only affect the Metro side can only be made on the desktop side. Bizarre!
Although the Settings charm controls some of the settings in Windows, the settings you find via the Settings charm are key to using the Metro tiled side of Windows and the tiled apps properly. They also have an impact on the old-fashioned desktop side of the fence, too.
In this chapter, I talk about the settings that you can access with the Settings charm from the tiled Start screen. If you can’t find the setting you want here, flip to Book VII, Chapter 1.
Using the Settings Charm
No matter where you are in Windows, the Settings charm gives you immediate access to six common settings, plus a hook to get into more settings. Here’s how to use the charm:
1. Swipe from the right or hover your mouse in the upper-right corner (or hold down the Windows key and press I) to bring up the Charms bar, and then at the bottom, choose the Settings charm.
You see the Settings pane, with six icons at the bottom. See Figure 4-1. Table 4-1 describes what each icon does.
2. Choose one of the following: any icon, one of the options at the top (which vary depending on where you’re located inside Windows), or Change PC Settings at the bottom.
3. To close the Settings pane, tap or click anywhere outside the pane.
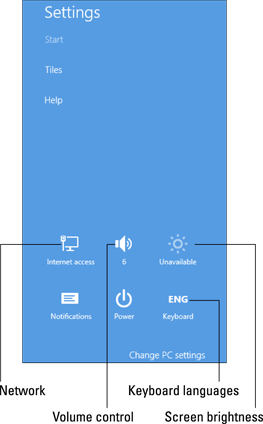
Figure 4-1: The six icons that are always in the Settings pane.
Table 4-1 Actions for the Settings Pane Icons
|
Icon |
Action |
|
Network |
Verify your network connection, connect to a different network, switch to Airplane mode, turn sharing on or off (right-click the connection; see Book VII, Chapter 5). Tap and hold, or right-click the specific connection to see how much data you’ve used since you last reset the counter. |
|
Volume |
Set the overall system volume. |
|
Brightness |
Sliding scale, not available on desktop PCs. |
|
Notifications |
Master switch that turns notifications on or off for all the apps that can produce notifications (see Book II, Chapter 3). |
|
Power |
Sleep, Shut Down, Restart (if you have updates waiting, the options change to Update and Shut Down, and Update and Restart). Some people recommend that you turn off your PC through this icon. I figure it’s easier to use the account picture. |
|
Language |
Change the way keystrokes are interpreted (to use keyboards in different languages) but without changing date or time formats. |
 Some mobile broadband providers have applications that notify you when you’re reaching your monthly data cap. The notifications appear as toaster fly-ins from the right of the screen, or as live tiles on the Windows logon screen or Start screen. If your service provider has such an app, it’s well worth seeking.
Changing PC Settings
At the bottom of the Settings pane is the Change PC Settings link. Tap or click it, and the PC Settings page, as shown in Figure 4-2, appears.
 The PC Settings page is a remarkable collection of settings, arranged in a way that’s infinitely more accessible — but arguably less logical — than the old-fashioned desktop Control Panel. On the left, you see these categories:
![]() PC and Devices: From here, you can change the lock screen, which appears whenever your PC resumes from Sleep (see Book II, Chapter 2); the Metro Start screen (see Book III, Chapter 1); or your account picture (see Book III, Chapter 1). You can set your display resolution, or invoke multiple displays, add devices (such as printers), make minor changes to your mouse’s behavior (for example, swap the left and right buttons), turn autocorrect on or off, alter the way apps are switched and turn off the distracting Charms bar when your mouse moves to the upper-right part of the screen; make power settings, set default behavior when you plug certain devices into your PC, and display standard information about your PC. I talk about devices in the final section of this chapter.
PC and Devices: From here, you can change the lock screen, which appears whenever your PC resumes from Sleep (see Book II, Chapter 2); the Metro Start screen (see Book III, Chapter 1); or your account picture (see Book III, Chapter 1). You can set your display resolution, or invoke multiple displays, add devices (such as printers), make minor changes to your mouse’s behavior (for example, swap the left and right buttons), turn autocorrect on or off, alter the way apps are switched and turn off the distracting Charms bar when your mouse moves to the upper-right part of the screen; make power settings, set default behavior when you plug certain devices into your PC, and display standard information about your PC. I talk about devices in the final section of this chapter.
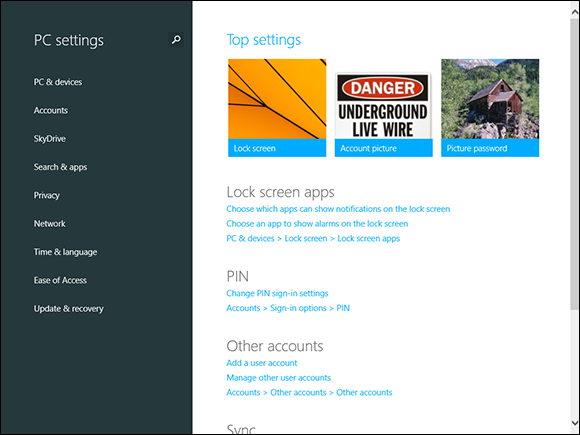
Figure 4-2: The treasure trove of Start screen–based settings.
![]() Accounts: Lets you disconnect a Microsoft account, set your account picture, and change information about your account with Microsoft’s account database in the sky. Find options that enable you to add a new standard user (you have to use the Control Panel to change a standard account into an administrator account, as I explain in Book II, Chapter 4), change your password or switch to a picture or PIN password (flip to Book II, Chapter 4), or switch between a Microsoft account and a local account (see Book II, Chapter 5).
Accounts: Lets you disconnect a Microsoft account, set your account picture, and change information about your account with Microsoft’s account database in the sky. Find options that enable you to add a new standard user (you have to use the Control Panel to change a standard account into an administrator account, as I explain in Book II, Chapter 4), change your password or switch to a picture or PIN password (flip to Book II, Chapter 4), or switch between a Microsoft account and a local account (see Book II, Chapter 5).
![]() SkyDrive: Shows you how much room you have left on SkyDrive, sets SkyDrive as your default save location, and lets you control upload of photos to SkyDrive. If you log in to Windows using a Microsoft account and confirm that the PC you’re using is a “trusted” PC, this section lets you control precisely what’s being synced as you move from PC to PC, logging in with your Microsoft account along the way. In many situations, you likely don’t want to sync everything — maybe not sync anything. Details are in Book II, Chapter 5.
SkyDrive: Shows you how much room you have left on SkyDrive, sets SkyDrive as your default save location, and lets you control upload of photos to SkyDrive. If you log in to Windows using a Microsoft account and confirm that the PC you’re using is a “trusted” PC, this section lets you control precisely what’s being synced as you move from PC to PC, logging in with your Microsoft account along the way. In many situations, you likely don’t want to sync everything — maybe not sync anything. Details are in Book II, Chapter 5.
![]() Search & Apps: Clear your search history. Turn off Smart Search — the Bing-feeding privacy-busting “feature” I rail against in Book II, Chapter 3, and several other places. You can turn on SafeSearch if you don’t want to see too much flesh as a result of Bing searches. There’s a list of Share Charm-enabled apps that you can modify to turn off sharing behavior (see Book III, Chapter 2). You can control notifications (which appear on your lock screen and also occasionally toaster-style from the right) on and off, both overall and for individual tiled apps. See Book II, Chapter 3. This section also gives you an overview of how much space is being consumer by individual apps (tiny, compared to all the data you no doubt have), and — at least in theory — you can set your default apps for web browsing, mail, music and video playing, the calendar, and the like.
Search & Apps: Clear your search history. Turn off Smart Search — the Bing-feeding privacy-busting “feature” I rail against in Book II, Chapter 3, and several other places. You can turn on SafeSearch if you don’t want to see too much flesh as a result of Bing searches. There’s a list of Share Charm-enabled apps that you can modify to turn off sharing behavior (see Book III, Chapter 2). You can control notifications (which appear on your lock screen and also occasionally toaster-style from the right) on and off, both overall and for individual tiled apps. See Book II, Chapter 3. This section also gives you an overview of how much space is being consumer by individual apps (tiny, compared to all the data you no doubt have), and — at least in theory — you can set your default apps for web browsing, mail, music and video playing, the calendar, and the like.
![]() Privacy: A grandstanding set of settings, with no access at all to Smart Search. You can block app access to your name and picture, turn on and off location tracking, and keep your webcam and microphone locked up.
Privacy: A grandstanding set of settings, with no access at all to Smart Search. You can block app access to your name and picture, turn on and off location tracking, and keep your webcam and microphone locked up.
![]() Network: Shows minimal information about your current network, lets you add a VPN connection, run through a proxy server, or (in Windows 8.1 Pro) connect to a domain. Also lets you join a HomeGroup (see Book VII, Chapter 5).
Network: Shows minimal information about your current network, lets you add a VPN connection, run through a proxy server, or (in Windows 8.1 Pro) connect to a domain. Also lets you join a HomeGroup (see Book VII, Chapter 5).
![]() Time and Language: Set your time zone, manually change the date and time, set date and time formats, and add keyboards in different languages.
Time and Language: Set your time zone, manually change the date and time, set date and time formats, and add keyboards in different languages.
![]() Ease of Access: Microsoft has long had commendable aids for people who need help seeing, hearing, or working with Windows. All the settings are here.
Ease of Access: Microsoft has long had commendable aids for people who need help seeing, hearing, or working with Windows. All the settings are here.
![]() Update and Recovery: An abbreviated form of the Automatic Update settings found in the Control Panel. See my contrarian opinion about Windows Automatic Update in Book VIII, Chapter 3. You can turn File History on and off from this location (see Book VIII, Chapter 1).
Update and Recovery: An abbreviated form of the Automatic Update settings found in the Control Panel. See my contrarian opinion about Windows Automatic Update in Book VIII, Chapter 3. You can turn File History on and off from this location (see Book VIII, Chapter 1).
 Remarkably, this section also includes (be careful!) links to refresh or reinstall Windows on your PC. Don’t accidentally choose one of these, okay? Details in Book VIII, Chapter 2.
All in all, it’s a well-thought-out subset of the settings that you may want to use, particularly if you spend most of your time on the tiled Metro side of Windows.
Touring the Start Screen Settings
The Settings charm (like all the charms except the Start charm) changes depending on where you are and what app you’re using. Here’s a brief rundown of what the charm does in the different apps:
![]() If you’re on the desktop and you bring up the Settings charm, you get a direct link into the desktop Control Panel (see the top of Figure 4-3). The other two entries — Personalization and PC Info — are just links to the corresponding piece of the Control Panel.
If you’re on the desktop and you bring up the Settings charm, you get a direct link into the desktop Control Panel (see the top of Figure 4-3). The other two entries — Personalization and PC Info — are just links to the corresponding piece of the Control Panel.
![]() If you bring up the Settings charm while you’re in Windows 8.1’s tiled Metro Mail, Calendar, or People apps, you can add e-mail accounts or control permissions for the tiled app (to use your webcam and microphone, and to run in the background even if the PC is locked). I talk about those tiled apps in Book IV, Chapter 2.
If you bring up the Settings charm while you’re in Windows 8.1’s tiled Metro Mail, Calendar, or People apps, you can add e-mail accounts or control permissions for the tiled app (to use your webcam and microphone, and to run in the background even if the PC is locked). I talk about those tiled apps in Book IV, Chapter 2.
![]() The Settings charm in the Windows 8.1 Photos app controls a small set of details, including shuffling photos on the Photos tile in the Start screen, and where the app can show Notifications. See Book IV, Chapter 3.
The Settings charm in the Windows 8.1 Photos app controls a small set of details, including shuffling photos on the Photos tile in the Start screen, and where the app can show Notifications. See Book IV, Chapter 3.
![]() By contrast, the Settings charms in Xbox Music and Xbox Video primarily concern themselves with all the wonderful ways you can spend more money with Microsoft.
By contrast, the Settings charms in Xbox Music and Xbox Video primarily concern themselves with all the wonderful ways you can spend more money with Microsoft.
![]() In the tiled, full-screen Metro Internet Explorer, the Settings charm offers a subset of all the settings that are available in the desktop IE version. For example, you can clear your browsing history, turn off the physical location sensing, set zoom to make text bigger or smaller, and change the encoding method for non-Latin characters.
In the tiled, full-screen Metro Internet Explorer, the Settings charm offers a subset of all the settings that are available in the desktop IE version. For example, you can clear your browsing history, turn off the physical location sensing, set zoom to make text bigger or smaller, and change the encoding method for non-Latin characters.
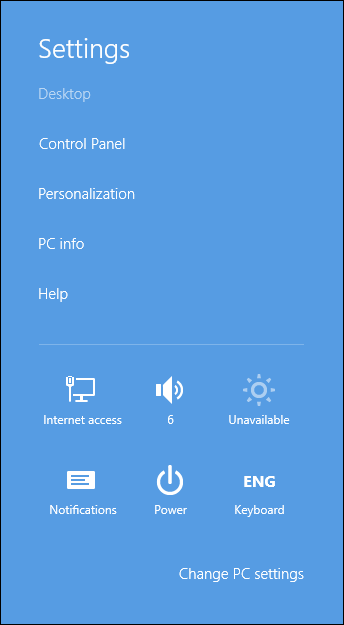
Figure 4-3: The desktop’s Settings pane.
Here are a few more minor settings:
![]() Metro Weather, in the Settings charm, lets you switch between Fahrenheit and Celsius.
Metro Weather, in the Settings charm, lets you switch between Fahrenheit and Celsius.
![]() Metro News turns on and off the ability to read articles offline.
Metro News turns on and off the ability to read articles offline.
Doing the Devices Charm
Most people go to the Metro Start screen, bring up the Devices charm, click on one of the offered entries — see Figure 4-4 — get an error message — You Can Only Play from Apps, for example — and figure the Devices charm is broken.
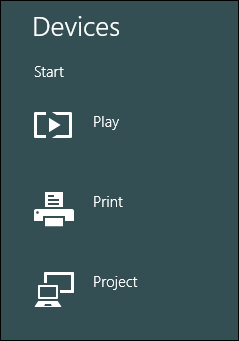
Figure 4-4: The Devices charm may underwhelm at first.
Not so.
Unlike most of the other Charms, the Devices charm shows options that aren’t even remotely applicable in the specific context: Clicking or tapping Devices/Play will only play media if you’re in one of the tiled Metro media apps.
And, of course, if you’re in one of the Metro media apps, you don’t need a Devices charm to play a song or a video clip. Duh.
If you bring up a tiled app — say, the tiled, full-screen Metro Internet Explorer — you’re likely to see printer(s) attached to your computer, or your network, and more devices accessible to the app. In the case of IE, you can access all your printing devices: printers and other sorta-printer-like things, possibly including OneNote and Microsoft’s XPS Document writer (don’t ask — it isn’t worth your effort trying to figure out XPS). You can see a typical list in Figure 4-5.

Figure 4-5: A list of devices (including many phantom printers, long deceased) appears on the tiled full-screen Metro Internet Explorer’s Devices pane.
The tiled Internet Explorer is designed to work with the Devices list to print a web page. Similarly, Windows 8.1’s Photos app works with Devices to print photos. The precise procedure isn’t exactly obvious from any descriptions that I’ve seen, but here’s how to print a picture in Photos:
1. Open the tiled Photos app. Navigate to the photo you want to print and select it (tap or click it).
If you forget to select a specific photo, the Device charm’s Printer option will tell you “This app can’t print right now,” instead of saying something like, “Choose a photo or photos for printing.” Really great human interface design, eh?
2. Swipe from the right or hover your mouse in the upper-right corner of the screen (or hold down the Windows key and press C).
The black carpet and the Charms bar appear.
3. Choose the Devices charm.
You see an abbreviated list of recently available printers, plus a few odds ’n ends, as shown in Figure 4-5.
4. Choose the device you want to use to print.
Windows shows you the print options screen, which can vary depending on the printer. Figure 4-6 shows a sample.

Figure 4-6: A typical print screen.
5. Make any changes you like and then tap or click Print.
The entire page prints.
As of this writing, with a few small exceptions — for example, setting up a second screen — the Devices charm doesn’t work with anything on the old-fashioned desktop.