
Chapter 2: A Fresh Start: Restore and Reset
In This Chapter
![]() Refreshing, resetting, and restoring your PC
Refreshing, resetting, and restoring your PC
![]() Introducing the Windows Recovery Environment
Introducing the Windows Recovery Environment
In this chapter, I look at how you can bring back to life a computer that’s been possessed. (This chapter doesn’t talk about bringing files back from the dead. That’s the purview of Book VIII, Chapter 1.)
 If you’ve worked with Windows for any length of time at all, you know that from time to time Windows PCs simply go out to lunch . . . and stay there. The problem could stem from a bad drive, or a scrambled Registry entry, or a driver that’s suddenly taken on a mind of its own, a revolutionary new program that’s throwing its own revolution, or that dicey tuna sandwich you had for lunch.
Windows is a computer program, not a Cracker Jack toy, and it will have problems. The trick lies in making sure that you don’t have problems, too. This chapter walks you through the important tools you have at hand to make Windows do what you need to do, to solve problems as they (inevitably!) occur.
 If you’re the family’s resident voodoo doctor — or the Windows go-to-gal in the office — this chapter can save your hide.
Microsoft has gone through a great deal of effort to make restoring a recalcitrant PC much simpler than ever before. The goal is to keep you out of the details and let Windows handle it: Computer, heal thyself, as it were. To a large degree, Microsoft has succeeded.
The Three R’s — and a Fourth RE
When resuscitating a machine with Windows gone bad, consider the three R’s — Reset, Refresh, and Restore. Two of them are readily available, but they make major changes to your machine. One’s not nearly so destructive, but it’s harder to understand and use.
Here are the three R’s that every Windows medic needs to know, starting with the most destructive:
![]() Reset removes everything on your PC and re-installs Windows. Your programs, data, and settings all get wiped out — they’re irretrievably lost. This is the most drastic thing you can do with your computer, short of shooting it. (Did you see that viral video of the guy shooting his daughter’s laptop? I digress.) If you like, you can tell Reset to do a thorough reformatting of the hard drive, in which case, random patterns of data are written to the hard drive to make it almost impossible to retrieve anything you used to store on the disk.
Reset removes everything on your PC and re-installs Windows. Your programs, data, and settings all get wiped out — they’re irretrievably lost. This is the most drastic thing you can do with your computer, short of shooting it. (Did you see that viral video of the guy shooting his daughter’s laptop? I digress.) If you like, you can tell Reset to do a thorough reformatting of the hard drive, in which case, random patterns of data are written to the hard drive to make it almost impossible to retrieve anything you used to store on the disk.
![]() Refresh keeps some Windows settings (accounts, passwords, the desktop, Internet Explorer favorites, wireless network settings, drive letter assignments, and BitLocker settings) and all personal data (in the User folder). It wipes out all programs and then restores the apps available in the Windows Store (primarily the tiled apps). This one’s pretty drastic, too, but at least it keeps the data stored in the most common locations — Documents folder, the desktop, Downloads, and the like. And as an added bonus, the Refresh routine keeps a list of the apps it zapped and puts that list on your desktop, so you can look at it when your machine’s back to its chirpy self.
Refresh keeps some Windows settings (accounts, passwords, the desktop, Internet Explorer favorites, wireless network settings, drive letter assignments, and BitLocker settings) and all personal data (in the User folder). It wipes out all programs and then restores the apps available in the Windows Store (primarily the tiled apps). This one’s pretty drastic, too, but at least it keeps the data stored in the most common locations — Documents folder, the desktop, Downloads, and the like. And as an added bonus, the Refresh routine keeps a list of the apps it zapped and puts that list on your desktop, so you can look at it when your machine’s back to its chirpy self.
If you’ve tried to bring back an older Windows machine from purgatory, in previous years, you may have encountered System Restore. In fact, System Restore still exists, but Microsoft really doesn’t want you to use it. Refresh is a combination of System Restore, safe mode, Recovery Console, and all sorts of minor earlier system recovery techniques, wrapped into one neat one-click bundle — with none of the hassles, but none of the old controls.

![]() Restore is very hard to find — Microsoft doesn’t want everyday users to find it — but it rolls Windows back to an earlier restore point, which I describe in the section “Restoring to an Earlier Point” later in this chapter. Restore doesn’t touch your data or programs; it simply resets the Registry to an earlier point in time. If your problems stem from a bad driver or a problematic program change you made recently, Restore may do all you need. If you’re familiar with earlier versions of Windows, the Windows 8.1 Restore is almost identical to Restore in the earlier version; you just access it a little differently.
Restore is very hard to find — Microsoft doesn’t want everyday users to find it — but it rolls Windows back to an earlier restore point, which I describe in the section “Restoring to an Earlier Point” later in this chapter. Restore doesn’t touch your data or programs; it simply resets the Registry to an earlier point in time. If your problems stem from a bad driver or a problematic program change you made recently, Restore may do all you need. If you’re familiar with earlier versions of Windows, the Windows 8.1 Restore is almost identical to Restore in the earlier version; you just access it a little differently.
Why does Microsoft make it hard to find Restore? As far as I know, the logic goes something like this: If you don’t use Restore right, you can shoot your machine; in which case, you’ll bother the folks at Microsoft mercilessly and accuse them of all sorts of mean things. Even if you do use Restore right, it fixes only a small percentage of all Windows-breaking problems, so if you try Restore and it doesn’t work, you’ll also bother the folks at Microsoft mercilessly — a classic lose-lose situation for the company. Importantly, there’s nothing analogous to Restore with any competing operating system, tablet, or phone. The iPad doesn’t have anything that resembles Restore; Android tablets and phones aren’t in any shape to Restore; OS X wouldn’t know a Restore from a hole in the ground; and my Linux friends start tittering obnoxiously anytime I say “Restore.” In short, only Windows has a Registry, and Restore works almost exclusively on the Registry, so only Windows needs a Restore. There’s not much competitive benefit to offering Restore to the average Windows consumer — and a lot of downside.
All three of these resuscitation methods play out in the Windows Recovery Environment (WRE), a special proto-Windows system. If you run Reset or Refresh, you won’t even know that WRE is at work behind the scenes, but it’s there.
When there’s trouble and Windows can’t boot normally, Windows instead boots into WRE, not into Windows itself. WRE has the special task of giving you advanced tools and options for fixing things that have gone bump in the night.
Reset, Refresh, and Restore — and several more (Recycle, Re-Use, Reduce?) are available in WRE.
I talk about WRE — and your advanced boot options — toward the end of this chapter.
Refreshing Your PC
You don’t really know or care about restore points, and you don’t want to dig in to Windows to make it work right. Mostly, you just want a one-tap (or click) solution that reams out the old, replaces it with known good stuff, and doesn’t destroy your files in the process. That’s what Microsoft has tried to offer with Refresh.
Have I got a Refresh for you. Here are the ground rules. Don’t say I didn’t warn you.
Running Refresh keeps all these:
![]() Many of your Windows settings: These include accounts and passwords, backgrounds, wireless network connections and their settings, BitLocker settings and passwords, drive letter assignments, and your Windows installation key.
Many of your Windows settings: These include accounts and passwords, backgrounds, wireless network connections and their settings, BitLocker settings and passwords, drive letter assignments, and your Windows installation key.
![]() Files in the User folder: That includes files in every user’s Documents folder, the desktop, Downloads, and so on. Refresh also keeps folders manually added to the root of the C: drive, such as C:MyData. Refresh keeps File History versions, and it keeps folders stored on drives and in partitions that don’t contain Windows (typically, that means Refresh doesn’t touch anything outside of the C: drive).
Files in the User folder: That includes files in every user’s Documents folder, the desktop, Downloads, and so on. Refresh also keeps folders manually added to the root of the C: drive, such as C:MyData. Refresh keeps File History versions, and it keeps folders stored on drives and in partitions that don’t contain Windows (typically, that means Refresh doesn’t touch anything outside of the C: drive).
 Files that aren’t kept can be retrieved for several weeks from the C:Windows.old folder. Yes, Microsoft keeps a secret stash of the files that it really wants to delete — and it’s up to you to find them, if something disappears unexpectedly.
![]() Apps from the Windows Store: Their settings are saved, too. So if you’re up to the 927th level of Cut the Rope before you run a Refresh, afterward, you’re still at the 927th level.
Apps from the Windows Store: Their settings are saved, too. So if you’re up to the 927th level of Cut the Rope before you run a Refresh, afterward, you’re still at the 927th level.
Running Refresh destroys all these:
![]() Many of your Windows settings: Display settings, firewall customizations, and file type associations are wiped out. Windows has to zap most of your Windows settings because they could be causing problems.
Many of your Windows settings: Display settings, firewall customizations, and file type associations are wiped out. Windows has to zap most of your Windows settings because they could be causing problems.
![]() Files — including data files — not in the User folder: If you have files tucked away in some unusual location, don’t expect them to survive the Refresh.
Files — including data files — not in the User folder: If you have files tucked away in some unusual location, don’t expect them to survive the Refresh.
![]() Desktop apps — basically anything that you didn’t install from the Windows Store: Their settings disappear, too, including the keys you need to install them, passwords in such programs as Outlook — everything. You need to re-install them all.
Desktop apps — basically anything that you didn’t install from the Windows Store: Their settings disappear, too, including the keys you need to install them, passwords in such programs as Outlook — everything. You need to re-install them all.
The Refresh routine, helpfully, makes a list of the programs that it identifies on the kill list and puts it on your desktop.
Here’s how to run Refresh:
1. Make very, very sure you understand what will come through and what won’t.
See the preceding bullet lists.
2. From the Start screen, swipe from the right or hover your mouse in the upper-right corner.
3. Choose the Settings charm; at the bottom, tap or click Change PC Settings; on the left, tap or click Update and Recovery.
At the bottom of the Update and Recovery list is the Recovery setting, as shown in Figure 2-1.
4. Under the heading Refresh Your PC Without Affecting Your Files (which is only a slight exaggeration), tap or click Get Started.
The message in Figure 2-2 appears; take it to heart.

Figure 2-1: Run Refresh from the tiled side of the fence.

Figure 2-2: What won’t make it through Refresh.
5. Tap or click Next, and then tap or click Refresh.
The whole process takes about ten minutes on a reasonably well-seasoned PC, but it can take longer, particularly on a slow tablet.
When Refresh is done, you end up on the Windows Log in screen.
6. Tap or click the Desktop tile, and then tap or double-click the new Removed Apps file on the desktop.
Your default browser appears and shows you a list of all the programs it identified that didn’t make it through the Refresh.
If Windows 8.1 can’t boot normally, you’re tossed into the Windows Recovery Environment. See the last section in this chapter for a description of how to start Refresh from the Windows Recovery Environment.
Resetting Your PC
Running Reset is very similar to running Refresh except . . .
 Warning! Warning! Danger, Will Robinson! Resetting your PC wipes out everything and forces you to start all over from scratch. You even have to enter new account names and passwords, and re-install everything, including Windows Store apps.
If you’re selling your PC, giving it away, or even sending it off to a recycling service, Reset is a good idea. If you’re keeping your PC, only attempt Reset when you’ve run two or more refreshes, and they haven’t solved the problem. Reset is very much like a clean install (which I discuss in Book I, Chapter 4). You’re nuking everything on your PC.
With that as preamble, here’s how to nuke, er, reset your PC:
1. Make very, very sure you understand that your PC will turn out like a brand-new PC, fresh off the store shelves. Also make sure that you have your 25-character Windows installation key.
Absolutely nothing survives the wipeout.
2. From the Start screen, swipe from the right or hover your mouse in the upper-right corner.
3. Choose the Settings charm; at the bottom, tap or click Change PC Settings; and on the left, tap or click Update and recovery.
At the bottom of the list is the Recovery setting, as shown in Figure 2-1.
4. Under the heading Remove Everything and Reinstall Windows, tap or click Get Started.
The Reset routine shows a warning message, per Figure 2-3. Heed it well.

Figure 2-3: Nothing makes it through Reset.
5. Tap or click Next.
Refresh asks whether you want to merely delete your old files or whether you want to positively nuke them, as shown in Figure 2-4.
• The Just Remove My Files option reformats the hard drive, but as you no doubt know, data can be recovered from a reformatted hard drive.
• The Fully Clean the Drive option writes random data on every sector of the hard drive. Although, in theory, the NSA may be able to reconstruct what’s on the hard drive, in practice, it’ll be very difficult (but not impossible!) to retrieve anything.
PCs with solid state drives will be handled correctly, in accordance with your instructions.
6. Tap or click the Just Remove My Files option or the Fully Clean the Drive option, depending on your intended disposition of the PC; then tap or click Reset.
The Just Remove My Files option takes about five minutes on a PC with a small hard drive. The Fully Clean the Drive option can take hours. Many hours.
Regardless of which option you choose, when Reset is done, you end up staring at a screen that asks for your product key. Now that’s a complete, scorched-earth install.

Figure 2-4: How thoroughly do you want to wipe out your old hard drive?
Restoring to an Earlier Point
If you’ve used an earlier version of Windows, you may have stumbled upon the System Restore feature. Windows 8.1 has full support for System Restore and restore points; it just hides all the pieces from you.
Why? Because Microsoft spends a fortune every year answering phone calls and e-mail messages from people who bork System Restore. Instead of trying to handle all the picayune questions — and there are hundreds of thousands of them — Microsoft said, “That’s enough!” and invented Refresh.
With a few exceptions, Refresh takes you all the way back in time to when you first set up your PC; it adds the Windows 8.1 tiled apps that ship with Windows, and it’s careful not to step on your data. Aside from a few Windows settings, that’s about it. Refresh is a sledgehammer, when sometimes the tap of a fingernail may be all that you need.
Smashing with a sledgehammer is easy. Tapping your fingernail requires a great deal more finesse. And that brings me to System Restore in Windows 8.1.
If you’ve enabled System Protection, Windows takes snapshots of its settings, or restore points, before you make any major changes to your computer — install a new hardware driver, perhaps, or a new program. You can roll back your system settings to any of the restore points.
A restore point contains Registry entries and copies of certain critical programs including, notably, drivers and key system files — a snapshot of crucial system settings and programs. When you roll back (or, simply restore) to a restore point, you replace the current settings and programs with the older versions.
When Windows can tell that you’re going to try to do something complicated, such as install a new network card, it sets a restore point — as long as you have System Protection turned on. Unfortunately, Windows can’t always tell when you’re going to do something drastic — perhaps you have a new CD player and the instructions tell you to turn off your PC and install the player before you run the setup program. So it doesn’t hurt one little bit to run System Restore — er, System Protection — from time to time, and set a restore point, all by yourself.
Creating a restore point
Here’s how to create a restore point:
1. Wait until your PC is running smoothly.
No sense in having a restore point that propels you out of the frying pan and into the fire, eh?
2. On the Start screen (yes, the Start screen, not the desktop), type restore point.
The first result in Windows Search is Create a Restore Point.
3. Tap or click the Create a Restore Point tile.
Windows flips you over to the desktop, brings up the System Properties Control Panel dialog box, and opens it to the System Protection tab. (Cool, huh? Sometimes it’s much easier to use the tiled side of Windows 8.1.) See Figure 2-5.

Figure 2-5: The hard-to-find System Restore command point.
4. If you haven’t yet enabled restore points (the Protection column says Off), click the Configure button, click Turn on System Protection, and click OK.
That will set the Protection column to On and activate restore points for that particular drive.
5. At the bottom, next to Create a Restore Point Right Now, tap or click the Create button.
The Create a Restore Point dialog box appears (see Figure 2-6).

Figure 2-6: Give your restore point a name.
6. Type a good description and then tap or click Create.
Windows advises that it’s creating a restore point. When it’s done, it shows a message that says The Restore Point Was Created Successfully.
7. Tap or click Close on the message and then tap or click the X button to close the System Properties dialog box.
Your new restore point is ready for action.
Rolling back to a restore point
If you don’t mind getting your hands a little dirty, the next time you think about running Refresh, see whether you can roll your PC back to a previous restore point, manually, and get things working right. Here’s how:
1. Save your work and then close all running programs.
System Restore doesn’t muck with any data files, documents, pictures, or anything like that. It works only on system files, such as drivers, and the Registry. Your data is safe. But System Restore can mess up settings, so if you recently installed a new program, for example, you may have to install it again after System Restore is done.
2. On the Start screen, type restore point.
The first result in Windows Search is Create a Restore Point.
3. Tap or click the Create a Restore Point tile.
Windows flips you over to the desktop, brings up the System Properties Control Panel dialog box, and opens it to the System Protection tab (refer to Figure 2-5).
4. Near the top, tap or click the System Restore button.
The System Restore wizard appears, as shown in Figure 2-7.
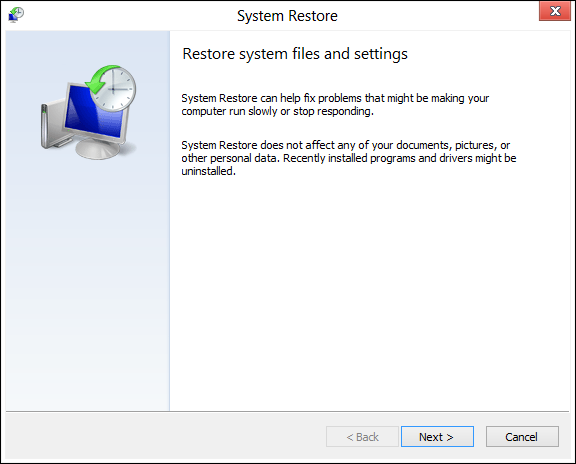
Figure 2-7: See, wizards are in Windows 8.1.
5. Tap or click Next.
A list of recent restore points appears, as shown in Figure 2-8.
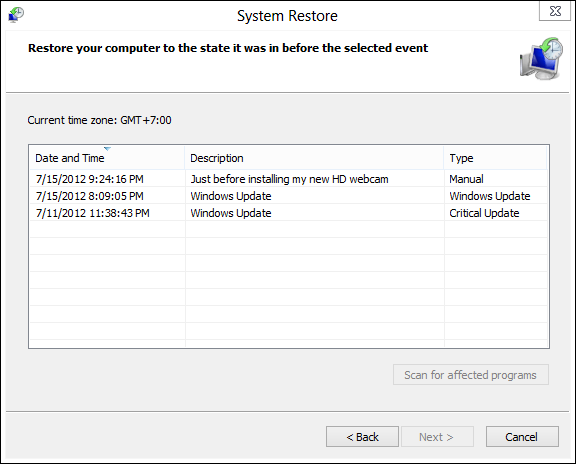
Figure 2-8: The latest restore point isn’t always the best restore point.
6. Before you roll your PC back to a restore point, tap or click to select the restore point you’re considering and then tap or click the Scan for Affected Programs button.
System Restore tells you which programs and drivers have system entries (typically in the Registry) that will be altered and which programs will be deleted if you select that specific restore point. See Figure 2-9.

Figure 2-9: Windows can scan the restore point to see what programs will be affected by rolling back to it.
7. If you don’t see any major problems with the restore point — it doesn’t wipe out something you need — tap or click Close, and then tap or click Next.
(If you do see a potential problem, go back and choose a different restore point, or consider using Refresh, as I describe earlier in this chapter.)
System Restore asks you to confirm your restore point. You’re also warned that rolling back to a restore point requires a restart of the computer and that you should close all open programs before continuing.
8. Follow the instructions to save any open files, close all programs, and then tap or click Finish.
True to its word, System Restore reverts to the selected restore point and restarts your computer.
System Restore is a nifty feature that works very well. The folks at Microsoft figure it’s too complicated for the general computer- and tablet-buying consumer public. They may be right but, hey, all it takes is a little help and a touch of moxie, and you can save yourself a Refresh.
Entering the Windows Recovery Environment
In Windows 8.1, the Windows Recovery Environment has become a very sophisticated, almost eerily intelligent fix-everything program that works very well.
Except, of course, when it doesn’t.
You know you’re in the Windows Recovery Environment if you see a blue Choose an Option screen or a blue Troubleshoot screen like the one in Figure 2-10. (If you find yourself facing a blue Choose an Options screen, choose Troubleshoot!)

Figure 2-10: The hallmark of the Windows Recovery Environ-ment.
From the Troubleshoot screen, you can run Refresh or Reset directly: They behave precisely as I describe earlier in this chapter. You can also choose Advanced Options, which brings you to several interesting — if little-used — options, as shown in Figure 2-11.
You can also get to this screen by choosing Advanced Startup from the Recovery list (refer to Figure 2-1). After you choose Advanced Startup, choose Troubleshoot and then choose Advanced Options.

Figure 2-11: The advanced boot options.
Here’s what the Advanced Options can do:
![]() System Restore puts your system back to a chosen restore point, following the same steps in the section “Rolling back to a restore point” earlier in this chapter. It won’t work, though, unless you’ve turned on restore points for one or more drives on your computer.
System Restore puts your system back to a chosen restore point, following the same steps in the section “Rolling back to a restore point” earlier in this chapter. It won’t work, though, unless you’ve turned on restore points for one or more drives on your computer.
![]() System Image Recovery requires a system image that you can make only by using the DOS command line in a very geeky way. Details at
System Image Recovery requires a system image that you can make only by using the DOS command line in a very geeky way. Details at http://blogs.msdn.com/b/b8/archive/2012/01/04/refresh-and-reset-your-pc.aspx.
![]() Startup Repair reboots into a specific Windows Recovery Environment program known as Start Repair and runs a diagnosis and repair routine that seeks to make your PC bootable again. I’ve seen this program run spontaneously when I’m having hardware problems. A Start Repair log file is generated at WindowsSystem32LogfilesSrtSrtTrail.txt. If you find yourself running Start Repair, you can’t do anything: Just hold on and see whether it works.
Startup Repair reboots into a specific Windows Recovery Environment program known as Start Repair and runs a diagnosis and repair routine that seeks to make your PC bootable again. I’ve seen this program run spontaneously when I’m having hardware problems. A Start Repair log file is generated at WindowsSystem32LogfilesSrtSrtTrail.txt. If you find yourself running Start Repair, you can’t do anything: Just hold on and see whether it works.
![]() Command Prompt brings up an old-fashioned DOS command prompt, just like you get if you go into safe mode. Only for the geek at heart. You can hurt yourself in there.
Command Prompt brings up an old-fashioned DOS command prompt, just like you get if you go into safe mode. Only for the geek at heart. You can hurt yourself in there.
![]() Startup Settings reboots Windows and lets you change video resolution, start debugging mode or boot logging, run in safe mode, disable driver signature checks, disable early launch anti-malware scans, and disable automatic restart on system failure. Definitely not for the faint of heart.
Startup Settings reboots Windows and lets you change video resolution, start debugging mode or boot logging, run in safe mode, disable driver signature checks, disable early launch anti-malware scans, and disable automatic restart on system failure. Definitely not for the faint of heart.