
Chapter 1: File History, Backup, Data Restore, and Sync
In This Chapter
![]() Discovering what happened to the Windows 7 backup
Discovering what happened to the Windows 7 backup
![]() Backing and restoring your data
Backing and restoring your data
![]() Can you make a full-disk “ghost” backup?
Can you make a full-disk “ghost” backup?
![]() Storing via the cloud
Storing via the cloud
If you’re accustomed to using earlier versions of Windows to back up or restore data, to “ghost” a whole drive, or to set restore points, you’re probably in this chapter looking for something that no longer exists.
 Although you can set manual restore points — much the same process as it was in Windows ME, many moons ago — the way to do so is buried deep inside the new Windows, and frankly, your need for them is highly debatable.
Microsoft has, in one stroke, made backup and restore much simpler and much less controllable. Or perhaps I should say micro-manageable.
In this chapter, I talk about how to back up your data: running backups, restoring them, being smart about where to store them, and accessing them if something goes wrong. (In Chapter 2 of this minibook, I talk about Refresh and Reset, two ways of bringing Windows back to life. Refresh keeps all your data. Reset wipes out everything and returns your PC to its out-of-the-box state.)
 In this chapter and Chapter 2 of this minibook, I don’t talk about a whole lot of old Windows topics that just don’t apply any more. These include system repair discs, restore points, image backups, recovery mode, and safe mode. You can find vestiges of those features in Windows 8.1 if you look hard enough. But they aren’t recommended any more — and they’re rarely supported.
What Happened to the Windows 7 Backup?
If you’re an experienced Windows 7 user, you may be looking for specific features that have been renamed, morphed, or axed in the current version of Windows. Here’s a little pocket dictionary to help you figure out the landmarks:
![]() Shadow Copies (or Previous Versions) of files are now called File History. It’s functionally very similar to the Apple Time Machine — just not as cool, visually.
Shadow Copies (or Previous Versions) of files are now called File History. It’s functionally very similar to the Apple Time Machine — just not as cool, visually.

![]() Image Backup (or System Image or Ghosting) is gone. In the not-so-good old days, you could make a very precise copy of your C: drive if you felt so consumed. In Windows 8, you could do an image backup, but it was hard to find the command center. In Windows 8.1, Microsoft has excoriated it entirely. Only option is to use a third-party utility, such as Acronis True Image.
Image Backup (or System Image or Ghosting) is gone. In the not-so-good old days, you could make a very precise copy of your C: drive if you felt so consumed. In Windows 8, you could do an image backup, but it was hard to find the command center. In Windows 8.1, Microsoft has excoriated it entirely. Only option is to use a third-party utility, such as Acronis True Image.
![]() Windows Backup and the Backup and Restore Center are also gone. They were in Windows 8, but they’re out of Windows 8.1. It’s much smarter to use File History anyway.
Windows Backup and the Backup and Restore Center are also gone. They were in Windows 8, but they’re out of Windows 8.1. It’s much smarter to use File History anyway.
![]() You can boot into safe mode if you really want to, but Microsoft makes it very difficult to get there. Follow the instructions in Book VIII, Chapter 2 to get into the Windows Recovery Environment.
You can boot into safe mode if you really want to, but Microsoft makes it very difficult to get there. Follow the instructions in Book VIII, Chapter 2 to get into the Windows Recovery Environment.
Microsoft is deprecating (killing, zapping) all the old backup, restore, system restore, and safe mode options, in favor of completely new (and much easier-to-use) backup and restore options.
Backing Up and Restoring Files with File History
Windows File History not only backs up your data files, it also backs up many versions of your data files and makes it very easy to retrieve the latest version and multiple earlier versions.
By default, File History takes snapshots of all the files in your Libraries (see Book VII, Chapter 3), your desktop, your Contacts data, and your Internet Explorer favorites. It does not take snapshots of anything in SkyDrive; that’s the cloud’s duty. The snapshots get taken once an hour and are kept until your backup drive runs out of space.
You can change those defaults. I explain how later in this section.
Setting up File History
To use File History, Windows demands that you have an external hard drive, a second hard drive, or a network connection that leads to a hard drive. In this example, I use a simple, cheap 1 TB external hard drive. You can pick up one at any computer store.
If you have a lot of photos in your Photos Library or a zillion songs in the Music Library, the first File History backup takes hours and hours (and longer!). If you have a lot of data and this is your first time, don’t even try to set up things until you’re ready to leave the machine for a long, long time.
(If you haven’t yet set up your Libraries, made them visible in File Explorer, and put the Public folders inside your Libraries, mosey over to Book VII, Chapter 3 and bring back the Library stuff Microsoft knocked out.)
To get the desktop version of File History going,
1. Bring up the Control Panel by right-clicking in the lower-left corner of the screen and choosing Control Panel. Click or tap System and Security and then File History.
Alternatively, you can go to the old-fashioned desktop, swipe from the right, choose the Settings charm and, at the top, pick Control Panel. (Although there’s a Metro Settings version of File History, the one in the Control Panel is much easier to use, in my humble opinion.)
The File History applet appears in the desktop Control Panel, as shown in Figure 1-1.
If you don’t have a drive set up for File History, you see the banner that starts, We Recommend That You Use an External Drive for File History . . .
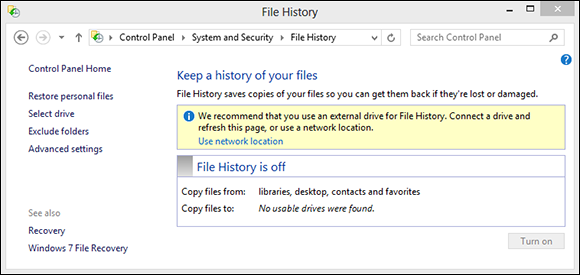
Figure 1-1: Set up File History here.
2. Attach your external drive, or tap or click the User Network Location link and navigate to a networked drive.
If you’re using a clean hard drive, the banner disappears. If data’s on your drive or your drive installs a driver of some sort, you may need to tap or click Use Network Location and point to the drive.
After your drive is connected, File History presents you with the dialog box shown in Figure 1-2.

Figure 1-2: With an external drive connected, time to turn on File History.
3. Tap or click the Turn On button.
If you have a HomeGroup, File History asks whether you want to recommend the drive to other members of your HomeGroup.
4. If you have a HomeGroup and want to recommend the drive to other members, so they can also use it for File History, tap or click Yes; if you don’t want to recommend the drive, tap or click No.
File History goes out to lunch for a long time. Possibly a very long time. It gathers everything in your libraries (see Book VII, Chapter 3), everything on your desktop, all your Contacts, and your Internet Explorer favorites.
You can go back to work, or grab a latte or three. Go home. Take a nap. If you have a lot of pictures in your Library, you may want to consider re-reading War and Peace. When File History is good and ready, a Run Now link appears in the File History dialog box, per Figure 1-3 appears.

Figure 1-3: File History is on the job.
5. Don’t tap or click Run Now, just yet. Before you leave the topic entirely, make sure that the backup actually happened by following the next steps.
Instead of relying on the File History program to tell you that the backup occurred, take matters into your own hands and look for the backup with File Explorer. To find the backup files with File Explorer:
1. On the desktop, tap or click the File Explorer icon on the taskbar.
File Explorer opens.
2. Navigate to the drive that you just used in the preceding steps for a backup.
This may be an external or a networked drive; it may even be a second drive on your PC, although I don’t recommend that.
3. Tap or double-click your way through the folder hierarchy:
• FileHistory
• Your username
• Your PC name
• Data
• The main drive you backed up (probably C:)
• Users
• Your username (again)
• Desktop (assuming you had any files on your desktop that you backed up)
A File Explorer screen like the one in Figure 1-4 appears.

Figure 1-4: Your backup data appears waaaay down in a chain of files; they’re stored on the hard drive.
4. Check whether the filenames match the files that are on your desktop, with dates and times attached.
5a. If the files match, you can close File Explorer and close the File History dialog box.
 Although you can restore data from this location via File Explorer, it’s easier to use the File History retrieval tools. (See the next section for details.)
5b. If you don’t see a list of filenames that mimics the files on your desktop, go back to Step 1 of the preceding steps list and make sure you get it right!
File History doesn’t run if the backup drive gets disconnected or the network connection to the backup drive drops — but Windows produces File History files anyway. As soon as the drive’s reconnected or the network starts behaving, File History dumps all its data to the correct location.
Restoring data from File History
File History stores snapshots of your files, taken every hour, unless you change the frequency. If you’ve been working on a spreadsheet for the past six hours and discovered that you blew it, you can retrieve a copy of the spreadsheet that’s less than an hour old. If you’ve been working on your résumé over the past three months and decide that you really don’t like the way your design changed five weeks ago, File History can help you there, too.
If you’re accustomed to the Windows 7 way of bringing back Shadow Copies, you need to unlearn everything you think you know about bringing back old files. Windows 8.1 works differently.
Here’s how to bring back your files from cold storage:
1. Bring up the Control Panel by right-clicking in the lower-left corner of the screen and choosing Control Panel. Click or tap System and Security, File History, and then Restore Your Files with File History.
The File History Restore Home page, as shown in Figure 1-5, appears.
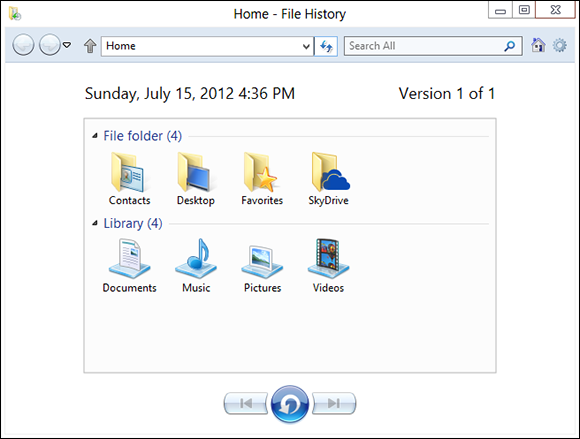
Figure 1-5: You need to find the file you want to restore, starting at the top.
2. Navigate to the location of the file you want to restore.
In Figure 1-5, I went to my desktop, where the file I want to resuscitate is stored.
You can use several familiar File Explorer navigation methods inside the File History program, including the up arrow to move “up one level,” the forward and back arrows, and the search box in the upper-right corner. See Figure 1-6.

Figure 1-6: First, find the location. Then, find the correct version.
3. Check the time and date in the upper-left corner.
4a. If that’s the time and date of the file you want to bring back, tap and hold or right-click the file, then choose Restore or (usually easier, if you have a mouse) simply click and drag the file to whatever location you like.
You can even preview the file by double-clicking it.
4b. If this isn’t the right time and date, at the bottom, tap or click the left arrow to take you back to the previous snapshot.
Tap or click left and right arrows to move to earlier and later versions of the files, respectively.
5. If you want to restore all the files you can see, at any given moment, tap or click the arrow-in-a-circle at the bottom of the screen.
You’re given options to replace the files (which deletes the latest version of each file) or to choose which files you want to replace.
Personally, I always restore by clicking and dragging. It’s much easier to see exactly what’s happening and avoid mistakes before they happen.
If you accidentally replace a good file, be of good cheer. There was a snapshot of that file taken less than an hour ago. You just have to find it. Kinda cool how that works, eh?
Changing File History settings
File History has several settings you may find valuable.
File History backs up every file in every Library on your computer. If you have a folder that you want to have backed up, just put it in a Library. Any Library. Invent a new Library if you want. You don’t have to use the Library; just put the folder in a Library. File History takes care of all the details.
I have an extensive discussion of libraries in Book VII, Chapter 3, but if you only want to stick an existing folder in a newly minted Library, it’s easy: Tap and hold or right-click the folder, choose Include in Library⇒Create New Library, and give your new Library a name. You’re done.
Here’s how to change some other key settings:
1. Bring up the Control Panel by right-clicking in the lower-left corner of the screen and choosing Control Panel. Click or tap System and Security, then File History.
The File History main page appears (refer to Figure 1-3).
2. If you want to exclude some folders in your libraries so they don’t get backed up, on the left, choose Exclude Folders.
File History opens a simple dialog box with an Add button that lets you put folders on the exclude list.
3. Tap or click the back arrow to get back to the File History applet.
4. To change how backups are made, on the left, tap or click the Advanced Settings link.
The Advanced Settings dialog box in Figure 1-7 appears.

Figure 1-7: Take control of your backups here.
In this dialog box, you can change the frequency of backups; the size of the cache where File History stores your temporary backups when you aren’t connected to your regular backup drive; and how long versions should be kept.
5. See my recommendations for these settings in Table 1-1 and choose accordingly.
6. Tap or click Save Changes.
Your next File History backup follows the new rules.
Table 1-1 File History Advanced Settings
|
Setting |
Recommendation |
Why |
|
Save Copies of Files |
Every 30 Minutes |
This is mostly a tradeoff between space (more frequent backups take a tiny bit of extra space) and time — your time. If you have a lot of backups, you increase the likelihood of getting back a usable version of a file, but on the other hand, you have to wade through many more versions. I find 30 minutes strikes the right balance, but you may want to back up more frequently. |
|
Size of Offline Cache |
10 percent of Disk Space |
Controls how much space File History will take up on your main hard drive if your backup drive is offline (or the network connection to your backup drive goes dead). I figure 10 percent is an easy price to pay for extra insurance, and I’m tempted to run it up to 20 percent. |
|
Keep Saved Versions |
Forever (default) |
If you choose Until Space Is Needed, File History won’t raise a holy stink if you run out of room on your backup drive. By leaving it at Forever, File History sends notifications when the hard drive gets close to full capacity, so you can run out and buy another backup drive. |
|
If This PC Is Part of HomeGroup |
Checked |
Other people who use your PC, and other people in your HomeGroup, probably need backups, too. |
Storing To and Through the Cloud
File History’s a great product. I use it religiously. But it isn’t the be-all and end-all of backup storage. What happens if my office burns down?
The best solution I’ve found is to have File History do its thing, but I also back up data, from time to time, to the Internet. Doing so is fast, cheap, and easy — but it does have problems. I talk about the mechanics of using SkyDrive in Book IV, Chapter 4, and SkyDrive’s certainly a good choice. But other choices are available, and I want you to know about them.
Backing up to the Internet has one additional, big plus: Depending on which package you use and how you use it, the data can be accessible to you, no matter where you need it — on the road, on your iPad, even on your phone. You can set up folders to share with friends or co-workers, and in some cases, have them help you work on a file while you’re working on it, too.
Four years ago, only one big player — Dropbox — was in the online storage and sharing business. Now there’s Dropbox, Microsoft SkyDrive, Google Drive, the Apple iCloud (which is a bit different), Amazon Cloud Drive, and Facebook’s storage — all from huge companies — and SugarSync, Box (formerly Box.net), SpiderOak, and many smaller companies.
What happened? People have discovered just how handy cloud storage can be.
I’m not talking about the mega-file uploading companies. Mega (formerly known as Megaupload and now relocated to New Zealand), RapidShare, Hotfile.com, Soundcloud, and many others specialize in offering parking places for large files, and making it easy to download single files. They’re in a slightly different business.
The cloud storage I’m talking about is specifically designed to allow you to store data on the Internet and retrieve it from just about anywhere, on just about any kind of device — including a phone or tablet. They also have varying degrees of interoperability and sharing so, for example, you can upload a file and have a dozen people look at it simultaneously. Some cloud storage services (notably Google Drive) have associated programs (such as Google Apps) that let two or more people edit the same file simultaneously.
Considering cloud storage privacy concerns
I don’t know how many times I’ve heard people tell me that they just don’t trust putting their data on some company’s website. But although many people are rightfully concerned about privacy issues and the specter of Big Brother, the fact is that the demand for storage in the cloud is growing by leaps and bounds.
The concerns I hear go something like this:
![]() I have to have a working Internet connection in order to get data to or from the online storage. Absolutely true, and there’s no way around it. If you use cloud storage only for offsite backup, it’s sufficient to be connected whenever you want to back up your data or restore it. Some of the cloud storage services have ways to cache data on your computer when, say, you’re going to be on an airplane. But in general, yep, you have to be online.
I have to have a working Internet connection in order to get data to or from the online storage. Absolutely true, and there’s no way around it. If you use cloud storage only for offsite backup, it’s sufficient to be connected whenever you want to back up your data or restore it. Some of the cloud storage services have ways to cache data on your computer when, say, you’re going to be on an airplane. But in general, yep, you have to be online.
![]() The data can be taken or copied by law enforcement and local governments. True. The big cloud storage companies get several court orders a day. The storage company’s legal staff takes a look, and if it’s a valid order, your data gets sent to the cops. Or the feds. Or the tax people.
The data can be taken or copied by law enforcement and local governments. True. The big cloud storage companies get several court orders a day. The storage company’s legal staff takes a look, and if it’s a valid order, your data gets sent to the cops. Or the feds. Or the tax people.
Unless, of course, you’re talking about the U.S. National Security Agency and programs like PRISM, which basically allows the NSA to take any data it likes and prohibits the storage company from even talking about it. With a little luck, that’s going to change, but it’s hard to say how, or when, or even if.
Moral of the story: If you’re going to store data that you don’t want to appear in the next issue of a certain British tabloid, it would be smart to encrypt the file before you store it. Word and Excel 2007 and later use very effective encryption techniques. Couple that with a strong password, and your data isn’t going anywhere soon. Unless, of course, you’re required by the court to give up the password, or the NSA sets one of its teraflops password crackers to the job.
![]() Programs at the cloud storage firm can scan my data. True, once again, for most (but not all) cloud storage firms. With a few notable exceptions — Mega, Spider Oak, and others — cloud storage company programs can see your data. There’s been a big push in the past few months to hold cloud storage companies responsible for storing copyrighted material: If you upload a pirate copy of Men in Black 3, the people who hold the copyright are going to get very upset.
Programs at the cloud storage firm can scan my data. True, once again, for most (but not all) cloud storage firms. With a few notable exceptions — Mega, Spider Oak, and others — cloud storage company programs can see your data. There’s been a big push in the past few months to hold cloud storage companies responsible for storing copyrighted material: If you upload a pirate copy of Men in Black 3, the people who hold the copyright are going to get very upset.
Different cloud storage companies handle the task differently, but with the takedown of Megaupload in January 2012, everybody’s concerned about incurring the wrath of the MPAA and RIAA, the companies that defend movie and music copyrights, respectively. The net result is that most cloud storage companies will be performing routine scans — either now or in the not-too-distant future — to see whether you’re trying to upload something that’s copyright-protected.
![]() Employees at the cloud storage firm can look at my data. True again. Certain cloud storage company employees can see your data — at least in the larger companies (Mega, Spider Oak and a few others excepted). They have to be able to see your data, in order to comply with court orders.
Employees at the cloud storage firm can look at my data. True again. Certain cloud storage company employees can see your data — at least in the larger companies (Mega, Spider Oak and a few others excepted). They have to be able to see your data, in order to comply with court orders.
Does that mean Billy the intern can look at your financial data or your family photos? Well, no. It’s more complicated than that. Every cloud storage company has very strict, logged, and monitored rules for who can authorize and who can view customer data. Am I, personally, absolutely sure that every company obeys all its rules? No, not at all. But I don’t think my information is interesting enough to draw much attention from Billy, unless he’s trying to swipe the manuscript of my next book.
![]() Somebody can break in to the cloud storage site and steal my data. Well, yes, that’s true, but it probably isn’t much of a concern. Each of the cloud storage services scrambles its data, and it’d be very, very difficult for anyone to break in, steal, and then decrypt the stolen data. Can it happen? Sure. Will I lose sleep over it? Nah.
Somebody can break in to the cloud storage site and steal my data. Well, yes, that’s true, but it probably isn’t much of a concern. Each of the cloud storage services scrambles its data, and it’d be very, very difficult for anyone to break in, steal, and then decrypt the stolen data. Can it happen? Sure. Will I lose sleep over it? Nah.
Reaping the benefits of backup and storage in the cloud
So much for the negatives. Time to look at the positives. On the plus side, a good cloud storage setup gives you:
![]() Offsite backups that won’t get destroyed if your house or business burns down.
Offsite backups that won’t get destroyed if your house or business burns down.
![]() Access to your data from anywhere, using just about any imaginable kind of computer, including phones and tablets.
Access to your data from anywhere, using just about any imaginable kind of computer, including phones and tablets.
![]() Controlled sharing so you can password-protect specific files or folders. Hand the password to a friend, and he can look at the file or folder.
Controlled sharing so you can password-protect specific files or folders. Hand the password to a friend, and he can look at the file or folder.
![]() Broadcast sharing from a Public folder that anyone can see.
Broadcast sharing from a Public folder that anyone can see.
![]() Direct access from application programs that run in the cloud. Google Apps is a good example.
Direct access from application programs that run in the cloud. Google Apps is a good example.
![]() Free packages, up to a certain size limit, offered by almost all the cloud storage services.
Free packages, up to a certain size limit, offered by almost all the cloud storage services.
Choosing an online backup and sharing service
So which cloud storage service is best? Tough question. Personally, I use four of them — three for PCs and Android, and iCloud for my Mac, iPad, and iPhone stuff — different services for different purposes.
Dropbox, Microsoft SkyDrive, and Google Drive have programs that you run on your PC or Mac to set up folders that are shared. Drag a file into the shared folder, and it appears on all the computers you have connected (with a password) to the shared folder. Go on the web and log on to the site, and your data’s available there, too. Install an app on your iPhone, Android, or Blackberry phone or tablet, and the data’s there as well. Here’s a rundown of what each cloud storage service offers:
![]() Dropbox, as shown in Figure 1-8, offers 2GB of free storage, with 100GB for $99/year. It's very easy to use, reliable, and fast. I use it for synchronizing project files — including the files for this book. Dropbox also connects to Facebook to retrieve or post pictures (
Dropbox, as shown in Figure 1-8, offers 2GB of free storage, with 100GB for $99/year. It's very easy to use, reliable, and fast. I use it for synchronizing project files — including the files for this book. Dropbox also connects to Facebook to retrieve or post pictures (www.dropbox.com).
![]() SkyDrive has 7GB of free storage, with 50GB for $25/year. I talk about SkyDrive in Book IV, Chapter 4 (
SkyDrive has 7GB of free storage, with 50GB for $25/year. I talk about SkyDrive in Book IV, Chapter 4 (www.skydrive.com).
![]() Google Drive, as shown Figure 1-9, has 5GB of free storage, with 100GB for $60/year. Google Drive isn't as slick as the other two, and there's no Facebook connection, but it works well enough. There's an optical character recognition facility, and the ability to launch web apps directly. Most of all, it's fall-down simple to use Google Drive with Google Apps, which includes Gmail, and several not-very-compatible writing and spreadsheet apps. See Book X, Chapter 3 (
Google Drive, as shown Figure 1-9, has 5GB of free storage, with 100GB for $60/year. Google Drive isn't as slick as the other two, and there's no Facebook connection, but it works well enough. There's an optical character recognition facility, and the ability to launch web apps directly. Most of all, it's fall-down simple to use Google Drive with Google Apps, which includes Gmail, and several not-very-compatible writing and spreadsheet apps. See Book X, Chapter 3 (www.drive.google.com). Google is in the process of changing many of its apps so they work while you aren't connected to the internet. Watch www.AskWoody.com for the latest.
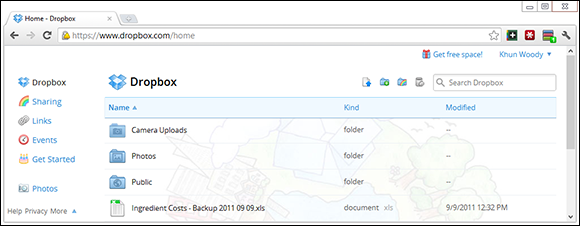
Figure 1-8: Dropbox popularized cloud storage.

Figure 1-9: Google Drive works very well with Google Apps.
![]() Apple iCloud, as shown in Figure 1-10, is really intended to be an Apple-centric service. The first 2GB is free, and then it's $20 per year for an additional 10GB. It works great with iPads and iPhones and even my new Mac, with extraordinarily simple backup of photos. In fact, photo and video backup and sharing take place automatically, and I don't have to do a thing. But it's not really set up for open data sharing (
Apple iCloud, as shown in Figure 1-10, is really intended to be an Apple-centric service. The first 2GB is free, and then it's $20 per year for an additional 10GB. It works great with iPads and iPhones and even my new Mac, with extraordinarily simple backup of photos. In fact, photo and video backup and sharing take place automatically, and I don't have to do a thing. But it's not really set up for open data sharing (www.icloud.com). Apple, too, is trying to bring its cloudy offerings down to the desktop. Stay up on the latest, if you're thinking about going with Apple.

Figure 1-10: iCloud works with Apple products, but makes it difficult to share files among PCs.
The other services have specific strong points:
![]() Amazon Cloud Drive ties in with Amazon purchases and the Kindle but not much else (
Amazon Cloud Drive ties in with Amazon purchases and the Kindle but not much else (www.amazon.com/clouddrive).
![]() SugarSync lets you synchronize arbitrary folders on your PC. That's a big deal if you don't want to drag your sync folders into one location (
SugarSync lets you synchronize arbitrary folders on your PC. That's a big deal if you don't want to drag your sync folders into one location (www.sugarsync.com).
![]() Box is designed for large companies. It gives companies tools to control employee sharing (
Box is designed for large companies. It gives companies tools to control employee sharing (www.box.com).
![]() SpiderOak is the most secure of the bunch: It doesn't keep the keys to your files, and unlike the other services in this chapter, it's impossible for SpiderOak to see your files (
SpiderOak is the most secure of the bunch: It doesn't keep the keys to your files, and unlike the other services in this chapter, it's impossible for SpiderOak to see your files (www.spideroak.com).
Like so many other things in the PC business, cloud storage is changing very, very rapidly. If you're interested in backing up to the cloud — and sharing files on the Internet, too, by the way — stay on top of the latest at my site, AskWoody.com (www.askwoody.com).