
Chapter 4: Storing in Storage Spaces
In This Chapter
![]() Virtualizing Storage Spaces
Virtualizing Storage Spaces
![]() Setting up Storage Spaces
Setting up Storage Spaces
![]() Care and feeding of Storage Spaces
Care and feeding of Storage Spaces
For people who want to make sure that they never suffer a data loss — in spite of dying hard drives or backup routines that don’t run properly — the Windows Storage Spaces feature may, in and of itself, justify buying, installing, and using Windows 8.1.
If you’re using Drobo, ReadyNAS, or some other, expensive, network attached storage device for file mirroring, you can toss your old hardware. Windows 8.1 handles it all as part of the operating system itself.
In this chapter, I introduce you to the Windows 8.1 approach to drive virtualization and how it enables Storage Space to work. Then you walk through setting up Storage Spaces and the tips and tricks you need to know to make Storages Spaces work for you. Using Storage Spaces for backup is quick and easy, and it works.
Understanding the “Virtualization” of Storage
You’re going to get sick of the term virtualization sooner or later. People who want to sell you stuff use the term all the time. But if you’ll pinch your nose and wade through the offal, there’s a solid core of real-world good stuff in this particular kind of virtualization technology.
Windows Storage Spaces takes care of disk management behind the scenes so you don’t have to. You’ll never even know (or care) which hard drive on your computer holds what folders or which files go where. Volumes and folders get extended as needed, and you don’t have to lift a finger.
You don’t have to worry about your D: drive running out of space because you don’t have a D: drive. Or an E: drive. Windows just grabs all the hard drive real estate you give it and hands out pieces of the hard drive as they’re required.
 As long as you have two or more physical hard drives of sufficient capacity, any data you store in a Storage Space pool is automatically mirrored between two or more independent hard drives. If one of the hard drives dies, you can still work with the one(s) that are alive, and you never miss a beat — not one bit is out of place. Run out and buy a new drive, stick it in the computer, tell Windows that it can accept the new drive into the Drive Spaces borg, wait an hour or two while Windows performs its magic, and all your data is back to normal. You never miss a beat. It’s really that simple.
 When your computer starts running out of disk space, Windows tells you. Install another drive — internal, external, USB, SATA, whatever — and, with your permission, it’s absorbed into the pool. More space becomes available, and you don’t need to care about any of the details — no new drive letters, no partitions, no massive copying or moving files from one drive to another, no homebrew backup hacks. For those accustomed to Windows’ whining and whining, the Storage Spaces approach to disk management feels like a breath of fresh air.
When you add a new hard drive to the Storage Spaces pool, everything that was on that new hard drive gets obliterated. You don’t have any choice. No data on the drive survives — it’s all wiped out. That’s the price the drive pays for being absorbed into the Storage Spaces borg.
Here’s a high-level overview of how you set up Storage Spaces with data mirroring:
1. Tell Windows that it can use two or more drives as a storage pool.
Your C: drive — the drive that contains Windows — cannot be part of the pool.
 The best configuration for Storage Spaces: Get a fast solid state drive for your system files and make that the
 C: drive. Then get two or more big, hunking drives for storing all your data. The big drives can be slow, and you'll hardly notice. You can use a mixture of spinning disks and solid state disks, if you like.
2. After you set up a pool of physical hard drives, you can create one or more Spaces.
In practice, most home and small business users will want only one Space. But you can create more, if you like.
3. Establish a maximum size for each Space and choose a mirroring technology, if you want the data mirrored.
The maximum size can be much bigger than the total amount of space available on all your hard drives. That’s one of the advantages of virtualization: If you run out of physical hard drive space, instead of turning belly up and croaking, Windows just asks you to feed it another drive.
Mirroring technologies in Storage Spaces
When it comes to mirroring — Microsoft calls it resiliency — you have four choices:
![]() You can choose to not mirror at all. That way you lose the automatic real-time backup, but you still get the benefits of pooled storage.
You can choose to not mirror at all. That way you lose the automatic real-time backup, but you still get the benefits of pooled storage.
![]() You can designate a space as a two-way mirrored space, thus telling Windows that it should automatically keep backup copies of everything in the space on at least two separate hard drives, and recover from dead hard drives automatically as well. It’s important to realize that your programs don’t even realize the data’s being mirrored. Storage Spaces takes care of all the details behind the scenes.
You can designate a space as a two-way mirrored space, thus telling Windows that it should automatically keep backup copies of everything in the space on at least two separate hard drives, and recover from dead hard drives automatically as well. It’s important to realize that your programs don’t even realize the data’s being mirrored. Storage Spaces takes care of all the details behind the scenes.
![]() You can use three-way mirroring, which is only for the most fanatical people with acres of hard drive space to spare.
You can use three-way mirroring, which is only for the most fanatical people with acres of hard drive space to spare.
![]() There’s another form of redundancy called parity that calculates check sums on your data and stores the sums in such a way that the data can be reconstructed from dead disks without having two full copies of the original file sitting around. This approach takes up less room than full mirroring, but there’s higher overhead in processing input/output. MS recommends that you use parity mirroring only on big files that are accessed sequentially — videos, for example — or on files that you don’t update very often.
There’s another form of redundancy called parity that calculates check sums on your data and stores the sums in such a way that the data can be reconstructed from dead disks without having two full copies of the original file sitting around. This approach takes up less room than full mirroring, but there’s higher overhead in processing input/output. MS recommends that you use parity mirroring only on big files that are accessed sequentially — videos, for example — or on files that you don’t update very often.
 For a discussion of the available mirroring technologies, see the sidebar “Mirroring technologies in Storage Spaces.”
4. If a drive dies, you keep going and put in a new drive when you can. If you want to replace a drive with a bigger (or more reliable) one, you tell Windows to get rid of (or dismount) the old drive, wait an hour or so, turn off the PC, yank the drive, stick in a new one, and away you go.
It’s that simple.
If you’ve ever heard of RAID (Redundant Array of Inexpensive Discs) technology, you may think that Storage Spaces sounds familiar. The concepts are similar in some respects, but Storage Spaces doesn’t use RAID at all. Instead of relying on specialized hardware and fancy controllers — both hallmarks of a RAID installation — all of Storage Spaces is built in to Windows itself, and Storage Spaces can use any kind of hard drive — internal, external, IDE, SATA, USB, eSATA, you name it — in any size, mix or match. No need for any special hardware or software.
Setting Up Storage Spaces
Even though you can set up Storage Spaces with just two hard drives — your C: system drive, plus one data drive — you don't get much benefit out of it until you move up to three drives. So in this section, I assume that you have your C: drive, plus two more hard drives — internal, external, eternal, infernal, whatever — hooked up to your PC. I further assume that those two hard drives have absolutely nothing on them that you want to keep. Because they will get blasted. Guaranteed.
Ready to set up a Space? Here’s how:
1. Hook up your drives and then go into File Explorer and verify that Windows has identified three drives.
In Figure 4-1, I have three drives. The C: drive has my Windows system on it; C:’s the boot drive. The other two have miscellaneous junk that I don’t want to keep.
2. Bring up the Control Panel (right-click the lower-left corner of the screen and choose Control Panel); tap or click System and Security, and then tap or click Storage Spaces.
Equivalently, you can go to the Metro Start screen, type storage spaces, and look under Settings.
If you choose either Storage Spaces or Manage Storage Spaces, you see the Storage Spaces dialog box, as shown in Figure 4-2.
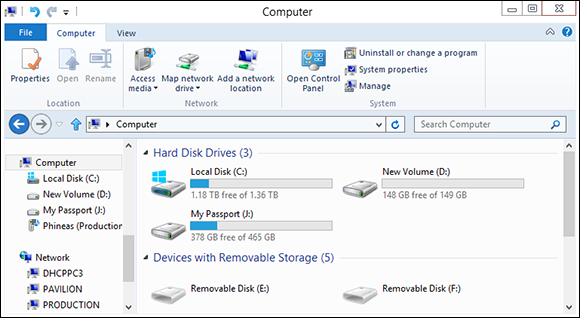
Figure 4-1: Start with three drives, two for your storage pool.

Figure 4-2: Create a new storage pool.
3. Tap or click the Create a New Pool and Storage Space link.
You have to create a storage pool first — that is, assign physical hard drives to Windows available pool of hard drives. Windows offers to create a storage pool, as shown in Figure 4-3.

Figure 4-3: Windows allows you to pool any drives other than those that contain the boot and system partitions.
 4. Select the check boxes next to the drives that you want to include in the storage pool. Note that if you accidentally select a drive that contains useful data, your data’s going to disappear. Irretrievably.
And I do mean irretrievably. You can’t use Recuva or some other disk scanning tool to bring back your data. After the drive’s absorbed into the storage pool borg, it’s gone.
5. Tap or click Create Pool.
Windows whizzes and wheezes and whirs for a while, and then comes up with the Create a Storage Space dialog box, as shown in Figure 4-4.

Figure 4-4: Windows wants you to give the new Storage Space a name and drive letter, and choose the mirroring and the maximum size.
6. Give your Storage Space a name and a drive letter.
You use the name and the letter in the same way that you now use a drive letter and drive name — even though the Storage Space spans two or more hard drives. You can format the Storage Space “drive,” copy data to or from the “drive,” and even partition the “drive,” even though there’s no real, physical drive involved.
7. Choose a resiliency.
For a discussion of your four choices — no mirroring, two-way, three-way, and parity — see the nearby sidebar “Mirroring technologies in Storage Spaces” earlier in this chapter.
8. Set a logical size for the Storage Space.
As mentioned, the logical size of the Storage Space can greatly exceed the available hard drive space. There’s no downside to having a very large logical size, other than a bit of overhead in some internal tables. Shoot for the moon. In this case, I turned less than 1 terabyte of actual, physical storage into a 32TB virtual monstrosity.
9. Tap or click Create Storage Space.
Once again, Windows whirs and sets up a freshly formatted Storage Space.
10. Go back out to File Explorer and verify that you have a new “drive” which is, in fact, an enormously humongous Storage Space.
You see something like Figure 4-5.

Figure 4-5: If it weren’t for the fact that you just created it, you probably wouldn’t be able to tell that the new Storage Space isn’t a “real” drive.
Working with Storage Spaces
Have a new Storage Space? Good. Go kick some tires.
First, realize that to the outside world, your Storage Spaces looks just like any other hard drive. You can use the drive letter the same way you’d use any drive letter. The folders inside work like any other folders; you can add them to libraries or share them on your network. You can back it up. If you have a cranky old program that requires a simple drive letter, the Storage Spaces won’t do anything to spoil the illusion.
That said, Storage Space “drives” can’t be defragmented or run through Checkdisk.
Here’s the grand tour of the inner workings of your Storage Spaces:
1. Bring up the Control Panel (right-click the lower-left corner of the desktop screen and choose Control Panel); tap or click System and Security and then tap or click Storage Spaces.
Equivalently, you can go to the Metro Start screen, type storage spaces, and look under Settings.
If you choose either Storage Spaces or Manage Storage Spaces, the Storage Spaces dialog box appears, this time with a Storage Space.
2. At the bottom, tap or click the down arrow next to Physical Drives.
The full Storage Spaces status report appears, as shown in Figure 4-6.
The Storage Spaces report tells you how much real, physical hard drive space you’re using; what the Storage Space looks like to your Windows programs; and how your physical hard drives have been carved up to support all that glorious, unfettered space.
It’s quite a testament to the Storage Space designers that all this works so well — and invisibly to the rest of Windows. This is the way storage should’ve been implemented years ago!

Figure 4-6: Full details of your Storage Space and the storage pool it sits on.