
Chapter 13. Audio Hardware
Although rudimentary audio capabilities were part of the original IBM PC of 1981 and its many successors, audio was used on early computers for troubleshooting rather than for creative tasks. The original IBM PC and compatible systems of the early to mid-1980s had very rudimentary sound capabilities, consisting mainly of the ability to generate crude tones or beeps. PCs did not gain true audio capabilities until the first add-on sound cards from companies such as AdLib and Creative Labs were developed in the late 1980s.
Thanks to competition among many companies, we now enjoy widely supported de facto hardware and software standards for audio. Audio hardware has gone from being an expensive, exotic add-on to being an assumed part of virtually any system configuration.
Today’s PC audio hardware might take one of the following forms:
• An audio adapter on an expansion card that you install into a bus slot (usually PCI or PCIe) in the computer or connect via an external bus such as USB or IEEE 1394 (FireWire).
• An AC’97 or HD Audio controller integrated into the motherboard chipset, combined with a sound codec chip located on the motherboard.
Regardless of their location, the audio features use jacks for speakers and a microphone. In addition, many of them provide dedicated jacks for MIDI (Musical Instrument Digital Interface) hardware (older cards usually provided an analog game port for joysticks). As you will see later in this chapter, many mid-range and high-end audio adapters also support sophisticated digital audio input and output. On the software side, the audio adapter requires the support of a driver that you install either directly from an application or in your computer’s operating system. This chapter focuses on the audio products found in today’s PCs, their uses, and how you install and operate them.
Early PC Audio Adapters
When the first audio adapters were introduced in the late 1980s by companies such as AdLib, Roland, and Creative Labs, they were aimed squarely at a gaming audience, were generally not compatible with each other, and often cost more than $100.
The first sound card for PCs to achieve widespread software support was the AdLib Music Synthesizer Card released in 1987, which used a Yamaha chip that produced sound via FM synthesis. Around the same time, Creative Labs introduced a competing but incompatible product called the Creative Music System, later renamed as the Game Blaster.
The Game Blaster, which was compatible with only a handful of games, was replaced by the Sound Blaster in 1989, which was compatible with the AdLib sound card and the Creative Labs Game Blaster card, enabling it to support games that specified one sound card or the other. The Sound Blaster included a built-in microphone jack, stereo output, and a MIDI port for connecting the PC to a synthesizer or other electronic musical instrument. This established a baseline of features that would be supported by virtually all other sound cards and onboard sound features up to the present. Finally, the audio adapter had the potential for uses other than games. The follow-up Sound Blaster Pro featured improved sound when compared to the original Sound Blaster. The Sound Blaster Pro and its successors eventually triumphed over earlier rivals to become de facto standards for PC sound reproduction.
Limitations of Sound Blaster Pro Compatibility
Through the mid-1990s, while MS-DOS was the standard PC gaming platform, many users of non–Creative Labs sound cards struggled with the limitations of their hardware’s imperfect emulation of the Sound Blaster Pro. Unfortunately, some cards required two separate sets of hardware resources, using one set of IRQ, DMA, and I/O port addresses for native mode and a second set for Sound Blaster Pro compatibility. Others worked well within Windows or within an MS-DOS session running with Windows in the background but required the user to install a DOS-based Terminate and Stay Resident (TSR) driver program to work in MS-DOS itself.
However, the rise of Windows games made audio support very simple by comparison. Windows applications use the operating system’s drivers to interface with hardware, relieving the software developer from needing to write different code for different sound cards, 3D graphics cards, and so on. For gaming sound and graphics, Microsoft Windows uses a technology called DirectX, which was first introduced in December 1995.
DirectX and Audio Adapters
Microsoft’s DirectX is a series of application programming interfaces (APIs) that sits between multimedia applications and hardware. Unlike MS-DOS applications, which required developers to develop direct hardware support for numerous models and brands of audio cards, video cards, and game controllers, Windows applications use DirectX to “talk” to hardware in a more direct manner than normal Windows drivers do. This improves program performance and frees the software developer from the need to change the program to work with different devices. Instead, a game developer must work with only the DirectX sound engine, DirectX 3D renderer, and other DirectX interface routines.
![]() For more information about DirectX, see “Microsoft DirectX 9.0c, 10, and and 11,” p. 705 (Chapter 12, “Video Hardware”).
For more information about DirectX, see “Microsoft DirectX 9.0c, 10, and and 11,” p. 705 (Chapter 12, “Video Hardware”).
Legacy Audio Support Through Virtualization
What about legacy software users? If you still enjoy playing MS-DOS-based games, then current audio adapters, chipsets, and integrated audio solutions still might present a compatibility challenge to you because of fundamental hardware differences between the ISA expansion slots used by classic Creative Labs and other sound cards and PCI slots, chipsets, and integrated audio.
At one time, the only way to achieve reliable audio compatibility with legacy games was to use a legacy operating system such as MS-DOS 6.x (with Windows 3.1 if needed) and a Sound Blaster Pro–compatible ISA audio card. Some early PCI audio sound cards provided fairly good emulation of the Sound Blaster Pro but required additional audio drivers or proprietary patch cables to provide emulation. Modern audio hardware is geared toward supporting Windows and often is not capable of providing legacy audio support if a legacy application is run directly in Windows XP or later.
However, you can now run legacy operating systems and applications with full support for legacy audio by creating a virtual PC environment using applications such as Microsoft Virtual PC, Parallels Desktop, VMWare Workstation, DOSBox (www.dosbox.com), and others.
In a virtual PC environment, you create a virtual machine on a host operating system by installing a virtualization application. Next, you install a guest operating system into the virtual machine, configure it to provide audio support, and install legacy games. The virtual machine translates audio and other hardware requests made by the legacy game and operating system to the host operating system, which then communicates with the hardware it supports. As a result, a legacy game running in an MS-DOS virtual machine “thinks” that a Sound Blaster Pro or similar sound card is available, even though the audio is actually being played by a modern sound card. You hear sound effects and music playback generated by the game just as you would if the game were being run on a system with legacy audio hardware.
PC Multimedia History
Virtually every computer on the market today is equipped with some type of audio adapter and optical drive. Computers equipped with an audio adapter and an optical drive are often referred to as multimedia PCs after the old MPC-1, MPC-2, and MPC-3 standards that were used to rate early multimedia computers. Since 1996, all computers with onboard sound and optical drive have exceeded MPC-3 standards by increasingly huge margins.
Following the MPC standards, Microsoft and Intel jointly produced a series of PC System Design Guides from 1995 through 2001. Although the last version of the PC System Design Guides is known as PC 2001, it and its predecessor (PC 99) are still useful references for multimedia hardware and software design and are still widely followed by the industry. For example, most I/O ports on recent systems use the PC 99 color-coding standard.
Note
You can download the PC 2001 and earlier PC System Design Guides from Microsoft’s website at www.microsoft.com/whdc/archive/pcguides.mspx.
Updated Microsoft-specific system design information is available at www.microsoft.com/whdc/system/platform/pcdesign/desguide/default.mspx.
Although virtually every computer is a “multimedia PC” today, the features of the audio adapter or onboard audio solution in your system will help determine how satisfied you will be with the wide range of specialized uses for multimedia-equipped systems.
Later in this chapter, you learn more about the features you need to specify to ensure your audio adapter—regardless of type—is ready to work for you.
Audio Adapter Features
To make an intelligent purchasing decision, you should be aware of some audio adapter basic components and the features they provide, as well as the advanced features you can get on better audio adapters. This section discusses the features you should consider while evaluating audio adapters for your PC.
Basic Connectors
Most audio adapters have the same basic external connectors. These 1/8″ minijack connectors provide the means of passing sound signals from the adapter to speakers, headphones, and stereo systems, and of receiving sound from a microphone, CD player, tape player, or stereo. Laptop computers with integrated audio often include only two jacks: stereo line out and line in. However, sound cards and motherboards with integrated audio often include additional jacks for supporting 5.1 or 7.1 surround audio and digital audio.
Figure 13.1 shows typical external audio jacks on a motherboard with integrated audio.
Figure 13.1 Typical input and output jacks on a typical motherboard with 5.1 surround audio support. The SPDIF and surround audio ports on this motherboard are located on a plug-in header cable that uses an expansion slot.
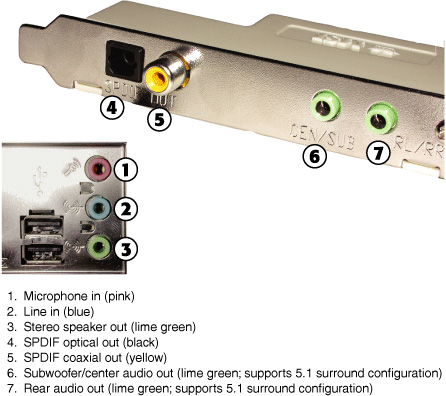
The jacks shown in Figure 13.1 are usually labeled, but when you’re setting up a computer on or under a desk, the labels on the back of the PC can be difficult to see. One of the most common reasons a PC fails to produce any sound is that the speakers are plugged into the wrong socket. To avoid this problem, many consumer-oriented audio cards color-code the jacks according to specifications found in the PC 99 Design Guide. The color-coding can vary on some audio adapters (or not be present at all).
A second method used on many recent systems with motherboard-based audio is universal audio jack sensing, a feature of the AC’97 version 2.3 audio standard. When a device is plugged into an audio jack, the audio driver pops up a dialog box asking the type of audio device in use, such as microphone, stereo speakers, stereo headphones, and so on. The audio driver dynamically assigns the jack to support the device plugged in, even if the “wrong” device is being used in a jack according to the color-coding. This feature is sometimes referred to as auto-sensing.
Tip
To avoid confusing the jack-sensing feature, plug in each device to the audio jacks separately and be sure to confirm the device type in the configuration program before continuing.
Regardless, the basic set of connections included on most audio cards and onboard audio include the following:
• Stereo line out or audio out connector (lime green)—The line out connector is used to send sound signals from the audio adapter to a stereo device outside the computer. You can hook up the cables from the line out connector to stereo speakers, a headphone set, or your stereo system. If you hook up the PC to your stereo system, you can have amplified sound. Some systems use the same lime-green color for surround audio jacks as for the stereo/headphone jack. Check additional markings on the jacks or your system documentation for help.
• Stereo line in or audio in connector (light blue)—With the line in connector, you can record or mix sound signals from an external source, such as a stereo system or VCR, to the computer’s hard disk. In place of a dedicated line in jack, some sound cards use a multipurpose jack (Creative calls it a “FlexiJack”) to support line in, microphone in, and optical out. See the audio card or motherboard documentation for details.
• Rear out and subwoofer/center or speaker connectors (no standard color)—Virtually all modern sound cards and desktop systems with integrated audio include jacks that support rear, center, and subwoofer output for use in 5.1 and greater surround audio systems. Systems that support 5.1 audio use three jacks: one for front (stereo) audio, one for rear audio, and one for center/subwoofer audio. Systems that support 6.1 or 7.1 audio might feature additional jacks or might reassign rear and center/subwoofer jacks with software to provide additional output. Depending on your software driver, you might need to run a proprietary setup program to enable surround audio. Alternatively, selecting the surround audio setup you use through your operating system’s speaker configuration utility might be sufficient.
Note
If you have only a single speaker/line out connector, you must carefully adjust your mixer volume control and the volume control on your amplified speakers to find the best quality sound. Don’t use powered speakers with an already-amplified sound if you can avoid it.
• Microphone in or mono in connector (pink)—The mono in connector is used to connect a microphone for recording your voice or other sounds to disk. This microphone jack records in mono—not in stereo—and is therefore not suitable for high-quality music recordings. To record in stereo, use the line in jack. Many audio adapter cards use Automatic Gain Control (AGC) to improve recordings. This feature adjusts the recording levels on the fly. A 600ohm–10,000ohm dynamic or condenser microphone works best with this jack. Some inexpensive audio adapters use the line in connector instead of a separate microphone jack. Some sound cards use a multipurpose jack in place of a dedicated microphone jack.
Note
See Figure 13.5, later in this chapter, for an example of a typical sound card with analog and digital audio cables attached.
To play audio CDs, you have two choices: The playback can be either analog or digital. Analog playback is supported via an analog audio cable connected between the drive and sound card. This cable does not carry data from the disc to the system bus; it connects the analog audio output of the optical drive directly to the audio amplifier in the sound card. This cable connection was necessary on many older drives and legacy audio solutions to enable music CD or game audio playback.
Current drives, audio cards, and integrated audio solutions normally support digital playback in addition to a direct analog connection. To determine whether you can use digital audio playback, open the properties sheet for your optical drive in the Windows Device Manager and click the Properties tab. Look for a check box in the Digital CD Playback portion of the tab. If the box is grayed out (meaning you can’t check it), digital audio is not supported for that drive or card. Most systems running Windows XP or newer will be automatically configured for digital playback.
Connectors for Advanced Features
Many of the newest sound cards and motherboards with onboard sound are designed for advanced gaming, DVD audio playback, or sound production and have additional connectors to support these uses, such as the following:
• MIDI in and MIDI out—Older sound cards with game ports (a 15-pin female connector) also supported MIDI in and MIDI out through adapters that plugged into the game port. With current high-end sound cards, MIDI ports are sometimes located on a proprietary I/O port adapter that slides into a 5.25-inch drive bay or sits on the tabletop (see Figure 13.2).
Figure 13.2 An internal breakout box providing support for MIDI in/out, coaxial and digital SPDIF in/out, convenient volume control knobs, stereo out, headphone out and line in jacks, and support for an IR remote control.

• SPDIF (also called S/PDIF) in and SPDIF out—The Sony/Philips Digital Interface receives digital audio signals directly from compatible devices without converting them to analog format first. The SPDIF out interface might be built into the sound card using a dedicated or multipurpose jack. Some motherboards include an SPDIF out jack on the rear port cluster, whereas others, such as the one shown in Figure 13.1, use a plug-in header cable to provide output. SPDIF ports may also be included on drive bay or external I/O port adapters (see Figure 13.2).
Note
SPDIF interfaces are also referred to by some vendors as “Dolby Digital” interfaces. SPDIF connectors use cables with the standard RCA jack connector but are designed to work specifically at an impedance of 75ohms—the same as composite video cables. Therefore, you can use RCA-jack composite video cables with your SPDIF connectors. Although audio cables are also equipped with RCA jacks, their impedance is different, making them a less desirable choice.
• CD SPDIF—A two-wire connection that interfaces compatible optical drives with SPDIF output to the digital input of the sound card.
• TAD in—Connects internal modems with Telephone Answering Device support to the sound card for sound processing of voice messages. Typical location: side of audio card.
• Optical SPDIF in/out—This supports home theater and digital speaker systems with optical inputs. Typical location: rear of card or external device. Motherboard-based audio solutions may include optical SPDIF out on the port cluster or on a header cable that uses an expansion slot, as in Figure 13.1.
• Aux in—Provides input for other sound sources, such as a TV tuner card. Typical location: side of audio card.
Sometimes these additional connectors are found on the card itself; sometimes they are attached to an internal or external breakout box, daughtercard, or external rack. Although details vary from card to card, most two-piece models feature a PCI-based sound card with basic I/O ports and a separate internal or external component with additional and more advanced I/O ports. Some cards route additional connections to an internal breakout box that fits into an unused 5 1/4″ drive bay (see Figure 13.2). Others use an external breakout box with the same connection options.
Volume Control
With virtually all recent sound cards, the volume is controlled through a Windows Control Panel speaker icon that can also be found in the system tray (near the onscreen clock). If you’re switching from a bare-bones stereo sound card to a more sophisticated one featuring Dolby Digital 5.1, 6.1, or 7.1 output or input, you will need to use the mixing options in the volume control to select the proper sources and appropriate volume levels for incoming and outgoing audio connected to the card or a breakout box. Keep in mind that if you are sending sound to an external audio receiver, you will need to adjust the volume on that device as well. Don’t forget to enable digital output if you are using the SPDIF output jack.
If the PC speakers are amplified but you aren’t hearing any sound, remember to check that the power is on, the volume control on the speakers is turned up, and the correct speakers are selected and properly connected.
MIDI Support Features
At one time, when evaluating audio adapters, you had to decide whether to buy a monophonic or stereophonic card. Today, all audio adapters are stereophonic and can play music using the MIDI standard, which plays scores using either synthesized instruments or digital samples stored on the audio adapter or in RAM.
Stereophonic cards produce many voices concurrently and from two sources. A voice is a single sound produced by the adapter. A string quartet uses four voices, one for each instrument. On the other hand, a polyphonic instrument, such as a piano, requires one voice for each note of a chord. Thus, fully reproducing the capabilities of a pianist requires 10 voices—one for each finger. The more voices an audio adapter is capable of producing, the better the sound fidelity. The best audio adapters on the market today can produce up to 1,024 simultaneous voices.
Early audio adapters used FM synthesis for MIDI support; the Yamaha OPL2 (YM3812) featured 11 voices, whereas the OPL3 (YMF262) featured 20 voices and stereophonic sound. However, virtually all audio adapters today use recorded samples for MIDI support; audio adapters using this feature are referred to as wavetable adapters.
Wavetable audio adapters use digital recordings of real instruments and sound effects instead of imitations generated by an FM chip. When you hear a trumpet in a MIDI score played on a wavetable sound card, you hear the sound of an actual trumpet, not a synthetic imitation of a trumpet. The first cards featuring wavetable support stored 1MB of sound clips embedded in ROM chips on the card or on an optional daughtercard. However, with the ascension of the PCI bus for sound cards and large amounts of RAM in computers, most soundcards adopted a so-called “soft wavetable” approach, loading 2MB–8MB of sampled musical instruments into the computer’s RAM.
Whereas early games supported only digitized audio samples (because most early sound cards had very poor MIDI support), late DOS games such as DOOM began to exploit the widespread wavetable-based MIDI support found on most mid-1990s and more recent sound cards. With all current sound hardware supporting wavetable MIDI and the improvements in DirectX 8.x and above for MIDI support, MIDI sound has become far more prevalent for game soundtracks. Many websites also offer instructions for patching existing games to allow MIDI support. Whether you play the latest games or like music, good MIDI performance is likely to be important to you.
The most important factor for high-performance MIDI is the number of hardware voices. Even the best sound cards normally support only 128 voices in hardware; the remainder of the voices required by a MIDI soundtrack must come from software. If your sound card supports only 32 MIDI voices in hardware or uses software synthesis only, consider replacing it with a newer model. Many of the models currently on the market support more than 500 simultaneous voices and 64 hardware voices for under $50.
Data Compression
Virtually all audio adapters on the market today can easily produce CD-quality audio, which is sampled at 44.1KHz. At this rate, recorded files (even of your own voice) can consume more than 10MB for every minute of recording. To counter this demand for disk space, many audio adapters include their own data-compression capability. For example, the Sound Blaster series includes on-the-fly compression of sound files in ratios of 2:1, 3:1, and 4:1.
Most manufacturers of audio adapters use an algorithm called Adaptive Differential Pulse Code Modulation (ADPCM) compression (it’s also called IMA-ADPCM), which was developed by the Interactive Multimedia Association (IMA) to reduce file size by more than 4:1. IMA-ADPCM compresses 16-bit linear samples down to 4 bits per sample. However, a simple fact of audio technology is that when you use such compression, you lose sound quality. Unfortunately, no standard exists for the use of ADPCM. For example, although both Apple and Microsoft support IMA-ADPCM compression, they implement it in different ways. Apple’s standard AIFF and Microsoft’s standard WAV file formats are incompatible with each other unless you use a media player that can play both.
When you install an audio adapter, several codecs (programs that perform compression and decompression) are installed. Typically, some form of ADPCM is installed along with many others. To see which codecs are installed on your system, open Windows Media Player (version 11 or later), select Show Classic Menus and click Help, About Windows Media Player. Then click the Technical Support Information link. In the browser window that opens, scroll down to see the installed audio codecs. In Windows XP, you can also open the Sounds and Audio Devices tool in the Control Panel, click the Hardware tab, select Audio Codecs, and click the Properties button. The codecs are listed in order of priority, highest to lowest. You can also change the priority if you prefer a different order of priority.
The most popular compression standard is the Motion Pictures Experts Group (MPEG) standard, which works with both audio and video compression and is gaining support in the non-PC world from products such as DVD players. MPEG by itself provides a potential compression ratio of 30:1. The popular MP3 sound compression scheme is an MPEG format, and it can be played back on most versions of the Windows Media Player, as well as by various other audio player programs and devices.
Multipurpose Digital Signal Processors
Many audio adapters use digital signal processors (DSPs) to add intelligence to the adapter, freeing the system processor from work-intensive tasks such as filtering noise from recordings and compressing audio on the fly. The DSP can be upgraded with software downloads to accommodate more simultaneous audio streams. The widespread use of DSPs in better-quality audio adapters enables you to upgrade them through software instead of the time-consuming, expensive process of physical replacement.
Sound Drivers
As with many PC components, a software driver provides a vital link between an audio adapter and the application or operating system that uses it. In most cases, the best place to find the most recent drivers for a piece of hardware has been the sound card manufacturer’s own website. However, in some cases, you can also download and install them automatically through Windows Update.
Sound Cards for Sound Producers
Sound producers are people who intend to create their own sound files. These can range from casual business users recording low-fidelity voice annotations to professional musicians. These users need an adapter that can perform as much of the audio processing as possible itself, so they don’t place an additional burden on the system processor. Adapters that use digital signal processors (DSPs) to perform compression and other tasks are highly recommended in this case. Musicians will certainly want an adapter with as many voices as possible and a wavetable synthesizer. Adapters with expandable memory arrays and the capability to create and modify custom wavetables are also preferable.
Many of the best sound cards for hardcore gamers can also be made suitable for sound producers by adding the appropriate sound-editing programs, such as Sound Forge, and by equipping the card with the appropriate connectors for SPDIF digital audio and MIDI interfaces. Many high-end sound cards include an internal breakout box with these features.
If you need to edit or output multiple audio sources, you need a sound card designed to handle multiple I/O sources. These products often include an external breakout box.
Note
The Recording Review website (www.recordingreview.com) is an outstanding resource for researching advanced sound cards and other audio hardware designed specifically for audio production.
Audio Adapter Concepts and Terms
To fully understand audio adapters and their functions, you need to understand various concepts and terms. Terms such as 16-bit, 24-bit CD quality, and MIDI port are just a few. Concepts such as sampling and digital-to-audio conversion (DAC) are often sprinkled throughout stories about new sound products. You’ve already learned about some of these terms and concepts; this section describes many others.
The Nature of Sound
To understand an audio adapter, you must understand the nature of sound. Every sound is produced by vibrations that compress air or other substances. These sound waves travel in all directions, expanding in balloon-like fashion from the source of the sound. When these waves reach your ear, they cause vibrations that you perceive as sound.
Two of the basic properties of any sound are its pitch and intensity.
Pitch is the rate at which vibrations are produced. It is measured in the number of hertz (Hz), or cycles per second. One cycle is a complete vibration back and forth. The number of Hz is the frequency of the tone; the higher the frequency, the higher the pitch.
Humans can’t hear all possible frequencies. Very few people can hear sounds with frequencies less than 16Hz or greater than about 20KHz (kilohertz; 1KHz equals 1,000Hz). In fact, the lowest note on a piano has a frequency of 27Hz, and the highest note has a frequency a little higher than 4KHz. Frequency-modulation (FM) radio stations can broadcast notes with frequencies as high as 15KHz.
The amazing compression ratios possible with MP3 files, compared to regular CD-quality WAV files, is due in part to the discarding of sound frequencies that are higher or lower than normal hearing range during the ripping process.
The intensity of a sound is called its amplitude. This intensity determines the sound’s volume and depends on the strength of the vibrations producing the sound. A piano string, for example, vibrates gently when the key is struck softly. The string swings back and forth in a narrow arc, and the tone it sends out is soft. If the key is struck more forcefully, however, the string swings back and forth in a wider arc, producing a greater amplitude and a greater volume. The loudness of sounds is measured in decibels (db). The rustle of leaves is rated at 20db, average street noise at 70db, and nearby thunder at 120db.
Evaluating the Quality of Your Audio Adapter
The quality of an audio adapter is often measured by three criteria: frequency response (or range), total harmonic distortion, and signal-to-noise ratio.
The frequency response of an audio adapter is the range in which an audio system can record or play at a constant and audible amplitude level. Many cards support 30Hz–20KHz. The wider the spread, the better the adapter.
The total harmonic distortion measures an audio adapter’s linearity and the straightness of a frequency response curve. In layman’s terms, the harmonic distortion is a measure of accurate sound reproduction. Any nonlinear elements cause distortion in the form of harmonics. The smaller the percentage of distortion, the better. This harmonic distortion factor might make the difference between cards that use the same audio chipset. Cards with cheaper components might have greater distortion, making them produce poorer-quality sound.
The signal-to-noise ratio (S/N or SNR) measures the strength of the sound signal relative to background noise (hiss). The higher the number (measured in decibels), the better the sound quality.
These factors affect all types of audio adapter use, from WAV file playback to speech recognition. Keep in mind that low-quality microphones and speakers can degrade the performance of a high-quality sound card.
Sampling
With an audio adapter, a PC can record waveform audio. Waveform audio (also known as sampled or digitized sound) uses the PC as a recording device (such as a tape recorder). Small computer chips built into the adapter, called analog-to-digital converters (ADCs), convert analog sound waves into digital bits that the computer can understand. Likewise, digital-to-analog converters (DACs) convert the recorded sounds to an audible analog format.
Sampling is the process of turning the original analog sound waves into digital (binary) signals that the computer can save and later replay (see Figure 13.3). The system samples the sound by taking snapshots of its frequency and amplitude at regular intervals. For example, at time X the sound might be measured with an amplitude of Y. The higher (or more frequent) the sample rate, the more accurately the digital sound replicates its real-life source and the larger the amount of disk space needed to store it.
Figure 13.3 Sampling turns a changing sound wave into measurable digital values.
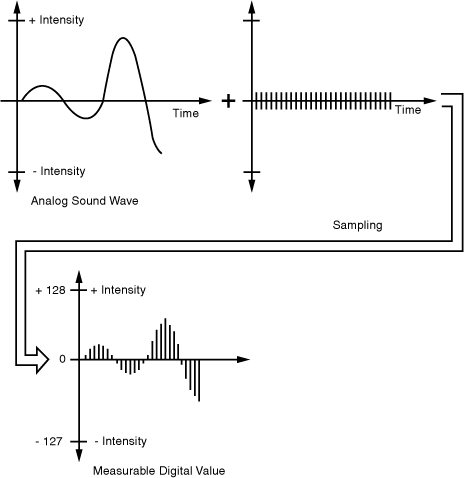
Originally, sound cards used 8-bit digital sampling, which provided for only 256 values (28) that could be used to convert a sound. More recently, sound cards have increased the quality of digitized sound by using 16-bit (216) sampling to produce 65,536 distinct values. Today’s highest-quality sound cards feature 24-bit sampling (224), which translates into more than 14.8 million possible digital values that can be matched to a given sound.
You can experiment with the effects of various sampling rates (and compression technologies) by recording sound with the Windows Sound Recorder (in Windows XP or earlier versions; neither Windows Vista nor Windows 7’s Sound Recorder permits selection of different sampling rates) or a third-party application set to CD-quality sound. Save the sound and play it back at that highest-quality setting. Then convert the file to a lower-quality setting and save the sound file again with a different name. Play back the various versions and determine the lowest quality (and smallest file size) you can use without serious degradation to sound quality.
Motherboard Chipsets with Integrated Audio
The Intel 810 chipset (introduced in April 1999) was the first mainstream motherboard chipset to integrate audio. Integrated audio can be found in virtually all motherboard chipsets (and therefore motherboards) since then. Even though modern boards include integrated audio, you can still add your own audio solution via an expansion card or USB device if desired.
While some of the earliest integrated audio implementations left a lot to be desired, thanks to improvements in chipset design and faster CPU performance, today’s best integrated chipsets provide solid mid-range performance. Virtually all current chipsets from Intel, VIA, ALi, and SiS have integrated audio (see Chapter 4, “Motherboards and Buses,” for details). Modern systems with integrated audio support at least one of the following audio standards:
• AC’97
• Intel High Definition Audio (Azalia)
AC’97 Integrated Audio
The phrase AC’97 integrated audio can be found in the descriptions of many recent systems. Because AC’97 can replace the need for a separate audio card but might not be a satisfactory replacement, you need to understand what it is and how it works.
AC’97 (often referred to as AC97) is an Intel specification that connects an audio codec (compression/decompression) architecture to a section of a South Bridge, an I/O Communications Hub chip called the AC-Link control, or an audio controller such as the VIA Envy24 series. The AC-Link control works with the CPU and an AC’97 digital signal processor (DSP) to create audio.
The AC’97 audio codec could be a physical chip on the motherboard (the most common form in recent systems), a chip on a small daughterboard called a communications and networking riser (CNR), or a software program. Thus, a motherboard with AC’97 integrated sound support doesn’t require the use of a separate audio card for sound playback. Sometimes AC’97 is also used to refer to audio chips on a sound card, but in this discussion we will use it to refer only to integrated audio. Sometimes motherboards also integrate an analog modem through an MC ’97 codec chip, or they might have an AMC ’97 (audio/modem) codec chip to combine both functions.
Note
Some low-cost sound cards and some USB-based audio products use AC’97 codec chips along with additional components instead of traditional single-chip audio solutions.
It’s important to realize that, although most recent chipsets support AC’97 audio, this does not mean that every motherboard built on a particular chipset uses the same AC’97 codec, or even the same method of creating sound. In most cases, AC’97 is implemented through a small AC’97 codec chip on the motherboard. It can be surface-mounted as shown in Figure 13.4, but many vendors use a small socket instead.
Figure 13.4 The Realtek ALC850 is a typical AC’97 2.3–compliant codec chip with surround audio support.

A few motherboards use an AMR or a CNR riser card to implement AC’97 audio along with audio ports.
For various reasons, including audio codec features and price, different motherboard vendors might use different AC’97 codec chips on motherboards that use the same chipset.
Major vendors of AC’97 codecs include Analog Devices (SoundMAX), C-Media, Cirrus Logic (Crystal Audio), National Semiconductor, Realtek (includes former Avance Logic products), SigmaTel (STAC C-Major), VIA Technologies, and Wolfson Microelectronics plc.
Note
The drivers for a particular AC’97 codec chip are supplied by your motherboard vendor because they must be customized to the combination of codec and South Bridge/ICH chip your motherboard uses.
Although the AC’97 specification recommends a standard pinout, differences do exist between AC’97 codec chips. Some vendors of AC’97 chips provide technical information to help motherboard builders design sockets that can be used with different models of the AC’97 codec chip. However, in other cases, AC’97 codecs are surface-mounted to the motherboard.
The four versions of the AC’97 codec are as follows:
• AC’97 1.0—Has fixed 48KHz sampling rate and stereo output.
• AC’97 2.1—Has options for variable sampling rate and multichannel output.
• AC’97 2.2—Has AC’97 2.1 features plus optional SPDIF digital audio and enhanced riser card support. Released in September 2000.
• AC’97 2.3—Has AC’97 2.1/2.2 features plus support for true Plug and Play detection of audio devices. Released in July 2002.
Note
Audio solutions that use AC’97 2.3–compliant codecs can detect whether you have connected a speaker to the microphone jack or a microphone to the speaker jack and warn you that the wrong jack is being used for the device. This helps eliminate one of the most common causes of audio failures.
Most recent motherboards with integrated audio support AC’97 2.2 or 2.3. To learn more about the AC’97 specification, you can download the standard at http://download.intel.com/support/motherboards/desktop/sb/ac97_r23.pdf
To determine whether a particular motherboard’s implementation of AC’97 audio will be satisfactory, follow these steps:
1. Determine which codec chip the motherboard uses. Read the motherboard manual or see which driver the motherboard uses for audio.
2. Look up the chip’s features and specifications. If you are not sure of the chip manufacturer, look up the part number with a search engine such as Google.
3. Use a search engine to find reviews of the chip’s sound quality and performance (typically found as part of a motherboard review).
4. Look at the motherboard’s features to determine whether it uses the full capabilities of the codec chip. Chips that support AC’97 2.1 can offer up to six-channel analog audio; those that support AC’97 2.2 can also offer SPDIF digital audio. However, motherboard makers don’t always provide the proper outputs.
5. Analyze how you use audio. If you play a lot of 3D games, you’re not likely to be satisfied with the performance of any integrated audio solution, no matter what its features might be. You can disable onboard audio with a BIOS setting if you prefer to install your own audio card.
![]() For details on how to enable and disable onboard audio, see “Advanced Peripheral Configuration,” p. 350 (Chapter 5, “BIOS”).
For details on how to enable and disable onboard audio, see “Advanced Peripheral Configuration,” p. 350 (Chapter 5, “BIOS”).
Intel “Azalia” HD Audio
Intel released Intel High Definition (HD) Audio in 2004 in order to deliver high-definition audio capable of playing back more channels at higher quality than the previous AC’97-integrated audio standard. The hardware based on Intel HD Audio specifications is capable of delivering 192KHz/32-bit quality for eight channels, and supports up to 7.1 surround audio. During its development, HD Audio was known by the code-name “Azalia,” and some vendors still refer to it by this name.
Although HD Audio was developed by Intel, it is also supported by most third-party audio codec vendors. Most systems built in 2004 and later with integrated surround audio now include support for HD Audio as well as the older AC’97 audio standard.
HD Audio is the foundation for the Unified Audio Architecture (UAA) audio design used in Windows Vista and later.
HD Audio not only can detect when devices are plugged in to an audio jack but can also change the default assignment of the audio jack to match the device being inserted. This helps to reduce audio failures caused by mismatched devices and jacks.
Installing a Sound Card
Before you can install a sound card, you must open your computer. In almost all cases today, you will install a PCI or PCI Express audio adapter that supports Plug and Play configuration.
If your computer has integrated audio, in most cases you should disable it. You could have audio conflicts with AC’97 or Intel HD Audio codec-based solutions and resource conflicts with solutions that emulate the Creative Sound Blaster. Refer to Chapter 5 for details.
Selecting an Expansion Slot
If you have several empty bus slots from which to choose, install the audio adapter in the slot that is as far away as possible from the other cards in the computer. This reduces any possible electromagnetic interference; that is, it reduces stray radio signals from one card that might affect the sound card. The analog components on audio adapters are highly susceptible to interference, and even though they are shielded, they should be protected as well as is possible. Next, you must remove the screw that holds the metal cover over the empty expansion slot you’ve chosen. Remove your audio adapter from its protective packaging. When you open the bag, carefully grab the card by its metal bracket and edges. Do not touch any of the components on the card because any static electricity you might transmit can damage the card. Also, do not touch the gold-edge connectors. You might want to invest in a grounding wrist strap, which continually drains you of static build-up as you work on your computer.
Before you make your final decision about which slot to use for your audio adapter, take a careful look at the external cables you must attach to the card. Front and rear speakers, microphone, game controller, line in, SPDIF, and other cables that attach to your system can interfere with (or be interfered by) existing cables already attached to your system. It’s usually best to choose a slot that allows you to route the audio cables away from other cables. If you’re installing a sound card that uses an internal bay mounted breakout box, be sure the ribbon cable from the drive bay used for the breakout box can comfortably reach the connector on the sound card. You might have to move an optical drive to a different drive bay to free up a drive bay needed by the breakout box.
Figure 13.5 shows a sound card after installation in a computer. The four-wire analog and two-wire digital cables to the optical drive are connected to the card, as is the ribbon cable to the card’s internal breakout box.
Figure 13.5 A sound card installed with analog and digital cables from the optical drive attached.

Many sound cards and optical drives have analog and digital audio connectors that support a two-wire connector. These are generally not required on systems running Windows XP or later, which support reading digital music data directly over the Serial or Parallel ATA data cable connection.
Next, insert the adapter’s edge connector in the bus slot, but first touch a metal object, such as the inside of the computer’s cover, to drain yourself of static electricity. When the card is firmly in place, attach the screw (refer to Figure 13.5) to hold the expansion card and then reassemble your computer.
Connecting PC Speakers and Completing the Installation
After the adapter card is installed, you can connect small speakers to the external speaker jack(s). Typically, sound cards provide 4 watts of power per channel to drive unpowered bookshelf speakers. If you are using speakers rated for less than 4 watts, do not turn up the volume on your sound card to the maximum; your speakers might burn out from the overload. You’ll get better results if you plug your sound card into powered speakers—that is, speakers with built-in amplifiers. If your sound card supports a four-speaker system, check the documentation to see which jack is used for the front speakers and which for the rear speakers. To use the rear speakers for 3D audio, adjust the properties with the mixer control software supplied with your sound card.
Tip
If you have powered speakers but don’t have batteries in them or have them connected to an AC adapter, don’t turn on the speakers! Turning on the speakers without power will prevent you from hearing anything at all. Leave the speakers turned off and use the volume control built in to your sound card’s mixer software instead. Powered speakers sound better, but most small models can run without power in an emergency.
Some computer power supplies feature small jacks to provide power for computer speakers.
When the sound card installation is finished, you should have a speaker icon in the Windows System Tray.
In some cases, you might be asked to insert the Windows install disc if additional drivers are required to complete the installation.
If you use digital sound sources or output such as Dolby 5.1, CD digital, or SPDIF, open the properties sheet for your mixer device and enable the display of these volume controls.
Use the volume control to ensure your speakers are receiving a sound signal. The mixer sometimes defaults to Mute. You can usually adjust volume separately for wave (WAV) files, MIDI, microphone, and other components.
Using Your Stereo Instead of Speakers
Another alternative is to patch your sound card into your stereo system for greatly amplified sound and for support of advanced Dolby Digital sound for DVD playback. Check the plugs and jacks at both ends of the connection. Most stereos use pin plugs, also called RCA or phono plugs, for input. Although pin plugs are standard on some sound cards and breakout boxes, most use miniature 1/8″ phono plugs, which require an adapter for connecting to your stereo system. For example, from RadioShack you can purchase an audio cable that provides a stereo 1/8″ miniplug on one end and phono plugs on the other. If you want to attach your sound card to Dolby 5.1 speakers, be sure you use cabling designed for the SPDIF connectors on your sound card. Some might use RCA-type plugs, whereas others use an optical cable with a square end (also known as a Toslink connector).
Make sure that you get stereo—not mono—plugs, unless your sound card supports only mono. To ensure that you have enough cable to reach from the back of your PC to your stereo system, get a 6-foot-long cable.
Hooking up your stereo to an audio adapter is a matter of connecting the plugs into the proper jacks. If your audio adapter gives you a choice of outputs—speaker/headphone and stereo line out—choose the stereo line out jack for the connection. This will give you the best sound quality because the signals from the stereo line out jack are not amplified. The amplification is best left to your stereo system. In some cases, you’ll attach a special DIN plug to your audio adapter that has multiple connections to your stereo system.
Connect this cable output from your audio adapter to the auxiliary input of your stereo receiver, preamp, or integrated amplifier. If your stereo doesn’t have an auxiliary input, other input options include—in order of preference—tuner, CD, and Tape 2. (Do not use phono inputs, however, because the level of the signals will be uneven.) You can connect the cable’s single stereo miniplug to the sound card’s stereo line out jack, for example, and then connect the two RCA phono plugs to the stereo’s Tape/VCR 2 Playback jacks.
The first time you use your audio adapter with a stereo system, turn down the volume on your receiver to prevent blown speakers. Barely turn up the volume control and then select the proper input (such as Tape/VCR 2) on your stereo receiver. Finally, start your PC. Never increase the volume to more than three-fourths of the way up. Any higher and the sound might become distorted.
Note
If your stereo speakers are not magnetically shielded, you might hear a lot of crackling if they are placed close to your computer. Try moving them away from the computer, or use magnetically shielded speakers.
Troubleshooting Sound Card Problems
To operate, an audio adapter needs hardware resources, such as IRQ numbers, a base I/O address, and DMA channels that don’t conflict with other devices. Most adapters come preconfigured to use the standard Sound Blaster resources that have come to be associated with audio adapters. However, problems occasionally arise even with Plug and Play adapters. Troubleshooting might mean that you have to change the settings used by your system BIOS for PnP devices, move the sound card to another slot, or even reconfigure the other devices in your computer. No one said life was fair.
Hardware (Resource) Conflicts
At one time, the most common problem for audio adapters (particularly if you still use ISA cards) is that they might conflict with other devices installed in your PC. Although this isn’t as common as it used to be, you might still run into situations where you notice that your audio adapter simply doesn’t work (no sound effects or music), repeats the same sounds over and over, or causes your PC to freeze. This situation is called a device conflict (or hardware conflict). What are they fighting over? Mainly the same bus signal lines or channels (called resources) used for talking to your PC. The sources of conflict in audio adapter installations are generally threefold:
• Interrupt requests (IRQs)—Hardware devices use IRQs to “interrupt” your PC’s CPU and get its attention. PCI cards can share IRQs, but ISA cards and onboard legacy ports such as serial, parallel, and PS/2 mouse ports can’t.
• Direct Memory Access (DMA) channels—DMA channels move information directly to your PC’s memory, bypassing the system processor. DMA channels enable sound to play while your PC is doing other work. ISA sound cards and PCI sound cards emulating the Sound Blaster standard require DMA settings; PCI sound cards running in native mode don’t use DMA channels.
• Input/output (I/O) port addresses—Your PC uses I/O port addresses to channel information between the hardware devices on your audio adapter and PC. The addresses usually mentioned in a sound card manual are the starting or base addresses. An audio adapter has several devices on it, and each one uses a range of addresses starting with a particular base address.
PCI-based sound cards and PCI-based onboard audio can share IRQs, don’t use DMA channels (except when emulating a Sound Blaster card), and can use a wide variety of I/O port addresses. Consequently, resource conflicts involving PCI-based audio are extremely rare today, in part because systems no longer use ISA slots or ISA cards (ISA devices cannot share IRQs). However, if you still work with ISA sound cards or ISA or PCI cards that use game ports, you might encounter resource conflicts. Resource conflicts can also happen in a virtualized environment.
Other Sound Card and Onboard Audio Problems
Like the common cold, audio adapter problems have common symptoms. Use the following sections to diagnose your problem.
No Sound
If you don’t hear anything from your audio adapter, consider these solutions:
• Make sure the audio adapter is set to use all default resources and that all other devices using these resources have been either reconfigured or removed if they cause a conflict. Use the Device Manager to determine this information.
• Are the speakers connected? Check that the speakers are plugged in to the sound card’s stereo line out or speaker jack (not the line in or microphone jack).
• Are the speakers receiving power? Check that the power “brick” or power cord is plugged in securely and that the speakers are turned on.
• Are the speakers stereo? Check that the plug inserted into the jack is a stereo plug, not mono.
• Are the mixer settings correct? Many audio adapters include a sound mixer application. The mixer controls the volume settings for various sound devices, such as the microphone or the CD player. There might be separate controls for both recording and playback. Increase the master volume or speaker volume when you are in the play mode.
If the Mute option is selected in your sound mixer software, you won’t hear anything. Depending on the speaker type and sound source type, you might need to switch from analog to digital sound for some types of sound output. Make sure that the correct digital audio volume controls are enabled in your audio device’s mixer control.
• Use your audio adapter’s setup or diagnostic software to test and adjust the volume of the adapter. Such software usually includes sample sounds used to test the adapter.
• Turn off your computer for 1 minute and then turn it back on. A hard reset (as opposed to pressing the Reset button or pressing Ctrl+Alt+Delete) might clear the problem.
• If your computer game lacks sound, check that it is designed to work with your audio adapter. For example, some legacy (DOS-based) and early Windows games might require the exact settings of IRQ 7 (or IRQ 5), DMA 1, and I/O address 220 to be Sound Blaster compatible. You also might need to load DOS drivers to enable some recent sound cards to work with DOS games.
• If you’re using motherboard-integrated audio, make sure the onboard audio is enabled (check the BIOS setup program) and that the proper drivers and player program have been installed (check the Windows Control Panel).
• If you’re using motherboard-integrated audio that uses a removable header cable (such as with many SPDIF optical or four/six-channel analog speaker configurations), make sure the header cable is properly connected to the motherboard.
One-sided Sound
If you hear sound coming from only one speaker, check out these possible causes:
• Are you using a mono plug in the stereo jack? A common mistake is to use a mono plug in the sound card’s speaker or stereo out jack. Seen from the side, a stereo connector has two darker stripes. A mono connector has only one stripe.
• If you’re using amplified speakers, are they powered on? Check the strength of the batteries or the AC adapter’s connection to the electrical outlet. If each speaker is powered separately, be sure that both have working batteries.
• Are the speakers wired correctly? When possible, use keyed and color-coded connectors to avoid mistakes.
• Is the audio adapter driver loaded? Some sound cards provide only left-channel sound if the driver is not loaded correctly. Rerun your adapter’s setup software or reinstall it in the operating system.
• Are both speakers set to the same volume? Some speakers use separate volume controls on each speaker. Balance them for best results. Separate speaker volume controls can be an advantage if one speaker must be farther away from the user than the other.
• Is the speaker jack loose? If you find that plugging in your speaker to the jack properly doesn’t produce sound but pulling the plug halfway out or “jimmying” it around in its hole can temporarily correct the problem, you’re on the road to a speaker jack failure. There’s no easy solution; you’ll need to buy a new adapter or whip out your soldering iron and spend a lot more time on the test bench than most audio adapters are worth. To avoid damage to the speaker jack, be sure you insert the plug straight in, not at an angle.
Volume Is Low
If you can barely hear your sound card, try these solutions:
• Are the speakers plugged into the proper jack? Speakers require a higher level of drive signal than headphones. Again, adjust the volume level in your mixer application.
• Are the mixer settings too low? Again, adjust the volume level in your mixer application. If your mixer lets you choose between speakers and headphones, be sure to select the correct speaker configuration.
• Is the initial volume too low? If your audio adapter has an external thumbwheel volume control located on the card bracket, check to ensure that it is not turned down too low. Check the speakers’ own volume controls as well.
• Are the speakers too weak? Some speakers might need more power than your audio adapter can produce. Try other speakers or put a stereo amplifier between your sound card and speakers.
Some Speakers Don’t Play
If you can hear sound coming from some speakers, but not others, check the following:
• Incorrect sound mixer settings—Most systems assume that you are using two-channel (stereophonic) sound, even if you have plugged in four or more speakers. Select the correct speaker type with the Windows Speaker icon or a third-party sound mixer.
• Additional speakers connected to the wrong jacks—Make sure you connect the additional speakers needed for four-channel or six-channel audio to the correct jacks. If you connect them to line in or microphone jacks, they won’t work.
• Incorrect balance settings—The volume control also adjusts the balance between the left and right speakers. If you hear audio from the left speakers only or the right speakers only, the balance control needs to be centered with the Windows Speaker icon or a third-party sound mixer.
Note
On some systems with integrated audio, audio jacks have multiple uses. For example, in six-channel mode on some systems, the normal line in and microphone jacks might be reconfigured to work with rear and center/subwoofer speakers. In such cases, the mixer controls need to be reset.
Some Types of Sounds Play, But Others Don’t
If you can hear CDs but not WAV or MP3 digital music, or can play WAV and MP3 but not CD or MIDI files, check the following:
• Low volume or mute settings for some audio types—Some audio mixers have separate volume controls for WAV/MP3, MIDI, CD digital, CD audio, and other sound types and sources. Unmute any audio types you play back and adjust the volume as desired.
• I/O port or DMA conflicts when playing DOS games—On most ISA-based sound cards or PCI-based sound cards or integrated audio solutions, separate I/O port address ranges and DMA channels are used for MIDI, FM synthesis, and normal audio. A conflict can cause some types of sounds not to play.
• Check the CD audio connection from your optical drive to your sound card.
Scratchy Sound
Scratchy or static-filled sound can be caused by several problems. Improving the sound can be as simple as rearranging your hardware components. The following list suggests possible solutions to the problem of scratchy sound:
• Is your audio adapter near other expansion cards? The adapter might be picking up electrical interference from other expansion cards inside the PC. Move the audio card to an expansion slot as far away as possible from other cards.
• An ISA-based audio adapter requires a lot of CPU attention. Frequent hard disk access can cause dropouts due to the CPUs switching between managing the sound card and the hard drive.
• Are your speakers too close to your monitor? The speakers can pick up electrical noise from your monitor. Move them farther away. Subwoofers should never be placed near the monitor because their powerful magnets can interfere with the picture. They should be on the floor to maximize low-frequency transmission.
• Are you experiencing compatibility problems between particular games and your sound card? If you notice sound problems such as stuttering voices and static on some games but not others, check with the game vendor for a software patch or with the sound card vendor for updated drivers. If the game uses DirectX under Windows XP or older versions, run the DXDIAG diagnostics program from the Windows Run dialog. Click Start, Run, type dxdiag and click OK. (Windows Vista and 7 also include DXDIAG, but they do not support hardware audio acceleration.) In DXDIAG, click the Sound tab. Adjust the slider for Hardware Sound Acceleration Level down one notch from Full (the default) to Standard, click Save All Information, and exit. Retry the game. If the problem persists, adjust the Hardware Sound Acceleration Level to Basic. If other games have performance problems after you adjust the Hardware Sound Acceleration Level, be sure to reset it to Full before playing those games.
Your Computer Won’t Start
If your computer won’t start at all, you might not have inserted the audio adapter completely into its slot. Turn off the PC and then press firmly on the card until it is seated correctly.
If you can’t start your computer after installing a new sound card and its drivers, you can use the Windows “bootlog” feature to record every event during startup; this file records which hardware drivers are loaded during startup and indicates whether the file loaded successfully, didn’t load successfully, or froze the computer. See the documentation for your version of Windows for details on how to create a bootlog when necessary.
Advanced Features
If you are having problems playing DVD audio, playing MP3 files, or using SPDIF connections, make sure of the following:
• You have enabled the hardware resources on the sound card.
• You are using the correct playback program.
• Your mixer has the correct volume control setting for the device.
• You have enabled digital playback (if you are using coaxial or optical SPDIF output).
• Your cabling is correct for the device.
Other Problems
Sometimes sound problems can be difficult to solve. Due to quirks and problems with the way DMA is implemented in some motherboard chipsets, problems interacting with certain cards or drivers can occur. Sometimes altering the Chipset Setup options in your CMOS settings can resolve problems. These types of problems can take a lot of trial-and-error to solve.
The PC standard is based loosely on the cooperation among a handful of companies. Something as simple as one vendor’s BIOS or motherboard design can make the standard nonstandard.
A good way to solve problems of all types with Plug and Play cards, a PnP BIOS, and Windows is to use the Device Manager to remove the sound card, restart the system, and allow the card’s components to be redetected. This installs a “fresh” copy of the software and reinserts Registry entries.
Speakers
Successful business presentations, multimedia applications, and MIDI work demand external high-fidelity stereo speakers. Although you can use standard stereo speakers, they are often too big to fit on or near your desk. Smaller bookshelf speakers are better.
Sound cards offer little or none of the amplification needed to drive external speakers. Although some sound cards have small 4-watt amplifiers, they are not powerful enough to drive quality speakers. Also, conventional speakers sitting near your display can create magnetic interference, which can distort colors and objects onscreen or jumble the data recorded on nearby floppy disks or other magnetic media.
To solve these problems, computer speakers need to be small, efficient, and self-powered. Also, they should be provided with magnetic shielding, either in the form of added layers of insulation in the speaker cabinet or electronic cancellation of the magnetic distortion.
Caution
Although most computer speakers are magnetically shielded, do not leave recorded tapes, watches, credit cards, or floppy disks in front of the speakers for long periods of time.
Quality sound depends on quality speakers. A 16-bit audio adapter might provide better sound to computer speakers, but even an 8-bit adapter sounds good from a good speaker. Conversely, an inexpensive speaker makes both 8-bit and 16-bit adapter cards sound tinny.
Speaker Selection Criteria
Dozens of models of PC speakers are on the market, ranging from inexpensive minispeakers from Sony, Creative, and LabTech to larger self-powered models from prestigious audio companies such as Bose, Cambridge Sound Works, Klipsch, Monsoon, and Altec Lansing. Many of the medium- to higher-end speaker systems even include subwoofers to provide additional bass response. To evaluate speakers, it helps to know the jargon. Speakers are measured by three criteria:
• Frequency response—A measurement of the range of high and low sounds a speaker can reproduce. The ideal range is 20Hz–20KHz, the range of human hearing. No speaker system reproduces this range perfectly. In fact, few people hear sounds above 18KHz. An exceptional speaker might cover a range of 30Hz–23,000Hz, and lesser models might cover only 100Hz–20,000Hz. Frequency response is the most deceptive specification because identically rated speakers can sound completely different.
• Total Harmonic Distortion (THD)—An expression of the amount of distortion or noise created by amplifying the signal. Simply put, distortion is the difference between the sound sent to the speaker and the sound you hear. The amount of distortion is measured in percentages. An acceptable level of distortion is less than 0.1% (one-tenth of one percent). For high-quality audio equipment a common standard is 0.05%, but the cheap amplifiers included with many inexpensive speakers have a distortion of 1% or more, which is at least 20 times greater.
• Watts—Usually stated as either total watts or watts per channel, this is the amount of amplification available to drive the speakers. This is one of the more misleading specifications because a valid comparison of output levels between different amplifiers can be difficult to make. Because distortion increases with power output, amplifiers with higher THD specifications will more easily have higher total or per-channel wattage ratings, and amplifiers driving more speakers will have higher total wattage figures as well, even though the amount of power to the primary stereo channels will usually be less. Finally, some manufacturers report an inflated and relatively meaningless PMPO (Peak Music Power Output) figure, instead of the RMS (Root Mean Square) figure standardized by the Federal Trade Commission. When making wattage number comparisons, make sure they are RMS values reported at the same level of THD; then you can compare either the total wattage figures or the per-channel figures for the primary front L and R (stereo) channels.
Before purchasing a speaker set, be sure to do your research and look at some reviews to see what others think about the speakers you are considering.
Inexpensive PC speakers sometimes use batteries to power the amplifiers. Because these speakers require so much power, you might want to invest in an AC adapter or purchase speakers that use AC power. With an AC adapter, you won’t have to buy new batteries every few weeks. If your speakers didn’t come with an AC adapter, you can pick one up from your local RadioShack or electronics supply store. Be sure that the adapter you purchase matches your speakers in voltage and polarity; most third-party adapters are multiple voltage, featuring interchangeable tips and reversible polarity.
You can control the volume and other sound attributes of your speakers in various ways, depending on their complexity and cost. Typically, each speaker has a volume knob, although some share a single volume control. If one speaker is farther away than the other, you might want to adjust the volume accordingly. Many computer speakers include a dynamic bass boost (DBB) switch. This button provides a more powerful bass and clearer treble, regardless of the volume setting. Other speakers have separate bass and treble boost switches or a three-band equalizer to control low, middle, and high frequencies. When you rely on your audio adapter’s power rather than your speakers’ built-in amplifier, the volume and dynamic bass boost controls have no effect. Your speakers are at the mercy of the adapter’s power.
For best audio quality, adjust the master volume on the sound card near the high end and use the volume control on powered speakers to adjust the volume. Otherwise, your speakers will try to amplify any distortions coming from the low-power input from the PC’s audio adapter.
A 1/8″ stereo minijack connects from the audio adapter’s output jack to one of the speakers. The speaker then splits the signal and feeds through a separate cable from the first speaker to the second one (often referred to as the satellite speaker).
Before purchasing a set of speakers, check that the cables between the speakers are long enough for your computer setup. For example, a tower case sitting alongside your desk might require longer speaker wires than a desktop computer.
Beware of speakers that have a tardy built-in sleep feature. Such speakers, which save electricity by turning themselves off when they are not in use, might have the annoying habit of clipping the first part of a sound after a period of inactivity.
Speakers that are USB based will not be capable of playing CD music unless the optical drive can perform digital audio extraction. Check your drive’s specifications for information.
Headphones are an option when you can’t afford a premium set of speakers. Headphones also provide privacy and enable you to play your PC audio as loud as you like.
For best results with newer sound cards that support four speakers or more, check the properties sheet for the audio adapter and set whether you’re using headphones, stereo speakers, or a larger number of speakers. Use your audio software to set up 3D or other audio effects.
Make sure that speakers are placed properly. If you use a subwoofer, put it on the floor for better bass sound and to reduce EMI interference with other devices.
How can you tell whether wireless satellite speakers are causing interference? Watch your monitor; frequencies as high as 2KHz can interfere with your video display. Move the speakers away from the monitor and check the display again.
Theater and Surround Sound Considerations
If you’re a serious gamer or DVD movie lover, you won’t be content with ordinary stereophonic sound. Most audio adapters now support front and rear speakers, and many of the best audio adapters also support Dolby-compatible 4.1 and 5.1 speaker setups. For high end use, you may prefer to connect your PC’s audio subsystem to a home theater system.
To ensure you get the sound you expect from four or more speakers, either directly connected to the system or via a home theater amplifier, check the following:
• Use the properties sheet for your audio adapter to properly describe your speaker setup. This includes selecting the number of speakers you are using, setting options for 3D environmental audio and positional sound such as reverb, and setting up your subwoofer if present.
• Make sure you use the correct cabling between your speakers and audio adapter. If you are planning to use AC3/Dolby speaker setups, such as 4.1, 5.1, 6.1, or 7.1, be sure you use the correct SPDIF connection and configuration. This varies from audio adapter to audio adapter; check the vendor’s website for details.
• Make sure you have placed your speakers correctly. In some cases you can adjust the audio adapter’s properties to improve sound quality, but sometimes you might need to move the speakers themselves.
• Make sure you have connected your speakers to the proper jacks. Mixing up left and right or front and rear causes poor sound quality.
• Select the correct setting in your amplifier configuration. If you are sending your computer’s audio signals to a home theater’s amplifier, make sure you select the output option corresponding to the input jacks you used. For example, many home theater amps have DVD and Video selections. If you also have a DVD player connected to your home theater, use the DVD connection for the DVD player and the Video connection for your PC. When you turn on your amplifier, select Video if you want to hear PC audio.
The simplest audio configuration available today is stereo, which uses two speakers placed to overlap sound. Most audio adapters now support at least four speakers, but depending on the audio adapter, settings, and sound output options in the program, the rear speakers might simply mirror the front speakers’ output, or you might have four distinct sound streams.
Four-point surround sound uses four speakers plus a subwoofer to surround you with music and gaming sound effects; the four speakers are placed around the listener, and the subwoofer is usually placed near a wall or in the corner to amplify its low-frequency sound. The subwoofer in stereo or four-point surround sound setups is not on a separate circuit but is controlled by the same signals sent to the other speakers. A stereo speaker system with a subwoofer is often referred to as a 2.1 speaker configuration, and a four-point surround sound configuration with a subwoofer is often referred to as a 4.1 speaker configuration.
5.1 Surround sound, also referred to as Dolby Digital or DTS Surround sound, uses five speakers plus a subwoofer. The fifth speaker is placed between the front two speakers to fill in any missing sound caused by incorrect speaker placement. The subwoofer is independently controlled. This is the preferred sound system for use with DVD movies. Most lower-cost audio adapters lack support for 5.1 Surround sound.
Some of the latest sound cards and motherboards with integrated audio support 6.1 and 7.1 Surround sound. The 6.1 configuration resembles the 5.1 Surround setup but adds a middle speaker along with a subwoofer. 7.1 Surround sound uses left-middle and right-middle speakers to flank the listener, along with a subwoofer. Depending on the sound card, some cards play back 5.1 or greater Surround sound configurations with analog speakers only, whereas others can also transmit Dolby Digital (AC-3), DTS Surround, or Dolby EX digital audio through the SPDIF digital audio port to a home theater system.
Microphones
Some audio adapters come complete with a microphone, but most do not. You’ll need one to record your voice to a WAV file. Selecting a microphone is quite simple. You need one that has a 1/8″ minijack to plug in to your audio adapter’s microphone jack (or audio in jack). Most handheld microphones have an on/off switch. However, you can also use the Mute control in the audio mixer to shut off the microphone.
Like speakers, microphones are measured by their frequency ranges. This is not an important buying factor, however, because the human voice has a limited range. If you are recording only voices, consider an inexpensive microphone that covers a limited range of frequencies. An expensive microphone’s recording capabilities extend to frequencies outside the voice’s range. Why pay for something you won’t be needing?
If you are recording music, podcasting, or producing other audio content that will be distributed, investing in a more expensive microphone is usually justified. However, in that case you should insure that your audio adapter can do justice to the signal produced by the microphone. A high-quality microphone can produce mediocre results when paired with a cheap audio adapter.
Your biggest decision is to select a microphone that suits your recording style. If you work in a noisy office, you might want a unidirectional microphone that will prevent extraneous noises from being recorded. An omnidirectional microphone is best for recording a group conversation.
Some audio adapters include a microphone. This can be a small lapel microphone, a handheld microphone, or one with a desktop stand. If you want to keep your hands free, you might want to shun the traditional handheld microphone for a lapel or desktop model. If your audio adapter does not come with a microphone, see your local stereo or electronics parts store. Be sure that any microphone you purchase has the correct impedance to match the audio adapter’s input.
If you’re using voice-recognition software, use the microphone supplied with the software or choose from alternative models the software vendor recommends. Run the microphone setup program again if your software has trouble recognizing your voice. Some models feature a battery pack to boost sound quality; be sure to check the batteries and replace them to keep recognition quality high.
If you’re talking but your voice-recognition or recording software isn’t responding, check the following:
• Incorrect jack. It’s easy to plug the microphone into the wrong jack. Try using a magic marker to color-code the microphone wire and jack to make matching up easier if your microphone or audio jack isn’t color-coded or uses competing standards. If your sound card or motherboard-based audio supports the auto-recognition feature included in AC’97 v2.3, make sure you plug in one cable at a time and select the device you connected when you are prompted by the audio setup program.
• The recording volume in the mixer control. This usually defaults to Mute to avoid spurious noise.
• Whether the microphone is turned on in the voice-recognition or recording software. You must click the Record button in recording software, and many voice-recognition programs let you “pick up” the microphone for use or “put it down” when you need to answer the phone. Look for an onscreen microphone icon in the Windows System Tray for fast toggling between modes.