
2 Light Dynamics and the Portrait

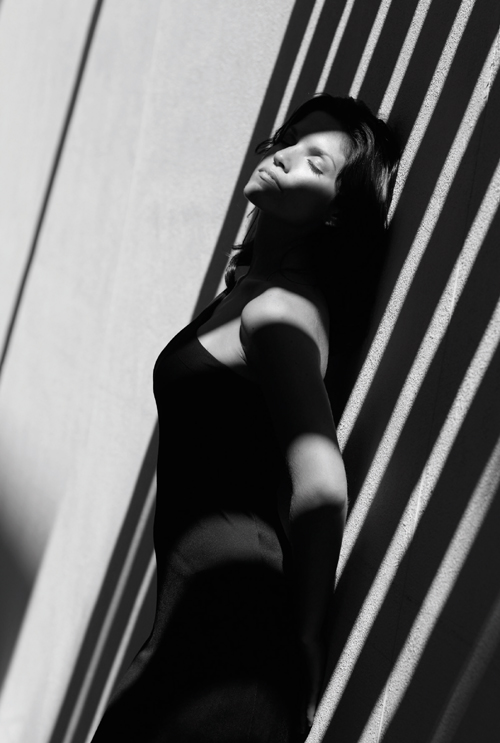
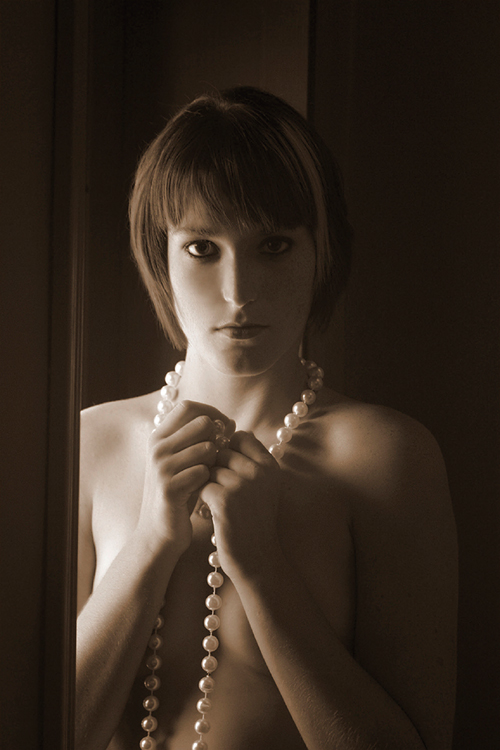
Joyce Wilson said of this image, “I had just finished with the assignment when the light from the setting sun caught my eye. With the atmosphere and the girl’s dress, there was the feeling of a fairy tale. But it was the light that caught my attention. To maintain the vision, I needed to capture the flare.”
© Joyce Wilson (Courtesy of the artist)
LD... Light Dynamics
The approach we have chosen is to deal with LD, or light dynamics, rather than present single solutions or methods to make specific portraits. Taking this point of view allows us to discuss both the physical realities of light and its effects on the subject. It also removes us from a simple “This is the way I do it” methodology to a discussion of how to solve lighting problems regardless of which side of the lighting equation they come from. The problems we find will not always fit within simple patterns. Through light dynamics, we build an understanding of our primary tool, the light and its effects, and how it makes successful photographs possible.
For portraiture, the key issue is that the way the light interacts with the subject’s hair, clothing, and skin determines the success of the portrait. It will be seen in the texture or lack of texture on the skin, the volume and form of the face, and the separation of the various areas of the picture. Therefore, we see control of the light dynamics as the way to make good portraits. The other aspects of good portraiture—pose, expression, and environment—will be dealt with later in the book.
Light dynamics are what make portraits possible. This has always been true with painting, and it is true now with digital portraiture. Photographers as well as painters use light to make portraits come alive and have form and volume through the addition of highlights and shadows. While light dynamics enliven portraits, we seldom see the light source itself. When light is visible in a portrait, we generally see light that is scattered, reflected by small particles in the air (dust, humidity, etc.), or emanated by an incident source. These types of effects are likely to be used for accents. In most situations, we see simply the effects of the light in the subject’s highlights and shadows.
There are four light dynamics that define the quality of the light used in portraiture:
- Highlights and shadows
- Intensity
- Direction of the light
- Color bias
Whether we create the light quality ourselves or find the light in a natural setting, these four factors control the light used to make a portrait.
While the lighting examples in this chapter show the dynamics of shadows very well, they cannot truly show the complexity of highlights. Highlight dynamics are difficult to see when reproduced on the printed page because of the limited range that the printing process is able to generate. Also, we put more emphasis on shadows early in the book because they are the determining factors in defining the shapes and features in the portrait.

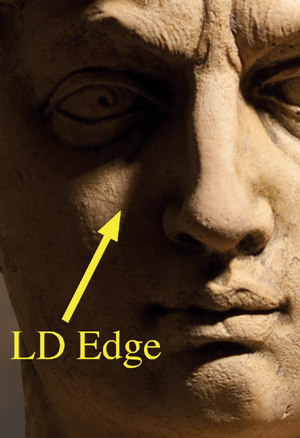
The light dynamic can be seen in the transitions between the lit and shadowed areas of the portrait. This is the Light Dynamic Edge (LD Edge).
Specular or Diffuse
Of the four light dynamics affecting the look of light in an image, the most important is the highlights/shadows dynamic that make up a portrait photograph. To begin, we analyze the quality of light in terms of its specular or diffuse nature. We think of specular and diffuse light as opposite ends of a spectrum. At the one end is an exceptionally specular light, a point source. At the other end is very diffuse light, like a thick overcast sky. Along this spectrum we describe the character of the highlights and shadows and the “Light Dynamic Edge” (LD Edge) between the highlights and shadows. We also describe specular light as hard, crisp, or harsh and diffuse light as smooth, soft, or broad. How these light dynamics interact with the skin, hair, and shape of the face control the look of the portrait.
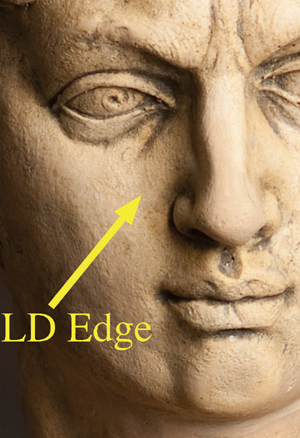
The LD Edge determines the feel of the portrait and defines the volume and shape of the face away from the contour. The specular/diffuse dynamic affects the light ratio of the portrait because of the amount of fill in the shadows. This particular issue will be dealt with in detail in chapter 5.
Whether a point source light, focused light, collimated light, or light modifier, specular light occurs when light strikes the subject with few or no angular differences or crossing light rays. The light emanates from a point source, from far away, or in parallel rays. The characteristics of this light produce small, intense highlights on the surface and well-defined, dark shadows.
We can create specular lighting with a bare bulb or any focused light using lenses or a focusing mirror and either continuous light or electronic flash. The specular highlight, or hot spot, falls off to the shadow relatively quickly on a textured surface. This lighting creates a distinct LD Edge that defines the surface shape where it divides the illuminated surface from the shadow. The more specular the light, the sharper and better defined the LD Edge. It must be said that when light acts on a surface, it might create a complex highlight containing various amounts of specular light mixed with diffused highlights. This issue will be addressed later in the book.
Because the shadows created by a specular light are dark with a crisp LD Edge, they can become visually important parts of the portrait. With most portraits, the LD Edge is not seen on the background or other objects, but if a shadow from a specular light appears on nearby surfaces, it will be well defined. In that case, the closer the shadow-catching surface is to the casting part of the subject, the sharper the cast shadow.
With specular lighting, the light dynamic shows with the dark and crisp shadows and the well-defined LD Edge
A diffuse light dynamic exists when the light produces numerous angles of illumination on the subject. Light can be diffused from a source that is scattered by a diffuser panel or reflected from a large surface such as an umbrella. Some atmospheric conditions, such as overcast skies or fog, naturally create diffuse light. Diffuse light reaches around edges, spreads out highlights, and allows light into shadows, thereby softening the portrait and reducing the contrast. The light on the subject displays open shadows that decrease the darkness and enlarge the highlights. With larger highlights, the fall-off to the shadow will be smooth and gradual, with a less distinct LD Edge. Just as diffuse and specular light are on opposite ends of a spectrum, diffuse light effects are the reverse of specular light effects with a lower lighting ratio.
With diffuse lighting, the light dynamic shows with the open and soft shadows and the weakly defined LD Edge
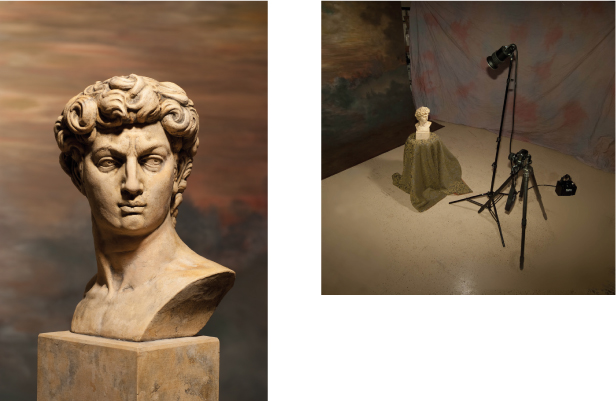
The diffuse quality of light is a combination of the size of the light and the distance of the diffusing medium from the subject. The largest light source available to a photographer on Earth is the sun; it is a specular source on a clear day because it is so far away. Only when conditions scatter the light, such as an overcast sky, does sunlight become diffuse. A large softbox close to the subject creates diffuse light, but that same light becomes specular the further away it is from the subject.

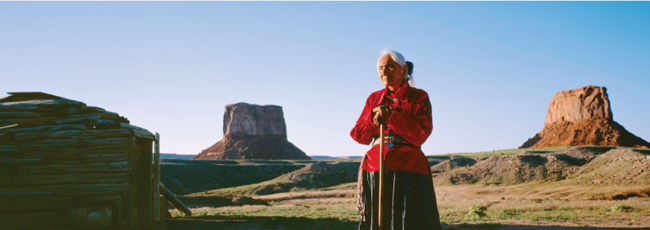
© Joyce Wilson (Courtesy of the artist)
Because the sky was clear, the sun cast strong, specular shadows
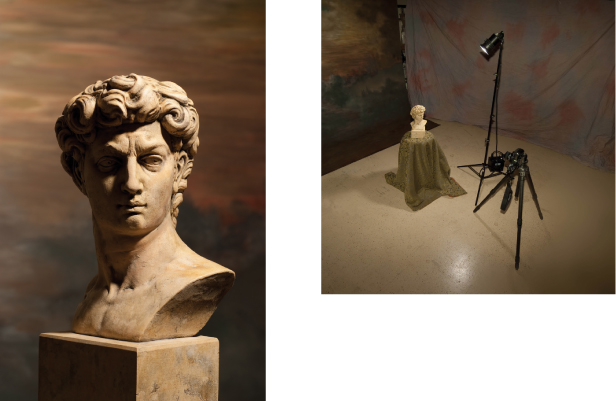
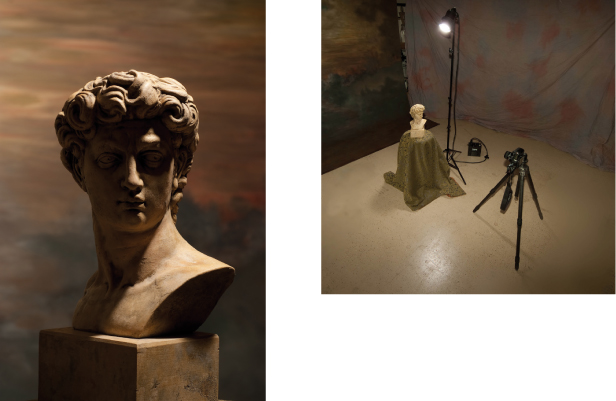
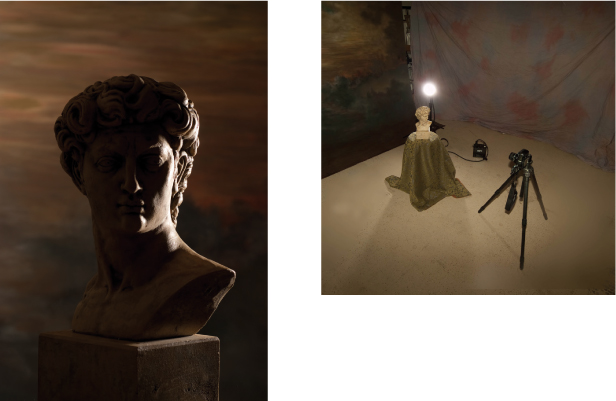
© Tim Meyer

As the light source, a small softbox, is moved from 29 inches to 58 inches and finally to 118 inches, the LD Edge becomes more defined and the shadow becomes darker
If the intensity and direction of the light are constant, specular light appears more harsh and shows off texture better than diffuse light. Diffuse light produces a softer look with more detail in the shadow areas. Skin textures in a portrait look smoother in diffuse light, while skin defects are more noticeable in specular light.
We can also use the terms “diffuse” and “specular” to discuss surfaces and reflections. In a portrait, a specular surface might be shiny, such as oiled or wet skin. This surface will reflect hot spots from lighting equipment with very little light visible on other areas of the subject. Even with a diffuse light, a specular surface will have crisper reflections. On the other hand, a diffuse surface spreads the light energy over a larger area and creates soft highlights. Powdered skin is an example of a diffused surface, and under specular light its LD Edge will be well defined. Effects on the skin are often complex, mixing varying amounts of diffuse and specular light. These effects can be controlled by various lights and modifiers and will be discussed later in the book.
To conclude this discussion, the quality of light that can be used for portraits possesses complex capabilities. Depending on the available lighting equipment, highlight and shadow characteristics can be modified from diffuse to specular.

In this portrait, the subject’s skin shows a specular characteristic. The highlights show this quality even though the skylight used for the portrait is diffuse.
© Matthew Scott Drake (Courtesy of the artist)

The two details show the effect of moving the light from 29 inches to 58 inches from the subject. The light has approximately two stops less intensity at twice the distance.
Intensity
Next, we will discuss how light intensity affects the quality of light. First, the intensity of the light establishes the key light (main light) and exposure for the portrait. The intensity of the fill, used to lighten the shadows and determine a lighting ratio, is the second light dynamic.
Intensity is not determined by the specular/diffuse dynamic of the light. Though the intensity of a lighting unit decreases as the light goes through a diffuser screen, once the light is scattered, its intensity is controlled by the distance from the subject. The closer the light, the greater the intensity. The Inverse Square Law predicts that if we move the light twice as far from the subject, the light’s intensity will be one quarter, or two stops, less than the original intensity. This law also works in the opposite direction: if you move the light one half the distance toward the subject, the intensity will be four times, or two stops, more than the original intensity. This holds true for an open bulb on the light beam’s axis or a bare bulb light. We will return to this subject in discussing light modification.
One factor that affects the intensity of the light is the size and form of the beam from the light source. Other than a point source light, the beam structure has three main parts: the central beam, the field area where light illuminates without a loss of one stop less intensity, and the falloff that goes from about three stops less intensity to no illumination. The central beam is concentrated around the light’s axis. It may be spread widely as a floodlight, be more constrained in a collimated form, or be somewhere between these extremes.
Direction
There are three directional dynamics that affect portrait photography:
- Axis of the face
- Axis of the camera
- Axis of the key light
The interaction of these axes defines the dynamics of the portrait. The axis of the face is perpendicular from the eyes. The axis of the camera is the line along the center point identified in the viewfinder. The axis of the key light is the line defining the central beam. The key light is the light that creates the dominant shadows and highlights and is used to set the base exposure.
For this beginning discussion, we will assume that the camera is in a fixed location without changing the axis, since the camera distance and angle do not affect light dynamics. While the axis of the camera can be considered steady, the axis of the face is movable and defined by posing, which will be dealt with in its own chapter. Once again, we will simplify this discussion by taking a ”mug-shot” approach so we can concentrate on the real light dynamic found in the axis of the key light. As the key light’s axis changes in relation to the face’s axis, most changes will occur in the lighting effects.
The directional component of the light dynamic affects the location of shadows and highlights. As the light axis comes closer to being perpendicular to the camera axis or the face’s axis, the light seems harsher with dramatic, elongated shadows. As the key light’s axis aligns with the camera’s axis, the light flattens out the face’s perceived depth and diminishes texture. In addition, as the light’s direction moves in relation to the subject and camera, the highlights will move, particularly with rounded forms. While in portrait photography we discuss the effects of the light’s axis in relation to the axis of the face, the camera’s axis determines how the texture, shape, and volume will be seen. As the light’s direction moves to where the LD Edge is clearly seen, the volume is easier to see (unless the main light’s axis is perpendicular to the camera axis).
The Light Dynamic Dome
The “light dynamic dome” (LD Dome) provides a method for showing the effects of moving the key light’s axis in relation to the face’s axis. It shows the light dynamic as controlled by the direction of the light. The foreground/background contrast establishes the contour of the portrait while the positioning of the LD Edge and the diffuse/specular quality of the light controls the form and volume within the face. The LD Edge appears at 90° from the light axis on a rounded surface; thus, it is visible in some form from all light positions other than behind the subject or if the light is blocked.

0-0 Or as near to the camera axis as possible. A camera flash produces this effect. The light is sterile and diminishes texture; it does not have an LD Edge to assist in seeing volume, shape, or depth. With on-camera flash, when there is a slight axis difference between the camera and the light, the shadow is thrown back into the scene. It will land on a surface behind and create a dark area around the edge of the face if the background is too close to the subject.
With the camera position and the point of view established, moving the light controls the LD Edge and the shadow/highlight creation in the portrait. The light dynamics produced by the interaction of the key light and face axes create emphasis as well as volume and depth. To better understand these dynamics, we imagine a dome that is equidistant over the subject. We then move light to different positions around the dome to see the effects on the face. In this example, we use 11 different locations on half of the dome, with and without a fill light. The positions we chose are the most common for portraiture. We also use words common to portrait photography in the accompanying captions. We use only half of the dome since the other half will produce similar results, only with the shadows and LD Edge projecting in the opposite direction. We have also done this demonstration without fill to show the light dynamic of each position.
Color
When we discuss color in light, two major considerations need to be addressed: the makeup of colors and the biases they have as we use light in a color capture environment.
In photography, we use “light primaries” for color mixing. This means that the basis of all colors that we can capture or see are components of red, green, and blue (RGB). While there are other ways to mix colors, using RGB is the most accurate choice. Based on this system, we find that the proportion of red, green, and blue defines all colors of light that make up any particular hue. For example, orange is made up primarily of red with less green to make it become more yellow; if the tone is lighter than the most saturated orange, it also contains some blue. To further this example, the computer mixture for this orange might be 240 red, 150 green, and 80 blue.
0-45 Horizontal features on the face such as the eyebrows, lips, and chin create LD Edges. Highlights are prominent on the forehead, cheeks, and nose. There is a good shadow from the chin’s edge.

0-70 This light tends to exaggerate shape, depending on the contours of the face. The bolder the facial features, the stronger the shadows. Textures on frontal surfaces are heightened.

45-0 This light is good for faces with strong vertical planar changes. Texture on front-facing surfaces is improved when the surface goes away from the light. Depth is shown through the shadows and the LD Edge on the cheek away from the light. If the nose is large or misshapen, its shadow may become problematic. The 45-0 position is not an attractive angle for portraiture. It casts horizontal shadows across the face, which are considered unflattering.
45-45 Often referred to as ¾ or open 45 lighting, this is one of the most common key light positions in portraiture. It is excellent for showing the shape of nonplanar objects and greater depth in the subject. The LD Edge is not on the meridian (the center) of the face, so off-set LD Edges between different planes add to the depth of the portrait. This light position also creates important highlights that add to the perceived depth of the image, particularly the highlights on the forehead, nose, chin, and both cheeks.

45-70 This light is dramatic with strong, bold shadows and strong highlights. With this lighting, the LD Edge is less important than the highlights for developing depth in the image. This light is not normally considered a good choice for portraiture due to the deep shadows obscuring the eyes.

90-0 This light position shows texture on vertical surfaces aligned with the light. The dominant feature is the LD Edge through the meridian of the face, which bisects it into light and shadow.

90-45 This is the most common location for split lighting when the face is on axis with the camera. Its dominant feature is the LD Edge through the meridian of the face, which bisects it into light and shadow. In this higher 45° position, it produces a more favorable light for portraiture.
90-70 While not a common lighting position, 90-70 shows the effect of a high light from the side
120-0 This light accentuates the shape of the face through highlights. The camera can become a problem as the light moves to the rear, and both the direct light and bright reflections can enter directly into the camera’s lens. This comes close to emulating the effect of side or edge lights in portraiture. Used to separate the subject from the background and to accentuate form, edge lights are commonly used in classical portraiture and were a signature style of artists like Yousuf Karsh.

120-70 This light is commonly used for a “hair light” in portraiture. As with other rear quadrant lighting, this setup is based on creating effects through highlights.
The sun late in the day takes on a reddish, warm tone
© Tim Meyer
When we mix colors in this way, we can envision a circle with RGB equally spaced around the outer edge. Within that circle, we can locate any light-generated hue. For the purposes of this book, we deal only with the colors around the outside edge (fully saturated colors). If we mix red and blue, we achieve magenta; with blue and green, we create cyan; and with red and green, we make yellow. These six colors make up the primary (RGB) and secondary (CMY) colors of light.
The secondary colors are the complements of the primaries. If we look at the color circle, also known as the color wheel, we recognize that across the circle from any color is its complement. This means that across the color wheel from orange is its complement, a bluish green. If fully saturated, complementary colors are mixed, they result in white light. Complementary colors that are not fully saturated mix to make neutrals (grays). Therefore, if the light source is yellowish in color (incandescent light), a blue filter or shifting the white balance toward blue neutralizes the color bias.
This effect happens with reflections as well. When light is reflected from a colored material, it takes on the color of that reflecting material. When a colored reflector is used, it acts like a colored light; it either adds a color to the subject or mutes the color of the subject if the color of the reflector is the subject’s complement. For example, a green reflector will gray out or reduce the redness of whatever part of a portrait receives the light coming from the reflector.

Spectral energy distributions of daylight, north light, and tungsten light. The color bias of each light source can be seen where the graph is higher. Midday daylight has a slightly blue bias, north light has a strong blue bias, and tungsten light has a strong reddish bias.
All light has some color bias. Sunrise and sunset are reddish in color, while shaded light on the north side of a building is bluish. Matching film and using white balance or correcting filters can neutralize color bias, or colored light can be added to the image for effect.
One of the main ways we speak about color in light is based on its color temperature. Without going into a highly technical discussion, let us lay out what happens to the color bias of light as its temperature changes. As an energy source becomes hotter, its color changes from red to blue. We first see the color as red-orange (sunrise/sunset), then as yellowish (e.g., tungsten light), then as bluish white (e.g., clear sky or electronic flash), and finally as blue (e.g., overcast sky). A scientist would describe these color biases in terms of Kelvins, but for the purposes of photography, we can simply say that the color is moving toward blue or toward red. This color bias is important for true color representations created by the light source and not related to filtered or manipulated color.
Color temperature can also be seen in spectral energy distribution; that is, the amount of different colors within the spectrum that can be seen as a bias. The spectral energy distribution for midday sunny light shows a slightly cyan bias, the north sky shows a highly blue color shift, and a clear sky shows the reddish color shift of tungsten light. Even though its spectral energy distribution is different, electronic flash has a color temperature similar to daytime sunlight.
We see the bias or other aspects of the light as the reflection of the light’s color. Color bias is reflected more in the mid tones than in any other area. In addition to the color bias, the light will also reflect nearby colors into the portrait if they are not controlled. For example, a portrait taken on grass may reflect green into the shadows of the subject. Also, materials that reflect high levels of ultraviolet energy, such as those washed in color brighteners, reflect higher amounts of blue.
© Joyce Wilson
(Courtesy of the artist)
Auto white balance can eliminate the color bias in digital cameras and filters can be used for adjusting the color bias when using film. However, a color bias may occasionally be desirable, such as in an image at sunset.
While the technical aspects of color impact how light is seen in a portrait, the perceptual and emotional aspects mean the most to us as portrait photographers. These will be discussed in more depth in chapter 10.