
5 Exposure and Metering
© Tim Meyer
Exposure refers to the capture of light on the camera’s sensor or film. Factors affecting exposure include the camera’s aperture and shutter speed as well as the speed of the sensor or film. When any one of these three factors remains constant, then the other two variables establish the exposure.
Though many portrait photographers believe they do not need to consider shutter speed because they use electronic flash, there are several situations where the shutter speed is crucial, such as when needing to include an unlighted background.
All photography is based on a 2:1 factor. Doubling the ISO increases the film or sensor’s sensitivity by a factor of 2. Both f-stops and shutter speeds are based on this doubling/halving function.
If the ISO is held constant (the method used for film), then f/4 at 1/125, f/5.6 at 1/60, f/8 at 1/30, and f/11 at 1/15 will all be equivalent exposures. (With digital sensors, the ISO is flexible.)
If the shutter speed is held constant, then f/11 at 400 ISO, f/8 at 200 ISO, and f/5.6 at 100 ISO will all be equivalent exposures.
If the f-stop is held constant, then 1/125 at 400 ISO, 1/60 at 200 ISO, and 1/30 at 100 ISO will all be equivalent exposures.
Basic Daylight Exposure
In some situations, understanding the basic power of sunlight will assist in making better exposures. Basic daylight exposure (BDE) gives the portrait photographer the ability to deal with ambient light as the key light, fill light, or background. BDE is based on the illumination level of clear sky sunlight. Also known as the “Sunny Day” or “Sunny 16” rule, it states that on a sunny day the proper exposure is f/16 at a shutter speed of 1/ISO.
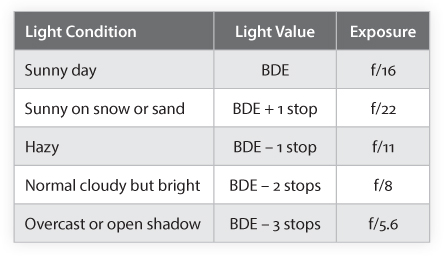
The table above shows specific recommended BDE exposures in various lighting situations. While BDE actually has an extensive list of recommended exposures for varying light conditions, the list presented here is shorter, focusing on exposures that might be used in an environmental or outdoor portrait.
Unmetered Electronic Flash Exposure
Electronic flash is the predominant method for lighting portraiture, and one of the most commonly used unmetered exposure methods is electronic flash guide numbers. The guide number is found by a formula that uses the intensity of the flash unit’s central beam and the ISO of the film or the sensor setting. Once we know the guide number (usually from the manufacturer’s publication), we can calculate the exposure; dividing the guide number by the distance to the subject gives the correct f-stop. Since shutter speed is not generally involved in electronic flash, the f-stop is the exposure control. For example, if the guide number for the key light flash unit is 110 and the distance from the flash unit to the subject is 10 feet, then the exposure will be f/11. (110 divided by 10 equals 11.)

These three meters allow the portrait photographer to use both ambient and electronic flash by reading incident light. The third meter, the L-578DR, also allows spot metering.
(Courtesy of Sekonic)
This technique is particularly helpful when using an on-camera fill flash or ring light in an ambient or backlit setting. The flash may or may not be used as the key light, but it will be important in setting the exposure for the face. This technique will be addressed later in this chapter.
Light Meters and Basic Metering
While it is possible to determine exposure without metering, most portrait photography is made with the aid of a light meter. Meters work with photocells similar to, but manufactured differently from, those in digital cameras. When the light’s energy is collected by the photocells, they can either create electric voltage or change the resistance in a circuit. When the current in the circuit is measured, it is calibrated to provide a measure of the light. In light meters, the light value is converted to provide f-stop and shutter speed in relation to a set ISO.
For portrait photography, a handheld light meter is the best choice. This is true for most studio-based photography. Since there will always be some movement in a subject, the structure of light is more important than the specific reflection in the portrait setting. While the flash power can be calculated within the camera’s through-the-lens (TTL) system, it will not accurately read the ratio or background.
Meters evaluate either the amount of light that falls on the subject (incident meters) or the amount of light reflected from the subject (reflective meters). The meter’s software measures the light and sets the exposure to acquire an 18% reflective value. For the portrait photographer, this is convenient since light flesh tone has approximately this value (dark skin is one stop lower).
Since an incident meter reads the amount of illumination rather than the amount of reflection, subject bias is avoided. The light is measured through a translucent diffuser covering the meter’s photocell. The translucent diffuser averages out the illumination falling on the subject. There are three types of translucent diffusers: dome, flat, and retractable. The most common design is the dome. When pointed at the camera, a dome receives light from all sources that illuminate the subject. Flat diffusers are affected only by light pointed at the diffuser. This is also true of retractable diffusers, which are even more restrictive because they retract into a housing that limits the amount of light being measured.
Generally speaking, flash meters are incident meters. While there are some reflective and spot flash meters, the incident light measuring method is superior for most portraiture. Modern meters simultaneously measure the high brief intensity of the electronic flash along with adding and/or separating the ambient light arriving at the subject. The flash meter reacts to the high intensity, short duration light and calculates the f-stop to provide the needed exposure. Some meters read both the flash and the ambient light to give a total light value.
Incident meters are not pointed at the subject to measure the light reflecting from its surface; rather, they are pointed either at the camera or at the key light from the subject’s position. When the meter is directed at the camera from the key lighted side of a portrait, it averages the key light directed at the subject and any ambient or fill light. When the meter is pointed at the light source, it measures the full illumination of the light as it reaches the subject’s surface. If the meter is pointed at the camera, it reads all light proportionally to its positioning. Therefore, if only part of the meter’s dome is lit, it will measure the light as less intense than when it is pointed directly at the light source. As we state later when discussing additive and source ratios, both methods work, but one must be chosen and consistently applied. It should also be obvious that pointing the incident meter at the camera is required for the additive method and pointing it at the light works best for the source method.
Reflective meters are infrequently used in portraiture but can be beneficial in certain situations. There are three types of reflective meters: average, programmed, and spot. Regardless of how much of the image is sampled to set the exposure—the amount of the image that is actually measured—the meter calculates the average light energy across the sample and sets that as the middle tone.
Software allows us to use digital camera sensors as meters. Also, metering photocells can be placed within the camera housing that read the light energy off the film’s surface or as the focused light passes through to establish exposure. These are known as TTL meters, and they are reflective meters. With digital cameras, the TTL system not only establishes the proper exposure level but also represents the range and distribution of the light through a graph known as the histogram. While the histogram can be used to assist in making a good exposure, it is directly related to the exposure settings entered into the camera. Therefore, a histogram can only tell whether the selected exposure fits within the camera’s abilities, not whether the exposure is the best available.
As a result of TTL and on-camera metering, “auto-exposure” settings are common on most cameras. These settings provide overall exposure calculation based on the light from the subject reflected back into the camera. It is important to remember that auto-exposure is not the only exposure choice. As with most reflective meter readings, auto-exposures are subject biased. If the subject shows mostly highlights, the auto-exposure setting will produce an underexposure. When the subject is dark, the image will be overexposed.
With the sophisticated sensors in today’s cameras, metering can be programmed to patterns rather than just basing an exposure on an average reading. The possibilities include weighted exposures and emphasizing certain areas of the frame; for example, programming can center weight a portrait to base an exposure on the face.
While a TTL meter can be accurate, it is inconvienent to set the camera on a tripod and use the TTL function. Furthermore, measuring the lighting ratio with a TTL is difficult compared to using a handheld reflective meter.
Substitution Metering
Many photographers only have an in-camera meter or a reflective handheld meter but wish to measure the light falling on the subject in order to avoid subject bias. This can be accomplished with substitution metering, which introduces a material with a known reflectivity, e.g., the palm of the hand (normally one stop lighter than 18%). The procedure is to measure the reflection from the substituted material with the knowledge of how it varies from the normal 18% reflectivity. Any material can be used as long as you know the number of stops it differs in reflectivity from 18%.
One easy way to use this method is a gray card that reflects 18% of the light falling on it. It is important to use the card at the same angle that you use for an incident meter.
To set the exposure for a portrait, the card should be perpendicular to the camera and as close as possible to the subject. This is important so that the card is illuminated by all the light provided on the highlight side of the subject. If the card produces some flare, do not readjust it because the flare will also be an issue in the photograph and needs to be considered in the metering.
Tonal Placement
Tonal placement can be very important in certain portraits. Because film and digital capture function differently, the way tonal placement is used can vary greatly. There are three different situations for the use of tonal placement: the general placement of a particular tone, such as skin tone; the placement of dark tones that are more critical when using film; and the placement of highlight tones when using digital capture.
Brigitte DeMayer © Tim Mantoani (Courtesy of the artist)
General tonal placement involves choosing a specific tone within the portrait and setting the exposure to reproduce that tone as a specific value. A reflective meter is required for all tonal placement techniques. Generally, a meter reading is taken for the critical tone, e.g., the facial tone of the cheek. As a result, the metered area reproduces as a middle tone. For light skin, one additional stop of exposure is given to the reading. For darker-skinned individuals, the reading ranges from an exposure of equal to the reading to two stops underexposure. The tonal placement approach to setting exposure adjusts not only the output of the chosen area but also all other areas of the portrait. For example, if underexposure is used to achieve a darker skin tone, it will also darken the entire portrait.
Dark-tone metering is perhaps the most useful nontechnical approach to expose film; however, it is not acceptable for digital capture because of the sensor’s inability to accept overexposure. This type of metering uses textured shadow (shadow detail) as the point for proper exposure. The phrase “expose for the shadows and develop for the highlights” explains how negative film-based photography worked for many years. (When shadow detail is critical, if it is not in the negative, then it will not appear in the final image.) Dark-tone metering is accomplished by determining the shadow area in the portrait that will be the darkest part with detail. This area of the setting is metered with a reflective meter that will produce a middle tone if not compensated. The compensation for exposure is to close down two stops. This results in a negative with good enough details in the shadows and enough latitude in the highlights that they will be represented well in the final print.
Digital capture and transparency film do not handle overexposure well. Because of this, exposure of the highlights becomes essential. With digital capture, “blowing out” highlights can be avoided by proper placement of the highlight tones. In this type of tonal placement, we select the area of highlights that needs to have detail in the final image. This area is measured with a reflective meter to provide an exposure that is two stops underexposed. The adjustment of the exposure by opening up two stops places detail in the highlight tones. Without this control, overexposure can result in “clipping,” i.e., white highlight values with no detail. Particularly when a portrait presents critical highlight detail, such as a bride in a white lace gown, highlight tonal placement is appropriate.
Average-value metering uses aspects of both dark-tone and highlight-tone metering to calculate exposure. With this method, we select and meter two tonal areas, one dark and one light, to establish a range of tones for the portrait. This exposure is defined by dividing the two tones. Effectively, we meter the shadow detail and the highlight detail and split the difference between the two. If there is no clear midpoint between the highlight and shadow meter readings, then a slight underexposure should be favored.

© Ray Prevost (Courtesy of the artist)
Testing for Exposure
When we are using digital capture, it is best to establish the correct Exposure Index (EI). This is the actual speed of our digital sensor rather than just the ISO setting on the digital camera. We need to know how the sensor will actually expose, its real speed, and its color bias. The following is a method for testing the sensor’s EI:
Speed Testing Digital Photography
You will need the following:
- An incident light meter.
- A test target that consists of white, 18% gray, and black areas that are large enough to measure with imaging software. These can be overlapped separate cards.
- A model wearing a textured white shirt or sweater. Alternatively, a piece of white material with heavy texture, ribs, or cabling can be draped over a shoulder.
- A camera in manual mode so that you can adjust the speed and aperture. Set the camera to capture RAW files.
Organize the test shot in the following manner:
- Find or create an evenly illuminated scene with an even, solid, dark background. If there is a bright background or backlighting, the test will be inaccurate.
- Put the cards on a stand near the model’s face. Make sure that you can see part of the white fabric in detail. The gray, black, and white cards must be parallel to the sensor’s plane (the back of the camera) for accuracy.
- Check to see that the light is nondirectional (diffuse) on the model and cards (no specular light).
- The ISO for the light meter must be the same as the selected ISO for the camera. (Because of noise considerations, we recommend that you use ISO 100 or the lowest available ISO for baseline testing.)
- Take an incident meter reading, and write down the f-stop and shutter speed.
- Start by setting the camera opened up two stops from the reading you made in step 5. This will be your first exposure.
- Close down the lens 1/3 stop and take the second exposure. If your lens has 1/2 stops, do the test in 1/2 stops. Record your information for each successive frame.
- Close down another 1/3 stop (or 1/2 stop if appropriate) and take another exposure. Repeat until you have a complete four-stop range.
To determine your camera’s true ISO, read the white card with the info marker in image software. Neutralize the file and then take information readings on the white card. (The neutralizing should not include adjusting the white point.) The correct exposure will be the frame where the white card value is approximately 245 with no exposure adjustment. This determination gives you the closest true white value that compares with your original meter reading.
If you organize the shooting and corresponding white point data in order, from most exposure to least exposure, you can see which exposure’s white point is closest to 245. The EI is the number of stops (1/3 or 1/2) away from the camera’s set ISO. For correct exposure, reduce the exposure setting if the EI is below the meter setting and increase the exposure setting if the EI is greater than the meter setting. Obviously, this method is viable only if the camera is used in manual mode and a light meter is used for testing.
To determine the highest amount of overexposure that your camera will allow and still give detail in white/highlight areas, start with your new EI exposure and view successively overexposed frames. Adjust exposure with the viewing software to avoid “clipping” by setting the white card at 245. You can magnify and view the white material with texture and look for the loss of detail, color shifts, blooming, and color fringing, thus determining the highest amount of overexposure that your camera will allow without significant degradation of the image. This finding is accurate whether the camera is used in manual or any automatic mode.