
6 Lighting Ratios
This image shows how the ratio is controlled to make the lighting look as though the light has a consistent direction from the high windows
© Arthur Rainville (Courtesy of the artist)
Techniques to convey details in highlights and shadows simultaneously have been part of painting since early human history. Because painters could interpret how they wished to delineate shadow detail, they could use the totality of their visual, mental, and artistic abilities to ensure the reading of details in the dark areas of a painting.
This approach differs from the photographic portrait process because the ability of the human perceptual system to see a range of light values is vastly different from the photographic process. The human perceptual system sees selectively; that is, when we look at a scene, our eyes automatically adjust for differences in illumination levels between light and dark areas. Our mind puts this information together seamlessly, processing light values across a 20-stop range. In contrast, photography is a nonselective means of viewing a scene that does not change to see variations. To emulate our normal visual ability to see details in highlights and shadows simultaneously, we must bring the levels of illumination closer together. This is where the concept of lighting ratios comes in.
Lighting ratios also relate to human perception in other major ways. Our visual system uses brightness to assist us in discerning depth. As subjects become brighter, they pull forward in visual space. If part of a portrait is bright, that area seems closer to the viewer than a darker area of the same image. This principle allows us to produce roundness and fullness in a portrait. If part of the portrait is maximum black, it becomes flat and absorbs energy from the image.
In talking about lighting ratios, the area of greatest concern is the face. This is true even if the totality of the image has a large dynamic range. We may be using kickers, hair lights, or darkened backgrounds, but they do not enter into our concern with how the ratio works.
Also, regardless of the other dynamics of the light, the LD Edge becomes more visible as the lighting ratio increases. The lower the ratio, the less volume can be seen in the portrait. This means that as long as the detail is maintained in the shadows, increasing the lighting ratios provides better volume and depth within the image. However, very high lighting ratios tend to show more texture, looking harsher and more dramatic. Therefore, for portraiture, moderate to lower lighting ratios are preferred.
Fit
While not normally discussed, the issue of how well a photographic system can capture and output the light is crucial to a successful portrait. This dynamic includes the effects of the camera system, the overall lighting of the subject, and finally, the output. “Fit” involves matching the contrast ratio of the light with the dynamic range of the capture and output systems. (While we have mentioned output, it will not be addressed further as the central thrust of this book is taking the portrait rather than printing it.)
At its simplest, the dynamic range of the camera system is the difference in stops between the darkest and lightest areas of the image that can be captured without losing detail. For film, this is defined as the difference between D-min (the lowest recorded light value) and D-max (the highest recorded light value). For negative film, it is 15 or more stops, depending on handling; with transparency film, the capture range is less than six stops. For digital cameras, the range is approximately 14 stops, though this is highly dependent on the software built into the camera.

This image has natural fill coming from the reflection of a nearby wall © Tim Meyer
The dynamic range of the lighting is more difficult to quantify than the capture range, and for portraiture, it is more important. Control of the lighting ratio is a complex issue for two reasons. First is the makeup of tones present in the subject. For example, if we make a portrait of a man in a black jacket with a bright white shirt, the dynamic range (also referred to as reflectance value) can be large. If the subject’s dynamic range exceeds the camera system’s ability to capture it, then “clipping” will occur; detail will be lost either from the highlights or shadows, and not all the image light will be captured.
Within the portrait studio, we have the ability to adjust the lighting to ensure that the brightest and darkest detailed reflections from the subject are within the capture capability. Two possible methods are the Zone System, the technical method of developing black-and-white film to match light conditions defined by Ansel Adams, and measured photography, a studio method that changes the lighting range to match the output abilities.
Regardless of the approach, in order to achieve fit, we need to control three dynamics: the capabilities of the camera system, the reflectivity of the detail range of the subject, and the light ratios.
Lighting Ratios
Lighting ratios are a means of measuring the different levels of illumination in a scene. In a portrait, we are dealing with the light from the highlight area as compared to the light in the shadow areas. Lighting ratios are numbers that represent the relative differences in intensity between these specific areas. A typical numerical representation might be a 3:1 lighting ratio. That means that the highlights (in this case represented by the 3) receive three times more light than the shadows (represented by the 1). A 5:1 ratio means that the highlights are illuminated with five times more light than the shadows.
The measurement and capture of lighting ratios in portrait photographs have been confusing to many. This is because there often is a discussion of the appropriateness of one of two specific methods based on either the measurement of relative intensity used for key and fill lights individually, or the relative intensity between the combined measurement of the key and fill lights and the fill light alone. These methods are the “source method” and the “additive method.”
The source method measures the key light and fill light independently. The light from each source is measured without the other light illuminating the subject. Thus the fill is turned on, the light value is measured, and then it is turned off. Then the key light (main light) is measured without the fill light. This method gives the light intensity values of each light unit.
The additive method is based on the assumption that the key and fill lights interact. First, the fill light is measured independently on the shadow side of the subject. Then the key light is turned on without turning off the fill light. A measurement of the combined key and fill lights is then taken on the highlight side of the subject of the combined key and fill lights.
At first glance, the distinction between the source and additive methods doesn’t seem that significant. It is! Fundamentally, one measures the light emitted from each source separately and the other measures the total amount of light that can be captured in the photographic process. Understanding this concept eliminates any confusion.
To better understand these measurement techniques, let’s begin by defining the positions of the key and fill lights. The key light is the light that determines the subject’s shape and dimension, as shown in chapter 2. For this example, we are using a key light placed at about 45° to the right of the camera/subject axis, about 45° above the camera’s axis. This is a very typical lighting setup in portraiture and is often called the 45/45 key light position. The fill light is in the traditional position directly above and behind the camera at 0/70, as described in chapter 2. Its sole function is to add light to the shadow areas. Placing it directly behind the camera eliminates any additional shadows that might be confusing in the portrait.
With this setup, using the source method we measure a 2:1 relative intensity difference between the key and fill lights. When we meter the fill light independently, it reads an intensity of f/5.6. (The shutter speed is irrelevant since we are using strobe lights.) Metering the key light independently, we get a reading of one stop brighter at f/8. In the source method, it is important to make sure that each light does not affect the meter reading of the other and that the incident dome of the meter points at the light from the subject.
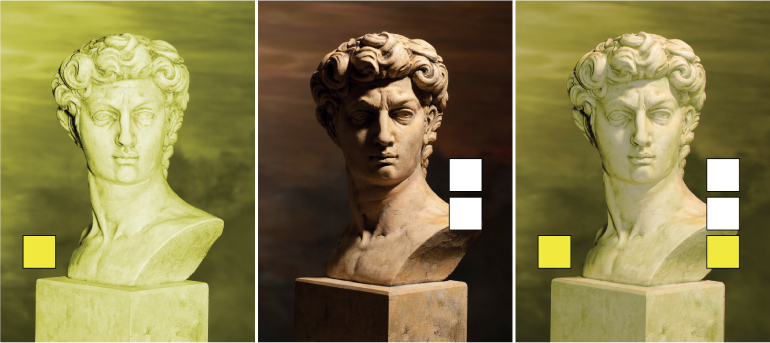
Each block indicates one unit of measured light intensity (e.g., f/5.6). The first image shows the fill as yellow light at an intensity of one unit/block. The second image shows the key as white light with an intensity of two units/blocks (f/5.6 + f/5.6 = f/8). The third image shows the effect of both the fill and key lights. In the fill area there is an intensity one unit/block while the key area has an intensity of two units/blocks from the key combined with one unit/block of intensity from the fill. Therefore, the lighting ratio is 3:1.
While the intensity ratio as measured by the source method is 2:1, the actual lighting ratio is 3:1 because the key light is strengthened in intensity by the overlay of the fill light.
When we use the additive method to determine the lighting ratio of the same setup, we measure the light differently. With the meter pointed at the camera from the subject, we measure the fill light from the shadow side and arrive at the same f-stop, f/5.6. However, when we read the highlight side with both the key light and the fill light, we find that the measurement reads f/8½ (about f/10 as read on a digital camera). This means the light ratio between the fill in the shadows and the total light in the highlights is 3:1.
In this example both measuring systems used the same lighting setup and produced the same functional ratio. However, the methods of description are different. The source method deals with the intensity of the lights, and the additive method deals with light on the subject. The source method uses an intensity ratio measured by the intensity of individual lights. The additive method states that the ratio is about the light available to be reflected back to the camera from the highlight and shadow areas; therefore, the total light in the shadows is compared to the total light in the highlights. It is an issue of words, not light; the light stays the same.
Is one method better to use than the other? Not a simple answer. Both are correct and where/how you learned ratios will probably determine which system you use. After years of using both methods, we have found that standardizing on the additive method provides better results in all situations—particularly with setups outside the studio environment that require metering the key and fill combined. In the outdoors, fill light is usually ambient light and is therefore impossible to turn off to get a true reading of the key light alone. That same system has translated well into the studio and requires less calculation. However, if you are working exclusively in the studio, the source method performs well and can be standardized.
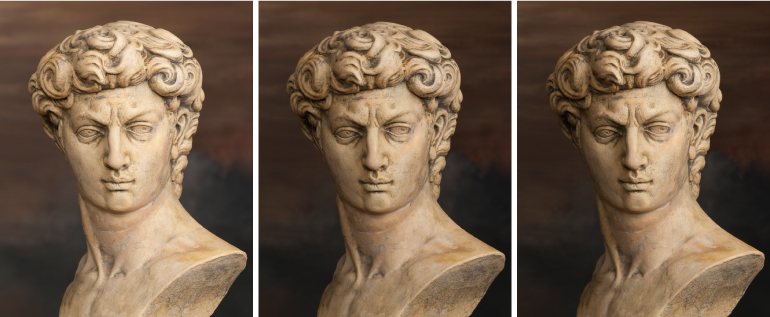
The examples show 2:1, 3:1, and 8:1 ratios
Ultimately, the capture and output devices you use have just as much an effect on how your images reproduce as the original lighting ratio. Learning to quickly reproduce the look you want is the crucial point.
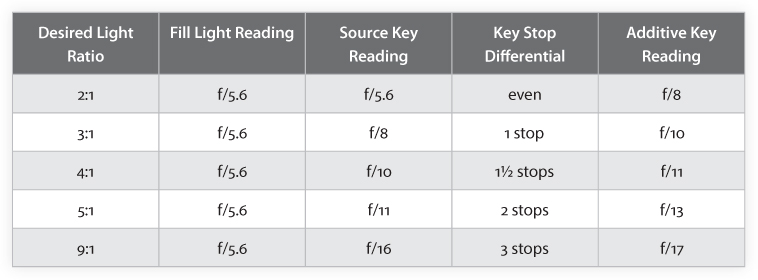
The table below provides both an easy way to see the relationship between the two methods and a guide to using ratios. We base this table on a setup that has the fill light set to read f/5.6. The key light is listed as both the f-stop compared to the fill light and the stop differential based on the fill stop. Exposures for these recommendations are the f-stop listed as the additive key reading regardless of the method used. If you use the source method and an f-stop other than f/5.6, the key stop differential provides the additional stops needed to achieve the desired light ratio. (Please note: The readings on the chart are represented in digital f-stops. These are delineated in 1/3 stop increments and are not as accurate as what can be achieved using 1/10 increments [available on most handheld light meters]. Unfortunately modern digital cameras only allow for aperture adjustments in 1/3 stop increments.)
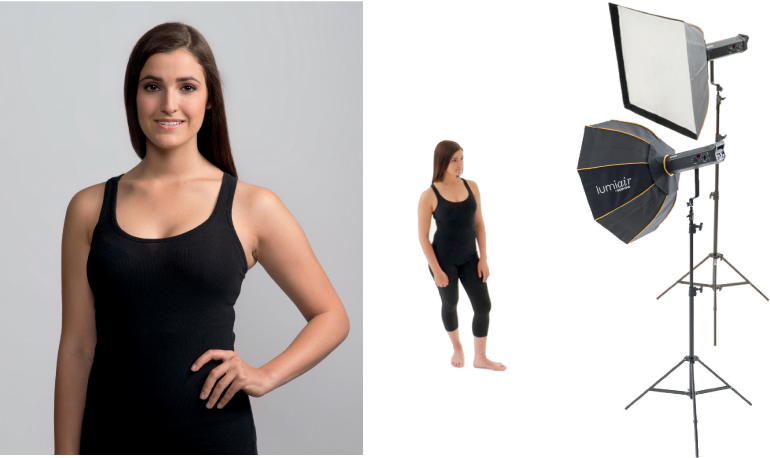
In this lighting setup, two diffuse light modifiers were used to create a 4:1 light ratio. The power of the two diffuse lights was adjusted with the rectangular softbox key light to create the desired ratio, and the Octobank was placed near the camera as the fill.
One final note about lighting ratios: What camera setting should you use when exposing the previously described ratios? The answer is whatever your meter indicates. You should take a meter reading with both the key and the fill lights illuminated and use that reading.

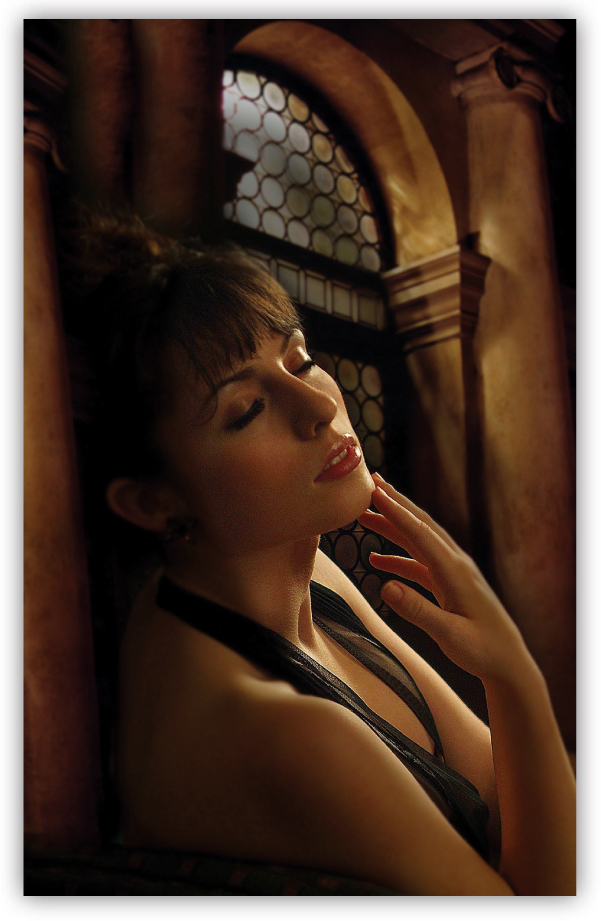
The lighting ratio in this image is 3:1
© Tim Meyer