Chapter 20
Develop the Control Plan Chapter 20
In This Chapter
♦ The road map for Control
♦ Mistakes are not an option
♦ Updating your Process Flow
♦ Writing good procedures
♦ Securing commitment to excellence
Feeling done? Not so fast. The method is not called DMAI. There’saC in DMAIC to remind you that your improvement project isn’t done until you’ve installed mechanisms for holding your gains. The natural state of any process is decay, so you have to fight this tendency with deliberate actions to lock in the gains you’ve made. Doing this keeps your process humming at its new and improved level.
In this chapter, we’ll cover the initial process and tools you need to sustain your gains. Since you’ve completed the hard work of DMAI, and since you’ll surely be pulled in another direction to solve another problem, you have to insist that you first seal up the deal, and do what you have to do to keep your good results from eroding away.
Introducing Control
Before you launch into all the specifics of Control, you can see the big picture, shown here. This is the macro road map for the Control phase—it shows you what you need to accomplish before you can say you’re truly a control freak. That’s one who refuses to believe the gains one has made will be maintained by others in one’s absence.

This is your road map for moving through the key steps of Control. Follow this and you will be successful in locking in the gains you’ve worked so hard to make.
Establishing sufficient process control will require discipline on your part, and support from your Project Champion. After all, results usually don’t begin to decay immediately. Only after time passes do your performance advancements become challenged by the natural course of erosion. Just remember: it’s not a matter of if, but when.
So unless you want to fight the same battle all over again, take note of the hard lessons others have learned. Take note of the Control road map and do what it tells you to do before moving on to the next big problem or performance-improvement challenge.
Control x, Monitor Y
A huge part of any Lean Six Sigma project is discovering the critical few xs that drive your Y metric of interest. Therefore, your work in the Control phase begins by listing the xs you’ve found to be so important; these are the objects of the Control Plan we will show you how to build at the end of this chapter.
Yes, you will want to monitor your Y and make sure it continues at its new level. But the true essence of control is in monitoring the xs that affect your Y. That’s why people who’ve lost weight due to diet and exercise are well advised to keep watching their food intake and workout routines, rather than just stepping on the scale every day.
Here’s a good place to revisit the Measurement System Analysis (MSA) tool we discussed earlier in Chapter 11. In the Measure phase, you used MSA to make sure you had an adequate measurement system for measuring Y. Now, you’ll want to make sure your critical xs are measured with the same confidence of repeatability and reproducibility.
Take a lesson from one team that determined viscosity was the critical x causing too much variation in coating weight (Y). A MSA of the viscosity measurement found that 80 percent of the variation was due to measurement error, making it impossible to know what the true viscosity was. Technicians were actually making viscosity variation worse by adjusting the process based on faulty measurements!
The viscosity measurement was improved to only 20 percent of the total variation by adding temperature control to the test device. The project was a roaring success, meeting the project goal of reducing coating weight variance by 50 percent.
An Ounce of Prevention
The simplest and most elegant control method is called Mistake Proofing—which means making it impossible, or nearly impossible, to make a mistake. Why incur the cost of inspection when you can remove the need for inspection via Mistake Proofed system designs? It’s far less costly to prevent a problem from occurring than to add another inspection step.
Years back, in the old days of the typewriter, a major daily newspaper did a DMAIC project to reduce spelling errors. Of course, the initial thought was to add another proofreading step. Proofreading, editing, audits, and approvals are all just another name for inspection.
But this was an enlightened project team, and they pushed for a Mistake Proofing approach. The solution was to convert the process from using typewriters to using PCs, which at the time could be equipped with an early form of the spell checker we all take for granted today. Back then, however, the spell-check function was a breakthrough Mistake Proofing solution.

Lean Six Sigma Wisdom
Mistake Proofing (a.k.a. poke-yoke) was coined by the Japanese engineer Shigeo Shingo, who wanted to describe the technique of changing the process to prevent mistakes from occurring.
Another example comes to us from manufacturing, where a project reduced the downtime involved in changing over a packaging line to a different carton size. The solution included Mistake Proofing the machine parts that had to be changed out. Prior to Mistake Proofing, one could put the part in backwards and not discover the problem until the line was restarted. The Mistake Proofing solution was to add a locator pin on one side of the part so the part would only fit in one way—the right way.
Take time with your project team brainstorming how to Mistake Proof your solution. Review the list of process changes you are making. List the ways the new solution could be done incorrectly, and recognize that it’s natural for people to make mistakes. Then consult Mistake Proofing resources to find the best way for ensuring your new process operates as intended.
For now you can examine the following table, which gives you some Mistake Proofing principles, and examples of their application.


Update Your Process Flow
After you’ve made your process changes, you need a new and improved Process Flow or Value Stream Map to reflect those changes. Surely you can’t control your new process if you can’t see it or don’t have it documented.
Therefore, revise your Process Flow (Value Stream Map or Process Flow Diagram) to reflect the new reality. By having both a before and after depiction of the process, you have an excellent way to educate stakeholders about what’s been changed.
The updated diagram also serves as an excellent training tool for any new people coming into the process. And if that’s not enough, your updated flow chart or Value Stream Map helps identify remaining opportunities for future project work.
Note that lead time for this process is 23.6 days, and the value-add time of 188 seconds. This was how the process looked before it was improved.
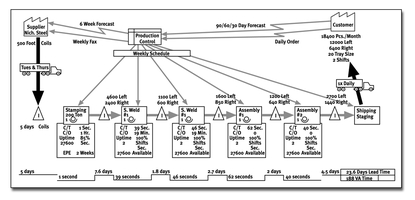
Note the new lead time of 5 days, and value-add time of 166 seconds, for the new and improved process.

Update Your FMEA
Remember Failure Mode and Effects Analysis, or FMEA? You do if you read Chapter 13 and completed a FMEA for your process in the Analyze phase. Here in Control, you need to update your FMEA because you’ve changed your process. By doing so, certain risks may have become less important while other risks may have become more important. And you may need to add new risks you didn’t have before based on your new process changes.
As shown in the matrix that follows, the “Recommended Actions” section of the FMEA is a history of the work conducted. Of course, you want to make sure your updated FMEA shows the work actually completed (Responsibility and Completion Date column). Then you want to list the Actions Taken and calculate your new Risk Priority Numbers (RPNs) for all your risks. Remember, RPNs are calculated by multiplying the SOD ratings (S*O*D).

Revisit your Failure Mode and Effects Analysis to see if you still have the same risks you did before you made your process improvement. Take action on any risks with higher RPNs.
Be Consistent and Standardize
Actions don’t happen on a consistent basis unless you build a system for making them happen on a consistent basis. That’s why most companies have standard operating procedures (SOPs), otherwise just called procedures, or policies and procedures. In any case, most Lean Six Sigma improvements require a change in SOPs that, when followed, allow the new process to operate reliably over time.
Of course, Mistake Proofing is the ultimate remedy, because then you don’t have to rely on SOPs to guide the actions of people, machines, processes, and systems. But often the Mistake Proofing solution has yet to be discovered, and the best you can do is develop good SOPs, then train people to adhere to them over time.
To help you, here are some tips on creating good SOPs:
♦ Build on existing SOPs. Modify and update them instead of inventing new ones. You’ll simplify the rollout and maintenance of the SOP if it’s part of an existing, healthy system.
♦ Write the procedures in brief, simple language. The test should be: “Can someone new to the area understand and follow the procedure?”
♦ Keep the detail at the appropriate level. Too much detail will make the document long and discourage its use. Too little detail will miss the key changes that need to be made to control your critical xs.
♦ Make liberal use of diagrams, flow charts, and digital photos. Remember the adage that a picture’s worth a thousand words when you create your new SOPs.
♦ Include a mechanism for regularly updating your SOPs.
SOPs are your current best approach for performing your process and, as such, they’re the repository of your knowledge (intellectual property) about how your process should work. When an organization’s procedures are covered in dust and more than five years old, what does that say about its learning rate?
Preparing good SOPs is necessary but not sufficient. To state the obvious, they must be put into use—and we all know that humans tend to resist standards, especially in cultures that value and reward individualism. You’ll have to overcome such resistance, so check out the following tips:
♦ Involve the people performing the procedure(s) to help create the new procedure(s). Remember that people like changing but just don’t like being changed.
♦ Include the reason for the procedure in the SOP. Clarify what problem is solved by the new procedure by answering the question “Why is this important?”
♦ When people say the SOP stifles their creativity, push back. You don’t want people doing something different just to be different. Work with folks to apply their creativity to new problems while applying the current best approach via the SOP.
♦ Create a simple and clear way for updating SOPs when data show a better way. The SOP should be a living document and always represent the current best knowledge about how to do the work.
♦ Incorporate the new SOP as the routine first step when investigating problems. The question should always be “Did we follow the SOP?” If not, why? If the SOP was followed and there’s still a problem, what needs to change? This brings relevance to the SOP, reinforces its use, and provides a steady stream of updates to keep it a living document.
♦ Train people on the new SOP. Even experienced employees need to learn the new actions, steps, or methods. Focus your training on the critical aspects of the change. In your training plan, include a measurement by which you can determine how well the new SOP is used.

Performance Pitfall
Don’t expect everyone to learn everything in a single training session. Remember that most learning occurs on the job. Combine up-front training with job aids, on-the-job coaching, performance measurement, and follow-up training sessions.
Plan for Control
Since you know process performance decays over time, you’ll have to develop a plan that determines exactly how you’ll keep your critical inputs (xs) and outputs (Ys) in control. You guessed it—we call this a Control Plan. Not a fancy name, but quite fitting nonetheless. Your Control Plan is the glue that pulls together all the key aspects of keeping your process on track and performing as intended.

Your Control Plan institutionalizes your new process and provides one-stop shopping for control information.
The following table shows a small portion of a Control Plan (for baking crackers). In building your plan, you rely on the work you’ve done in Define, Measure, Analyze, and Improve. Your Process Map and your FMEA highlight the areas you’ll need to control—while all your measurements and data studies (DOE, etc.) determine your operating windows and rational tolerances for your critical xs.
This is a sample Control Plan for the baking of a cracker. It only shows one input and one output. Most Control Plans have about two outputs and six inputs.
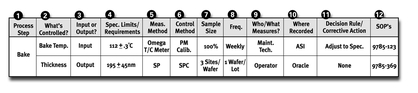
Let’s walk through building a Control Plan, working from left to right across the table. In the example that follows, the project goal was to improve the percentage of crackers falling within their specification limits for thickness. The critical x was determined to be baking temperature.
♦ Column 1 identifies the process step and should tie directly back to the Process Flow diagram.
♦ Column 2 identifies the metrics.
Performance Pitfall
Avoid monitoring too many items by focusing just on the critical xs and important Ys. Don’t create more work for yourself than is necessary.
♦ Column 3 clarifies whether the metric is an input or an output for the process.
♦ Column 4 lists the target and tolerances for each metric.
♦ Column 5 clarifies what method is used to make the measurement.
♦ Column 6 identifies the method used to control the measure.
♦ Column 7 is the sample size. In our example, the sampling is 100 percent. In another case, a sample of 5 might be taken from a production process making 1,000 units an hour.
♦ Column 8 displays the sampling frequency. In this example, the input is measured weekly, and the output is measured at a rate of one wafer per lot.
♦ Column 9 is where you identify the important “who” that does the data collection.
♦ Column 10 identifies where the data will be recorded and stored. Often this is on a chart that is part of a visual controls display.
♦ Column 11 clarifies what action is required when an out-of-control situation is signaled in the data. More on this in the next chapter.
♦ Column 12 shows where the added details can be found for this control item. What documentation governs this control process?
Whew! Another plan made and more to do. That’s the story of Lean Six Sigma: a never-ending journey toward perfection. Assuming you successfully lock in your gains on any one project, you’ll soon be off to another. But not so fast; you still have to implement your Control Plan. Before you do, however, there’s one more thing to do ….
You’ll need to obtain the formal agreement and approval of your Lean Six Sigma Champion, Process Owner, and anyone else who’s critical to the functioning of your new process. This is where the rubber meets the road when it comes to whether or not your process will stay in tip-top shape, or whether it will fall into bad health. So practice good management and leadership, and get it in writing.

Have key people sign off on your Control Plan. Better to get it in writing than to leave the continued maintenance of your hard work in jeopardy.
The Least You Need to Know
♦ Processes naturally decay. The purpose of the Control phase is to prevent this from occurring.
♦ Focus on ways to control the significant xs your project has identified. You’ll still want to monitor Y to ensure the gains are held, but xs are actionable and earlier indicators.
♦ Find as many Mistake Proofing solutions as you can, because Mistake Proofing is the surest and cheapest way to eliminate defects.
♦ Don’t forget to update those Process Flow Diagrams and FMEAs. You want to leave the Process Owner with a picture of the new reality, and anticipate what could go wrong.
♦ It takes some work to do your standard operating procedures (SOPs) correctly, but they are essential when you find that the way a procedure is done is a critical x.
♦ Control Plans pull together all the elements of improvement sustainability into a cohesive whole. They are an important deliverable from the project team to the Process Owner.
..................Content has been hidden....................
You can't read the all page of ebook, please click here login for view all page.