Now that you’re familiar with the InCopy interface and understand how to create, import, and open InCopy documents, it’s time to start editing text. That’s the whole reason you’re using InCopy, right?
Before we start, we want to share a true story that exposes the problems that can arise if you don’t take advantage of powerful software features that are right under your nose. Adam was working recently with a large magazine publisher (the guilty party will remained unnamed) who had some questions about adding InCopy to their InDesign workflow. The goal of the conference call was to find ways to automate the publishing workflow, and as the conversation developed it became obvious that mapping text styles would save a lot of time and manual labor. Adam asked the customer to open one of their latest publications in InDesign and tell him what was in the Paragraph Styles and Character Styles palettes. The response? “Nothing.”
That’s right, this large publisher was using InDesign to create magazines without using a single text style. They were obviously getting their work done, but they weren’t working efficiently. We can only imagine how much time had been wasted and how many formatting inconsistencies must have appeared in their publications. Read this chapter to save yourself from similar pain and suffering!
InCopy’s truly fantastic word-processing tools help writers, editors, and proofreaders work more seamlessly with their designer counterparts than they ever thought possible. This smooth integration is possible because InCopy and InDesign share a lot of common technologies, including the same text-composition engine, the same font support, common file formats, and the same character and paragraph styles features. All this means that you can work together and learn from each other like never before.
If you’ve made it this far into a book about writing with a computer, we assume you know how to type. However, your writing might include ideas or quotes from another text file, word-processing document, or Web page. There are two Paste commands in the Edit menu that you need to know about:
Paste (Command/Control-V): When you copy styled text from another document to the clipboard and paste it into InCopy using the normal Paste command, it retains whatever text formatting has already been applied to it.
Paste without Formatting (Shift-Command/Control-V): This modified Paste command strips away the formatting and pastes just the plain text from the clipboard.
Tip
If you copy formatted text from one InCopy document and paste it without formatting into another InCopy document, the result is plain text, but character and paragraph styles from the source text are still added to the target document.
You can also copy text from other sources such as Microsoft Word, a Web browser, or your email and paste it into an InCopy document. By default, InCopy pastes plain text (without formatting) from other applications. This is usually a good thing because it helps avoid situations in which you paste formatted text that doesn’t rely on InCopy’s Character and Paragraph styles. It also reduces the chances of inadvertently adding lots of RGB color swatches (see “Introducing the Swatches Palette” later in this chapter) to your InCopy document, which can happen when copying and pasting text from a Web browser.
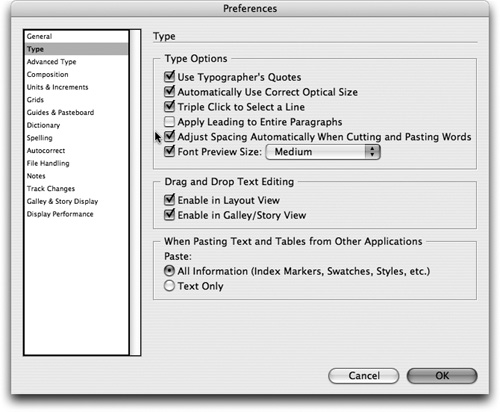
If you have a good reason to change the default pasting behavior, choose InCopy > Preferences > Type on Mac or Edit > Preferences > Type on Windows. At the bottom of the dialog, change the setting from Text Only to All Information. Now when you paste text from other applications all the source formatting, for better or worse, is retained.
Copying and pasting text works just fine, but it has an ’80s retro feel when compared with the new drag and drop text features available in InCopy CS2 and InDesign CS2. Drag and drop is enabled by default in Galley and Story views (you can enable it in Layout View in the Type pane of the application preferences) and should be familiar to anybody who has used Microsoft Word before. Just select any text (letters, words, sentences, or paragraphs), move your cursor over the text until the cursor changes (![]() ), click and drag the selection to a new location, and release the mouse button. The selection is moved (cut and pasted).
), click and drag the selection to a new location, and release the mouse button. The selection is moved (cut and pasted).
If you hold down Option/Alt as you drag, the selection is copied and pasted, which is especially handy when you have multiple stories from one layout and you want to use the same text in more than one location. For example, say the spread you’re working on includes a story and several pullquote stories. You can Option/Alt-drag an interesting quote from the body of the story into the pullquote story and then edit it for copyfit.
Tip
If you prefer copy and paste, you can disable drag and drop in the Type pane of the application preferences.
You can also drag and drop text from other applications such as your Web browser, email application, or another text editor. You get the same results with copy and paste, but it’s sometimes easier to drag and drop. When you drag and drop text from other applications, InCopy respects the preferences for copy and paste from other applications as described earlier in this chapter.
The helpful “Adjust Spacing Automatically When Cutting and Pasting Words” feature (Figure 3.1) is enabled by default. When you are copying and pasting or dragging and dropping text, InCopy automatically adds or removes spaces before and after words as necessary. This makes things easier when you’re moving a text selection because you don’t have to worry about selecting the correct number of spaces before and after the edited text. The feature is even smart enough to know when you’re dragging and dropping text to the end of a sentence and it won’t add a space before the period, question mark, or exclamation mark.
Depending on your writing habits and your source notes, you might have to clean up the case of the letters in your writing. The Type > Change Case submenu has four commands that are pretty self explanatory:
THIS IS UPPERCASE
this is lowercase
This Is Title Case
This is sentence case
Select the text you want to change, select one of the change case commands, and watch InCopy reformat your text for you in an instant. With text selected, these commands are also in the contextual menu (Control-click on Mac or right-click on Windows) for easy access. If you use these commands frequently, you should considered creating custom keyboard shortcuts for them (see Chapter 1).
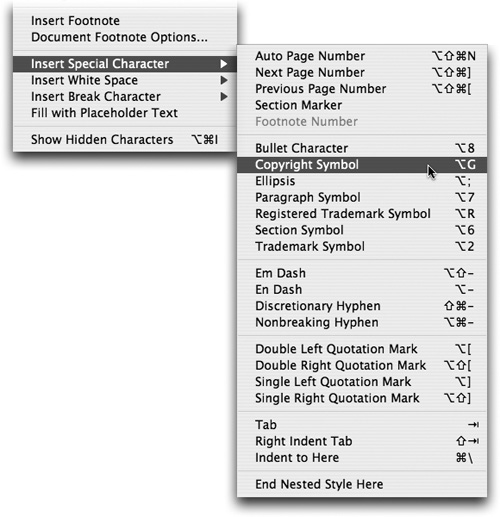
Are you tired of trying to remember arcane keyboard shortcuts for obscure characters? Do you still ask your coworkers how to type trademark and copyright symbols? If so, you can throw away your secret decoder ring and start using the Type > Insert commands instead. The Type > Insert Special Character menu lets you add a wide variety of characters, including trademark and copyright symbols, dashes, and other punctuation (Figure 3.2). The Type > Insert White Space menu lets you insert more kinds of spaces than you even knew existed, including em spaces and en spaces. There’s also the Type > Insert Break Character menu that lets you insert every kind of break character you can imagine, including frame breaks and forced line breaks. If you ever need some lorem ipsum, just choose Type > Fill with Placeholder Text.
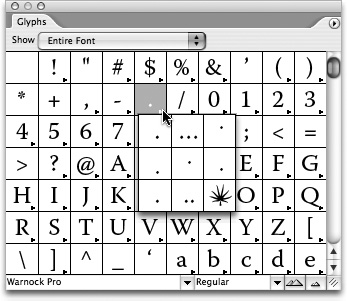
If you’re looking for other obscure characters or advanced typographic features such as ligatures, fractions, or dingbats, then the Glyphs palette is your friend. Choose Type > Glyphs, and the font for the active text is displayed by default (Figure 3.3). Use the pulldown menus at the bottom of the palette to change the font family and font face. If you want to see larger or smaller previews of the glyphs, click the large or small mountain icons ![]() in the bottom-right corner of the palette. These mountain icons let you zoom in and out between six different preview sizes.
in the bottom-right corner of the palette. These mountain icons let you zoom in and out between six different preview sizes.
If you’re using an OpenType font with an advanced set of characters, you might have some options in the Show menu at the top of the Glyphs palette. The Show menu lets you browse just a subset of the selected font instead of forcing you to wade through every letter, number, fraction, dingbat, and punctuation. Double-click a glyph in the Glyphs palette to insert it in your active story at the current cursor location. In some cases you’ll notice a small black triangle next to a glyph in the Glyphs palette. Click and hold on any glyph with this flyout option and you can choose an alternate for the selected glyph.
Tip
The Glyphs palette renders your fonts accurately even when you’re working in the Galley or Story view.
As you become comfortable with the Glyphs palette, you’ll probably use it more and more often. Glyph sets are an easy way to organize special glyphs that you use on a regular basis. To start a new glyph set, select a glyph in the Glyphs palette, choose New Glyph Set from the palette menu, and give the set a name. To add more glyphs to a glyph set, select the glyphs in the Glyphs palette and add them one at a time by choosing Add to Glyph Set > [Set name] in the palette menu (Figure 3.4). After you’ve created some useful custom glyph sets, you can easily access them by choosing View Glyph Set > [Set name] from the palette menu. If you need to organize your sets a little more effectively you can also edit and delete glyph sets with the corresponding palette menu commands in the Glyphs palette.

The ability to see hidden characters such as spaces, tabs, and paragraph breaks can be a helpful editing and troubleshooting tool (Figure 3.5). You can toggle the visibility of hidden characters by choosing Type > Show/Hide Hidden Characters or clicking the Show/Hide Hidden Characters button ![]() in the Command Bar. Notice that hidden characters can be made visible in Galley, Story, and Layout views.
in the Command Bar. Notice that hidden characters can be made visible in Galley, Story, and Layout views.

The new auto-correction feature (see Chapter 4) should fix many of your common typing errors, but InCopy also has a Transpose feature to fix little mistakes. If you accidentally jumble two adjacent characters as you type, you can easily fix your mistake by inserting your cursor between the two characters and choosing Edit > Transpose. For example, if you type $136, you can insert the cursor between the “3” and the “6” and change the figure to $163 with one command.
For many years, people have used tabs to align text at the same horizontal point or create the look of a table. Because InCopy and InDesign can create tables (see Chapter 6) natively and can even place tables from Excel and Word documents, many of the old uses for tabs can be eliminated. That said, there are still situations where tabs can be helpful, and here we give a brief overview of how InCopy handles them. Start by choosing Type > Tabs to open the Tabs palette (Figure 3.6), switch your document to Layout view so you can see an accurate preview of the results, and insert your text cursor in the paragraph you want to format. Tabs are rendered in Galley and Story views, but they are all the same generic width and only function as placeholders.

There are four styles of tabs you can create in InCopy, and each is represented by a unique icon in the top left corner of the Tabs palette.
 Left-justified: All text aligned to this tab style is left-aligned.
 Center-justified: All text aligned to this tab style is centered.
 Right-justified: All text aligned to this tab style is right-aligned.
 Decimal-aligned: Aligns a specified character such as a decimal or a dollar sign to the tab stop.
To create a tab, click the button for the tab style you want and then click just above the tab ruler. To adjust the precise position (X value) of a tab after it’s created, click and drag it and watch the black vertical line that indicates the results on the text. You can also select the tab and enter an X value in the tab position field. Regardless of the unit of measurement you have selected in your application preferences under Units & Increments, you can enter any unit of measurement here. For example, if your application preferences are set to measure everything in points, and you know you want a tab stop at 0.5 inches, just type 0.5 in in the Position field, and InCopy does the unit conversion for you and positions the tab in the correct location.
Tip
To match up the Tabs palette to your actual Layout view, scroll the document so you can see the top of the frame that contains the paragraph you’re formatting and click the magnet icon ![]() on the right side of the Tabs palette. This snaps the Tabs palette to the correct position at the top of the frame, making it easier to create and edit tabs accurately.
on the right side of the Tabs palette. This snaps the Tabs palette to the correct position at the top of the frame, making it easier to create and edit tabs accurately.
To change the alignment of a tab, select it above the tab ruler and click a different tab style icon. You can also Option/Alt-click on an existing tab to cycle through the four different tab style options. To delete a tab, select it and drag it away from the tab ruler. If you’ve created lots of tabs and want to start over, use the Clear All command in the Tabs palette menu.
Tip
You can repeat a selected tab with the Repeat Tab command in the palette menu, but if that’s what you’re doing you should consider using a table instead (see Chapter 6).
When you use tabs with the default options, the space between the tabbed text is just empty space. However, sometimes you want a tab leader, such as a string of periods, to fill the gap between the text and the next tab. Select the tab you want a leader for and insert a character (or up to eight characters) such as a period, dash, or bullet in the Leader field in the Tabs palette. Now your tab leader character will fill the gap between the text and the tab instead of empty white space. This can be especially helpful with financial data or a table of contents when tabs are set very wide.
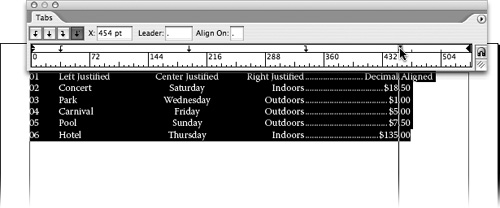
The last feature you should know about in the Tabs palette is the ability to create tabs that align on a special character such as a decimal point, dollar sign, or hyphen. Create a decimal tab ![]() and enter a character in the Align On field while the tab is still selected. Now the alignment character in the text aligns to the tab marker, which can be especially helpful when formatting financial or scientific data (Figure 3.7).
and enter a character in the Align On field while the tab is still selected. Now the alignment character in the text aligns to the tab marker, which can be especially helpful when formatting financial or scientific data (Figure 3.7).
You can make text bold or italic by selecting the Bold or Italic font style in the Character palette, but InCopy and InDesign offer a much more complete set of formatting options. These text formatting options are found in the Character, Paragraph, and Story palettes, which are all listed in the Type menu. We give you a brief overview of the options in InCopy, but we want to enforce the idea that any text formatting and styling guidelines should be a joint decision between the writers and editors using InCopy and the designers and production staff using InDesign. Text formatting standards in a publishing workflow are typically determined by the design staff using InDesign, so our explanation of the formatting options will be relatively brief. If the InDesign user you work with needs more information about formatting text, check out Real World Adobe InDesign CS2 by Olav Martin Kvern and David Blatner (Peachpit Press, 2006).
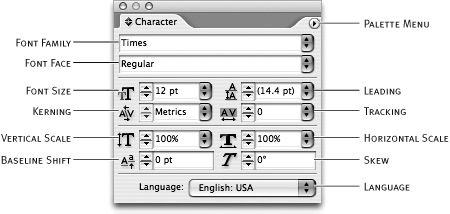
Let’s start with the building blocks of writing by opening the Character palette (Figure 3.8). Choose Customize in the palette menu and make sure all four options are enabled. This way you can be certain all the possible options are available and your screen will look like the figures in this book. The Character palette can affect any range of selected text, all the way down to a single character. You can select and format text in any of the three view modes (Galley, Story, or Layout), but it usually makes sense to apply formatting in Layout view so you can see a real-time preview of all the changes you’re making.
When you select a font in the Character palette or the Type menu, you’ll see sample text that shows exactly how the font will be rendered in the layout. This makes it much easier to choose fonts because it eliminates much of the guesswork. You’ll also notice a small icon next to each font, indicating whether the font is PostScript ![]() , TrueType
, TrueType ![]() , or OpenType
, or OpenType ![]() .
.
One thing that might surprise you when you format text is that you can’t just click a button to make selected text bold and italic like you can in Microsoft Word. This might seem like a missing feature, but it’s not. InCopy intentionally requires you to use a bold or italic typeface in order to apply bold or italic attributes. This way, InCopy and InDesign make sure you only use font attributes that can print reliably on professional printing equipment. If your active font does include bold and italic faces, you can use keyboard shortcuts to make selected text bold (Shift-Command/Control-B) and italic (Shift-Command/Control-I) or use the options in the Character palette to apply a bold or italic font face to your selection.
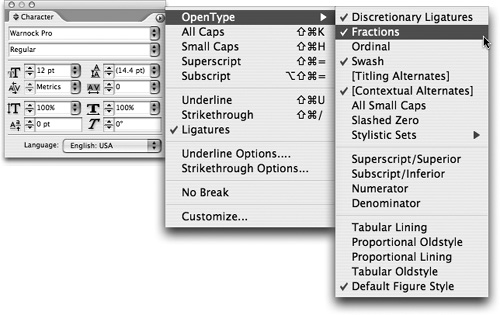
Most of the character formatting options available in the Character palette are pretty self-explanatory for anybody who understands the basics of typography, but there are some more advanced options available in the Character palette menu (Figure 3.9). The most notable options here are found in the extra flyout menu of OpenType options. The OpenType options are only available when using OpenType fonts (see “Understanding OpenType” later in this chapter), and even then you’ll have different options for different fonts depending on the completeness of the font design. The other advanced options are beyond the scope of this book, but they are explained in the Adobe Help Center.
To change the color of selected text, open the Swatches palette and click a color swatch (Figure 3.10). Before you get too excited about applying colors to your text, make sure you discuss the implications with your designer counterparts. In most cases, decisions about text color are made by the design staff, not the editorial staff. See Chapter 8 for a complete discussion of the decision-making process and the implications for the rest of the InCopy/InDesign workflow. Even if the writers and editors using InCopy have the freedom to apply colors to text, it’s probably best to do that by using character and paragraph styles, which are discussed later in this chapter.

If the design and editorial departments agree that it’s okay for InCopy contributors to create their own color swatches, you create them in the Swatches palette, but only in standalone documents. Open the Swatches palette from the Window menu and choose New Color Swatch from the palette menu (Figure 3.11). The only type of swatch you can create with InCopy is a process color (using the standard four colors of Cyan, Magenta, Yellow, and Black), which means you can’t create spot colors such as Pantone colors. InCopy also doesn’t have a Color or Gradient palette, which means you cannot create gradient swatches or apply random colors to your text. As a writer, this might seem limiting, but in the overall workflow this constraint is a very good thing. Remember that the production artists using InDesign are usually responsible for getting the files ready to print, and if an InCopy user created a spot or gradient swatch and the designer didn’t catch those special swatches, the publisher could be stuck with very expensive printing errors.

Tip
Spot and gradient swatches cannot be created with InCopy, but they can be used if the original InDesign document includes them.
You can create color swatches using the Lab or RGB color modes, but stick with CMYK unless you receive specific instructions otherwise. Use the color sliders or the ink percentage fields to mix the colors until you get the combination you need. By default, InCopy uses the same CMYK mix values as the swatch name, but you can uncheck the “Name with Color Value” option and give the swatch a custom name, such as “Headers” or “Captions.” When you’re done mixing and naming your new swatch, click OK, and the swatch is added to the bottom of the Swatches palette. If you have several new swatches to create, click the Add button after mixing each swatch and then click OK when you’re done mixing all the new swatches you need.
Tip
You can drag and drop swatches in the Swatches palette to rearrange them according to your preference.
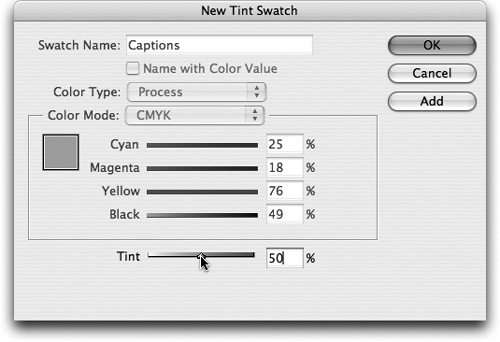
In addition to creating process swatches, you can also create tint swatches which are a shade of an existing swatch. To create a tint swatch, select an existing swatch ([None] and [Paper] won’t work) and choose New Tint Swatch from the palette menu. The New Tint Swatch dialog opens, and the only editable field is the tint slider at the bottom (Figure 3.12). Choose a shade of the original swatch and click OK. Now the original swatch and the tint swatch are tied together. For example, if the tint swatch is set to 50% and you change the original swatch from brown to red, the tint swatch will change from tan to pink.
If the list of swatches in the Swatches palette is full of colors you never use, you might want to tidy things up. Choose Select All Unused from the Swatches palette menu to select all unused swatches in the document. Now click the Derete Swatch button ![]() at the bottom of the palette. If you try to delete a swatch that is used by the document in any text or that is referenced in a text style, InCopy prompts you to remap the deleted swatch to another swatch (Figure 3.13). This remapping process helps you avoid situations where your story can include lots of stray color usage without having defined color swatches. That might not sound like a big deal to you, but undefined color swatches can be a nightmare for the design department.
at the bottom of the palette. If you try to delete a swatch that is used by the document in any text or that is referenced in a text style, InCopy prompts you to remap the deleted swatch to another swatch (Figure 3.13). This remapping process helps you avoid situations where your story can include lots of stray color usage without having defined color swatches. That might not sound like a big deal to you, but undefined color swatches can be a nightmare for the design department.

Open the Paragraph palette from the Type menu and use the Customize command in the palette menu to make sure all the options are enabled. The Paragraph palette contains options that apply to an entire paragraph, such as alignment, justification, indents, and drop caps (Figure 3.14). Just like the Character palette, there are several advanced options to choose from in the palette menu. For a complete explanation of all paragraph formatting options, please consult Real World Adobe InDesign CS2 by Olav Martin Kvern and David Blatner (Peachpit Press, 2006) or the InCopy Help files (Help > InCopy Help).

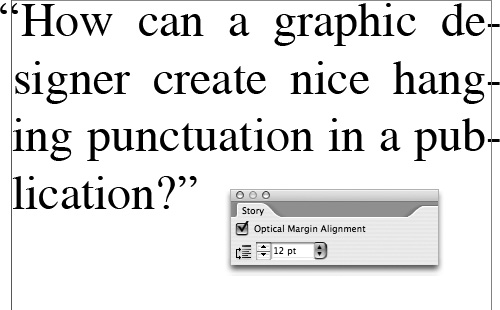
The simple little Story palette may be a one-trick pony, but it can accomplish in one click what used to take designers hours of tedious work. Open the Story palette from the Type menu and enable the Optical Margin Alignment option to create hanging punctuation for all text frames in a story. Now, anytime punctuation such as quotes, hyphens, and dashes are at the edge of a text frame, they will hang outside the frame edge just slightly and improve the readability of the text (Figure 3.15). To control the amount of overhang, enter a size in the text entry field that matches the size of the text. As usual, any major decisions about typography should probably be a joint decision between design and editorial.
At the dawn of desktop publishing in the early 1980s, virtually all design was done on a Macintosh. As Adobe and other software vendors expanded support for Microsoft Windows, the platform landscape started to change. It meant more choices for designers, but it also made the complexity of cross-platform publishing environments more common. Most of these issues were worked out over the years, but fonts have long been a cross-platform nightmare.
Fast forward 20 years, and now we have a wonderful new font format called OpenType. In this book there is no room for a complete explanation of all aspects of OpenType, but a few of the most important benefits include:
A single, cross-platform font file that can be used on both Macintosh and Windows computers.
An expanded character set (65,000+ possible glyphs in a single font) based on Unicode for support of multiple languages.
Advanced typographic capabilities such as small capitals, fractions, and ligatures in one font file.
Compact font outline information for smaller font file sizes.
OpenType combines the best of TrueType and PostScript fonts in a single file format that works the same on Macintosh and Windows computers. Because OpenType is a superset of existing font technologies, it is also a good solution for reliable output on professional printing equipment. While TrueType and PostScript fonts have driven the last two decades of publishing, we expect OpenType to take us through the next two decades.
Thanks to the power of OpenType, a publishing workflow that combines InCopy and InDesign with Macintosh and Windows computers can be a seamless reality. You don’t have to worry about licensing Macintosh and Windows versions of the same fonts and you shouldn’t have to worry about inconsistent character mapping between different users on different platforms. If you work in a cross-platform environment but do not use OpenType fonts, you may experience unexpected results with extended characters and advanced typography. For more information about OpenType and where to acquire OpenType fonts visit http://studio.adobe.com/type.
Manually formatting text isn’t difficult, but it sure is tedious if you need to format a lot of it. And what guarantee do you have that you and all your co-workers will format text consistently? When you consider changing the formatting of every single headline or caption throughout a publication, it’s enough to make you scream. That’s why you need to understand how to use character and paragraph styles. In most cases, the character and paragraph styles for an InCopy document are created by a graphic designer using InDesign, but even if you’re not the person who creates the styles you need to understand how they’re created and how to apply them to your text.
Tip
Change the default formatting of text in InCopy by double-clicking the [Basic Paragraph] style in the Paragraph Styles palette and making changes in the Paragraph Style Options dialog.
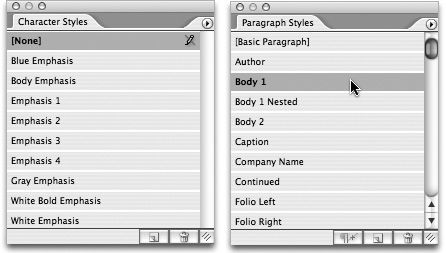
Open the Character Styles and Paragraph Styles palettes from the Window > Type & Tables submenu to see all the styles available in the active document (Figure 3.16). To apply a character style, select a range of text as small as one character and click the style name in the Character Styles palette. To apply a paragraph style to a single paragraph, insert your cursor anywhere in the paragraph and click the style name in the Paragraph Styles palette. You can apply a paragraph style to multiple paragraphs if all the paragraphs are selected first.
Tip
If you import existing content from Microsoft Word, make sure you read Chapter 2 to understand how to manage text styles when placing Word documents in InCopy.
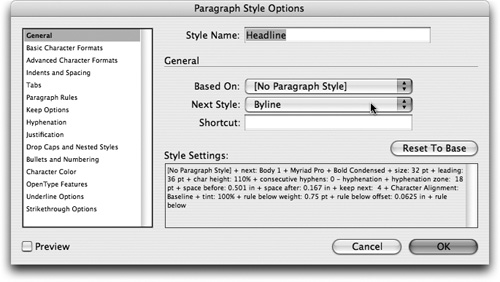
If you’re editing an InCopy Assignment file (see Chapter 8), you’re not allowed to view or change style definitions. But with a stand-alone InCopy document, you can see how a style was created. To see all the formatting options for a style in an InCopy document, double-click the style name to open the Style Options dialog (Figure 3.17). From here you can browse the categories on the left and see what attributes have been used. You can change style attributes, including the name of the style, but make sure to discuss any changes with the rest of your co-workers first. A simple alteration such as changing the name of a style can cause a lot of problems in a publishing workflow if everybody involved isn’t anticipating the change.
Tip
You can apply character and paragraph styles in any document view, but you can only see regular, bold, and italic in Galley and Story views. Switch to Layout view to see all the formatting changes.
Two powerful options for paragraph styles you should know about are Next Style and Nested Styles. The Next Style option, set in the General section of the Paragraph Style Options (Figure 3.17) dialog, chooses which paragraph style to apply to the following paragraph. For example, you can create a paragraph style called Headline that has a Next Style option set to another paragraph style called Byline. Now, when you type a paragraph with the Headline style and press Return/Enter, the next paragraph is automatically formatted with the Byline paragraph style. You can string multiple styles together with the Next Style option, such as setting the Next Style for Byline to Body.
This is great if you type all your text in InCopy, and if you always plan ahead, but we realize that’s not how the process always works. In cases where you import text from other sources or wait to apply styles until after the text has already been typed, there’s a great trick for applying Next Styles you need to know about. First, select all the related paragraphs that need a sequence of next styles. Then Control/right-click on the name of the first paragraph style in the Paragraph Styles palette and choose Apply [Style Name] then Next Style. This instantly applies the first paragraph style and any other Next Style definitions and saves you a lot of time.
Another powerful paragraph style option is the Nested Style feature, which strings together multiple character styles into one intelligent paragraph style. We’re not going to explain all the details of creating Nested Styles, but we want to make sure you’re aware of the feature and are not surprised when you see one for the first time. For example, a nested paragraph style could use a bold character style through the first comma, an italicized character style through the first colon, and then plain text until the end of the paragraph (Figure 3.18). This is a very efficient way to style repetitive text such as a photo caption without having to apply each character style individually.

Perhaps the best aspect of Nested Styles is that once the style is applied to the paragraph, the nested character formatting is applied automatically at the pre-determined break points. If one of the break points, such as the comma or colon in the preceding example, is moved or deleted, the Nested Style updates automatically, and no new formatting is required.
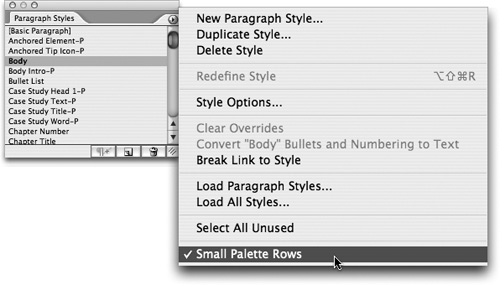
Character and paragraph styles save you time, ensure consistency, and make future updates much easier, but the traditional method of applying styles by selecting text and clicking on the style name in the Style palettes can be tedious. Some documents may have as many as 150 or more styles, which makes the situation even more unwieldy. Enabling the Small Rows option in the palette menu for the Character Styles and Paragraph Styles palettes lets you squeeze more styles into the same space (Figure 3.19), but scrolling through that many styles to find the correct one can still be a drag.
Applying styles while you type can interrupt your typing and therefore your thought process. It’s also a hassle to be forced to take your hands of the keyboard, grab the mouse, scroll, apply the style, put your hands back on the keyboard, and start typing again. What if you could skip all those steps and apply character and paragraph styles with just a few taps on the keyboard? This is where the new Quick Apply feature saves the day.
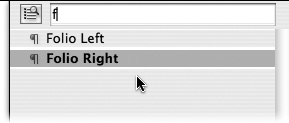
Select text you want to style and press Command-Return (Mac) or Control-Enter (Windows) to open the Quick Apply window in the top-right corner of the screen (Figure 3.20). Next, start typing letters and numbers that you know are part of the style name you want to apply. For example, if you type the letter “f” the list of styles in the Quick Apply list narrows to show only styles with the letter “f” in them. You don’t need to type complete text strings, or even type them in order, so typing the letters “f” and “r” would quickly narrow the long list of styles to “Proofreading” as well as “Folio Right.” If you narrow the list of styles to a short list, you can start navigating the list with the up and down arrow keys. When you highlight the style you’re looking for, press Return/Enter to apply the style to the selected text and return the focus of the cursor back to the text you’re editing.
Because we’ve written this entire book using InCopy, we’ve really fallen in love with this new Quick Apply feature. It’s saved us a lot of annoying mousing around because we’ve been able to apply all the styles with the keyboard. We’re also grateful for the extra screen real estate we have because we don’t have to have any palettes open in order to apply the styles.
Sometimes when you apply paragraph styles to text you’ll notice a plus mark (+) next to the style name in the Paragraph Styles palette. This plus mark indicates there’s a manaul override on the selected text that you might want to eliminate. When you apply a paragraph style to text that already has custom formatting, the custom formatting is retained as an override to the applied paragraph style. Option/Alt-click on the style name in the Paragraph Styles palette to eliminate the override. This resets the selected text to the active style definition, and the plus mark (+) goes away.
When there’s a character or paragraph style in one InCopy file that you want to use in another file, you have two options. You could try to recreate the style from scratch in your InCopy file, but that process is tedious and prone to mistakes. The point of sharing styles is to ensure they are identical, so instead of recreating text styles, you should import styles directly from one InCopy document into another by following these steps:
Open the Character Styles or Paragraph Styles palette and choose Load All Styles from the palette menu. Notice there are also palette menu commands for Load Character Styles and Load Paragraph Styles in their respective palettes, but these commands just open same dialog box with different options pre-selected.
Select the InDesign (.indd), InCopy (.incx), or InCopy Template (.inct) file that contains the text style(s) you want to load and click Open.
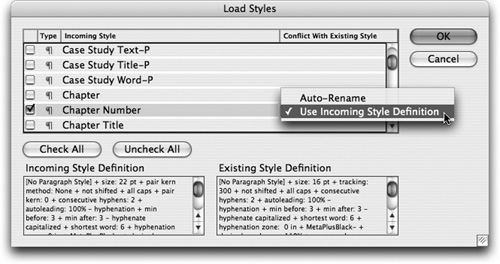
Paragraph styles are listed alphabetically at the top of the list, and Character styles are listed alphabetically at the bottom of the list. Check the styles you want to import and use the Check All and Uncheck All buttons to help you get the selection you need. You can choose to load just one style, a few styles, or all of them.
If two styles with the same name exist in the two documents, InCopy forces you to either Auto-Rename the loaded style or use the existing style definition. In the event of such a “collision,” the incoming and existing style definitions are listed at the bottom of the dialog so you can compare them and choose the one you want (Figure 3.21).
After you select the styles to load, click OK, and InCopy adds them to the document.
In some cases, you’ll notice styles with a floppy disk icon ![]() next to them in the Character and Paragraph Styles palettes. The floppy disk icon indicates the style was introduced to the InCopy document by placing a Word document that contained the style. Also note that if you place a Word document with styles into an InCopy document, the text styles from the Word document retain the floppy disk icon when those styles are loaded into another InCopy document.
next to them in the Character and Paragraph Styles palettes. The floppy disk icon indicates the style was introduced to the InCopy document by placing a Word document that contained the style. Also note that if you place a Word document with styles into an InCopy document, the text styles from the Word document retain the floppy disk icon when those styles are loaded into another InCopy document.
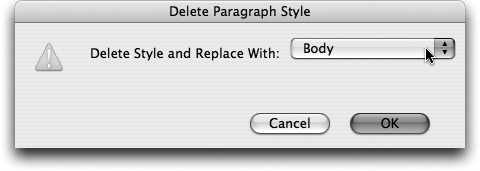
If you find that your InCopy stories include lots of text styles you never use, consider paring down your styles. To find all the unused styles in a document, open the Character Styles and Paragraph Styles palettes from the Window menu and choose Select All Unused from the palette menu. Now you can delete the unused styles by clicking the trash can icon ![]() at the bottom of the palette. You’ll have to do this once in the Character Styles palette and once in the Paragraph Styles palette to clean up everything. If you try to delete a style that’s used in the document, InCopy forces you to remap the style you’re deleting to another style in the document (Figure 3.22). You can only remap paragraph styles to paragraph styles and character styles to character styles. If deleting a used style was an accident, just click Cancel instead of remapping and deleting the style.
at the bottom of the palette. You’ll have to do this once in the Character Styles palette and once in the Paragraph Styles palette to clean up everything. If you try to delete a style that’s used in the document, InCopy forces you to remap the style you’re deleting to another style in the document (Figure 3.22). You can only remap paragraph styles to paragraph styles and character styles to character styles. If deleting a used style was an accident, just click Cancel instead of remapping and deleting the style.
You’ve learned how to edit, format, and style your text, but that’s only part of the equation. In the next chapter we explore many other features that help you automate your writing workflow with powerful tools such as dynamic spelling, auto-correction, and text macros.