
Now that you know what InCopy’s interface looks like, which tools you have at your disposal, and where they are, it’s time to get to work. Though we hope you didn’t just look at the Table of Contents and jump to this chapter to get started, we understand your excitement.
When we say getting started we mean putting pen to paper, as it were. The time has come to start writing. (Sure, there’s a section for those of you who need to get started by deciding on what kind of workflow you’re going to use and how to integrate InCopy with InDesign. That’s found in Part Two, “Understanding the Workflow.”)
Much as InCopy is truly a writer’s tool, writers who are used to other word-processing tools can find the very process of getting started to be a bit intimidating. We’ll get you up and writing in no time.
One would think that the first item of business would be creating a new document, or maybe, for those familiar with other workflows, checking out a file.
Nope.
One of the beauties of working in an InCopy/InDesign workflow is that more than one person can be working on a page at the same time. That means you, the writer, don’t have to wait for a designer to check a story back in before you go to work on your column, or wait for another scribe to finish her section. You can take control of your column of space by simply checking it out using the Assignments palette while the designer continues to lay out the page. But the designer might need to know which writers have which text blocks checked out, or in a different workflow, which writers have been assigned to a spread by an editor.
For all these reasons, the first order of business is to identify yourself. InCopy doesn’t let you do much of anything until you take this simple, significant step. With each user using a unique name, everyone involved in the process can tell who wrote what, who made which edits, who added notes, and so on.
From the File menu, choose User (Figure 2.1). (You can also choose User from the Assignments palette menu.)
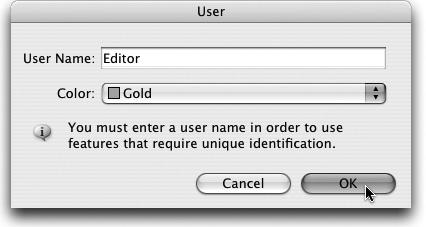
There are really only two options here. First, give yourself a name. Remember that you’re giving yourself a name in order to identify your work to others. That means your notes, your changes, everything you do will be attributed to this name. Think of this as getting credit for what you’ve done. You may want to agree on a naming convention for your entire staff, such as first name, last initial. Your name is application-specific, meaning that you should have only one name when you’re using InCopy. InCopy will not let you be Clark Kent in the morning and Superman in the afternoon.
The second option is to identify yourself by color as well. Consult with your colleagues to make certain that everyone has chosen a unique color to identify his or her work. This way everyone can tell at a glance, by color, who made which addition, note, or edit as an article works its way from first draft to final edit. When choosing a color for your identity, also bear in mind that it should not conflict with any custom settings you might have for the display of Galley and Story views. For example, if you use the Terminal theme with green text and then choose a User color with the same green, your edits are going to be really difficult to read.
Tip
We realize there are several different workflows available for InCopy users. Depending on your workflow, you may need to begin by checking out an existing text block from an InDesign document, rather than beginning by creating a new document. (For more on workflows, see Part Two, “Understanding the Workflow.”)
Now you’re ready to write. Like most word-processing tools, InCopy can create a brand-new blank document so that you can begin to put words to paper, as it were. But because InCopy is tailored toward a workflow environment, realizing that your words will eventually be laid out on the printed page in a larger context, even the New Document dialog offers some options you may not be used to.
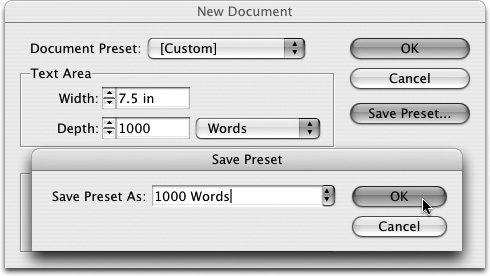
Choosing File > New brings up the New Document dialog (Figure 2.2). The first field in this dialog is the Text Area setting. Why a text area? You’re not laying out a whole page in InCopy. In fact, you’re not laying out pages in InCopy at all. That’s the designer’s job. You’re here to write, so InCopy is simply asking you how much space you have for your words. This setting is designed for writers who need to write to fit. The feature, new to InCopy CS2, is called Standalone Copyfit.

In some cases you’ll know the settings that belong in these fields. In some cases you won’t. Don’t worry if you don’t. InCopy is quite forgiving on this score. It’s not going to stop you from writing simply because you’ve gone over your word allotment (or your line count, or what have you). It’s just going to let you know how you’re measuring up against that allotment of space. Truth is, most of this information is just for you, the writer, to be able to see how your work interacts with the geometry of your layout: line breaks, line counts, page breaks, and copyfitting. The default setting for text area in this dialog is 7.5 inches wide (Figure 2.3). But if you do need to change these settings, no worries, just head over to File > Document Setup and change it.

Imagine that you’re assigned a sidebar to a longer story. Your cigar-chomping editor has bellowed that he needs 500 words in it. He also told you that your sidebar will be 4 inches wide. In that case, set the Text Area width to 4 inches. Notice that the Depth Options pull-down menu lets you define the depth of your copy. You can define it in terms of words, lines, pages, or column inches.
Of course, a 500-word sidebar with a 4-inch width has significantly more lines than one with a 7.5-inch width.
Regardless of how you define the width, as long as you define the depth to 500 words, InCopy lets you know when you’ve hit your editor’s 500-word limit. It also tells you in the Copyfit Info toolbar how far under or over it you are. That’s part of the beauty of writing in InCopy as opposed to a standalone word-processing program. If he only told you your word count, don’t worry about the Text Area width setting. When the InCopy document lands in the InDesign document, the designer will make it the correct width. Feel free to write your 500-word sidebar without worrying about width.
If you know the number of lines, pages, or column inches for your copy and want to define it that way, change the pull-down option in the Document Setup dialog.
There is also an option for page size here. That way if you’re assigned a number of pages and know the metrics of the pages you’re writing, InCopy can still keep accurate count of copyfit information.
When you’re done filling out the dialog, click OK and you’ll be ready to start working on your new document.
If you frequently write the same-sized documents, like that 500-word sidebar, or a 5-page feature, you can save those settings as a preset. That way you don’t have to fill out the New Document dialog repeatedly. Select File > New, create your document’s settings, click the Save Preset button, and name your preset (Figure 2.4). The next time you choose Command/Control-N, the Document Preset pull-down menu at the top of the dialog will display any presets you’ve named and saved.
To manage all your document presets, there’s no better place than InCopy’s Document Presets dialog. Choose File > Document Presets > Define to access the dialog (Figure 2.5). Create new presets by clicking New on the right side of the dialog. You’ll find yourself in a dialog that looks identical to the New Document dialog with the same options for text area and page size, but it asks you to name your preset. From here, if you select OK, it adds your newly named preset to the list of document presets.
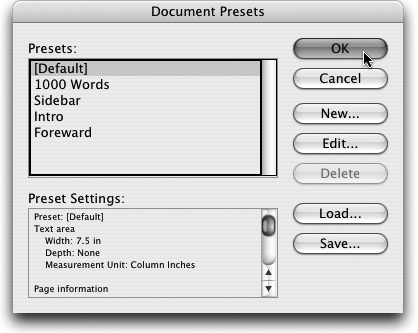
If you have a set of presets you’d like to make available to everyone in your group, you’ll need to save them. Select all the presets you’ve created, either by selecting contiguous presets in the list with the Shift key, or using the Command/Control key to select presets from your list one by one. Next, click the Save button and then name and save the presets as an .icst (InCopy Document Settings file) file. To load the settings on another user’s computer, choose File > Document Presets > Define and click Load. Navigate to the .icst file and select that file to load the presets. This is a great way to standardize your entire group.
Tip
Note that there is a [Default] document preset in the File > Document Presets > Define dialog. Typically, you can’t redefine a Default preset in an Adobe application. In fact, any preset that is denoted in brackets is generally a factory predefined standard not modifiable by a user. That’s not the case here. Highlight it and click Edit. This could be helpful if your typical InCopy document is something other than a letter-sized page, for instance. Want to reset [Default] back to the factory standard? Quit InCopy, relaunch it, and hold down Shift-Control-Option-Command (Mac) or Shift-Control-Alt (Windows). InCopy prompts you with a dialog asking if you really want to delete the preferences. Click Yes and let InCopy finish launching.
InDesign CS2 opens InCopy CS2 files (.incx) and a wide variety of InCopy CS2-generated files, such as .inca and .inct. (For an overview of each of these file types see the sidebar “Alphabet Soup.”)
Tip
As we discussed in the section “User Designation” earlier, when opening an existing document in an InDesign/InCopy workflow, part of opening an existing file will likely involve opening the file and then checking it out of the workflow. For the purposes of this chapter, we’re going to assume that you have permission to check out the files we’re discussing, but your workflow may prevent you from working on a file type that InCopy CS2 is capable of opening. For more on workflow and permissions, see Part Two, “Understanding the Workflow.”
You can open a standalone InCopy CS2 document (.incx file) which has been previously created in InCopy CS2 or InDesign CS2. In this case, choose File > Open and select the .incx file. Even if it originated in InDesign CS2, the file will not show the page geometry of the InDesign CS2 file. It will, however, have all character and paragraph styles and swatches available. You can also open an original InDesign CS2 (.indd) file. When you do so, you’ll be able to take advantage of Layout view, as well as the Story and Galley views of the document, because InCopy CS2 can read the geometry and graphic elements of the InDesign CS2 document and display them in Layout view. The advantage is that in Layout view, an InCopy user can accurately see text wraps, page geometry, and graphics in an .indd file. InCopy also lets you use styles and swatches originating in InDesign. InCopy CS2 opens InCopy CS2 template files (.inct) as well as InDesign assignment files (.inca).
You can place an existing InCopy CS2 document into InCopy CS2. This is particularly helpful when you have a large text file to put into InCopy. When you do this, all the textual content of an existing InCopy CS2 file as well as any styles and swatches get inserted into your current InCopy CS2 document where the cursor is. (For more on file types, see the sidebar “Alphabet Soup.”)
Tip
In our tests, enabling Show Import Options did not invoke the Import Options dialog as we expected, and we reported this finding to Adobe. So, if you have identically named styles in both documents and place an InCopy CS2 (.incx) document into your current InCopy CS2 document, the styles of the file you’re placing will override the styles in your current document.
You can also copy and paste (or, new to InCopy CS2, drag and drop) from one InCopy CS2 document into another. This helps if you want the unformatted text from another InCopy CS2 document. Although the associated styles for the source text are still appended to the target document (meaning that they become available in the style palettes), they’re not applied to the pasted text, and you can delete them or reapply them depending on what you need. (As you’ll learn in Chapter 3, you can control this behavior.)
It’s possible that not everyone you’ll be working with will be using InCopy CS2. Maybe you’ll be working with people who are using InCopy CS at the same time you are using InCopy CS2. InCopy CS2 gives you many options for working with folks who are using InCopy CS. You can open, place, or copy from InCopy CS documents. Each of these options is slightly different and offers its own set of options and advantages.
File > Open (Command/Control-O) opens an InCopy CS file (.incd), allowing InCopy CS and InCopy CS2 users to work together. Slightly more complicated is making your InCopy CS2 file available to InCopy CS users. Doing that requires choosing File > Save Content As and clicking InCopy CS Document in the format pull-down. When you open an InCopy CS file with InCopy CS2, all styles and swatches in the original document are ready for use in InCopy CS2.
You can also place InCopy CS (.incd) files. Simply position your cursor at an insertion point in the InCopy CS2 file, select File > Place (Command/Control-D), and navigate to the file you want to place. When placing InCopy CS files, all paragraph and character styles, as well as swatches from the original InCopy CS file, are brought into your InCopy CS2 document.
A few things to watch out for when placing InCopy CS .incd files into InCopy CS2: If you have identically named styles in InCopy CS and InCopy CS2, the attributes of the InCopy CS-defined styles will be overwritten by those of InCopy CS2. Suppose your InCopy CS file has paragraph styles of Head, Subhead, and Body, which are all Minion Pro in 48-, 36-. and 14-point black, respectively, and you place it into InCopy CS2, where you’ve defined identically named styles (capitalization must be identical as well) as 64-, 48-, and 12-point blue, respectively. All of your paragraph-styled copy will change to reflect the styles as defined in the InCopy CS2 document.
Tip
You have more control if you select Load All Styles from the Styles palette menu after you’ve placed the InCopy CS text. (For more information on using styles in InCopy CS2, see the section in Chapter 3, “Ensuring Consistency with Character and Paragraph Styles.”) Similarly, a swatch identically named Mustard, for example, in both applications will acquire the attributes assigned to it in the InCopy CS2 document. (For more information on using styles and swatches in InCopy CS2, see Chapter 3.)
Another way to move text from InCopy CS to InCopy CS2 is to copy and paste. Unfortunately, you can’t drag and drop because InCopy CS doesn’t support drag and drop at all. The good news is that all the styles and swatches from your InCopy CS file will arrive intact in your InCopy CS2 file if you copy and paste. Styles marked with an icon resembling a floppy disk in the Paragraph Styles or Character Styles palette have been imported into the document rather than created natively.
You may well find yourself needing to work with Microsoft Word files because stringers are writing their copy in Microsoft Word. Or, as is quite common, your newspaper may have an archive of obituaries of famous people that are updated when they are needed for publication, and you may be called upon to update one that was originally written in Word.
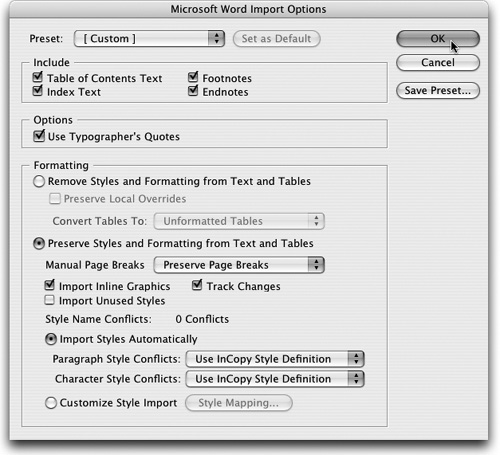
You can open Word documents directly in InCopy CS2. Choose File > Open and navigate to the Word document you want to open; highlight it and click the Open button. Seems simple enough. But — gasp — while you’ve been minding your own business and expecting your Word document to pop open in the friendly confines of InCopy CS2, you’re suddenly faced with a huge dialog entitled Microsoft Word Import Options, with a seemingly baffling array of checkboxes, radio buttons, pull-down menus, and electrical wiring. Okay, there’s no electrical wiring, or at least no exposed electrical wiring. But there are a lot of options here (Figure 2.6).
Tip
The Microsoft Word Import Options dialog is a major new function in InCopy CS2. InCopy CS didn’t open Word documents directly. You could place Word documents, but not open them directly. Now you can.
Stick with us. This isn’t that tough. The dialog is actually divided into three sections: Include, Options, and Formatting (note the headings and hairlines which group the sections together).
If you work in a textbook or academic publishing environment, the Include section of this dialog is rife with possibilities. The Word document you’re opening in InCopy probably already includes such things as a table of contents, index, footnotes, and endnotes. By default, the Word Import dialog checks all of these options, meaning that if they exist in the Word document, they’ll arrive intact in InCopy. Even better, you can pick and choose. Maybe you want the footnotes and endnotes, but not the table of contents text or the index text. Just remove the checkmarks next to the items you don’t want, and they will be left behind as your Word document makes its journey into an InCopy document (Figure 2.7).
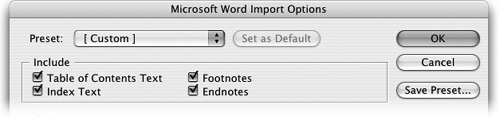
When you want to include an existing table of contents or index from a Word document, check the appropriate boxes in this dialog. Note that the options are officially called “table of contents text” and “index text.” This means that the Word document’s table of contents and index arrive in your InCopy document as plain text. The paragraph styles associated with a Word document’s table of contents, typically TOC1, TOC2, and so on, appear in InCopy’s Paragraph Styles palette. The page references in your original Word document remain in the InCopy document, but any of the styling that was applied in the Word table of contents will not. The assumption is that eventually these items will be styled in InDesign, by a designer.
Footnotes, as you would hope, are preserved, but are renumbered and formatted according to your current InCopy settings for footnotes (see Chapter 6).
Admittedly, we’re a bit baffled by the term “Options” to describe the second box, but nobody asked us. There’s only one option here, though it’s a helpful one. There are two types of curly quotation marks in the world: left quotation marks, which look like this:
“
and right quotation marks, which look like this:
”
Typically, those are also referred to as typographer’s quotes or smart quotes. The alternative is straight quotation marks, which look like this on both the left and right of a quote:
“
The option is whether your quotation marks should come in as typographer’s quotes or not. Most of the time, you’ll probably opt for the typographer’s quotes, but if your Word document uses straight quotes for inches and feet, you may want to turn this option off by deselecting the checkbox. If your Word document has a combination of straight and typographer’s quotes, deselecting the checkbox will leave the quotation formatting exactly as it was in your Word document.
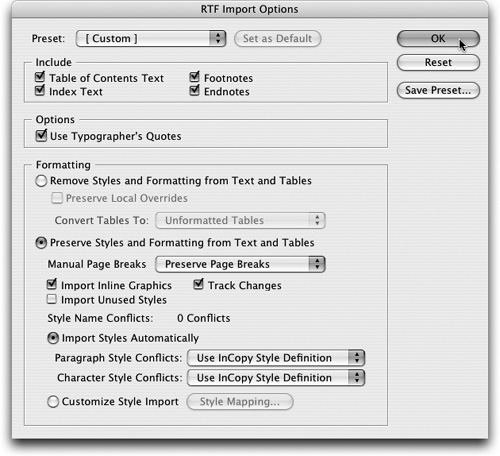
The last and largest section of the Word Import dialog is called Formatting, and, if you’re going to be bringing a lot of Word documents into InCopy CS2, it’s well worth understanding (Figure 2.8).
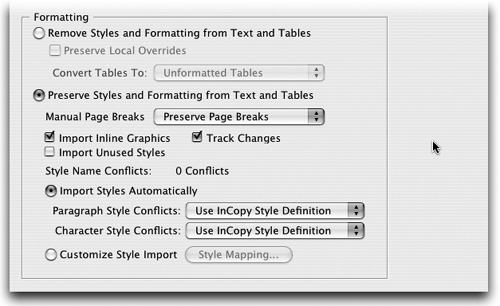
Suppose the person who originally wrote the Word document used all sorts of manual styling. He used a different font than your publication uses, italicized words that he thought important but you don’t, used the wrong type size, and even created new paragraph or character styles. The first radio button, Remove Styles and Formatting from Text and Tables, tells InCopy to strip out all formatting and styles as it opens the Word document. That can save lots of work. It even removes the dreaded Normal paragraph style, which is created by default in a standard Word document. (Because it cannot be deleted from a Word document, Normal can cause designers grief in a workflow, either if several conflictingly styled Normals end up placed into a single InDesign document or if a production person has to track down unused styles at the end of the production cycle not knowing whether Normal has been inadvertently used at some point by a Word user.) If you opt to remove all the styles, you’re also presented with the option to preserve local overrides. That means that any character-level formatting such as bold or italic in the incoming Word document, either on a one-off basis or because it was assigned to a character style in Word, will be preserved. Beware, though, that if you opt to remove the styles and formatting, even if you choose to preserve local overrides, the attributes will remain, but any character styles will not be brought in with the document.
You can also strip out any formatting in a Word table at this point. “Convert tables to” gives you two options. The first is to convert existing Word tables to unformatted tables, stripping out not only font styling but also background colors, line colors, styles, and so on, to make the table as plain as possible to allow for styling it in InDesign. The alternative is to convert the table to tabbed text. Don’t rush to judgement. InCopy CS2 does some wonderful things with tables, things that are previously unheard of in a word-processing program, so you may want to keep the table as a table. (We explore more table-related options in Chapter 6.)
But maybe you want to retain the formatting of your original Word document. Or, quite conceivably, you want to retain some, but not all, of the formatting. InCopy lets you have your cake and eat it, too. You may choose to Preserve Styles and Formatting from Text and Tables. InCopy CS2 now has very robust support for bringing styles originating in Microsoft Word into InCopy CS2. If you opt to preserve, you are faced with three options in the Manual Page Breaks pull-down menu (Figure 2.9).

You can preserve manual page breaks, on the assumption that you’ll be replicating the layout of the Word document in InCopy, and thus ultimately in InDesign. You can convert them to column breaks, if that makes sense for your Word document. Or you can remove the breaks altogether by selecting No Breaks. Manual page breaks may be fine when the Word document is a standalone document, but when opening it in InCopy, with a final destination being an InDesign layout, most likely you want to remove them and let the designer handle it in InDesign.
You’re then faced with a series of checkboxes that allow for a great deal of control over which facets of an incoming Word document will be retained and which will be dispensed with.
Import Inline Graphics does exactly that. If you check it, any inline graphic that was already in the Word document will become an inline graphic in your InCopy document. (This is new to InCopy CS2. In previous versions of InCopy, inline graphics that originated in Word didn’t show up in InCopy.) InCopy CS2 treats inline graphics from Word just as it does inline graphics created natively in InCopy, with one major exception: inline graphics from Word are embedded in the InCopy CS2 document, and there is no way to unembed them. (For more on inline graphics, see Chapter 6.)
Tip
A word of caution: Inline graphics preserved from Word will show up named “fo” in InCopy’s Links palette (as well as InDesign’s, when eventually placed there). We’ve reported to Adobe that we’d prefer to have each inline named accordingly in the Links palette, but for the time being, beware.
Checking the Track Changes checkbox will bring into InCopy all the text edit changes that were tracked in the Word document. You’re then free to work your way through those edits as if they originated in InCopy. (For more on tracking changes, see Chapter 5.)
Tip
But importing Word’s track changes doesn’t bring in many of the other attributes: Date, time, and name of the originator of the change do not appear in the converted InCopy document. Also beware that this is a one-way street. There is no way to save or export tracked changes created in InCopy back to a Word document.
Why would you import unused styles? It’s quite conceivable that the Word document began its life as a Word template, with a veritable plethora of styles, both character and paragraph, created specifically for your publication. All of them may eventually end up being used, but maybe not until the copy is placed into the InDesign CS2 document. Still, it might be best that the styles are retained all the way through the editorial process, even if they aren’t used until later in InDesign. We tend to leave this box checked so that the styles are available throughout the workflow. (For more on styles, see Chapter 3.)
Yes, we realize that this dialog has more options in it, but they are not relevant here. InCopy CS2, for better or worse, uses this same dialog for all interaction with Word documents, regardless of whether they’re being opened or placed into InCopy CS2. The options relating to style mapping, a powerful new feature in InCopy CS2, are only relevant when you are placing a Word document into an existing InCopy CS2 document (see the upcoming section “Placing Word Documents”).
After you’ve set everything according to your needs, it’s tempting to click OK, but there’s one more item to take a look at. If you’re going to be opening a number of Microsoft Word documents and will usually be using the same settings, you should save your choices as a preset. We looked at document presets earlier in this chapter. These presets are Word Import Presets. (We realize that you’re opening, not importing, the Word document at this point. Don’t worry about it.). Presets are a way of saving all those settings you just carefully made. You might create several presets, for a variety of situations, some that preserve the formatting, some that don’t; some that bring in footnotes, some that don’t. Trust us, over the long term presets will save you time when opening Word documents. Click the Save Preset button and give your preset a name to help you remember what it does, such as Remove Formatting, and click OK to close and save the preset. Atop the Word Import dialog, the Preset pull-down menu will now have the name of your preset (Figure 2.10). Click OK again to finish opening your Word document.

You can create more Word Import Presets in this dialog by either opening a Word document in InCopy or placing one (see “Placing Word Documents” later in this chapter). So if you have the time and inclination, save the first preset, keep modifing your settings, and save as many presets as you like. When you’re done, all the presets you’ve created will be listed in the pull-down menu at the top of the Word Import dialog.
Tip
Word Import Presets are saved as .smp files inside the folder InCopy CS2/Presets/WordImportPresets.
InCopy’s default installation creates a Presets folder populated with the following folders: Autocorrect, Images, InCopy Shortcut Sets, Scripts, and Swatch Libraries. The Word Import Presets folder does not get created until you create your first Word Import Preset inside of InCopy CS2. You may, however, create the folder manually (spaces in the name must be there) and then populate it with .smp files. Do you have a series of these files you want to share with other InCopy CS2 users in your shop? You can copy them to the same directory on other users’ machines. These are XML files, making them fully cross-platform, meaning they can be copied from Windows machines to Macintosh computers and vice versa, allowing you to keep your shop consistent.
When you open a Word Document in InCopy CS2, it opens as Untitled. It doesn’t retain the name of your original Word document. That can be quite frustrating if you have to figure out the source of that text long after the fact.
Armed with a series of Word Import Presets, you may choose to set one as your default Word import preset. Make your choice from the pull-down menu atop the Word Import dialog and then click the Set As Default button. Next time you place a Word document, you can leave the Show Import Options box unchecked, and your default settings will be applied. If you open a Word document, you’ll still be taken to the Word Import dialog, but it will be pre-populated with your default preset.
Placing a Microsoft Word document into an InCopy CS2 document can be advantageous when dealing with long Word documents. Another advantage to placing as opposed to opening is that InCopy CS2 now lets you exert even more control over styling and formatting that is already resident in the Word document than you have when opening a Word document in InCopy CS2. Choose File > Place in InCopy CS2, locate the Word document you plan to place, be sure to check the Show Import Options box, and then click Open. You’re faced with the Word Import dialog. Whereas this might scare other mortals, you realize the power harnessed in these options. (We already covered a good chunk of them in the section on opening Word files. The options are identical, so if you ignored that section, now would be a good time to flip back there and commit that section to memory.) It’s in the third section of the Word Import dialog, the one we skipped earlier because it didn’t apply to opening Word documents, that you’ll find options for resolving conflicts between incoming Word styles and those that already exist in your InCopy document (Figure 2.11).
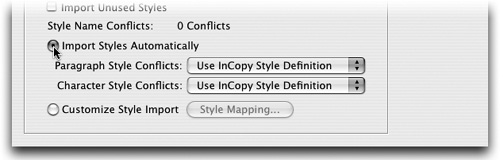
Loitering there in the Word Import dialog, just below the Import Unused Styles checkbox, is a report: As you’re placing your Word document into InCopy, in the background InCopy’s import filter has already done a quick analysis of the styles in both the Word document and your current InCopy CS2 document. If your incoming document has styles whose names are identical to those in the existing InCopy CS2 document, they can’t coexist in the same document. For example, let’s say that your Word document has a paragraph style called Heading 1. It is defined there in Word as Adobe Garamond Pro, Bold, 36-point, left-aligned, and you place it into your InCopy CS2 document where there’s also a paragraph style called Heading 1, which is defined as Bickham Script Pro, Semibold, 48-point, right-aligned. Any text assigned to Heading 1 can’t have conflicting formatting. The process starts with the line in the Word Import dialog that says “Style Name Conflicts.” If that number is zero, and sometimes it is, you could say “Mission Accomplished” and declare an end to major style name conflicts as you place your Word document.
If you do have style name conflicts, though, InCopy puts a yellow warning icon in that line and tells you how many of the conflicts are with paragraph styles and how many are with character styles (Figure 2.11). Now you’ll need an exit strategy from the dialog, exercising a tremendous amount of control over how that styled text from Word arrives in the safe haven of your InCopy CS2 document.
You can opt for the Import Styles Automatically radio button (Figure 2.11) as one step toward resolving any conflicts. Adam and Mike are control freaks and admit it. Most of the time they avoid automatic settings because it means giving up control. Not in this case.
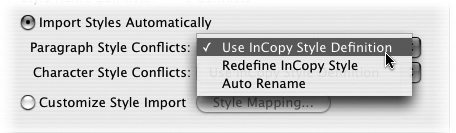
Let’s go back to our example above. Heading 1 in the incoming Word document is Adobe Garamond Pro, Bold, 36-point, left-aligned, and Heading 1 in the InCopy CS2 document is Bickham Script Pro, Semibold, 48-point, right-aligned. Which should end up as the attributes of Heading 1 in the InCopy document? Use the pull-down menu for paragraph style conflicts (Figure 2.12), and you have complete control while letting InCopy CS2 do the heavy lifting. To resolve a conflict, your options are three.
If you opt to import styles automatically, the pull-down menu allows you to choose an automated solution for resolving style conflicts.
Using InCopy Style Definition means that irrespective of the attributes of the identically named style in the Word document, the attributes of the InCopy CS2-defined style will emerge victorious. In our example, that means text coming in from Word that is tagged with the Heading 1 paragraph style will arrive in InCopy CS2 as Bickham Script Pro, Semibold, 48-point, right-aligned.
Redefine InCopy Style means the attributes of the style in the Word document will be used to redefine the identically named style in the InCopy CS2 document. In our example, the text coming in from Word that is tagged Heading 1 will arrive in InCopy CS2 as Adobe Garamond Pro, Bold, 36-point, left-aligned. But beware, this can have sweeping effects on your InCopy CS2 document, because now you’ve redefined the style, so any previously existing text in your document which was assigned to the Heading 1 style is now going to be restyled as Adobe Garamond Pro, Bold, 36-point, left-aligned.
Auto-rename brings coexistence to the conflict. Our two Heading 1 styles? They’ll coexist in our InCopy CS2 document. The Heading 1 style that was already in our InCopy CS2 document will remain there, unchanged, and all text that was styled with Heading 1 will remain intact, unchanged. Here’s the tricky part: the Heading 1 style from the Word document will be renamed, slightly, to Heading 1_wrd_1, and any text that was tagged with Heading 1 in Word will now be tagged with the newly named style Heading 1_wrd_1, and its attributes (Adobe Garamond Pro, Bold, 36-point, left-aligned) will remain.
Pretty good, don’t you think? We’ve brought an end to the conflicts exactly according to our strategy. Not only that, but the process for character styles is identical, yet separate. Meaning that it’s just as easy, but if you want paragraph styles set to redefine the InCopy style, but character styles set to use the InCopy style, you have that degree of control.
Unfortunately, even that won’t solve everyone’s style conflict issues. The Word document you began with may very well have Heading 1, Heading 2, and Normal, largely because that’s what Word offers up as defaults, but what if you’re placing it into an InCopy CS2 document that has Headline, Subhead, and Body Copy? They’re certainly not going to be resolved if you used Import Styles Automatically. You could finish placing the Word document and then hunt and peck your way through the process of finding every iteration of Heading 1 and change it to Headline, and so on, but don’t do that. Instead, select the Customize Style Import radio button (see Figure 2.11), click the Style Mapping button, and behold a way to control, on a style-by-style basis, how styles from a placed document map to their brethren in your InCopy document (Figure 2.13).
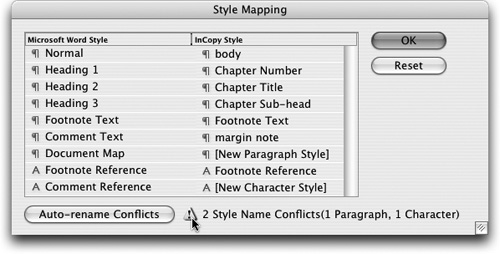
If InCopy detected style conflicts in the process of placing this Word file and warned you in the Word Import dialog, it’s repeated here at the bottom of the Style Mapping dialog, along with the scorecard reminding you of how many current style conflicts you have. The left-hand column lists the styles in the document you’re placing, and it takes that order from the order in which the source document lists them. The right-hand column lists the styles currently available in the InCopy document. The idea of mapping is to use InCopy CS2 to define a relationship between the styles in your incoming Word file and your InCopy document.
If, in fact, you have any style conflicts, InCopy will line them up so that you can find them easily. InCopy will put its current list of styles in the right-hand column in the same order as it found the incoming styles. It’s not going to be like those puzzles in the paper where you have to draw a line from the item in the left-hand column to the appropriate item in the right-hand column.
The easiest solution here is to click the Auto-rename Conflicts button at the bottom. There’s no difference between that option and the one we delved into earlier, where we were offered Auto-rename separately for paragraph style conflicts and character style conflicts. Clicking Auto-rename Conflicts automatically renames all the incoming styles, both paragraph and character, just as in our previous example. The InCopy Style list, on the right, now revises all formerly conflicting style names as Auto-renamed. Problem solved.
But remember that Adam and Mike want control—here is where we begin to exercise it. Back to our example. On the left, Heading 1, Heading 2, Heading 3. Lined up next to each of those on the right, the New Paragraph Style pull-down menu. If you leave things alone, those three paragraph styles will each become a new paragraph style in the InCopy document. Click on the New Paragraph Style pull-down for a list of paragraph styles currently available in the InCopy document (Figure 2.14). If you click the pull-down menu next to Heading 1 and select the Headline style, you’ve now mapped Heading 1 from your incoming document to Headline in the InCopy document. You can roll right along from here and map Heading 2 to Subhead, and Heading 3 to Body Copy. Once you’ve made all your mapping decisions, click OK in the Style Mapping dialog, then OK in the Word Import dialog. Mission Accomplished!
![If you click on [New Paragraph Style], InCopy offers the options of Auto-rename Conflicts buttonAuto-rename, Redefine InCopy Style, and a list of paragraph styles currently available in the InCopy document.](http://imgdetail.ebookreading.net/design/12/0321337050/0321337050__the-adobe-incopy__0321337050__graphics__fig0214.jpg)
Tip
You do have the option of creating exceptions to your Auto-rename policy. Suppose you would like to take advantage of all the Auto-renaming InCopy has to offer, with the exception of Heading 1, where you’d rather retain the style attributes of Heading 1 as already defined in the InCopy document. After you’ve Auto-renamed everything, you can then locate Heading 1 in the left-hand column and click on the words Auto-rename in the right-hand column. You get a pull-down listing all the styles already in your InCopy document.
You can either copy or cut and paste from Microsoft Word. By default, text pasted into InCopy CS2 from Word arrives stripped of all formatting, including paragraph and character styles, as well as swatches. (We cover modifying the default settings for pasting from Word in Chapter 3.) Pasted text will be formatted in your default InCopy CS2 font and assigned the Basic Paragraph style.
Now that you’re an expert in all the facets of opening, placing, and pasting .doc files, bringing .rtf (Rich Text Format) into InCopy CS2 should be a piece of cake. InCopy CS2 will open, place, or copy and paste from .rtf files.
Copy and paste being the simplest option, you can cut or copy from an .rtf document and paste directly into InCopy CS2. Of course, you can accomplish the same thing by dragging from an .rtf document into InCopy CS2. Just as when pasting from a .doc file, pasted .rtf text is stripped of all formatting, including paragraph and character styles, as well as swatches. By default, it is formatted in your default InCopy CS2 font and assigned the Basic Paragraph style.
Opening or placing .rtf files is nearly identical to opening or placing their cousins, .doc files. When opening an .rtf file, you’ll come face-to-face with the RTF Import Options dialog (Figure 2.15). You’ll see the same RTF Import Options Dialog if you check the Show Import Options box when placing .rtf. It’ll look awfully familiar, because everything is identical to the Word Import dialog. (For technical reasons, these are two dialogs that do the same thing.) Because its options for mapping styles, making presets, and setting defaults are identical, we’ll not go through them here. If need be, review the options in the “Opening Microsoft Word Documents” section earlier in this chapter.
A .txt file is a plain text file. That means that the file is already stripped of all formatting, so bringing it into InCopy CS2 is a pretty simple process. Cut or copy and paste from a .txt file into InCopy CS2, and your text arrives free of formatting, assigned to the Basic Paragraph style with a character style of None, meaning it also arrives in your default font. If you choose to open or place a .txt file, you are faced with the Text Import Options dialog. As befits text stripped of all formatting, this dialog has far fewer options than its Word Import dialog cousin (Figure 2.16).

Take our word for it, the only settings here you need to be concerned with are the checkboxes.
Extra Carriage Returns: You can remove these at the end of every line. They’ll be replaced by tabs. You can also opt to remove them between paragraphs, which means that empty lines in your .txt file will be removed before they arrive on your InCopy page.
Formatting: If the .txt file has a series of spaces where a savvier user might have put a tab, you can replace the series with a tab and even define how many spaces in a row will merit a tab.
Tip
Shift-click Open when placing a text file to invoke the Import Options dialog temporarily when placing .doc, .rtf, or .txt files instead of checking the Show Import Options text box.
Now you know how to create a new document. You can also take nearly any file format they throw at you and wrangle it into InCopy CS2. Next step? Actually writing and editing copy. Just turn the page.
Alphabet Soup: Understanding the Differences Between .indd, .indt, .incd, .incx, .inct, and .inca
InCopy CS2 is capable of opening, placing, copying, and saving all sorts of text-based documents. The goal is to give editors a truly versatile tool for working with all sorts of source files. There may be writers inside your office who are working in InCopy, while freelancers or remote users outside the office continue to write in Microsoft Word or some text editor.
.incx: An .incx file is the default file type for InCopy CS2. That’s what users get when they choose File > Save Content (Command/Control-S) in InCopy CS2 (Figure 2.17). InCopy CS2 users will use this file type the vast majority of the time. When an InDesign CS2 user exports graphic elements or stories from InDesign CS2 for access by an InCopy CS2 user, this is the file type created, and an InCopy CS2 user will have no problem opening these files, but InCopy CS users will not be able to open them.
.inct: An .inct file is an InCopy template file. This is new to InCopy CS2. If you’re using a “content-first” workflow (see Chapter 9), .inct files are a great way to start a standalone text document that already has styles, tags, swatches, and any info you may have created in the Page Setup dialog. When you open an .inct file with File > Open (Command/Control-O) in InCopy CS2, it will open as an untitled document, but will be all set with all the attributes you need to get started.
.indd: An .indd file is an InDesign document. Saving a file from InDesign in its standard format creates an .indd file. InCopy and InDesign share the same basic file structure. This means that InCopy can open an InDesign (.indd) file. The beauty of this is that InCopy can therefore provide the InCopy user all the information in the original .indd file, including layout information, content, linked files, styles, and swatches. That’s primarily a function of the Layout view in InCopy. When an InCopy user opens the .indd file, she can only edit copy blocks exported as InCopy stories (.incx) by the InDesign user.
.indt: An .indt file is an InDesign template. Although InCopy can, in fact, open an InDesign template, we can’t really recommend that as part of your workflow.
.incd: An .incd file is an InCopy CS document. The primary use of an .incd file is to make your InCopy CS2 document backwards compatible, meaning available to an InCopy CS user. This option is available from the File > Save Content As (Command/Control-Shift-S) dialog. From the Format pull-down menu, choose InCopy CS Document to save your content as an .incd file. When you save your InCopy CS2 file as an .incd file, InCopy CS2 very helpfully warns you that an InCopy CS document may not support some of the features used in an InCopy CS2 document. Isn’t that always the trade-off? At least you were warned. But don’t worry, InCopy CS2 will have no problem opening that .incd file when the InCopy CS user passes it on back to you. Even better, if you then open that .incd file and attempt to save it, InCopy CS2 will require you to do a “Save Content As,” so you don’t inadvertently save it as an .incx file and give up the backwards compatibility.
.inca: An .inca file is an InDesign assignment file. The file is just a pointer to the pieces and a record of the geometry that ties together the InDesign CS2 file and, at the InDesign user’s discretion, placeholder frames, assigned spreads, or all the spreads in the original InDesign CS2 file. The idea of an assignment file is a logical grouping of text components of an InDesign file that might be assigned to a particular writer. Thus she can work on all the components for which she’s responsible. For instance, a headline, subhead, byline, and body might be one logical group, or byline, article, caption, and sidebar might be another. Assignment files can only be created in InDesign CS2 and can only be opened by InCopy CS2 users. We look at assignment files more extensively in Part Two, “Understanding the Workflow.”

Tip
Be careful when you’re working on an .incd file in InCopy CS2. Adobe has made certain that you’re going to consciously save the file to the .incd format, but that comes at a price. If you’re working away on that .incd file and using your typical good computer hygiene of tapping Command/Control-S every few minutes, nothing happens. You must go to the File pull-down menu and select Save Content As (Figure 2.17).