
You might call this the “money chapter.” This is where we explain how InCopy and InDesign work together in an editorial workflow. We cover exporting InCopy stories from InDesign, managing stories with the new assignments feature, and managing the check-in/check-out process with the LiveEdit Workflow.
On the following pages we explain the various workflow options and the trade-offs of different solutions and offer some insight into the decision-making process behind setting up an InCopy workflow. In Chapter 9 we walk you through basic examples of the three main workflow options, but don’t jump ahead until you’ve worked through Chapter 8. This is where we lay it all out for you. Enjoy!
If you’re part of the steering committee that decided to use InCopy with InDesign, you can use the first part of this book to see the benefits of InCopy’s feature set. Use this second part to determine how using InCopy in concert with InDesign can improve your workflow. If somebody else made the decision to start using InCopy, you might be wondering why you’re switching from your previous workflow. Why all the hassle? Why read this book? Is it all worth it?
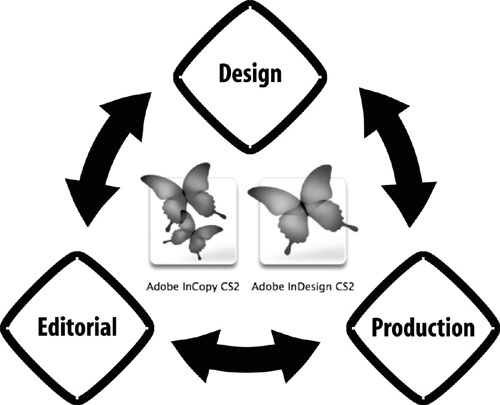
InCopy has a lot of useful features for writers and editors, but the elegance of an InCopy/InDesign workflow is all based on the amazing integration of the two applications. The fact that InCopy and InDesign share common features such as text styles, text composition engines, color engines, color swatches, and file formats means these applications are more like twins than cousins. They share the same programming “DNA” which means designers using InDesign and writers using InCopy enjoy a common user experience while they collaborate on a single publication. The benefits of this tight integration between InCopy and InDesign can be broken down into main three categories: parallel workflow, page visualization, and productivity. Let’s look at these three areas now.
A common design workflow involves somebody designing a page, spread, or chapter in a layout application, then waiting for a writer or editor to finish with the copy. When the copy is complete, the text is imported into the layout application. If the copy needs a last-minute edit, the editor has to wait for the designer to finish working in the layout application before the edit can be made. Similarly, if the designer needs to make a last-minute change to the layout, he has to wait until the editor is done with the file. This repetitive loop is a common bottleneck in the publishing process (Figure 8.1). When each department is waiting for the other department, you realize how slow and inefficient this linear approach is.

Alternatively, InDesign and InCopy let designers and writers/editors work simultaneously. For example, a designer can make last-minute changes to a layout, such as changing the size of a photo or inserting a late advertisement, at the same time that an editor is fixing an error or correcting a fact in the text of the same layout (Figure 8.2). That’s right, different parts of the same layout can be edited at the same time by different people using different computers. You can even have one designer making last-minute edits to the layout while multiple writers and editors work on multiple stories from the same layout. This parallel workflow can streamline the publishing process, allow for more flexibility near press time, and make it easier to meet deadlines.
Another significant advantage of a parallel workflow is that it helps distinguish roles in the process. When you implement InDesign and InCopy together, it allows designers to focus on design and layout while allowing writers and editors to focus on writing and editing. This might sound overly simple, but we’ve seen a lot of publishers struggle with designers who edit copy and editors who change the layout. Adding InCopy to the workflow helps publishers take a divide-and-conquer approach between their design and editorial departments.
The second major advantage of using InCopy is that it gives writers and editors the power of page visualization. Writers and editors typically use word-processing or text-editing software that has no concept of the final layout. This is like writing in the dark, with only the slightest sense of how the writing will appear in the context of the layout. We’ve talked with a lot of writers who make their best effort at writing to an estimated word count and then “toss it over the wall” with a vague hope it will actually fit the layout. The text might be too long, too short, or suffer from awkward line breaks when placed on the designed page. Unfortunately, the writer has no idea how his copy will fit with the layout unless he’s using an editorial solution like InCopy and InDesign.
InCopy works hand-in-hand with InDesign so that InCopy can accurately display the page layout that the writer is writing for, including line breaks, column breaks, page breaks, text wrap, and copyfit statistics. You can view the various breaks in Galley view or see the actual InDesign layout, complete with graphics and text flow, in Layout view (Figure 8.3). As if this page visualization weren’t cool enough, InDesign and InCopy can even work together so that any updates to the layout or text stories can update for users working on a particular layout, so all contributors can be confident they’re always up to date.

This page visualization is possible because InDesign and InCopy share a lot of common technology, including file formats, text styles, text composition engines, and the LiveEdit Workflow plug-ins. Because of this tight integration, you should always use InDesign and InCopy with matching versions. For example, InCopy CS works best with InDesign CS but not as well with InDesign CS2. To be specific, if the layout department uses InDesign 4.0.1, then the InCopy users should also use InCopy 4.0.1, but not InCopy 4.0.
The third area where InCopy really shines is general productivity features that allow you to work quickly and efficiently when a deadline is looming. The new Quick Apply feature (see Chapter 3) makes it easy to apply text styles without taking your hands off the keyboard. It’s a great example of the kind of thoughtful details that make working with InCopy a speedy process. Automatic text macros (see Chapter 4) are another handy feature that expands short text strings such as “ic” into longer pieces of text like “Adobe InCopy CS2.” Automated bullets and numbering make the life of a writer that much easier. Lastly, the dictionary and spell check features got a major overhaul in version CS2 and now include dynamic spell check (as in Microsoft Word), shared dictionaries, and easy import of custom word lists.
InCopy and InDesign work together seamlessly to share page layout and story text so that users can participate in a parallel workflow, but how does it actually work? How is it possible for multiple users on multiple computers to work on the same layout at the same time? The Adobe InCopy LiveEdit Workflow plug-ins (previously known as the Bridge Workflow plug-ins in InDesign CS) are one way to tie InCopy and InDesign together. The LiveEdit plug-ins are included with your Adobe software at no extra charge and are a good solution for smaller workgroups of 2-10 users. These plug-ins can be your secret sauce that allows InDesign and InCopy to talk with each other and negotiate the check-in/check-out process for multiple users simultaneously. If you have more than ten users or a more complex workflow, you should consider a more robust integration solution from Adobe InCopy partners such as MEI, DTI, or Wooding (see appendix A). If you’re using one of these partner solutions, you’ll need to rely on your integration partner for solution-specific training.
In order for InDesign and InCopy users to work together, they both need the LiveEdit plug-ins installed. InCopy users have the plug-ins installed by default any time they install InCopy because anybody using InCopy will also be working with InDesign users. However, not all InDesign users collaborate with InCopy users, so the LiveEdit plug-ins must be installed in InDesign.
Before you install the LiveEdit plug-ins, open the Adobe InDesign CS2/Plug-Ins folder to see what’s already installed. You should see a folder called InCopyWorkflow in the Plug-Ins folder and you might think you have everything you need. However, if you open the InCopyWorkflow folder you’ll see only two plug-ins, InCopyImport and InCopyWorkflow (Figure 8.4). These default plug-ins merely allow InDesign to be aware of InCopy files and to place them in a layout. These plug-ins are the equivalent of a Word or RTF text-import filter. If all you need in InDesign is the ability to place InCopy files, then these two plug-ins are sufficient. However, if you want to participate in a parallel workflow with other users and enjoy the benefits of a LiveEdit Workflow, such as check-in/check-out, notes, assignments, and exporting InCopy stories, then you need to install the rest of the LiveEdit plug-ins.

Before you install the LiveEdit plug-ins, you should quit InDesign CS2. Now you need to locate the plug-ins that you’re about to install, and the location of these files varies depending on how you licensed your Adobe software.
You have this... | The LiveEdit plug-ins are here... |
|---|---|
InDesign CS2 | InDesign CD/Technical Information/InDesign CS2/InCopy CS2 Plug-ins |
Creative Suite 2 (Standard or Premium) | Resources and Extras CD/Technical Information/InDesign CS2/InCopy CS2 Plug-ins |
InDesign or Creative Suite Download Purchase from Adobe.com | Technical Information/InDesign CS2/InCopy CS2 Plug-ins folder in the original download package |
If you work in a large organization that participates in Adobe’s volume licensing program it’s highly likely that you have Adobe software installed on your computer but don’t have access to the installation media. In that case, you’ll need to contact your internal support staff or IT manager to request access to the installation CDs.
When you locate the LiveEdit plug-ins, follow these simple instructions to install them in the correct location:
Select all eight plug-ins: Assignment UI, InCopy Bridge UI, InCopy Bridge, InCopyExport, InCopyExportUI, Note, NotePref, and Username UI.
Press Command/Control-C to copy the plug-ins.
Locate the application folder at Adobe InDesign CS2/Plug-Ins/InCopyWorkflow on your hard drive.
Press Command/Control-V to paste the files so InDesign can access them (Figure 8.5).
Relaunch InDesign CS2.

When you install the LiveEdit plug-ins, you’ll notice that one new tool (Note), two new palettes (Assignments and Notes), and several new menu commands have been added to InDesign. Let’s take a look at how each of these new features is used by an InDesign user participating in a LiveEdit workflow.
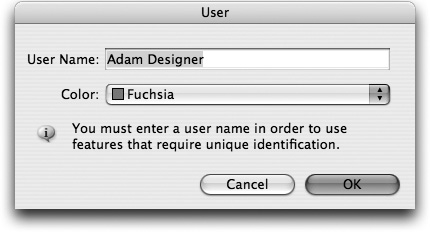
First, notice the File > User command that has been added by the LiveEdit plug-ins. Choose this command to enter a unique user name and choose a color that will be used to identify your contributions to the workflow (Figure 8.6). This user name is used when multiple users are checking out stories from the same layout, and the color is used to indicate any notes you insert in a story. See Chapter 2 for a complete discussion of choosing a user name.
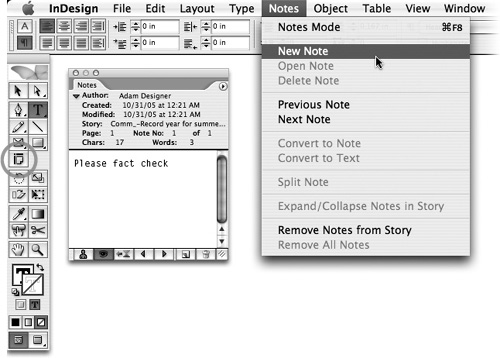
You’ll also notice the Note tool ![]() has been added to the Tools palette. The Note tool in InDesign works exactly like it does in InCopy (see Chapter 5) and lets an InDesign user add notes to an InCopy story. Without the LiveEdit plug-ins installed, though, an InDesign user cannot even see notes in an InCopy story. But when the plug-ins are installed, an InDesign user has full notes functionality, including the Notes menu and Notes palette in addition to the Note tool in the Tools palette (Figure 8.7).
has been added to the Tools palette. The Note tool in InDesign works exactly like it does in InCopy (see Chapter 5) and lets an InDesign user add notes to an InCopy story. Without the LiveEdit plug-ins installed, though, an InDesign user cannot even see notes in an InCopy story. But when the plug-ins are installed, an InDesign user has full notes functionality, including the Notes menu and Notes palette in addition to the Note tool in the Tools palette (Figure 8.7).
Additionally, the Edit > InCopy submenu is added by the LiveEdit plug-ins and includes many commands for creating assignments, exporting stories, and managing content. InDesign users manage assignments and stories with the Assignments and Links palettes, and the View > Show Assigned Frames command highlights which stories have been assigned to InCopy users. All of these features and more are covered in detail later this chapter.
In order for text to be available for editing in InCopy, it must first be exported from InDesign as InCopy stories. When you export stories as InCopy files (.incx), the content is managed by the LiveEdit plug-ins and is available to be checked out and edited by InCopy users. But if you don’t export content to InCopy stories, InCopy users can’t edit the stories. An InCopy story contains either a text thread or a single graphic frame. You can export text frames with placeholder content (Type > Fill with Placeholder Text) or with real content that needs to be edited by an InCopy user. You can also export empty frames, but they must be either text frames or graphic frames. To specify the type of frame, select the frame in the InDesign layout and choose Object > Content > Text, or Object > Content > Graphic. Unassigned frames that haven’t been specified as either a text or graphic frame cannot be exported as InCopy stories.
When the LiveEdit plug-ins are installed, the Edit > InCopy > Export submenu in InDesign includes several different ways to export InCopy stories (Figure 8.8). Here’s a list of the five export commands and when you might use them.
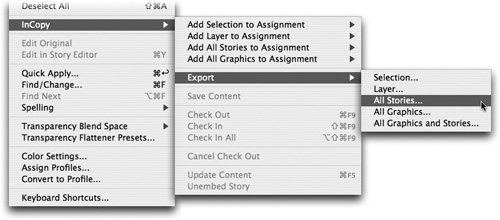
Selection: Exports all selected text and graphic frames. If no text or graphic frames are selected, this command is grayed out.
Layer: Exports all content on the selected document layer. This command is particularly useful if you use layers in InDesign to separate different types of content, for instance, putting text and images on separate layers or using different languages on different layers.
All Stories: Exports all the text frames in an InDesign document. If you have already exported stories from an InDesign document, and you add some new frames, choosing this command exports only frames you’ve added.
All Graphics: Exports all graphic frames that haven’t already been exported.
All Graphics and Stories: Exports all text and graphic frames that haven’t already been exported.
Tip
If you use the Edit > InCopy > Export commands frequently, you might want to assign custom keyboard shortcuts (see Chapter 1) instead of using these deeply nested menu commands.
The purpose of exporting text threads as InCopy stories is obvious, but the ability to export graphic frames as InCopy stories is new in InCopy CS2 and probably sounds like a foreign concept. Previous versions of InCopy maintained a strict separation between text and graphic handling, but based on user feedback, the InCopy product team decided to give users a few more options in the CS2 version. For example, many newspaper publishers in Europe expect their editors to choose the images that accompany their stories.
Whether or not you make graphic frames available to your InCopy users is an important decision. If you’d rather not let your editors place, scale, or rotate images, then export only text stories and don’t export graphics as InCopy stories. Choose Edit > InCopy > Export > All Stories and you’ll be safe because InDesign will export only text stories for the InCopy users to edit. If you’re planning to let your editors use InCopy to place images and make minor edits such as scale, rotate, and shear, then you can also export graphics as InCopy stories. If you want your InCopy users to control only certain graphics, then select only those graphic frames and export just the selected images.
When you export InCopy stories from InDesign, it’s important to consider where you’ll save the stories so that everybody involved in the publication understands the organization and structure of the files. Because InDesign and InCopy need to collaborate on the same group of files, you need to store the InDesign and InCopy documents on a file server that all contributors can access.
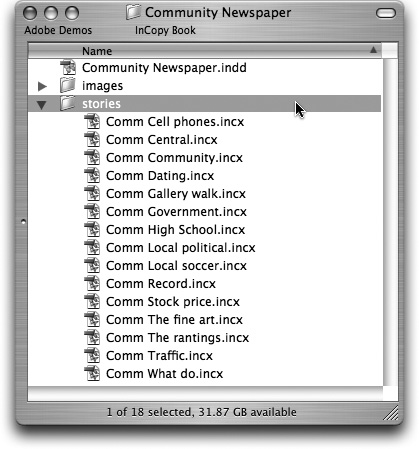
The InDesign and InCopy files should probably be saved in the same place, but that doesn’t mean they have to be in exactly the same directory. For example, it’s a good idea to export all the InCopy stories to a subfolder called Stories, next to the InDesign file (Figure 8.9). This way all the files are together, but users aren’t as likely to confuse the InDesign (.indd) files with the InCopy (.incx) files. However you decide to organize your exported InCopy stories, ensure that everybody working on the publication uses the same organizational scheme.
If you export InCopy stories one at a time, you get to choose the filename for each story, such as: travel story by Bob.incx. Some users might enjoy that level of control, but most folks don’t have the time to export every individual story manually. It’s not a difficult task, but it’s tedious and time consuming. Instead, you’ll probably export all stories or an entire layer at a time.
Tip
If you export a selected story, you only have to select one text frame even if the story is threaded across multiple frames or multiple pages.
When you export multiple stories simultaneously, InDesign uses a default naming pattern for the exported .incx files. This isn’t a problem, but it’s helpful to understand the naming scheme. If you create an InDesign file called monday_features.indd with four empty text frames, choose Edit > InCopy > Export > All Stories, and use the defaults, InDesign exports four .incx files named:
monday_features-Text.incx monday_features-Text-1.incx monday_features-Text-2.incx monday_features-Text-3.incx
Notice that the name of the InDesign file is used as the default prefix for all the exported stories and then is followed by the type of frame (Text) and then a sequence number that makes each filename unique. If you’d rather use your own prefix for the exported .incx files, type a custom filename in the Export dialog. For example, if you type travelstory.incx in the Export dialog, the .incx filenames will be:
travelstory-Text.incx travelstory-Text-1.incx travelstory-Text-2.incx travelstory-Text-3.incx
Tip
If you type a custom file prefix, make sure to include the .incx extension or else none of the exported files will have a file extension.
If you add three graphic frames to the InDesign file and export them as InCopy stories, the filenames follow the same pattern except “Graphic” is used instead of “Text” to indicate what kind of story it is. For example, here are the filenames of the three graphics if you export them as InCopy stories:
monday_features-Graphic.incx monday_features-Graphic-1.incx monday_features-Graphic-2.incx
If the text frames you export as InCopy stories already have text in them (as opposed to being empty), then the first few words in each story are used in the exported filenames. For example, here are the filenames for three exported stories about fall activities:
monday_features-October is perfect for a .incx monday_features-September is a good time .incx monday_features-November is when you shou.incx
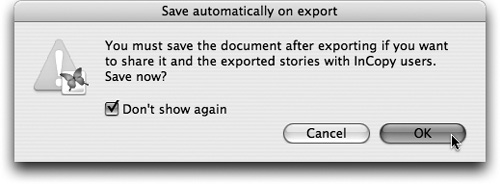
After you export content as InCopy stories, InDesign warns you that you must save the InDesign file if you want to share it and the InCopy stories with other users (Figure 8.10). In order for the connection between InDesign and InCopy to function properly, you really don’t have a choice, so click OK.
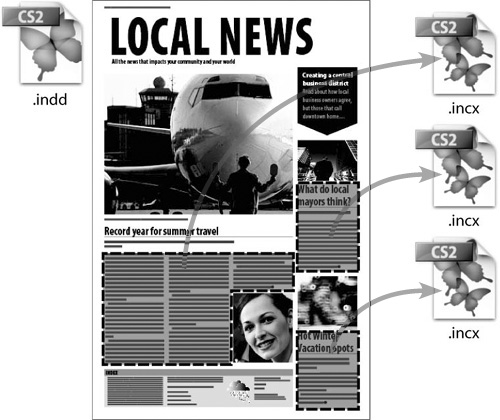
It’s important to understand why InDesign needs to save the working document. Before you exported the InCopy stories, the content, such as placeholder text and empty text frames, were considered internal objects in the InDesign document. However, when you export the InCopy stories, you externalize that content so that it’s available to InCopy users as .incx files. This means that what used to be an internal document element is now an externally linked object in InDesign (Figure 8.11).
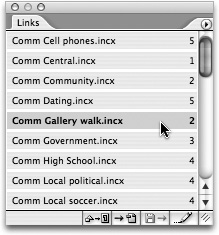
An easy way to see how this works is to watch the Links palette in InDesign when you export InCopy stories. Export a few stories and you’ll see the .incx files listed in the Links palette just like linked images (Figure 8.12). Realizing that InCopy stories are linked files in an InDesign document is key to understanding how the LiveEdit workflow manages the InCopy stories.
In addition to the fact that InCopy stories are listed in the Links palette, InDesign also adds a small graphic adornment to any frame that is linked to an InCopy story (Figure 8.13). Look near the top left of a frame in InDesign, and a small icon of a globe and a document icon appear if the frame is an InCopy story and therefore part of the managed workflow.

Just like previous versions of InCopy, you can open entire InDesign documents (.indd) with InCopy. In fact, multiple InCopy users can open the same InDesign layout at the same time. The trick is that the InCopy user isn’t really opening the InDesign file, but a temporary snapshot of the InDesign file. The only limitation is that even though multiple users can open the same InDesign file, only one user can check out a given story at one time.
Tip
When you open an InDesign layout with InCopy, you can only check out and edit stories that have been exported as InCopy stories and are managed as part of the LiveEdit workflow.
Opening InDesign files with InCopy is very useful because the InCopy user can see how her copy is interacting with the rest of the layout and can use InCopy’s copyfitting features to ensure that her writing fits the allocated space on the page. However, opening entire InDesign files with InCopy can be a slow process because the files you’re opening are probably relatively large files over a computer network. Imagine opening an InDesign document that contains an entire magazine, newspaper section, or book chapter when all you need to do is edit one story, headline, or caption. You’d be able to edit what you need, but opening the whole InDesign file would be overkill for a small text edit. If you have relatively simple files and a fast network, then opening InDesign files with InCopy might be a good solution, but most users should keep reading to learn about other ways for InDesign and InCopy users to share files.
A faster way to edit the text of a layout is to open the InCopy stories (.incx) instead of the InDesign layout (.indd). This way you’re opening relatively small text files instead of typically larger layout documents. This is definitely faster, but the big trade-off is that when you open just an InCopy document you can’t see the page layout in InCopy and you can’t calculate copyfit statistics.
If you’re working on a publication where exact page count and copyfit information don’t matter very much, then opening just the InCopy stories might be a good solution. In fact, that’s how we’ve written most of this book. However, in most cases, the lack of page visualization and copyfit calculations is a real show stopper. Opening InDesign documents gives you more than you need but is slower, and opening InCopy files doesn’t give you everything you need but is faster. The good news is that there’s a healthy compromise: assignments.
In previous versions of InDesign and InCopy, you had to choose between opening entire InDesign layouts with copyfit calculations or tiny InCopy files without copyfit statistics. The new assignments feature gives you the best of both worlds: speed and copyfit statistics. Instead of opening the entire InDesign file, an assignment file (.inca) is a relatively small snapshot of the page geometry, which is just enough information for an InCopy user to see the InDesign layout related to his story and to view the copyfit statistics, but doesn’t include anything that isn’t needed.
Tip
Page geometry refers to the position and size of text frames, graphic frames, text wrap, layers, and how various page elements interact in the layout.
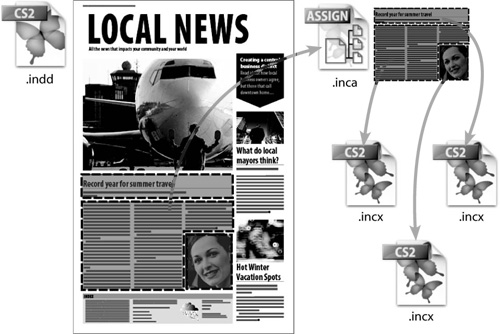
Assignments help solve the features vs. performance dilemma that arises when multiple contributors are collaborating on a design-intensive publication, but that’s not the only purpose of this exciting new feature. Another annoyance in previous versions of InDesign/InCopy was that if the designer used separate, unthreaded text frames in InDesign for different story elements such as headline, story, and caption, then the InCopy user had to open a different InCopy file for each story element. Now with assignments, the InDesign user can bundle separate text threads into one assignment, which makes it much easier for the InCopy user to participate in the workflow (Figure 8.14). Instead of opening separate InCopy files for the headline, story and caption, or a large InDesign file, the InCopy user just opens the InCopy assignment file (.inca), which provides faster access to all the necessary elements in one window.
Now that you understand why InCopy assignments are the greatest thing since sliced bread, let us show you how a designer using InDesign creates them. It’s important to remember that assignments are just a snapshot of the page geometry of the InDesign layout. This means that if an InDesign user creates an assignment and then changes the page layout or adds stories to the assignment, she must update the assignment before InCopy users can see the changes. The nice thing about the assignment being a snapshot of the layout and stories is that the InDesign user doesn’t have to push design changes until they’re relevant to the other contributors using InCopy.
In this chicken-and-egg cycle, the InDesign user should first export the InCopy stories that are supposed to be a part of the managed, collaborative workflow. After the InDesign user has exported the InCopy stories, she should select the stories in the layout that she wants to assign as a logical group (assignment) to a writer or editor. When she has all the pieces of the story selected (headline, body, photo captions, and maybe even graphic frames) she chooses Edit > InCopy > Add Selection to Assignment > New. When she’s prompted to save the assignment file (.inca), she should save it in a different location than the exported InCopy stories, such as a folder reserved just for assignment files. You can name the assignment file whatever you want, but give it an understandable name and always use the .inca file extension, as in weekend_dining.inca. Saving the assignment file with the .inca extension and in a specific folder helps keep InCopy users from accidentally opening the wrong files.
After the InDesign user names the assignment file and chooses where to save it, she still has a few more decisions to make in the New Assignment dialog that appears (Figure 8.15). The first field is for the Assignment Name, which defaults to the name of the .inca file she specified in the previous dialog. She can change this to be different from the .inca file name if she wants, but if she’s chosen a useful filename for the .inca file, then changing this here is only going to cause confusion. In fact, we’ve even heard from InCopy users who wish that InCopy required that the assignment name always match the .inca file and didn’t allow users to change it.
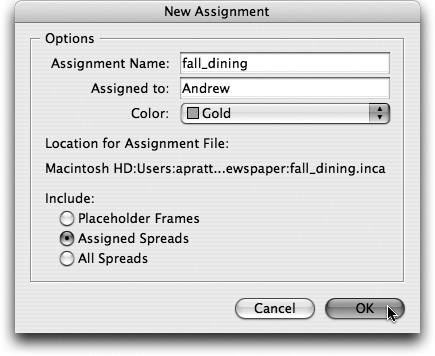
In the Assigned to field, the InDesign user can type the name of a particular person, a department, a role, or leave it blank, whichever makes sense. The Assignments palettes in InDesign and InCopy reference the value of the Assigned to field, but don’t necessarily prohibit other users from accessing the assignment. It’s more of a reminder note for you and your co-workers as to who is expected to work on that assignment.
The third option in the New Assignment dialog is the Color pop-up menu, where the InDesign user can choose from a list of dozens of different colors. It’s technically not necessary to choose a different color for each assignment, but it’s helpful when dealing with complex publications that have several contributors. The color of an assignment is used both as a visual reminder in the Assignments palette and as the frame tint and border color when the Assigned Frames option is enabled in the View menu.
The last option in the New Assignment dialog determines how much detail is included in the assignment file. The three options are:
Placeholder Frames: Includes only the pages or spreads needed for the assigned stories and renders all unassigned frames as empty placeholder frames. This option results in the smallest .inca files and the fastest performance in InCopy, but if the editor would benefit from a more complete view of the rest of the layout, consider one of the following two options.
Assigned Spreads: Includes only the pages and spreads needed for the assigned stories and includes all text and graphic frames on those pages. This option is the best compromise of speed and visual information, and is the ideal solution for most users.
All Spreads: Includes all the spreads in the InDesign document with all text and graphic frames visible. This is the most complete way to create an assignment but also results in the largest .inca files and therefore slower performance in InCopy. This option is overkill for most users, but can be useful if a writer or editor needs to cross-reference other stories in a longer document.
If you use assignments in your InCopy/InDesign workflow, make sure all placed images are linked to a file server instead of the designer’s hard drive. If the images aren’t available on the server, InCopy users will see gray boxes instead of image previews when they open an assignment file. If InCopy users open InDesign files instead of InCopy assignments, they don’t have to have access to the file server to see the image previews because the .indd file stores low-res image previews.
After the InDesign user creates assignments in InDesign, she might need to make changes to the layout, stories, or organization of the content. For example, if she decides to add a sidebar to a story, she’d start by adding a new text frame to the InDesign layout and exporting it as a new InCopy story. This new frame is itself a story, and she’ll probably want to add the new story to the related assignment. To add new content to an existing assignment, the InDesign user follows these steps:
Select the new frames in the InDesign Layout.
Choose Edit > InCopy > Add Selection to Assignment > Assignment Name.
Save the InCopy stories when prompted and click OK if the Save automatically on export dialog appears.
Altered assignments show a small yield triangle icon ![]() in the Assignments palette. The InDesign user can choose Update All Assignments from the Assignments palette menu to refresh all the affected assignments (Figure 8.16).
in the Assignments palette. The InDesign user can choose Update All Assignments from the Assignments palette menu to refresh all the affected assignments (Figure 8.16).
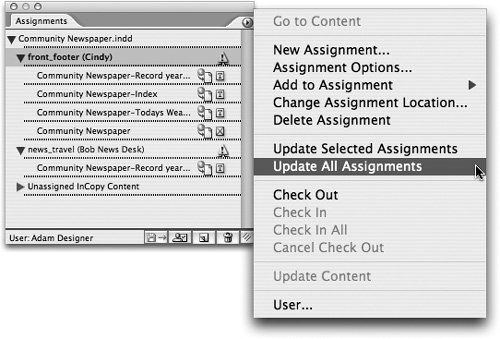
Adding new stories to an existing assignment obviously requires the assignment to be updated, but so does making a change to the InDesign layout. If the InDesign layout is changed by doing things such as resizing a text frame, adding a new text frame, or changing the text wrap on an image, the assignments should be updated. To update specific assignments, the InDesign user selects them in the Assignments palette and chooses Update Selected Assignments in the Assignments palette menu.
Tip
If an assignment is updated while an InCopy user is working on it, the InCopy user must update his design. See “Managing Updates” later in this chapter for more details on this update process.
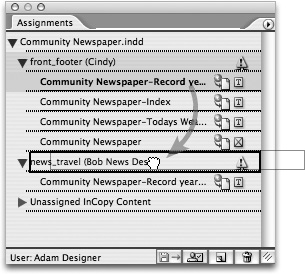
In some cases, the InDesign user might accidentally add the wrong story to an assignment. If that happens, she can just drag the mismatched story in the Assignments palette to the correct assignment (Figure 8.17). After she reassigns the story, both assignments must be updated. She can drag and drop stories to change their sequence within an assignment in the Assignments palette, but this has no effect on the sequence of the stories when the assignment file is opened in InCopy.
If the InDesign user inadvertently adds a story to an assignment, she can change her mind and remove it. To remove a story from an assignment, select the story in the Assignments palette and choose Remove from Assignment from the palette menu. After the story is removed from the assignment, the InDesign user must update the assignments as previously described.
There are a few more scenarios to be aware of where InDesign users might need to manage assignments. If the designer opens an InDesign file in InDesign and the associated assignment files cannot be located, she’ll see the warning dialog box shown in Figure 8.18.
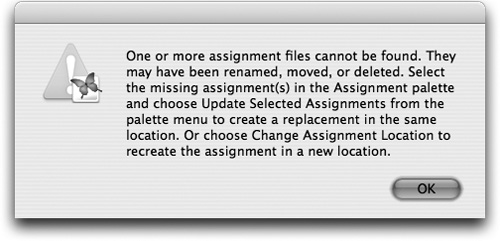
This dialog box is pretty verbose, but it actually does a good job of explaining what has happened: An assignment file has been moved, renamed, or deleted. To fix the problem she should select the assignment in the Assignments palette and choose Update Selected Assignments from the palette menu.
InDesign will create new assignment files with the same names in the same locations and resolve the issue. InDesign can recreate the assignments from scratch because assignments are just snapshots of the current page geometry. InDesign remembers that the assignments exist, but an InDesign file doesn’t have a dependent link to an assignment in the same way it requires linked files such as images and InCopy stories.
To change the name or location of an assignment, the InDesign user selects it in the Assignments palette and chooses Change Assignment Location in the palette menu. When prompted, she must choose a new location for the .inca file and can change the filename if desired. This is another way to fix missing assignments and an easy way to correct mistakes if an assignment was accidentally saved in the wrong place on the file server. To change assignment options other than location and filename, the InDesign user selects the assignment and chooses Assignment Options in the Assignments palette menu to change settings such as the assigned user and the color.
To delete an assignment altogether, the InDesign user chooses the assignment(s) in the Assignments palette and clicks the trash can icon ![]() at the bottom of the palette or chooses Delete Assignment from the palette menu. When she deletes an assignment, she’s only deleting the organization provided by the assignment, but nothing in the layout and none of the InCopy story files are deleted.
at the bottom of the palette or chooses Delete Assignment from the palette menu. When she deletes an assignment, she’s only deleting the organization provided by the assignment, but nothing in the layout and none of the InCopy story files are deleted.
The purpose of exporting InCopy stories from InDesign is to separate the text from the layout. As you know, this separation of content and design makes it possible for multiple editors and writers using InCopy to collaborate on a publication at the same time that an InDesign user is working on the design of the spreads. This parallel workflow results in significant productivity gains, but it also requires a mechanism or policy that prohibits multiple users from editing the same story at the same time and saving over each other’s work.
Anybody who has collaborated with other people and saved files to a common file server has known the frustration of inadvertently saving over another person’s file. Instead of relying on people’s good intentions, the LiveEdit plug-in workflow introduces a check-in/check-out mechanism to manage the content. In a managed environment, multiple users can open an InDesign file (.indd), InCopy story (.incx), or an InCopy assignment (.inca) simultaneously. That means multiple users can be looking at it simultaneously, but an individual story can only be checked out by one person at a time. The only way for a person to work on a file is to check it out (as opposed to opening it). Therefore, it’s virtually impossible to save over each other’s work.
Tip
Users can only check out content that has already been exported as an InCopy story and hasn’t been checked out by another user.
Users can check out and edit stories from within InDesign or from within InCopy. InCopy users check out stories by opening a document (.indd, .incx, or .inca), selecting a story in the document window or the Assignments palette, and choosing File > Check Out. InCopy users can also select a story in the Assignments palette and choose the Check Out command in the palette menu, or Control/right-click on an assignment in the Assignments palette and choose Check Out from the contextual menu. If you try to edit an available story in InCopy without checking it out first, InCopy will warn you and offer to check out the story for you (Figure 8.19). If you want to edit the story, just click OK and get to work.
InDesign users can open an InDesign file (.indd only), select the story in the document window, and choose Edit > InCopy > Check Out. InDesign users can also select a story in the Assignments palette and choose the Check Out command in the palette menu or Control/right-click on an assignment in the Assignments palette and choose Check Out from the contextual menu.
When a user checks out a story five things happen:
That user, and only that user, can edit the checked-out story.
Nobody else can edit that story until it’s checked back in.
The frame adornment in an InDesign document window and in the InCopy Layout view changes from the globe and document icon
 to the pencil icon
  , indicating the story is checked out. Other users in the workflow see an icon of a pencil with a red slash through it
  , indicating that the story is checked out and in use by another user.
The status icons in the Assignments palette update as described in #3.
The story bar separator in InCopy’s Galley and Story views shows the story is being Edited instead of Available (Figure 8.20).

When you’re done editing a story in InCopy, make sure to check it back in by selecting File > Check In. InDesign users have the same command, but it’s in a slightly different menu at Edit > InCopy > Check In. Saving the content you’re working on isn’t the same as checking the content back in to the workflow. You should still save intermittently to protect against data loss in the event of a system failure or power outage, but also make sure to check the story in when you’re done editing the story so that other users don’t think you’re still working on it.
If you have several stories checked out at the same time and you’re done with an editing session, you can choose File > Check In All (in InDesign, Edit > InCopy > Check In All) to check in all the stories at once. If, before you’ve checked a story back in, you change your mind about edits you’ve made to a story, you can cancel the check-out and thereby void any edits you have made by choosing File > Cancel Check Out (in InDesign, Edit > InCopy > Cancel Check Out).
The check-in/check-out mechanism avoids file collisions, but that is only part of the equation in a collaborative workflow. Other key components include understanding who is working on different stories and managing live updates between InDesign and InCopy. For example, what happens if an InDesign user has to shorten the column length of a story to make room for a last-minute advertisement? The good news is that the LiveEdit plug-ins also handle these delegation and update aspects of the workflow.
There are several ways to know if a managed story is checked out and, if so, who is working on it. When an InDesign user looks at the layout she should notice the small frame adornment icons on the top left edge of the frame or next to the story name in the Assignments palette. There are five icons that communicate the status of an InCopy story:
- Available: Anybody in the workflow can check out the story.
- In Use By Me: The user who sees this icon is the same user who has the story checked out.
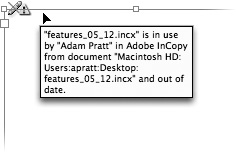
- In Use By “Name”: Users in the workflow see this icon when another user has a story checked out.
 In Use and Out of Date: The story has been checked out by somebody else, edited, and saved, but not yet checked back in.
 Linked File is Missing: The link from the InDesign layout to the InCopy story file is broken. The .incx file was either moved, deleted, or renamed, or the connection to the file server has been lost. If you store your .incx file on a file server, you should verify that the file server is mounted and your network is functioning properly. To fix the link, open the Links palette, select the story with the red stop sign icon, and either choose Relink from the palette menu or click the Relink button
  at the bottom of the palette and choose the correct .incx file. If the .incx file truly has been lost, choose Unlink from the Links palette menu and then re-export the InCopy story. When you open the re-exported story in InCopy, you’ll notice everything from the original story is retained, including text styles, notes, and even tracked changes.
In addition to these status icons, you can hover your mouse pointer over them and see a tooltip with more information. For example, if a story has been checked out by another user in the workflow, the tooltip tells you the name of the story file, who has the story checked out, which application they are using to edit the story (InDesign or InCopy), and the complete file path (Figure 8.21).
InDesign users can see the impact of the story edits made by InCopy users by choosing Edit > InCopy > Update Content. You can also select an out-of-date InCopy story in the either Links or Assignments palette and click the Update Link button ![]() at the bottom of the palette to force the layout to refresh. These updates aren’t automatic because the performance on the file server and network would undoubtedly slow to a crawl. Imagine a newspaper spread getting real-time updates from ten different editors. Not only would the network slow down, but it would be distracting to see multiple stories updating at the same time in the same spread while somebody worked on the layout in InDesign.
at the bottom of the palette to force the layout to refresh. These updates aren’t automatic because the performance on the file server and network would undoubtedly slow to a crawl. Imagine a newspaper spread getting real-time updates from ten different editors. Not only would the network slow down, but it would be distracting to see multiple stories updating at the same time in the same spread while somebody worked on the layout in InDesign.
In most workflows, the process starts with an InDesign user who creates a template, designs the layout, reserves sufficient space for any advertising, and creates text frames for the stories that will be written in InCopy. Then the designer exports the text frames as InCopy stories so that they can be accessed by a writer using InCopy. The designer might also create InCopy assignments to hand off parts of a layout to an InCopy user.
However, that’s just the beginning of the process. The integration of InDesign and InCopy really kicks in later in the workflow when the two applications communicate with each other via the LiveEdit plug-ins. When a designer updates a layout by doing things like resizing a text box, inserting a new ad, changing a text wrap, or altering a text style, the change should be communicated to the InCopy users. To ensure that the writers and editors are working with the most current update of the layout, the InDesign user should update all out-of-date assignments in the Assignments palette (see “Managing Assignments” earlier in this chapter). It also wouldn’t hurt to save the InDesign file to make sure recent changes are saved to disk.
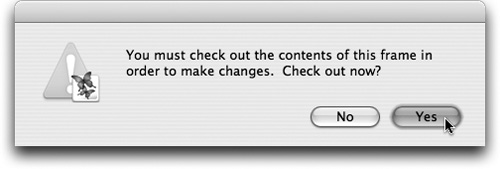
Layout updates are only communicated to InCopy users who open InDesign documents (.indd) and InCopy assignments (.inca) because those two file formats understand page geometry and copyfit calculations (see “Calculating Copyfit” later in this chapter). If an InCopy user only opens InCopy (.incx), he will not get updates about page geometry from the InDesign document. When an InCopy user is editing a story affected by an InDesign design update, the document title bar changes to say [Out of Date] (Figure 8.22). This indicates to the writer or editor using InCopy that there’s a change to the InDesign layout that could affect the amount of space for the story.

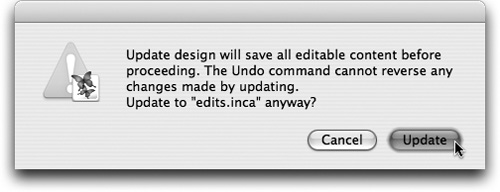
When this happens, the InCopy user should choose File > Update Design to refresh the layout and ensure they’re writing for the most recent layout from the designer. The Update Design command is also available from the context menu in the Assignments palette and in the Assignments palette menu. When Update Design is invoked, InCopy warns you that all content must be saved and that the Edit > Undo command won’t reverse the update (Figure 8.23). Click OK, and InCopy saves and closes the document, but then immediately opens it again. When the document re-opens in InCopy, you’ll see a refreshed view of the design with the changes submitted to the workflow from the InDesign user. Any stories checked out before a design update stay checked out.
When using the LiveEdit plug-ins, the final decisions are ultimately made by the designer using InDesign, so the list of responsibilities for the InCopy user is pretty short. Essentially, InCopy users need to check out stories (File > Check Out), edit them, and check them back in (File > Check In) when they’re done.
The ability to write to fit with InCopy is one of the most powerful features of the LiveEdit Workflow. Without an accurate way to calculate copyfit statistics, writers and editors are working in the dark and don’t really know if their copy is too short or too long for the allocated space on the page. Writing up to a certain word count is better than nothing, but it’s still only an estimate. When a story is too long, it is usually routed back to the editorial department for yet another round of edits. This kind of antiquated workflow brings the publishing process to its knees.
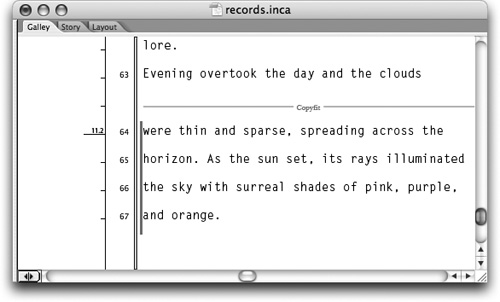
When you open InDesign documents (.indd) and InCopy Assignments (.inca) with InCopy, InCopy is aware of the page geometry. Problem solved. While editing .indd or .inca files, you can write to fit with InCopy’s Layout or Story view, but if your copy is overset, the Galley view is the best option. In addition to showing you if you are over or under your allocated space, the Galley view also shows you accurate line endings, column breaks, frame breaks, and page breaks. The Galley view even shows accurate line breaks when the story you’re working on intersects with text wrap in the InDesign layout. If you open an InCopy story (.incx), you’ll still be able to edit the story but you won’t be able to calculate copyfit statistics.
Open the Copyfit Info toolbar from the Window menu and notice that part of the toolbar that looks like a progress bar. If what you’ve written is less than the allocated space in the InDesign layout, the progress bar is blue and shows you how many more lines you should write without going over your allocation. On the other hand, if what you’ve written is longer than the allocated space, the progress bar is red and shows you how much you need to cut before the story will fit. When you’ve edited the story to the perfect length, the Copyfit progress bar changes to green and says COPYFIT (Figure 8.24).
The beauty of writing to fit in InCopy is that the writer or editor can make important editing decisions instead of leaving it up to the designer to cut a few paragraphs at the last minute. InCopy updates your copyfit calculations in real time as long as you have the option to Update Info Automatically enabled in the flyout menu of the Copyfit Info toolbar. If you have that option disabled, or if InCopy is slow to update, just click the Update icon ![]() to the left of the progress bar to force the calculation to refresh.
to the left of the progress bar to force the calculation to refresh.
In addition to the crucial copyfit calculation, the Copyfit Info toolbar can also display several other helpful pieces of information about the story you’re editing. Choose the Customize option in the flyout menu and enable all five options to experiment with these extra features. Using these extra options, InCopy can calculate statistics for the current text selection, everything from the beginning of the story to the current cursor location, and everything from the current cursor location to the end of the story. Don’t forget that you can also tear off the Copyfit Info toolbar and convert it to a floating palette (Figure 8.25).
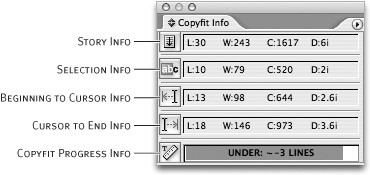
These statistics might seem like a bunch of useless minutiae until you realize they can help you get your story to copyfit. Let’s look at a few examples so you’ll begin to appreciate how useful they can be. Imagine that the Copyfit progress bar says you’re story is over by eight lines, and there’s a paragraph toward the end of the story that you think you could live without. Instead of deleting the paragraph, waiting for InCopy to recompose the text, and watching the Copyfit progress bar, you can just select that weak paragraph and see how many lines it takes up by looking at the Selection Info section of the toolbar. If InCopy tells you that paragraph takes up eight lines, then you know you’ve got the perfect paragraph to cut from the story. If the paragraph is a little longer or shorter than eight lines, then you can continue to adjust the selection until InCopy tells you have selected the right amount to cut.
One of the reasons that we said writing to fit in InCopy’s Layout view is a bad idea is that you can’t see any overset. Any time you see a red plus mark ![]() in Layout view, that’s your cue that there’s overset text that doesn’t fit inside the text frames (Figure 8.26). To edit overset text and get your copy to fit the story area, switch to Galley or Story view and find the copyfit break line and red, vertical overset indicator to the left of the overset text. This line indicates the point in the layout where your copy extends beyond the frames in the layout. Use the Copyfit Info toolbar and the copyfit break line as your guides as you edit your copy to fit. When the Copyfit Info Progress bar is green and the red overset indicator disappears, you know your job is done.
in Layout view, that’s your cue that there’s overset text that doesn’t fit inside the text frames (Figure 8.26). To edit overset text and get your copy to fit the story area, switch to Galley or Story view and find the copyfit break line and red, vertical overset indicator to the left of the overset text. This line indicates the point in the layout where your copy extends beyond the frames in the layout. Use the Copyfit Info toolbar and the copyfit break line as your guides as you edit your copy to fit. When the Copyfit Info Progress bar is green and the red overset indicator disappears, you know your job is done.
When you use InCopy as a part of your workflow, it adds a lot of .incx and .inca files to the collection of project files. After a publication has gone to press and you’re ready to archive the files, it would be really nice to eliminate any unnecessary files if you don’t need them. Minimizing the number of files and the required storage always makes a backup easier. For example, to make a backup of all the files used to create an issue of a magazine or newspaper after it’s been published, you can unlink all the stories and simplify your file organization. To streamline an InDesign file, open it in InDesign, select all the InCopy stories in the Links palette, and choose the Unlink command from the palette menu. This breaks all the links to the .incx files and ensures that all the content is embedded in the InDesign file.
After you unlink all the InCopy stories, you should update all the Assignments in the Assignments palette to make sure you haven’t missed anything. You know for certain that all the InCopy stories are unlinked when all the Assignments are empty and the Assignments palette lists nothing under the “Unassigned InCopy Content” listing. Now you can delete all the .incx and .inca files on your hard drive that are related to that InDesign document and back up the project in your archives.
If you’re upgrading from InDesign/InCopy CS to InDesign/InCopy CS2, we don’t recommend that you change your software in the middle of a publication cycle. It’s not that we anticipate any problems in upgrading to CS2, but upgrading any important software or altering a workflow when deadlines are looming is inherently risky. Instead, we recommend that you finish your current publication and start the next one with the CS2 version products. However, if you must switch from CS to CS2 in the middle of a project, follow these steps:
Have all InCopy CS users check in all their stories.
Open InDesign files in InDesign CS, select all InCopy stories in the Links palette, and choose Unlink from the palette menu to unlink all InCopy CS (.incd) files.
Save and close the InDesign files with InDesign CS.
Open the InDesign CS file with InDesign CS2 to update the document to the latest file format version and prepare it for compatibility with InDesign CS2 and InCopy CS2.
Re-export all InCopy stories in the InCopy CS2 format (.incx). Create InCopy Assignments (.inca) as needed.
By going through this conversion process, you ensure that all your InDesign and InCopy files are converted to the latest versions of the InDesign and InCopy file formats. You also avoid the problem of accidentally breaking links to InCopy stories due to the file extension change from .incd to .incx.
We hope this chapter has been helpful. In the next chapter we outline three possible workflow scenarios that will help you find the right solution for your publication.