
It seems that no matter how hard we try and how many times we revise our own writing, every time we submit a book chapter or a magazine story to an editor it comes back full of comments and corrections. This back and forth process of writing, editing, and revising can go through several rounds before the content is ready to publish, and it’s important to always have a virtual paper trail of the editing process. This is where the track changes features of InCopy help streamline the process, especially when there are multiple writers, editors, and proofreaders involved.
If you edit a story in a simple text editor by adding, deleting, or moving text, the text is altered, but there’s no way to keep track of what was edited, when, and by whom. The track changes feature in InCopy maintains a history of all the edits to a story and even lets you revert edits later in the workflow. This makes it easy to track the progress of a story so that everybody involved can easily review the contributions of other team members. The concept of tracking changes will be especially familiar if you’ve ever used the track changes features in Microsoft Word, but InCopy streamlines the process in a few unique ways. For example, InCopy is smart enough to perform word count and copyfitting calculations while ignoring notes and deleted text. InCopy also makes it easy to manage notes created by multiple users.
The first time you create a note or enable the track changes feature and start to make an edit, InCopy prompts you to enter a user name and choose a color to differentiate the changes that are yours. You can wait for InCopy to prompt you for this information, or you can beat it to the punch by choosing File > User, entering a unique user name, and choosing a color (Figure 5.1).

Tip
See Chapter 2 for a more complete discussion of choosing a user name.
In order to track your changes, you must turn the feature on in InCopy CS2. To enable track changes for the active story, choose Changes > Track Changes in Current Story or click the Enable Track Changes button ![]() in the Track Changes toolbar. If you have multiple stories open, choose Changes > Enable Tracking in All Stories to enable tracking in all of them at the same time. If you spend most of your time writing as opposed to editing or proofreading, then enabling the track changes feature from time to time isn’t a big deal. However, if you spend the majority of your time editing other people’s writing, enabling track changes for every single story you open can get really annoying. The solution is to close all documents and choose Changes > Track Changes. Now every time you open a new InCopy file the track changes feature is enabled by default.
in the Track Changes toolbar. If you have multiple stories open, choose Changes > Enable Tracking in All Stories to enable tracking in all of them at the same time. If you spend most of your time writing as opposed to editing or proofreading, then enabling the track changes feature from time to time isn’t a big deal. However, if you spend the majority of your time editing other people’s writing, enabling track changes for every single story you open can get really annoying. The solution is to close all documents and choose Changes > Track Changes. Now every time you open a new InCopy file the track changes feature is enabled by default.
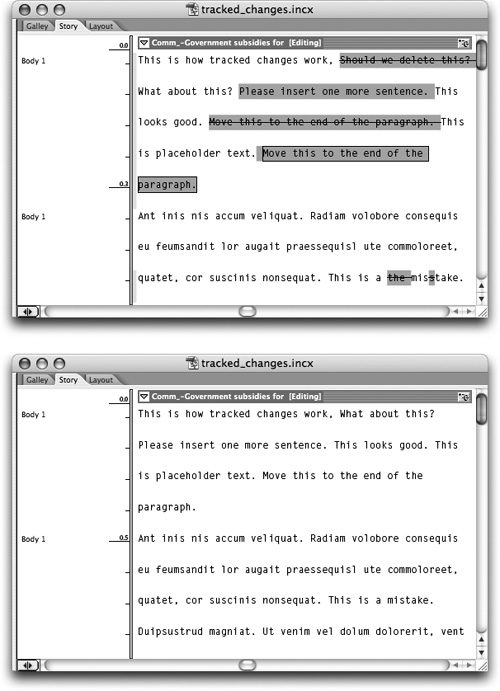
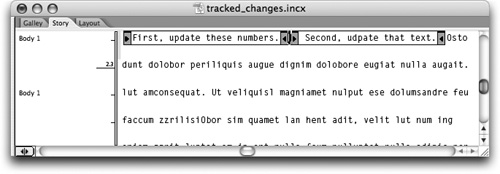
You can make three different kinds of text edits with InCopy, and each one has a unique edit mark. Deleted or cut text is highlighted in the user’s color and marked with a strikethrough. Text that is inserted or pasted is highlighted. When you move text, the original is highlighted and marked with a strike-through and the new location is highlighted and surrounded by a box outline (Figure 5.2). InCopy also places a colored vertical bar in the Info Column to the left of every line that has tracked changes. This colored “change bar” makes it easy to scan a story for edits without having to scan every word in the text.

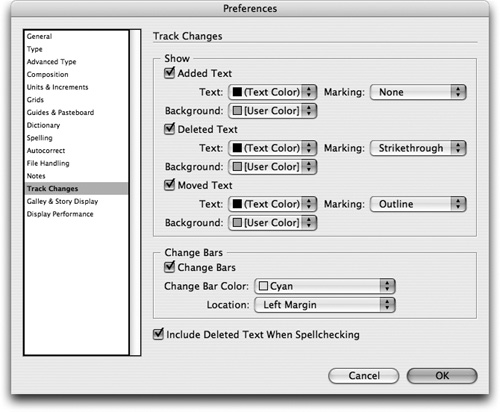
One of our favorite aspects of using InCopy is that it’s very customizable, and the track changes feature is no exception. If you want to change how tracked changes are displayed, choose InCopy > Preferences > Track Changes (Mac) or Edit > Preferences > Track Changes (Windows) (Figure 5.3). You can change the text color, background color, and the marking style for the three kinds of edits. You can even disable the markings for any kind of edits. For example, if you care about inserted and deleted text but aren’t concerned about moved text, then uncheck the option to show moved text. At the bottom of this preferences pane, you can also change the color of the change bars and move them to the left or right margin.
When you make edits with track changes enabled, InCopy automatically remembers the user name, date, time, and type of edit that was made. This information stays with the file until the changes are accepted or rejected and makes it easy to determine who made which edits at what times. Consider this track changes information as your virtual paper trail, and you can stop printing three copies of every story.
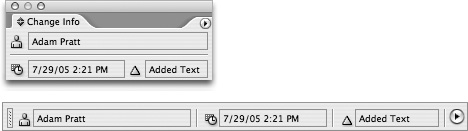
Open the Change Info palette from the Window menu and choose Customize from the palette menu. Here you can control whether all the tracked information is displayed or only the user name. Also, remember that you can drag the Change Info palette to the top or bottom of your screen and convert it into a space-saving toolbar (Figure 5.4).
After you’ve done a lot of editing with track changes enabled, your text can look like a messy rainbow of strikethroughs, underlines, and highlights. It’s important to know who made what edits, but it can make the final text difficult to read. If you want a clean view of the text that shows the results of all the edits, click the Hide Changes button ![]() in the Track Changes toolbar or choose View > Hide Changes. Hiding changes doesn’t accept changes, reject changes, or turn off the track changes feature. All that info is still there. It just temporarily hides all the tracked changes markings, which should make the text much easier to read. When you’re done reading the clean text, click the Show/Hide Changes button again to switch back to the normal track changes view (Figure 5.5).
in the Track Changes toolbar or choose View > Hide Changes. Hiding changes doesn’t accept changes, reject changes, or turn off the track changes feature. All that info is still there. It just temporarily hides all the tracked changes markings, which should make the text much easier to read. When you’re done reading the clean text, click the Show/Hide Changes button again to switch back to the normal track changes view (Figure 5.5).
If you’re a writer or editor who submits InCopy files for editing, you should receive back an InCopy file with all the edits marked for you. When you do, it’s time to navigate through all the changes so you can accept the ones you feel are appropriate and reject those that aren’t. To find the first tracked change in a story, switch to Galley or Story view and choose Changes > Next Change (Command/Control-PageDown) or click the Next Change button ![]() in the Track Changes toolbar. This locates the first change, scrolls the window to the correct location, and selects the change. After you evaluate the edit, you need to decide whether to accept or reject the change. To accept the edit, choose Changes > Accept Change (Shift-Command/Control-O) or click the Accept Change button
in the Track Changes toolbar. This locates the first change, scrolls the window to the correct location, and selects the change. After you evaluate the edit, you need to decide whether to accept or reject the change. To accept the edit, choose Changes > Accept Change (Shift-Command/Control-O) or click the Accept Change button ![]() in the Track Changes toolbar. To reject the edit, choose Changes > Reject Change (Shift-Command/Control-;) or click the Reject Change
in the Track Changes toolbar. To reject the edit, choose Changes > Reject Change (Shift-Command/Control-;) or click the Reject Change ![]() button in the Track Changes toolbar.
button in the Track Changes toolbar.
To accept or reject several tracked changes at one time, select the range of text that contains the tracked changes and choose Accept Change or Reject Change. This is much easier than accepting or rejecting each change individually but doesn’t force you to accept or reject all the changes in the entire story. Notice there are also menu commands and toolbar buttons that accept all changes ![]() or reject all changes
or reject all changes ![]() in a story. This is a quick way to clear out all the tracked changes as you get the text ready for final publication.
in a story. This is a quick way to clear out all the tracked changes as you get the text ready for final publication.
Although tracking changes is a really helpful tool in the iterative process of writing and editing, it doesn’t easily accommodate all the communication needed among writers, editors, and proofreaders. Another limitation of tracked changes is that when a graphic designer places an InCopy story in an InDesign layout, they cannot see the tracked changes.
Inserting notes in InCopy stories solves both of these problems. Users on the editorial side can use notes to communicate with each other, and graphic designers also benefit because they can view and create notes in InDesign that transfer seamlessly between InDesign and InCopy. Notes in an InCopy story don’t add to the word count of an InCopy document and don’t affect copyfit calculations. Unlike tracked changes, which are only visible in Galley and Story views, notes can be created and seen in all three InCopy view modes and in InDesign.
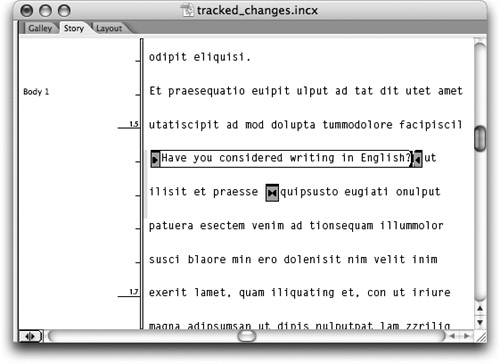
To create a note in a story, insert your cursor at the desired location and choose Notes > New Note. Or you can choose the Notes tool ![]() in the Tools palette and click the place in the text flow where you want the note to go. When you create a new note, it’s bookended (bracketed) in the same color as your user name. The cursor is now blinking in the note, ready for you to type away. Think of notes in InCopy as digital sticky notes: type whatever you want in them. Notes are a great way to leave yourself a memo for later reference, ask a team member a question, make a suggestion to the production artist, or explain to an editor or author something you’ve written or changed (Figure 5.6).
in the Tools palette and click the place in the text flow where you want the note to go. When you create a new note, it’s bookended (bracketed) in the same color as your user name. The cursor is now blinking in the note, ready for you to type away. Think of notes in InCopy as digital sticky notes: type whatever you want in them. Notes are a great way to leave yourself a memo for later reference, ask a team member a question, make a suggestion to the production artist, or explain to an editor or author something you’ve written or changed (Figure 5.6).
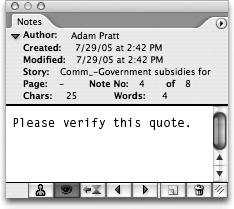
To get basic information about a note, hover over it with your cursor. A small tool tip appears with the author name and the time and date the note was last modified. If you want even more information about a note, click to insert your cursor in the note and open the Notes palette from the Window menu. The Notes palette gives you the same basic information as the tool tip (author name, modified time, and modified date) but also includes the creation time and date, page number, note number, and number of characters and words in the selected note (Figure 5.7). The Notes palette is especially useful when you’re reviewing notes that are collapsed and the note text isn’t readily visible (see “Expanding and Collapsing Notes” later in this chapter).
The Notes palette is an efficient way to read through a bunch of notes in an InCopy story, but it’s easy to lose the visual connection between the note you’re reading and the location of the note in the text flow. To find the anchor location of the current note, click the Go to Note Anchor button ![]() at the bottom of the Notes palette. If you’re in Galley or Story view and you click this button, the entire note is selected and highlighted. Click the same button in Layout view, and just the note anchor placeholder is selected and highlighted
at the bottom of the Notes palette. If you’re in Galley or Story view and you click this button, the entire note is selected and highlighted. Click the same button in Layout view, and just the note anchor placeholder is selected and highlighted ![]() .
.
To expand or collapse a single note, click one bookend of the note ![]() . As you proceed through a document, you might collapse each note after you’ve read it as a way to keep track of your progress. This is a simple way to review a document with several notes. However, if you need to collapse or expand all the notes in a story, then toggling them one at a time is a fast-track to carpal tunnel syndrome. Instead, choose Notes > Expand/Collapse notes in Story to toggle all the notes at the same time. To temporarily hide the notes instead of just collapsing them, choose View > Hide Notes or click the Show/Hide Notes button
. As you proceed through a document, you might collapse each note after you’ve read it as a way to keep track of your progress. This is a simple way to review a document with several notes. However, if you need to collapse or expand all the notes in a story, then toggling them one at a time is a fast-track to carpal tunnel syndrome. Instead, choose Notes > Expand/Collapse notes in Story to toggle all the notes at the same time. To temporarily hide the notes instead of just collapsing them, choose View > Hide Notes or click the Show/Hide Notes button ![]() at the bottom of the Notes palette. Choose the same command again to reveal the notes.
at the bottom of the Notes palette. Choose the same command again to reveal the notes.
Now that you know how to collapse all the notes in a story, you might be wondering why in the world you would want to do that. Notes are harder to find and read when they are collapsed, so why do that on purpose? In the Notes palette (opened from the Window menu), the Go to Previous Note ![]() and Go to Next Note
and Go to Next Note ![]() buttons at the bottom of the palette let you navigate between notes even if they are collapsed. Use these buttons to skip from note to note throughout a story and read the note text right inside the Notes palette. This is a way to make quick work of an editing project without the hassles of scrolling through the story, finding the notes, and expanding them to read them.
buttons at the bottom of the palette let you navigate between notes even if they are collapsed. Use these buttons to skip from note to note throughout a story and read the note text right inside the Notes palette. This is a way to make quick work of an editing project without the hassles of scrolling through the story, finding the notes, and expanding them to read them.
As you navigate through notes in a document, you might find notes that are draft comments that the author isn’t confident should be included in the text. To turn a note into regular text, make sure the cursor is inserted in the note and choose Notes > Convert to Text. You can also select the Convert to Text command from the Notes palette menu. On the flip side, you might come across some text in a story that is questionable, or that needs, say, to be run by the legal department. Instead of deleting the text with the track changes feature, you can select the text and choose Notes > Convert to Note. Converting it to a note retains the text in a way that both InCopy and InDesign users can see, attracts extra attention from editors, and can be easily converted back to normal text.
In some cases you might want to split one long note into two or more notes. For example, imagine that you’re editing an InCopy story and write a really long note at the beginning of the document. As you read more of the story you realize that part of your first note would be more relevant in a later paragraph. Instead of retyping your comments or copying and pasting into new notes, just insert the cursor at an appropriate breakpoint in the first note and choose Notes > Split Note (Figure 5.8). Now you can click one bookend of the newly divided note and drag it to a different location in the story. If you later find yet another section where you want a remaining part of your first note to go, you can split it again.
Normally when you want to delete an object in a software application, you select the object and hit the Delete key on the keyboard. That works in InCopy, but you can’t select notes with the Notes tool, and trying to select just the note with the Type tool can be tricky. Instead of selecting a note to delete it, try inserting your cursor inside the note and choosing Notes > Delete Note. If the cursor is in the note, you can also Control-click (Mac) or right-click (Windows) anywhere in the note and choose Delete Note from the contextual menu (Figure 5.9). Navigating to a note and clicking the trash can icon at the bottom of the Notes palette is another option. To delete all the notes in a story at once, choose Notes > Remove Notes from Story or right-click anywhere in the story and choose Remove Notes from Story. If you’ve opened an InDesign document or an InCopy assignment with several stories, choose Notes > Remove All Notes to delete all the notes in all stories that have been checked out (see Chapter 8 for more about checking in and checking out stories).

Now that you understand the fundamentals of the notes feature in InCopy, we want to introduce you to an interesting way to use notes in a super-efficient editing mode. You can use all the notes features as already described, but when you choose Notes > Notes Mode, InCopy assumes you’re ready to do nothing but work with notes and kicks into high gear. For example, insert your cursor in text and choose the Notes Mode command or use the keyboard shortcut (F8), and InCopy will insert a new note for you. If you have text selected and invoke Notes Mode, the text is converted to a note. On the other hand, select a note and invoke Notes Mode, and the note is converted back to text. Click in the middle of a note and invoke Notes Mode again, and the note is split in two. Think of Notes Mode as a rapid-fire way to work with notes without having to use a bunch of different menu commands or memorize a slew of keyboard shortcuts.
Although we encourage you to use InCopy’s editing tools to keep your workflow as digital as possible, we realize some folks still want a printed copy. If that’s the case, then InCopy has the printing features to give you what you need. Choose File > Print to open the Print dialog and choose a printer from the Printer pull-down menu. The default behavior is to print the current view in the document window, but you can switch between Layout or Galley & Story at any time from the top of the Print dialog. Start by choosing the Galley & Story view and see that the first few options for number of copies, page size, and page orientation are self-explanatory. Notice that from the Galley & Story view you can print all the active stories, just the current stories, or only the expanded stories, but you cannot control which pages of a story to print (Figure 5.10).

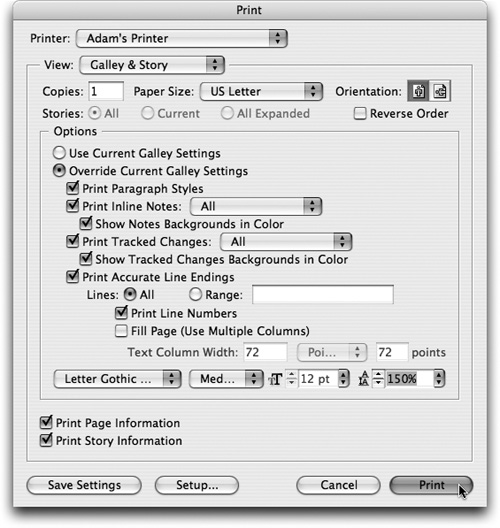
In the Options section, you can choose to print in a way that mimics the current Galley view settings or you can override the current Galley view settings and customize the output to meet your particular needs. The printing options here mirror the Galley and Story view preferences (see Chapter 1), but there are a few important items we want to point out. We frequently talk with InCopy users who want to print out their stories with all the notes and tracked changes visible, even if they aren’t expanded or visible in the document window. To do that, choose Override Current Galley Settings, enable the Print Inline Notes and Print Tracked Changes options, and set both of their pulldown menus to All. You can also force InCopy to print accurate line endings from Galley view and choose the font, font size, and line spacing for the printing (Figure 5.11).
If you enable Print Page Information, the page numbers, filename, and time of printing are included on each printed page. When you enable the last option, Print Story Information, then the document title, author, and description are printed at the bottom of the last page of the story (Figure 5.12). The story information is extracted from metadata that you enter with the File > Content File Info command (see “Working with Embedded Metadata” later in this chapter).
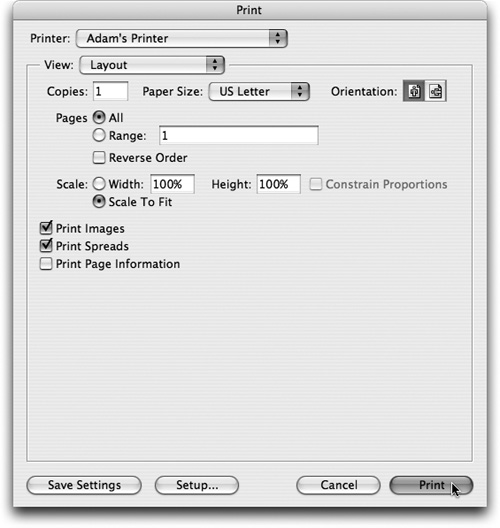
You can also print the Layout view of an InCopy story to get a realistic sense of how your writing will fit with the rest of the surrounding design. To print the Layout view instead of just the plain text, choose Layout from the View menu in the Print dialog and choose the number of pages, paper size, page orientation, and the page range (Figure 5.13). Depending on the type of publication you’re writing for, it’s possible that the desktop printer you print your stories on is not large enough to print a sheet of paper as large as the final output will be. For example, if you write for a newspaper that is tabloid or broadsheet size but your desktop printer can only print 8.5 x 11 inches, then you’re going to have to make some adjustments. You can manually scale your printed output in the Print dialog box, but choosing Scale to Fit forces InCopy to do the math for you. If you Scale to Fit, the printed output won’t match the final size, but you will be able to see the entire layout proportionately on one piece of paper and get a sense of the overall interaction of design and copy.
If you want to see your text and the images together, enable the Print Images option. With this option disabled, the images are replaced with gray boxes, but the page prints faster because InCopy and your printer don’t have to process all the image data. To see how facing pages of a spread will print in the layout, enable the Print Spreads option.
After you tweak the settings just the way you like them, click the Save Settings button at the bottom of the Print dialog to remember your favorite print settings for next time. When you’re ready to see ink on paper, click Print.
When you’re writing or editing with InCopy, it’s typical for team members to also have InCopy so they can use the same file formats, editing tools, dictionaries, and so on. However, there are times when you need someone to read or approve a document who doesn’t necessarily have to edit the story or doesn’t use InCopy. In these cases, Adobe PDF is the best interchange file format because virtually every computer user can view PDF files with the free Adobe Reader. You can also rest assured that a PDF will always look the same for different users on different computer platforms. If they don’t have the free Adobe Reader, they can download the latest version for free from www.adobe.com/reader. To export a PDF from InCopy, choose File > Export and select Adobe PDF from the Format pull-down menu.
As in the Print dialog, you can choose between Layout view and Galley & Story view when exporting PDF. Choose Galley & Story View to get started. All of the export options are the same as those described previously in the Print dialog, so choose your preferred settings as if you were printing (Figure 5.14). If you want to see the final PDF automatically as soon as the export is complete, enable View PDF after Exporting at the bottom of the PDF Export dialog.

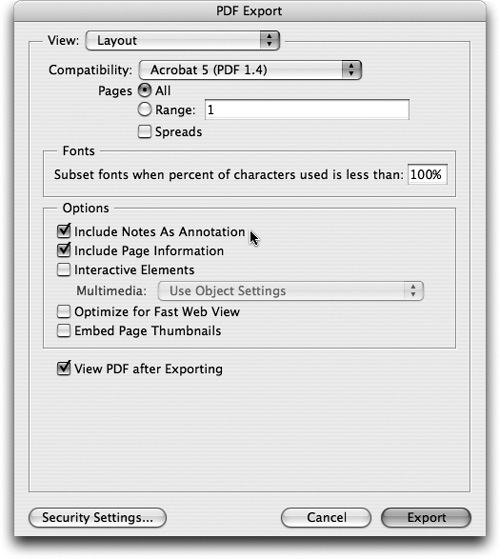
If you’d rather export a PDF that shows your story in the context of the layout, choose Layout in the View pull-down menu and choose which pages to export (Figure 5.15). The rest of the options are virtually identical to the print options as already described, with one noteworthy exception: the ability to Include Notes as Annotation. This option converts InCopy notes to PDF comments so the notes can be viewed in Adobe Acrobat or Adobe Reader. We’re convinced the world would be a better place if every writer and editor used InCopy. Until that happens, the ability to convert InCopy notes to PDF comments means that anybody, even people without InCopy, can read these notes. This can be helpful if you’re using a PDF commenting and review process in addition to or in lieu of the InCopy track changes process.
One more option for exporting PDF from InCopy that you should be aware of is the ability to assign security to the exported files. This is a reliable way to share files and at the same time ensure that only people with the appropriate permission can view the story. Click the Security Settings button at the bottom of the PDF Export dialog, and the Security dialog box opens (Figure 5.16). Enable the Password Required to Open Document option and enter a password in the Document Open Password field. Because the password shows as bullet characters when you type it, InCopy will prompt you when you click Save to verify the password by re-typing it.

Tip
There is no way to access a secure PDF without the correct password, so make sure you record your PDF passwords in a secure location.
You can also add a separate password that controls what a recipient is allowed to do with a PDF that you send them. Enable the Password Required to Change Permissions and Passwords option and enter a unique password, just like you did in the Document Open Password field. Unless the viewer of this secure PDF has this second password, they won’t be able to perform any of the checked permissions options at the bottom of the Security dialog. For example, if you give a PDF permissions security and enable No Printing and No Content Copying or Extraction, the recipient will be able to open and view your PDF, but not print it or copy any text from it.
A secure PDF can have an open password, a permissions password, or both, but remember that the open password and the permissions password for a secure PDF cannot be the same. If you use the PDF security settings, you have to enter a password for every file you create. This can get a little tedious if you use the feature frequently, but it makes it impossible to add security inadvertently to every PDF you export. When you’re done changing the security for a PDF, click Save in the Security dialog and then click Export to generate a PDF with your security settings.
Metadata is a labeling technology that makes it easier to search, track, and manage documents in complex publishing workflows. All of Adobe’s professional publishing applications, including InCopy, have the ability to store metadata inside a wide variety of file formats. One of the most important aspects of the way Adobe applications handle metadata is that the information is usually stored inside the native file. This means if you add some keywords or a copyright statement to a story in InCopy, that information travels with the document regardless of who opens it on what computer.
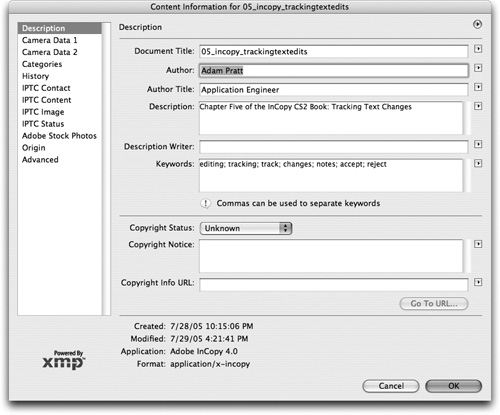
To edit or view metadata for an InCopy document, choose File > Content File Info, and the standard Adobe metadata dialog opens (Figure 5.17). The information entered here can be helpful in understanding who created a document and where it came from.
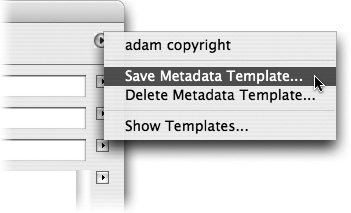
If you find yourself entering some of the same information over and over again, you should create a metadata template to save time and minimize data-entry errors. To create a metadata template, enter information in all the fields that will be common to many files, such as Author and Author Title. Then choose Save Metadata Template from the flyout menu in the top right corner of the dialog and give your template a name (Figure 5.18). Now every time you want to add the same metadata to a new file, just choose File > Content File Info and choose the name of your metadata template from the flyout menu. Another easy method of entering previously used metadata is to select from the recently used list found in the arrow pull-downs to the right of the field.
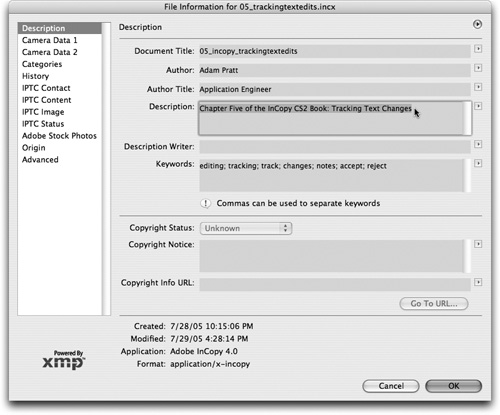
Metadata assigned to an InCopy file can be seen when the story is placed in InDesign. After placing the InCopy file in an InDesign layout, select the InCopy file in the Links palette and choose Link File Info from the palette menu to reveal the same metadata dialog as seen in InCopy and the rest of the CS2 applications (Figure 5.19). You can also access the metadata by selecting the placed InCopy story and choosing File Info from the Info palette menu. When metadata is viewed in InDesign for a placed file, the dialog is read-only, but you can copy text from the dialog. If the InCopy story has helpful meta-data in it, this is an easy way for an InDesign user to verify the byline or copyright status of a placed InCopy story.
If you think using metadata in your InCopy files would help eliminate some bottlenecks and confusion in your current workflow, then have a discussion with your co-workers and agree on standard information that you’ll all enter for the InCopy files you create. To learn more about metadata in Adobe applications, visit www.adobe.com/xmp.
We’ve introduced a lot of new concepts in this chapter, but we trust they’ve helped you get a more complete vision for the InCopy/InDesign workflow and the elegance of the editing tools in InCopy. We’ve spent years writing with other word-processing applications, but this is our first project writing with InCopy. We’re proud to say InCopy CS2 is the only software used to write and edit this entire book, and it’s felt like a breath of fresh air. Needless to say, the InCopy editing features described in this chapter have been a pleasure to use as two co-authors, one technical editor, one production editor, one proofreader, and a designer have all worked together on these pages.