
By now you should have a good grasp of the most frequently used features of InCopy, which include the various writing, editing, and commenting tools. In this chapter we address more advanced features that you may or may not use a lot, depending on the kinds of publications you work on and your overall workflow.
Some publishers expect their writers to choose the photos that accompany their stories, so we cover how to work with images from an editorial perspective. Other publishers develop financial or scientific material with lots of tabular data, so we also explore the process of creating and editing tables. Lastly, we explain how to work with footnotes, which are important for working with academic publications and many long documents.
Depending on the workflow you’ve established between design/production using InDesign and writers/editors using InCopy, you may find yourself working with images in InCopy. Chapter 8 covers the details of organizing your workflow, but we give you a quick run-down here. Basically, InCopy users can work with images only when graphics have been exported as InCopy stories. If a designer has only exported and assigned text frames as InCopy stories, then the InCopy user can only edit the text in the document and has no control over how images are placed, sized, or positioned in the layout.
For many publications, this strict division of labor between design and editorial is the ideal scenario: the designers can design, the writers can write, and nobody’s toes get stepped on. But sometimes there is flexibility in the workflow so that writers and editors using InCopy have more freedom to work with images. For example, many European publishers expect the editorial department to choose which images go with their stories. Our coverage of working with images in this chapter should teach you everything you need to know about the subject.
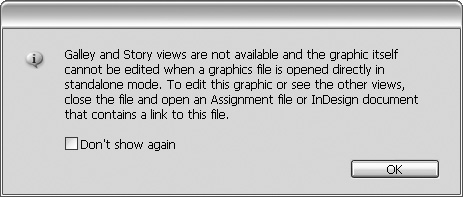
Images can be placed in InCopy assignment files and InDesign files that are open in InCopy, but with some restrictions. First, images can only be placed in existing graphic frames, so that an InCopy user can’t arbitrarily overrule the designer’s layout by creating new graphic frames and placing images in them. Essentially, this limitation maintains the division of labor between InDesign and InCopy, restricting the InCopy user to editing only content (text and sometimes images) without actually altering page geometry. Second, the graphic frames must first be exported to InCopy stories from InDesign. If you’re opening InCopy assignments, these exported graphic frames must also be added to your assignment in order for you to place images. Graphics in InDesign can be exported as InCopy stories, but they cannot then be edited in InCopy. You can open the .incx file that contains an exported graphic in stand-alone mode, but InCopy warns you that the image can only be edited if you open the InCopy assignment or the InDesign file (Figure 6.1). See Chapter 8 for more information about assignments.
To place an image using InCopy, follow these basic steps:
Start by opening the .inca (InCopy assignment) or .indd (InDesign document) file in InCopy.
Choose the Position tool
 in the toolbox and select the graphic frame where you want to place an image. Remember that if you’re working on an assignment file the graphic frame must be a part of the assignment.
Choose File > Check Out (Command/Control-F9) to check out (see Chapter 8) the graphic frame and prepare it for a placed image.
Choose File > Place, select an image, and click Open to place the file.
Common print-friendly file formats include Photoshop (.psd), Illustrator (.ai), PDF, TIFF, and EPS. When you place images in a print publication you’ll almost always want to ensure the color is defined as CMYK or grayscale, not RGB. Before you place any images that don’t follow these guidelines, make sure to discuss the options with your design department.
Tip
When you place a native Photoshop or Illustrator PDF file you have the option of customizing the object layer options, which control which graphic layers are visible in the layout. See the InDesign Help files to understand how a designer can use this new feature.
Tip
You can control the quality of image previews in InCopy with the Display Performance settings. Refer to the section “Adjusting Display Performance” in Chapter 1 for more details.
You can select a frame before you place an image, but it’s not necessary. Alternatively, you can choose File > Place to select an image and then hover the loaded cursor ![]() over any assigned graphic frame and click to place the image. Also note that you can place an image in an empty graphic frame or replace an existing image.
over any assigned graphic frame and click to place the image. Also note that you can place an image in an empty graphic frame or replace an existing image.
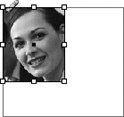
Unless you have previous experience doing page layout with InDesign, there are a few things that might surprise you about how images are handled. For example, if you place an image that has different dimensions than the graphic frame you’re placing into, InCopy doesn’t automatically adjust the size of the image for you. This can result in what looks like two boxes (Figure 6.2).
As far as InCopy and InDesign are concerned, a graphic frame works like a container and has dimensions, selection handles, and a bounding box. Images, with their own dimensions, selection handles, and bounding boxes, can be placed inside graphic frames. Understanding the distinction between a graphic frame and its content is important to working effectively with images in InCopy. The next section explores this concept in more detail.
When you place an image using InCopy, its size and proportions may not match the size and proportions of the graphic frame into which it is placed. In these situations, you have several ways to control how to fit the image into the frame so it focuses the reader’s attention on the important part of the image and complements the related text. Select an image (not the graphic frame) with the Position tool ![]() and choose the appropriate fitting command from the Object > Fitting submenu, or Control/right-click on the image and choose a Fitting command from the contextual menu (Figure 6.3).
and choose the appropriate fitting command from the Object > Fitting submenu, or Control/right-click on the image and choose a Fitting command from the contextual menu (Figure 6.3).
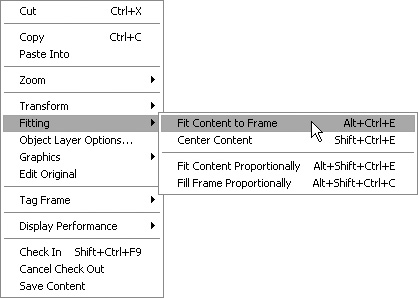
The four frame fitting options are:
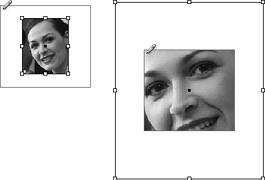
Fit Content to Frame: This resizes the image so it matches the dimensions of the graphic frame. This is only a good choice when you’re certain the proportions of the image are exactly the same as the proportions of the graphic frame. If the proportions don’t match, and you choose this fitting command, the image will be stretched or squashed to fit the frame (Figure 6.4).
Center Content: This doesn’t resize the image but positions it in the center of the graphic frame. If the image is larger than the frame, a portion of it is cropped at the edges of the image. If the image is smaller than the frame, it is positioned inside the frame with extra space between the bounding box of the image and the graphic frame (Figure 6.5).
Fit Content Proportionally: This scales the image proportionally (like resizing an image with the Shift key pressed) until either the width or height of the graphic frame is filled, whichever occurs first (Figure 6.6). Unless the proportions of the image exactly match the proportions of the frame, you’ll have a bit of extra space on one edge of the image.
Fill Frame Proportionally: This scales the image proportionally until the graphic frame is filled both horizontally and vertically and is probably the best option for most cases. The only catch you need to be aware of is that you can end up cropping the image (Figure 6.7). The next section discusses how to control the placement of an image in a frame.


If you’ve ever looked at the frame fitting options in Adobe InDesign, you might remember that InDesign has one more option that’s not available in InCopy: Fit Frame to Content. This option isn’t available in InCopy because InCopy only lets you edit content, not page geometry. Allowing you to resize graphic frames using InCopy would break all the rules of the InDesign/InCopy workflow, so that feature’s off limits.
After an image has been placed in a frame, you might want to move the image in the frame to get the best crop. For example, if you use the Object > Fitting > Fill Frame Proportionally command, and part of the image is cropped by the graphic frame, you can control what portion of the image is cropped by moving the image in the frame. Select the Position tool ![]() , click the image (not the graphic frame), and move it within its frame until you’re happy with it. For an added bonus, click with the Position tool and hold the mouse button down for a second before moving the image. You see a dimmed preview of the cropped area which helps you get the right position quickly and easily (Figure 6.8).
, click the image (not the graphic frame), and move it within its frame until you’re happy with it. For an added bonus, click with the Position tool and hold the mouse button down for a second before moving the image. You see a dimmed preview of the cropped area which helps you get the right position quickly and easily (Figure 6.8).

Moving an image inside a graphic frame is usually an easy task that can done with the Position tool as you estimate the position with your eyes. However, if you need to move an image with a high level of precision, there’s a menu command to help you. Select the image with the Position tool and choose Object > Transform > Move to open the Move dialog box (Figure 6.9). Here you can move the selected image by precise horizontal and vertical values or move the image a specific distance at a certain angle. We don’t think you’ll use this feature very often, but at least you know it’s possible.

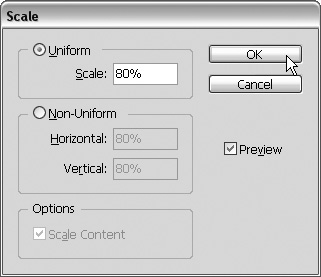
In addition to moving an image within its frame, you can also scale, rotate, and shear images. To scale a selected image, click and drag any of its corners or edges. Make sure to hold the Shift key as you scale the image so the proportions are preserved and the image is not distorted. If you’d rather scale the image mathematically, choose Object > Transform > Scale, enter values in the dialog box, and click OK (Figure 6.10).
You rotate and shear images with the corresponding commands in the Object > Transform submenu, but significant changes such as these should be discussed with your design department. Image transformations such as rotating and shearing are usually done by a designer, so make sure everybody working on the publication agrees on the same boundaries.
If you’ve made adjustments to an image that you want to undo, you can always choose Edit > Undo (Command/Control-Z) to undo each previous step. However, if you’ve made a lot of changes to an image that you want to undo but don’t want to undo any text edits, it’s probably easier to cancel the check out for just the graphic. Select the image you want to revert with the Position tool ![]() and choose File > Cancel Check Out. This reverts the selected graphic frame to its original state without affecting any other text or images in the open file.
and choose File > Cancel Check Out. This reverts the selected graphic frame to its original state without affecting any other text or images in the open file.
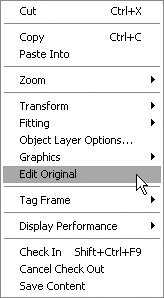
If you’re fortunate enough to have Adobe Photoshop or Adobe Illustrator installed on your machine, you can edit assigned graphics in addition to placing, moving, and transform them. To edit the original image in the application that created the file, Control/right-click the image and choose Edit Original (Figure 6.11) or hold down Option/Alt and double-click the image in InCopy’s Layout view. This launches Photoshop or Illustrator, whichever application created the image, so that you can make edits to the original graphic. When you’re done editing the image, save the file and switch back to InCopy, which automatically updates the layout with the latest version of the image.
Just because you can doesn’t mean you should. Consult with your graphic design department and agree on a workflow before you tread into uncharted waters by yourself. Many publications insist that editors and proofreaders shouldn’t edit graphics any more than designers and photo retouchers should write. Whatever you decide, make sure you all agree on the same strategy for working with images. Read Chapter 8 for a thorough discussion of workflow options.
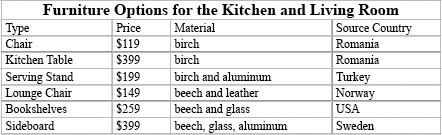
For years, writers have used tabs to add consistent formatting to structured text such as schedules, financial data, and product specifications. Tabs work, but they can be difficult to understand and format. InCopy supports tabs if you want use that option, but consider using tables instead because they are much easier to create, format, and update. Tables work like a spreadsheet application, meaning they function as a grid of horizontal rows and vertical columns that are easy to edit, resize, and format.
Tip
If you have a good reason to use tabs instead of tables, you can read more about them in Chapter 3.
InCopy has fantastic table support, but we should note from the beginning that tables can only be seen and edited when working in the Layout view. When you look at a table in the Galley or Story view, you only see a table placeholder icon ![]() . Why the restriction? InCopy has some really advanced table features such as merging cells, splitting cells, and nesting tables inside each other. A complex table that uses all the available table features would be a royal mess in a text-only view, so InCopy only renders tables in the Layout view where it can faithfully represent all the information. Unfortunately, the fact that tables can only be seen in Layout view also means you can’t track text changes in tables.
. Why the restriction? InCopy has some really advanced table features such as merging cells, splitting cells, and nesting tables inside each other. A complex table that uses all the available table features would be a royal mess in a text-only view, so InCopy only renders tables in the Layout view where it can faithfully represent all the information. Unfortunately, the fact that tables can only be seen in Layout view also means you can’t track text changes in tables.
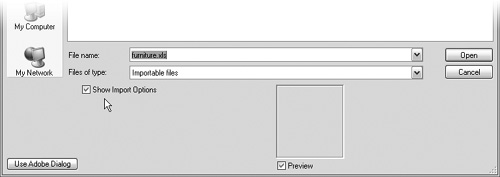
Creating tables in InCopy is as easy as placing Microsoft Excel files or Word documents that contain tables. Just choose File > Place, select the Excel (.xls) or Word (.doc) file, enable Show Import Options (Figure 6.12), and click Open.
When you enable the Show Import Options setting in the Place dialog, you can customize the formatting of the placed table by choosing among three options (Figure 6.13):
Formatted Table: Table formatting from the Excel file, including cell color, text formatting, and cell orientation, are retained. Sometimes the formatting for a spreadsheet serves the needs of the accounting department (green background for a positive number, red background for a negative number) but is hardly in keeping with the design of your printed publication. Designers normally want to stylize the table to match the rest of the layout, so we almost never choose this option.
Unformatted Table: The structure and data of the table are imported, but all formatting is ignored. This makes it easy to apply your own formatting later and is the option we normally use.
Unformatted Tabbed Text: If you still prefer using tabs, you can import text as tabbed text and go from there.

A lot of tabular data begins as an Excel spreadsheet, but that’s not the only possible source. It’s very common for tab and comma delimited text to come from other sources, such as a plain text file or an export from a database. You can place these text files in InCopy, select the text, and choose Table > Convert Text to Table. In the Convert Text to Table dialog, choose a Column Separator (almost always a tab or a comma) and a Row Separator (almost always a paragraph break) and click OK (Figure 6.14). Whether you place, paste, or type text directly in InCopy, it’s easy to convert tabbed text into a table with this menu command.

A third option for creating tables is to create the table structure first and then type the text content later. To create a new table from scratch, choose Table > Insert Table, enter the number of horizontal rows and vertical columns you need, and click OK (Figure 6.15). InCopy creates a basic table according to your settings and places the cursor in the first cell (top left), ready for you to type. You can add or delete rows and columns later, so don’t fret about getting the table perfect on the first try.

As far as cell navigation is concerned, InCopy offers basically the same experience as Microsoft Excel does. To move from one cell to another you can click with your cursor, but navigating table cells with the keyboard is easier. The logical sequence of table cells is left to right, then top to bottom, so press the Tab key to jump to the next cell and press Shift-Tab to jump to the previous cell. You can also navigate up, down, left, and right between cells by using the arrow keys on your keyboard.
When you need to add additional rows to an existing table, choose Table > Insert > Row (Command/Control-9). Use the Insert Row(s) dialog to enter the number of rows to add, choose whether they should be added above or below the current row, and click OK (Figure 6.16). You can add columns to an existing table in the same fashion with the Table > Insert > Column (Option-Command/Alt-Control-9) command.

To create new rows and columns in a more freeform way, just click on a row or column divider, start dragging, and then press the Option/Alt key. InCopy creates more rows and columns until you release the cursor (Figure 6.17).

Tip
Insert your cursor in the last (bottom right) cell of a table and press the Tab key to create a new row.
It’s just as easy to delete cells as it is to create new ones. Insert your cursor in a table cell and choose Table > Delete > Row (Command/Control-Delete) to delete the current row or Table > Delete > Column (Shift-Delete) to delete the current column. To delete the entire table, insert your cursor in any cell and choose Table > Delete > Table. There’s no confirmation dialog for deleting a table, but you can choose Edit > Undo to restore the table if you change your mind or make a mistake.
The Table > Select submenu has commands for selecting the different components of a table, but it’s more practical to take a quick swipe with your mouse to select the parts of a table you need. For example, click and drag over a range of cells to select them. To select a column, hover your cursor near the top edge of a table until the cursor changes to a down arrow and then click (Figure 6.18). You can click and drag left or right with the down arrow cursor to select multiple columns.

Select horizontal rows in a similar way by hovering the cursor on the left edge of a table until the cursor changes to a right-facing arrow ![]() . To quickly select the entire table, hover your cursor over the top-left corner of a table and click with the diagonal arrow cursor
. To quickly select the entire table, hover your cursor over the top-left corner of a table and click with the diagonal arrow cursor ![]() .
.
Selecting tables and table cells is pretty straightforward, but it can be tricky to distinguish between selecting a cell and selecting its contents. An easy shortcut is to insert your cursor anywhere in a table cell and press the Escape key to select the cell. Press Escape again to select its contents.
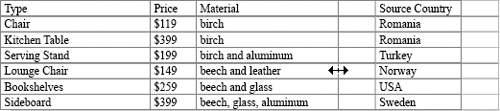
To resize a cell, place the cursor over the cell edge until it becomes a two-headed arrow and then click and drag the divider line. This gesture resizes the cell and also affects the dimensions of the entire table (Figure 6.19).
If you hold down the Shift key as you resize a cell, it resizes that cell and the adjacent row or column, but retains the overall dimensions of the table (Figure 6.20). If you hold down Shift and resize the table from the bottom or right edge, all the cells are scaled proportionally.

Although most tables work effectively as simple grids of cells, there are times when irregular cell configurations are required. For example, you might want to merge the entire first row of a table into one cell and use it as a label (Figure 6.21). To alter the arrangement of the cells in your table, select the cells you want to change and choose the appropriate Merge Cells, Unmerge Cells, or Split Cells command in the Table menu.
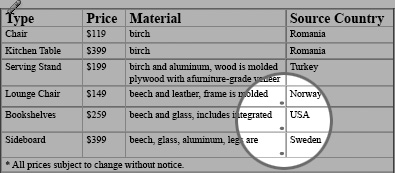
If you create content for financial publications, annual reports, or textbooks, you’re probably all too familiar with really long tables. Sometimes tables seem to go on forever, and when they jump from frame to frame or page to page, you’re faced with an interesting dilemma. Imagine you have a table that contains profit and loss information for a company, and the table jumps from one page to the next. When readers sees the table on the second page, how are they supposed to know which column shows profits and which column shows losses? This is a perfect example of why you would want to use header rows to label the content of the body rows in the table consistently.
When you have a table that jumps from frame to frame or page to page, you should select the row or rows at the top of the table that you want in every instance of the threaded table and choose Table > Convert Rows > To Header. Now those selected rows are at the top of every instance of that table, even if it’s threaded across multiple frames and pages. Footer rows work the same way except they appear at the bottom of each table in the text thread. Legal disclaimers, copyright statements, and technical explanations are all great candidates for a footer row.
There are also contextual menu commands for Convert to Header Rows and Convert to Footer Rows. Select the rows you want to convert, Control/right-click, and InCopy is smart enough to make the appropriate command available based on your selection. If you select rows at the top of the table, the Convert to Header Rows command is available in the contextual menu; if you select bottom rows, the Convert to Footer Rows command appears (Figure 6.22).

After you’ve created running headers and footers, you might need to edit the contents of these special rows. The utter coolness of running headers and footers becomes obvious when you realize that you can edit a header or footer row one time and it updates every instance of that table, no matter how many other frames or pages it extends to. If you try to edit a header or footer row, you might notice your cursor changes to a padlock icon ![]() , which should remind you that these rows can be edited only in the first instance of the table. If the table spans many pages, it can be challenging to find where it starts, so choose Table > Edit Header or Table > Edit Footer to jump to the right place in an instant. Now you can easily edit the running headers and footers and have the results applied automatically to the rest of the table.
, which should remind you that these rows can be edited only in the first instance of the table. If the table spans many pages, it can be challenging to find where it starts, so choose Table > Edit Header or Table > Edit Footer to jump to the right place in an instant. Now you can easily edit the running headers and footers and have the results applied automatically to the rest of the table.
After you’ve created a table, added content and resized a few rows, your table design can be a real mess. To tidy things up, select the rows or columns you want to clean up and choose Table > Distribute Rows Evenly or Table > Distribute Columns Evenly. These commands evenly distribute the selected rows and columns within the current dimensions of the table. Evenly spaced table cells aren’t always necessary, but in many cases they can improve the readability of a table.
In addition to all the other ways to format and customize tables in InCopy, several menu commands in the Table > Table Options and Table > Cell Options submenus also affect tables. Choose Table > Table Options > Table Setup to control various table attributes, including table borders, spacing, alternating row strokes, alternating column strokes, alternating fills, and header and footer rows (Figure 6.23).

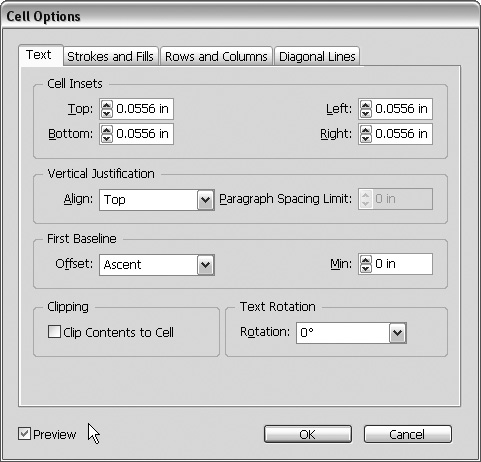
Similarly, you can choose any of the commands under Table > Cell Options to customize text placement, cell stroke and fill, cell size, and diagonal lines in table cells (Figure 6.24). You can apply these cell options one at a time or select a range of cells before you open the Cell Options dialog to change all selected cells at once.
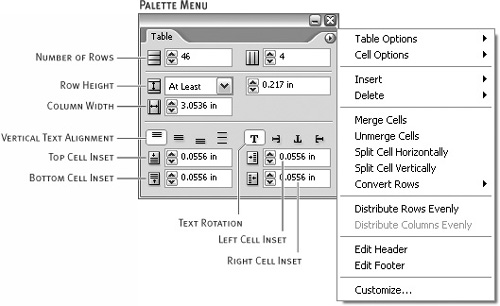
You can access all the table formatting features in the menus we’ve already explained, but finding your way through all those submenus and dialogs can be a little overwhelming. An alternative approach is to choose Window > Type & Tables > Table, which opens the Table palette and gives you one-click access to the most commonly used table-related features. In addition to the commands in the palette menu, you can use the Table palette to adjust cell sizes, vertical text justification, text rotation, and cell inset spacing (Figure 6.25).
After you design your table and add all the text content, you’ll probably want to format your text with paragraph and character styles that match the rest of your document. When it comes to formatting text in tables, it’s business as usual. Use your cursor to select text, even text in multiple cells, and apply styles and formatting just as you would any other text. For a complete discussion of text formatting, see Chapter 3.
The page design and formatting will be finalized by a designer in InDesign, but you should still understand how to structure a table, edit content, and make basic changes. A few common problems may arise when working with tables. We walk you through them here so you don’t get stuck.
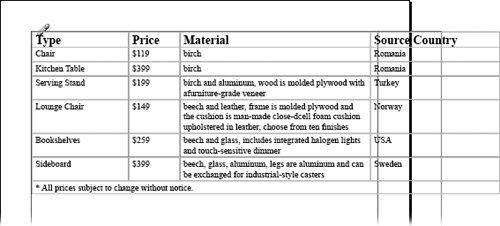
The first problem is the fact that tables can be stretched wider than their text frames. This problem can easily occur by resizing a table so that it’s wider than the frame or page where it’s placed (Figure 6.26). Because you can’t use InCopy to alter the page or column width of an InDesign layout, the solution is pretty straightforward: resize the table. Click and drag on the right edge of the table to resize the right column. If adjusting just the right column isn’t enough, hold down the Shift key as you resize the table, and all the columns resize proportionally.
Unfortunately, fixing this first problem can introduce the second problem we want to explain. If you have too much content in a table cell, all the content cannot be displayed, and it is called an overset table cell. You know you have an overset cell when you see a small red dot in the bottom right corner of the cell (Figure 6.27). To see all the content and remedy the overset problem, you can either make the cell larger or make the content smaller. To make the cell larger, click on the edges of the cell and drag the row and column dividers as described earlier in this chapter. Resizing table cells works in some cases, but not always. To make the content smaller, either edit the text down or select the text and format it with a smaller font size so that more text can fit in the same area. When the red dot goes away, you know you’re in the clear and you’ve fixed the overset table cell.
One of the most exciting new features in InCopy CS2 is the ability to import, create, and manage footnotes. This is especially helpful when editing longer stories that might be a part of a book, magazine, academic journal, or technical documentation. There have always been labor-intensive work-arounds for creating footnotes, but now InCopy CS2 and InDesign CS2 support them natively without any special plug-ins, tricks, or flaming hoops. The real elegance of InCopy footnotes is that they are edited inline with the rest of the story but are displayed at the bottom of the text frames in the Layout view.
You can create, edit and view footnotes in Layout view, but that’s not the easiest way to work with footnotes. Instead, we suggest you stick with Galley or Story view when your writing includes footnotes. Because footnotes aren’t rendered with accurate line endings in Galley view, it still makes sense to switch to Layout view near the end of the process to make sure the text and footnotes are flowing as you expect.
You can create footnotes as you type by choosing Type > Insert Footnote, whereupon your cursor is automatically inserted into the newly created footnote area. When you add footnotes in Galley or Story view, the footnote is inserted with a unique bookend icon ![]() at the current location of your cursor. Click one end of a footnote to collapse it into a small, space-saving icon. Like notes (see Chapter 5), footnotes can be collapsed and then reopened by clicking the footnote icon again (Figure 6.28).
at the current location of your cursor. Click one end of a footnote to collapse it into a small, space-saving icon. Like notes (see Chapter 5), footnotes can be collapsed and then reopened by clicking the footnote icon again (Figure 6.28).

If you create a footnote in Layout view, it’s added to the bottom of the text frame. Either way, now you can type the text of the footnote. When you’re done typing the footnote, choose Type > Go to Footnote Reference to jump back to the location of the footnote reference. If you type a footnote in Galley or Story view, you can press the right arrow key once or twice to position the cursor after the footnote text and keep typing.
Tip
If your story includes lots of footnotes, consider assigning a custom keyboard shortcut to the Type > Insert Footnote command (see Chapter 1 for instructions on customizing keyboard shortcuts). When your cursor is inside a footnote, the command changes to Type > Go to Footnote Reference but still uses the same shortcut. This makes it easy to jump back and forth.
Footnotes can be created in InCopy, but they can also be imported as part of Microsoft Word and RTF (rich text) files. When you place a .doc or .rtf file, enable the Show Import Options checkbox before you click Open to invoke the Import Options dialog. The option to include footnotes is enabled by default, but make sure it’s still checked before you click OK (Figure 6.29). All the footnotes and references from the source document are preserved, but they may be renumbered to match the settings of your InCopy file. Read on to learn how the document footnote options control footnote numbering and formatting.

When you edit text that includes footnotes, InCopy manages the footnotes for you. For example, if you cut and paste or drag and drop text that includes a footnote from one location to another, the footnote reference and footnote text are moved along with the text. To make the whole process virtually foolproof, InCopy even renumbers the footnote references if the sequence of the notes changes. You can even drag and drop or copy and paste text with footnotes from one InCopy file to another, and the footnotes are retained and renumbered as needed. If you need to move a footnote reference, just select the footnote in Galley or Story view and drag it to a new location.
To control how footnote references (usually superscript numbers like this1) appear in your InCopy story, choose Type > Document Footnote Options. Use the Numbering and Formatting section of the Footnote Options dialog to format the footnote markers, and use the Layout section to control the formatting of the actual footnote text (Figure 6.30). You can customize the footnote formatting options, but beware that when an InCopy story is placed in an InDesign layout, the story assumes the footnote options of the InDesign document and ignores the settings you had in InCopy. This means you can customize footnote options for your own convenience while you write and edit, but the formatting of footnotes may or may not match what the InDesign layout shows.
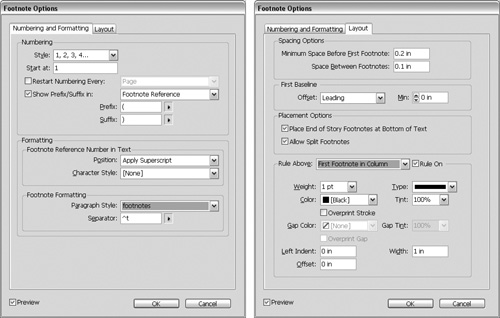
The most useful footnote option that you should be aware of while writing in InCopy is the Style option (Figure 6.31). You can choose from seven different styles of footnote references, including Arabic numerals, Roman numerals, uppercase letters, and lowercase letters. The numbering options are helpful because you can keep track of the sequence of your footnotes as you work on a long story. For more details about the Document Footnote Options, look in the Help Center files, but remember these settings don’t guarantee that the same formatting will be used when your story is placed in InDesign.

There’s one more option related to footnotes, which involves keeping track of word count and copyfit calculations. Locate the Copyfit Info toolbar and click on the flyout menu. Notice the option called Include Footnotes in Text Statistics (Figure 6.32). The default configuration has this option disabled, but if you enable it the text in your footnotes is included when InCopy calculates the number of lines, words, and characters in a story.

You might not use all the advanced features discussed in this chapter, but we want to make sure we cover all the bases. Even if you don’t use these advanced features now, we hope you’ll keep this book around as a reference when you need to use features such as tables and footnotes.