Rip
When you first launch iTunes, its library is empty. When you rip, or import, a music CD, you add the music to the library. You can then listen to it on your computer or sync it to your iOS device. But you can add more than just ripped music: you can rip audiobooks from CDs or add videos from DVDs that you own.
Rip Topics
Which Compression Format Should I Use to Rip CDs?
Which Bit Rate Should I Use to Rip CDs?
What Other Settings Are Important When Ripping CDs?
How Do I Convert Audio Files to a Different Format?
How Do I Rip Videos to Use in iTunes?
Can I Rip Just the Music from a Concert DVD?
How Should I Rip My CDs?
Many music lovers still buy CDs. These plastic discs offer several advantages over digital music: they contain uncompressed music; they have liner notes; and, in some cases, they are cheaper than digital downloads. You can pick up used CDs for a few bucks each, and you can get many excellent box sets of classical music for just a couple of dollars per disc.
Ripping CDs is simple, but you should make some decisions regarding compression format, bit rate, and tagging before you start. If you have a large music library, you’ve probably already made these decisions, but if you’re still building your library, it’s not too late. You can re-rip CDs you’ve ripped in the past, if you decide that you’d rather use a different bit rate. But also consider how much your music library is going to grow. If you have lots of CDs that you haven’t yet ripped, or if you buy a lot of music, plan ahead. Keep reading to find advice on each of these topics.
Which Compression Format Should I Use to Rip CDs?
Before getting our hands dirty with actual CD rips, I want to discuss compression formats. When you rip a CD with iTunes, you can either use iTunes’ default format or choose a different one that suits you. To make this choice, you need to understand a bit about compression. (Skip ahead to How Do I Rip a Music CD? if you don’t care and want to use the default, or if you already know this stuff.)
Compression is a seemingly magical function that reduces the size of digital files. You’ve probably used compressed .zip archives, which allow you to store data in smaller files or to transfer data over a network more effectively. Compression software looks for redundancies in bits of data, especially repeated characters or series of characters, and replaces them with shorter bits of data. You can compress text files to about half or one-third of their original size, and some graphic files can be compressed to less than one-tenth of their full size.
When you compress some kinds of files, such as text files or apps, you need to use lossless compression—this means that after you decompress the files you have exactly the same data you started with. While there are lossless compression formats for music, the most popular compression schemes are lossy, and they save space by removing certain data that is deemed unessential. For this reason, compressed music in lossy formats contains less data and is never as good as the original music on your CDs.
Or is it? In blind tests, most people can’t tell the difference between music compressed at a high-enough bit rate and original CDs. In fact, only those with audiophile equipment are likely to notice any differences. In most cases, home stereos are good-but-not-great, and what’s lost in compression won’t be noticed. If you’re ripping music for a portable device, you won’t hear much of a difference because of the ambient noise around you. You might want to do a test yourself; read my article Can You Really Tell the Difference Between Music at Different Bit Rates? to see how to carry out this test.
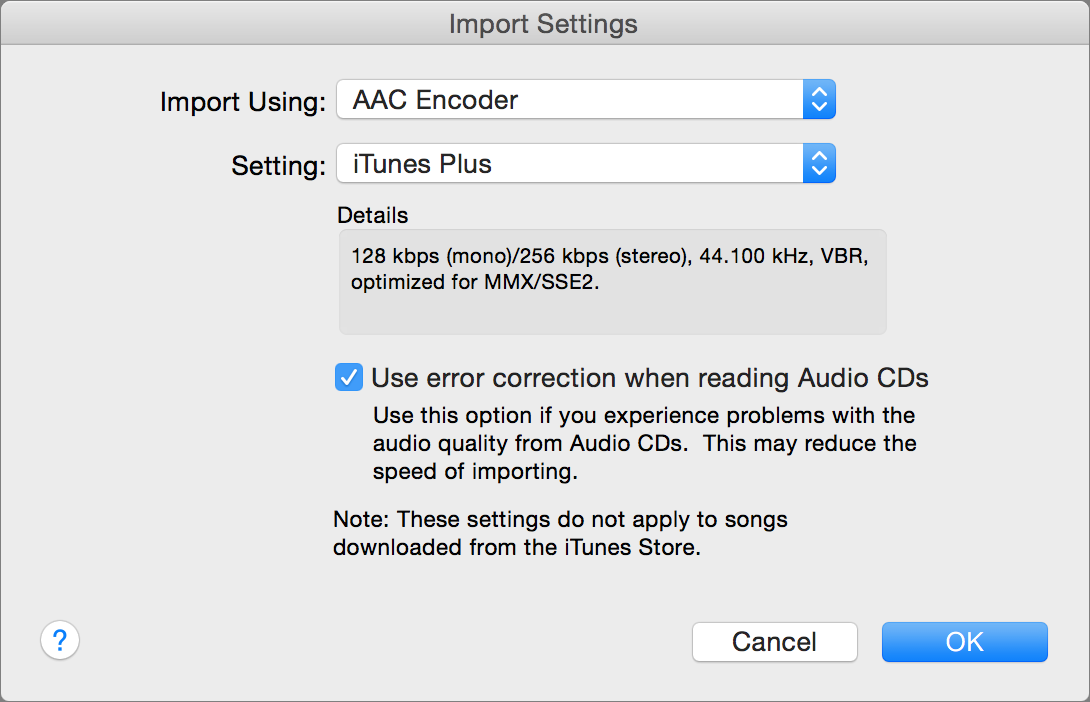
To set a preferred compression format to use when you rip, choose iTunes > Preferences > General and then click Import Settings (in the “When a CD is inserted” section). iTunes opens the Import Settings dialog (Figure 91).
From the Import Using pop-up menu, choose a format:
- AAC Encoder: This default choice compresses files in AAC (Advanced Audio Coding) format. AAC is not, as many people think, a proprietary format created by Apple. It is part of the MP4 standard and can be used by any hardware or software. iOS devices can play this format, but some digital players don’t support it.
- AIFF Encoder: Both AIFF and WAV files encapsulate raw sound data from a music CD in file headers so the data can be used on computers. This uncompressed format takes up a lot of space, around 600–700 MB per disc, or about 10 MB per minute of audio.
- Apple Lossless Encoder: Apple Lossless or ALAC (Apple Lossless Audio Codec) is a lossless format that Apple created. It retains all the original musical data while taking up much less space than AIFF. Audio from a CD ripped in Apple Lossless format takes up about 250–400 MB, or around 7 MB per minute, depending on the type of music.
- MP3 Encoder: Most people are familiar with MP3 files, which were the catalyst for the digital music revolution. MP3 files can play on just about any device or program that handles digital music.
- WAV Encoder: Like AIFF, WAV is uncompressed, and takes up the same amount of space. I don’t recommend that you use WAV, however, as it doesn’t support tags very well.
Apple suggests that you use the default AAC format. But should you? In most cases, AAC is a good choice. AAC has several advantages over MP3: it sounds better at lower bit rates, and it has a number of technical advantages that make it more efficient. However, if you want to rip your music to use on non-Apple music players or phones, check if your device supports AAC; if not, you may want to use MP3. (These days, most portable devices support AAC, but you may have a car stereo that can’t play this format.)
If you’re concerned about getting the maximum quality from your CDs, and you’re an audiophile, you’ll probably want to use Apple Lossless. These files take up more space, but no data is discarded during compression. However, you may not be able to use this format with all your devices. (Apple released the Apple Lossless format as open source in September 2010, and support for this format has become more common, but not ubiquitous.)
For most people, the choice is between AAC and MP3. If you plan to stick with iTunes and iOS devices, use AAC; if you have doubts, go with MP3. However, if you want to keep archival copies of your music, you can rip in Apple Lossless format, and you’ll never have to re-rip your CDs if you change your mind later, because you can covert from Apple Lossless to other formats with no loss in quality. And, when you sync these files to your iOS device, you can sync them as is or have iTunes reduce their bit rate so you can fit more music on your device. I explain this in How Do I Squeeze as Much Music as Possible on My iOS Device?
While you’re in the Import Settings window, you may also want to choose a bit rate. I discuss bit rates next.
Which Bit Rate Should I Use to Rip CDs?
You’ve chosen a compression format, now you may need to choose the bit rate, or the amount of compression. The bit rate in music compression is the number of bits per second of music, measured in kbps, or thousands of bits per second. Higher is better.
If you’re using AIFF, WAV, or Apple Lossless, there is no such choice: AIFF and WAV are 1,411 kbps, the bit rate of CDs, and the Apple Lossless encoder adapts its compression to retain all the musical data, so the bit rate (and file size) of lossless files varies according to the type of music you rip. However, if you use AAC or MP3, you can either stick with Apple’s default suggestion, or change to the bit rate you prefer.
You choose the bit rate in the Import Settings dialog (Figure 91, previous topic) from the Setting pop-up menu. If you’ve chosen AAC Encoder from the Import Using pop-up menu, the Setting menu offers the following choices:
- High Quality (128 kbps): iTunes used High Quality as its default bit rate before Apple introduced the iTunes Plus format in the iTunes Store in 2009. 128 kbps (kilobits per second) is a decent bit rate, and, with AAC, is sufficient for most uses. If you don’t listen to music on your stereo, and often listen on an iOS device outdoors, or on cheap or built-in computer speakers, High Quality may be fine. However, if you listen, say, through an Apple TV connected to a stereo in your living room, it may not be sufficient.
- iTunes Plus: The iTunes Plus setting is 256 kbps, twice that of High Quality; remember, higher bit rates are better. These files are twice as large, and use the bit rate of music sold in the iTunes Store.
- Spoken Podcast: This is a good bit rate for spoken recordings, such as podcasts or audiobooks. It’s 32 kbps mono or 64 kbps stereo, and it uses voice filtering, so it focuses on the frequencies in the human voice and ignores any low or high frequencies; this technique allows for better sound quality of voices and more compact files.
-
Custom: You can choose a bit rate from 16 kbps to 320 kbps. How do you decide? Here’s what I did.
Many years ago, I ripped a number of CDs at different bit rates. I had decided that I’d use AAC, since I’m a Mac guy and I didn’t plan to buy other types of MP3 players. I ripped CDs at 96, 128, 160, 192, and 256 kbps, and lossless. I mixed up the music, and listened to it at random. I listened over and over, rating tracks according to how I felt they sounded, without knowing their bit rates.
I’ve repeated these tests over the years, and I have organized such tests with listeners and even a group of classical music critics. In fact, most people can’t tell the difference between a 128 kbps AAC file and a CD. But for me, 160 kbps was the perfect balance between quality and size, especially with the limited storage of iPods at the time.
A few years ago, I switched to 256 kbps, because size is much less of an issue given the capacities of recent iOS devices. This is the same bit rate that Apple uses for music sold in the iTunes Store.
More recently, since storage is cheap, I’ve been ripping CDs in Apple Lossless format; this ensures that I have archival copies of my CDs. If I ever want to convert to another format, I can do so easily. Although I haven’t re-ripped older CDs, I now rip new discs in that format.
Bear in mind that the higher the bit rate, the larger the file. Table 1 shows the differences in size for different bit rates and formats.

The amount of music that you can put on your iOS device, or store on your computer, depends on the bit rate. If you choose, for example, 256 kbps, you can get 4,000 4-minute tracks on a 32 GB iPod; that’s roughly 100–150 albums. However, at 128 kbps, you can store twice as much music on the same device. (Obviously, with an iPhone or iPad, the amount of music you can sync depends on how many apps and other media files the device contains.)
What Other Settings Are Important When Ripping CDs?
Besides the compression format and bit rate that I just discussed, there are a number of other import settings, and these are different for each of the different encoders. I’d like to mention a few of them here; for the others, it’s safe to leave the defaults.
- Variable Bit Rate Encoding: This compression technique uses less space than the default method, constant bit rate encoding. In essence, it uses less data for parts of the music that are less complex, or that are silent. Apple uses it by default in its iTunes Plus encoding; you can leave it on or not (by choosing a custom bit rate). In most cases, it saves only a small amount of space and doesn’t impact the music quality.
- High Efficiency Encoding: This addition to the AAC format, also a custom bit-rate choice, provides better encoding for low bit rates (64 kbps or less). I discuss it in How Do I Rip an Audiobook CD?, later.
- Error correction: Available in the main Import Settings window, the “Use error correction when reading Audio CDs” option tells iTunes to analyze data read from CDs to determine whether what is read matches what is on the CD. (CD players sold for use with stereos all have error correction.) If not, the data is corrected. This leads to slower ripping times, but may give better results. With error correction off, you may hear noise or tiny pops in music you rip; this is due to defects in the actual CD, dust, or neutrinos that hit your drive’s laser beam during the rip. I keep this setting on all the time.
How Do I Rip a Music CD?
When you insert a CD into your optical drive, you’ll hear it spin for a few seconds, then it will likely open in iTunes. If not, launch iTunes.
iTunes checks the Gracenote CD Database for metadata information, and then displays the CD. If it finds this information, you’ll see the names of your album, artist, and tracks in the main portion of the iTunes window.
The huge Gracenote CD Database contains information contributed by record labels and by users, who can upload tags themselves, for millions of CDs. Nevertheless, your CD may show nothing more than Track 1, Track 2, and so on. If so, you’ll want to Tag your music manually in order to help iTunes sort and organize it. (And even if Gracenote does offer you tag data, you may want to change it.)
To rip the CD, make sure it’s selected in the navigation bar so that its tracks are listed in the main portion of the window beneath the CD header bar (Figure 92).

To begin ripping:
- To rip all or most of the tracks directly into your Music library, uncheck any tracks that you don’t want to import, and then click the Import CD button at the right of the CD header bar.
- If you’d prefer to import tracks not only into your Music library but also have them placed in a playlist, select them and drag them to the left edge of the iTunes window. A list of playlists slides over from the left. If you want to put the tracks in one of these playlists, drop them on that playlist. If you want to create a new playlist, drop them in that sidebar but not on a playlist; iTunes creates a new playlist, whose name is the album’s artist and title.
How Do I Rip an Audiobook CD?
Many people enjoy audiobooks and obtain them in different ways. You can buy audiobooks as downloads from Audible.com, or from the iTunes Store and other Web sites; or you can buy them on CD and rip them to your iTunes library. Because of the type of audio they contain—voice—and their length, ripping audiobooks requires different considerations than those for ripping music CDs.
I’m assuming that you’ve read, earlier in this chapter, the details about compression and bit rate. You should review those topics if anything here doesn’t make sense.
When you rip audiobook CDs, you’ll want to use a lower bit rate than for music. Voice uses a limited frequency range, so there’s much less data. Even at very low bit rates—such as 32 kbps—audiobooks sound fine. (That’s the bit rate that Audible and Apple use for the audiobooks they sell.) Also, you may want to use some iTunes voodoo to ensure that you have fewer files than the ones that the audiobook CD shows you. And, you’ll want to tag the audiobook so it shows up in your iTunes Audiobooks library (or Books library, in iTunes for Windows).
Just as with music, I suggest you use the AAC compression format for audiobooks, unless you have a special reason for using the MP3 format, such as wanting to play them on a portable player or car stereo that doesn’t handle AAC. To set the format, choose iTunes > Preferences > General and click the Import Settings button.
Let’s start with the bit rate for an AAC file. Since audiobooks don’t need the same quality as music, you’ll want to choose a lower bit rate. Many people are happy with 32 kbps in mono for audiobooks; voice is compressed easily without artifacts, and, unless you’re listening to a performance of a play or a full-cast recording of a book, stereo won’t make any difference.
If you choose Spoken Podcast from the Setting pop-up menu in the Import Settings dialog, iTunes will rip CDs at 32 kbps mono or 64 kbps stereo, using “voice filtering,” which limits the frequencies that iTunes rips. However, since most audiobook CDs are in stereo, your resulting files will be just that; you won’t get the space-saving advantage of ripping in mono. So to get the best settings, choose Custom from the Settings pop-up menu.
Figure 93 shows my ideal custom audiobook settings for ripping in AAC format.

Some of the above needs explaining:
- Stereo Bit Rate: I’ve been talking about using 32 kbps to rip audiobooks, so why is this set to 64 kbps? Because that’s the stereo bit rate. The Channels pop-up menu is set to Mono, so the actual bit rate used is half of what’s chosen in the Stereo Bit Rate pop-up menu. Confusing? Sure, but that’s the way it works.
- Use High Efficiency Encoding (HE): This option provides better encoding at low bit rates. If you have any problems listening to audiobooks on your portable player, turn this off. (If you have an older iPod, you may want to rip just one file and make sure it plays correctly before you rip more.)
- Optimize for voice: Since voices use a limited frequency range, this eliminates high and low frequencies that aren’t needed, saving space, and providing more space for frequencies that are present.
If you plan to rip in MP3 format for compatibility with non-Apple devices, note that MP3 has lower quality at low bit rates, so you might want to rip at a slightly higher bit rate, say 48 kbps. The ideal custom settings are 96 kbps for the stereo bit rate (remember, it’s double the mono number), Mono for the channel, and “Filter Frequencies Below 10 Hz.”
Let’s start. I’ve put an audiobook CD into my optical drive, and iTunes lists the CD’s content, like any other CD. iTunes also displays any info that it can find on the Gracenote CD Database (Figure 94).

In the figure above, my audiobook CD has track information. If your audiobook doesn’t show any such information, you need to fill it in manually. What’s most important is that you enter an artist, album (or book title), and disc number, so the tracks will stay together and in order. To do this, select all the tracks (press Command-A), then press Command-I to edit them. Enter the name of the author in the Artist field, the name of the book in the Album field, the disc number in the appropriate field, and Audiobook for the genre (you can use other genres, such as Thriller, Romance, or Science Fiction, if you wish). Click OK to save this data. (I cover this process, called tagging, in Tag.)
There are several ways to rip audiobooks. I’m going to present two methods, and you can choose which works best for the way you want to organize and listen to your audiobooks.
Joining Tracks
The first method involves “joining” tracks to make one file from each disc. Using my example, Samuel Becket’s Molloy has seven discs, so I’ll end up with seven files, each a bit over an hour long. I’ll lose the separations between sections–the different tracks–that you can see in Figure 94 (slightly earlier), but for books this is rarely a problem.
To join tracks on a CD, select the tracks, click the Options ![]() icon near the right of the CD header bar, and choose Join CD Tracks. (If this doesn’t work, make sure the CD’s tracks are sorted by the leftmost column, the one with the track number, as in Figure 94, slightly earlier). With Join CD Tracks chosen, iTunes shows a sort of bracket from the first to the last track, with a single checkmark beside the first one. Click the Import CD button, and iTunes rips the entire CD into one file. iTunes names the file according to the first track in the CD’s track list; you can change the name later.
icon near the right of the CD header bar, and choose Join CD Tracks. (If this doesn’t work, make sure the CD’s tracks are sorted by the leftmost column, the one with the track number, as in Figure 94, slightly earlier). With Join CD Tracks chosen, iTunes shows a sort of bracket from the first to the last track, with a single checkmark beside the first one. Click the Import CD button, and iTunes rips the entire CD into one file. iTunes names the file according to the first track in the CD’s track list; you can change the name later.
Repeat this process for each of the CDs. You end up with the same number of tracks as the number of CDs that make up your audiobook.
To listen to these joined audiobook files, you must mark them as audiobooks:
- Find the tracks in your library, select them all, and then press Command-I to bring up the Info dialog.
- On the Options pane, from the Media Kind pop-up menu, choose Audiobook.
- Click OK.
iTunes stores these files in your Audiobooks library (or, in Windows, in your Books library), and it marks them with two important settings. “Remember playback position” tells iTunes to mark the spot where you stop listening, and “Skip when shuffling” ensures that these files won’t come up when you choose Shuffle Songs on an iOS device, and won’t be copied to an iPod shuffle when you use Autofill. (You can listen to these files in non-Shuffle mode on any iOS device.)
Keeping Individual Tracks
The second method involves keeping each track separate, which may mean that you have hundreds of tracks for a book. As explained above, if iTunes doesn’t show metadata for your audiobook CDs, or if you want to adjust those tags, you should do so before you rip the CDs. That way, you can find the tracks later. Rip each CD and don’t worry where the files go.
The best way to listen to the many tracks of an audiobook is to make a smart playlist. (If you don’t know how, refer to What Are Smart Playlists? for background information and then read the directions ahead.) This smart playlist should be set up as follows (Figure 95):
Match [music] for [all] of the following rules
[Artist] [is]
author name
[Album] [is]
book name
[Plays] [is]
0
The “Live updating” checkbox should be checked.

In order for this smart playlist to work correctly, you must make the following changes to the tracks:
- Select them all, and press Command-I.
- On the Options pane, make sure the Media Kind is Music. (This is the case when you rip any kind of CD, even those from audiobooks. Don’t change it to Audiobook.) Then select “Remember playback position” and “Skip when shuffling.”
- Click OK.
- Go to the playlist, choose View > View As > Songs, and then click the Album column header so it is selected, and so the arrow at the right of the header points up.
Your tracks are now in order, and the two options you chose in Step 2 ensure that iTunes remembers where you left off. Each time you listen to a track, its play count increments, and it is removed from the playlist, so the next track to listen to is always at the beginning. You can listen to the book in iTunes or sync it to your iOS device and listen there. In either case, the tracks drop off the playlist as you listen.
How Do I Convert Audio Files to a Different Format?
I told you above how to choose a file format for ripping your audio CDs. But what if you change your mind? After you rip your CDs, you may want to convert your files to another format. There are several reasons to do this:
- If you ripped your CDs as WAV, AIFF, or Apple Lossless files, which take up a lot of space, you may want to change to AAC or MP3 files.
- If you’ve ripped audio in AAC format, you may want to convert it to MP3 for a music player or software that doesn’t support AAC files.
- If you have MP3 files that you ripped with other software, you may want to convert them to AAC files.
- You may want to change the bit rates of your files; one reason to do this would be to reduce the size of audiobook files that were imported at a bit rate that is normal for music but excessive for spoken word recordings.
To convert a track or tracks to a different format using iTunes, follow these steps:
- (Optional) Make a playlist of the tracks you plan to convert. That way you’ll be able to find and select them easily. (Read How Do I Make a Standard Playlist? if you don’t know how.)
- Set the new format and/or bit rate you want to use in the iTunes preferences (in the General pane, click the Import Settings button).
- Select the tracks you want to convert.
- Choose File > Convert > Create Format Version, where Format is the one that you’ve selected in the preferences. Whatever settings you chose in the Import Settings dialog are used here.
When iTunes has finished converting the selected file(s), you can find the new files in your Library, but not in any playlists. If you want to delete the old files, go ahead.
How Do I Rip Videos to Use in iTunes?
iTunes supports a limited number of video file formats: you can watch videos that you’ve bought from the iTunes Store, you can watch movies that you’ve rented from the iTunes Store, and you can add your own video files in QuickTime-compatible formats—these are video files that have .mp4, .m4v, or .mov extensions.
iTunes can’t rip DVDs. The main reason for this is the entertainment industry’s reluctance to allow people to watch videos in different ways. You can rip videos from DVDs, however, although, as I mentioned at the beginning of this chapter, this may be illegal in your country. Ripping DVDs is not complicated, but it requires third-party software. Rather than go into detail here, I suggest you read my Macworld article How to rip DVDs with Handbrake, which should give you a better idea of how to rip DVDs as well as how to add your rips to iTunes.
You can also rip Blu-ray discs, if you have an external Blu-ray drive connected to your Mac. See this article by Rob Griffiths, Revisiting ripping Blu-ray discs.
Why Won’t My Video Sync?
When you want to sync a video to an iOS device, it’s worth keeping in mind that not all iOS devices accept all the types of videos that iTunes can play. For example, older iPods and older iPhones can’t play high-definition (HD) content, though iPads can. If you create or convert a video and it does not play, try converting it again with iTunes. Select the video, and then choose File > Convert > Create iPod or iPhone Version.
For more about video formats that don’t get copied to an iOS device, see Apple’s technical note If you can’t play videos from iTunes on your iPhone, iPad, iPod, or Apple TV.
Can I Rip Just the Music from a Concert DVD?
The short answer is “yes,” but it can be a complicated procedure. I wrote a Macworld article about this, Rip audio tracks from your DVDs. Have a look at the article to see a couple of possibilities.
You can also rip audio from Blu-ray discs, if you have an external Blu-ray drive connected to your Mac. This is a slightly convoluted process, but it works. See How to rip audio from your Blu-ray discs.
You can use Rouge Amoeba’s $49 Audio Hijack to record the audio from any kind of optical disc, be it a CD, DVD, Blu-Ray, or DVD-A. Audio Hijack records the digital audio stream after it’s read from the disc, and the quality is exactly the same as on the original disc. This may be the easiest method if you want to rip a lot of concert DVDs or Blu-Rays. However, Audio Hijack records in real time, so it will take the full duration of each disc to rip its audio.