Sync
If you have an iOS device, iTunes is the tool you’ll use to sync your media files to it, along with apps and other information. The way you set up your media library in iTunes reflects how these files become accessible on your portable device.
Syncing offers many options. I want to point out some of the basics, and explain how you can put your favorite media files on your iOS device. As with the rest of this book, my focus here is music and videos. Once you grasp the concepts, it’s simple to sync your media to your iOS device exactly the way you want to.
Sync Topics
What Should I Sync to My iOS Device?
How Do I Connect My Device to iTunes?
How Do I Squeeze as Much Music as Possible on My iOS Device?
Can I Have iTunes Fill My iOS Device?
How Can Multiple People Sync iOS Devices with the Same Computer?
How Do I Put Music on an Apple Watch?
What about Syncing an Apple TV?
Are There Special Features for Syncing an iPod shuffle?
What Should I Sync to My iOS Device?
Before thinking about what you want to sync, take a minute to consider what you can’t sync through iTunes:
- If you’ve turned on iCloud Music Library, you no longer copy music through iTunes.
- It’s the same with iCloud Photo Library—if you’ve turned it on, you no longer sync photos through iTunes.
- If you’ve turned on iCloud sync for calendars or contacts, you can’t sync that data through iTunes.
For items that you can sync, you may wish to transfer them in some other way. For example, on an iPhone, you may prefer to download iTunes Store purchases from the cloud and podcasts can all come over the air. However, you’ll be able to add new content to the device only when it has an Internet connection. In the case of a cellular connection, if your data plan is limited or the connection is slow, you may find that you can’t get the items you want when you need them. And, of course, cellular works only for cellular devices, such as an iPhone or an iPad with cellular access.
Another part of thinking about what to sync has to do with your device’s capacity for holding media:
-
Your device has the capacity to hold all your media: In this case, sync it all; it’ll be much easier for you to not worry about choosing specific items. This will be the case if you have a 160 GB iPod classic, for example (may it rest in peace), and less than 160 GB of media (well, 149 GB to be precise; that old my-bytes-aren’t-the-same-as-your-bytes thing). Or if you have a 64 GB iPhone, and have, say, 20 GB of music and a few GB of videos.
Unless you really don’t want your videos on the device, then don’t worry, sync everything and be happy.
- Your device doesn’t have space for all your media: In this common situation, you need to choose what to sync. Your choice isn’t permanent; you can change what you sync every week, or even every day. You can have certain types of items sync dynamically: for example, you can sync only unwatched TV shows or unplayed podcasts, or only a certain number of them. In this way, your iOS device’s content will change as you watch TV shows or listen to podcasts. You can also use smart playlists to change the music that you sync: for example, you can sync only music you haven’t listened to recently, or only music you’ve bought in the last few months.
Many people fall into the second camp, but generally because of the videos in their iTunes libraries, not audio. In that situation, you may want to sync all your music, and pay more attention to choosing which, if any, videos you sync to your device.
How Do I Connect My Device to iTunes?
Initially, you’ll connect your device with a USB cable. You can continue to connect with USB, or if your device supports it, you can set up a Wi-Fi connection (see the sidebar Wi-Fi or USB Cable?, ahead slightly).
Once you’ve made the connection, to see your device in iTunes, select it on the navigation bar (or click the Devices button on the navigation bar and then select it).
The items in the sidebar change. You can now click an item in the Settings section in order to view a pane related to managing or syncing your device. Most of the panes relate to a specific type of media, but the Summary pane, which is selected in the sidebar in Figure 83, contains housekeeping options, such as whether you need to update your device’s operating system and options for backing up your device.

How Do I Sync My Content?
You can sync content in several ways. Let’s look at these choices closely, since it is important that you pick the appropriate technique for your requirements:
- Pick media by checkbox: With this method, iTunes will copy only songs and videos whose little checkboxes are checked. This method is best if you have limited space on your device, or if you want fine-grained control and find this method appealing. See Picking Media by Checkbox, just ahead, for details.
- Drag media to your device: With this simple option, you drag songs, videos, playlists, and so on to your device. For devices with limited space, such as an iPod shuffle, this works nicely. See Dragging Media to Your Device, ahead.
- Pick media automatically: This method lets you choose your media somewhat more generally, so you don’t need to fuss with manually selecting checkboxes or with finding items in order to drag them over. In any case, you must use this method to transfer apps, contacts, calendars, or photos. Read Picking Media Automatically, ahead.
Picking Media by Checkbox
To refresh your memory about the checkboxes, read the sidebar The Importance of the Little Checkboxes, earlier. To sync only checked songs and videos, select your device in the iTunes navigation bar, click Summary in the sidebar, scroll down in the Summary pane to the Options section, and select “Sync only checked songs and videos” (the third box down in Figure 84).

Ensuring that the checkboxes are selected for what you want to sync can be time-consuming, but you can change what’s selected bit by bit, as you tire of listening to something or buy new music. Also, if space on your device is a concern, you can check and uncheck items until you have an amount that will fit. (If there’s too much, iTunes will tell you when you click the Sync button; the capacity bar at the bottom of the iTunes window will also show you whether you’ve tried to cram too much on your device.)
Dragging Media to Your Device
To start using this method, select your device in the iTunes navigation bar, click Summary in the sidebar, scroll down in the Summary pane to open the Summary pane, and select “Manually manage music and videos.” Once you’ve selected this option (shown unchecked in the figure just above), music and videos will copy to your iOS device only if you drag them to its list of contents.
To add items:
- Use the Devices button in the navigation bar to select your device, as discussed a page or so earlier. In the On My Device section in the sidebar, you see a list of the libraries and playlists on the device. (To review which content is on the device, click an item in the sidebar to see what’s in it at the right.)
- Click a library listed under On My Device, and click the Edit Playlist button near the top-right of the window. iTunes displays a panel showing the name of the device above the right-hand list, along with the amount of free space available.
- Drag any items from the center section of the iTunes window to the right-hand list.
- When you’ve finished adding content, click Done. Click Done again to exit the iOS device summary pane, or click the Back button in the navigation bar to return to your view before you selected the device.
To delete items:
- With the device selected in the navigation bar, in the On My Device section of the sidebar, click a library.
- Select any files you want to remove. You can even select all files in a category.
- Press the Delete key.
iTunes removes the deleted item(s) from your device, but does not delete them from your iTunes library.
Picking Media Automatically
To begin, select your device from the navigation bar, as discussed in How Do I Connect My Device to iTunes?, earlier.
Music
Let’s look at how you can sync music first.
Click Music in the Settings section of the sidebar, and then select the “Sync Music” checkbox (near the upper left). Now select a radio button to sync your “Entire music library” or “Selected playlists, artists, albums, and genres” (Figure 85).

In the figure above, I’ve selected only certain playlists but no artists. (The Genres and Albums lists appear below the Playlist and Artists sections, and you can see their headings near the bottom of the figure.) You can add or remove playlists by checking or unchecking them on the Music pane, which is much easier than checking and unchecking individual items.
I find it useful to have special playlists for each iOS device in my iTunes library. If you have multiple iOS devices, as I do, you can create unique playlists for each one.
Podcasts, Movies, TV Shows, and iTunes U
The options for each of these panes are quite similar. In each case you can just sync everything or you can sync only a selection.
For example, on the Podcasts pane, you can tell iTunes to sync all unplayed episodes, or, from the “Automatically include” pop-up menu, you can choose to sync the 5 most recent unplayed episodes, 10 least recent episodes, and so on. Since I’ve chosen “all unplayed” episodes in Figure 86, I can’t pick individual episodes to sync. If I deselect the “Automatically include” checkbox, I can select individual episodes to sync by selecting a podcast name in the Podcasts list at the left and then checking the checkboxes for individual episodes at the right.

Ebooks
For ebooks—files in EPUB or PDF format—you can sync them all or sync only those selected in the Books pane (Figure 87). If you have a lot of books and are trying to manage which ones are selected, try sorting either by author or title, using the right-hand pop-up menu below Books.
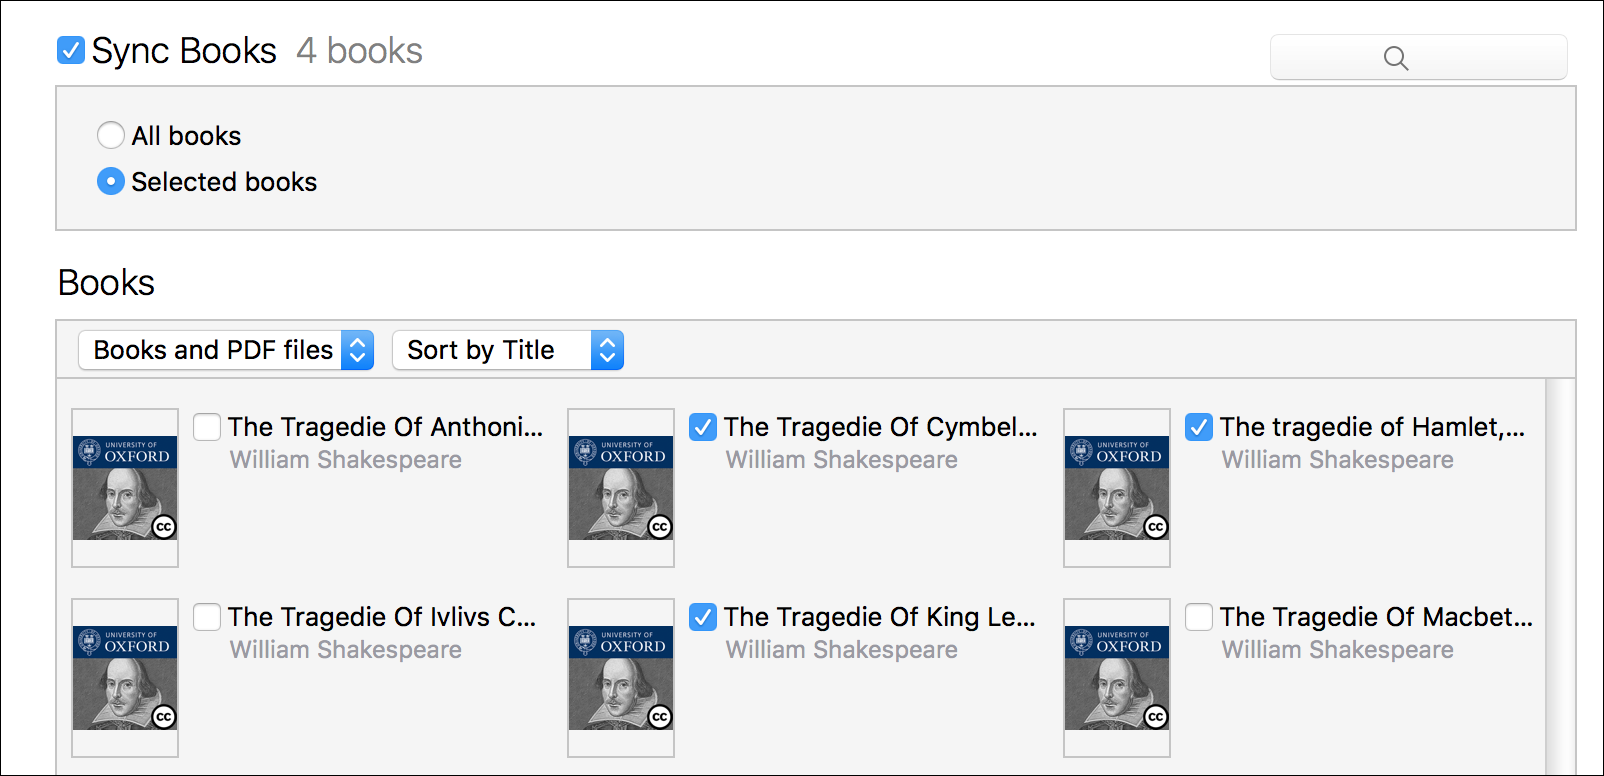
Windows users should note that checking or unchecking ebooks in your iTunes Books library has no effect on syncing, as it does with audio or video files—when you select “All books” under Sync Books, All means all.
Mac users view and manage ebooks in the iBooks app, but sync them via iTunes.
Audiobooks
Audiobooks sync to all iPods and iOS devices. The choices available on the Audiobooks pane (Figure 88) are much like those on the other media panes, but if an audiobook has more than one part, you can select which parts to sync (for example, you may have already listened to the first part or parts, and not want to sync them again).

Unlike ebooks, if you choose to sync all audiobooks, then the ones that will sync are those that have checked boxes in your Audiobooks library (or Books library if you don’t have an Audiobooks library).
How Do I Sync This Ebook?
If you purchased this book from the iBooks Store, instead of syncing it to an iOS device, you may prefer to just download it from within iBooks on your iOS device.
If you purchased this book from the Take Control site or some other book seller site besides the iBooks Store, your first step is to put the PDF or EPUB file where iTunes can find it:
- Mac: In iBooks, choose File > Add to Library, navigate to the book file, and click the Add button. Or, drag the book file from the Finder into the iBooks window.
- Windows PC: In iTunes, choose File > Add to Library, navigate to the book file, and click the Open button.
Once the file is added, it is available for syncing in iTunes just like any other ebook. I talk about syncing generally earlier in this chapter, and I discuss ebooks in Ebooks.
Once the sync is complete, the file appears in iBooks on your iOS device—EPUBs appear in the Books collection by default. To see PDFs on an iPad, tap the Collections button at the top of the library screen and then tap PDFs; to see them on an iPhone or iPod touch, tap the Books button—or whatever the label may be—at the top of the library screen and in the collections list that appears, tap PDFs.
How Do I Squeeze as Much Music as Possible on My iOS Device?
With an iOS device selected in the navigation bar, Summary selected in the sidebar, and the right-hand pane scrolled down to display the Options section (Figure 89), you see a checkbox labeled “Convert higher bit rate songs to.”

When you select this box and choose a bit rate, iTunes saves space on the device by converting copies of music files that are above the target bit rate to this lower rate while syncing. You can choose 128, 192, or 256 kbps. (Music from the iTunes Store is 256 kbps, so this option lets you put up to twice as much of that music on your iOS device.) Use 256 kbps if the tracks in iTunes are in Apple Lossless format, for example, and you want to still have high-quality files on your iOS device. The other bit rates give you more music at lower quality.
Since you’re likely to listen to your iOS device outdoors, or in noisy environments (such as in a car, bus, or when walking), you won’t notice the difference in sound quality. It may take a long time the first time you sync, since iTunes has to convert the files, so consider letting the sync run overnight. (The time will depend on the speed of your computer and the total size of the files being converted.) Subsequent syncs will take a while too, if you’ve added a lot of new music. But you’ll have lots more to listen to.
Can I Have iTunes Fill My iOS Device?
In the Music pane for a selected iOS device, when you select the “Sync Music” checkbox and pick the “Selected playlists, artists, albums, and genres” radio button, another checkbox appears: “Automatically fill free space with songs.” Enable this checkbox, and, after iTunes has synced everything you chose, it fills the remaining space on the device with songs. iTunes chooses songs at random, but it seems to prefer music with high play counts or high ratings.
How Can Multiple People Sync iOS Devices with the Same Computer?
This can be a problem. Apple has never really come up with a solution for families sharing a single computer. Here are some ideas:
- One solution is to create two libraries, as I explain in Can I Have More than One iTunes Library on My Computer?. If both people want to add the same tracks to their library, the task will have to be done twice, once per library; however, each person can launch iTunes and choose their library, and then sync their iOS device. If each person wants to sync manually, this solution will do the job.
- Another solution, and this one is fairly simple, is to sync music to each device using the “Sync selected playlists, artists, albums, and genres” feature I noted in the previous topic. Each person can make their own playlists and set their iOS device to sync only those playlists. If there’s other content, such as apps, audiobooks, or TV shows, each person can choose their own options. This method is easy because you don’t need to copy any new files to each library.
- Yet another solution is for each person to have their own user account on the computer, and their own iTunes library. This can lead to a number of problems with copying music from one account to the other—see How Can I Share My iTunes Store Content with Family Members? for an overview of what might be involved.
- Finally, if two or more people share an iTunes Match or Apple Music subscription, they can turn on iCloud Music Library on their iOS devices (the only iPod that supports this is the iPod touch). Then, they can download exactly what music they want to the device, but they’ll each see all the music in the library on their device. iCloud Music Library does not manage content other than music, however, so the above suggestions still apply for movies, books, and other content.
How Do I Put Music on an Apple Watch?
Although most functions on the Apple Watch require the watch to be in close proximity to the iPhone that it’s paired with, you can copy a single playlist to an Apple Watch from the iPhone and then listen to it using Bluetooth headphones with the watch, even if the iPhone is out of range.
Although you don’t sync music directly from iTunes to the Apple Watch, it’s useful to prepare for this transfer in iTunes.
I suggest that you create a playlist for the Apple Watch in your iTunes library. I’ve done so, naming it, appropriately, Apple Watch. When I want to change the music on my wrist computer, I alter that playlist. You could use any playlist, but you may not have enough music in many of your playlists to satisfy your iPhone-less listening needs.
You sync the playlist from your computer to your iPhone’s Music app—or it will sync automatically if you use iCloud Music Library. You can then copy it to the watch with the Apple Watch app on the iPhone. Open that app and tap Music to see the Music screen (Figure 90).

The Music screen has two playlist-related options, which you can change at any time:
- Synced Music: Tap here to pick a playlist from the Music app, such as the one you’ve set up especially for watch in iTunes.
-
Storage Limit: Tap this option to set how much of the Apple Watch’s 8 GB is used for music:
- Tap Storage to select whether you want your Apple Watch to hold 100 MB, 500 MB, 1 GB, or 2 GB of music. This is an upper limit; if the playlist doesn’t reach that amount, the iPhone won’t add music to fill up the rest of that space.
- Tap Songs to select 15, 50, 125, or 250 songs. Frankly, 15 songs isn’t much; it’s a bit more than the average album. 250 songs gives you plenty of leeway. Since you can alter the contents of your selected playlist in iTunes, I suggest that you pick 250 for now. In the future, if your watch fills with apps competing for space, you can lower the limit.
Be aware that it takes a very long time to sync music to an Apple Watch, and the watch must be connected to a charger to sync. If you wish to sync a lot of music, you should do it overnight.
What about Syncing an Apple TV?
An Apple TV is a sort of media hub for the living room. The first-generation Apple TV, which has a hard disk, can sync with the iTunes library on a computer, and its syncing options in iTunes are similar to those for a video-playing iPod. You can use the information earlier in this chapter to configure iTunes to sync media to a first-generation Apple TV, or you can stream certain types of media to the device. For more information, be sure to read Apple’s iTunes for Mac: Play items in your iTunes library using Apple TV (1st generation) support article.
Subsequent generations of the Apple TV have no user accessible storage; you can’t sync any content to them. Instead, you have several options for transferring iTunes content to them:
-
AirPlay: Stream content from an iOS device or Mac, using AirPlay. This is usually as simple starting to play your music or video and then clicking the AirPlay
 button. (See How Do I Play Media over a Network?, earlier.)
 - Home Sharing: Point the Apple TV to your iTunes library via Home Sharing in Settings > Accounts > Home Sharing (see How Do I Share My iTunes Library over a Network?, earlier).
- iCloud Music Library: If you’ve turned on iCloud Music Library, you can play your music through the Apple TV. On the Apple TV, go to Settings > Apps > Music > iCloud Music Library, and enter your Apple ID and password. You can also use Apple Music on the Apple TV, if you subscribe to that service, and stream music directly from Apple’s servers.
Are There Special Features for Syncing an iPod shuffle?
Apple has added some of the features it first offered with the iPod shuffle to other iPods, such as the capability to compress music files to 128 kbps AAC or to automatically fill empty space with music using the AutoFill option. In general, sync settings for the iPod shuffle are the same as for iOS devices, but you may want to use Autofill to put as much music as you can on the limited storage of your iPod shuffle.
To fill the iPod shuffle’s free space with as much of your library or a playlist as will fit:
- Select the iPod shuffle in the navigation bar.
- Click Music in the Settings section of the sidebar.
- Check “Automatically fill free space with songs.”
- Click Apply. iTunes fills the device.
- When the sync has completed, click Done.