Tag
Tagging media files is the most important thing you can do to take control of your iTunes library. You could add all your music to your iTunes library and play it at random, but without correct tags, you’d never find what you want, and you wouldn’t be able to make smart playlists. To correctly organize your music, tagging is essential.
In this chapter, I’ll show you which tags you can change, how to change them for single and multiple items, and how to streamline tagging so you can easily organize your library. (Note: I mostly discuss music here, but the methods of tagging are the same for all types of files.)
Tag Topics
Where Is Tag Information Stored?
Which Tags Should I Add or Change?
Which Tags Make Classical Music Easier to Manage?
What the Heck Is the Compilation Tag?
How Do I Put Files in the Correct Library?
How Do I Add Lyrics to My Tracks?
How Do I Add Missing Album Art?
How Do I Reset My Plays or Skips?
What Are Tags?
In order for iTunes to keep track of your media files, and for you to know which ones to play, every item in your iTunes library has tags. Tags are metadata—information about the files and their content—that helps iTunes sort tracks and keep albums together, tells iTunes what types of files they are, and more.
At a minimum, for a song, you need a song name, artist, and album name. But you can add other tags: composer, year, genre, track number, disc number, and more. You can also tell iTunes how to play certain items and what types of content they contain (such as whether a video is a movie or TV show), and you can add comments, lyrics, and album artwork.
To see tags for any item, select it and press Command-I. Here’s a list of the main tags for music, audiobooks, videos, and podcasts, and what they commonly contain:
- Song (or Title for non-music files): The name could be a song name, the name of a movement in a symphony, a movie title, an audiobook title, and so on.
- Artist: This is the person or group who recorded the music. For a movie, this tag is Director; for audiobooks, it’s Author.
- Album: The name of the album on which the track appears, the title of an audiobook, or the name of a TV series.
- Album Artist: Say you have a record by U2 with a song featuring Luciano Pavarotti. The artist tag would mention both of these artists, but the Album Artist tag would contain only U2, because the song is on a U2 album. This tag helps you sort music correctly by album, yet list additional artists on specific tracks.
- Composer: The composer of the music, whether a classical composer or a songwriter.
- Grouping: Some music from the iTunes Store—usually classical music—has this tag. For example, an album that has three piano concertos by Mozart will have a single name for the album, but the individual works’ names will be entered in the Grouping tag. You can sort files by grouping in iTunes, and you can use this tag with smart playlists.
-
Genre: You can pick from a number of preset genres, or you can add your own by typing one in this field. I’ve found that the Genre tag is a great way to organize my music. Because it’s easier to look at genres that contain less music, I’ve created plenty of non-standard genres. For example, I have genres for Dylan (Bob Dylan, and his recordings with The Band), Dead (The Grateful Dead, and its members’ solo recordings), Lieder (German art songs), Chamber Music (string quartets, violin sonatas, etc.).
Another way to set up fine-grained genres is to use multiple words, like Classical: Opera, or Blues: Electric. You’ll have all your genres grouped by the first word, with the sub-genre visible after it.
You can also set genres for movies, TV shows, and audiobooks, in order to sort and organize them more efficiently.
- Year: The year the music was recorded, performed, or released, the year a movie was made, or the year a podcast was produced.
- Track Number and Disc Number: These should be self-explanatory.
- BPM: Beats per minute; useful for DJs or others who want to organize music by tempo.
- Comments: You can put anything you want in this field; you may want to enter specific information to help with smart playlists. For example, my Bob Dylan live albums have “live” in the Comments tag, so I can make a smart playlist of Dylan’s live songs. Note that this field holds only 255 characters.
- Compilation: Selecting Album Is a Compilation of Songs by Various Artists tells iTunes to group the song with other songs in the same album that are also tagged as a compilation, even if those songs are by different artists.
- Artwork: You can add art for music, videos, and other content to the Artwork pane. Items purchased from the iTunes Store come with artwork. See What Is Album Art?.
- Lyrics: The Lyrics pane lets you add lyrics to music, and you can view the lyrics when listening with iTunes or with an iOS device. I discuss adding lyrics in How Do I Add Lyrics to My Tracks?.
I’ll discuss other tags later as they apply to specific types of content.
Where Is Tag Information Stored?
Most tag information, including all the tags that identify files, is stored within the files themselves. However, some tag data is stored in your iTunes library file. This file holds copies of all the identifying tags, and it keeps track of what media files you have in your library and which playlists you’ve created. It also contains the Last Played and Plays tags, as well as your ratings. If you move files from one computer to another, tag information stored in your library file won’t transfer with the files.
There are ways to get around this—you could create playlists by Rating to record which files have 5 stars, which have 4 stars, which are Loved, etc. You could set up playlists by Plays as well. But this can be complicated, and, in most cases, you’ll lose some information when you move files to a different computer. This is, of course, a feature, not a bug; your spouse may not share your opinions about (and, therefore, ratings of) the music you swap, nor care about how many times you’ve listened to your favorite songs.
Which Tags Are Important?
At a minimum, your music needs tags for Song, Artist, Album, and, perhaps, Genre. Any music you buy from the iTunes Store comes with these tags, along with many others. Music from the iTunes Store also includes Track Number and Disc Number (if needed) tags. If you rip a CD, iTunes will add the Track Number tag automatically, but for multiple disc sets, you should add the Disc Number tag if it’s not there, to ensure that the discs are organized in the correct order. It’s also important to set the Compilation tag correctly.
Movies usually just need the title tag. TV shows need Show, Season Number, and Episode Number tags to keep them grouped together.
As for other tags, it all depends on how obsessive you are about organizing your content (I’m somewhat tag-obsessive), and whether you want to use specific tags to create smart playlists. I’ll discuss the uses of other tags next, and I’ll explain how to use them for smart playlists in Organize.
Just remember: the more complete your tags are, the more possibilities you’ll have when you create smart playlists.
How Do I Add or Change Tags?
Content from the iTunes Store is tagged, as is most music from online vendors. These tags might not be totally correct, or you may, for various reasons, want to make changes. In addition, if you don’t tag music on a CD before you rip it, you can change the tags later.
Changing tags is easy. Select either one item, such as a music track, or a group of items, and press Command-I to open an “Info” dialog.
If you’ve selected one track, a “single-item” dialog appears; whereas if you’ve selected multiple tracks the “multiple-items” dialog appears (Figure 49). In the case of music, two of the tags in the single-item dialog aren’t available in the multiple-items dialog: Song (you can’t change multiple items to the same song name at the same time) and Lyrics. Aside from that, the same tags are available in each dialog.
These dialogs show different fields for different types of media. So, for TV Shows, you see tags such as Show, Season, and Episode; for Movies, you see Title and Director; and so on. Previously, these tags were available to all files, even if they weren’t applicable.

Moving Quickly in an Info Dialog
To work quickly, press the Tab key to move to the next field or press Shift-Tab to move to the previous field. To change panes, use Command-key shortcuts: the first pane, Details, is Command-1, the second, Artwork, is Command-2, and so on.
And, when the single-item Info dialog is open, you can move to the next or previous track by pressing Command-N or Command-P, or by clicking an arrow ![]() button at the bottom left of the dialog.
button at the bottom left of the dialog.
Using Emoji in iTunes Tags
You know what emoji are, right? You can use those cute characters ? in text messages and on Facebook, in any text on your Mac, and you can even use them in iTunes ♫ tags. You may want to put them in playlist names, to have colorful prefixes ? for your favorites. Or you might want to use some symbols in the tags for album or song names, to make certain tracks ❤️ stand out. On a Mac, press Command-Control-Space to display the Emoji & Symbols picker, and click any character to enter it. ?
Which Tags Should I Add or Change?
The short answer is, “The ones you need.” Here are some scenarios:
- You want to find music when you search in iTunes: Make sure that everything is spelled correctly. Check the spelling of song titles, album names, and artist names.
- You want to browse your library to choose music to play: If you want to view your music by genre, your Genre tags should be consistent; in other words, most of your artists should have all their music in one genre (there are exceptions, of course). If you browse by artist, make sure your Artist tags are complete and spelled correctly, so you don’t have multiple entries for certain artists.
-
You’re into classical music and want to sort by composer: If this is your case, then the Composer tag is for you. Fill it in for all your classical music. Be consistent; if you tag some music with
JohannSebastianBach, don’t tag other music withJ.S.Bach. I preferBach,JohannSebastian, because I find it easier to spot composers by their last names when I’m scanning a list. Every time you add new music to your library, make sure the Composer tag matches a name you’ve used already.
- You have a lot of music by multiple artists: A lot of music these days has multiple artists: as I write this, the iTunes Store top-ten song chart has five songs with a “feat.” artist, or an artist who sings in a song but isn’t the “lead” singer. You’ll want to put the main artist in the Album Artist field; otherwise, your music won’t sort correctly. This is the case not only for popular music, but also for jazz and classical; you may have a lead artist on an album, with specific artists you want to note for different songs or works, such as soloists on jazz recordings or singers in operas.
- You’re a DJ: If your job is to keep the beats going steady throughout the night, you’ll probably want to use the BPM, or beats per minute, tag. Be aware, however, that determining the actual BPM of a song is not easy. This isn’t my bailiwick, but the BPM Detection Web page has links to software that can help.
- You want smart playlists based on the year or decade music was recorded or released: Wouldn’t it be great to make a playlist of everything Miles Davis recorded in 1959? You can do that by filling in the Year tag for all his music. I do that for my Grateful Dead collection, which has lots of live recordings. I can sort their albums by year, and I have smart playlists for each decade, so when I want to hear a great show from the 1970s, it’s easy to find.
- You have movies and TV shows: For movies, you can enter both the title and director. Use the latter if you want to find movies by director. For TV shows, you can enter such items as show name, season, episode, and more. In fact, you must do this, if you want TV show episodes to be organized in iTunes, on an iOS device, and on an Apple TV.
- You have lots of ebooks: If you’re using a Windows PC, you can organize ebooks in different ways. If you display them by author, make sure your Author tags are consistent (for example, don’t have both Emerson, Ralph Waldo and Ralph Waldo Emerson). Use the Genre field to group books by genre. And add Year tags, if you want to be able to see an author’s work in chronological order. (On the Mac, although iTunes used to store ebooks, that function has been taken over by Apple’s iBooks app.)
- You like to shuffle, but don’t want certain tracks to play: On the Options pane is an important tag: Skip When Shuffling. Select this checkbox for any tracks you don’t want to come up when you use Shuffle. I do this for all my classical music, as well as for spoken word recordings. (Although Apple might change this, at the moment, Skip When Shuffling doesn’t work for Genius Shuffle.)
An article I wrote for Macworld, Manage classical music in iTunes 12, has more discussion along these lines. Even if you’re not into classical music, it will give you more tips about tagging complex music. While it’s a bit old, the concepts I discuss are still valid.
Which Tags Make Classical Music Easier to Manage?
Classical music listeners have long struggled to fit their music into iTunes’ limited tag structure. Classical music often has works with movements, rather than albums with songs. While there are plenty of songs in the classical repertoire—such as Schubert’s lieder and Mozart’s opera arias—the majority of classical music doesn’t fit this paradigm.
iTunes 12.5 added new tags for classical music. You can use them with any type of music, but they make sense mostly with classical music.
To use these tags, select a group of tracks that are all part of the same work—a symphony, string quartet, or piano sonata—and press Command-I to open the multiple-item Info dialog. Click Details. Select the “Use work and movement” checkbox. As you can see in Figure 50, some new fields are added.

Enter the appropriate tags for your work, and click OK.
You next need to work with individual tracks to apply movement names. Select a track and press Command-I. The single-item Info dialog now shows the additional fields (Figure 51).

Enter the movement number of the track (1 of 4 in the figure above), and the movement’s name (Emerson in the figure above). Click OK to save this, or click the left or right arrow ![]() button to move to another track in the Info dialog.
button to move to another track in the Info dialog.
When you’re finished applying these tags, the work displays differently in certain views. For example, Figure 52 shows the album I’ve tagged above in Albums view. There are three works on the album, and each work shows its name, followed by the composer’s name, and then the movement names indented below.

Note that this different display also carries over to the iOS Music app, so tracks you’ve tagged this way display in a similar manner, in some views, when you sync them, or when you view them in your iCloud Music Library.
What the Heck Is the Compilation Tag?
Nothing causes more confusion in iTunes than the Compilation tag. Apple changed the terminology in iTunes 12: they now label the checkbox “Album is a compilation of songs by various artists.” You set the tag in the Info dialog (Command-I), in the Details pane. But I’m not sure the change in terminology helps to clarify this tag’s purpose.
The Compilation tag tells iTunes to group tracks with the same album name, even if they are by different artists. In other words, say your album Favorite Covers of Alvin and the Chipmunks Classics has 23 tracks by different artists. If the Compilation tag isn’t set for every track of the album, there will be 23 album listings, one for each artist and album combination. On the other hand, if the Compilation tag is set for a song that’s not part of a compilation, it won’t be listed under its artist, but only under the album name.
You can use the Column Browser to find songs that are tagged as parts of compilations: Choose View > Column Browser > Show Column Browser to display the column browser. Then look in the View > Column Browser submenu. If Group Compilations doesn’t have a checkmark next to it, choose Group Compilations. A Compilations entry appears at the top of the Artists column. Click it to see which albums iTunes considers compilations.
When you set the Compilation tag for files that you rip, iTunes stores them, on your computer, in a Compilations folder, with subfolders for each album name.
It’s worth noting that you can’t have two compilation albums with the same title. iTunes looks at the title, and the state of the Compilations tag, to group these tracks. So if you have two different “Greatest Hits of the 1840s” compilations, they’ll be grouped together.
How Do I Put Files in the Correct Library?
Your iTunes library contains a number of sub-libraries, though I usually call each one just a “library” for simplicity. Each has a menu item in the Media Picker: Music, Movies, TV Shows, Podcasts, iTunes U, Apps, Audiobooks (called Books in Windows), and Tones. (If you don’t see these libraries in the Media Picker, read Customizing the Media Picker.) A Rentals library displays only if an available movie rental is in your iTunes library, and an Internet Radio “library” is available, but it displays a list of radio stations that Apple provides and that you cannot edit.
You can tag a media file so that it appears in a particular sub-library. Press Command-I to display the Info dialog, go to the Options pane, and then use the Media Kind pop-up menu. For example, for an audio file, you can choose Music, Podcast, iTunes U, Audiobook, or Voice Memo. (You cannot change the Media Kind for Apple Music tracks.)
There are six media kinds for videos: Music Video, Movie, Home Video, TV Show, Podcast, and iTunes U. The sidebar in the Movies library has views for Movies and Home Videos. Music Videos are kept in your Music library. Any videos that you import to iTunes—whether you shot them yourself or ripped them from DVDs—get the Media Kind tag set to Home Video by default. If they are DVD rips, you probably want to change the Media Kind to Movie. The files are stored in the same library—Movies—but grouped under different views.
How Do I Add Lyrics to My Tracks?
If a track doesn’t already have lyrics associated with it, you may want to add them. To do this, select the track and press Command-I to open the Get Info dialog. Click the Lyrics button. Click the “Custom Lyrics” checkbox at the bottom of the dialog. You can copy and paste lyrics from a Web site—a quick Google search should turn them up—or you can type them manually.
You can add any kind of text to the Lyrics tag. The field seems to hold an unlimited amount of text, although iPods and iOS devices can display only 24,800 characters. The classical record label Hyperion Records has done interesting things with the Lyrics tag in the digital files they sell; they include full liner notes and sung texts (if any). So if you download, say, a disc of Schubert lieder from Hyperion’s excellent series of the composer’s complete songs, you’ll have texts for each of the songs, as well as copious notes for each album and track.
What Is Album Art?
If you grew up in the LP era, like me, you remember how great it was to look at the more imaginative album covers of the period. When CDs came along, the available space shrank from 12” by 12” to 5” by 5”, making the more detailed artwork on LPs impossible to reproduce. Now, with digital files, we don’t stare at the covers any more, but it’s great to have album art to give a visual reminder of what you’re listening to.
When you buy music from the iTunes Store, you get album art; these 600-by-600 pixel files download with your music. Movies, TV shows, and audiobooks also come with artwork.
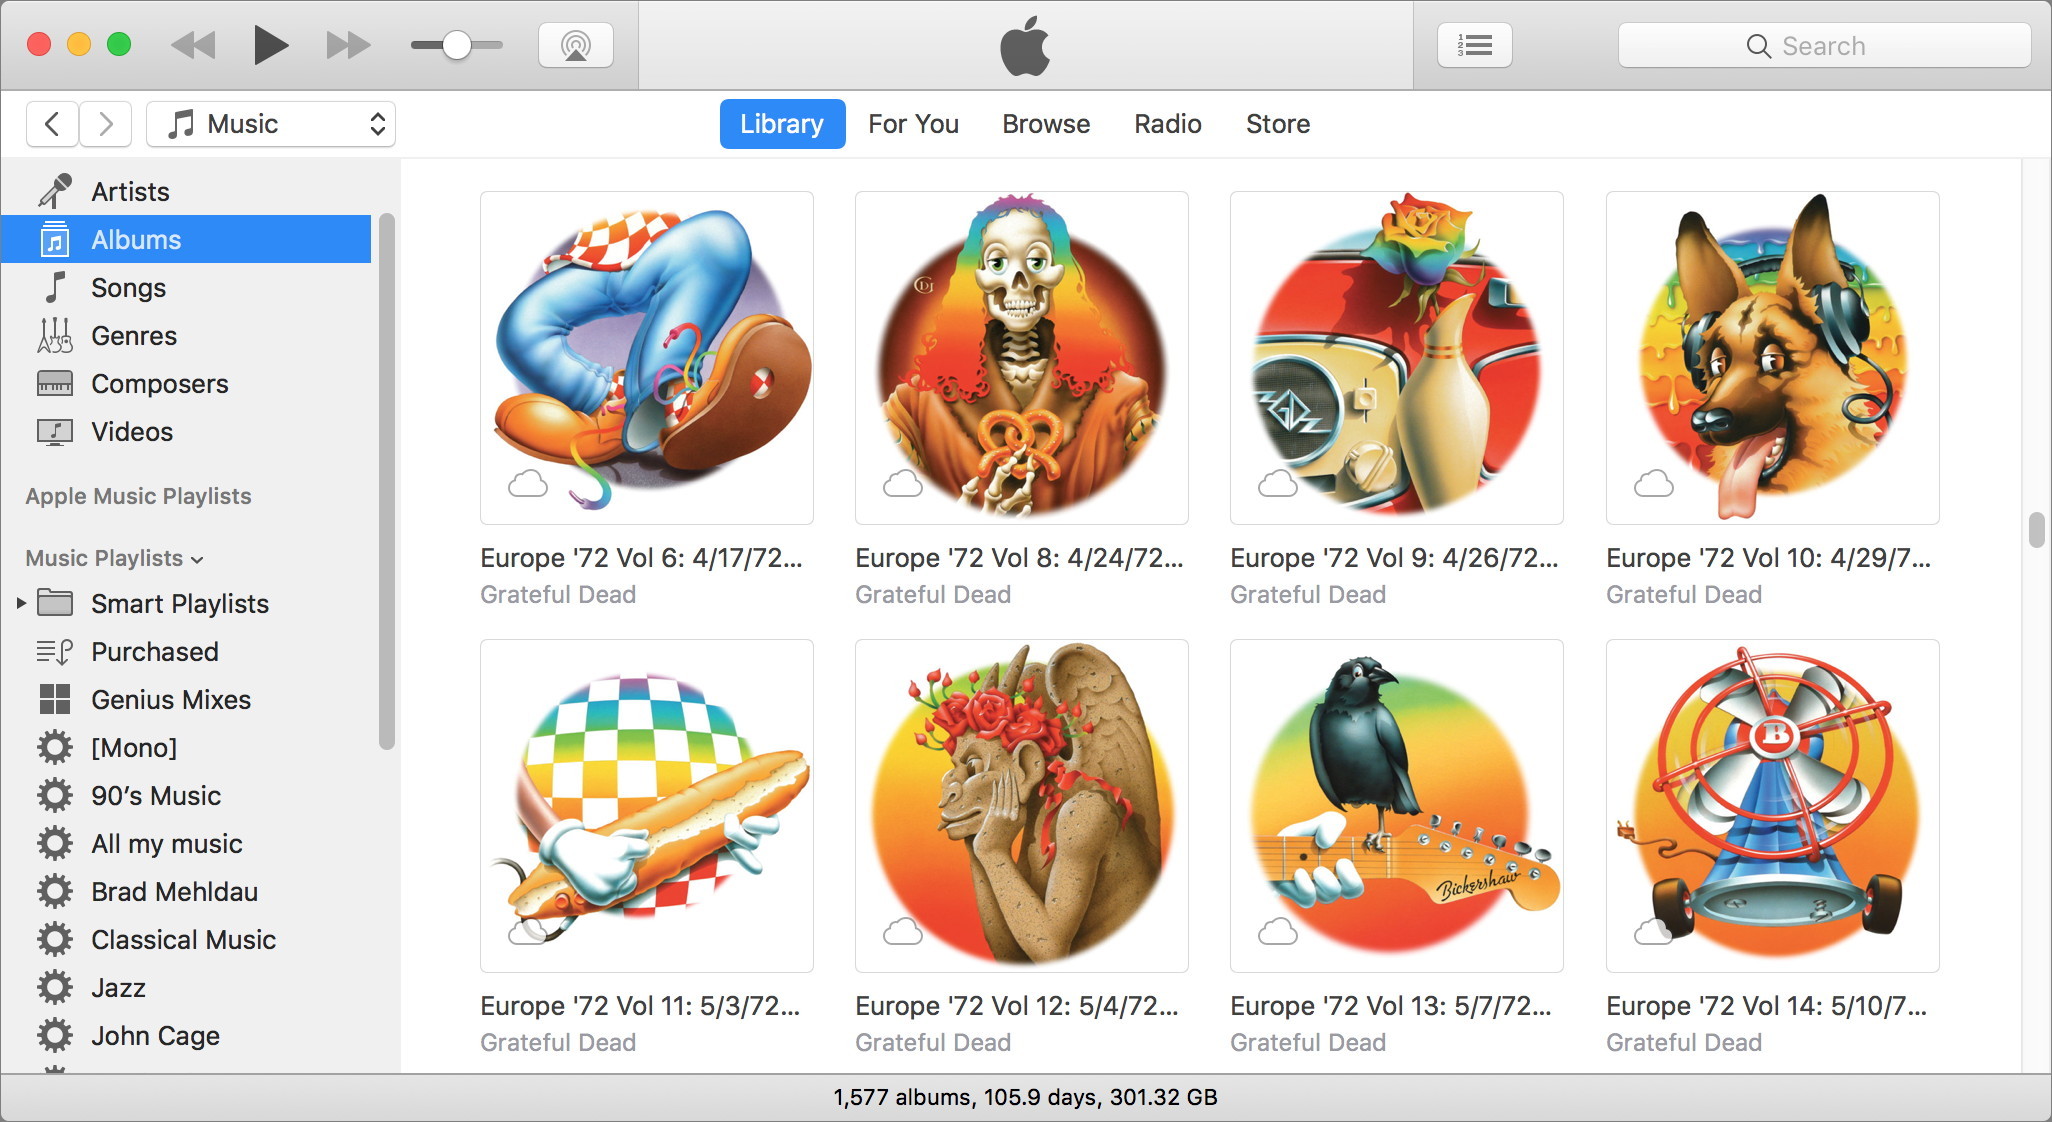
Figure 53 shows album art in Albums view. Album art also displays in Artists view and Genres view, and you can choose to display album art in a column in the austere Songs view. (See the next chapter, View, for more about these views.)
How Do I Add Missing Album Art?
You have two options for adding missing album art. You can either download it from the iTunes Store or you can hunt it down on the Internet and copy it into iTunes.
Adding Album Art from the iTunes Store
If you have an iTunes Store account, you can use iTunes to search in the iTunes Store for missing album art. To do this, switch to any view where you can see an entire album (Albums view, Artists view, etc.), Control-click (right-click) an album’s artwork square, and choose Get Album Artwork. If artwork is found, it is added; if not, you are notified.
If the iTunes Store can’t provide album art, here’s the easiest way to add it:
- Go to Google, and search for the name of an artist or album. Click the Images link above the search results.
Google shows—if you’re lucky, and your album isn’t too rare—a number of hits.
- Choose an image that’s the size you want; I like around 600 by 600, as bigger files can take up too much space, and artwork at this size displays well on my iOS devices. (Album art above a certain size won’t sync to iOS devices; you can read an article about this on my blog, Kirkville.)
- Control-click the image and choose Copy Image, or whatever menu option your browser offers to copy the file.
- In iTunes, select all the tracks of the album you want to add the artwork to and then press Command-I. In the Info dialog, click Artwork and press Command-V to paste the image. Click OK to save the artwork to the tracks. (You can also drag a graphic file into the Artwork pane.)
Making Added Album Art Stick
How you add album artwork will affect where it’s stored:
- When you add artwork manually, as described just above, it’s embedded in the file itself. If you move the file to another computer and add it to an iTunes library, you’ll see the album art.
- When you buy music from the iTunes Store, or download album art from there, it is stored on your disk (stashed away in the
Album Artwork/Download/folder, in your iTunes folder). iTunes finds the album art there to display, but if you move those music files to a different computer, the art will not show up.If you want to prevent the art from potentially becoming separated from the individual files, you need to embed it in all the tracks from an album. To do this, select a track, display the Info dialog (Command-I), click the Artwork button, and copy the art (click it and press Command-C). Next, close the window, select the entire album, press Command-I, and paste the art in the Album Artwork well as described just previously.
How Do I Rate Songs?
While not technically a tag, a rating lets you store information about what you like and don’t like in your iTunes library. You can use ratings to create smart playlists based on your favorite songs, or to find those you like the least and remove them from your library. This information is stored in your iTunes library file, not in the songs themselves, so if you move files to another computer, the ratings get left behind.
You can apply two types of ratings to items in your iTunes library: star ratings and Love/Dislike Ratings.
Star Ratings
Before you can apply a star rating, you need to turn on this feature. Choose iTunes > Preferences > General, and in the Show section, select “Star ratings.”
There are several ways to set star ratings:
- Control-click one or more items, and then choose a number of stars from the Rating submenu. For example, choose five stars for a top song, or choose None to remove an existing rating.
- To set a number of stars for the currently playing tune, hover over the track name in the iTunes LCD (at the top of the iTunes window), click the More
 icon, and then choose a number of stars from the Rating submenu (Figure 54).

Figure 54: You can rate tracks from the iTunes LCD’s More menu. - Use the rating stars, as shown in Artists view in Figure 55. In Genres view, the ratings show in the same place; in Albums view, click an album to enter expanded album view, where you can click to rate items.

Figure 55: iTunes lets you rate both songs and albums, and the different types of stars show which you’ve rated. To see stars on a track that you’ve not yet rated, hover over the track and then click a star—click the leftmost star for a 1-star rating, the next star over for a 2-star rating, and so on.
To remove a rating, click a bit to the left of the leftmost star, or Control-click the track and choose Rating > None.
- You can rate albums as well. In some views, as in Figure 55, above, album rating stars display in the album’s header bar. Click a star to apply a star rating. Hover over a track’s name to see the Love
 button display to its left. If no rating is applied, hover in the header bar to see and click a star (hover where the stars should be, as in the Figure 55, above).
If you rate a song, its rating stars are blue, and the album rating shows an average song rating in gray stars. If you rate an album, but not its songs, all the songs of the album get gray stars showing the album rating. For example, Figure 55, above, the first album shown, American Beauty, the blue color of the stars by each individual song indicates that the songs were rated. The album, however, is not rated, but iTunes displays a computed rating, using the average of the song ratings, in light gray stars. The second album, Workingman’s Dead, has a five-star album rating, but no song ratings, so the album rating has blue stars and the songs have gray stars.
Love/Dislike Ratings
iTunes 12.2 added another type of rating: Loves. And iTunes 12.5 added Dislike ratings. The Love ![]() button lets you set a binary rating for any track, album, movie, book, and so on. If you click it, you love it; if you don’t click it, you either don’t love it or haven’t yet made up your mind.
button lets you set a binary rating for any track, album, movie, book, and so on. If you click it, you love it; if you don’t click it, you either don’t love it or haven’t yet made up your mind.
Unlike star ratings, Apple Music takes your Loves and Dislikes into account when it makes music recommendations. You can, of course, dislike music that you own, but unless you care about seeing which songs you hate the most, there’s not much use to this. However, you can access Love and Dislike ratings on iOS devices, so you may want to use both when rating your music, then refine these ratings later with stars in iTunes.
You can set Love and Dislike ratings in many ways, including:
- Control-click one or more items, and then choose Love or Dislike.
- Click the More
 icon in the iTunes LCD when a track is playing, or next to a track, album name, or playlist, then choose Love or Dislike.
 - Hover over a track, and then click the Love button that appears to the left of the track number in certain views (Artists, Albums, Genres, Composers) (Figure 56).

Figure 56: Hover over a track name to display the Love button to its left. - In Songs view, you can display a Love column (see The View Options Window to learn how to display this column). For an unloved track that you want to love, hover over the track to see a Love button in the Love column and click the button. Curiously, there is no Dislike column.
- To rate something on an iOS device, tap the Now Playing controller bar. Tap the More
 icon, and then tap the Love
  button.
You can use both star ratings and Love/Dislike ratings, if you wish. This combination allows you to have very granular ratings: those tracks that you really, really love, perhaps, and others that you rate with stars.
What Are Plays and Skips?
Plays are the number of times that you’ve listened to an audio track or watched a video. iTunes increments this number automatically, whether you listen to it on your computer with iTunes, or on an iOS device. Plays change when you’ve finished listening to an entire track, or when you start listening to another track within 10 seconds of the end of the current track. If you use iTunes Match or Apple Music, plays increment each time a track is played on any device that uses iCloud Music Library.
Skips are how many times you’ve skipped a track, by clicking or pressing the Next button, either in iTunes or on an iOS device, after it has played for at least 2 seconds.
You can use Plays and Skips as conditions for smart playlists; common uses are smart playlists that collect songs with zero plays, songs you haven’t listened to, and favorites—those with the most plays.
How Do I Reset My Plays or Skips?
You can reset Plays easily from a contextual menu. Control-click one or more items, and choose Reset Plays. You can also reset plays for a single track in the Info dialog; press Command-I to display the Info dialog, and then click the Reset button to the right of Play Count. However, there is no way to reset Skips from the iTunes interface.
Mac users can easily reset these counts for multiple items with these AppleScripts from Doug Adams:
Select one or more tracks, and then run one of these scripts. If you want to, say, reset skips, and you’ve selected tracks with different skip counts, choose a number higher than the largest number of skips. For example, if you select ten tracks, and the skips range from 1 to 15, subtract 16, and they’ll all be set to zero. With both scripts, if the resulting number is zero, then the Last Played Date or Last Skipped Date will be erased.