Play
Music is made for listening, and iTunes handles this task well. Shuffle and Genius help you enjoy music in different ways, and with Up Next you can queue your music for a listening session.
You can play your media through other devices, and even control iTunes with Apple’s iTunes Remote app on an iOS device or an Apple Watch.
The last two topics in this chapter look playing audiobooks and videos.
Play Topics
How Do I Play a CD? | Do I Have to Play Music in Order?
How Do I Shuffle My Music? | Can I Shuffle Albums?
How Do I Sing Along with My Music?
Can My Mac Tell Me What I’m Hearing?
What Is Genius? | How Do I Turn On Genius? | How Do I Create a Genius Playlist? | How Do I Play Genius Mixes? | What Is Genius Shuffle?
How Do I Replay a Recent Song?
How Do I Make My Music Sound Better?
How Do I Play Media over a Network?
How Do I Control iTunes Remotely?
How Do I Display Eye Candy While Listening to Music?
Is There Anything Special to Know about Listening to Audiobooks?
How Do I Watch Videos in iTunes?
How Do I Start Playing Music?
Playing media in iTunes is a lot like using a CD player (remember those?). Select the album, playlist, disc, or track that you want to hear and then click the Play ![]() button near the left of the toolbar (or any handy Play button; you may see more than one). The Play button in the toolbar becomes a Pause
button near the left of the toolbar (or any handy Play button; you may see more than one). The Play button in the toolbar becomes a Pause ![]() button that you can click to stop playing.
button that you can click to stop playing.
To skip ahead one track, click the Next ![]() button; to skip back, click the Previous
button; to skip back, click the Previous ![]() button. To scrub (skip) ahead or back within a track, press and hold one of these buttons or drag the playhead in the iTunes LCD, the status display at the top-center of the iTunes window, in the toolbar. And to change the volume, just drag the volume slider in the toolbar.
button. To scrub (skip) ahead or back within a track, press and hold one of these buttons or drag the playhead in the iTunes LCD, the status display at the top-center of the iTunes window, in the toolbar. And to change the volume, just drag the volume slider in the toolbar.
Your iTunes library may contain a combination of tracks stored locally and in the cloud. If iTunes reaches a song in the cloud, it will stream the song; depending on your bandwidth, there may be a brief lag as iTunes starts pulling down the file.
How Do I Play an Album?
Generally, you start playing an album by clicking a Play ![]() button somewhere in the iTunes window. If you’re viewing an album that’s in your library, there are no play buttons to be seen, except on the toolbar. To see another Play button, hover over the album art or a track. Or, double-click a track to start listening to it.
button somewhere in the iTunes window. If you’re viewing an album that’s in your library, there are no play buttons to be seen, except on the toolbar. To see another Play button, hover over the album art or a track. Or, double-click a track to start listening to it.
When you view an album in Apple Music, clicking the Play ![]() button in the iTunes toolbar does nothing (surely Apple will fix this bug soon). To play an album in Apple Music, hover over the album artwork to display a big blue Play
button in the iTunes toolbar does nothing (surely Apple will fix this bug soon). To play an album in Apple Music, hover over the album artwork to display a big blue Play ![]() button (Figure 2) and click it, or hover over the first track and click the Play
button (Figure 2) and click it, or hover over the first track and click the Play ![]() button that displays to the left of it, or double-click the first track of the album.
button that displays to the left of it, or double-click the first track of the album.

How Do I Play a Playlist?
As with albums, you may find that the Play button on the toolbar doesn’t work and that there is no other Play button visible. To play a playlist—whether it’s on Apple Music or in your local library—you have two options: double-click the first track, or hover over the playlist’s artwork to see a Play button.
At the time of this writing, hovering over playlist artwork for a locally stored playlist does not display a Play ![]() button, but for Apple Music it does.
button, but for Apple Music it does.
How Do I Play a CD?
If you still listen to CDs, you can use iTunes to play them through your computer, which may be connected to speakers or even a stereo system.
Launch iTunes, and then slide a CD into your computer—if it has an optical drive; if not, you’ll need an external CD/DVD drive. With a default setup, after a few seconds, iTunes displays the contents of the CD (Figure 4). (If not, click the CD icon in the navigation bar.)

To start playing the disc, click the Play ![]() button in the iTunes toolbar or double-click the first track.
button in the iTunes toolbar or double-click the first track.
To specify what iTunes does when you insert a CD in your drive, choose iTunes > Preferences > General. Near the bottom of the General pane, the “When a CD is inserted” pop-up menu has five options:
- Show CD: The CD appears in the iTunes window with its track names, if possible (Figure 4, above). The track names appear if the “Automatically retrieve CD track names from Internet” box just below this pop-up menu is selected, and if the CD can be identified and is in the Gracenote CDDB database. (This requires that you have an active Internet connection, but if you’ve previously played the CD on the same computer, iTunes may have stored its track information.)
- Play CD: This does what you’d expect.
- Ask to Import CD: A dialog asks if you want to Rip the CD.
- Import CD: iTunes starts ripping right away.
- Import CD and Eject: If you plan to rip a lot of CDs, this option makes it easier to rip them sequentially with little intervention.
Do I Have to Play Music in Order?
Of course not. You have several options: you can shuffle (play in a random order), repeat (loop and continue playing until you tire of it), or even choose which tracks you want to play:
-
Shuffle: When you are playing a CD, album, playlist, or some other grouping of music, a Shuffle
 button appears at the left of the progress bar in the iTunes LCD in the toolbar. To shuffle tracks (play them in a random order), just click this button; the button changes
  to show that Shuffle mode is active. The track order shown in iTunes won’t change, but if you click the Next
  button, iTunes jumps to a different track at random. To turn off Shuffle, click the Shuffle button again.
 -
Repeat tracks: Click the Repeat
 button in the iTunes LCD to loop your music until your battery runs out or you stop playback. Choose Controls > Repeat and choose All to repeat the entire album or playlist when it’s finished or choose One to play the current song over and over, until you simply have to turn it off.
 - Play only selected tracks: If there are certain tracks that you don’t want to listen to and you’re in a list view (such as Songs View), click the checkboxes next to them to uncheck them. iTunes plays only checked tracks. If you don’t see checkboxes, Control-click the track(s) that you don’t want to play and choose Uncheck Selection. (This works only if you’ve selected the “List view checkboxes” box in iTunes’ General preferences.)
- Program your CD: As with a CD player, you can “program” tracks, choosing their play order. To do this, drag a track to the position you want. (The CD must be sorted by track order; if it is, the leftmost column header above the track numbers, which contains no text, will display a caret (^) pointing up. If you don’t see this, click the header, and click again if the caret points down.)
How Do I Shuffle My Music?
Sometimes, you don’t know what music you want to hear. It’s good to be able to play music at random, either enjoying the serendipity of Shuffle mode or waiting to find a song that grabs you and then playing its album. You can play all the songs in your iTunes library in random order or you can limit the shuffle to just an album or playlist:
-
Shuffle your entire music library: Choose Music in the Media Picker, start playing any song, and then click the Shuffle button in the iTunes LCD, at the top of the window. The button changes to indicate that Shuffle is on.
-
Mix up songs in a playlist, album, artist, or genre: Click the Shuffle button in the header for that list, album, or other group, and then click the adjacent Play
 button.
When you play music in Shuffle mode, iTunes jumps around in the list of songs to be played, but leaves the songs displayed in their original order. You can see the play order in the Up Next list, which I describe in How Do I Use Up Next?.
To turn off Shuffle while the music is playing, click the highlighted Shuffle ![]() button in the iTunes LCD. Playback continues from its current position in the order you see in iTunes.
button in the iTunes LCD. Playback continues from its current position in the order you see in iTunes.
Can I Shuffle Albums?
Wouldn’t it be great to tell iTunes to play a random album? iTunes can do this, but not very well. To shuffle by album, choose Controls > Shuffle and then pick Albums in the bottom section of the submenu. In the top section of that submenu, make sure to choose On, or click the Shuffle ![]() button in the iTunes LCD (if there’s already music playing; if not, that button won’t be visible).
button in the iTunes LCD (if there’s already music playing; if not, that button won’t be visible).
Next, click the Play ![]() button to start playing music. When iTunes reaches the end of the album, it plays another, randomly-selected album. If you don’t like this album, though, you’ll have to skip through all the tracks to start another one.
button to start playing music. When iTunes reaches the end of the album, it plays another, randomly-selected album. If you don’t like this album, though, you’ll have to skip through all the tracks to start another one.
There are some AppleScripts that do this better, allowing you to easily choose a different album if the one iTunes proposes doesn’t match your mood. (I discuss AppleScript at the end of this book, in Bonus: Extend iTunes with AppleScripts.) Doug Adams, who creates and curates a collection of AppleScripts for iTunes, offers two scripts designed to play random albums:
- Play Random Album picks an album from your Music library, adds it to a Some Random Album playlist, and starts playing it. You can listen to this album, or run the script again to choose another one.
- Random Full Albums to Playlist takes a number as input (such as 5) and then randomly picks that number of albums to add to a Some Random Albums playlist. You can play them all, delete some and play the rest, or run the script again to get another aleatory selection.
How Do I Use the MiniPlayer?
To focus on listening, you can view the MiniPlayer, which provides playback controls, album art, and little else (Figure 6).

To open the MiniPlayer:
- With audio playing, click the album artwork in the iTunes LCD, at the top of the window (if the audio you’re playing doesn’t have album artwork, you’ll see just a square with two musical notes). Clicking the album artwork opens the MiniPlayer and hides the main iTunes window; Option-clicking the artwork displays the MiniPlayer above the iTunes window.
- Choose Window > Switch to MiniPlayer. This closes the main iTunes window.
- Choose Window > MiniPlayer. This lets you also keep the iTunes window open while you view the MiniPlayer.
To change the size of the MiniPlayer, drag either vertical edge; both the maximum and minimum sizes of this window are limited.
To see more controls in the MiniPlayer, including basic playback controls, hover your pointer over it.
Other MiniPlayer options are these:
-
Contextual menu: Click the More
 icon to love the current track, rate it with stars, add it to Up Next, start an Apple Music Radio station from it, and much more.
 -
Volume: Click the Speaker
 button and make your adjustment. If you’re streaming your music using AirPlay, the Speaker button changes to an AirPlay
  button; click this button to access a volume slider and to choose a different AirPlay target.
 -
Search: Click the Search
 button to display a search field, and then search for any music in your iTunes library by song name, album name, artist, or playlist. You can then start playing music by double-clicking an item in the list, or you can add music to Up Next from the list.
 -
Up Next: Click the Up Next
 button to view or change what’s in your play queue (see How Do I Use Up Next?). Click the button again or press the Escape key to close the Up Next list.
 - Time info: At the bottom of the MiniPlayer is a progress bar. A time display at its right shows the elapsed time of the current track. If you click the time display, you can switch between the track’s elapsed time, remaining time, and total time.
-
Switch to the iTunes window: Click the Close
 button.
 -
Switch to/from the larger Artwork MiniPlayer: Click the expand
 button or the artwork. The width of this window matches the width of the MiniPlayer, to a maximum of 400 pixels on a standard display and 800 pixels on a Retina display. You can resize this window by dragging from any edge, so you can make it tiny.
When you hover over the Artwork MiniPlayer, you reveal, as in Figure 7, playback and window controls.

How Do I Sing Along with My Music?
Prior to iTunes 12.5, you could add lyrics to iTunes manually by pasting them into the Lyrics pane of the Info dialog (see How Do I Add Lyrics to My Tracks?). You could view them later in that same pane. Those features remain available, but iTunes 12.5 improves the experience significantly by displaying the lyrics of the currently playing track in the Up Next popover. And, if you have an Apple Music subscription, iTunes will even automatically download lyrics for many of your songs.
To view lyrics while music is playing, click the Up Next ![]() button, either to the right of the iTunes LCD or on the MiniPlayer, and then click Lyrics (Figure 8). (If lyrics aren’t available for a song, you’ll see “No Lyrics Available” in the popover.)
button, either to the right of the iTunes LCD or on the MiniPlayer, and then click Lyrics (Figure 8). (If lyrics aren’t available for a song, you’ll see “No Lyrics Available” in the popover.)

Can My Mac Tell Me What I’m Hearing?
iTunes hooks into Notification Center in 10.8 Mountain Lion and later, so when a new song begins playing, iTunes can send a notification in the form of a banner or an alert (Figure 9). These notifications display only if iTunes is not the frontmost application.

Instead of receiving a banner or alert (or in addition to receiving one), you can collect these notifications in Notification Center. Click the Notification Center ![]() icon at the far right of the menu bar to open Notification Center.
icon at the far right of the menu bar to open Notification Center.
To configure your iTunes notifications, choose iTunes > Preferences > General. In the Notifications section, you see two options (Figure 10). To display a banner or alert notification when a song starts playing, select the first checkbox, “When song changes.” To keep a list of recently begun songs in Notification Center, select the second box.

To refine these notifications, go to System Preferences > Notifications (to open System Preferences, click its icon on your Dock or choose it from the Apple menu at the upper left of your screen).
On the Notifications pane, select iTunes in the left-hand list to view its notifications settings on the right:
- If you’ve selected “When song changes,” click an “iTunes alert style” icon to pick a banner or an alert.
- If you’ve selected “Keep all song changes…”, select “Show in Notification Center” to make those changes appear in Notification Center. The notifications will remain in Notification Center until you clear them.
To view the songs in Notification Center, click the Notification Center ![]() icon in the menu bar, at the far right (or swipe left with two fingers from the right edge of your trackpad). The songs appear in the Notifications view.
icon in the menu bar, at the far right (or swipe left with two fingers from the right edge of your trackpad). The songs appear in the Notifications view.
What Is Genius?
Genius takes much of the effort out of deciding what to listen to. Don’t want to spend time creating a custom playlist? Just pick one song and make a Genius playlist from it. Or, pick a preset Genius mix, based on the genres of music in your iTunes library. Or, don’t think at all and let chance dictate your listening: start Genius shuffle and iTunes picks the songs for you.
These features are great, but although Apple has not said so in any support document, at this time, some Genius playlists and suggestions do not work with Apple Music, though Genius Mixes and Genius Shuffle do. Apple Music subscribers can approximate these features with Apple Music Radio (see How Do I Listen to Apple Music Radio?), but these radio stations build playlists from the entire Apple Music catalog, not just the music in your library.
Apple claims that Genius “searches your iTunes library to find songs that go great together” and uses this information to create on-the-fly playlists (Genius playlists and Genius shuffle playlist) or static playlists (Genius Mixes).
To use any of these Genius features, you must have an iTunes Store account. If you don’t have an account, you can create one when you turn on Genius. When you turn on Genius, iTunes sends information about your library to Apple. It compares your library with other users’ music libraries, and it finds similarities in order to propose playlists.
How Do I Turn On Genius?
To turn on Genius, choose File > Library > Turn On Genius. If it wasn’t there already, iTunes displays and selects the Genius icon in the sidebar. In the main iTunes pane, click Turn On Genius and follow the prompts. iTunes examines your library and sends information to Apple. After a few minutes, or longer for a large library, Apple sends back information, which is stored in certain files in your iTunes folder.
When Genius is set up, a message appears saying that it has been turned on successfully and a Genius Mixes entry appears in the sidebar (Figure 12).

iTunes automatically updates Genius once a week, but if you add a lot of music to iTunes, you might want to update Genius manually. You can do this by choosing File > Library > Update Genius.
If you tire of Genius, turn it off by choosing File > Library > Turn Off Genius.
How Do I Create a Genius Playlist?
If you’re not using Apple Music (at this time, anyway), you can create a Genius playlist based on any song or track in your iTunes Music library.
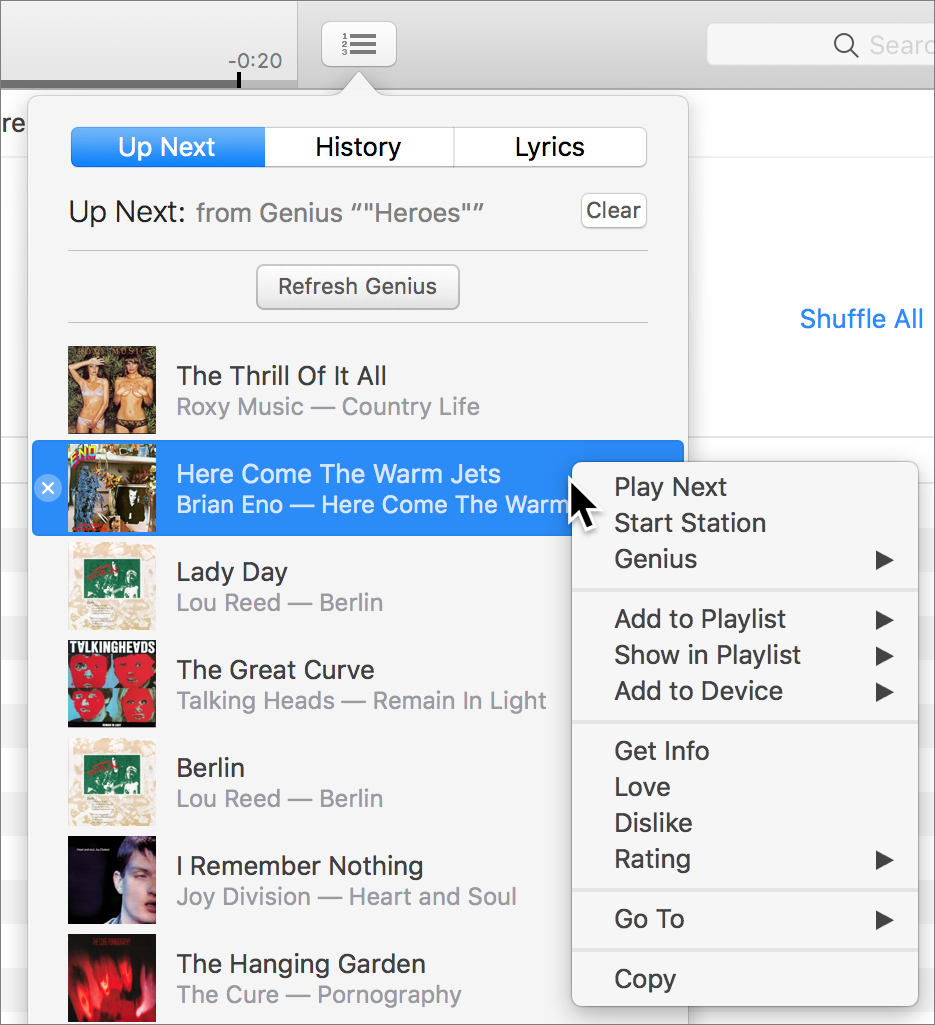
Say you’ve got an itch to listen to David Bowie. You love the “Heroes” album, and you’d like to hear the title track and some other songs that “sound great together” with it. Select that song and choose File > New > Genius Playlist. iTunes creates a new playlist having the name of the song (or album) you used as the germ for the playlist, fills it with 25 related songs, and then shows you that playlist (Figure 13).

You can change the Genius playlist:
- Change the length: At the left of the list’s header, you can choose 50, 75, or 100 songs from the pop-up menu that defaults to “25 songs” for a new playlist.
- Get a new set of songs: At the far right of the list’s header, click the Refresh button—this rebuilds the playlist with other songs that go with the “Based on” song.
- Remove songs: Select a song that you’re not in the mood to hear, and press the Delete key (this doesn’t delete it from your library).
You can sync the Genius playlist to your iOS device. If you change it in iTunes—for example by removing songs or adding songs—subsequent syncs will make the same changes on your iOS device.
To delete a Genius playlist, select it in the Playlists sidebar and press Delete. iTunes deletes the playlist, but not the tunes it contains.
How Do I Play Genius Mixes?
When you turn on Genius and iTunes processes your library’s contents, it creates several Genius Mixes, depending on the music in your library (as few as zero mixes if your library is too small and Genius can’t find enough songs that go together, or as many as a dozen). These mixes are static; unlike Genius playlists, you can’t refresh them to get a new song list or remove songs that you don’t want. You can’t even see what they contain.
To play one of these, click Genius Mixes in the sidebar. iTunes displays the Genius Mixes that it has generated from your music library. Hover over a Genius Mix icon to see the names of some of the artists that it contains and a Play button (Figure 14). Click the Play ![]() button to start playing. You can then control playback using the Previous
button to start playing. You can then control playback using the Previous ![]() , Pause
, Pause ![]() , and Next
, and Next ![]() buttons in the toolbar. You can also view the upcoming songs—and edit the playlist—in Up Next.
buttons in the toolbar. You can also view the upcoming songs—and edit the playlist—in Up Next.

The problem with Genius Mixes is that you have no sway over which songs are used to create them, or even which styles of music. iTunes creates Genius Mixes based on the music in your library, and you can’t say which mixes you don’t like. For example, I’d never listen to classical music in a Genius Mix, and I’d love to have, say, a Genius mix for my electronica music, but there isn’t one.
To remove a Genius Mix, Control-click its icon and choose Remove “name of Genius Mix.” But that leaves a blank space. To restore all your genius mixes, Control-click one of them and choose Restore All Mixes.
What Is Genius Shuffle?
Genius Shuffle is a way of creating on-the-fly Genius playlists from random songs. For example, I started Genius Shuffle once, and it played a bunch of songs by the Grateful Dead, Bob Dylan, Hot Tuna, and others; these are all artists whose music goes together. The next time, I got a playlist of my jazz artists. Another time, I got a playlist of artists like David Bowie, Kate Bush, and Peter Gabriel. Genius Shuffle changes each time you restart it.
Genius Shuffle is different from the general Shuffle feature. With the Shuffle feature, you can, for example, shuffle your entire music library (see How Do I Shuffle My Music?, earlier). But Genius Shuffle doesn’t shuffle your entire library; it uses the Genius feature to play songs that “go great together” (see What Is Genius?, earlier).
Genius Shuffle picks a track at random, then creates a Genius playlist from that track. It probably aims for a higher-rated track as a seed track, and it probably takes into account the number of times you’ve listened to a track, whether you’ve rated it, and even how recently you’ve played it, but Apple has not shared any information about how it works.
To activate Genius Shuffle, choose Controls > Genius Shuffle (Option-Space). iTunes begins playing the first song in the new shuffle list and the Previous button on the toolbar changes into a Genius ![]() button (Figure 15).
button (Figure 15).

If you don’t like what comes up, just click the Genius button or press Option-Space again… and again, if necessary, until your mood and your iTunes picks are in sync.
To see what’s coming in your Genius Shuffle list, click the Up Next ![]() button to the right of the iTunes LCD (Figure 16). You can re-order or delete songs from the queue (see How Do I Use Up Next?).
button to the right of the iTunes LCD (Figure 16). You can re-order or delete songs from the queue (see How Do I Use Up Next?).

The Previous button will return to the toolbar when you stop playing the Genius Shuffle list and start playing something else.
How Do I Replay a Recent Song?
iTunes has a Play Recent submenu nestled in its Controls menu. It shows the last ten items you’ve played, whether they are songs, movies, TV shows, podcasts, or audiobooks. These items are displayed with the names of their playlists, if you listened to them from a playlist. To play an item, choose it from the menu.
Why would you want to play a recent item? If you’ve been jumping around in iTunes, you may have stopped playing something but are no longer in the right location to start playing it again. For example, you might start playing a playlist, go to the Store, play a preview of a song, and then want to return to what you were listening to before.
How Do I Use Up Next?
Up Next lets you queue songs and music videos in a playlist. You can add individual songs or entire albums and move tracks around or remove them as your listening session progresses. You can even use Apple’s iTunes Remote app on an iOS device, or Apple Watch, to manage the Up Next queue.
The Song Queue and Up Next
In iTunes, whenever you play any music—unless you are playing a playlist or CD that contains just one track—there is a song queue. It may be all the songs of an album, all the songs of a playlist, or all the tracks in your library. You can see the song queue at any time by clicking the Up Next ![]() button on the toolbar at right of the iTunes LCD, or at the right of the MiniPlayer (Figure 17).
button on the toolbar at right of the iTunes LCD, or at the right of the MiniPlayer (Figure 17).

Adding Items to Up Next
You can add music tracks or music videos from any view of your Music library to Up Next. You can also add music from Apple Music or a shared library. Unfortunately, you can’t add podcasts or audiobooks, at least not audiobooks that are in your Audiobooks library (Books library in Windows). You can add audiobooks from your Music library, if you have any there.
There are several ways to add items to your Up Next queue:
- Drag and drop: Select one or more items—tracks, albums, playlists, or entire artists or genres—and drop them on the iTunes LCD, at the top of the window. A flash of album artwork over the Up Next button indicates that iTunes has registered the drop.
-
More icon: Hover over a track, click the More icon (if it appears), and choose Play Next or Play Later (Figure 18).

Figure 18: Add a track to Up Next by choosing Play Next. If you choose Play Next, iTunes adds the tune to the top of the Up Next list and plays the tune immediately after the currently playing track ends. Or, if you choose Play Later, iTunes adds the track to the end of the Up Next queue.
- Contextual menu: Control-click (right-click) an item, and then choose Play Next or Play Later as described earlier in this list.
-
Option-click: Hold down the Option key and hover over a track. A small Add to Up Next
 icon appears to the left of the track name. Click this icon to add the item to the end of the Up Next queue.
 - Option-Return: If you select a track and press Option-Return, iTunes displays a dialog asking what you want to do (Figure 19). Click Clear Songs to remove songs you’ve added to the Up Next list and play the selected song next. Click Play Song keep the songs you’ve added to the list and play the selected song next.
Viewing and Editing Your Up Next Queue
Once you’ve added a bunch of songs to your Up Next queue, you may want to re-order the queue, perhaps to make a favorite song play sooner. Fortunately, the queue is designed to be altered as you go.
To view the Up Next queue (Figure 20), click the Up Next ![]() button in either the toolbar or the MiniPlayer. Or, press Command-Option-U to toggle it open and closed.
button in either the toolbar or the MiniPlayer. Or, press Command-Option-U to toggle it open and closed.
You can see only 20 tracks in the Up Next queue, but if you’ve added more—or if you’ve started playing an album or playlist that contains more—they’ll be in the queue, but not visible. As tracks play, or as you delete tracks, new ones appear at the bottom of the queue. (You may have to scroll to see all 20.)
Here’s how to edit your Up Next queue:
-
Move an item: Drag it in the list. Or, to promote a track to the top of the list, hover over it to show the More icon to its right and choose Play Next. (You can’t re-order Apple Music For You playlists in this way, unless you’ve added them to your library.)
-
Delete an item: Hover over the item to reveal a Close
 button on the left, as you can see next to the second track in Figure 20, above. Click the icon. Or, arrow up or down in the queue to select a track that you want to remove from the queue (but not from iTunes) and then press the Delete key.
 - Delete several items: To delete tracks from the queue, first select them. To select tracks that are next to each other, click the first track and then Shift-click the last track; to select non-contiguous tracks, click a track and then Command-click the other tracks. Next, press the Delete key to remove the selected tracks from the queue.
- Delete the entire queue: Click the Clear button, located near the upper right of the list. If you also want to clear the currently playing track, click the Clear button again or press Command-period.
-
Replay a tune: Click History at the top of the Up Next popover to view the Previously Played list. Hover over a song, click the More icon (at the right), and choose Play Next or Play Later. Or, hover over the song and click the Add to Up Next icon (at the left) to add the song to the end of the queue. Click the Up Next button to return to the Up Next queue.
You can also rate any track in the Up Next list; click the More ![]() icon to display the contextual menu for a track and rate it with stars (use the Rating sub-menu), or you can Love or Dislike it. I discuss rating music in How Do I Rate Songs?.
icon to display the contextual menu for a track and rate it with stars (use the Rating sub-menu), or you can Love or Dislike it. I discuss rating music in How Do I Rate Songs?.
How Do I Make My Music Sound Better?
iTunes wouldn’t be complete without playback settings that can change the way it plays music, or adjust the way the music sounds:
- Segue songs: The Crossfade Songs setting, like most of the others in this topic, is found in the iTunes Playback preferences. If you turn this setting on by checking its box, iTunes segues songs by playing the beginning of one over the end of another. You can adjust the amount of time the crossfade lasts by dragging the slider, from 1 to 12 seconds. This can work well with some music, but if you have songs that have a few seconds of silence at the beginning or end, the crossfade will happen during silence, and you won’t really notice it. Also, Crossfade Songs does not segue tracks within an album when you play them in album order.
-
Enhance sound (or not): There’s a “Sound Enhancer” setting with a slider that goes from low to high in the Playback preferences. Apple describes Sound Enhancer as, “an Apple-developed digital sound processing technology introduced in iTunes 2 that adds additional life and richness to audio playback, improving the listening experience with headphones and with external speakers.” (Yes, Sound Enhancer has been around for a long time—the 2 in the previous sentence is not a typo.)
Sound Enhancer adds a sort of faux-3D effect to the music. You may or may not like this, depending on the type of equipment you use to listen to your music.
-
Normalize volume: The Sound Check feature can be useful. It normalizes the volume of music during playback. When you turn it on in the Playback preferences, iTunes applies a positive or negative adjustment to songs, based on their average volume, so they can match a baseline volume during playback, thus saving you from needing to frequently change the volume. That’s the theory. In practice, though, it doesn’t always work.
Say you have a song such as Led Zeppelin’s “Stairway to Heaven,” which begins with an acoustic guitar and vocals and ends with a raucous electric guitar. No matter what the average volume of this song is, the beginning or the end are at a different volumes. This common discrepancy is especially problematic with classical music, where the average volume of a symphonic movement may be high or low depending on whether it is pastoral or tumultuous, but when it flows to the next movement, you might notice too much of a difference in loudness.
However, Sound Check can work well with pop, rock, dance, electronic, or hip-hop music, where recorded volumes vary, but where the individual songs are relatively uniform in volume. It’s most useful when you listen to a selection of music spanning several decades. In recent years, the overall volume of recordings has increased, so if you play a recent pop tune then, say, a Beatles song, there will be an obvious difference in volume. (I wrote more about this in my Macworld article Adjust the volume of iTunes and iPod tracks.)
-
Equalize your music: Audio buffs are familiar with graphic equalizers, devices that change the relative volume of different frequency ranges of music. While one should never have to do this if music is engineered correctly, if you’re listening on a good stereo, differences in hardware, rooms, or your ears, may lead you to want to increase the bass or treble, or heighten the midranges and lower the extremes. You can make detailed adjustments to music playback with an equalizer, and the digital equalizer in iTunes—available by choosing Window > Equalizer—reproduces these features. Use the pop-up menu to choose presets for different types of music or speakers and to make a preset of your own settings.
I’ve found that while the equalizer does alter the bass or treble a bit, in many cases it also distorts music. If you don’t like the way your music sounds, especially if you have small speakers or cheap headphones, give it a try, but don’t expect miracles.
-
Get better equipment: Your music sounds only as good as the equipment you play it on. If you’re listening on an iMac’s internal speakers, for example, you might want to get external speakers. Or, for especially good sound, you should run your audio through a stereo system. Some computer speakers sound good, but none sound as good as a real stereo amplifier and decent bookshelf speakers.
I added a DAC (digital-to-analog converter) to my office stereo a few years ago. It runs between my Mac and my amplifier, and converts the digital data from my Mac to analog data which it then pipes into the amplifier. Although your Mac’s built-in sound hardware can do this, a standalone DAC does it much better. You can get a good DAC for around a hundred dollars, and it can make a big difference in the quality of your sound.
If you use headphones, look into buying better headphones. You may want different headphones for different places. While out and about, you want light, portable headphones or earbuds. But for good sound at home, you should look into larger, over-ear headphones. I use a half-dozen different headphones for different purposes.
-
Try high-resolution music files: While you can get lossless audio by ripping CDs or buying downloads in lossless format from many sites, you can also buy “high-resolution” music files from some vendors. These are files whose quality is higher than CDs; they are sometimes called studio masters, as they may be the quality of actual digital audio files used in recording and mixing studios. Whether you find these files to be better is up to your ears and equipment.
I examined this type of music file for Macworld in How to find and play high-resolution audio on the Mac. However, before you start breaking the bank to buy these files, read my article Music, Not Sound: Why High-Resolution Music Is a Marketing Ploy.
How Do I Play Media over a Network?
A great feature in iTunes is AirPlay, which lets you stream music over a network to a stereo, through an AirPort Express wireless device or an Apple TV, or to a speaker or amplifier that supports AirPlay. AirPlay requires only that you set up the requisite devices on your network (for help, read Take Control of Your Apple Wi-Fi Network). You can even control iTunes playback with Apple’s iTunes Remote app on an iOS device or Apple Watch.
To stream with AirPlay, click the AirPlay ![]() button to the left of the iTunes LCD and choose an AirPlay device (Figure 21). If you have multiple AirPlay devices, you can stream to more than one at a time; click a device’s plus
button to the left of the iTunes LCD and choose an AirPlay device (Figure 21). If you have multiple AirPlay devices, you can stream to more than one at a time; click a device’s plus ![]() button to select it. You could, for example, stream music to two rooms at the same time. You can’t stream different content to different devices.
button to select it. You could, for example, stream music to two rooms at the same time. You can’t stream different content to different devices.
 button on the popover.](http://images-20200215.ebookreading.net/19/2/2/9781492020127/9781492020127__take-control-of__9781492020127__images__airplay-menu.png)
 button on the popover.
I talk more about streaming video with AirPlay a few pages ahead, in the sidebar Streaming Videos with AirPlay.
How Do I Control iTunes Remotely?
If you’re using one of the above techniques to stream music, you may not be in the same room as the computer where iTunes is running. So you’ll need a way to control it from across the room or down the hall if you want to pause, change tracks, or start listening to a new playlist. With an iOS device, you can use Apple’s free iTunes Remote app either on the device or with an Apple Watch.
When I say “iTunes Remote,” I’m talking about the app that’s called iTunes Remote in the App Store, shown in Figure 22 at the left. The app shown in Figure 22 at the right is for controlling a fourth-generation Apple TV. In the App Store, it’s called the Apple TV Remote.

If the Remote app doesn’t automatically find the device that you want to control, tap Settings and either turn on Home Sharing or tap Add an iTunes Library. You may see directions telling you to select the remote icon from the navigation bar. Figure 23 shows how to make this selection.

iTunes Remote lets you connect to an iTunes library and choose what to listen to, be it a song, an album, music by a specific artist, or a playlist (Figure 24).

If you tap a track in an album, the album will play in order starting with that track. If you tap a track in a playlist, that playlist will play, starting with that track, in order, or you can tap Shuffle ![]() to mix up the playlist. You can also add items to the Up Next queue.
to mix up the playlist. You can also add items to the Up Next queue.
You can also access minimal controls in the iTunes Remote ![]() app on an Apple Watch. Open the app to see any available devices, such as computers running iTunes or Apple TVs. Tap a device to control playback from its library, or tap Add Device and follow the directions.
app on an Apple Watch. Open the app to see any available devices, such as computers running iTunes or Apple TVs. Tap a device to control playback from its library, or tap Add Device and follow the directions.
To control music playback, tap the Play/Pause button, the Next or Previous button, or a volume — or + button (Figure 25).

To access AirPlay from the iTunes Remote app on the Apple Watch, force-touch a playback screen (press until you feel haptic feedback), tap the AirPlay icon, and then tap an AirPlay target, such as an Apple TV or AirPort Express base station with a speaker connected to it.
On the Apple Watch, don’t confuse the iTunes Remote app with the Music ![]() app. The Remote app controls playback in iTunes or on an Apple TV, not what you’re listening to on your iPhone or Apple Watch.
app. The Remote app controls playback in iTunes or on an Apple TV, not what you’re listening to on your iPhone or Apple Watch.
To control your iPhone from your watch, press the Digital Crown to access the app cloud and tap the Music ![]() icon. The Music app is an extension of the paired iPhone’s general playback controls, allowing you to control playback not only from the Music app but also, for example, from the Podcasts app.
icon. The Music app is an extension of the paired iPhone’s general playback controls, allowing you to control playback not only from the Music app but also, for example, from the Podcasts app.
How Do I Display Eye Candy While Listening to Music?
iTunes includes a visualizer, a trippy, real-time light show that you can view while you’re playing music. While this would have been way cool when I was a teenager back in the 70s, it can also provide visual entertainment for parties of any size in this day and age.
To activate the visualizer, press Command-T; you can make it fill the screen by pressing Command-Control-F. Press the ? key to see which keys will make changes to the visualizer. Press Esc to exit the visualizer.
While this is interesting to watch for a while, you probably won’t want to try it at work.
Is There Anything Special to Know about Listening to Audiobooks?
iTunes lets you listen to audiobooks, whether you’ve purchased them from the iTunes Store or from Audible, or ripped your own audiobook CDs. (See How Do I Rip an Audiobook CD? for special information about ripping audiobook CDs.) Depending on how you tag it, iTunes stores an audiobook in the Music library or the Audiobooks library.
Listening to an audiobook is similar to listening to music, with one small difference: many audiobooks are chaptered, and when you play a chaptered audiobook, a Chapters menu appears in the menu bar, allowing you to start listening at the beginning of any chapter. iTunes remembers where you pause listening to an audiobook, if it’s tagged as such (see How Do I Put Files in the Correct Library?), so, in most cases, unless you’re listening to a collection of short stories and want to choose a specific one to listen to, you won’t use the Chapters menu.
How Do I Watch Videos in iTunes?
You can buy movies, TV shows, and music videos, and you can rent movies from the iTunes Store. You can also convert your own videos to .mov, .m4v, or .mp4 files, and add them to iTunes to play them in the app, or stream them via AirPlay to an Apple TV. (In How Do I Rip Videos to Use in iTunes? I briefly discuss converting videos.)
Purchased movies get placed in the Movies library, TV Shows library, or Music library (for music videos), depending on how they are tagged. Videos you import from other sources get placed in the Home Videos section of the Movies library, but you can change this by setting a tag (see How Do I Put Files in the Correct Library?).
Watching videos in iTunes is just as easy as playing music. Double-click an item, and it opens, by default, in the iTunes window. Move your cursor over the window to display a controller at the bottom to play, pause, scrub, or change volume.
You can choose how videos display by Control-clicking a video while it’s playing in iTunes. Your options are as follows, and they depend on how you are viewing a video (in other words, you won’t see an option to change to the current view):
- Play Video in iTunes Window: Videos play in the regular iTunes window, with the toolbar visible at the top (and the Status Bar at the bottom, if you’ve chosen to display it via the View menu).
- Play Video in Separate Window: Videos play in a floating window above the iTunes window. When you’re viewing a video in a floating window, a contextual menu also offers size options: you can choose to view the video at Actual Size, you can make it as large as possible (without going into full-screen mode) by choosing Fit to Screen, or you can choose Increase Size or Decrease Size.
- Play Video Full Screen: Videos fill your display and hide windows and menus.
The above three options set how the currently playing video appears, as well as any videos that you play in the future—at least until you change the setting again. The next option is specific to the video that is playing:
- Set Poster Frame: A poster frame is the image that iTunes shows for a video in your library, if you’re in a non-list view. You can go to any point in a video and choose Set Poster Frame to have iTunes use that image. (It’s best to pause before choosing this option from the contextual menu to make sure you get the frame you want.) You can’t set poster frames on music videos provided by Apple Music.
If you’re running macOS 10.12 Sierra or later, you can take advantage of the Picture-in-Picture feature to minimize a video to a small display at the corner of your screen while you work with other windows. To do this, click the Picture-in-Picture ![]() icon on the video’s window.
icon on the video’s window.