
CHAPTER 11
Creating and Managing Applications
IN THIS CHAPTER
![]() ConfigMgr Applications Overview
ConfigMgr Applications Overview
![]() Creating and Modifying Applications
Creating and Modifying Applications
![]() Managing and Creating Global Conditions
Managing and Creating Global Conditions
![]() Managing Application Management, Application Configuration, and Volume License Purchases
Managing Application Management, Application Configuration, and Volume License Purchases
System Center 2012 Configuration Manager (ConfigMgr) introduced applications and deployment types (DTs) for software deployment, and DTs continue to be enhanced with ConfigMgr Current Branch. Applications include numerous advantages over packages and programs. The client evaluates DTs for applicability at installation, programmatically determining the best preferred command (a DT) to execute. This differs from packages, which use collections for each type of user or system in order to target where to distribute the package, thus requiring multiple collections to distribute a single package.
ConfigMgr applications can associate users with one or more devices, and they can install only when a particular user is logged on to a particular device type. Deployment behavior is controlled by DTs, which means ConfigMgr administrators can control if, when, and how software is installed. Applications also use detection methods to verify that an application installed correctly.
NOTE: CLARIFYING THE TERMS APPLICATION AND PACKAGE
The term application refers to the software application a user installs and executes. It also refers to a ConfigMgr application, which ConfigMgr uses to install an application. As using the same word for two things can be confusing, the authors make a distinction between a software application and a ConfigMgr application.
The same goes for packages; there are ConfigMgr packages, referring to the functionality used in ConfigMgr, and you will also see the term package used by specific DT variations used in a ConfigMgr application.
This chapter discusses ConfigMgr applications. Chapter 12, “Creating and Using Deployment Types,” discusses available DTs and creating new DTs. Chapter 14, “Distributing and Deploying Applications and Packages,” describes delivering an application to a device by creating collections, using distribution points (DPs), and creating deployments.
ConfigMgr Applications Overview
A ConfigMgr application is a container that delivers software. It includes a name, a version, an application owner, and localization information describing how the application is displayed in the Software Center and Application Catalog. It also contains information regarding distribution settings and the DPs and DP groups where content is distributed, as well as references and dependencies for other applications, such as whether the application replaces an existing application or is part of a virtual environment.
NOTE: OLD SOFTWARE CENTER AND NEW SOFTWARE CENTER
Several chapters in this book use the terms old Software Center and new Software Center. These terms refer to two experiences from an end user point of view:
![]() Old Software Center: Introduced with ConfigMgr 2012, the old Software Center requires Silverlight on the device and works in conjunction with the Application Catalog. It shows device-targeted deployments, whereas the Application Catalog shows user-targeted deployments.
Old Software Center: Introduced with ConfigMgr 2012, the old Software Center requires Silverlight on the device and works in conjunction with the Application Catalog. It shows device-targeted deployments, whereas the Application Catalog shows user-targeted deployments.
![]() New Software Center: The new Software Center, introduced with ConfigMgr Current Branch version 1511, combines functionality from the old Software Center and Application Catalog into one experience. Silverlight is no longer required.
New Software Center: The new Software Center, introduced with ConfigMgr Current Branch version 1511, combines functionality from the old Software Center and Application Catalog into one experience. Silverlight is no longer required.
Applications are shells; installation requires DTs, the key component of the application. Each ConfigMgr application has a minimum of one DT defined.
Following are some actions you can perform on a ConfigMgr application:
![]() Distribute ConfigMgr application content (software) to DPs.
Distribute ConfigMgr application content (software) to DPs.
![]() Deploy the application (required or optional) to devices or users.
Deploy the application (required or optional) to devices or users.
![]() Create one or more DTs.
Create one or more DTs.
![]() Simulate deployment to validate DTs.
Simulate deployment to validate DTs.
![]() Export a ConfigMgr application (with or without content) to import it into a different ConfigMgr environment or save to disk in case it needs to be restored later, as discussed in the “Exporting and Importing Applications” section, later in this chapter.
Export a ConfigMgr application (with or without content) to import it into a different ConfigMgr environment or save to disk in case it needs to be restored later, as discussed in the “Exporting and Importing Applications” section, later in this chapter.
![]() Create a prestaged content file to transport the content to remote locations (without using wide area network [WAN] connectivity).
Create a prestaged content file to transport the content to remote locations (without using wide area network [WAN] connectivity).
![]() Set security scopes to ensure that team members have appropriate access to the ConfigMgr application. Chapter 23, “Security and Delegation in Configuration Manager,” discusses security scopes.
Set security scopes to ensure that team members have appropriate access to the ConfigMgr application. Chapter 23, “Security and Delegation in Configuration Manager,” discusses security scopes.
![]() Monitor content distribution.
Monitor content distribution.
![]() Monitor deployment status.
Monitor deployment status.
Using a ConfigMgr application is an enhanced technique for delivering software to a user or computer. Applications may contain multiple methods of installation, based on user or computer state. Like packages, applications distribute software, but they include additional information to support smart deployment to different devices and deployment scenarios.
Applications can have multiple DTs. You may have software with different installations for x86, x64, or different versions of Windows. Once the DTs are properly built and the application deployed, the DTs are evaluated using requirement rules to determine the appropriate installation. For example, an x64 Windows 8.1 DT only installs an x64 version of the software.
CAUTION: DEPLOYMENTS UNINSTALLING SOFTWARE DO NOT CHECK REQUIREMENT RULES
Deployments uninstalling applications do not use requirement rules to determine if the uninstall is necessary. The application is always uninstalled on each system for which the deployment is set. For additional information, see https://docs.microsoft.com/sccm/apps/deploy-use/uninstall-applications.
Requirement rules are flexible and can leverage practically anything on a system, as well as Structured Query Language (SQL) or Lightweight Directory Access Protocol (LDAP) queries, primary user information, and more. Applications are deployed to a user or group of users and installed with the applicable DT, depending on the type of device in use and where the device is situated at that time.
At the time of writing this book, 16 types of DTs are available. This chapter discusses the basics of DTs; Chapter 12 provides further detail. Some DTs require the device that executes the DT to be enrolled in Intune; Table 11.1 identifies those types. Intune integration is covered in Chapter 16, “Integrating Intune Hybrid into Your Configuration Manager Environment.”
Following is a brief description of the different deployment types:
![]() Windows Installer: Executes a Windows Installer file (.msi file).
Windows Installer: Executes a Windows Installer file (.msi file).
![]() Windows Installer Through MDM: Executes an .msi file using ConfigMgr’s mobile device management (MDM) capabilities in combination with Microsoft Intune.
Windows Installer Through MDM: Executes an .msi file using ConfigMgr’s mobile device management (MDM) capabilities in combination with Microsoft Intune.
![]() Microsoft Application Virtualization (App-V): Deploys virtual application packages created using the Microsoft App-V sequencer. ConfigMgr supports App-V DTs for App-V versions 4 and 5.
Microsoft Application Virtualization (App-V): Deploys virtual application packages created using the Microsoft App-V sequencer. ConfigMgr supports App-V DTs for App-V versions 4 and 5.
![]() Windows App Package: Installs a Windows app package (.appx) or Windows app package bundle (.appxbundle) type of application. You can also create a DT that only links to an application in the Windows Store (known as deeplinking).
Windows App Package: Installs a Windows app package (.appx) or Windows app package bundle (.appxbundle) type of application. You can also create a DT that only links to an application in the Windows Store (known as deeplinking).
![]() Windows Phone App Package: Installs a Windows Phone app package file (.xap). You could also create a link to the application in the Microsoft store for Windows Phone.
Windows Phone App Package: Installs a Windows Phone app package file (.xap). You could also create a link to the application in the Microsoft store for Windows Phone.
![]() Windows Mobile Cabinet: Installs a Windows Mobile Cabinet (.cab) file.
Windows Mobile Cabinet: Installs a Windows Mobile Cabinet (.cab) file.
![]() App Package for iOS: Installs an application package for iOS (.ipa) file or links to an application in Apple’s App Store.
App Package for iOS: Installs an application package for iOS (.ipa) file or links to an application in Apple’s App Store.
![]() App Package for Android: Installs an application package for Android (.apk) file or links to an application in the Google Play store.
App Package for Android: Installs an application package for Android (.apk) file or links to an application in the Google Play store.
![]() Mac OS X: Deploys applications to Mac OS X using a .cmmac file, created using the CMAppUtil tool on Mac OS X.
Mac OS X: Deploys applications to Mac OS X using a .cmmac file, created using the CMAppUtil tool on Mac OS X.
![]() Script Installer: Specifies a script to deploy to devices running an installation or making specific configuration changes. The script can range from a complex Visual Basic file to a simple batch file. Installations using an executable (.exe, .msu, and so on) are also considered script installers.
Script Installer: Specifies a script to deploy to devices running an installation or making specific configuration changes. The script can range from a complex Visual Basic file to a simple batch file. Installations using an executable (.exe, .msu, and so on) are also considered script installers.
![]() Web Application: Deploys a link to an uniform resource locator (URL).
Web Application: Deploys a link to an uniform resource locator (URL).
TABLE 11.1 Intune Enrollment Requirements for DTs
DT Type |
Requires Device to Be Enrolled in Intune? |
Windows Installer |
No |
Windows Installer through MDM |
Yes if the device on which you want to install is managed via the Internet; no if managed using its MDM channel through ConfigMgr on-premise |
Microsoft Application Virtualization |
No |
Windows App Package |
No |
Windows Phone App Package |
Yes |
Windows Mobile Cabinet |
No |
App Package for iOS |
Yes |
App Package for Android |
Yes |
Mac OS X |
No |
Web Application |
Only if deployed to enrolled devices |
Script Installer |
No |
Using the Requirement Rule Component in a DT
Requirement rules are DT components used to determine if a DT is installable on a system. They are optional; if there is no requirement rule, the DT is applicable to any system evaluating it. Use requirements to determine which DT to install; the first applicable DT is installed.
Requirements are defined using global conditions; they can be based on the operating system (OS) name and/or architecture, total physical memory, free disk space, Active Directory (AD) site, organizational unit (OU), primary user, and more. Global conditions can create requirements for a DT. While requirements are not necessary, the authors recommend using them to ensure that software is delivered to appropriate devices and/or users. The “User Device Affinity” section, later in this chapter, discusses the primary user global condition, which allows the ConfigMgr administrator to specify that the DT may only execute when the primary user of the machine is logged on.
The following is a description of an application with four DTs and their requirements:
![]() Operating system is Windows 8.1 x86 and the primary user is set to True
Operating system is Windows 8.1 x86 and the primary user is set to True
![]() Operating system is Windows 8.1 x64 and the primary user is set to True
Operating system is Windows 8.1 x64 and the primary user is set to True
![]() Operating system is Windows 10 x64 and the primary user is set to True
Operating system is Windows 10 x64 and the primary user is set to True
![]() Operating system is Windows 10 x86 or x64
Operating system is Windows 10 x86 or x64
The first three DTs are Windows Installer-based DTs; the final one is an App-V DT. The first three are obvious about whether the DT is installable. Requirements are evaluated by priority, meaning if the OS is Windows 10 x86 and the primary user is set to False, only the fourth DT is installable. The requirements ensure that full installation applies only to systems where the primary user for the device is set to True. If the system is Windows 8.1 x64 and the primary user is set to False, no DTs are applicable; a user attempting to install would receive a message that requirements have not been met to install the application.
Understanding Detection Methods
A detection method must resolve to True for a DT to install on a device. A device evaluates an application using requirement rules to determine which DT to install and uses a detection method to see if the DT is already installed. The detection method could check for a specific Registry key or Registry key value, or it could verify installation of an MSI file by confirming that the MSI product code exists.
If an application is deployed as Required (mandatory), the client agent reevaluates the application installation, based on the requirement rules and detection method. This occurs weekly by default. The reevaluation interval is configured through client settings. Client settings are discussed in Chapter 9, “Client Management.”
User Device Affinity
User device affinity allows an administrator to associate a user with his or her primary devices. Primary devices are a user’s typical daily work devices, such as a workstation or laptop. Devices can be associated with more than one user, and a user can be associated with more than one device. Chapter 9 discusses configuring client settings for user device affinity.
A huge benefit of user device affinity is that the ConfigMgr administrator can deploy applications to users without knowing the name of the device. Administrators also have more control in deploying the application, as they can create rules related to user device affinity as part of the deployment. Say you have an application for Microsoft Visio with two DTs; the first DT installs Visio with the full MSI file, and the second DT installs the Visio Viewer application:
![]() You create a requirement rule for the full MSI version and require the primary device to be set to True, as displayed in Figure 11.1. You also set this DT as the first DT available, as the first requirement rule valid for the DT is the one executed.
You create a requirement rule for the full MSI version and require the primary device to be set to True, as displayed in Figure 11.1. You also set this DT as the first DT available, as the first requirement rule valid for the DT is the one executed.
![]() When a user attempts to install the software (or you set it as Required), the application evaluates the first DT, and where the primary user is set to True, the application installs the Windows Installer (.msi) version of Visio. If the primary user is set to False, the Windows Installer application for Visio Viewer is installed.
When a user attempts to install the software (or you set it as Required), the application evaluates the first DT, and where the primary user is set to True, the application installs the Windows Installer (.msi) version of Visio. If the primary user is set to False, the Windows Installer application for Visio Viewer is installed.

FIGURE 11.1 Primary device is set to True.
There are many ways to create user device affinity:
![]() Import a comma-separated values (CSV) file that contains two columns: users and devices.
Import a comma-separated values (CSV) file that contains two columns: users and devices.
![]() Have the user specify his or her primary device in the Application Catalog or Software Center.
Have the user specify his or her primary device in the Application Catalog or Software Center.
![]() Have the administrator manually select the user and primary device.
Have the administrator manually select the user and primary device.
![]() Set the user device affinity during operating system deployment (OSD).
Set the user device affinity during operating system deployment (OSD).
![]() Set affinity during mobile device enrollment.
Set affinity during mobile device enrollment.
![]() Have the site detect affinities between users and devices based on usage information; the affinity must be approved by an administrator.
Have the site detect affinities between users and devices based on usage information; the affinity must be approved by an administrator.
Following is information an affinity can hold:
![]() A single user to a single device
A single user to a single device
![]() A single user to many devices (such as a desktop and a mobile device)
A single user to many devices (such as a desktop and a mobile device)
![]() Many users to a single device (such as a desktop shared by the same department)
Many users to a single device (such as a desktop shared by the same department)
NOTE: APPLICATIONS ARE NOT ALWAYS THE BEST DEPLOYMENT OPTION
While the authors recommend deploying software using ConfigMgr applications, in some cases—such as the following—implementing packages and programs, task sequences, or PowerShell scripts might be more suitable:
![]() Scripts that do not install an application on a computer (such as a script to defragment a disk drive)
Scripts that do not install an application on a computer (such as a script to defragment a disk drive)
![]() One-off scripts that do not need continual monitoring
One-off scripts that do not need continual monitoring
![]() Scripts running on a recurring schedule that cannot use global evaluation
Scripts running on a recurring schedule that cannot use global evaluation
![]() Application installations that update frequently
Application installations that update frequently
![]() Applications using a complex method to determine if installed correctly
Applications using a complex method to determine if installed correctly
For applications with multiple dependencies on other applications or packages, consider using task sequences to install the application and its dependencies. Task sequence (TS) logic can determine the appropriate prerequisite to install. Task sequences also can combine applications and packages in an installation sequence.
You can migrate existing packages from earlier supported versions of ConfigMgr and deploy them in your ConfigMgr hierarchy. (Only App-V packages from ConfigMgr 2007 migrate automatically to an application.) The packages appear under Software Library -> Packages. You can modify and deploy these packages much as you would by using the ConfigMgr 2007/2012 software distribution.
Three client system logs are used for application monitoring: AppintentEval.log, AppEnforce.log, and AppDiscovery.log. Information on accessing log files is available in Appendix A, “Configuration Manager Log Files” and at https://docs.microsoft.com/sccm/core/plan-design/hierarchy/log-files.
Creating and Modifying Applications
You can create ConfigMgr applications manually by providing all properties and then adding a DT. You could also create an application by specifying its first DT; most application properties are automatically supplied by the information ConfigMgr reads from the installer file that installs the DT.
The following sections introduce the concept of a definitive software library (DSL) and step through the process of creating ConfigMgr applications with the Create Application Wizard. Several properties are available only if the application is created manually or is modified after using the wizard.
Using a Definitive Software Library
The authors recommend using a DSL to host ConfigMgr application source files. A DSL is centrally located, typically on a Distributed File System (DFS) file share. It contains master copies of all software your organization has used, plus modified versions resulting from the application packaging process and used as input to create DTs and programs hosted on the DSL. (For more information about application packaging, see the “Best Practices for Installing Software” section, later in this chapter.) The DSL is often used to store documentation about how to configure applications for use with ConfigMgr, making it a single source of all software being used. Back up the DSL regularly; if something goes wrong, you can then avoid rebuilding your environment from scratch.
Creating a Windows Installer (.msi)-Based Application
The following example shows how to create a Windows Installer-based application, using 7-Zip (available at www.7-zip.org) as a sample ConfigMgr application. The x86 and x64 .msi files are already downloaded and saved to the DSL, \OdysseyDSLApplicationsIgor Pavlov7-Zipv16.02Deployx86 and \OdysseyDSLApplicationsIgor Pavlov7-Zipv16.02Deployx64.
Perform these steps to start the Create Application Wizard:
1. Open the ConfigMgr console and navigate to Software Library -> Application Management.
2. Right-click Applications and select Create Application.
The wizard opens to the General page, with two options:
![]() Automatically detect the ConfigMgr application information using existing content
Automatically detect the ConfigMgr application information using existing content
![]() Manually define the information
Manually define the information
Follow these steps to create a ConfigMgr application for 7-Zip with existing Windows Installer content:
1. Specify the location or browse to the MSI for the application. The path must be a universal naming convention (UNC). This example creates the x86 DT first: \OdysseyDSLApplicationsIgor Pavlov7-Zipv16.02Deployx867z1602.msi.
2. Click Next. You may be warned that the .msi could not be verified. Click Yes to import this file. The wizard imports the application information from the specified MSI.
3. Click Next to see the results. These include the application name and installation program, which is a default command line for a silent, unattended Windows Installer installation. This information is used to create the application’s first DT. The information may be minimal, with only the name, installation program, and installation behavior displayed as General Information. This populates the application information and is required for the DT.
4. For 7-Zip, the installation should always install using system rights, so be sure to select Install for system. Figure 11.2 shows the outcome of this part of the wizard.
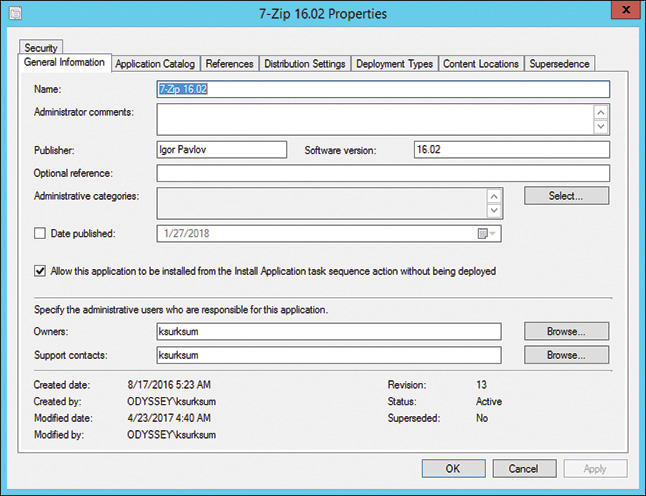
FIGURE 11.2 Specifying application information in the Create Application Wizard.
REAL WORLD: APPLICATIONS OFTEN REQUIRE ADMINISTRATOR RIGHTS FOR INSTALLATION
Most traditional installations, including MSI executables, require that the application be installed with administrator rights. Test applications thoroughly to ensure that you enable the correct installation option.
5. Click Next to continue to the Summary page and review the information. Then click Next to create the application and DT.
6. On the Completion page, which shows successful completion of the application or details about why the process was not successful, click Close.
The wizard provides only several configurable options; other options take defaults. To view the details of this application and its DT to ensure that the defaults are properly configured, select the application in the console and then click Properties on the ribbon bar.
Viewing Application Properties
A ConfigMgr application can be more complex than a package and a program, but its benefits significantly compensate for the additional time spent defining the application. Configure settings to provide the best user experience for application delivery. The following sections provide a detailed look at application properties.
General Information Tab
The General Information tab provides basic information about the application. Following is a brief description of each property on this tab. Table 11.2 specifies their locations in the Software Center and Application Catalog:
![]() Name: The name is used in the console and for monitoring. Use a generic name, as you may have multiple DTs for specific installation scenarios, such as x86 versus x64. Give your DTs specific names so you can easily identify them in logging and reporting.
Name: The name is used in the console and for monitoring. Use a generic name, as you may have multiple DTs for specific installation scenarios, such as x86 versus x64. Give your DTs specific names so you can easily identify them in logging and reporting.
![]() Administrator Comments: This information is available only in the console. Use this field to add information that is visible only to administrators.
Administrator Comments: This information is available only in the console. Use this field to add information that is visible only to administrators.
![]() Publisher: Specify the software manufacturer, which appears in the Software Center under the Publisher column and in the Application Catalog.
Publisher: Specify the software manufacturer, which appears in the Software Center under the Publisher column and in the Application Catalog.
![]() Software Version: Use a user-friendly software version, as the end user sees this in the Software Center and Application Catalog.
Software Version: Use a user-friendly software version, as the end user sees this in the Software Center and Application Catalog.
![]() Optional Reference: This property, which is only available to administrators, can be used to add information such as a work order or request ID for software deployment.
Optional Reference: This property, which is only available to administrators, can be used to add information such as a work order or request ID for software deployment.
![]() Administrative Categories: These categories are used in the Application Catalog. An administrator can select existing application categories or create new ones.
Administrative Categories: These categories are used in the Application Catalog. An administrator can select existing application categories or create new ones.
![]() Date Published: This additional field appears in Software Center. Use this property to timestamp when an application is deployed.
Date Published: This additional field appears in Software Center. Use this property to timestamp when an application is deployed.
![]() Allow This Application to Be Installed from the Install Application Task Sequence Action Instead of Deploying It Manually: Enable this option for installation to occur during an OSD TS.
Allow This Application to Be Installed from the Install Application Task Sequence Action Instead of Deploying It Manually: Enable this option for installation to occur during an OSD TS.
![]() Owners: Enter an optional owner or click Browse to select a user or group from AD.
Owners: Enter an optional owner or click Browse to select a user or group from AD.
![]() Support Contacts: Enter a contact into this field or click Browse to select a user or group from AD.
Support Contacts: Enter a contact into this field or click Browse to select a user or group from AD.
Additional data at the bottom of this tab includes dates created and modified and by whom, current revision, current status (active or retired), and if the application is superseded.
Applications are version controlled. When a new version of an application is created, the previous version is saved and can be restored or revised as needed. Right-click an application and select Revision History (or select it and choose Revision History) to show or select previous versions.
TABLE 11.2 General Information Tab and End-User Visibility
Description |
Visible in Old Software Center? |
Visible in Application Catalog? |
Visible in New Software Center? |
Name |
No |
No |
No |
Administrator Comment |
No |
No |
No |
Publisher |
Yes |
Yes |
No |
Software Version |
Yes |
Yes |
No |
Optional Reference |
No |
No |
No |
Administrative Categories |
No |
No |
No |
Date Published |
Yes |
No |
Yes |
Allow Application to be Installed from the Install Application Task Sequence Action Instead of Deploying It Manually |
No |
No |
No |
Owners |
No |
No |
No |
Support Contacts |
No |
No |
No |
Application Catalog Tab
The Application Catalog tab displays all properties used to enhance the user experience when searching for or selecting an application from the Application Catalog. Some properties are also used when the application is visible in Software Center.
Following is a brief description of each property. Table 11.3 specifies their locations in the Software Center and Application Catalog:
![]() Selected Language: Multiple languages are supported. If this option is configured, custom language text appears when a user with appropriate language settings in his or her browser launches the Application Catalog using Internet Explorer (IE). If settings are configured for a language not enabled for the application, the user sees the language marked as default (English by default). All items on this tab are localized. Populate the remaining information in the page for each language you support.
Selected Language: Multiple languages are supported. If this option is configured, custom language text appears when a user with appropriate language settings in his or her browser launches the Application Catalog using Internet Explorer (IE). If settings are configured for a language not enabled for the application, the user sees the language marked as default (English by default). All items on this tab are localized. Populate the remaining information in the page for each language you support.
![]() Localized Application Name: This is the friendly name of the application and appears in the Software Center and Application Catalog. This name is searchable in both locations.
Localized Application Name: This is the friendly name of the application and appears in the Software Center and Application Catalog. This name is searchable in both locations.
![]() User Categories: Use these categories (Web Browsers, Utilities, Human Resources, and so on) to help end users locate software quickly in the Application Catalog. Categories appear in the left-hand frame of the Application Catalog.
User Categories: Use these categories (Web Browsers, Utilities, Human Resources, and so on) to help end users locate software quickly in the Application Catalog. Categories appear in the left-hand frame of the Application Catalog.
![]() User Documentation: Enter a web URL or import a file to enable a link to be visible in the Software Center and Application Catalog when viewing application details. Clicking the link launches the web URL or opens the file. If uploading files, use a common file type available on all systems.
User Documentation: Enter a web URL or import a file to enable a link to be visible in the Software Center and Application Catalog when viewing application details. Clicking the link launches the web URL or opens the file. If uploading files, use a common file type available on all systems.
![]() Link Text: Provide a localized entry of what occurs when a user clicks on the user documentation.
Link Text: Provide a localized entry of what occurs when a user clicks on the user documentation.
![]() Privacy URL: Provide a URL to where privacy information about the application can be found.
Privacy URL: Provide a URL to where privacy information about the application can be found.
![]() Localized Description: Populate this field to provide additional details to the user about the application. This field is searchable from the Software Center and Application Catalog.
Localized Description: Populate this field to provide additional details to the user about the application. This field is searchable from the Software Center and Application Catalog.
![]() Keywords: Separate keywords with spaces. Add information such as file extensions and generic terms for the product, such as “archive,” “word processor,” and so on. You can search for these keywords in the Application Center or Software Center.
Keywords: Separate keywords with spaces. Add information such as file extensions and generic terms for the product, such as “archive,” “word processor,” and so on. You can search for these keywords in the Application Center or Software Center.
![]() Icon: Click Browse to select a standard icon or import an icon from an .ico, .msi, .exe, or .dll file. This icon appears in the Application Catalog and Software Center. Its size is 250 pixels by 250 pixels maximum.
Icon: Click Browse to select a standard icon or import an icon from an .ico, .msi, .exe, or .dll file. This icon appears in the Application Catalog and Software Center. Its size is 250 pixels by 250 pixels maximum.
TABLE 11.3 Application Catalog Tab and End-User Visibility
Description |
Visible in Old Software Center? |
Visible in Application Catalog? |
Visible in New Software Center? |
Selected Language |
Yes |
Yes |
Yes |
Localized Application Name |
Yes |
Yes |
Yes |
User Categories |
No |
Yes |
No |
User Documentation |
Yes |
Yes |
No |
Link Text |
No |
Yes |
No |
Localized Description |
Yes |
Yes |
No |
Keywords |
No |
Yes |
No |
Icon Image |
Yes |
Yes |
Yes |
References Tab
The Reference tab displays three types of application relationships, which are self-explanatory:
![]() Applications that depend on this application
Applications that depend on this application
![]() Applications that supersede this application
Applications that supersede this application
![]() Virtual environments that contain this application
Virtual environments that contain this application
The tab shows whether changes made to the application affect another application. You can also see revisions of the referenced application. You can view the fine print, which tells you that there are no items in the list or that you do not have permission to view all items. Depending on how role-based administration (RBA) is configured, some administrators cannot see all applications based on the configured scopes.
Distribution Settings Tab
The Distribution Settings tab helps you manage how packages are distributed to targeted DP groups and DPs. It offers the following settings:
![]() Distribution Priority: Control the order in which multiple packages are sent to DPs. By default, each application has priority Medium, but you can choose Low, Medium, or High. You may want to configure more critical packages (antivirus, security patches, and so on) as High, so they are sent to child sites and DPs faster than those set to Low, such as a portable document format viewer application.
Distribution Priority: Control the order in which multiple packages are sent to DPs. By default, each application has priority Medium, but you can choose Low, Medium, or High. You may want to configure more critical packages (antivirus, security patches, and so on) as High, so they are sent to child sites and DPs faster than those set to Low, such as a portable document format viewer application.
![]() Distribute the Content for This Package to Preferred Distribution Points: Preferred DPs exist in the boundary group defined for the boundary matching its location. If a client in a preferred DP boundary requests a package not on the DP, content is automatically deployed to the preferred DP to fulfill the client request. Use this excellent approach for content you do not want to deploy to all DPs, such as a Multi User Interface (MUI) language package.
Distribute the Content for This Package to Preferred Distribution Points: Preferred DPs exist in the boundary group defined for the boundary matching its location. If a client in a preferred DP boundary requests a package not on the DP, content is automatically deployed to the preferred DP to fulfill the client request. Use this excellent approach for content you do not want to deploy to all DPs, such as a Multi User Interface (MUI) language package.
![]() Prestaged Distribution Point Settings: If you select Enable this distribution point for prestaged content check box in the distribution point properties, the following settings affect content distribution:
Prestaged Distribution Point Settings: If you select Enable this distribution point for prestaged content check box in the distribution point properties, the following settings affect content distribution:
![]() Automatically Download Content When Packages Are Assigned to Distribution Points: You can cause the DP to perform normally and not follow prestaged content rules. Content is distributed to any targeted DP.
Automatically Download Content When Packages Are Assigned to Distribution Points: You can cause the DP to perform normally and not follow prestaged content rules. Content is distributed to any targeted DP.
![]() Download Only Content Changes to the Distribution Point: Set this option to export and extract content manually on the DP for initial distribution. Subsequent update DP actions send delta updates.
Download Only Content Changes to the Distribution Point: Set this option to export and extract content manually on the DP for initial distribution. Subsequent update DP actions send delta updates.
Say you are ready to deploy the next version of Microsoft Office. The source installation is around 1GB. Due to WAN availability, you may choose to manually transfer content to the DP the first time (by using a WAN file copy or by shipping media that contains content to the remote DP). After prestaging the initial payload, update DPs work normally, as expected.
![]() Manually Copy the Content in This Package to the Distribution Point: Prevent ConfigMgr from copying any content to the DP configured for prestaged content, requiring you export content from the console and extract it to the DP each time for that package.
Manually Copy the Content in This Package to the Distribution Point: Prevent ConfigMgr from copying any content to the DP configured for prestaged content, requiring you export content from the console and extract it to the DP each time for that package.
Drilldown into the Deployment Types Tabs
DTs are the heart of an application, determining the best method to deploy an application to a system. Each DT contains one source files path and installation command for the deployment.
This section describes the different properties tabs for a DT. Chapter 12 contains information on creating specific DTs. For each DT, select it and click Edit to display its properties.
![]() General Tab: Table 11.4 describes the properties of this tab.
General Tab: Table 11.4 describes the properties of this tab.
TABLE 11.4 Deployment Type Properties General Tab
Property |
Description |
Name |
The name is visible in the ConfigMgr client logs, through the console for DT properties and deployment status, and through the reporting services point. |
Technology |
Specify the technology used to create the DT (Windows Installer, script-based, and so on). |
Administrator Comments |
Here is where you can add comments about the DT; comments are visible only to ConfigMgr administrators. |
Languages |
This is another informational box where you can multi-select supported languages for this DT. To actually restrict the application installation to specific languages, use the Requirements tab. |
![]() Content Tab: Table 11.5 describes the properties of this tab, which contains installation source information and distribution settings.
Content Tab: Table 11.5 describes the properties of this tab, which contains installation source information and distribution settings.
TABLE 11.5 Deployment Type Properties Content Tab
Property |
Description |
Content Location |
Specify the UNC source path to the content. All files in this path (including subfolders) are captured and stored in the content store, sent to DPs, and downloaded to clients for installation. For content, less is more: Keep the source as small as possible. |
Persist content in the client cache |
When you enable this setting and deploy the application to a target collection, clients using this DT (based on the requirement rules) download and keep the installation source in the local ConfigMgr cache (%windir%ccmcache). Client cache size is limited to 5GB, so use this option sparingly. |
Allow clients to share content with other clients on the same subnet |
Enable this check box to leverage BranchCache or Peer Cache (provided that they are configured for your environment). |
Allow clients to use a distribution point from the default site boundary group |
If a client cannot locate content for this deployment on a DP in a current or neighbor boundary group, have the client use the DPs from the default boundary group. See Chapter 14 for more information regarding DPs. |
Deployment Options |
If the client uses a DP from a neighbor boundary group or the default site boundary group, you can choose to not download content or to download and run locally. |
![]() Programs Tab: Table 11.6 describes the properties of this tab, which defines the installation/uninstallation properties for a Windows Installer or script-based DT.
Programs Tab: Table 11.6 describes the properties of this tab, which defines the installation/uninstallation properties for a Windows Installer or script-based DT.
TABLE 11.6 Deployment Type Properties Programs Tab
Property |
Description |
Installation Program |
Specify the command line to install the software. This is run from the root of the content source location. Click Browse and select the installation program if necessary. The path should be relative to the content source location. |
Installation start in |
If the installation requires a specific path to run, specify that here. Most modern installations do not require this configuration. |
Uninstall program |
Specify the unattended uninstall command line. If using the Create Deployment Type Wizard and specifying a Windows Installer program, this command is added automatically. Review and test the command line to verify that the uninstall works as expected. Include the Uninstall command when possible, allowing the user to remove optional software from Software Center, as well as any uninstall deployments from the site. Uninstalling previous applications can also be used with supersedence. |
Uninstall start in |
If the uninstall requires a specific path to run, specify that here. |
Run installation and uninstall program as a 32-bit process on 64-bit clients |
Enable this option if the application is a 32-bit installation, meaning it will install to %Program Files (x86)%. This setting helps ConfigMgr properly install and uninstall 32-bit applications on a 64-bit system. The ConfigMgr client agent on a 64-bit system will not use the %Program Files (x86)% file path or the |
Product Code |
Used for Windows source management. Specify a Windows Installer product code or click Browse and import the .msi file to ensure that the code is accurate. |
NOTE: DEFINING WINDOWS SOURCE MANAGEMENT
Many Windows Installer-based applications support self-healing and/or the repair feature. These actions require the original installation files. If installing applications from ConfigMgr, the source location is a subfolder of %windir%ccmcache (unless selecting Run from DP, an option only available for packages, which means the DP UNC path is the source location). Neither is ideal in the long term.
Entering a valid product code lets ConfigMgr manage the source location and configure the system to use the closest DP, based on site boundaries. If your network address changes, the client agent verifies that the Windows Installer source is leveraging the closest DP.
![]() Detection Method Tab: This tab specifies how ConfigMgr determines whether the software specified in the DT is already installed. When the wizard creates a DT, a detection method is automatically created, based on the MSI product code. A wrapped MSI can cause unwanted side effects; for example, the software may not uninstall, as the product code is from the wrapped MSI and not the actual installed software.
Detection Method Tab: This tab specifies how ConfigMgr determines whether the software specified in the DT is already installed. When the wizard creates a DT, a detection method is automatically created, based on the MSI product code. A wrapped MSI can cause unwanted side effects; for example, the software may not uninstall, as the product code is from the wrapped MSI and not the actual installed software.
Every DT has a detection method. The application depends on the detection method to provide its proper state. Every seven days (by default), the client performs an application deployment evaluation cycle for required installations. If an application is found required but not installed (based on the detection method), ConfigMgr installs it automatically. For more information on creating detection methods, see the “Creating Detection Methods” section, later in this chapter.
![]() Deployment Type User Experience Tab: This tab defines how the installation interacts with the user. Specify user experience settings for the application in the first part of this tab. Make the proper selection to determine the rights used to install the software:
Deployment Type User Experience Tab: This tab defines how the installation interacts with the user. Specify user experience settings for the application in the first part of this tab. Make the proper selection to determine the rights used to install the software:
![]() Installation Behavior: Specify rights used to install the software:
Installation Behavior: Specify rights used to install the software:
![]() Install for User: Install using the rights of the current user.
Install for User: Install using the rights of the current user.
![]() Install for System: Install using the rights of the SMS Agent Host service (Local System account).
Install for System: Install using the rights of the SMS Agent Host service (Local System account).
![]() Install for System if Resource Is Device; Otherwise Install for User: If the application is targeted to a collection of devices, install for system; if targeted to a collection of users or user groups, install for user.
Install for System if Resource Is Device; Otherwise Install for User: If the application is targeted to a collection of devices, install for system; if targeted to a collection of users or user groups, install for user.
![]() Logon Requirement: Determine when installation can occur; this will be Only when a user is logged on, Only when no user is logged on, or Whether or not a user is logged on.
Logon Requirement: Determine when installation can occur; this will be Only when a user is logged on, Only when no user is logged on, or Whether or not a user is logged on.
A required (mandatory) deployment waits for the appropriate state before starting the installation.
![]() Installation Program Visibility: Define how the installation appears to the user during the installation process:
Installation Program Visibility: Define how the installation appears to the user during the installation process:
![]() Normal: Shows the installation program in its intended way, comparable to a normal installation.
Normal: Shows the installation program in its intended way, comparable to a normal installation.
![]() Minimized: Shows the installation program only on the task bar during installation. The window exists on the task bar during the installation process, although it is not the active window maximized on the user’s workstation.
Minimized: Shows the installation program only on the task bar during installation. The window exists on the task bar during the installation process, although it is not the active window maximized on the user’s workstation.
![]() Maximized: Shows the installation program as it would show if executed manually. The authors recommend this setting when installing programs requiring user intervention. It is also useful for package testing.
Maximized: Shows the installation program as it would show if executed manually. The authors recommend this setting when installing programs requiring user intervention. It is also useful for package testing.
![]() Hidden: Hides the program during installation. This option is recommended for fully automated program deployments.
Hidden: Hides the program during installation. This option is recommended for fully automated program deployments.
Installation program visibility settings are effective only if the installation has information to show the user. If you use a Windows Installer command line with the /passive switch, an installation progress bar appears during the installation if Installation program visibility is set to Normal or Maximized. Using /quiet makes the installation completely silent; no information appears during installation, regardless of the property setting. This visibility setting is also dependent on the next check box setting on this tab.
![]() Allow Users to View and Interact with the Program Installation: Allow user to see and/or interact with the installation. This is also used for troubleshooting when applications are not installing correctly. You might choose this option if the program requires the user to make a selection or click a button. If a program runs without this option and requires user intervention, it waits for the user interaction (which never occurs) and eventually times out at the maximum allowed runtime. This setting can be enabled only if the Logon requirement is configured to Only when a user is logged on.
Allow Users to View and Interact with the Program Installation: Allow user to see and/or interact with the installation. This is also used for troubleshooting when applications are not installing correctly. You might choose this option if the program requires the user to make a selection or click a button. If a program runs without this option and requires user intervention, it waits for the user interaction (which never occurs) and eventually times out at the maximum allowed runtime. This setting can be enabled only if the Logon requirement is configured to Only when a user is logged on.
The following two settings specify maximum runtime and estimated installation time of the deployment program for the application:
Maximum Allowed Run Time (Minutes): Define the maximum time the program is expected to run. There can be considerable variation in how a program runs, due to the speed of the system where it is being installed, program size, and network connectivity between the system and the source files used for the installation. The example in this chapter has the setting defaulted to 120 minutes. However, previous installations of 7-Zip indicate that it should complete within 5 minutes. ConfigMgr requires a setting between 15 and 720 minutes, so set this value to 15 minutes.
![]() Maximum Run Time Affects Installation: The client monitors the installation until maximum time is reached. If it does not complete by then, ConfigMgr sends a status message stating the maximum runtime is reached and that ConfigMgr will no longer monitor it, freeing up ConfigMgr to deploy additional software, if required.
Maximum Run Time Affects Installation: The client monitors the installation until maximum time is reached. If it does not complete by then, ConfigMgr sends a status message stating the maximum runtime is reached and that ConfigMgr will no longer monitor it, freeing up ConfigMgr to deploy additional software, if required.
Before a program runs, ConfigMgr checks for any defined maintenance windows to verify that the available window is larger than the maximum allowed runtime. If the window is not large enough, the client waits for an available window to deploy, unless the deployment is configured to ignore maintenance windows.
![]() Estimated Installation Time (Minutes): This is the expected installation time, and it appears to the user when selecting an application to install from Software Center.
Estimated Installation Time (Minutes): This is the expected installation time, and it appears to the user when selecting an application to install from Software Center.
![]() Should Configuration Manager Enforce Specific Behavior Regardless of the Application’s Intended Behavior: Use this dropdown to specify whether ConfigMgr should manage any operating system restart, providing this information to the user through the Software Center or Application Catalog. Following are the available settings:
Should Configuration Manager Enforce Specific Behavior Regardless of the Application’s Intended Behavior: Use this dropdown to specify whether ConfigMgr should manage any operating system restart, providing this information to the user through the Software Center or Application Catalog. Following are the available settings:
![]() Determine Behavior Based on Return Codes: Handles reboots based on codes configured on the Return Codes tab. The user sees a message similar to “Might require a reboot” in the Software Center and Application Catalog. While somewhat vague, this option is the most flexible, as the user is notified that a reboot is required if a defined return code is returned. This is a good user experience.
Determine Behavior Based on Return Codes: Handles reboots based on codes configured on the Return Codes tab. The user sees a message similar to “Might require a reboot” in the Software Center and Application Catalog. While somewhat vague, this option is the most flexible, as the user is notified that a reboot is required if a defined return code is returned. This is a good user experience.
![]() No Specific Action: Tells ConfigMgr and the end user that no reboot should be required after installation.
No Specific Action: Tells ConfigMgr and the end user that no reboot should be required after installation.
![]() The Software Install Program Might Force a Device Restart: Advises that ConfigMgr is not controlling the reboot, and the actual installation may force a restart without warning. For example, if your Windows Installer command line includes the argument
The Software Install Program Might Force a Device Restart: Advises that ConfigMgr is not controlling the reboot, and the actual installation may force a restart without warning. For example, if your Windows Installer command line includes the argument /ForceRestart, the installation process will force a restart. While this is the least desirable outcome, ConfigMgr at least expects a restart to occur. With any other setting, if the application forces a restart, ConfigMgr returns a failure status message about an unexpected system restart.
![]() Configuration Manager Client Will Force a Mandatory Device Restart: Use this setting if you know an application requires a restart; make sure the software installation does not force a restart on its own. Once the installation exits, ConfigMgr will notify the user that a restart is required or proceed to restart the computer. This decision is based on the user interaction, configured when you create a deployment (discussed in Chapter 14).
Configuration Manager Client Will Force a Mandatory Device Restart: Use this setting if you know an application requires a restart; make sure the software installation does not force a restart on its own. Once the installation exits, ConfigMgr will notify the user that a restart is required or proceed to restart the computer. This decision is based on the user interaction, configured when you create a deployment (discussed in Chapter 14).
TIP: CONFIGURING THE RESTART OPTION CORRECTLY
Take time to configure the restart option correctly to avoid surprising users with unexpected restarts.
![]() Requirements Tab: Defines the required settings for the DT to be installed. For this example (and by default when using the Create Application Wizard), there are no requirements. This tab allows you to specify requirements for an installation to specific operating systems (such as Windows 8.1 x64).
Requirements Tab: Defines the required settings for the DT to be installed. For this example (and by default when using the Create Application Wizard), there are no requirements. This tab allows you to specify requirements for an installation to specific operating systems (such as Windows 8.1 x64).
To create the basic requirement for 7-Zip (x64), click Add to display and configure the Create Requirement dialog. You can configure this DT to support all Windows 8.1 (64-bit) and all Windows 10 (64-bit) applications. Click OK to save the platform restriction. The Requirements tab for an application contains many more features than traditional programs. The “Managing and Creating Global Conditions” section, later in this chapter, discusses creating requirements.
![]() Return Codes Tab: Contains defined installation return codes for the DT. Default return codes include the most popular Windows Installer return codes. Update these as required. Click Add to create a new return code entry.
Return Codes Tab: Contains defined installation return codes for the DT. Default return codes include the most popular Windows Installer return codes. Update these as required. Click Add to create a new return code entry.
![]() Dependencies Tab: Specifies required prerequisite applications for the application. See the “Adding Application Dependencies” section, later in this chapter, for more information.
Dependencies Tab: Specifies required prerequisite applications for the application. See the “Adding Application Dependencies” section, later in this chapter, for more information.
When you are finished setting the properties of the DT, click OK to go to the application properties.
Content Locations Tab
The Content Locations tab for the application displays all targeted DPs and DP groups. Content distribution is discussed in detail in Chapter 14.
Supersedence Tab
Use the Supersedence tab to supersede an existing application with a new application or a newer version of the same application. Supersedence can automatically upgrade systems with an existing application or require the latest version on one targeted collection while continuing to support the previous version on a different collection. See the “Superseding Applications” section, later in this chapter, for more information.
The next sections dive a little deeper into some of the components of a ConfigMgr application.
Creating Detection Methods
This section discusses the importance of having a proper detection method and how to create complex detection methods.
Detection methods determine whether software is installed. They do not determine whether ConfigMgr installed the application. Software can be installed and uninstalled in nonstandard ways. When deploying a ConfigMgr application to a collection of devices (either available or required), the application state is evaluated on each targeted system on a regular interval—seven days by default and configurable using client settings. In addition, for user-targeted ConfigMgr applications, when a user installs an application from the Software Center or Application Catalog, the application appears in Software Center and is evaluated on the same interval as device-targeted applications.
The application deployment evaluation cycle can be triggered from the client (as with hardware inventory), or it can be configured using client settings. If a ConfigMgr application is deployed as required but not installed when the application deployment evaluation cycle runs, ConfigMgr automatically triggers an install/reinstall. Consider required applications to be a type of desired state. If a required deployment for an application exists, ConfigMgr ensures that the application is installed.
Detection methods are important because they report the current state of the ConfigMgr application (installed, not installed, or required). Correctly configuring detection methods is vital to keeping software from reinstalling.
Automatic software reinstallation can of tremendous benefit; however, if your detection methods are not correct, it can be a nightmare. Incorrect detection methods can cause an incorrect application state (installed or not) and repeated attempts to install the application. Be sure to test thoroughly.
Creating Detection Methods for Windows Installer Applications
ConfigMgr applications using Windows Installer generally use a simple detection method based on the Windows Installer product code. If you use the Create Application Wizard or Create Deployment Type Wizard and select a Windows Installer application, the detection method is automatically configured to use the Windows Installer product code. While this is normally sufficient, there are some caveats:
![]() Duplicate Product Codes: MSI product codes should be unique. The authors have encountered duplicate product codes for some repackaged applications. For example, maybe the packager created Package A and then reused Package A to create Package B but failed to generate a new product code. Or perhaps the packager created a major revision to Package A (say from revision 2.1 to revision 3.0) and reused the same product code. In traditional package and program software distribution, these errors would not be as significant. However, with the new application model, using invalid product codes as a detection method could cause an incorrect installation state.
Duplicate Product Codes: MSI product codes should be unique. The authors have encountered duplicate product codes for some repackaged applications. For example, maybe the packager created Package A and then reused Package A to create Package B but failed to generate a new product code. Or perhaps the packager created a major revision to Package A (say from revision 2.1 to revision 3.0) and reused the same product code. In traditional package and program software distribution, these errors would not be as significant. However, with the new application model, using invalid product codes as a detection method could cause an incorrect installation state.
![]() Repackaged Applications: When you repackage an application into Windows Installer format, that application will have a product code. This does not always tell you if the actual application is installed, especially if other users installed it with the original source.
Repackaged Applications: When you repackage an application into Windows Installer format, that application will have a product code. This does not always tell you if the actual application is installed, especially if other users installed it with the original source.
![]() Wrapper Installers: While similar to a repackaged application, the application installation is usually intact, so the wrapper simply calls the installation executable with the proper command-line arguments. The wrapper may then launch additional actions (such as installing a licensing file) to complete the installation. Wrappers have their place, but not always as a detection method.
Wrapper Installers: While similar to a repackaged application, the application installation is usually intact, so the wrapper simply calls the installation executable with the proper command-line arguments. The wrapper may then launch additional actions (such as installing a licensing file) to complete the installation. Wrappers have their place, but not always as a detection method.
While using the wizard to create a Windows Installer DT could save some steps, it might cause additional pain in the future. Be sure you know the origin of the installer (vendor, repackaged, and so on) and are aware of any additional steps the installation performs.
Consider adding additional detection clauses to the detection method when working with these special-case installers. For example, you may want to confirm that a file exists, is a specific version, or uses a specific Registry value. The next section discusses additional detection methods.
Following are the basic steps to add a Windows Installer detection method:
1. From the Deployment Type Properties dialog, select Detection Method and click Add Clause.
2. Choose the appropriate setting type. In this case, select Windows Installer and click Browse.
3. Navigate to the desired .msi file and click Open. The product code appears. By default, the rule only looks for the product code. You can modify the rule to require a minimum version of the product code.
4. Click OK to save the detection rule.
Adding Other Detection Methods
In addition to the Windows Installer detection method, you can use built-in methods based on file system and Registry properties. This section walks through examples of each. Basic steps to add a file-based detection method follow:
1. From the Deployment Type Properties dialog, select Detection Method and click Add Clause.
2. Choose the appropriate setting type. In this case, select File System and click Browse. Use the Browse File System dialog to browse the current computer or a different computer (provided that the system is online and you have administrative rights) by entering a computer name and clicking Connect. Expand the computer information in the left frame, find the desired file, and click OK.
The Detection Rule dialog appears, with file and folder information populated. The middle section automatically populates based on the file selected. It shows that 7zG.exe will be looked for in %ProgramFiles%7-Zip. An additional file version check was added and is shown in the bottom frame of Figure 11.3.
Notice the check box This file or folder is associated with a 32-bit application on 64-bit systems. Selecting it enables the DT detection rule to look first in the 32-bit file and Registry location; if not found, it looks in the 64-bit location on 64-bit operating systems. For example, if an application installs in C:Program Files (X86)foofoo.exe on a 64-bit system, enabling this check box causes the rule to check both C:Program Files (X86)foofoo.exe and C:Program Filesfoofoo.exe.

FIGURE 11.3 Creating a file system detection rule.
Following are the basic steps for adding a Registry-based detection method:
1. From the Deployment Type Properties dialog, select Detection Method and click Add Clause.
2. Choose the appropriate setting type. In this case, select Registry and click Browse.
3. Select the proper Registry key or value and click OK. You could create a basic Registry rule, looking for the existence of the HKLMSOFTWAREMicrosoftWindowsCurrentVersionUninstall{23170F69-40C1-2702-1602-000001000000} Registry key. As mentioned previously, the check box to include the x86 Registry path on x64 systems is enabled. You can also specify specific Registry name and value properties, if desired, as displayed in Figure 11.4.

FIGURE 11.4 Creating a Registry-based detection rule.
Creating detection methods is straightforward and similar to creating compliance settings. The challenge is working with your packaging team (or reverse-engineering a product installation) to determine the detection rules needed.
You can also group multiple clauses and change connectors between ANDs and ORs, as shown in Figure 11.5. In the dialog shown in Figure 11.5, select the last two rows in the grid and click Group and then toggle the Or to an And. Also, change the first And to an Or, as shown in the figure. This enables ConfigMgr to look for either the product code or the combination of Registry key and file path with version. 7-Zip is a good example of why you may want to create a detection method, as shown in this figure: The 7-Zip installer is available as both an .msi and an .exe, so the product code may or may not exist, depending on the installer used.
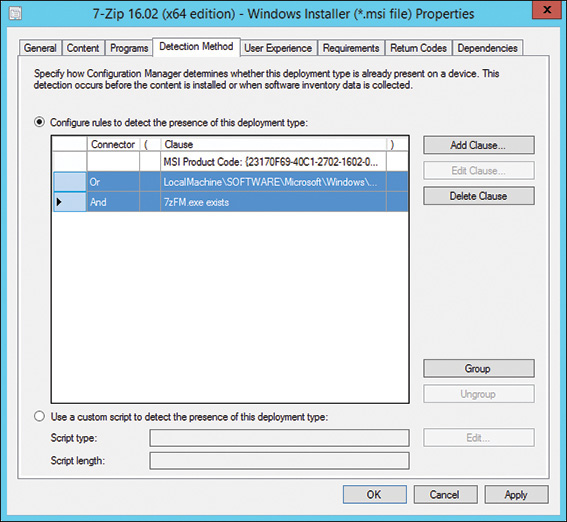
FIGURE 11.5 Configuring grouping rules.
Using Custom Script Detection Methods
The final detection method is to use a custom script, where you can specify any script you want. Most applications use standard detection methods (Windows Installer product code, file, or Registry), but you could encounter an application that requires a more complex way to determine if it is installed.
The custom script detection method requires writing a custom script for ConfigMgr to determine whether the software is installed. Be sure to return text from the script to confirm that the software is installed. If no text is returned, ConfigMgr understands that the software is not installed. The next two sections provide sample scripts to leverage the custom script detection method.
Creating a Custom Detection Method Script with PowerShell
From the Deployment Type Properties dialog, enable Detection Method to create a custom script and click Edit. Select PowerShell as the script type.
TIP: MODIFYING THE POWERSHELL EXECUTION POLICY IF REQUIRED
You may need to use client settings to adjust the PowerShell execution policy (under the Computer Agent group).
Listing 11.1 is a sample PowerShell script that checks for the existence of a file and verifies its version. Note the write-host Version Exists line. If all tests pass (that is, the file exists and the version is correct), text is written to standard output, signifying True for the script detection. If the script returns text, ConfigMgr considers the application installed.
LISTING 11.1 PowerShell Script to Check for Existence of a File and Its Version
$strFilePath = "c:Program Files7-Zip7zG.exe"
if (test-path) ($strFilePath)
{
   $file = get-childitem $strFilePath | select *
   if ($file.VersionInfo.ProductVersion -eq "16.2.0.0")
   {
          write-host "Version Exists"
   }
   else
   {
         #version does not exist
   }
}
else
{
   #file does not exist
}
Creating a Custom Detection Method Script with VBScript
Enable the Detection Method option and click Edit, this time selecting VBScript as the script type.
Listing 11.2 is a sample Visual Basic script that checks for the existence of a file and verifies the file version. Notice the wscript.echo "Proper Version!" line in the code. If all tests pass (that is, the file exists and the version is correct), text is written to standard output, signaling to ConfigMgr that the application is installed.
LISTING 11.2 Visual Basic Script that Checks for Existence of a File and Verifies the File Version
strFileName = "C:Program Files7-Zip7zG.exe"
Set filesys = CreateObject("Scripting.FileSystemObject")
if filesys.FileExists(strFileName) Then
   'File exists, now let's check version
   if(filesys.GetFileVersion(strFileName) = "16.2.0.0") then
      wscript.echo "Proper Version!"
   else
      'wrong version
   end if
else
'file doesn't exist
End If
TIP: AVOIDING SMART QUOTES WITH VBSCRIPT AND POWERSHELL
When you type or paste text into a text editor, you may create “smart quotes,” which curve the quotes around whatever is being quoted (both single and double quotes.) Smart quotes cause scripts to break. If you encounter smart quotes, paste the code into a text editor such as Windows Notepad and replace all smart quotes with standard quotes. Remember to replace both single and double quotes.
The Open option in the Script Editor dialog lets you browse to a script file to import it. You can enable scripts to run in the 32-bit environment on a 64-bit system. Some applications install to the 32-bit section of the Registry; this check box allows you to determine the environment where your script will run. The check box has no effect on 32-bit operating systems.
For more information about the application model and how it works, see https://blogs.msdn.microsoft.com/steverac/2015/06/01/configmgr-2012-the-application-model-and-advanced-detection-logic/.
Managing and Creating Global Conditions
Use global conditions to configure DTs to ensure that software only installs on a specific OS and service pack. This way you can deploy software to a collection of all systems, and only the systems that meet the platform requirements actually install the software. Global conditions are requirement rules representing business or technical conditions, and they specify how an application is provided and deployed to client devices. Using global conditions reduces the number of collections needed for software deployment.
TIP: COLLECTIONS VERSUS GLOBAL CONDITIONS
Whereas a deployment requires a target collection, a global condition does not. Say you want to deploy AppA to all systems in the HR organizational unit (OU); you would create requirement rules on the DT in AppA to ensure that it only installs on systems in that OU. You can then target a larger collection of systems than just the HR OU, which means you may not need to create a specific collection for the HR OU.
To review the built-in global conditions, open the Deployment Type properties dialog, select Requirements, and then click Add. Then choose from one of three categories, discussed in the following sections.
Device Global Conditions
Device conditions contain information specific to the client device. Figure 11.6 shows a built-in device condition with a device requirement where total memory is at least 8GB (8192).

FIGURE 11.6 Specifying a total physical memory requirement.
The following are the built-in device conditions:
![]() Active Directory Site: Specifies that the DT can only run for systems that are part of or not part of any specific AD site or sites.
Active Directory Site: Specifies that the DT can only run for systems that are part of or not part of any specific AD site or sites.
![]() Configuration Manager Site: Specifies that the DT can only run for systems that do or do not belong to a specific site code or codes.
Configuration Manager Site: Specifies that the DT can only run for systems that do or do not belong to a specific site code or codes.
![]() CPU Speed: Specifies a CPU speed requirement, in megahertz.
CPU Speed: Specifies a CPU speed requirement, in megahertz.
![]() Disk Space: Specifies an amount of free disk space that must be met to run the DT for the application. Select the system drive, a specific drive, or any drive. The value is specified in megabytes. You can use operators such as Equals, Not equals, Greater than, Less than, Greater than or equal to, and so on.
Disk Space: Specifies an amount of free disk space that must be met to run the DT for the application. Select the system drive, a specific drive, or any drive. The value is specified in megabytes. You can use operators such as Equals, Not equals, Greater than, Less than, Greater than or equal to, and so on.
![]() Number of Processors: Specifies the number of processors the device should have to run this DT.
Number of Processors: Specifies the number of processors the device should have to run this DT.
![]() Operating System: Specifies that the DT can only run on a specific OS, such as on Windows 7 64-bit operating systems.
Operating System: Specifies that the DT can only run on a specific OS, such as on Windows 7 64-bit operating systems.
![]() Operating System Language: Configures the operating system language or languages as a requirement for the DT.
Operating System Language: Configures the operating system language or languages as a requirement for the DT.
![]() Organizational Unit (OU): Specifies that the DT runs only on devices that belong to an OU that you add. To include child OUs, select the Include child OUs option.
Organizational Unit (OU): Specifies that the DT runs only on devices that belong to an OU that you add. To include child OUs, select the Include child OUs option.
![]() Total Physical Memory: Specifies how much memory is required to run the DT for the application. The value is entered in megabytes.
Total Physical Memory: Specifies how much memory is required to run the DT for the application. The value is entered in megabytes.
User Global Conditions
Only one user global condition currently exists: Primary Device. Set the requirement to True or False so that the appropriate software installs, based on whether the user is considered the primary user of the device.
Creating Custom Global Conditions
Create custom conditions, also known as global conditions, when device and user conditions are inadequate. These can contain LDAP queries, Windows Management Instrumentation (WMI) Query Language (WQL) queries, file and Registry queries, and many other custom configurations. The process is similar to the process of creating configuration items for compliance settings. You can build multiple queries into one custom global condition. Use the Create Deployment Type Wizard or create global conditions from the Global Conditions node under Software Library -> Application. Perform the following steps to create a custom condition:
1. In the Create Requirement dialog, select the Custom category.
2. Select Create -> New condition in the condition field to open a new page to create new custom conditions. The following fields are available in the upper section of this page:
![]() Name: Specify a name for the global condition.
Name: Specify a name for the global condition.
![]() Description: Specify a description for the global condition.
Description: Specify a description for the global condition.
![]() Device Type: Use the dropdown list to specify if the condition is for a Windows, Windows Mobile, or Nokia device.
Device Type: Use the dropdown list to specify if the condition is for a Windows, Windows Mobile, or Nokia device.
![]() Condition Type: Use the dropdown list to specify if the condition is a single setting or an expression (a group of settings).
Condition Type: Use the dropdown list to specify if the condition is a single setting or an expression (a group of settings).
Configure the actual condition in the lower section. Based on the settings type, multiple options are available. Available types follow:
![]() Active Directory Query: Create an LDAP query condition. For example, the output of the query can be a specific AD group.
Active Directory Query: Create an LDAP query condition. For example, the output of the query can be a specific AD group.
![]() Assembly: Specify an assembly from the global assembly cache that will be used as the condition for the DT.
Assembly: Specify an assembly from the global assembly cache that will be used as the condition for the DT.
![]() File System: Specify that a particular file or folder should be present on the device.
File System: Specify that a particular file or folder should be present on the device.
![]() IIS Metabase: Build a condition based on a specific property ID of an Internet Information Services (IIS) metabase.
IIS Metabase: Build a condition based on a specific property ID of an Internet Information Services (IIS) metabase.
![]() Registry Key: Specify that a certain Registry key should exist on a device in order to run the application DT. You can specify multiple Registry hives, such as
Registry Key: Specify that a certain Registry key should exist on a device in order to run the application DT. You can specify multiple Registry hives, such as HKEY_LOCAL_MACHINE, or click Browse and browse through the local Registry of the system running the console.
![]() Registry Value: Similar to the Registry key settings type, this option allows you to specify a key and value requirement.
Registry Value: Similar to the Registry key settings type, this option allows you to specify a key and value requirement.
![]() Script: Add a script that queries and returns data to ConfigMgr. Scripts can be in PowerShell, VBScript, or Java.
Script: Add a script that queries and returns data to ConfigMgr. Scripts can be in PowerShell, VBScript, or Java.
![]() SQL Query: Execute a SQL query against a SQL database. You can specify the SQL instance, the database name, a column, and the actual SQL statement. Click Open to upload an existing SQL query file. The query will run under the Local System account.
SQL Query: Execute a SQL query against a SQL database. You can specify the SQL instance, the database name, a column, and the actual SQL statement. Click Open to upload an existing SQL query file. The query will run under the Local System account.
![]() WQL Query: WMI contains information about the OS and where hardware is stored. For example, if your application is software required for a specific video card, you can write a WQL query to query for that card, including type and model.
WQL Query: WMI contains information about the OS and where hardware is stored. For example, if your application is software required for a specific video card, you can write a WQL query to query for that card, including type and model.
![]() XPath Query: Add an eXtensible Markup Language (XML) script to query and return data to ConfigMgr. You can specify the path for the file and the filename, along with the XPath query.
XPath Query: Add an eXtensible Markup Language (XML) script to query and return data to ConfigMgr. You can specify the path for the file and the filename, along with the XPath query.
3. Select the desired settings and click OK to save the global condition.
Global conditions are listed on the Create Requirements page, under Custom. Use this page to specify if the result of the condition should be True, False, or contain a value. Examples of custom global conditions follow:
![]() File System Condition: Figure 11.7 demonstrates creating a global condition based on a file system check. The figure shows a global condition using %ProgramFiles%ACME CorpLicensefile.lic.
File System Condition: Figure 11.7 demonstrates creating a global condition based on a file system check. The figure shows a global condition using %ProgramFiles%ACME CorpLicensefile.lic.

Add the requirement to your application after saving the global condition. Figure 11.8 shows that the requirement will pass only if the license file has a modified date of 8/22/2016 12:18:23 PM. You can create a requirement to check that a file exists. You can verify more than its existence; following is a list of file properties available for the custom file system global condition:
![]() File Size
File Size
![]() File Version
File Version
![]() Date Created
Date Created
![]() Date Modified
Date Modified
![]() Company
Company
![]() Product Name
Product Name
![]() SHA-1 Hash
SHA-1 Hash
![]() File Attributes
File Attributes

![]() WQL Query Condition: WMI queries can add flexibility to global conditions. Figure 11.9 shows how you can create requirement rules to deploy software to specific computer models.
WQL Query Condition: WMI queries can add flexibility to global conditions. Figure 11.9 shows how you can create requirement rules to deploy software to specific computer models.
Figure 11.9 shows creating a global condition that dynamically makes the computer model available, based on the Model property of the Win32_ComputerSystem WMI class. The condition runs a WQL query in the rootcimv2 namespace, Select Model from Win32_ComputerSystem. Leave the Where clause section empty to make the condition dynamic and then create a new requirement for the DT.
Figure 11.10 leverages the global condition created in Figure 11.9. Select the custom condition named Computer Model with the operator Contains followed by the computer model for the value. Note that some computer manufactures pad the Model property with extra spaces, so use Contains instead of Equals when possible. Now this requirement rule will be met only if the computer model property contains HP Elitebook 820 G2.
Global conditions enable targeted software deployments without needing custom collections for each deployment. Test thoroughly to verify that a condition works as expected.
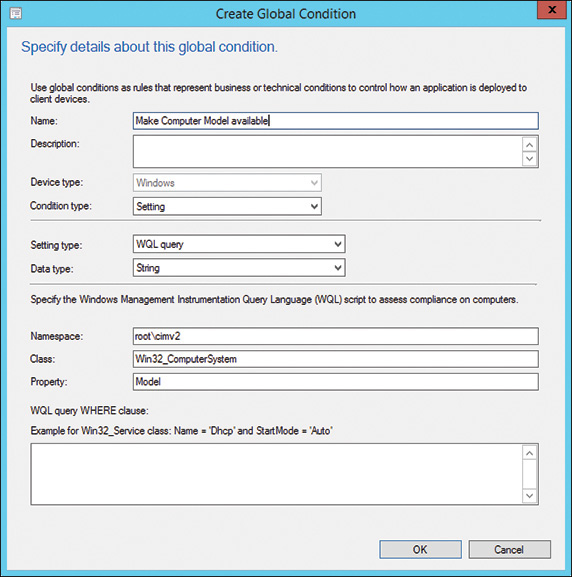

FIGURE 11.10 The Create Requirement dialog for the custom computer model condition.
Managing Application Management, Application Configuration, and Volume License Purchases
You can configure applications or restrict what an application can do by using mobile application management (MAM) policies. ConfigMgr can also manage Internet access for managed browsers and manage volume purchasing of iOS apps or Windows Store for Business apps. These topics are discussed in the following sections.
About Mobile Application Management Policies
MAM policies can modify or restrict app functionality. These policies enable you to restrict copy, cut, and paste operations and ensure that web links within an app are only opened by a managed browser. Currently these policies are supported for Android (version 4 and later) and iOS (version 7 and above).
Not all apps can be managed, as an app must be aware and support manageability by a management platform. To apply restrictions to apps using ConfigMgr with hybrid Intune, the app itself must incorporate the Microsoft Intune software development kit (SDK). This can be done in two ways:
![]() The developer incorporates the Microsoft Intune SDK while developing the app and makes the app publicly available in the app store.
The developer incorporates the Microsoft Intune SDK while developing the app and makes the app publicly available in the app store.
TIP: OVERVIEW OF MANAGEABLE APPS
Available apps built with the Intune SDK are listed in the Microsoft Intune mobile application gallery, at https://www.microsoft.com/cloud-platform/microsoft-intune-partners.
![]() The app is repackaged using a “wrapper” to make it manageable. Wrap Intune apps with the Microsoft Intune App Wrapping Tool, used to process in-house created apps by restricting features of the app without changing any code.
The app is repackaged using a “wrapper” to make it manageable. Wrap Intune apps with the Microsoft Intune App Wrapping Tool, used to process in-house created apps by restricting features of the app without changing any code.
TIP: MORE INFORMATION ABOUT WRAPPING APPLICATIONS
For information about wrapping in-house created apps for iOS, see https://docs.microsoft.com/intune/deploy-use/prepare-ios-apps-for-mobile-application-management-with-the-microsoft-intune-app-wrapping-tool.
For information on wrapping Android in-house created apps, see https://docs.microsoft.com/intune/deploy-use/prepare-android-apps-for-mobile-application-management-with-the-microsoft-intune-app-wrapping-tool.
Creating Application Management Policies
The example in this section shows the different options for an application management policy. Follow these steps:
1. In the ConfigMgr console, navigate to Software Library -> Application Management -> Application Management Policies.
2. Select Create Application Management Policy in the ribbon bar to start the Create Application Management Policy Wizard.
3. On the General page, provide a name and a description for the application management policy and then click Next.
4. On the Policy Type page, select the platform (either iOS or Android) and policy type (either General or Managed Browser) to use.
Depending on the chosen platform and policy type, the next page displays iOS Policy, Android Policy, or Managed Browser. Figure 11.11 shows the Application management policy for iOS page.

FIGURE 11.11 Application policy for iOS page.
The policy pages provide the following options:
![]() App Web Content Restrict web content to display in the managed browser: If this option is enabled, links are opened with the browser.
App Web Content Restrict web content to display in the managed browser: If this option is enabled, links are opened with the browser.
![]() Data Relocation Prevent Android Backups: (Android only) When this option is enabled, backups are disabled.
Data Relocation Prevent Android Backups: (Android only) When this option is enabled, backups are disabled.
![]() Data Relocation Prevent iTunes and iCloud Backups: (iOS only) When this option is enabled, backups are disabled.
Data Relocation Prevent iTunes and iCloud Backups: (iOS only) When this option is enabled, backups are disabled.
![]() Data Relocation Allow App to Transfer Data to Other Apps: Set to none, policy managed apps, or any app.
Data Relocation Allow App to Transfer Data to Other Apps: Set to none, policy managed apps, or any app.
![]() Data Relocation Allow App to Receive Data from Other Apps: Set to none, policy managed apps, or any app.
Data Relocation Allow App to Receive Data from Other Apps: Set to none, policy managed apps, or any app.
![]() Data Relocation Prevent “Save As”: Enable or disable.
Data Relocation Prevent “Save As”: Enable or disable.
![]() Data Relocation Restrict Cut, Copy and Paste with Other Apps: Set to none, policy managed apps, policy managed apps with paste in, or any app. Policy Managed Apps with Paste In means that cut or copied data can be pasted into other restricted apps, and the data cut or copied from any app can be pasted into this app.
Data Relocation Restrict Cut, Copy and Paste with Other Apps: Set to none, policy managed apps, policy managed apps with paste in, or any app. Policy Managed Apps with Paste In means that cut or copied data can be pasted into other restricted apps, and the data cut or copied from any app can be pasted into this app.
![]() Access Require Simple PIN for Access: When this option is enabled, users must create a personal identification number (PIN) that must be entered before using the app.
Access Require Simple PIN for Access: When this option is enabled, users must create a personal identification number (PIN) that must be entered before using the app.
![]() Access Number of Attempts Before PIN Reset: Specify the number of PIN entry attempts before the user must reset the PIN.
Access Number of Attempts Before PIN Reset: Specify the number of PIN entry attempts before the user must reset the PIN.
![]() Access Require Corporate Credentials for Access: When this option is enabled, requires users enter corporate credentials before using the application.
Access Require Corporate Credentials for Access: When this option is enabled, requires users enter corporate credentials before using the application.
![]() Access Require Device Compliance with Corporate Policy for Access: When this option is enabled, restricts access to apps when device is jailbroken or rooted.
Access Require Device Compliance with Corporate Policy for Access: When this option is enabled, restricts access to apps when device is jailbroken or rooted.
![]() Access: Recheck the Access Requirements After (Minutes) - Timeout: Specify the time before access requirements are rechecked (30 minutes by default).
Access: Recheck the Access Requirements After (Minutes) - Timeout: Specify the time before access requirements are rechecked (30 minutes by default).
![]() Access Recheck the Access Requirements After (Minutes) - Offline Grace Period: Specify the time before access requirements are rechecked if the device is offline (720 minutes by default).
Access Recheck the Access Requirements After (Minutes) - Offline Grace Period: Specify the time before access requirements are rechecked if the device is offline (720 minutes by default).
![]() Additional Policies Encrypt App Data: When this option is enabled, encrypts all data associated with the app.
Additional Policies Encrypt App Data: When this option is enabled, encrypts all data associated with the app.
iOS data is encrypted using the device-level encryption provided by the OS when the device is at rest; this requires that a device PIN policy be set by the IT administrator.
Android data encryption is provided by Microsoft during file I/O operations, using Advanced Encryption Standard (AES-128) encryption in Cipher Block Chaining (CBC) mode.
![]() Additional Policies Block Screen Capture: (Android only) When this option is enabled, blocks screen capture capabilities of the device when using the app.
Additional Policies Block Screen Capture: (Android only) When this option is enabled, blocks screen capture capabilities of the device when using the app.
The Managed Browser page provides two options:
![]() Allow the managed browser to open only the URLs listed below (allow list)
Allow the managed browser to open only the URLs listed below (allow list)
![]() Block the managed browser from opening the URLs listed below (block list)
Block the managed browser from opening the URLs listed below (block list)
One option must be used; specify the allow list or block list in the Allowed or blocked URLs section of the Managed Browser page. URLs can be provided using wildcards such as https://*.odessey.com or https://*. *.microsoft.com is always allowed.
5. Check the settings on the Summary page; click Previous to reach the page where you want to make modifications. When finished, click Next to create the application management policy.
6. On the Completion page, ensure that the application management policy was created successfully and click Close to close the wizard.
Associate the application management policy with a DT when creating the deployment defined for a collection. Apps requiring a policy automatically prompt for a policy with which to be associated. When the managed browser is a DT, you must provide a general and managed browser policy, as the managed browser is also a managed app.
If the Intune-managed browser was previously installed, you cannot manage it with ConfigMgr application management policies. The app must be deployed with those policies.
The managed browser app does not open sites with expired or untrusted certificates. It cannot use any settings set for the built-in browser of the device, as it cannot access those settings. The browser cannot block access when intermediate services are used to access the site, such as using the cached or translated version of the page from a search engine. If the Require simple PIN for access or Require corporate credentials for access mobile application management policy setting is set and a user clicks the help link on the authentication page, the help can be used to browse to any Internet site, even sites blocked in the application management policy.
Because application management policy is linked to a DT, conflicts can occur when you apply multiple policies:
![]() The value in conflict is removed and a built-in conflict value of the app is used if the conflict occurs during its first deployment.
The value in conflict is removed and a built-in conflict value of the app is used if the conflict occurs during its first deployment.
![]() If MAM policies are already applied and a conflicting policy is applied with conflicting settings, existing policy settings are retained.
If MAM policies are already applied and a conflicting policy is applied with conflicting settings, existing policy settings are retained.
Policy settings are tattooed in the device and not removed when the device is unenrolled from ConfigMgr, even if the app is uninstalled and reinstalled.
Managed browser policies can also conflict; in this case, URLs are not enforced if the modes in each policy are the same or different or when the policy is received for the first time. If a second policy is applied with conflicting policies, these policies are ignored.
Monitor application management policies using the deployment properties for the ConfigMgr application to which the policy is specified. The policy is found under Related Objects.
App Configuration Policies
App configuration policies configure the application with specific settings required when a user runs the app. These could contain language settings, a company logo as branding, and more. Policies are supported on iOS devices running iOS 7 and later and can be configured using individual property list keys and values or with app configuration XML files containing listings of property list keys and values. The format of the XML property list varies, depending on the app you are configuring. Contact the app’s supplier for details about the exact format to use.
Intune supports only the following data types in a property list:
![]()
<integer>
![]()
<real>
![]()
<string>
![]()
<array>
![]()
<dict>
![]()
<true /> or <false />
Intune supports the following token types (which are placed between the {{ }} characters):
![]()
{{userprincipalname}}
![]()
{{mail}}
![]()
{{partialupn}}
![]()
{{accountid}}
![]()
{{deviceid}}
![]()
{{userid}}
![]()
{{username}}
![]()
{{serialnumber}}
![]()
{{serialnumberlast4digits}}
![]()
{{udidlast4digits}}
Perform the following steps to create an app configuration policy:
1. In the ConfigMgr console, navigate to Software Library -> Application Management -> App Configuration Policies. Click Create App Configuration Policy on the ribbon bar to start the Create App Configuration Policy Wizard.
2. On the General page, provide a name and description. You can also assign a category to the policy for searching and filtering afterward by using the ConfigMgr console. Click Next.
3. Use the iOS policy page to specify name and value pairs or browse for a property list file. Click Next.
Enable the Specify name and value pairs option to create pairs. To get there, click New to open the Add Name/Value Pair dialog, where you can specify type, name, and value. Browse to a property list file to paste the app configuration policy or click Select file to import an XML file with the configuration.
4. On the Summary page, verify the settings and make modifications as needed by clicking Previous. When all settings are validated, click Next to create the policy.
5. On the Completion page, verify that the policy was created successfully. Click Close.
Listing 11.3 is an example of an app configuration XML file.
LISTING 11.3 Sample App Configuration XML File
<dict>
 <key>userprincipalname</key>
  <string>{{userprincipalname}}</string>
  <key>mail</key>
  <string>{{mail}}</string>
 <key>partialupn</key>
  <string>{{partialupn}}</string>
  <key>accountid</key>
  <string>{{accountid}}</string>
  <key>deviceid</key>
  <string>{{deviceid}}</string>
  <key>userid</key>
  <string>{{userid}}</string>
  <key>username</key>
  <string>{{username}}</string>
  <key>serialnumber</key>
  <string>{{serialnumber}}</string>
  <key>serialnumberlast4digits</key>
  <string>{{serialnumberlast4digits}}</string>
  <key>udidlast4digits</key>
  <string>{{udidlast4digits}}</string>
</dict>
After creating the app configuration policy, associate it with a DT when you create the deployment. Use the App Configuration Policies page of the Deploy Software Wizard, available when deploying Apple DTs.
Apple Volume License Purchasing
ConfigMgr administrators can deploy and manage iOS apps purchased in volume from the Apple App Store, using the Apple Volume Purchase Program (VPP) for Business. This requires ConfigMgr to be configured in hybrid device management mode, using Microsoft Intune. After joining the VPP, you can configure the VPP token to be uploaded into ConfigMgr. The following functionality becomes available:
![]() Purchased apps are displayed in the ConfigMgr console.
Purchased apps are displayed in the ConfigMgr console.
![]() Purchased apps can be deployed and monitored for installation and the number of licenses used in ConfigMgr.
Purchased apps can be deployed and monitored for installation and the number of licenses used in ConfigMgr.
![]() Licenses can be reclaimed by uninstalling volume-purchased apps.
Licenses can be reclaimed by uninstalling volume-purchased apps.
![]() Volume purchase change information is synchronized with ConfigMgr twice a day. Full synchronization takes place every seven (7) days, or you can click Sync to perform a manual sync.
Volume purchase change information is synchronized with ConfigMgr twice a day. Full synchronization takes place every seven (7) days, or you can click Sync to perform a manual sync.
If you deploy an iOS volume-purchased app to a device without a user, it is not installed. Configure user affinity by using the Device Enrollment Program (DEP) or Apple Configurator from Apple. The VPP token is valid for one year, after which it should be renewed.
Follow these steps to upload the Apple VPP token in ConfigMgr:
1. In the ConfigMgr console, navigate to Administration -> Cloud Services -> Apple Volume Purchase Program Tokens.
2. Click Add Apple Volume Purchase Program Token in the ribbon bar to start the Add Apple Volume Purchase Program Wizard.
3. Use the General page to configure the following settings:
![]() Name: Specify the name for the token.
Name: Specify the name for the token.
![]() Token: Click Browse to select the token downloaded from Apple.
Token: Click Browse to select the token downloaded from Apple.
![]() Description: Provide a description to help identify the token in the ConfigMgr console.
Description: Provide a description to help identify the token in the ConfigMgr console.
![]() Assigned Categories to Improve Searching and Filtering: Specify or assign a category to the VPP token that can be used in searches.
Assigned Categories to Improve Searching and Filtering: Specify or assign a category to the VPP token that can be used in searches.
4. Click Next to complete the wizard.
View the token’s information in the Apple Volume Purchase Program Tokens node. This includes when it was last updated, the expiration date, and when it was last synchronized. Volume-licensed apps are also visible in License Information under Software Library -> Application Management -> Store Apps. Select an app and click Create Application to create a ConfigMgr application containing the iOS volume-purchased app using deeplinking. When deploying this type of app, Microsoft supports it only as a required app.
Integrating Windows Store for Business
Windows Store for Business allows a company to volume purchase or individually purchase Windows apps for Windows 10-based devices. Connecting Windows Store for Business to ConfigMgr lets you synchronize purchased app information, making that information available in the console and for deployment, as in any other ConfigMgr application. Synchronization occurs every 24 hours.
For Windows 10 Azure AD-joined devices, users and devices can connect directly to the store to get the app (called an online app) and its license. For all other scenarios, apps can be cached for direct deployment within the on-premise network (an offline app); no store or Internet connection is needed.
More information about integrating Windows Store for Business is available at https://technet.microsoft.com/library/mt740630.aspx. This article will be updated after a new ConfigMgr build is released that provides production support for Windows Store for Business integration.
TIP: MORE INFORMATION ABOUT WINDOWS STORE FOR BUSINESS
For information about Windows Store for Business, see https://technet.microsoft.com/itpro/windows/manage/windows-store-for-business-overview.
More About Managing Applications
Applications are a large component of ConfigMgr. The preceding sections provide an extensive discussion about creating applications. The next sections describe additional features that enable you to leverage applications to their fullest potential.
Adding Application Dependencies
Many applications have software prerequisites. For example, the FreeMind application, discussed in Chapter 12, requires the Java Runtime Environment. Package/program deployment incorporates the Run another Program First feature, which works well to install software prerequisites but cannot determine if that software is already installed. ConfigMgr might run the prerequisite software again (depending on advertisement and program rerun properties), even if it is already installed.
ConfigMgr application dependencies are smarter than Run another Program First. When an application has a dependency, detection and requirement rules run to determine which DT needs to be installed, if any. If the dependent application is already installed (per detection rules), ConfigMgr skips that installation, checks additional dependencies, and installs the application. Following are some items to note about application dependencies:
![]() An application can only be dependent on another application (not on a package/program).
An application can only be dependent on another application (not on a package/program).
![]() A package/program cannot be dependent on an application.
A package/program cannot be dependent on an application.
![]() Application dependencies are honored during OSD. (Package/program dependencies are not and must be called out separately in a TS.)
Application dependencies are honored during OSD. (Package/program dependencies are not and must be called out separately in a TS.)
![]() Dependent applications install in a nondeterministic order. If an application requires a specific order, create the dependency for that application rather than creating one application with all dependencies defined.
Dependent applications install in a nondeterministic order. If an application requires a specific order, create the dependency for that application rather than creating one application with all dependencies defined.
![]() Create a separate dependency group for each application requirement. When creating a dependency group, only one application from the group must be installed for the requirement to be considered satisfied.
Create a separate dependency group for each application requirement. When creating a dependency group, only one application from the group must be installed for the requirement to be considered satisfied.
If any of these constraints makes the task more difficult, consider using a TS. You can create a generic TS to install software in a well-defined sequence. However, you can only deploy task sequences to devices.
NOTE: USING A TS TO INSTALL COMPLEX SOFTWARE CONFIGURATIONS
While task sequences are designed primarily for deploying operating systems, they can deploy ConfigMgr applications and packages. This is useful with complex applications or situations, such as when the installation is a combination of ConfigMgr applications and packages.
The following procedure installs FreeMind, which requires Oracle Java. The example uses an Oracle Java ConfigMgr application and the FreeMind ConfigMgr application. Perform the following steps to create the dependency:
1. From the Deployment Type dialog in the ConfigMgr console application, select the Dependencies tab. Click Add to display the Add Dependency dialog.
2. Enter a group name for the installation (for this example, call it Oracle Java) and click Add to display the Specify Required Application dialog.
3. Select the required application—in this case, the Oracle Java JRE 8 Update 11 deployment type—and click OK. The Add Dependency dialog displays the dependency information, shown in Figure 11.12. The Auto Install check box is enabled by default, indicating that the software will be automatically installed on targeted systems.
4. Click OK in the Add Dependency Wizard and then click OK again to save the DT and the application.
Now when you deploy the FreeMind ConfigMgr application, ConfigMgr automatically installs the Oracle Java Runtime Environment requirement first.

Managing Revision History
Each time you modify an application, ConfigMgr creates a new revision of that application, allowing you to easily revert to a previous application state. When you restore a revision, ConfigMgr creates a duplicate of the desired revision and assigns it the latest revision number. Figure 11.13 shows a sample application revision history for 7-Zip.
The figure shows that only the last revision is currently referenced. You can select and delete any revision without a reference. A primary site has a site maintenance task, Delete Unused Application revisions, that removes any revision that is not referenced and that is at least 60 days old.
To revert to a previous version, select the desired version and click Restore. Notice that newer versions do not disappear. When you select a revision to restore, ConfigMgr clones the desired revision into a new revision.
Older revisions may still have assigned references. View a revision to identify the reference and then go to the reference and reconfigure it to a newer revision, if desired. You cannot delete a revision that has references.

CAUTION: REVISIONS AND RELATED CONTENT ON DPS
An important caveat to remember about revision history is that DP content is kept for each revision. Say you have a new application, with a DT that has a content source path. You send that content to the DPs and notice that the size is 8GB. You know this is incorrect and investigate; you discover that you are using the wrong source path, so you change the source path for the DT and, increment the revision history. However, the previous version of the application remains in the revision history, and as long as it is in revision history, that extra 8GB of content remains on the DPs.
When you finish testing and are ready to deploy an application to production, consider implementing a standard process to clean up any old revision history entries so you can start as cleanly as possible in production.
Exporting and Importing Applications
Configuration Manager can export objects from the console and import them into a different infrastructure, enabling you to migrate objects between ConfigMgr environments. Follow these steps to export one or more objects:
1. In the console, navigate to Software Library -> Applications. Select one or more applications, right-click, and select Export.
2. Enter a path for the destination to export, making sure to include the .zip file extension. Review Figure 11.14 for more information.

FIGURE 11.14 General page of the Export Application Wizard.
You can choose to export all dependencies, supersedence relationships, and global conditions. You can also choose to export content for the selected applications and dependencies.
3. Continue through the additional pages to complete the wizard.
4. Copy the .zip file to a new infrastructure and import as desired.
If you import a ConfigMgr application that already exists, ConfigMgr adds a revision, unless the action is modified to create a new application.
TIP: MODIFYING THE DEPLOYMENT TYPE PATH AFTER IMPORTING
After importing the exported ConfigMgr application, notice the path of the DT pointing to the location from where you imported the .zip file. The authors recommend that you copy referenced folders to your DSL and ensure that they align with your designed folder structure by modifying the path of the DT.
Superseding Applications
Use supersedence when moving to a new revision of a product. Say you have FooApp version 1.0 and are deploying to multiple collections. When FooApp 2.0 releases, create a new application for FooApp 2.0. When you know it works, supersede FooApp version 1.0 with version 2.0.
Supersedence does not automatically execute an installation. However, if an application was previously deployed as Required, that software can reinstall automatically. Figure 11.15 shows the Uninstall check box enabled, instructing ConfigMgr to uninstall the previous version, based on the uninstall command-line argument in the superseded application, and install the new version. If this option is not enabled, ConfigMgr runs the replacement DT without uninstalling the previous version. Running the replacement DT is expected in some situations, and the installation will upgrade the existing application. As always, test before deploying to production.

FIGURE 11.15 Specifying the supersedence relationship.
If an application has more than one DT, select the desired old and new DTs to map them to run together. You do not need to re-deploy an old version of software to take advantage of supersedence. Say that myApp version 1.0 has been in production for a year, and you just upgraded to ConfigMgr Current Branch. Create an application for myApp version 1.0, create myApp version 2.0, and supersede myApp 1.0. When you deploy myApp 2.0, ConfigMgr detects that 1.0 is installed and follows supersedence rules.
Retiring and Deleting Applications
When you no longer need to create new deployments for an application, right-click the application and select Retire. When an application is retired, you can no longer create deployments or distribute it to DPs unless you reinstate it. Retiring an application does not affect existing deployments; only new deployments.
To delete an application, remove all references to it. References such as dependent applications, active deployments, and dependent task sequences can affect your ability to delete an application.
Remember that you can export an application (with or without associated content) and store it on a file share in case you need to restore it later.
Best Practices for Working with Applications
A common misconception about installing applications is that ConfigMgr supports each installation installer type. This is not true; there are some prerequisites for ConfigMgr to successfully distribute and install software to remote clients. The next sections discuss some best practices for working with applications, including installing software and working with task sequences.
Best Practices for Installing Software
Most software installed with ConfigMgr uses an installer; this could be a Windows Installer (.msi) or third-party installation method such as installers from InstallShield, Wise, Nullsoft, Inno, and so on. You can also use script methods. Keep the following in mind about application installers:
![]() If the installer can install the software unattended (without user interaction), you could use it as a DT within an application or as a program within a package.
If the installer can install the software unattended (without user interaction), you could use it as a DT within an application or as a program within a package.
![]() If the software cannot be installed with an installer but can be installed unattended or requires company-specific modifications, it uses a repackaging process. This process involves capturing a software installation procedure, modifying it, and repackaging the installation to make it repeatable for large-scale rollouts. Microsoft provides the Orca tool to perform some minor adjustments to its Windows Installer .msi installers. However, most organizations repackaging software use third-party tools from InstallShield, Raynet, or Flexera. Repackaging has been used since early versions of Systems Management Server (SMS)/ConfigMgr.
If the software cannot be installed with an installer but can be installed unattended or requires company-specific modifications, it uses a repackaging process. This process involves capturing a software installation procedure, modifying it, and repackaging the installation to make it repeatable for large-scale rollouts. Microsoft provides the Orca tool to perform some minor adjustments to its Windows Installer .msi installers. However, most organizations repackaging software use third-party tools from InstallShield, Raynet, or Flexera. Repackaging has been used since early versions of Systems Management Server (SMS)/ConfigMgr.
CAUTION: BE CAREFUL WHEN REPACKAGING MICROSOFT INSTALLER FILES.
When repackaging Microsoft Installer files, take care not to change detection settings, uninstallation options, or installation results; such changes could lead to issues when deploying with ConfigMgr. Also make sure that a unique Windows Installer ID is generated for each new packaged .msi.
Before trying to distribute software with ConfigMgr, the authors recommend testing an unattended installation on a nonproduction machine. After confirming that the installation works, define the DT in ConfigMgr.
NOTE: COMMUNITY INFORMATION ABOUT UNATTENDED SOFTWARE INSTALLATION
Testing whether software can be installed unattended is often a matter of finding the right command-line parameters to use with the software installer. The Internet has a valuable community-driven forum for users to share their experiences with software installations. Previously known as AppDeploy.com, the forum now goes by the name AppDetails. See http://www.appdetails.com.
Testing, Testing, Testing
The best way to avoid issues with ConfigMgr packaging is to test as many contingencies as possible. If you create a software package to deploy to 1,000 workstations, you almost certainly will run into unexpected configurations. Effective testing can limit the risks of program failures or unexpected complications.
To test software packages, you need a testing lab (also discussed in Chapter 4, “Architecture Design Planning”) that includes computers representative of the systems to which you will deploy the package.
It may be difficult to obtain nonproduction versions of actual systems for testing purposes. Address this issue with a virtual lab. Products such as Hyper-V and VMware let you run multiple systems without using an entire lab of physical hardware. Virtual labs also have smaller physical footprints. You can quickly return a computer to an earlier configuration, which makes it easy to roll back an OS to its previous state (prior to deploying the software). This is useful when testing software packages, as you often need to go through multiple testing iterations. Always build your virtual test systems using the same procedure as with a physical system.
However, physical lab environments provide real examples of systems where you would deploy the package. There are cases in which only a physical environment can identify issues such as a driver conflict between the software package and a set of computers running on a specific hardware platform. These computers should be actual production systems taken from those groups where you are deploying software packages, and they should represent the types of hardware in your environment.
The authors recommend using a hybrid lab environment that includes physical and virtual systems. Using both types of systems minimizes the number of systems required yet provides many of the benefits of a physical lab. Create a set of tests that identify the types of conditions to test before releasing the software package. Following are some examples:
![]() Installing the software package where there is not enough disk space
Installing the software package where there is not enough disk space
![]() Deploying to an unsupported platform
Deploying to an unsupported platform
![]() Deploying where the software is already installed
Deploying where the software is already installed
![]() Deploying with other software packages installed that may cause conflicts
Deploying with other software packages installed that may cause conflicts
While tests vary depending on the specific software, identifying potential failure conditions ahead of time and testing for them can significantly increase the likelihood of creating a functional package.
Before ConfigMgr executes a DT, it checks whether the application is already installed, avoiding unnecessary execution. After installation, ConfigMgr checks to verify that the detection method validated successfully. These checks make it important to correctly specify the detection method and understand the process before deploying software to remote agents.
The following occurs when ConfigMgr installs software:
1. ConfigMgr executes the command line specified in the DT.
2. ConfigMgr monitors the process ID of the executable. When the process ID is no longer active, ConfigMgr uses the return code to determine whether installation was successful and whether a reboot is needed. The Maximum allowed runtime value specifies how long the installation may run and is available for DTs and programs. Return codes are specified based on the MSI known return codes, which are as follows:
![]() 0: Successful installation, no reboot is necessary.
0: Successful installation, no reboot is necessary.
![]() 1707: Successful installation, no reboot is necessary.
1707: Successful installation, no reboot is necessary.
![]() 3010: Soft reboot required.
3010: Soft reboot required.
![]() 1641: Hard reboot needed.
1641: Hard reboot needed.
![]() 1618: Fast retry, meaning another installation is already running.
1618: Fast retry, meaning another installation is already running.
3. If a reboot is required, users are presented with a popup window asking whether to reboot the machine at this time. Configure the installation such that it utilizes the information that a reboot is needed. Do not let the application reboot the system, as that causes the installation to fail from a ConfigMgr perspective.
CAUTION: POTENTIAL ISSUES WITH SOFTWARE INSTALLATION WRAPPERS
Some organizations use installation wrappers, which can be command files or scripts. They typically provide basic logging and determine the required environment for the installation. A wrapper is a template, meaning that individuals creating applications need only fill in the information necessary for the installation.
With packages and programs, wrappers typically were not a problem and could be used to install a 32-bit version of the software on 32-bit systems or a 64-bit version of the software on 64-bit systems. However, installation wrappers often return to ConfigMgr only the return code of the last action performed (such as writing to a log file) and do not take into account the return code of the installer that was executed. For example, if the wrapper logged to a log file as its last action, which was successful, the wrapper would return a return code of success to ConfigMgr even if the installation failed! This can have serious consequences: The detection method executed afterward would determine that the application actually is not installed, causing installation to eventually fail from a ConfigMgr perspective.
ConfigMgr executes the command line specified in the DT or program, waits for the process to finish, and determines whether the installation was successful based on return codes; this means there is time when ConfigMgr logging is unavailable. The authors recommend enabling logging on the installation command line or globally on a per-machine basis. If this is enabled, you can determine why an installation failed.
TIP: SAMPLE APPLICATIONS FROM THE SOFTWARE DEVELOPMENT KIT
The System Center 2012 Configuration Manager SDK includes the Application Model Kit, which contains a set of exported applications demonstrating the use of various features of the application model. Import the .zip file for the kit to create sample applications and some custom global conditions.
The latest version of the SDK is for ConfigMgr 2012 R2 and available at https://www.microsoft.com/download/details.aspx?id=29559. While this version is specifically for an older version of ConfigMgr, the Application Model Kit can still be used with ConfigMgr Current Branch.
Best Practices for Working with Applications in Task Sequences
Although Microsoft recommends that you deploy applications for users, applications could also be included within a TS during OSD. Consider Microsoft Office, which is commonly deployed in a TS because it provides application components such as Word and Excel to end users and also serves as a type of middleware for other applications.
Because of how task sequences run, you must take extra precautions when installing applications in a TS, for several reasons:
![]() The task sequence runs in the context of the Local System account.
The task sequence runs in the context of the Local System account.
![]() The explorer.exe task is not running during a task sequence.
The explorer.exe task is not running during a task sequence.
![]() The installer must be fully unattended, and no user interaction is allowed. If the installer requires interaction, the task sequence fails.
The installer must be fully unattended, and no user interaction is allowed. If the installer requires interaction, the task sequence fails.
Follow these steps to install user-targeted applications after the TS finishes:
1. Define a user device affinity (UDA), filling the SMSTSSUdaUsers variable with the account of the user using the machine. Prompt for its value using a pre-hook execution command or by creating an empty SMSTSUdaUsers variable on the computer object or collection.
2. While deploying the application and specifying the deployment settings, ensure that the purpose is set to Required and the Pre-deploy software to the user’s primary device option is checked.
Support for Write Filters in Windows Embedded
Windows Embedded is designed for use in embedded systems—that is, devices with all-in-one functionality. Microsoft makes Windows Embedded available for original equipment manufacturers (OEMs) to preload on embedded devices.
Operational reasons may make it undesirable to write to storage media in Windows Embedded devices. By redirecting all write requests to a separate disk partition or RAM, a write filter allows the runtime image to maintain the appearance of a writable image without committing changes to the storage media. Changes made to the system are discarded at restart; this is also true for any software installation that occurs while the write filter is enabled.
Microsoft supports write filters with the Commit changes at deadline or during a maintenance window (requires restarts) option (enabled by default) in the Deploy Software Wizard. When this option is enabled, the software is installed when the deadline is reached or when the device enters a maintenance mode time frame defined by the settings for the collection of which it is a member; this is known as forced persist. If this option is not enabled, ConfigMgr assumes that you have another process for committing the software; this is called opportunistically persist.
When ConfigMgr disables the write filters, the device is put in a servicing lock mode, and only members of the Local Administrators security group are allowed to log on.
Deploying PowerShell Scripts
ConfigMgr Current Branch version 1706 introduced, as a pre-release feature, the ability to deploy PowerShell scripts to collections. This feature allows a ConfigMgr administrator to import PowerShell scripts into ConfigMgr. Scripts can be edited in the ConfigMgr console if they are not signed. The console also provides the ability to approve or deny scripts; this can be done by an approver that is not the author of the script to provide segregation of duties, or it can be done by the author. Scripts can be run targeted at collections, running the script in near real time on client devices. Results returned by a script can be examined in the ConfigMgr console.
PowerShell Script Prerequisites and Configuration
In order to run a PowerShell script on a client, the client must be running ConfigMgr Current Branch version 1706 or newer and have PowerShell version 3.0 or later installed.
By default, the individual who creates the script cannot approve it. You can modify this behavior in the Hierarchy Settings Properties dialog box by clearing the check box at the Do not allow script authors to approve their own script option on the General tab.
Creating, Editing, Approving, and Denying Scripts
You can create, edit, approve, and deny scripts in the Scripts section of the Software Library. Perform the following steps to create a script:
1. Open the ConfigMgr console and navigate to Software Library -> Scripts.
2. Click Create Script in the Create group on the Home tab.
3. On the Script page of the Create Script wizard, configure the following settings:
![]() Script Name: Provide a name for the script.
Script Name: Provide a name for the script.
![]() Script Language: For now, there is only one option available (PowerShell), but this may change in the future.
Script Language: For now, there is only one option available (PowerShell), but this may change in the future.
![]() Script: Paste the script or click Import and browse for a script to import.
Script: Paste the script or click Import and browse for a script to import.
Once the script is created, it displays in the script list with the status Waiting for approval. Scripts must be approved before they can be run on a collection.
To approve or deny a script, follow these steps:
1. Open the ConfigMgr console and navigate to Software Library -> Scripts.
2. Click on a script that has the Waiting for approval or Approved status and then click Approve on the ribbon bar to start the Approve or Deny Script wizard.
3. In the wizard, either approve or deny the script and provide comments for later reference.
Monitoring Scripts
A ConfigMgr administrator can view the results of running scripts from the Monitoring workspace in the ConfigMgr console. Follow these steps:
1. Open the ConfigMgr console and navigate to Monitoring -> Script Status.
2. In the Script Status list, view the results of each script that ran on a client device. Exit code 0 typically means that the script ran successfully.
Summary
This chapter discussed creating ConfigMgr applications and explained how applications include DTs. DTs have detection and requirement rules, which you can use to deploy software using fewer collections. This chapter also covered the application state and how to reinstall required applications based on detection rules.
This chapter described how to use custom scripts for detection methods, as well as how to create and leverage global conditions. It covered exporting and importing of applications, revision history, dependency, and supersedence. It also covered deploying PowerShell scripts that run against collections. Chapter 12 shows how to create DTs for different types of applications.