
One of C#’s strengths is the ease with which your code can use all sorts of external components. All C# programs use the components that make up the .NET Framework class library, but many cast their net wider—GUI application developers often buy control libraries, for example. And it’s also common for software developers to want their own code to be reusable—perhaps you’ve built up a handy library of utilities that you want to use in all the projects in your organization.
Whether you’re producing or consuming components, C# makes it simple to achieve binary reuse—the ability to reuse software in its compiled binary form without needing the source code. In this chapter, we’ll look at the mechanisms that make this possible.
In .NET, an assembly is a single
software component. It is usually either an executable program with a file
extension of .exe, or a library with
a .dll extension. An
assembly can contain compiled code, resources (such as bitmaps or string
tables), and metadata, which is information about
the code such as the names of types and methods, inheritance relationships
between types, whether items are public
or private, and so on.
In other words, the compiler takes pretty much all the information in the source files that you added to your project in Visual Studio, and “assembles” it into a single result: an assembly.
We use this same name of “assembly” for both executables and
libraries, because there’s not much difference between them—whether you’re
building a program or a shared library, you’re going to end up with a file
containing your code, resources, and metadata, and so there wouldn’t be
any sense in having two separate concepts for such similar requirements.
The only significant difference is that an executable needs an entry point—the piece of code that runs
when the program starts, usually the Main method in C#. Libraries don’t have an
equivalent, but otherwise, there’s no technical difference between a
.dll and an .exe in .NET.
Note
Of course, libraries normally export functionality. It’s less common for executables to do that, but they can if they want to—in .NET it’s possible for an .exe to define public classes that can be consumed from other components. That might sound odd, but it can be desirable: it enables you to write a separate program to perform automated testing of the code in your main executable.
So, every time you create a new C# project in Visual Studio, you are in effect defining a new assembly.
No assembly can exist in isolation—the whole point is to enable reuse of code, so assemblies need some way to use other assemblies.
You can choose to use an external assembly by adding a reference to it in your project. Figure 15-1 shows how the Solution Explorer presents these—you can see the set of references you get in any new console application. All project types provide you with a few references to get you started, and while the exact set depends on the sort of project—a WPF application would include several UI-related libraries that you don’t need in a console application, for example—the ones shown here are available by default in most projects.
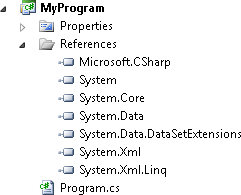
Note
C# projects have an implicit reference to mscorlib. This defines critical types such
as String and Object, and you will not be able to compile
code without these. Since it’s mandatory, Visual Studio doesn’t show
it in the References list.
Once you’ve got a reference to an assembly, your program is free
to use any of the public types it offers. For example, the System.Core library visible in Figure 15-1 defines the types
that make up the LINQ to Objects services that Chapter 8
described.
Note
There’s a point that we mentioned in Chapter 2, which is vitally important
and often catches people out, so it bears repeating: assemblies and
namespaces are not the same thing. There is no System.Core namespace. It’s easy to get
confused because in a lot of cases, there is some apparent
similarity—for example, five of the seven assemblies shown in Figure 15-1 have names that
correspond to namespaces. But that’s just a convention, and a very
loose one at that, as we discussed in detail in the sidebar Namespaces and Libraries.
You can add references to additional DLLs by right-clicking the References item in the Solution Explorer and choosing the Add Reference menu item. We’ve mentioned this in passing a couple of times in earlier chapters, but let’s take a closer look. Figure 15-2 shows the dialog that appears. You may find that when you open it, it initially shows the Projects tab, which we’ll use later. Here, we’ve switched to the .NET tab, which shows the various .NET components Visual Studio has found.

Visual Studio looks in a few different places on your system when populating this list. All the assemblies in the .NET Framework class library will be here, of course, but you’ll often find others. For example, companies that sell controls often provide an SDK which, when installed, advertises its presence to Visual Studio, enabling its assemblies to show up in this list too.
Note
If you’re wondering how you’re meant to know that you need a particular assembly, the documentation tells you. If you look in the Visual Studio help, or online in the MSDN documentation, each class definition tells you which namespace and assembly the class is defined in.
You’ll notice that Figure 15-2 shows some other tabs. The COM tab contains all the COM components Visual Studio has found on your system. These are not .NET components, but it’s possible to use them from C# as we’ll see in Chapter 19.
Sometimes you’ll need to use a component which, for whatever reason, isn’t listed in the .NET tab. That’s not a problem—you can just use the Browse tab, which contains a normal file-browsing UI. When you add an assembly with the Browse tab, it gets added to the Recent tab, so if you need to use it again in a different project, this saves you from navigating through your folders again to find it in the Browse tab.
Once you’ve selected one or more assemblies in whichever tab suits your needs, you can click OK and the assembly will appear in that project’s References in the Solution Explorer. But what if you change your mind later, and want to get rid of the reference?
Deleting references is about as straightforward as it could be: select the item in the Solution Explorer and then press the Delete key, or right-click on it and select Remove. However, be aware that the C# compiler can do some of the work for you here. If your code has a reference to a DLL that it never uses, the C# compiler effectively ignores the reference. Your assembly’s metadata includes a list of all the external assemblies you’re using, but the compiler omits any unused assemblies in your project references. (Consequently, the fact that most programs are unlikely to use all of the references Visual Studio provides by default doesn’t waste space in your compiled output.)
Warning
Things are slightly more complex in Silverlight. Unlike other .NET programs, Silverlight projects put the compiled assembly into a ZIP file (with a .xap extension). If your project has references to any assemblies that are not one of the core Silverlight libraries, those will also be added to that ZIP. Although the C# compiler still optimizes references when it produces your main assembly, this doesn’t stop Visual Studio from copying unused assemblies into the ZIP. (And it has good, if obscure, reasons for doing that.) So, in Silverlight, it is actually worth ensuring that you do not have references to any DLLs you’re not using.
Making use of existing libraries is only half the story, of course. What if you want to produce your own library?
Visual Studio offers special project types for writing libraries. Some of these are specific to particular kinds of projects—you can write a WPF control library or an activity library for use in a Workflow application, for example. The more specialized library projects provide an appropriate set of references, and offer some templates suitable for the kinds of applications they target, but the basic principles are the same for all libraries. To illustrate the techniques, we’ll be using the simplest project: a Class Library project.
But before we do that, we need to think about our Visual Studio solution. Solutions allow us to work with multiple related projects, but most of the examples in this book have needed only a single project, so we’ve pretty much ignored solutions up to now. But if we want to show a library in action, we’ll also need some code that uses that library: we’re going to need at least two projects. And since they’re connected, we’ll want to put them in the same solution. There are various ways you can do that, and depending on exactly how you’ve configured Visual Studio, it may or may not hide some of the details from you. But if you want to be in complete control, it’s often easiest to start by creating an empty solution and then to add projects one at a time—that way, even if you’ve configured Visual Studio to hide solutions with simple projects, you’ll still be able to see what’s happening.
To create a new solution, open the New Project dialog in the usual
way, and then in the Installed Templates section on the left, expand
Other Project Types and select Visual Studio Solutions. This offers a
Blank Solution template in the middle of the dialog. In this example,
we’re going to call our solution AssemblyExample. When you click OK, Visual
Studio will create a folder called AssemblyExample, which will contain an
AssemblyExample.sln file, but you
won’t have any projects yet. Right-click on the solution and choose
Add→New Project from the context menu.
This open the Add New Project dialog, which is almost identical to the
New Project dialog, except it adds projects to the solution you have
open, rather than creating a new one.
For the examples in this chapter, we’re going to add two projects
to the solution, both from templates in the Visual C#→Windows section: a Console Application called
MyProgram, and a Class Library called
MyLibrary. (Create them in that
order—Visual Studio picks the first one you create as the one to debug
when you hit F5. You want that to be the program, because you can’t run
a library. Although if you were to do it in the other order, you could
always right-click on MyProgram and choose Set as Startup
Project.)
A newly created Class Library project contains a source file, Class1.cs, which defines a rather boring class shown in Example 15-1. Notice that Visual Studio has chosen to follow the convention that the namespace matches the assembly name.
Example 15-1. The default class in a new Class Library project
using System;
using System.Collections.Generic;
using System.Linq;
using System.Text;

namespace MyLibrary
{
    public class Class1
    {
    }
}
We can try to use this class from the Program.cs file in the console application. Example 15-2 shows that file, with the necessary additions in bold.
Example 15-2. Using an external class
using System;
using System.Collections.Generic;
using System.Linq;
using System.Text;
using MyLibrary;

namespace MyProgram
{
    class Program
    {
        static void Main(string[] args)
        {
            var o = new Class1();
        }
    }
}
This won’t compile. We get this error:
error CS0246: The type or namespace name 'MyLibrary' could not be found (are
 you missing a using directive or an assembly reference?)
The compiler appears not to recognize the MyLibrary namespace. Of course it doesn’t—that’s defined in a completely
separate project than the MyProgram
project that contains Program.cs.
As the error helpfully points out, we need to add a reference in
MyProgram to MyLibrary. And this time, the Add Reference
dialog’s default choice of the Projects tab, shown in Figure 15-3, is exactly what
we want. MyLibrary is the only
project listed because it’s the only other project in the solution—we
can just select that and click OK.
The code will now build correctly because MyProgram has access to Class1 in MyLibrary. But that’s not to say it has
access to everything in the library. Right-click on
MyLibrary in the Solution Explorer, select Add→Class, and create a new class called MyType. Now in Program.cs, we can modify the line that
creates the object so that it creates an instance of our newly added
MyType instead of Class1, as Example 15-3 shows.
This fails to compile, but we get a different error:
error CS0122: 'MyLibrary.MyType' is inaccessible due to its protection level
(Well, actually, we get two errors, but the second one is just a
distracting additional symptom, so we won’t show it here. It’s this
first one that describes the problem.) The C# compiler has found the
MyType class, and is telling us we
can’t use it because of protection.

In Chapter 3, we saw how you
can decide which members of a class are accessible to code outside the
class, marking members as public,
private, or protected. And if you didn’t specify a
protection level, members were private by default. Well, it’s a similar story
with members of an assembly—by default, a type is not accessible outside
its defining assembly. The only reason MyProgram was able to use Class1 is that the class definition has
public in front of it, as you can see
in Example 15-1. But as
Example 15-4 shows, Visual Studio
didn’t do that for the second class we added.
Example 15-4. Type with the default protection
using System;
using System.Collections.Generic;
using System.Linq;
using System.Text;

namespace MyLibrary
{
    class MyType
    {
    }
}
It may seem a little weird that Visual Studio chose different
protection levels for our two types, but there’s logic to it. In most
assemblies, the majority of the code is implementation detail—with most
components, the visible public surface area is only a fraction of the
code. (Not only are most types not public, but even public types usually have many non-public members.) So, it makes sense for a
newly added class not to be public.
On the other hand, if we’re writing a library, presumably we’re planning
to make at least one class public, so
it’s reasonable for Visual Studio to provide us with a single public class as our starting point.
Some people like to avoid implicit protection—if you’re reading
code such as Example 15-4 that
doesn’t say what protection level it wants, it’s difficult to tell
whether the developer chose the default deliberately, or simply hasn’t
bothered to think about it. Specifying the protection level explicitly
avoids this problem. However, if you try putting private in front of the class in Example 15-4, it won’t compile—private protection means “private to the
containing class” and since MyType
isn’t a nested class, there is no containing class, so private would have no meaning here. We’re
trying to say something different here—we want to say “private to the
containing assembly” and there’s a different protection level for that:
internal.
If you mark a class as internal, you’re explicitly stating that you
want the class to be accessible only from within the assembly that
defines it. You are, in effect, saying the class is an implementation
detail, and not part of the API presented by your assembly. This is
the default protection level for a normal class. (For a nested class,
the default protection level is private.)
You can also apply internal
to members of a class. For example, we could make the class public, but its constructor internal, as Example 15-5 shows.
This would enable MyProgram
to declare variables of type MyType, which it was not able to do before
we made the class public. But it’s
still unable to construct a new MyType. So, in Example 15-6, the first line will
compile, but we will get an error on the second line because there are
no accessible constructors.
Example 15-6. Using the type and using its members
MyType o;            // Compiles OK
o = new MyType();    // Error
This is more useful than it might seem. This has enabled
MyLibrary to define a type as part
of its public API, but to retain control over how instances of that
type are created. This lets it force users of the library to go
through a factory method, which can be useful for several
reasons:
Some objects require additional work after construction—perhaps you need to register the existence of an object with some other part of your system.
If your objects represent specific real entities, you might want to ensure that only code you trust gets to create new objects of a particular type.
You might sometimes want to create a derived type, choosing the exact class at runtime.
Example 15-7
shows a very simple factory method which does none of the above, but
crucially our library has reserved the right to do any or all of these
things in the future. We’ve chosen to expose this factory method from
the other type in the library project, Class1. This class gets to use the internal constructor for MyType because it lives in the same
assembly.
Example 15-7. Factory method for a public type with an internal constructor
public class Class1
{
    public static MyType MakeMeAnInstance()
    {
        return new MyType();
    }
}
Our MyProgram project can
then use this method to get Class1
to construct an instance of MyType
on its behalf, as Example 15-8 shows.
Example 15-8. Using a type with an internal constructor from outside
MyType o = Class1.MakeMeAnInstance();
Note
Example 15-7
shows another reason it can be useful to have a public class with no public constructors. Class1 offers a public static method, meaning the class is
useful even if we never construct it. In fact, as it stands, there’s
never any reason to construct a Class1, because it contains no instance
members. Classes that offer public
static members but which are never constructed are rather
common, and we can make it clear that they’re not meant to be
constructed by putting the keyword static before
class. This would prevent even
code in the MyLibrary project
from constructing an instance of Class1.
Occasionally, it can be useful to make the internal features of an assembly accessible
to one or more other specific assemblies. If you write a particularly
large class library, it might be useful to split it into multiple
assemblies much like the .NET Framework class library. But you might
want to let these all use one another’s internal features, without
exposing those features to code that uses your library. Another
particularly important reason is unit testing: if you want to write
unit tests for an implementation detail of your class, then if you
don’t want to put the test code in the same project as the class under
test, you’ll need to grant your test project access to the internals
of the code being tested. This can be done by applying an
assembly-level attribute, which normally goes in the AssemblyInfo.cs file, which you can find by
expanding the Properties section of your project in the Solution
Explorer. Attributes are discussed in Chapter 17, but for now, just know that
you can put the code in Example 15-9 in that
file.
If we put this in the AssemblyInfo.cs of MyLibrary, MyProgram will now be able to use internal
features such as the MyType
constructor directly. But this raises an interesting problem: clearly
anyone is free to write an assembly called MyProgram and by doing so, will be able to
get access to the internals, so if we thought we were only opening up
our code to a select few we need to think again. It’s possible to get
a bit more selective than this, and for that we need to look in more
detail at how assemblies are named.
By default, when you create a new assembly—either a program
or a library—its name is based on the filename, but with the file
extension stripped. This means that our two example projects in this
chapter build assemblies whose filenames are MyProgram.exe and MyLibrary.dll. But as far as the .NET Framework
is concerned, their names are MyProgram
and MyLibrary, respectively, which is
why Example 15-9 just
specified MyProgram, and not MyProgram.exe.
Actually, that’s not the whole truth. These are the simple names, but there’s more to assembly names. We can ask the .NET Framework to show us the full name of a type’s containing assembly, using the code in Example 15-10.
Example 15-10. Getting a type’s containing assembly’s name
Console.WriteLine(typeof(MyType).Assembly.FullName);
Running this produces the following output:
MyLibrary, Version=1.0.0.0, Culture=neutral, PublicKeyToken=null
As you can see, there are four parts to an assembly name. First there is the simple name, but this is followed by a version number. Assemblies always have a version number. If you don’t specify one, the compiler sets it to 0.0.0.0. But Visual Studio puts an assembly-level attribute in the AssemblyInfo.cs file setting it to 1.0.0.0, which is why we see that in the output. You would typically change the version each time you formally release your code. Example 15-11 shows the (unsurprising) syntax for the version attribute.
The next part of the name is the culture. This is normally used only
on components that contain localized resources for applications that need
to support multiple languages. Those kinds of assemblies usually contain
no code—they hold nothing but resources. Assemblies that contain code
don’t normally specify a culture, which is why we see Culture=neutral in the name for our MyLibrary assembly.
Finally, there’s the PublicKeyToken. This is null in our example, because we’re not using it.
But this is the part of the name that lets us say we don’t just want any
old assembly with a simple name of MyProgram. We can demand a specific bit of code
by requiring the component to be signed.
Assemblies can be digitally signed. There are two ways to do this—you can use Authenticode signing just as you can for any Windows DLL or EXE, but such signatures don’t have any relevance to an assembly’s name. However, the other signing mechanism is specific to .NET, and is directly connected to the assembly name.
If you look at any of the assemblies in the .NET Framework class
library, you’ll see they all have a nonnull PublicKeyToken. Running Example 15-10 against string instead of MyType produces this output:
mscorlib, Version=4.0.0.0, Culture=neutral, PublicKeyToken=b77a5c561934e089
The version number changes from time to time, of course—it didn’t
look quite like that in .NET 1.0. However, the important part here is
the PublicKeyToken. Assemblies with
this feature in their name are called strongly named assemblies. But what
does that mean?
If you add a reference to a strongly named assembly, the C#
compiler includes the full name in your program’s metadata. This means
that when the .NET Framework loads our program, it will see that we have
a reference to mscorlib, and that
we’re expecting its strong name to include that public key token. The
framework requires strongly named components to be digitally signed
(using a signing mechanism specific to .NET assemblies). And it will
also require that the public key of the key pair used to generate the signature has a value which,
when run through a particular cryptographic hash algorithm, matches the
PublicKeyToken.
This provides some protection against ending up using the wrong assembly. It also provides some protection against using a copy of what was originally the right assembly, but which has been tampered with, possibly by someone up to no good.
If the .NET Framework attempts to load the wrong assembly, things
won’t match. Perhaps the assembly it found isn’t signed at all, in which
case it’ll throw an exception, because it knows we’re looking for a
strongly named assembly. Or perhaps it attempts to load an assembly that
is strongly named, but which was signed with a different key pair. Even
if it is correctly signed, the different key will mean that the hash of
the public key will not match the PublicKeyToken we’re expecting, and again the
component will fail to load.
Alternatively, we might end up with an assembly with the right
name, but which has either been tampered with or has become corrupted.
In this case, the public key of the key pair used to sign the assembly
will match the PublicKeyToken, but
the signature will not be valid—digital signatures are designed to
detect when the thing they’ve been applied to has changed.
You may be thinking: can’t we just generate a new signature,
choosing the same key pair that the original assembly used? Well, if you
have access to the key pair, then yes, you can—that’s how Microsoft is
able to build new versions of mscorlib with the same PublicKeyToken as earlier versions. But if
you’re not in possession of the key pair—if all you know is the public
key—you’re not going to be able to generate a new valid signature unless
you have some way of cracking the cryptography that underpins the
digital signature. (Alternatively, you could also try to create a new
key pair which happens to produce the same PublicKeyToken as the assembly you’re trying
to mimic. But again this would require you to defeat the
cryptography—hashing algorithms are designed specifically to prevent
this sort of thing.) So, as long as the private key has been kept
private, only someone with access to the key can generate a new assembly
with the same PublicKeyToken.
Note
Not all key pairs are kept private. An open source project may want to give a component a strong name just so that it can have a globally unique name, while enabling anyone to build his own version. In these cases the full key pair is made available along with the source code, in which case the strong name brings no assurances as to the integrity of the code. But it still offers identity—it enables you to refer to the library by a distinct name, which can be useful in itself.
We can therefore be reasonably confident that if we add a reference to a strongly named assembly, we’re going to get the assembly we are expecting. (The exact level of confidence depends not just on the privacy of the key, but also on the integrity of the machine on which we’re running the code. If someone has hacked our copy of the .NET Framework, clearly we can’t depend on it to verify strong names. But then we probably have bigger problems at that point.)
You can apply a strong name to your own components. We’re not going to show how to do that here, mainly because it opens up key management problems—these are security issues that are beyond the scope of this book. But if you’d like to know more, see http://msdn.microsoft.com/library/wd40t7ad.
We’ve seen how components can refer to one another, and how assemblies are named. But one important question remains: how does the .NET Framework know where to load them from?
The .NET Framework automatically loads assemblies for us. It does this on demand—it does not load every assembly we reference when the program starts, as that could add delays of several seconds. Typically, loading happens at the point at which we first invoke a method that uses a type from the relevant assembly. Be careful, though: this means we can end up loading an assembly that we never use. Consider Example 15-12.
Example 15-12. A rare occurrence
public void Foo()
{
    if (DateTime.Now.Year == 1973)
    {
        SomeExternalType.Disco();
    }
}
Unless you run this on a computer whose clock is incredibly
inaccurate the body of that if
statement is never going to run. Despite this, when you first call
Foo, the .NET Framework will ensure
that the assembly that contains SomeExternalType is loaded, if it hasn’t already
been. Life is significantly simpler for the JIT compiler (and it can
therefore do its job faster) if it loads all the types and assemblies a
method might use up front, rather than loading each one on demand. The
downside is that assemblies sometimes load slightly earlier than you might
expect, but this isn’t usually a problem in practice.
Note
Visual Studio can show you exactly when assemblies load. If you run an application in the debugger, it will display a message to the Output panel for each assembly your program loads. If you don’t have the Output panel open, you can show it from the View menu. This can sometimes be useful if you have an application that is taking longer than expected to start up—take a look through the assemblies listed in the Output window, and if you see any you weren’t expecting, perhaps you have some code like Example 15-12 that is unnecessarily loading something you’re not really using.
We know when assemblies are loaded. But from where are they loaded? There are many different places they could theoretically come from, but in the vast majority of cases, it’ll be one of two locations: either the same folder the application lives in or something called the GAC.
When you add a reference from one project to another, Visual
Studio copies the DLL being referenced into the consuming application’s
folder. So, if we look in the binDebug folder for the MyProgram example shown earlier in this
chapter, we’ll see both MyProgram.exe and a copy of MyLibrary.dll.
An obvious upshot of this approach is that each application that uses a particular library will have its own copy. This may seem a little wasteful, and may even seem contrary to the spirit of DLLs—traditionally DLLs have offered a performance benefit by allowing disk space and memory to be shared by applications that use common DLLs. And while that’s true, sharing can cause a lot of problems—installing a new application could end up breaking old applications, because the new application might bring a new version of a shared DLL that turns out not to work with programs expecting the older version.
To prevent this, .NET encourages isolation between applications—if each application brings its own copy of the libraries it requires, the chances of things breaking when new applications are installed are much lower. And now that disk and memory are much cheaper than they were back in the 1980s when DLLs were introduced, “not breaking everything” seems like a worthwhile return for using a bit more space.
However, .NET does support a shared model, through the GAC.
The global assembly cache (GAC) is a machine-wide repository of shared .NET assemblies. All the assemblies that make up the .NET Framework class library live in the GAC, and other components can be added to it.
To live in the GAC, an assembly must be strongly named. This is to avoid naming collisions—if multiple applications all decide to provide their own shared component called Utils.dll, we need some way of distinguishing between them if they’re going to live in a shared repository. Strong names give us this—signing key pairs are unique.
The GAC tries to avoid the problem of one application’s new DLLs
breaking an existing application that was relying on older DLLs. The GAC
is therefore able to hold multiple versions of the same DLL. For
example, if you install one of the “Team” editions of Visual Studio 2008
and Visual Studio 2010 on a single machine, you’ll find various
assemblies in the GAC whose names begin with Microsoft.TeamFoundation, and there will be
two versions of each, one with version 9.0.0.0 and one with 10.0.0.0.
So, even when using this shared model, you’ll get the version of the DLL
you were expecting even if other versions have been installed
since.
Silverlight adds a complication: applications are downloaded from the Web, so it doesn’t really make sense to talk about an “application folder.” However, in practice, the rules are pretty similar as for the full .NET Framework. When you build a Silverlight application, Visual Studio creates a ZIP file (with a .xap extension) that contains your program’s main assembly. If you add a reference to any assemblies that are not part of the core set of assemblies offered by Silverlight, Visual Studio will add those assemblies to the ZIP too. This is conceptually equivalent to putting those DLLs in the application folder with a full .NET application.
Silverlight doesn’t have a GAC. It does have a core set of assemblies stored centrally, which are available to all applications, but you can’t add additional assemblies to this, unlike with the GAC. The shared assemblies are the ones that are built into the Silverlight plug-in itself, and they are the main libraries in its version of the .NET Framework class library.
Note
A lot of the libraries in the Silverlight SDK are not part of the core set built into the plug-in. This is because Microsoft wanted to ensure that Silverlight was a small download—if it was too hefty, that might put people off installing it. The downside is that some library features require you to include a copy of the library in your .xap file.
You can ask the .NET Framework to load an assembly explicitly. This makes it possible to decide to load additional components at runtime, making it possible to create applications whose behavior can be extended at runtime.
The Assembly class in the
System.Reflection namespace offers a
static LoadFile method, and
you can pass the path to the assembly’s location on disk. If you don’t
know where the assembly is but you know its fully qualified name (i.e.,
a four-part name, like the one printed out by Example 15-10) you can call
Assembly.Load. And if you have only
part of the name—just the simple name, for example—you can call Assembly.LoadWithPartialName.
Things are slightly different in Silverlight. You have to download
the assembly yourself, which you can do with the WebClient class, described in Chapter 13. You’ll need to get the assembly itself (and not
a .xap containing the assembly),
and then you can simply construct an AssemblyPart, passing the Stream containing the downloaded DLL to its
Load method, and it
will load the assembly. (If the assembly you want to use is in a
.xap, it’s still possible to load
dynamically, it’s just rather more complicated—you need to use the
Application.GetResourceStream method to
extract the assembly from the .xap
before passing it to an AssemblyPart.)
All of these various techniques for loading assemblies will leave
you with an Assembly object, which
you can use to discover what types the assembly offers, and instantiate
them at runtime. Chapter 17 shows how
to use the Assembly class.
If you’re considering using any of these techniques, you should look at the Managed Extensibility Framework (MEF), a part of the .NET Framework class library designed specifically to support dynamic extensibility. It can handle a lot of the detailed issues of loading assemblies and locating types for you. This lets you focus on the types you want to use, rather than the mechanisms necessary to load them. You can find information about MEF at http://msdn.microsoft.com/library/dd460648 and you can even get hold of the source code for it from http://code.msdn.microsoft.com/mef.
The advantage of loading assemblies explicitly is that you don’t need to put a reference into your project at compile time. You can decide at runtime which assemblies to load. This can be useful for plug-in systems, where you want to load assemblies dynamically to extend your application’s functionality. You might allow third-party assemblies, so other people or companies can extend your application. However, if you decide to support plug-ins, there’s one thing you need to be aware of: unloading can be problematic.
Once you’ve loaded an assembly, unloading it is tricky. The .NET Framework commits various resources to the assembly for the lifetime of the application, and there’s no method you can call to unload an assembly. This makes it easy to find yourself in a situation where you want to delete a DLL, but you can’t because your .NET application is holding onto it. (The .NET Framework locks the file to prevent deletion or modification for as long as the assembly is loaded.)
There is a way around this. Strictly speaking, the assembly is loaded for the lifetime of the appdomain. An appdomain is a similar sort of idea to an operating system process—it’s an environment that can load and run code, and which is isolated from other appdomains. The difference is that you can have multiple appdomains in a single process. If you really need to be able to unload DLLs after loading them, the way to do it is to create a separate appdomain. Once you’re done, you can destroy the appdomain, at which point it will unload any DLLs it had loaded.
Appdomain programming is an advanced topic that is beyond the scope of this book—we mention it mainly because it’s important to be aware that there’s a potential problem if you start loading assemblies dynamically, and it’s useful to know that a solution exists. More information about appdomains can be found at http://msdn.microsoft.com/library/2bh4z9hs and http://blogs.msdn.com/cbrumme/archive/2003/06/01/51466.aspx (which despite being an obviously rather old URL, continues to be one of the most comprehensive descriptions around).
An assembly is a .NET component, and can be either an executable program or a library. C# code is always packaged into an assembly, along with the metadata necessary to describe that code, and assemblies can optionally include resources such as bitmaps or other binary streams. Assemblies offer an additional protection boundary beyond those we saw with classes in Chapter 3—you can make types and members available only within the defining assembly. And we saw how components can be installed in the same directory as the application that uses them, stored centrally in the GAC, or loaded dynamically at runtime.