
Most interesting computer systems are distributed these days—it’s
increasingly unusual for a program to run in isolation on a single machine.
So .NET provides various ways to communicate across networks. The array of
networking options looks a little bewildering at first: there are 10
namespaces whose names start with System.Net containing more than 250 classes, and
that’s not even the complete set—there’s an even bigger API for producing
and consuming web services.
Fortunately, it’s simpler than this makes it seem—despite the large API surface area most of the options fall into three categories. There’s WCF—the Windows Communication Foundation, a framework for building and using web services. There are lower-level APIs for working directly with web protocols. Or you can use sockets if you need very low-level control. We’ll start by discussing how to choose the most appropriate style of communication for your application, and then we’ll look at these three options in more detail.
The first step in choosing the right networking API is to decide on the nature of the communication your application requires. There are many different styles of distributed applications. Perhaps you are building a public-facing web service designed to be used by a diverse range of clients. Conversely, you might be writing client code that uses someone else’s web service. Or maybe you’re writing software that runs at both ends of the connection, but even then there are some important questions. Are you connecting a user interface to a service in a tightly controlled environment where you can easily deploy updates to the client and the server at the same time? Or perhaps you have very little control over client updates—maybe you’re selling software to thousands of customers whose own computers will connect back to your service, and you expect to have many different versions of the client program out there at any one time. Maybe it doesn’t even make sense to talk about clients and servers—you might be creating a peer-to-peer system. Or maybe your system is much simpler than that, and has just two computers talking to each other.
The variations are endless, so no single approach can work well for all systems. The next few sections will look at some common scenarios, and discuss the pros and cons of the various networking options .NET offers. Even within a specific scenario there will often be more than one way to make things work. There are no hard-and-fast rules, because each project has different requirements. So this section won’t tell you what to do—it’ll just describe the issues you’ll need to consider. Ultimately, only you can decide on the right solution for your system. We’ll start with a very common web-based scenario.
Web user interfaces have been getting smarter lately. A few years ago, most of a web application’s logic would live on the server, with client-side code in the web browser typically doing little more than making buttons light up and menus fly out in response to the mouse. But now, we expect more from our web user interfaces. Whether you use AJAX (Asynchronous JavaScript and XML), or a RIA (Rich Internet Application) technology such as Silverlight or Flash, web applications often communicate constantly with the web server, and not just when navigating between pages.
If you’re writing the server-side parts of this sort of application in C#, you will typically use ASP.NET to provide a web user interface. But what should you use for programmatic communication—the messages that flow between the web UI and the server once a page is already loaded?
WCF is a flexible choice here, because as Figure 13-1 illustrates, you can make a single set of remote services accessible to many common browser-based user interface technologies. A WCF service can be configured to communicate in several different ways simultaneously. You could use JSON (JavaScript Object Notation), which is widely used in AJAX-based user interfaces because it’s is a convenient message format for JavaScript client code. Or you could use XML-based web services. Note that using WCF on the server does not require WCF on the client. These services could be used by clients written in other technologies such as Java, as long as they also support the same web service standards as WCF.
Looking specifically at the case where your web application uses C# code on the client side, this would mean using either Silverlight or WPF. (You can put WPF in a web page by writing an XBAP—a Xaml Browser Application. This will work only if the end user has WPF installed.) If you’re using C# on both the client and the server, the most straightforward choice is likely to be WCF on both ends.
What if your server isn’t running .NET, but you still want to use .NET on the web client? There are some restrictions on WCF in this scenario. Silverlight’s version of WCF is much more limited than the version in the full .NET Framework—whereas the full version can be configured to use all manner of different protocols, Silverlight’s WCF supports just two options. There’s the so-called basic profile for web services, in which only a narrow set of features is available, and there’s a binary protocol unique to WCF, which offers the same narrow set of features but makes slightly more efficient use of network bandwidth than the XML-based basic profile. So if you want a Silverlight client to use WCF to communicate with a non-.NET web service, as Figure 13-2 illustrates, this will work only if your service supports the basic profile.


More surprisingly, similar restrictions exist with a WPF XBAP. Even though XBAPs use the full version of the .NET Framework, certain features of WCF are disabled for security purposes—client code in web browsers shouldn’t have complete freedom to connect to anywhere on the Internet, because that would make life too easy for hackers. So WCF offers only a very limited version of its services to .NET applications running inside web browsers, meaning that XBAPs have similar WCF limitations to Silverlight.
If you’re writing a Silverlight client and you want to talk to a service that does not conform to the web services basic profile, that’s not necessarily a showstopper. It just rules out WCF—you will need to use the lower-level web-based APIs instead, or even the socket APIs, depending on the service.
Note that while WCF is usually a good default choice on the server side for web applications with client-side code, there are a few cases where you might not want to use it. ASP.NET provides its own mechanism for supporting AJAX clients, and while it’s considerably less flexible than WCF, you might not need the flexibility. The simplicity of using just one framework on the server instead of two might end up looking like a better option.
There’s a subtler reason why WCF might not always be the best fit: the style of communication. If you use WCF in a web application, the communication it supports will tend to involve the following steps:
Some code in the client (browser script, C# code, or Flash ActionScript) decides to send a message to the server.
The server receives the message and runs some code that does whatever it needs to do to process the message.
Once the code has finished, the server sends a message back to the client containing any data returned by the code (or if there is no data to return, just a message to say the work is complete).
This is, in effect, a remote method invocation—it’s a way for the client to ask the server to run some code and optionally get a return value. (WCF is more flexible than this in general, but in the context of a web application, your communication patterns are constrained because clients will typically be behind a firewall.) That’s likely to be a perfectly good pattern for operations such as looking up a stock price or retrieving a weather forecast. However, if you are building a photograph browser application, this would not be a great way to retrieve pictures. You could make it work, but it’s easier to use the mechanisms already built into the web browser for downloading images—you’d almost certainly want to make the bitmaps available for download via HTTP rather than using WCF. HTML and Silverlight have UI elements that know how to render images downloaded with HTTP. Browsers are usually able to start rendering images without having to wait for the download to finish, and that’s difficult to achieve with a method invocation idiom. And by using normal HTTP image download, you’d also get to take advantage of standard HTTP caching in your web browser and any caching proxies you may be using. Plain old HTTP works better here than trying to fetch a bitmap using something resembling a method call.
More generally, if the information your client code works with looks like a set of resources that might be identified with URIs (Uniform Resource Identifiers; for instance, http://oreilly.com/) and accessed via HTTP you might want to stick with ordinary HTTP rather than using WCF. Not only do you get the benefits of normal HTTP caching when reading data, but it may also simplify security—you might be able to take whatever mechanism you use to log people into the website and secure access to web pages, and use it to secure the resources you fetch programmatically.
Note
A service that presents a set of resources identified by URIs to be accessed via standard HTTP mechanisms is sometimes described as a RESTful service. REST, short for Representational State Transfer, is an architectural style for distributed systems. More specifically, it’s the style used by the World Wide Web. The term comes from the PhD thesis of one of the authors of the HTTP specification (Roy Fielding). REST is a much misunderstood concept, and many people think that if they’re doing HTTP they must be doing REST, but it’s not quite that straightforward. It’s closer to the truth to say that REST means using HTTP in the spirit in which HTTP was meant to be used. For more information on the thinking behind REST, we recommend the book RESTful Web Services by Sam Ruby and Leonard Richardson, (O’Reilly).
Using WCF typically requires less effort than designing a RESTful service—you can get up and running with a good deal less thought and forward planning (although you might not consider a lack of thought and planning to be a good thing for your particular application). But if the communication you require with your server doesn’t sound like it fits well into a method-call-like style, you’ll probably want to consider alternatives to WCF.
Occasionally, neither WCF nor plain HTTP will be the best approach when connecting a web UI to a service. With Silverlight, you have the option to use TCP or UDP sockets from the web browser. (The UDP support is somewhat constrained. Silverlight 4, the current version at the time of writing this, only supports UDP for multicast client scenarios.) This is a lot more work, but it can support more flexible communication patterns—you’re not constrained to the request/response style offered by HTTP. Games and chat applications might need this flexibility, because it provides a way for the server to notify the client anytime something interesting happens. Sockets can also offer lower communication latency than HTTP, which can be important for games.
Fashionable though web applications are, they’re not the only kind of distributed system. Traditional Windows applications built with WPF or Windows Forms are still widely used, as they can offer some considerable advantages over web applications for both users and developers. Obviously, they’re an option only if all your end users are running Windows, but for many applications that’s a reasonable assumption. Assuming clients are running Windows, the main downside of this kind of application is that it’s hard to control deployment compared to a web application. With web applications, you only have to update an application on the server, and all your clients will be using the new version the next time they request a new page.
Note
Out-of-browser Internet applications could well blur this distinction. Both Silverlight and Flash make it possible for Internet applications to have parts that are installed on the user’s machine and run like normal applications outside the web browser. So the considerations in this section could apply if that’s the sort of web application you’re building.
To update a classic Windows application, you need to somehow get a new version of the program onto the end users’ machines. Since it’s rarely practical to install a new version on every single user’s machine simultaneously, you need to handle the possibility of having several different versions of the client software all trying to talk to your server. The extent to which this can cause problems will depend on how much control you have over the client computers.
Some applications are deployed in tightly controlled environments. For example, suppose you’re writing a line-of-business application in WPF that will only ever be deployed to machines owned by your business. If your IT department has an iron grip on the company’s computers, you might be able to exert considerable control over what versions of your application are out there. Network administrators could forcibly upgrade users to the latest version. So new versions might overlap with old versions for only a day or so. You could even go further and arrange for your application to check for updates and refuse to continue running when a newer version is available.
This is a happy situation for a developer, because it makes it much easier to introduce changes to your server. Chances are that at some point you’ll want to add new services to support new features in your application. You might also want to modify existing services, which is usually more problematic than completely new features—if you’re using WCF, it’s not easy to modify the way an existing service works without breaking that service for older clients. It’s possible, but it’s hard, and it’s often easier to run multiple versions of the service simultaneously during the transition period. The nice thing about having sufficient control to remove old versions of the application is that you can know when you’ve reached the end of a transition period and can shut down the older version of the service. This won’t be the case if you can’t force that sort of change on the client.
If your application’s customers don’t all work for your company, life becomes more complex, because it’s harder to force upgrades on your customers. It’s not impossible—for example, Microsoft’s Windows Live Messenger program occasionally tells you that if you don’t upgrade you won’t be able to carry on using the service. Mind you, it’s a free service, so it gets to dictate its terms of use; you might find that paying customers won’t put up with that, insisting that the product they’ve bought carries on working without needing to install regular upgrades.
The implication is that you might need to support old versions of your service indefinitely. At this point, WCF might not look like such a good choice. One of the attractive features of WCF is that it does a lot of work for you under the covers, but that’s a double-edged sword—it works really well when both ends of the connection evolve simultaneously, but it can become a burden over time if the two ends do not move forward in tandem. If you want a service to be able to evolve while the client does not, you end up needing to understand exactly how WCF presents your service, and how the changes you have in mind might affect its operation. For example, if you decide that a method in your service requires an extra argument, what happens when an old client invokes the operation without that new argument? In practice, it might actually be easier just to work directly with HTTP and XML, because that way you have complete control over what messages go across the network.
That’s not to say that WCF is definitely the wrong choice here. You could deal with the problem described by maintaining multiple versions of the service, or by dropping down to WCF’s lower-level messaging API, for example. But the trade-off between WCF and HTTP is altered by the nature of your deployment. In a tightly controlled deployment, WCF is likely to be a good choice, but when you have less control, the lower-level APIs can start to look like they’re worth the extra effort.
Regardless of how much control you have over deployment, as with the web application case there are some specialized scenarios in which neither WCF-based web services nor web APIs are the best fit. If you need communication patterns that don’t fit well with HTTP, be aware that with this style of application, you can use the full range of communication styles offered by WCF—as we’ll see, it supports more than just the typical web communication patterns. This means that sockets are an even more unusual choice in this scenario, and would typically be useful only if you need very precise control over the way in which messages are constructed and delivered.
You won’t necessarily write the code at both ends of a connection. You might build a .NET client which talks to a web service provided by someone else. For example, you could write a WPF frontend to an online social media site such as Twitter, or a Silverlight client that accesses an external site such as Digg.
In this case, your choice of communication technology will be determined largely by the service you’re connecting to. If it presents information in a way that WCF is able to consume, use WCF. How would you know that this is the case? You could try asking the service provider’s support staff if their service works with WCF, but if they’re not sure, it’ll be down to the nature of the service. If your service provider uses the so-called WS-* family of web service standards, there’s a good chance WCF will be able to talk to the service.
Warning
If you were hoping for something more definitive than “a good chance,” you’re out of luck. The mere fact that two systems have both opted to use the same set of standards is no guarantee that they’ll be able to communicate successfully, even if both ends conform strictly to the standards. If this information is news to you, welcome to the world of systems integration!
If WCF works in your scenario, that’s great, but when it is not an option, use .NET’s HTTP-based APIs. Unless, of course, the service in question is not HTTP-based, and requires you to work directly with TCP or UDP, in which case you would use sockets. In short, you’re at the mercy of the server, and you’ll just have to pick whichever option happens to work.
Note that because Silverlight’s version of WCF is considerably more limited than the full .NET Framework version, a Silverlight client is more likely to have to drop down to the HTTP APIs than a full .NET client.
If you are writing a web service in .NET that you would like to be accessible to client programs written by people other than you, the choice of technology will be determined by two things: the nature of the service and the demands of your clients.[26] If it’s something that fits very naturally with HTTP—for example, you are building a service for retrieving bitmaps—writing it as an ordinary ASP.NET application may be the best bet (in which case, refer to Chapter 21). But for services that feel more like a set of remotely invocable methods, WCF is likely to be the best bet. You can configure WCF to support a wide range of different network protocols even for a single service, thus supporting a wide range of clients.
As with the other application types, you would use sockets only if your application has unusual requirements that cannot easily be met using the communication patterns offered by HTTP.
So having looked at some common scenarios and seen which communication options are more or less likely to fit, let’s look at how to use those options.
WCF is a framework for building and using remotely accessible services. It’s particularly well suited to XML-based web standards, although it’s not limited to these. It provides a programming model that supports many different underlying communication mechanisms; as well as supporting numerous web service standards, WCF also offers high-performance proprietary protocols that you can use in end-to-end .NET systems, and it’s extensible, so support for other protocols can be added. WCF’s design makes many of these details a matter of configuration—you write services and clients in the same way no matter what communication mechanisms are in use.
To explore WCF, we’ll build a very simple instant messaging application to allow multiple users to chat with one another. So that we can focus on the communication code, the client will be a simple console application.
We’ll start with the server for our chat application. If
you want to build your own copy of the project as you read, open Visual
Studio’s New Project dialog (Ctrl-Shift-N) and in the template list on
the left, select Visual C#→WCF. Choose
the WCF Service Library project template. Call the project ChatServerLibrary. Ensure that the “Create
directory for solution” checkbox is checked, and call the solution
WcfChat.
This project will produce a DLL as its output, because the WCF Service Library project template doesn’t commit to hosting the WCF service in any particular container application. WCF can run inside IIS, a Windows Service, a console application, or indeed pretty much any .NET application. If you want to use a particular kind of host, you can just create the relevant type of project—for example, instead of creating a WCF Service Library, you could create an ASP.NET web application project if you wanted to host your WCF service in there. (You can add a WCF service as a new item to an existing web project, so you don’t need a WCF-specific project type.) But there are a couple of benefits to this library-based template: as you’ll see shortly, it provides an easy way to do simple manual testing of the service. Also, it means you can host the service in multiple different host applications, which can be useful for automated testing—you can test the service without having to deploy it into its intended environment.
Visual Studio will have added a single service to the project,
called Service1. This contains some
example code that does things we don’t need in our chat application, so
we’ll ignore that. (Feel free to delete them if you’re building your own
version as you read this.) We’ll add a new WCF Service item to the
project with the Add New Item dialog, called ChatService. Visual Studio adds two files to
the project: ChatService.cs and
IChatService.cs. This reflects the
fact that WCF makes a distinction between the code that implements a
service, and the contract for that service.
When two systems communicate over a network, they need to
agree on what information is to be sent back and forth. WCF formalizes
this with what it calls contracts. So the IChatService interface added by the wizard
represents a service contract. The service
contract defines the operations the service offers. As Example 13-1 shows, the interface is marked with a
ServiceContract attribute to make it
clear that it’s a contract definition.
Example 13-1. A service contract
[ServiceContract]
public interface IChatService
{
    [OperationContract]
    void DoWork();
}
Each method in the interface that defines an operation offered by
the service must be marked with an OperationContract. You might have thought that
it would be enough that the interface is marked as ServiceContract—why do we also need to
annotate each method? WCF requires you to be explicit so that it’s
always obvious when you’re defining some aspect of your system that will
be visible across the network. A method call to a local object is a
quite different kind of operation than using a remote service—the
performance and reliability characteristics are poles apart—so it’s
important for such boundaries to be clearly visible in the code.
Note
Although we’re defining a method for each operation, ultimately
the contract defines what messages can go in and
out of the service. To invoke an operation, a client will need to send
a message to the server over the network. When you add a method marked
with OperationContract to an
interface marked with ServiceContract, you are really defining the
logical structure of the message that will be sent to invoke that
operation, and also of the message that will be sent back to the
client when the operation is complete. WCF lets you represent these
message formats as method signatures because it’s a convenient
abstraction for developers.
WCF supports other ways of defining message formats—you can write a contract in WSDL, the Web Service Definition Language, and then generate types from that. This approach is beyond the scope of this book.
Our service is designed to let people chat, so it will need to
provide clients with a way to send a short bit of text, which we’ll
refer to as a note. (A more obvious name would be
message, but that would introduce ambiguity—WCF
sends messages to and from the server for every operation, so to call
one of the pieces of information that crops up in certain messages a
message would be confusing.) To keep things simple, we’ll just have one
big chat room where everyone can see every note; we’re not going to
support private conversations. To support sending notes, we’ll get rid
of the DoWork method provided by
Visual Studio, and replace it with the code in Example 13-2.
If you attempt to build your project in Visual Studio, you’ll get a compiler error:
error CS0535: 'ChatServerLibrary.ChatService' does not implement interface
 member 'ChatServerLibrary.IChatService.PostNote(string, string)'
Remember that Visual Studio added two files: IChatService.cs (the contract) and ChatService.cs (the service implementation).
The compiler is pointing out to us that our service implementation no
longer conforms to the contract for the service. So in ChatService.cs, we need to replace the
DoWork method with this code:
public void PostNote(string from, string note)
{
    Debug.WriteLine("{0}: {1}", from, note);
}
For this to compile, you’ll need to add a using System.Diagnostics; directive to the top
of your file.
Note
There’s an obvious security question with this service: how do we know that the note comes from the person it claims to come from? The answer is that we don’t—identification is a complex topic, with many possible solutions. The appropriate choice of solution would depend on the context in which the application will be used—on a corporate network, integrated Windows security might be best, but that wouldn’t work for a public-facing Internet application. The way to solve these problems is currently an area of debate, and could easily fill a chapter. Since this example just illustrates the basic mechanics of WCF, we are using the naïve trust model for identity: users can claim to be whoever they want to be, and our application will believe them.
You can now build and run the application—either press F5 or choose Debug→Start Debugging. Normally, you’d get an error if you tried to run a library project, because you can’t run a DLL. However, Visual Studio knows this is a WCF project, and it has a special feature for running and testing WCF libraries. When you run the project, you’ll see a balloon pop up in the taskbar notification area, as Figure 13-3 shows.

The WCF Service Host (or WcfSvcHost, as it’s abbreviated in the pop up)
is a program provided by Visual Studio that loads your WCF DLL and makes
its services available for local access for debugging purposes. Visual
Studio also launches a second program, the WCF Test Client—this is a
Windows application that provides a UI for invoking operations on your
service to try it out. As Figure 13-4 shows, it presents a
tree view listing all the services defined by your project, and all the
operations available in each service. (If you’ve deleted the unwanted
IService1 mentioned earlier in your
code, you’ll only see one service.)
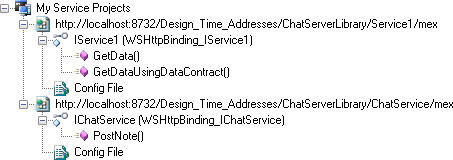
The test client has found both the original Service1 service that we chose to ignore and
the ChatService we added.
Double-clicking on the PostNote item
that represents the operation we defined for the chat service shows a
tab on the right that lets us try out the service—the test client’s job
is to let us try invoking service operations without having to write a
whole program just to do that. Figure 13-5 shows this tab
with arguments. If you look at the Value column, you’ll see arguments
for the from and note parameters of the PostNote operation—you can just type these
directly into the Value column.
Clicking the Invoke button invokes the PostNote operation on the service. We can
verify that the information typed into the WCF Test Client made it
through, by looking in Visual Studio’s Output window—that’s where text
sent to Debug.WriteLine appears.
(There’s an item on the View menu to make the Output window visible, if
it’s not already open.) The Output window gets fairly busy, so you might
have to look quite carefully, but somewhere in the noise, you’ll see
that the from and note argument values are both shown, for
example:
Ian: Hello, world
Note
If you’re trying this yourself, it’s possible you’ll see an error back in the WCF Test Client if you set breakpoints in Visual Studio—the client program will time out if you spend too long suspended at a breakpoint. It’s common with networking systems to give up after a certain length of time. If a client doesn’t get a response, all manner of things could be wrong—there may be a network problem, perhaps locally, or maybe at the server end, or somewhere in between. Maybe the server is offline, or just too busy to respond to the request. The client can’t easily tell—all it knows is it’s not getting a response. So by default, WCF gives up after a minute and throws an exception. The WCF Test Client reports this with an error dialog.

Once the test client has received a response from the service, it
indicates this in the bottom half of the tab. Our PostNote operation has a return type of
void, which means that it sends back
an empty response. (It still sends a response to report that the
operation has finished. It just contains no data.)
You may be curious to know what the messages being sent between the client and the server look like. And if you’re not, we’d recommend becoming curious about such things. It’s difficult to design good, nontrivial distributed systems (and impossible to diagnose problems with them) if you don’t know what the messages they send look like. Sadly, some developers are happy to be ignorant about this sort of thing, but they frequently get stuck and have to ask for help from people who know what they’re doing anytime something goes wrong. If you’d rather be one of the wizards who can fix these problems, you need to learn what the messages that go over the network really look like. You can see the messages in the WCF Test Client by clicking on the XML tab at the bottom. It’s beyond the scope of this book about C# to explain the structure of these WCF messages in detail, but it’s easy to see where the data you sent ended up in this example. If you want to learn more, the book Learning WCF by Michele Leroux Bustamante (O’Reilly) would be a good place to start, or for a more advanced treatment, you could try Programming WCF Services by Juval Lowy (O’Reilly).
Note
If you plan to do any real work with network communications, one of the most useful things you can do is get familiar with a tool that lets you inspect the contents of the messages being sent and received by your computer’s network card. Microsoft’s Network Monitor program is available for free, as is the open source Wireshark. They can seem a little intimidating at first because of the sheer level of detail they offer, but they’re an indispensable tool for diagnosing communication problems, because they show you exactly what messages were sent and what they contained.
The WCF Service Host and Test Client are useful for very simple interactive testing, but a real, useful service needs to be hosted somewhere more permanent. So next, we’ll look at how .NET programs can host WCF services.
WCF services are flexible about their location—any ordinary .NET application can host WCF services, so there’s no such thing as a specialized WCF Service Host project template in Visual Studio. You can host WCF services inside ASP.NET web applications, Windows Services, console applications, or even applications with GUIs built with Windows Forms or WPF. Any process that can accept incoming network connections should work, so about the only place you can’t host a WCF service is in a process where security constraints prevent inbound connections, such as a web browser. (For example, Silverlight clients can make outbound WCF connections, but they can’t host a service that accepts incoming connections.)
ASP.NET web applications are a particularly popular host environment for WCF services, because ASP.NET solves a lot of the problems you need to solve for an online service. Web applications automatically become available when a machine starts up—there’s no need for anyone to log in and start a program. ASP.NET provides a robust hosting environment—it’s able to restart after errors, and integrate into diagnostic management systems so that system administrators can discover when problems occur. There are well-understood ways to load-balance web applications across multiple servers. ASP.NET can make use of IIS security features such as integrated authentication.
However, ASP.NET is not always the right choice. A WCF service hosted in a web application can’t use the full range of protocols supported by WCF—incoming messages have to arrive by HTTP. Also, web applications usually get to run code only while they are actively handling a request from a client. If you need to perform long-running work that continues even when there are no clients connected right now, a web application host might be a bad idea, because in some configurations ASP.NET will restart web applications from time to time, or may even shut them down completely when they’ve had no incoming requests lately. So in some situations it might make more sense to write your own host. A Windows Service might be a good bet, as it can start automatically when the machine starts.
Sometimes it’s useful to host a WCF service inside a normal Windows application. Imagine a WPF application providing some sort of advertising display on a screen in a shop window—it could be useful to build a WCF service into this to enable the display to be controlled without needing physical access to the machine.
The techniques for hosting look much the same in all cases. And since we won’t be getting on to ASP.NET until later in the book, we’ll keep it simple by hosting our service in a console application. It’ll be easy enough to move it into different hosting environments later because the service itself is in a separate DLL project—we could just add it to a Windows Service or a web application.
Regardless of the type of host, one of the most important parts of WCF hosting is the configuration file.
If you look in the ChatServerLibrary project, you’ll find an
App.config file. You’ll find one
of these, or its web equivalent, web.config, in lots of different kinds of
.NET applications, but an App.config in a library project is
something of an anomaly—application configuration files
configure applications, and a library is not an
application. Normally, adding an App.config file to a project that builds a
DLL does nothing useful, but WCF projects are an exception because of
the WCF Service Host we saw earlier. The test host loads the contents
of this file into its own application configuration. Normally,
application configuration files must go either into projects that
build executable applications, or into web projects.
Warning
The App.config in a WCF Service Library project is used only by the WCF Service Host. You will always need to copy the configuration into your real service host application.
So that we can have an application to configure, we’ll add a
console application called ChatHost
to our WcfChat solution. This
console application will host our WCF service, so we’ll add a
reference to the ChatServerLibrary.
And since we’ll be using this console application as the host from now
on instead of WcfSvcHost, we’ll
need to copy the configuration in the ChatServerLibrary project’s App.config into the ChatHost project’s App.config. (Once we’ve done this, we can
delete the App.config in the
ChatServerLibrary project.)
We’ll look at each of the App.config file’s sections to understand
how the file works. Everything lives inside the root <configuration> element—all App.config and web.config files have one of these, no
matter what sort of application you’re writing. The first child
element will be this:
<system.web>
  <compilation debug="true" />
</system.web>
Our example doesn’t need this, so it’s safe to delete it. The WCF Service Library template adds this in case you are planning to host the project in a web application—this enables debugging in web apps. But since we’re not writing a web application, it’s not needed here.
Next is a <system.serviceModel> element—in fact,
all the remaining contents of the App.config file are inside this element.
This is where all WCF configuration lives, regardless of the type of
host application.
The first element inside the WCF configuration is <services>. This contains a <service> element
for each service the program will host. Visual Studio has added two:
one for the Service1 service that
we’re not using, and one for the ChatService we wrote. Since we don’t need
the Service1 service, we can delete
that first <service> element
and everything it contains. This leaves the <service> element for our ChatService. It begins:
<service name="ChatServerLibrary.ChatService">
The name attribute is the
name of the class that implements the service, including the
namespace. Inside the <service> element we find some
<endpoint> elements. Remember
that earlier we said WCF can make a single service implementation
accessible through multiple communication mechanisms. You do that by
adding one endpoint for each mechanism you wish to support. Here’s the
first endpoint Visual Studio added for us:
<endpoint address=""
          binding="wsHttpBinding"
          contract="ChatServerLibrary.IChatService">
  <identity>
    <dns value="localhost" />
  </identity>
</endpoint>
An endpoint is defined by three things: an address, a binding, and a contract—sometimes referred to collectively as the ABC of WCF. The address is typically a URL—it’s the address a client would use to connect to the service. In this case the address is blank, which means WCF will deduce the address for us—we’ll see how in a moment.
The binding determines the communication technology that WCF
will use on this endpoint. Here we’ve used one of the built-in
bindings called wsHttpBinding. The
“ws” denotes that this uses the various web service standards that
begin with WS-. So this binding supports standards such as
WS-ADDRESSING and WS-SECURITY. This is a feature-rich binding, and it
may use features that some clients don’t understand—it’s not supported
by Silverlight, for example. If you wanted to use the basic
profile that Silverlight clients support, you’d specify basicHttpBinding here instead. But for this
application, you can leave the binding as it is.
Finally, the contract
attribute here contains the name of the interface type that defines
the operation contract for our service. We already looked at
contracts—this refers to the interface we saw in Example 13-1 and modified in Example 13-2.
Inside the <endpoint>
element you’ll see an <identity> element. This is intended
for scenarios where the service needs to be able to identify itself
securely to a client—for example, in a banking application you’d want
to be confident that you’re really talking to your bank. But we’re not
going to get into security in this example, so we can delete the
<identity> element and its
contents.
Visual Studio added a second endpoint to the App.config when we created the ChatService:
<endpoint address="mex"
          binding="mexHttpBinding"
          contract="IMetadataExchange" />
This enables something called metadata exchange—this endpoint doesn’t provide a way to use the service, and instead makes it possible to get a description of the service. We’ll be using this later when we build a client for our service.
Finally, after the two <endpoint> elements, you’ll see a
<host> element, as Example 13-3 shows. (This
contains a very long line, which has been split across two lines here
to make it fit on the page.) This <host> element is still inside the
<service> element, so like
the two <endpoint> elements,
this entry is still describing one particular service—our ChatService.
Example 13-3. Host element with default base address
<host>
  <baseAddresses>
    <add baseAddress=
"http://localhost:8732/Design_Time_Addresses/ChatServerLibrary/ChatService/" />
  </baseAddresses>
</host>
This element contains hosting information that applies to all of
this service’s endpoints—this is
how WCF works out what address to use for each endpoint. The baseAddress attribute is combined with the
contents of the address attribute
for each <endpoint> element
to work out the effective address for that endpoint. Since the first
endpoint’s address is empty, that endpoint’s address will be the
baseAddress specified here. The
second endpoint’s address was mex,
so that endpoint for the service will be available at:
http://localhost:8732/Design_Time_Addresses/ChatServerLibrary/ChatService/mex
If you’re wondering why Visual Studio chose this slightly peculiar-looking address as the default base address for our service, see the sidebar below.
After the <services>
element you’ll see a <behaviors> element in your App.config, containing a <serviceBehaviors> element which
contains a <behavior>
element. This section allows various WCF features to be switched on or
off. You might wonder why these settings don’t just go into the
<services> section. The
reason is that you might want to host multiple services, all of which
share common behavior configuration. You can define a single named
<behavior> element, and then
point multiple <service>
elements’ behaviorConfiguration
attributes at that behavior, reducing clutter in your configuration
file. Or, as in this case, you can create an unnamed <behavior> element, which defines
default behavior that applies to all services in this host process.
Since we’re hosting only one service here, this doesn’t offer much
advantage, but this separation can be useful when hosting multiple
services.
The <behavior> element
that Visual Studio provides has some comments telling you what you
might want to change and why, but paring it down to the essential
content leaves just this:
<behaviors>
  <serviceBehaviors>
    <behavior>
      <serviceMetadata httpGetEnabled="True" />
      <serviceDebug includeExceptionDetailInFaults="False" />
    </behavior>
  </serviceBehaviors>
</behaviors>
This configures a couple of optional features. The first is related to the metadata exchange mentioned earlier—it just ensures that the service description can be fetched in a certain way. Again, we’ll come back to metadata when we get to the client, so you can ignore that for now.
The second behavior here—the serviceDebug element—doesn’t have any
effect, because it sets the includeExceptionDetailInFaults property to
its default value, False. Nothing
would change if you removed this. The only reason Visual Studio puts
this here at all is to help you out when debugging—sometimes it’s
useful to set this to True
temporarily, and putting this entry in the file saves you from having
to look up the name of the setting. Making this True will mean that if your service throws
an exception, the full exception details including stack trace will be
sent back to the client in the response.
Generally speaking, you should never do this, because sending stack traces to your clients reveals implementation details about your system. If some of your clients are evil hackers, this might make it easier for them to break into your system. (Technically, if your system is completely secure, a stack trace won’t help them, but when did you last hear about a computer system that was completely secure? It’s safe to presume that everything has security flaws, so the less help you give hackers the better—this is often described as reducing the attack surface area of your system.) While you don’t normally want to send stack traces over the network, doing so can sometimes make it easier to diagnose problems during development. So you might switch this setting on temporarily to make your life easier. But remember to turn it off before you ship!
That’s everything Visual Studio put into our configuration file. This shows just a tiny fraction of all the settings we could put in there, but this isn’t a book about WCF, so that’ll do for now.
After all that, our program still isn’t ready to host the service. As well as putting configuration entries into the application configuration file, our program needs to make an API call to tell WCF that it wants to host services. (If we were writing a web application, we wouldn’t need to do this—having the configuration in the web.config file would be enough. But for other application types, we need to do this one last step.)
So we need to add a reference to the System.ServiceModel component—that’s the main .NET Framework class library
DLL for WCF—and we also need to add using System.ServiceModel; and using ChatServerLibrary; directives to the
top of the Program.cs file in our
ChatHost project. We can then write
our Main method to look like Example 13-4.
Example 13-4. Hosting a WCF service
static void Main(string[] args)
{
    using (ServiceHost host = new ServiceHost(typeof(ChatService)))
    {
        host.Open();

        Console.WriteLine("Service ready");
        Console.ReadKey();
    }
}
This creates a ServiceHost
object that will make the ChatService available. WCF will load the
configuration from our App.config
file to work out how to host it. And we need to make sure our program
hangs around—the service will be available only for as long as the
program that hosts it. So we leave the program running until a key is
pressed.
If you want to try this out, you’ll need to make sure the host
console application is the program Visual Studio runs by default—right
now it won’t be because the ChatServerLibrary is still set as the
default. You’ll need to right-click on ChatHost in the Solution Explorer and select
Set as Startup Project. Now pressing F5 will run the program, and a
console window will appear showing the message “Service ready” once
the ServiceHost is ready.
Warning
If you didn’t delete the App.config file in the ChatServerLibrary project earlier, you’ll
now get an error. Even when you set ChatHost as the startup application,
Visual Studio will still attempt to launch the WCF Service Host for
the ChatServerLibrary project.
That would be useful in a solution that has just a WCF client and a
service DLL. It’s unhelpful here because we end up with two programs
trying to host the same server on the same URL—whichever one gets
there second will fail.
If you don’t want to delete the App.config in that project, you can
disable the WCF Service Host by opening the ChatServerLibrary project’s Properties,
going to the WCF Options tab, and unchecking the relevant
checkbox.
Now what? We no longer have the WCF Test Client, because Visual
Studio thinks we’re running a normal console application. Since the
default wsHttpBinding for our
service endpoint uses HTTP we could try pointing a web browser at it.
Remember, the service is running on the address in the configuration
file:
http://localhost:8732/Design_Time_Addresses/ChatServerLibrary/ChatService/
Strictly speaking, the service isn’t really designed to support a web browser. This chapter is all about enabling programs to communicate with one another, not how to build web user interfaces. However, WCF is rather generous here—it notices when we connect with a web browser, and decides to be helpful. It generates a web page that patiently explains that the thing we’ve connected to is a service, and shows how to write code that could talk to the service. And that’s exactly what we’re going to do next.
We need to create a client program to talk to our service.
Again, to keep things simple we’ll make it a console application. We’ll
add this to the same solution, calling the project ChatClient. (Obviously, you’ll need to stop
the ChatHost program first if you’re
trying this out and it’s still running in the debugger.)
When you right-click on a project’s References item in Visual Studio’s Solution Explorer, you’re offered an Add Service Reference menu item as well as the normal Add Reference entry. We’re going to use that to connect our client to our server via WCF.
The Add Service Reference dialog offers a Discover button (shown
in Figure 13-6) which attempts to locate
services in your current solution. Disappointingly, if we were to click
it with our code as it is now, it would report that it didn’t find any
services. That’s because we wrote all the hosting code by hand for
ChatHost—Visual Studio doesn’t
realize that our console application is hosting services. It usually
looks only in web projects—if we’d hosted the service in an ASP.NET web
application, it would have found it. But with the approach we’re taking
here, it needs a little help.
Note
If you left the App.config
file in place in the ChatServerLibrary project, it would find
that and would launch the WCF Service Host for you when you click
Discover. But be careful—ChatHost
is our real service, and when we start modifying settings in its
App.config (which we’ll do later)
it’s important that the Add Service Reference dialog is talking to the
right service. That’s why we suggested deleting the App.config from the DLL project earlier—it
avoids any possibility of accidentally configuring your client for the
wrong service host.
For Visual Studio to be able to connect to our console-hosted
service we need the service to be up and running before the Add Service
Reference dialog is open. The easiest way to do this is to run the
project, without debugging it. Instead of pressing
F5, we choose Debug→Start Without
Debugging, or we press Ctrl-F5. This runs the ChatHost program without debugging, leaving
Visual Studio free for other tasks, such as adding a service
reference.
We’ll need the address of the service handy, and since it’s quite
long, it’s easiest to open our host’s App.config and copy the service address to
the clipboard. (It’s the baseAddress attribute in the <host> section.) Then we can go to the
ChatClient project and add a Service
Reference. If we paste the address of the service into the Address box
and then click the Go button, after a few seconds we’ll see the Services
panel on the left display a ChatService entry. Expanding this shows an
IChatService item representing the
contract, and selecting this shows the one operation available in our
contract, PostNote, as Figure 13-6 shows.

While the list of services, contracts, and operations in the Add Service Reference dialog is useful for verifying that we have the service we wanted, the significance of the information here goes a little deeper—it’s part of an important feature of how systems communicate in WCF. Remember that we defined a contract earlier, to describe the operations our service provides to its clients. For the client to communicate successfully with the server, it also needs a copy of that contract. So the best way to think of the Add Service Reference dialog is that it’s a tool for getting hold of the contract from a service.
This is the purpose of the metadata exchange entry we saw earlier when we looked at the configuration Visual Studio generated for our WCF service. Metadata exchange is just a fancy way of saying that a service provides a way for a client to discover the contract and related information about the service. The Add Service Reference dialog uses this information to configure a client application to communicate with the service, and to provide it with a copy of the contract.
To see the results of this, we’ll finish with this dialog. In the
Namespace text box near the bottom, we’ll type
ChatService—Visual Studio will put the contract and
any other types relating to this service into this namespace. When we
click OK a Service References item appears in the project in the
Solution Explorer, and it will contain an entry called ChatService. (Now that we’ve done this, we can
stop the service host console window we ran earlier.)
Visual Studio generates some code when adding a service reference.
By default, it hides this, but we can take a look at it. At the top of
the Solution Explorer, there’s a toolbar, and if you hover your mouse
pointer over the buttons you’ll find that one has a tool tip of Show All
Files. This button toggles each time you click it. When it’s pressed in,
the ChatService service reference can
be expanded, as Figure 13-7 shows.
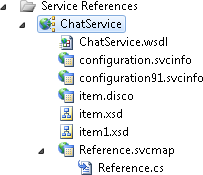
The most interesting file in here is Reference.cs, inside the Reference.svcmap item. Inside this file, near
the top, there’s a copy of IChatService—the contract we wrote
earlier:
[System.CodeDom.Compiler.GeneratedCodeAttribute("System.ServiceModel",
                                                "4.0.0.0")]
[System.ServiceModel.ServiceContractAttribute(
       ConfigurationName="ChatService.IChatService"]
public interface IChatService
{

    [System.ServiceModel.OperationContractAttribute(
         Action="http://tempuri.org/IChatService/PostNote",
         ReplyAction="http://tempuri.org/IChatService/PostNoteResponse")]
    void PostNote(string from, string note);
}
It looks a little more complex than the original, because Visual Studio has annotated it with various attributes, but it’s simply being explicit about the values that WCF fills in by default.[27] Aside from these extra details, you can see that it is essentially a copy of the original contract.
You might wonder why we jumped through all these hoops
rather than just copying IChatService from the service project to the
client. In fact, that would have worked, and we could even have
written a separate DLL project to define the contract interface and
shared that DLL across the two projects. As you’ll see shortly, Visual
Studio generated a few other useful things for us as part of this Add
Service Reference process, but as it happens, sharing the contract
definition directly is sometimes a perfectly reasonable thing to
do—you’re not obliged to use metadata exchange.
Of course, you won’t always own the code at both ends. If you need to connect to a service on the Internet provided by someone else, metadata exchange becomes more important—it provides a way to get hold of a contract you didn’t write. And since the metadata exchange mechanisms are standards-based, this can work even when the service is not written in .NET.
Warning
Metadata exchange is not universally supported. In practice, contract discovery can happen in all sorts of ways, including (and we’re not making this up) being faxed a printout showing samples of the messages the service expects to send and receive.[28] If you’re getting the contract through that kind of informal channel, you’ll need to write an interface (by hand) in your client program to represent the service contract.
The process of metadata import also highlights an important
point about service evolution. You might modify the ChatService after the ChatClient has added its reference. If these
modifications involve changing the contract, it’s clear that there’s a
problem: the client’s copy of the contract is out of date. You might
think that sharing the interface directly through a common DLL would
be a good way to avoid this problem, but it might only make the
problem harder to see: what if you’ve already deployed a version of
the client? If you then modify the contract the modified code might
run fine on your machine, but if you deploy an update to the service
with this changed contract any copies of the old client out there will
now be in trouble because they’re still working with an old copy of
the contract. Explicitly going through the metadata exchange doesn’t
make this problem any easier to solve, of course, but it makes it less
likely for changes to creep in by accident and go undetected. A
complete solution to the problem of service evolution is beyond the
scope of this book, so for now, just be aware that changing a contract
should not be undertaken lightly.
Note
Michele Leroux Bustamante’s Learning WCF (O’Reilly) discusses versioning of service contracts.
Looking further through the Reference.cs file generated by adding the
service reference, the next most interesting feature after the
contract is a class called ChatServiceClient. This implements IChatService, because it acts as a
proxy for the service. If we want to communicate
with the service, all we need to do is create an instance of this
proxy and invoke the method representing the operation we’d like to
perform. So if we add a using ChatClient.ChatService; directive
to the top of Program.cs in
ChatClient, we can then modify its
Main method as shown in Example 13-5.
Example 13-5. Invoking a web service with a WCF proxy
static void Main(string[] args)
{
    using (ChatServiceClient chatProxy = new ChatServiceClient())
    {

        chatProxy.PostNote("Ian", "Hello again, world");
    }
}
Notice the using
statement—it’s important to ensure that you dispose of WCF proxies
when you have finished using them. When the client calls this method
on the proxy, WCF builds a message containing the inputs, and it sends
that to the service. Over in the service (which is running in a
separate process, perhaps on a different machine) WCF will receive
that message, unpack the inputs, and pass them to the PostNote method in
the ChatService class.
To try this out, we’re going to need to run both the client and
the server simultaneously. This means configuring the solution in
Visual Studio a little differently. If you right-click on the WcfChat solution in the Solution Explorer
and select Set Startup Projects, the dialog that opens offers three
radio buttons. If you select the Multiple Startup Projects radio
button, you can choose which of your projects you’d like to run when
debugging. In this case, we want to change the Action for both the
ChatClient and ChatHost projects from None to Start. (We
leave the ChatServerLibrary Action
as None—we don’t need to run
that project, because our ChatHost
project hosts the server library.) Also, we want to give the service a
head start so that it’s running before the client tries to use it, so
select ChatHost and click the up
arrow next to the list, to tell Visual Studio to run it first. (In
theory, this is not a reliable technique, because there’s no guarantee
that the server will get enough of a head start. In practice, it
appears to work well enough for this sort of debugging exercise.)
Figure 13-8 shows how
these settings should look.

If we run the program by pressing F5, two console windows will open, one for the client and one for the service.
Note
If you’re following along, it’s possible that you’ll see an
AddressAlreadyInUseException with
an error message complaining that “Another application has already
registered this URL with HTTP.SYS.” This usually means you have a
copy of ChatHost still
running—somewhere on your desktop you’ll find a console window
running the service host. Or possibly, the WCF Service Host is still
running. This error occurs when you launch a second copy of the
service because it tries to listen on the same address as the first,
and only one program can receive requests on a particular URL at any
one time.
Visual Studio displays the message in its Output window because
of the call to Debug.WriteLine in
PostNote, just like it did when
using the WCF Test Client earlier, verifying that the proxy was able
to invoke an operation on the service. (You might need to look
carefully to see this—the message can get buried among the various
other notifications that appear in the Output window.)
Notice that in Example 13-5 we didn’t need to
tell the proxy what address to use. That’s because the Add Service
Reference dialog imported more than just the contract definition. It
adds information to the ChatClient
project’s App.config file, shown
in all its gory detail in Example 13-6.
Example 13-6. Generated client-side App.config
<?xml version="1.0" encoding="utf-8" ?>
<configuration>
    <system.serviceModel>
        <bindings>
            <wsHttpBinding>
                <binding name="WSHttpBinding_IChatService"
                    closeTimeout="00:01:00" openTimeout="00:01:00"
                    receiveTimeout="00:10:00" sendTimeout="00:01:00"
                    bypassProxyOnLocal="false" transactionFlow="false"
                    hostNameComparisonMode="StrongWildcard"
                    maxBufferPoolSize="524288" maxReceivedMessageSize="65536"
                    messageEncoding="Text" textEncoding="utf-8"
                    useDefaultWebProxy="true"
                    allowCookies="false">
                    <readerQuotas maxDepth="32" maxStringContentLength="8192"
                        maxArrayLength="16384"
                        maxBytesPerRead="4096" maxNameTableCharCount="16384" />
                    <reliableSession ordered="true"
                        inactivityTimeout="00:10:00" enabled="false" />
                    <security mode="Message">
                        <transport clientCredentialType="Windows"
                            proxyCredentialType="None" realm="" />
                        <message clientCredentialType="Windows"
                            negotiateServiceCredential="true"
                            algorithmSuite="Default" />
                    </security>
                </binding>
            </wsHttpBinding>
        </bindings>
        <client>
            <endpoint address="http://localhost:8732/Design_Time_Addresses/
                                  ChatServerLibrary/ChatService/"
                binding="wsHttpBinding"
                bindingConfiguration="WSHttpBinding_IChatService"
                contract="ChatService.IChatService"
                name="WSHttpBinding_IChatService">
                <identity>
                    <userPrincipalName value="[email protected]" />
                </identity>
            </endpoint>
        </client>
    </system.serviceModel>
</configuration>
Like the service configuration we examined earlier, this also
has an <endpoint> element
with an address, binding, and contract, although being on the client
side, this <endpoint> appears inside a
<client> element instead of a
<service> element. The proxy
gets the address from this endpoint definition.
Note
You can provide the proxy with an address from code if you want to. It offers various constructor overloads, some of which accept a URL. But if you don’t provide one, it will look in the configuration file.
Notice that the endpoint also has a bindingConfiguration attribute—this refers
to a <binding> element
earlier in the file that contains information on exactly how the
wsHttpBinding should be configured.
There was nothing like this in the service, because we were just using
the defaults. But the Add Service Reference dialog always generates a
binding configuration entry, even if you happen to be using the
defaults.
Our “chat” application is demonstrating the ability for the client to send a note to the server, but it’s not complete yet. The client needs a couple of extra features. To make our conversation a bit less one-sided, we should be able to see notes written by other people. And unless our conversations are all going to be exceptionally brief, we need to be able to type in more than just one note.
We’ll fix that second problem by modifying the code in Example 13-5. We’ll put the call to the proxy inside a loop, and we’ll also ask for the user’s name, so we can support notes from people who may not be called Ian (see Example 13-7).
Example 13-7. Client with input loop
static void Main(string[] args)
{
    ChatServiceClient chatProxy = new ChatServiceClient();

    Console.WriteLine("Please enter your name:");
    string name = Console.ReadLine();
    while (true)
    {
        Console.WriteLine("Type a note (or hit enter to quit):");
        string note = Console.ReadLine();
        if (string.IsNullOrEmpty(note))
        {
            break;
        }
        chatProxy.PostNote(name, note);
    }
}
We’ll also modify the server so that it prints out the note,
rather than sending it to the debug output—that’ll make it a bit
easier to see when notes are coming in. So change PostNote in ChatService to this:
public void PostNote(string from, string note)
{
    Console.WriteLine("{0}: {1}", from, note);
}
If you run both programs again by pressing F5, the client program will ask you to type in your name, and will then let you type in as many notes as you like. Each new note will be sent to the server, and you should see the notes appear in the server console window.
This is an improvement, but there’s still no way for the client to find out when other users have typed notes. For this, we’ll need to add bidirectional communication.
The contract for our chat service is a one-sided affair—it’s all about the notes the client sends to the server. But WCF supports duplex contracts, which provide a means for the server to call the client back. (Note that there are some issues with HTTP that can make duplex communication tricky—see the sidebar on the next page.) A duplex contract involves two interfaces—as well as an interface that the server implements, we also define an interface that the client must implement if it wants to use the service. In our example, the service wants to notify clients whenever any user posts a note. So the client-side interface, shown in Example 13-8, looks pretty similar to our current server interface.
Example 13-8. Callback interface for duplex contract
public interface IChatClient
{
    [OperationContract]
    void NotePosted(string from, string note);
}
Notice that while methods in a callback interface require the usual OperationContract attribute, the interface
itself does not need to be marked with ServiceContract. That’s because this callback
interface is not a contract in its own right—it’s one half of a duplex
contract. So we need to modify the existing IChatService to associate it with this new
callback interface (see Example 13-9).
Example 13-9. Duplex contract
[ServiceContract(
    CallbackContract=typeof(IChatClient),
    SessionMode=SessionMode.Required)]
public interface IChatService
{
    [OperationContract]
    bool Connect(string name);

    [OperationContract]
    void PostNote(string note);

    [OperationContract]
    void Disconnect();
}
By setting the ServiceContract
attribute’s CallbackContract
property, we’ve declared that this is a duplex contract, and have
identified the interface that defines the client side of the contract.
Example 13-9 also makes a couple of other changes
that turn out to be necessary for our service to work as intended: we’ve
set the SessionMode property of the
ServiceContract attribute, and we’ve
added a couple of extra methods to enable clients to connect and
disconnect. We’ve also removed the string name argument from PostNote—as you’ll see, this will turn out to
be redundant. All of these changes are related to
sessions.
The ServiceContract
attribute’s SessionMode property
determines the nature of the relationship between the server and any
particular client. By default, the relationship is presumed to be
transient, not necessarily lasting any longer than a single operation.
This reflects the fact that WCF is designed to support web services,
and HTTP does not offer any idea of a connection between the client
and the server that lasts longer than a single request.
Note
It’s true that HTTP allows a single TCP connection to be reused across multiple requests, but this is just a performance optimization, and nothing is allowed to depend on it. Either the client or the server is free to close the connection at the end of a request, forcing a new one to be established for the next operation, without changing the semantics of the operations. (And even if the client and server both want to keep the connection alive between requests, a proxy in the middle is free to overrule them.) Logically speaking, each HTTP request is completely disassociated from the ones that came before or after.
This connectionless behavior is very useful for scalability and robustness—it means you can load-balance across large numbers of web servers, and it doesn’t greatly matter whether all of a particular client’s requests are handled by the same machine. It’s often possible to take a single machine in a web farm out of service without disrupting any of the clients. However, the absence of connections is sometimes unhelpful—some applications need some sort of session concept. For example, it would be annoying to have to type in your username and password every time you move from one page to another in a website—once you’ve logged in to a website, you want it to remember who you are. Likewise, if our chat application is going to be able to call clients back to notify them that notes have arrived, that implies that the application needs to know which clients are currently connected.
Although HTTP has no standard way to represent a session, various ad hoc systems have been developed to add such a feature. Websites typically use cookies. (Cookies are not part of the HTTP specification, but they are supported by all popular web browsers. Some users disable them, though, so they’re not necessarily universally available.) The web service standards supported by WCF prefer a slightly different solution—it’s similar to how cookies work, but it puts the relevant information in the messages being sent, rather than in the HTTP headers.[29]
Since our contract is now duplex, it requires the ability to
maintain a connection between each client and the server. We tell WCF
this by setting the SessionMode
property to SessionMode.Required.
Note that this doesn’t actually switch on sessions; it merely says
that anything that wants to communicate using this contract had better
do so with sessions enabled. Remember, the contract is separate from
implementations that conform to the contract. The effect of this
setting is that WCF will produce an error if you try to use this
contract without enabling sessions; we’ll see how to enable sessions
by modifying the client and server configuration files once we’ve
finished modifying the code.
A session will be established the first time a client connects
to a service, which presents our application with another problem. WCF
won’t send a message until it has something to send, so our chat
client will first connect to the service when we send our first note.
(Creating an instance of the ChatServiceProxy does
not connect—nothing goes over the network until
the first time you try to invoke an operation.) But we want clients to
be able to receive notes straight away, without being required to post
one first. So we need a way for clients to announce their presence to
the service without sending a note. That’s why Example 13-9 adds a Connect method. And
we’ve also provided a Disconnect method for
clients to announce that they are leaving so that the chat server
doesn’t attempt to send notes to clients that are no longer there.
(Without this, the server would get an exception the next time it
tried to send a message. Although it would notice that the clients had
gone, an explicit disconnect is a bit neater—it also makes it possible
to tell the difference between users who deliberately leave the
conversation and users who get cut off due to problems.)
We now need to update the server to implement the modified contract, and to track the clients.
Our service is going to need to maintain a list of connected clients so that it can notify every client when it receives each note. We can store the list as private data in our service class, but since that one list needs to be available across all sessions, we need to tell WCF that we only ever want it to create one instance of that class.
WCF offers several different modes for creating instances of your service class. It can create one per client session—that’s useful when you want per-session state. But in our case, all notes get sent to everyone, so the only interesting state is global. Since our application state is global, we don’t have much use for per-client instances here. WCF can also create a new instance of your service class for every single request—if you don’t hold any state in the service class itself this is a reasonable thing to do. But in our case, we want one instance for the lifetime of the service. We can indicate this like so:
[ServiceBehavior(
    InstanceContextMode=InstanceContextMode.Single,
    ConcurrencyMode=ConcurrencyMode.Reentrant)]
public class ChatService : IChatService
{
We added a ServiceBehavior
attribute to the code to specify this single-instance behavior. Notice
that we also asked for a ConcurrencyMode of Reentrant. This tells WCF to have our
service work on requests for only one session at a time—if requests
from multiple clients come in simultaneously, WCF will service them
one after another. This is convenient as it means that as long as any
single client does only one thing at a time, we don’t need to write
any code to ensure the thread safety of our state handling.
Note
An alternative to the single-instance context mode would have
been to store our state in a static field. This would share the data
across all clients, which is what we need. But then we’d be on our
own for thread safety. The ConcurrencyMode property applies only to
any particular instance of the service, so if you don’t choose the
single-instance mode, WCF will let different instances of your
service execute simultaneously.
In practice, real applications are likely to need to do their
own thread synchronization. Here we’re relying on clients making
only one call at a time, which might work in a small, controlled
example but is a risky thing to do if you don’t completely trust
your client machines. (Even with only one session at a time, a
single client session could invoke multiple operations
simultaneously.) You may be wondering why we didn’t use ConcurrencyMode.Single, which enforces a
completely strict one-at-a-time model. Unfortunately, that turns out
to prevent you from calling back into clients while you’re in the
middle of handling a call from a client—a blocking outbound call
from a nonreentrant single-threaded context presents an opportunity
for deadlocks, so WCF forbids it.
Next, we’ll add a field to hold the state—a collection of currently connected clients:
private Dictionary<IChatClient, string> clientsAndNames =
     new Dictionary<IChatClient, string>();
This is a dictionary where the key type is the client callback
interface we defined earlier. The value is the client’s name. To see
how this gets used, here’s the Connect implementation:
public bool Connect(string name)
{
    if (clientsAndNames.ContainsValue(name))
    {
        // Name already in use, so refuse connection
        return false;
    }

    IChatClient clientCallback =
        OperationContext.Current.GetCallbackChannel<IChatClient>();

    // clientsAndNames is shared state, but we're not locking
    // here, because we're relying on ConcurrentMode.Reentrant
    // to give us messages one at a time.
    clientsAndNames.Add(clientCallback, name);
    Console.WriteLine(name + " connected");

    return true;
}
The first thing we do is check that the username is unique. Now
that we’re maintaining a list of connected clients, we’re in a
position to prevent multiple users from picking the same name. If a
new user is trying to sign up with a duplicate name, we return
false. (A return code here makes
more sense than an exception because this isn’t really an exceptional
condition.)
If the name looks OK, we retrieve the client callback interface with the following expression:
OperationContext.Current.GetCallbackChannel<IChatClient>()
OperationContext is a WCF
class whose Current property
provides information about the operation that your code is handling
right now. One of the services it provides is the ability to retrieve
the callback interface when a duplex contract is in use. GetCallbackChannel
returns a proxy object similar to the one the client uses to talk to
the service, but this proxy goes in the other direction—it invokes
operations on the client that called our Connect method. We just add this to the
dictionary of connected clients, associating it with the client’s
chosen name, and then return true
to indicate that we’re happy that the user’s name wasn’t previously in
use and that we have accepted the user’s connection.
Next, let’s look at the modified PostNote:
public void PostNote(string note)
{
    IChatClient clientCallback =
        OperationContext.Current.GetCallbackChannel<IChatClient>();
    string name = clientsAndNames[clientCallback];

    Console.WriteLine("{0}: {1}", name, note);

    // ToArray() makes copy of the collection. This avoids an
    // exception due to the collection being modified if we have
    // to disconnect a client part way through the loop.
    KeyValuePair<IChatClient, string>[] copiedNames =
        clientsAndNames.ToArray();
    foreach (KeyValuePair<IChatClient, string> client in copiedNames)
    {
        // Avoid sending the message back to the client that just sent
        // it - they already know what they just typed.
        if (client.Key != clientCallback)
        {
            Console.WriteLine("Sending note to {0}", client.Value);
            try
            {
                client.Key.NotePosted(name, note);
            }
            catch (Exception x)
            {
                Console.WriteLine("Error: {0}", x);
                DisconnectClient(client.Key);
            }
        }
    }
}
Again, we begin by retrieving the callback interface for the
current client. Remember, our chat server will usually have multiple
clients attached, and this lets us discover which particular one is
sending a note. The next line looks up the callback interface in the
dictionary to find out what name this user originally passed to
Connect—this is why we were able to
remove the argument we previously had on this method in which the
caller passed her name. We remember her name from before—we have to
remember it to guarantee uniqueness—and since we’re remembering it,
there’s no need to make the client pass in the name every single
time.
This code then iterates through all the connected clients in the
clientsAndNames dictionary, to
deliver the new note to each client. It calls the NotePosted on the
proxy. Notice that we wrapped this in exception-handling code. If a
client becomes inaccessible because of a network failure, a crash, a
machine failure, or a programming error that caused it to exit without
remembering to call Disconnect, the
proxy’s NotePosted method will
throw an exception. Our code catches this and removes the client from
the list, to avoid trying to send it any more notes.
Note
This code is a little simplistic, for two reasons. First, we might want to be a little more lenient with errors—perhaps we should give the client a chance to recover before giving up on it entirely. One way to do this would be to have a second collection of connections to act as a kind of sin bin—you could give failed clients another chance after a certain amount of time. (Another strategy would be to require that the client attempt to reconnect in the event of a failure, in which case the server’s error handling is just fine as it is.)
Second, calling each client in turn using a loop will perform poorly as the number of clients gets large, or if some clients are on slow connections. This code will be OK for small groups on a private network, but for a larger scale, an asynchronous approach would work better. WCF provides full support for asynchronous use of proxies, but the chapter on threading and asynchronous programming is coming later, so we can’t show you that just yet.
The code to disconnect clients is in a separate method, because
it’s shared by the error-handling code and the Disconnect method that’s part of the new
contract. Here’s the common code:
private void DisconnectClient(IChatClient clientCallback)
{
    string name = clientsAndNames[clientCallback];
    Console.WriteLine(name + " disconnected");
    clientsAndNames.Remove(clientCallback);
}
This just removes the client from the dictionary. This makes the
Disconnect method very
simple:
public void Disconnect()
{
    IChatClient clientCallback =
        OperationContext.Current.GetCallbackChannel<IChatClient>();
    DisconnectClient(clientCallback);
}
Once again, we get hold of the callback interface, and then call the same disconnection helper as the error-handling code.
We have one more modification to make on the server: the
wsHttpBinding we’re using doesn’t
support the duplex behavior we require, so we need to modify the
ChatHost program’s
configuration.
As we mentioned earlier, WCF lets us change the
communication mechanism we’re using by configuring a different
binding. We don’t need to change
any code to do this. We just need to modify our host project’s
App.config file, specifically the
<endpoint> tag:
<endpoint address=""
          binding="wsHttpBinding"
          contract="ChatServerLibrary.IChatService">
</endpoint>
We change that binding
attribute’s value to wsDualHttpBinding. This binding is very
similar to wsHttpBinding; it just
adds support for callbacks. It also enables sessions automatically.
(Sessions are available with wsHttpBinding, but they are off by default,
so you’d need to add further configuration to switch them on if you
wanted sessions without duplex communication.)
Our server is now ready to work in duplex mode, so next we need to update the client.
We’ve made several changes to the contract: we modified the one existing method, added two new methods, and turned it into a duplex contract. We also changed the binding. Any one of these changes would need the client to be updated, because each has an impact on the work done by the Add Service Reference operation. (All these things change the contract, the configuration, or both.) However, we don’t need to completely redo the work of adding the service reference. If you right-click on an item in a client’s Service References in the Solution Explorer, you’ll see an Update Service Reference item. This modifies the generated source code and application configuration, saving you from having to build it all again from scratch. This refetches the metadata, so the service needs to be running when you do this, just as when adding the reference in the first place.
Once we’ve updated the reference, rebuilding the solution now
produces two compiler errors. The call to PostNote fails, because we’re passing in two
arguments where the new contract requires only one. And we also see
the following error on the line where we construct the ChatServiceClient proxy:
error CS1729: 'ChatClient.ChatService.ChatServiceClient' does not contain
a constructor that takes 0 arguments
Because the service now has a duplex contract, the generated proxy insists that the client implement its half of the contract—we need to provide an implementation of the callback interface and pass that to the proxy. Example 13-10 shows a straightforward implementation of the interface.
Example 13-10. Implementing the client-side callback interface
[CallbackBehavior(ConcurrencyMode=ConcurrencyMode.Reentrant)]
class ChatCallback : IChatServiceCallback
{
    public void NotePosted(string from, string note)
    {
        Console.WriteLine("{0}: {1}", from, note);
    }
}
Note
The callback interface seems to have changed names. We called
it IChatClient on the server, but
here it’s IChatServiceCallback.
This is the normal if slightly surprising behavior when using
metadata exchange through Visual Studio’s Add Service Reference
feature. It’s nothing to worry about. As far as WCF is concerned, a
contract has only one name (IChatService in this case), even when it
happens to be split into server-side and client-side pieces. WCF
considers the name of the client-side interface to be irrelevant,
and doesn’t advertise it through metadata exchange. When you add or
update a reference to a service with a duplex contract, Visual
Studio just makes up the client-side interface name by appending
Callback to the contract
name.
Notice the CallbackBehavior
attribute—it specifies a ConcurrencyMode just like on the server.
Again, we’ve specified Reentrant—this means that this particular
callback handler expects to be dealing with just one session at a
time, but can cope with being called back by the server while it’s
waiting for the server to do something. We need this so that the
server can send notifications to the client inside its PostNote implementation.
We need to provide WCF with an instance of this callback
implementation, so we modify the code at the start of Main from Example 13-7 that creates the proxy:
ChatCallback callbackObject = new ChatCallback();
InstanceContext clientContext = new InstanceContext(callbackObject);
ChatServiceClient chatProxy = new ChatServiceClient(clientContext);
This wraps the callback object in an InstanceContext—this represents the session,
and is essentially the client-side counterpart of the object returned
by OperationContext.Current on the
server. It provides various utility members for managing the session,
but here the only thing we need it for is to pass our callback object
to the proxy—the proxy won’t take the callback directly and demands
that we wrap it in an instance context.
We have a few more modifications to make. Remember that the client now needs to tell the server that it wants to connect, so we can do that directly after asking for the user’s name:
Console.WriteLine("Please enter your name:");
bool ok = false;
while (!ok)
{
    string name = Console.ReadLine();
    ok = chatProxy.Connect(name);
    if (!ok)
    {
        Console.WriteLine("That name is taken. Please try another.");
    }
}
This checks the return code to see if the name we entered was already in use, and asks for a different name if it was. The end user can go through the relevant legal procedures to change her name, and then try again.
The line that calls PostNote
no longer needs to pass our name each time, because the server now
remembers our name based on our session:
chatProxy.PostNote(note);
And finally, we should add a line of code at the very end of
Main to let the server know we’re
going away:
chatProxy.Disconnect();
We’re now ready to test the application. We can run the client and service as before, but we want an extra client or two, to test out this multiuser chat service. Visual Studio doesn’t provide a way to debug two instances of the same application, so we need to run the extra instances manually. We can do this by finding the folder where the compiled program lives. This will be in a subfolder of the project folder—the program will be in a bindebug subfolder. Running a couple of instances of the client we can type in some different names, and we see notes appear in the service’s console window as the users connect:
Service ready
Ian connected
Matthew connected
When we type a note in one of the clients, it appears in all of the client console windows, as well as the server.
Our application’s user interface has a long way to go before it’ll become the new live chat tool of choice, but we have now demonstrated a complete, if rather basic, WCF-based application. We have only scratched the surface of WCF, of course—it’s a large enough technology to warrant a book in its own right. Learning WCF, a book we already mentioned a couple of times, is a good choice if you’d like to learn more about what WCF can do. Next, we’re going to look at how to work directly with HTTP.
The .NET Framework class library provides various classes
for working directly with HTTP. Some of these are for client scenarios,
and are useful when you need to fetch resources from a web server such as
bitmaps, or if you need to use an HTTP-based service that WCF cannot
easily work with. You can also provide server-side HTTP support. You would
normally do that by writing an ASP.NET web application, which we’ll look
at in a later chapter. But there is a class that enables other program
types to receive incoming HTTP requests, called HttpListener. (We won’t be covering that, and we
mention it mainly for completeness—it’s more normal to use ASP.NET, to
which we have devoted a whole chapter.)
The most common starting point for client-side HTTP code
is the WebClient class in the
System.Net namespace. It offers a few
ways of working with HTTP, starting from very simple but inflexible
methods, through to relatively complex mechanisms that give you complete
control over detailed aspects of HTTP. We’ll start with the simplest
ones.
Note
Although the examples in this section are HTTP-based, WebClient supports other protocols,
including https:, ftp:, and file: URLs. It is extensible, so in
principle you can adapt it to support any protocol that has a URL
scheme.
Example 13-11
illustrates one of the simplest ways of using the WebClient class. We construct an instance,
and then use its DownloadString method
to fetch data at a particular URL. (You can specify the URL
as either a string or a Uri
object.)
Example 13-11. Fetching content with WebClient
WebClient client = new WebClient();
string pageContent = client.DownloadString("http://oreilly.com/");

Console.WriteLine(pageContent);
Of course, DownloadString
succeeds only if the URL you’re fetching happens to contain textual
content. The URL in Example 13-11
is an HTML web page, which is a text-based format, so it works just
fine, but what if you’re fetching a bitmap, or a ZIP? In that case,
there’s DownloadData, which works
in the same way, except it returns an array of bytes instead of a
string:
byte[] data =
   client.DownloadData("http://oreilly.com/images/oreilly/oreilly_large.gif");
There’s a third easy method for fetching data, DownloadFile. This
downloads the resource into a local file:
client.DownloadFile("http://oreilly.com/", @"c: emporeilly.html");These three methods will block—they don’t
return until they have finished fetching the data you asked for (or
they have tried and failed, in which case they’ll throw some kind of
exception). This could take awhile. You might be on a slow network, or
talking to a busy server, or just downloading a particularly large
resource. If you’re building a GUI, it’s a bad idea to call blocking
APIs.[30] Fortunately, WebClient offers asynchronous versions of
all these methods. You use these by attaching an event handler to the
relevant completion event, for example:
client.DownloadFileCompleted += OnDownloadComplete;
client.DownloadFileAsync(new Uri ("http://oreilly.com/"), @"c:	emp");

...

static void OnDownloadComplete(object sender, AsyncCompletedEventArgs e)
{
    MessageBox.Show("Download complete");
}
The DownloadXxxAsync methods all return straight away.
WebClient raises the relevant
DownloadXxxCompleted event once the data has been
fetched. (This means that you’ll need to ensure that your application
hangs around long enough for that to happen; if you were to use these
asynchronous techniques in a console application, you’d need to take
steps to make sure the program doesn’t exit before the work
completes.) Of course, DownloadStringAsync and DownloadDataAsync cannot provide the fetched
data as a return value, unlike their blocking counterparts, so they
provide it as the Result argument
of their completion event argument.
Note
If you’re writing a Silverlight client, you’ll find that WebClient offers only
the asynchronous versions. And in general, that’s true of all of
Silverlight’s networking support—since Silverlight is designed just
for building user interfaces, it doesn’t even offer you the blocking
forms.
As well as providing completion event notifications, WebClient also offers progress notifications
through its DownloadProgressChanged
event. This is raised from time to time during asynchronous downloads,
regardless of which of the three methods you used. It provides two
properties, BytesReceived and
TotalBytesToReceive, which tell you
how far the download has gotten and how far it has to go.
Note
If you use these asynchronous methods in a GUI built with
either WPF or Windows Forms, you don’t need to worry about threading
issues. As you’ll see in later chapters, that is not true for all
asynchronous APIs, but these automatically take care of UI threading
for you—as long as you start asynchronous operations from the UI
thread, WebClient will raise
completion and progress events on the UI thread.
WebClient offers the
UploadString, UploadData, and UploadFile methods. These correspond
directly to the DownloadString,
DownloadData, and DownloadFile methods, but instead of
fetching data with an HTTP GET,
they send data to the server, typically using an HTTP POST, although overloads are available that
let you specify other verbs, such as PUT.
Lots of APIs in the .NET Framework work with the
Stream abstraction defined in the
System.IO namespace. The XML
classes can load data from a Stream, or write data into one, for example.
The bitmap decoding and encoding classes in WPF can also work with
streams. The first three lines of Example 13-12 obtain a stream for
an Atom feed[31] from a WebClient and
use it to initialize an XDocument.
The code then uses LINQ to XML to extract the list of titles and links
advertised by this particular feed.
Example 13-12. From HTTP to LINQ to XML via a Stream
WebClient client = new WebClient();
Stream feedStm = client.OpenRead("http://feeds.feedburner.com/oreilly/news");
XDocument feedXml = XDocument.Load(feedStm);

string ns = "http://www.w3.org/2005/Atom";
var entries = from entryElement in feedXml.Descendants(XName.Get("entry", ns))
              select new
              {
                  Title = entryElement.Element(XName.Get("title", ns)).Value,
                  Link = entryElement.Element(XName.Get("link", ns)).
                                Attribute("href").Value
              };
foreach (var entry in entries)
{
    Console.WriteLine("{0}: {1}", entry.Title, entry.Link);
}
For sending data there’s an OpenWrite method.
With HTTP or HTTPS, this defaults to POST, but as with the Upload methods, you can call an overload
that takes the verb as well as the URL.
You can use streams asynchronously. Following the same pattern
as the other methods we’ve looked at so far, you’ll find OpenReadAsync and OpenWriteAsync methods, with corresponding
completion events. But streams add an extra dimension: the Stream abstract base class also offers both
synchronous and asynchronous operation. For example, if you’re reading
data, you can call either Read or
BeginRead. You are free to use the
Stream in either mode, regardless
of whether you obtained it from the WebClient synchronously or asynchronously.
But bear in mind that if you are trying to avoid blocking in order to
keep your user interface responsive, you’ll most likely want to get
hold of the stream asynchronously (e.g., use OpenReadAsync) and use
the stream asynchronously. When you open a stream asynchronously, the
completion notification tells you that the WebClient is ready to
start reading (or writing) data, but that’s no
guarantee that you’ll be able to finish reading data immediately. For
example, if you use OpenReadAsync to fetch a 1 GB file by
HTTP, WebClient won’t wait until it
has downloaded the whole 1 GB before giving you a stream. You’ll get
an OpenReadCompleted event when it
has begun to fetch data so that you can start processing it straight
away, but if you try to read data from the stream faster than your
network connection can download it, you’ll be made to wait. So if you
want nonblocking behavior for the whole download, you’ll need to use
the Stream asynchronously
too.
Warning
While the asynchronous methods offered by WebClient will call you back on the
correct thread in a GUI application, the asynchronous stream methods
will not, and you’ll have to deal with threading issues
yourself.
The WebClient class’s
most powerful mechanism is accessed through its GetWebRequest and GetWebResponse methods. But these turn out
to be wrappers around another set of classes altogether—WebClient just provides these wrappers as
convenient helpers. So we’ll move on to the classes that do the real
work for these methods.
WebRequest and WebResponse are abstract base classes for a
family of classes that provide the most detailed level of control over
web requests. The concrete HttpWebRequest and HttpWebResponse classes add details specific
to HTTP, and .NET also offers specialized FtpWebRequest/Response and FileWebRequest/Response classes. This section will mainly
focus on the HTTP classes.
The main limitation with the WebClient-based mechanisms we’ve explored so
far is that they focus on the content of the request or the response.
They don’t provide any way to work with standard HTTP features such as
the content type header, the UserAgent string, cache settings, or proxy
configuration. But if you use HttpWebRequest and HttpWebResponse, all the detailed aspects
of HTTP are available to you.
The cost of this power is additional verbosity. The main difference is that you end up with one object to represent the request and one to represent the response, in addition to streams representing the data being sent or received. Moreover, the only way to access the data with these classes is through streams. To do the same job as Example 13-11—fetching the data from a particular URL into a string—requires the rather more complex code shown in Example 13-13.
Example 13-13. Fetching a string with HttpWebRequest and HttpWebResponse
HttpWebRequest req = (HttpWebRequest) WebRequest.Create("http://oreilly.com/");
using (HttpWebResponse resp = (HttpWebResponse) req.GetResponse())
using (Stream respStream = resp.GetResponseStream())
using (StreamReader reader = new StreamReader(respStream))
{
    string pageContent = reader.ReadToEnd();
    Console.WriteLine(pageContent);
}
The two casts on the first two lines of Example 13-13 are a little
messy, but are, unfortunately, usually necessary. The WebRequest family of classes is extensible to
multiple protocols, so most of the methods are declared as returning the
abstract base types, rather than the concrete types—the exact type
returned depends on the kind of URL you use. So if you need access to a
protocol-specific feature, you end up with a cast. In fact, Example 13-13 isn’t using
anything protocol-specific, so we could have avoided the casts by
declaring req and resp as WebRequest and WebResponse, respectively. However, the usual
reason for using these classes is that you do in fact want access to
HTTP-specific information. For example, you might want to simulate a
particular web browser by setting the user agent string, as shown in
Example 13-14.
Example 13-14. Changing the user agent header with HttpWebRequest
HttpWebRequest req = (HttpWebRequest) WebRequest.Create("http://oreilly.com/");
req.UserAgent = "Mozilla/5.0 (iPod; U; CPU iPhone OS 2_2_1 like Mac OS X; en-us)
AppleWebKit/525.18.1 (KHTML, like Gecko) Mobile/5H11a";

... as before
This code has been split across multiple lines, as the user agent string is too wide to fit. This would let you discover what response a website would send if the request came from an Apple iPhone. (Many websites adapt their content for different devices.)
As you’d expect, asynchronous operation is available so that you can avoid
blocking the current thread while waiting for network operations to
complete. But it looks slightly different from the WebClient mechanisms we’ve seen so far,
because of the way in which the methods you call can change when the
request gets sent. No network communication happens at the point where
you create the request, so there is no asynchronous method for that.
Remember, the request object represents all the settings you’d like to
use for your HTTP request, so it won’t actually attempt to send anything
until you’ve finished setting the request’s properties and tell it
you’re ready to proceed.
There are two ways in which you can cause an HttpWebRequest to send the request. Asking for
the response object will cause this, but so will asking for a request
stream—the request’s GetStream method
returns a write-only stream that can be used to supply the body of the
request for POST or similar verbs
(much like WebClient.OpenWrite). This
stream will start sending data over the network as soon as your code
writes data into the stream—it doesn’t wait until you close the stream
to send the data all in one go. (For all it knows, you might be planning
to send gigabytes of data.) This means that by the time it returns the
stream, it needs to be ready to start sending data, which means that the
initial phases of the HTTP request must be complete—for example, if the
request is going to fail for some reason (e.g., the server is down, or
the client machine has lost its network connection), there’s no point in
attempting to provide the data for the request. So you’ll be notified of
failures of this kind when you ask for the stream.
The upshot of all this is that GetStream is a blocking method—it won’t return
until the server has been contacted and the request is underway. So
there’s an asynchronous version of this. But WebRequest doesn’t support the event-based
pattern that WebClient uses. Instead, it uses the more
complex but slightly more flexible method-based Asynchronous Programming
Model, in which you call BeginGetRequestStream, passing in a delegate
to a method that the request will call back once it’s ready to proceed,
at which point you call EndGetRequestStream. This Begin/End pattern is
very common in .NET and will be discussed in Chapter 16.
The second way in which the sending of the request can be
triggered is to ask for the response object—if you haven’t already asked
for the request stream (e.g., because you’re doing a GET, so there is no request body) the request
will be sent at this point. So GetResponse also has an asynchronous option.
Again, this uses the method-based asynchronous pattern. Example 13-15 shows a version of
Example 13-13 modified to
get the response object asynchronously.
Example 13-15. Obtaining a response asynchronously
HttpWebRequest req = (HttpWebRequest) WebRequest.Create("http://oreilly.com/");
req.BeginGetResponse(delegate(IAsyncResult asyncResult)
{
    using (HttpWebResponse resp = (HttpWebResponse)
                                      req.EndGetResponse(asyncResult))
    using (Stream respStream = resp.GetResponseStream())
    using (StreamReader reader = new StreamReader(respStream))
    {
        string pageContent = reader.ReadToEnd();
        Console.WriteLine(pageContent);
    }
}, null);
This example uses an anonymous method as the completion callback,
which allows the code to retain a similar structure to the original,
synchronous version. But you need to be mindful that the code that
handles the response in Example 13-15 is now a separate
method, and could run some considerable length of time after the call to
BeginGetResponse returns, and
probably on a different thread. So as with the event-based pattern,
you’ll need to ensure that your application runs for long enough for the
operation to complete—having some outstanding asynchronous operations in
progress will not keep your process alive if all of the nonbackground
threads exit.
Warning
This asynchronous pattern does not take care of UI threading issues (unlike the event-based pattern seen previously). The completion callback will usually occur on some random thread, and attempting to update the user interface from that code will fail. We’ll see how to handle this in Chapter 16.
Example 13-14 shows
just one of the HTTP protocol features you can customize—the UserAgent string. Many similar settings are
available, many of which are quite obscure, so we won’t go through all
of them here. That’s what the MSDN reference is for. But we will cover
the most common cases.
HTTP defines various ways for a client to authenticate itself to the server. Note that most public-facing websites don’t actually use any of these—a website that presents a login UI where you type a username and password directly into fields in the web page itself isn’t using HTTP authentication at all, and is usually relying on cookies instead (more on this later). HTTP authentication gets involved in two main scenarios. The most visible scenario is when the browser opens a small window asking for credentials before it navigates to the web page—this is less common than logging in via a form on a web page, but a few websites work this way. Slightly more subtly, HTTP authentication is used for integrated security scenarios—for example, when a client machine belongs to a Windows domain, and the user’s identity is automatically available to an intranet web server on the same domain. In this case, you don’t need to log in explicitly to an intranet site, and yet it knows exactly who you are—this is thanks to implicit use of HTTP authentication.
By default, HttpWebRequest
will not attempt to authenticate the client to the server, even in
integrated authentication scenarios. (So it has a different default
policy than Internet Explorer—IE will automatically authenticate you
to servers on your local network with integrated authentication, but
HttpWebRequest will not.) If you’re
writing client code and you want it to identify the user to the
server, you must set the request’s Credentials property.
For integrated authentication, there’s a special credentials
object to represent the user’s identity, provided by the CredentialCache class. Example 13-16 shows how to use
this to enable integrated authentication. (Obviously, this will only
do anything if the server is prepared to use it—so this code merely
tells HttpWebRequest that we’re
happy to use integrated authentication if the server asks for it. If
the server turns out not to require authentication at all, you won’t
see an error.)
Example 13-16. Enabling the use of integrated authentication
HttpWebRequest request =
    (HttpWebRequest) WebRequest.Create("http://intraweb/");
request.Credentials = CredentialCache.DefaultCredentials;

...
HTTP authentication isn’t always integrated with Windows security. It also supports username- and password-based authentication. The HTTP specification supports two ways of using this. Basic authentication just sends your username and password as part of the request, so unless you’re using HTTPS, that’s not very secure. The alternative, digest authentication, is better, but seems to be rarely used. In practice, basic authentication over HTTPS seems to be the popular choice. For either kind of authentication, you specify the username and password in the way shown in Example 13-17.
Example 13-17. Providing credentials for basic or digest authentication
HttpWebRequest request =
    (HttpWebRequest) WebRequest.Create("https://intraweb/");
request.Credentials = new NetworkCredential("user1", "p@ssw0rd");

...
This approach doesn’t let you specify whether to use basic or
digest authentication because the server gets to choose. Since you
therefore don’t know whether the password will be sent in the clear,
you should normally provide credentials this way only when using
HTTPS. You can force the use of digest authentication by wrapping the
NetworkCredential in a CredentialCache object, which lets you
specify the authentication schemes you want to support. Even so, you
might want to be wary of using digest authentication without
HTTPS—although digest authentication can be secure, some servers
implement it in an unsecure way.
By default, web requests will look at the Internet Explorer settings to determine whether a web proxy should be used. But you might not want this default behavior, so there are a couple of ways you can change it.
Note
Prior to .NET 2.0, IE proxy settings weren’t honored, so you may occasionally come across code that goes to some lengths to work out whether it needs to use a proxy. Usually such code is either old or written by someone who didn’t know that .NET 2.0 fixed this issue.
You can add entries to your App.config file to modify the default proxy behavior. Example 13-18 stops web requests using the configured default proxy by default.
Example 13-18. Configuring default proxy behavior
<configuration>
  <system.net>
    <defaultProxy enabled="false" />
  </system.net>
</configuration>
The default behavior, in the absence of any configuration,
specifies that the use of the default proxy is enabled, but the
application will not use the user’s credentials to identify the user
to the proxy server. (Authenticating the user to a proxy happens
independently of authenticating the user to the web server.) Some
companies require users to authenticate with the proxy in order to
access the Internet, in which case you would need to change the
configuration, setting the <defaultProxy> element’s useDefaultCredentials attribute to true.
You can also modify the behavior in code. The HttpWebRequest class has a Proxy property, and you can set this to
null to disable the use of a proxy.
Or you can set it to a WebProxy
object specifying a specific proxy and settings, as Example 13-19 shows.
Windows maintains a per-user cache of web resources, to
avoid having to download frequently used bitmaps, CSS, JavaScript,
HTML pages, and other content again and again. Internet Explorer uses
this cache, but it’s also accessible to .NET code. By default, your
programs won’t use the cache, but you can enable caching by setting
the request’s CachePolicy, as Example 13-20 shows.
Example 13-20. Setting cache policy
HttpRequestCachePolicy cachePolicy = new HttpRequestCachePolicy(
    HttpRequestCacheLevel.CacheIfAvailable);
HttpWebRequest request =
    (HttpWebRequest) WebRequest.Create("https://intraweb/");
request.CachePolicy = cachePolicy;
The default policy is BypassCache, which means that not only will
requests not look in the cache, but any resources you fetch will not
be added to the cache. Example 13-20, on the
other hand, will use a cached copy of the resource if one is
available, and if not, it will add the resource it downloads to the
cache (unless headers in the HTTP response indicate that it’s not a
cacheable resource).
The HttpRequestCacheLevel
enumeration supports various other caching options. If you want to
force the resource to be fetched anew, but would like the result to be
added to the cache, you can specify Reload. You can also force a check for
freshness—HTTP allows clients to tell the server that they have a
cached version and that they want to download the resource only if a
newer version is available, and you can enable this behavior with
Revalidate. (Some more obscure
options are also available, for developers who are familiar with the
full complexities of HTTP caching and want complete control.)
As far as the HTTP specification is concerned, each request is entirely unconnected with any previous requests from the same client. But it’s often useful for a website to be able to recognize a series of requests as having come from the same client, and so a common mechanism to support this, called cookies, is widely used.[32] Cookies underpin features such as shopping baskets, where a web application needs to maintain per-user state—I expect to see only the things that I’ve put in my basket, and not the items that any other users who are logged in right now have put in theirs. Cookies are also commonly used for managing logins—once the user has typed in his username and password in an HTML form, a cookie is often used, in effect, to authenticate the user from then on.
If you’re using a web browser, cookies just work without needing any intervention (unless you’ve disabled them, of course). But if you’re writing code, you need to take specific steps to use them—by default, .NET will not use cookies at all, and does not have access to the cookie store for Internet Explorer.[33] Nor does it implement a cookie store of its own.
Often, ignoring cookies doesn’t cause any problems. But you may find that you sometimes need to write code that accesses a site that depends on cookies to work, in which case you’ll need to write code on the client side to make that happen.
The basic idea behind cookies is that when a client receives a response from a server, that response may include information that the server would like the client to remember and to pass back the next time that client makes a request. The client isn’t expected to do anything other than pass the information back verbatim—there’s no useful information that the client can extract from the cookie. (Or at least there shouldn’t be, although there are some infamous cases where people got this wrong. For example, one online store made the mistake of putting prices of shopping basket entries into a cookie, enabling devious customers to grant themselves discounts by manually editing their cookies.) The client is just expected to hold onto the cookies it receives. (See Example 13-21.)
Example 13-21. Getting the cookies from a response
CookieContainer container = new CookieContainer();

Uri address = new Uri("http://amazon.com/");
HttpWebRequest req = (HttpWebRequest) WebRequest.Create(address);
HttpWebResponse resp = (HttpWebResponse) req.GetResponse();

CookieCollection cookies = resp.Cookies;
container.Add(address, cookies);
We’re using the CookieContainer class provided by .NET to
remember which cookies we’ve seen from the various servers we’ve been
talking to, and which addresses they are associated with. When we come
to make our next request, we can then supply this container:
Uri address = new Uri("http://oreilly.com/");
HttpWebRequest newReq = (HttpWebRequest) WebRequest.Create(address);
newReq.CookieContainer = container;
Anytime we get a response, the server is allowed to return new cookies, or to modify the value of existing cookies, so you would need to make sure you updated your cookie container anytime you get a response, using the code in Example 13-21.
Sockets are the most powerful networking mechanism available in .NET—HTTP is layered on top of sockets, and in most cases WCF is too. Sockets provide more or less direct access to the underlying TCP/IP network services—they effectively let you speak the native language of the network. This can offer some flexibility and performance benefits over HTTP-based communications, but the downside is that you need to do more work. Also, in corporate environments, communication with the outside world with ad hoc use of sockets is often blocked, as firewalls may be configured to let through only the traffic they understand and expect. But in cases where those restrictions do not apply, and if the flexibility or (relatively small) performance benefits are worth the effort, sockets are a useful tool.
The basic idea of a socket has been around for decades, and appears
in many operating systems. The central concept is to present network
communication through the same abstractions as file I/O. We already saw
something like that with WebClient—it
can provide Stream support. However,
those streams are concerned with the body of an HTTP request or response.
With sockets, the streams are at a lower level, encompassing all the data.
(If you used a socket-based stream to connect to a web server, you’d see
all of the details of the HTTP protocol in the stream, not just the
body.)
Besides the file-like abstraction, socket APIs also have a standard set of operations for establishing connections, and for controlling aspects of those connections’ behavior.
To understand sockets, you need some familiarity with the network protocols they depend on, so as well as introducing the API features the next section incorporates a very quick overview of the TCP/IP family of protocols. If you already know TCP/IP, please feel free to skim through the next section and just look at the examples that illustrate usage.
Note
Sockets can be used with some other protocols besides those in the TCP/IP family. For example, you can use sockets for IrDA (Infrared) or Bluetooth communications to communicate with local devices. There are other network protocols too, but the TCP/IP family is the most widely used.
The Internet uses a family of protocols typically known collectively as TCP/IP. The lowest level is IP, which is short for Internet Protocol. This is the means by which all network traffic flows across the Internet—when you buy an Internet connection, you’re buying the ability to deliver information from your computer to the Internet, and vice versa, via IP.
IP’s main job is the ability to get packets (as individual messages are called in networking) of data between different computer networks (hence internet). For example, data sent by a web server in a data center out of its network port somehow needs to make its way to your home WiFi network. These networks are connected together by routers, whose job is to work out where to send IP packets next; there are well-defined rules for how they should do this, ensuring that data ends up at the machine it’s meant for. This process depends on the IP address—a number that identifies a machine in a way that makes it possible for routers to work out how to route messages to that machine.
If you’re using sockets, you will need to work with IP addresses
because they’re how you identify the machine you’d like to communicate
with. You can typically just treat them as opaque identifiers, wrapped
by the IPAddress class in the
System.Net namespace. But there’s one
aspect of IP addressing that it’s worth being aware of: the distinction
between IPv4 and IPv6 addresses. See the sidebar below.
While the Internet protocol uses numbers to identify machines,
users are more familiar with names such as oreilly.com and www.microsoft.com. The Internet
has a system called the Domain Name Service (DNS)—your Internet service provider gives
you access to this as part of your connection—whose job is to convert these
textual names into the IP addresses required to communicate with the
machines (or hosts, as the entities associated with
IP addresses are conventionally called). Example 13-22 uses the Dns class in the System.Net namespace to look up the IP
addresses for a particular hostname. DNS can associate multiple
addresses with a name; for example, a DNS name may have both an IPv4 and
an IPv6 address. This code loops through all the addresses, printing
their type and value. (If you call ToString() on an IPAddress, which is what Console.WriteLine will do in Example 13-22, it’ll return the
standard string representation for the numeric address.)
Example 13-22. Getting the IP addresses for a hostname
IPHostEntry hostDnsEntry = Dns.GetHostEntry("localhost");
foreach(IPAddress address in hostDnsEntry.AddressList)
{
    Console.WriteLine("Type: {0}, Address: {1}", address.AddressFamily,
                                                 address);
}
This example looks up the special hostname localhost, which always
refers to the local machine on which the program is running. Both IPv4
and IPv6 define special addresses that are reserved to refer to the
local machine, so if you run Example 13-22, you’ll see that it
prints out two addresses, one for IPv6 and one for IPv4:
Type: InterNetworkV6, Address: ::1
Type: InterNetwork, Address: 127.0.0.1
Note
For years, IPv4 was the only IP version in use, so it’s often
not qualified with a version number, which is why this IPv4 address’s
AddressFamily property is just
displayed as InterNetwork, and not
InterNetworkV4.
Many DNS entries don’t have an IPv6 address, and if you modify
Example 13-22 to look up
such an address (e.g., at the time of this writing, w3.org has only an
IPv4 address) you’ll see just one address back from GetHostEntry:
Type: InterNetwork, Address: 128.30.52.45
Armed with an IP address for the machine we want to talk to, we now have enough information for the Internet to deliver IP packets to the target machine. But there are a couple of issues to resolve. First, there’s the question of how the receiving machine will know what to do with the packet when it arrives. Second, there’s the problem that the Internet is fundamentally unreliable. TCP (the Transmission Control Protocol) offers a solution to both of these problems.
The Internet does not guarantee to deliver all IP packets. It can’t. Suppose you are using a machine connected to the Internet with a 100 Mbps connection and you try to send data at full speed to a machine that is connected with a 56 Kb modem. (Remember those? In some parts of the world, they’re still used. If you get a chance, try using a modern website via a 56 Kb dial-up connection, and then marvel at the fact that 56 kbps modems were once considered really fast.) As we send data to this bandwidth-impoverished machine, the routers between us and them will initially try to manage the speed difference—a router connecting a fast network to a slower network will store incoming packets from the fast network in its memory, and they queue up while it plays them out in slow motion to the target network. But eventually it’ll run out of memory, at which point it’ll just start discarding packets.
At busy times of the day, packets may get discarded even if both ends of the connection can operate at the same speed—perhaps the route the traffic needs to take through the Internet between the two networks includes busy links that just don’t have the bandwidth to support all the traffic that all of the ISP’s customers are trying to send. So network congestion can also cause packet loss, even in the absence of speed mismatches.
The upshot of this is that IP is not a reliable protocol—you get what’s sometimes called a best effort service. In attempting to deliver your data, the Internet will give it its best shot, but there are no guarantees. (You may have a service level agreement with your ISP that makes statistical guarantees about the proportion of data it will successfully deliver to and from the boundaries of the ISP’s network infrastructure, but there are no guarantees for any single packet, nor can your ISP guarantee what will happen to your data once it has been passed off to someone else’s network.)
To add to the fun, IP doesn’t even guarantee to deliver messages in the same order you sent them. ISPs might have multiple routes through their network to ensure reliability in the face of individual link failures, or just to ensure enough bandwidth to cope with high loads. So if you send a series of IP packets to the same computer, not all of those packets will necessarily take the same route—they might be split across two or more routes. Some of those routes may prove to be quicker, meaning that the packets can arrive at their destination in a different order than you sent them.
Writing networked applications can be challenging if you have no idea whether any particular message will be received, nor any way of knowing in what order the ones that do arrive will turn up. So to make life easier, we have the Transmission Control Protocol—the TCP in TCP/IP. This is a protocol that sits on top of IP and adds some useful features. It provides support for connections—rather than each packet being handled in isolation, each transmission is part of the sequence of communication occurring over the connection. TCP puts sequence numbers into each IP packet so that it can detect when packets arrived out of order. And finally, the receiving machine acknowledges receipt of each message. Clients use this to work out how fast the messages are getting through, which enables them to send data at a rate that matches the network’s ability to deliver, avoiding problems with mismatched network speeds and network congestion. And clients also use this to work out when data didn’t get through and needs to be resent.
These features enable TCP to offer a data transmission service that sends data in order, at a rate that will not try to exceed the capacity of the network routes available and in a fashion that is reliable in the face of occasional packet loss. A socket is usually just an API on top of a TCP connection that presents a stream-style API—your program can write data into a socket stream, and the TCP/IP networking code running on the computers at both ends uses TCP to ensure that the program at the receiving end has another socket stream from which it can read the exact same sequence of bytes you wrote into the stream. The programs don’t need to know about out-of-order delivery or packet loss. As long as the networks are not hopelessly lossy, it looks like there is perfectly reliable in-order transmission. TCP sockets are symmetrical, in that both ends can send and receive data. And the directions are independent—communication can be full duplex, so there’s no need for the two ends to take it in turns.
TCP also solves the problem of how the receiving computer knows
what it’s supposed to do with incoming data. A single computer may offer
many network services—a small company might run the intranet web server,
file server, and email server on the same computer, for example. So TCP
adds the concept of port numbers. A service on a target
machine will be associated with a particular number. There’s a central
administrative body called IANA—the Internet Assigned Numbers Authority—which (among
other things) assigns and publishes port numbers for common services.
For example, IANA has designated port 80 as the TCP port on which HTTP
servers usually accept incoming requests. When a web browser (or the
WebClient class we saw earlier)
fetches a resource via HTTP, it does so by opening a TCP connection to
port 80.
Note
A single client computer might open several simultaneous connections to the same service—web browsers often do this in order to download the various pictures, CSS, and JavaScript files concurrently, so as to be able to display the web page sooner. To distinguish between them, each connection has a client-side port number as well as a server-side port. But while you need to know the server port in order to connect, the client port number is usually picked for you dynamically by the OS.
Let’s look at a real example. We’re going to connect to a service using a very old and very simple protocol called Daytime Protocol. This hasn’t changed since its specification was published in 1983—you can find its definition in a document called RFC867 at http://www.faqs.org/rfcs/rfc867.html. It’s remarkably simple: clients open a TCP connection to port 13 on a server that offers the daytime service, and the server will send back the time of day as text and then close the connection. The specification is pretty vague about the format—it says this:
There is no specific syntax for the daytime.  It is recommended that
   it be limited to the ASCII printing characters, space, carriage
   return, and line feed.  The daytime should be just one line.
It then goes on to give examples of a couple of popular formats, but servers are free to do pretty much anything they like.
This is a service that cannot be accessed with the WebClient or any of the WebRequest family of classes—those types
expect data to be layered inside HTTP (or sometimes another higher-level
protocol such as FTP), but Daytime Protocol just makes very basic,
direct use of plain TCP. So we need to use sockets if we want to access
such a service.
The U.S. government’s National Institute of Standards and Technology (NIST)
lists a few servers that offer this daytime service. Once such machine,
located in Redmond, Washington, has the DNS name of time-nw.nist.gov. We’ll use that. To start
with, we need to look up its IP address, which we’ll do using a similar
technique to Example 13-22:
IPHostEntry hostDnsEntry = Dns.GetHostEntry("time-nw.nist.gov");
IPAddress serverIp = hostDnsEntry.AddressList[0];
Next, we need to open a TCP connection to port 13 (the daytime
service port) on that machine. To do this, we’ll need a Socket object.
The System.Net.Sockets
namespace defines the Socket class,
which makes the socket features of the underlying operating system
available from .NET. We use a Socket
when we want to open a TCP connection to a remote service:
Socket daytimeSocket = new Socket(
    serverIp.AddressFamily,
    SocketType.Stream,
    ProtocolType.Tcp);
Note
Socket implements IDisposable, so you will need to call
Dispose at some point. And while we
would normally write a using
statement to handle that, that’s somewhat unusual with sockets,
because they often have a longer lifetime than any particular method.
There isn’t one right way to handle this, because the right moment to
dispose a socket will depend on the way in which your application uses
the socket. The next few examples therefore don’t show disposal,
because we are illustrating aspects of the API that will be the same
no matter how you are using sockets. But be aware that you will always
need to find a suitable place to call Dispose.
The Socket constructor needs
three pieces of information. It needs to know the address family we will
use to identify the server (e.g., IPv4 or IPv6). It also needs to know
what style of communication we’re expecting—we’re asking for stream-like
communication. (Some protocols support some other styles of
communication, but with TCP you always specify Stream here.) Finally, we specify the specific
protocol we’d like to use—TCP in this case.
Note
If this constructor seems more complex than necessary, it’s because sockets aren’t just for TCP/IP. The underlying Windows socket API (WinSock) was introduced before TCP/IP had become the dominant protocol, so it supports numerous protocols. Windows even supports custom providers that add socket support for new protocols.
Note that we don’t specify where we’re connecting to yet. That
information doesn’t go in the constructor because not all sockets work
the same way—some protocols support transmission patterns other than
simple point-to-point connections. So the Socket class requires that we first say what
sort of socket we want before going on to say what we’re trying to
communicate with. We supply that information when we connect to the
service:
daytimeSocket.Connect(serverIp, 13);
Remember, port 13 is the port number allocated by IANA for the daytime service. We’re going to retrieve the time of day as text from this service, so we declare a variable to hold the result:
string data;
Sockets represent all data as bytes. (Or more precisely, octets, which are 8-bit bytes. Back in the old days, some computers used other byte sizes, and you occasionally come across evidence of this—for example, some parts of the Internet email system guarantee to transfer 8-bit bytes, and may truncate your data to seven bits per byte.) The Daytime Protocol specification says that the service will return text using the ASCII encoding, so we need something that can convert a stream of bytes containing ASCII into a .NET string. Example 13-23 does this.
Example 13-23. Retrieving ASCII data from a TCP socket
using (Stream timeServiceStream = new NetworkStream(daytimeSocket, true))
using (StreamReader timeServiceReader = new StreamReader(timeServiceStream,
                                                         Encoding.ASCII))
{
    data = timeServiceReader.ReadToEnd();
}
A few things are going on here. First, we constructed a NetworkStream—this class derives from Stream, and it’s how .NET lets us treat a
socket-based connection in the same way as any other Stream. In general, the use of streams is
optional because the Socket class
provides methods that let you read and write data directly. But in this
example, getting an actual Stream
object is useful because we can plug it into a StreamReader. StreamReader takes a stream that contains text
and can convert the bytes in that stream into string objects. Example 13-23 uses the StreamReader class’s ReadToEnd method—this
asks to read all of the data in the stream to the very end and to return
it as a single string.
Notice that the first line of Example 13-23 passes true as a second argument to the NetworkStream constructor. This tells the
NetworkStream that we’d like it to
take ownership of the Socket
object—once we are done with the NetworkStream and call Dispose on it, it will
shut down the Socket object for us.
That’ll happen at the end of the block for the using statement here. This is important: we
must close connections when we have finished with them, because
otherwise, we could end up hogging resources on the server
unnecessarily.
Having fetched the data and closed the socket, we finally print out the data:
Console.WriteLine(data);
Example 13-24 shows the whole example.
Example 13-24. Using a Socket to fetch data from a daytime server
IPHostEntry hostDnsEntry = Dns.GetHostEntry("time-nw.nist.gov");
IPAddress serverIp = hostDnsEntry.AddressList[0];

Socket daytimeSocket = new Socket(
    serverIp.AddressFamily,
    SocketType.Stream,
    ProtocolType.Tcp);

daytimeSocket.Connect(serverIp, 13);
string data;
using (Stream timeServiceStream = new NetworkStream(daytimeSocket, true))
using (StreamReader timeServiceReader = new StreamReader(timeServiceStream))
{
    data = timeServiceReader.ReadToEnd();
}
Console.WriteLine(data);
If you run the program, you’ll see something like this:
55059 09-08-16 06:29:42 50 0 0 912.5 UTC(NIST) *
It’s not strictly relevant to the use of sockets, but if you’re interested, here’s what the numbers this particular server returns all mean. The first number is the number of days that have elapsed since midnight on November 17, 1858. (If you’re curious to know why anyone might find that useful, search the Web for “Modified Julian Date”.) The set of three numbers that follows are the year, month, and date (2009, August 16 in this example), followed by the time of day as UTC (time zone zero, or as we British authors like to call it, Greenwich Mean Time). The 50 signifies that daylight saving time is in effect where the server is located, and the following two zeros indicate respectively that no leap second will be added this month and that the server believes it is not currently experiencing any problems. The next number indicates that the server is deliberately advancing times by 912.5 ms to compensate for transmission delays in the Internet.
That’s all you need to do to use a service with sockets—construct
a suitably configured socket, call Connect, and then read data. If the service
you’re using expects to be sent data, you can also write data into the
NetworkStream. Obviously, you need to
be prepared for errors—the Connect method will
throw an exception if it is unable to connect to the service, and you
should also be prepared to get errors anytime you try to read or write
data with a socket; even if you connect successfully, parts of the
network may later fail, severing the connection to the service. Again,
.NET indicates this by throwing exceptions.
We’ve looked at only half of the story so far—what if you wanted
to write a program that implements a service like the daytime service?
You can do this with the Socket class
too, but it’s a little more involved.
To implement a TCP-based service, we need to make sure our program is ready to receive requests when they come in. If a computer receives an incoming TCP connection request for some port number and no programs are currently listening for connections on that port number, it will simply reject the request. So the first thing we need to do is create a socket that listens for incoming connections (see Example 13-25).
Example 13-25. Listening for incoming TCP connections
using (Socket daytimeListener = new Socket(
    AddressFamily.InterNetworkV6,
    SocketType.Stream,
    ProtocolType.Tcp))
{
    daytimeListener.SetSocketOption(
        SocketOptionLevel.IPv6, (SocketOptionName) 27, 0);

    IPEndPoint daytimeEndpoint = new IPEndPoint(IPAddress.IPv6Any, 13);
    daytimeListener.Bind(daytimeEndpoint);

    daytimeListener.Listen(20);
    ...
As with the client side, we create a Socket object, once again specifying the
address family, socket type, and protocol. (In this particular example,
the lifetime we require for the Socket happens to be the same as the lifetime
of our Main method, so a using statement is an appropriate way to
manage the socket’s disposal.) Whereas with the client we could just use
whichever IP address type came back from Dns.GetHostEntry, when we write a server we
need to state which sort of address we want to listen on. Example 13-25 chooses the InterNetworkV6 family to enable the use of
IPv6. If you want to support just IPv4 you can specify InterNetwork. In fact, this example supports
both kinds of address—the call to SetSocketOption after the constructor puts
this socket into dual mode, meaning that it’s able
to accept connections through either IPv4 or IPv6. (The magic number 27
that appears in the call corresponds to a value defined by the Windows
SDK that doesn’t currently have an equivalent entry in the SocketOptionName enumeration. So
unfortunately, this is just a magic incantation that you need to know in
order to enable a socket to accept incoming connections on either IP
version.)
Warning
Dual-mode sockets are supported only on Windows Vista or later versions of Windows. If you want to accept incoming connections on both IPv4 and IPv6 on earlier versions of Windows, you’ll need to create two sockets and listen for connections on both.
Next, we call Bind—this is how
our application claims ownership of a particular TCP port number. We’ve
built an IPEndPoint object that
specified port 13—the port number for the daytime service—and also
indicates which of the local machine’s addresses we’d like to listen on.
Machines often have multiple addresses—in fact, a connected machine
usually has at least two IPv4 and two IPv6 addresses. Earlier we saw the
special machine name localhost, and this
corresponds to special IPv4 and IPv6 addresses. Even a completely
disconnected machine has these addresses—the IPv4 address 127.0.0.1 and
the IPv6 address ::1 always refer to the local machine. On top of this,
a machine usually gets both an IPv4 and an IPv6 address when it connects
to a network.
It’s possible to create sockets that listen on only the local addresses. That might not sound very useful, as it means that you cannot connect to those sockets over the network. In fact, this is quite handy for software developers. You can run services on your machine that are inaccessible over the network but which programs running locally on your machine can still connect to. This may allay the concerns of your IT administrators who don’t like the idea of desktop machines running web servers or other services because they (quite reasonably) consider such things to be a security risk. If you configure a service to listen on only these local addresses, it won’t be visible on the network, making it less likely to be a security liability. The test web server that Visual Studio can set up for ASP.NET web projects works this way—it uses only a local address, so it is accessible only to browsers running on the same machine. Note that this technique is not very useful outside of a developer machine. A local socket cannot be secured, so it will be accessible to any user logged in to the machine. For a developer box that’s fine, but on server systems, this might constitute a security risk. So you should avoid using local sockets.
Example 13-25 chooses
the special address IPAddress.IPv6Any, which means that the socket
will accept incoming connections directed to any of the computer’s IPv6
addresses. And since we’ve configured this to be a dual-mode socket, it
will also accept incoming connections for any of the computer’s IPv4
addresses too.
If some other program on the computer is already using TCP port
13, the call to Bind will throw an
exception—any particular port number can be owned by only one process on
the machine at any one time. If Bind
succeeds the port is now ours, and so we can call Listen to indicate that we’re ready for
incoming connection requests.
As you can see from the last line of Example 13-25, Listen takes a single argument. This indicates
the maximum backlog for this socket. The backlog
allows for the situation where new connections arrive faster than our
server can handle them. As you’ll see shortly, we need to execute some
code to accept each incoming connection, and at busy times, we might lag
behind—if a new connection request comes in before we’ve managed to
accept the last one, that new request goes into the backlog queue. If
the number of requests in the backlog gets as high as the number we pass
to Listen, the OS will start
rejecting any further requests until our application catches up.
Our socket is now in a listening state, which means that if client programs start trying to connect to our computer on port 13, the OS knows those connections are destined for our program. The next thing our code has to do is accept those connections. Example 13-26 does this in a loop so that it can keep accepting connection requests for as long as the program runs.
Example 13-26. Accepting incoming connections
while (true)
{
    Socket incomingConnection = daytimeListener.Accept();
    using (NetworkStream connectionStream =
                        new NetworkStream(incomingConnection, true))
    using (StreamWriter writer = new StreamWriter(connectionStream))
    {
        writer.WriteLine(DateTime.Now);
    }
}
This code calls Accept on the
listening Socket. If there are
currently no clients trying to connect to the service, this call will
block—it won’t return until there’s a client. Once at least one client
is attempting to use the service, this will return, handing back another
Socket object. The Socket API is designed to allow multiple
simultaneous connections to a single service, and so each call to
Accept returns a new Socket. Your server will end up with one
Socket object for each distinct
connected client, plus the one listening Socket.
Note
You never actually send or receive data on the listening socket.
It doesn’t represent a TCP connection—its only job is to return a new
socket for each incoming TCP connection you accept. Arguably it’s a
little weird to use the same Socket
class for both jobs, because accepting incoming connections feels like
a pretty different kind of activity than representing an active TCP
connection. But that’s how sockets have worked for decades. .NET is
merely continuing the slightly eccentric tradition.
Example 13-26 chooses to deal
with the clients one at a time—the loop accepts a single connection,
sends a response, closes the connection, and then moves on to the next
client. So this particular server will have up to two active Socket objects at any one time—the one for the client connection
it’s currently handling, and the one Socket that is listening for incoming
connections. You don’t need to do this—it’s very common to accept new
connections on a listening socket when you already have open connections
that came from the same socket. (For example, a web server does not
insist on finishing the processing of whatever request it’s handling at
the moment before starting work on the next one. It’s common for a
server to have hundreds of inbound connections open simultaneously.) But
since this particular service can do all the work it needs to do and
then close the connection immediately, it doesn’t have any particular
reason to open several connections simultaneously.
The code that does the work here is pretty similar to the client
code we saw in Example 13-24. As before, we
create a NetworkStream, passing
true to indicate that we want to
close the Socket when we dispose the
stream. This time we create a StreamWriter instead of a StreamReader, because we’re now implementing
the server, and it’s going to be sending data rather than receiving it.
We call the writer’s WriteLine method,
passing the current date and time, which, as you may recall, was the
whole point of this service in the first place. Example 13-27 shows the
completed code.
Example 13-27. The complete daytime service
using (Socket daytimeListener = new Socket(
    AddressFamily.InterNetworkV6,
    SocketType.Stream,
    ProtocolType.Tcp))
{
    daytimeListener.SetSocketOption(SocketOptionLevel.IPv6,
                                    (SocketOptionName) 27, 0);

    IPEndPoint daytimeEndpoint = new IPEndPoint(IPAddress.IPv6Any, 13);
    daytimeListener.Bind(daytimeEndpoint);
    daytimeListener.Listen(20);

    while (true)
    {
        Socket incomingConnection = daytimeListener.Accept();
        using (NetworkStream connectionStream =
                            new NetworkStream(incomingConnection, true))
        using (StreamWriter writer = new StreamWriter(connectionStream,
                                                        Encoding.ASCII))
        {
            writer.WriteLine(DateTime.Now);
        }
    }
}
The first time you run this code, you can expect to see the warning dialog shown in Figure 13-9 (unless you’ve disabled your Windows Firewall). By default, the Windows Firewall will notify you when programs start listening for incoming network connections out of the blue. Typically, a program that has a legitimate need to accept connections will register itself with the firewall when it’s installed, so when a program that the firewall knows nothing about suddenly starts listening for incoming connections, that’s likely to be a sign of trouble—it’s exactly the sort of thing that malware would do if it wanted to make your machine available to hackers for distributing spam or launching distributed denial of service attacks. Of course, in this case, you know that the code is legitimate because you just wrote it, and the reason your program hasn’t gone through the official route of registering itself during installation is that you only just wrote the code, and you haven’t written the Windows Installer .msi yet. So as a developer, you expect to see this sort of warning for your own programs when they listen for incoming connections. (You didn’t see this for the WCF example earlier because it was using the specially reserved design-time address space that Visual Studio sets up when you install it. But that works only for HTTP—there’s no equivalent for sockets.) You just need to click Unblock, and you shouldn’t see this warning again for this particular program.

To test this program, you can use the client program you wrote
earlier. The simplest approach will be to run two copies of Visual Studio, one for the client and one for the server.
(Or you could configure Visual Studio to run both projects, as we did
earlier.) Run the server first. Then go to the client, modify the line
that specifies the machine name—replace time-nw.nist.gov with localhost—and then run the client. It should
print out the current time and date. The format will be different from
the one used by the NIST server—it’ll be the default used by the
DateTime type. But that’s fine,
because the Daytime Protocol specification says we’re free to use any
format we like as long as it’s ASCII and it fits on a single
line.
And that’s it for basic socket use. Sockets also support asynchronous versions of all the methods—in fact, they support both the event-based and the method-based asynchronous styles we encountered earlier. Since you’ve already seen this kind of code in action, we won’t show it again here, but we’ll come back to asynchronous programming techniques later in the book.
This chapter has touched on the most widely used networking types,
but for completeness we should mention that some more specialized
networking APIs are available. For example, the System.Net.Mail namespace provides types for
sending email through an SMTP relay, and the related System.Net.Mime namespace supports MIME features, which are the standard way to represent
attachments for emails. The System.Net.PeerToPeer namespaces provide access
to the peer-to-peer networking features of Windows. (There are also
WCF bindings that support this system.) The System.Net.NetworkInformation namespace provides
types for discovering network status, through network interface
information, and TCP/IP ICMP mechanisms such as ping. The TLS/SSL infrastructure that enables HTTPS to send
encrypted data is also available for you to use directly, through the
System.Net.Security namespace.
We looked at three approaches to networked communication in this
chapter. WCF works at a fairly high level, enabling us to write servers
that offer operations that can be invoked by clients, modeling these
remote invocations as method calls. We also looked at the support for HTTP
operations provided by the WebClient,
HttpWebRequest, and HttpWebResponse classes. And finally, we looked
at how to work at a very low level, dealing directly with the bytes sent
across the network with TCP, by using the Socket class. There’s one particularly common
form of communication that we’ve not yet looked at: many applications need
to talk to a database. We’ll look at this in the next chapter.
[26] More accurately, the demands to which you feel inclined to accede.
[27] In fact, it has revealed a small problem: the tempuri.org that appears in the URL
indicates something temporary that we’re supposed to fill in—the
ServiceContract attribute on the
original service definition has a Namespace attribute, and we’re supposed to
pick a URI that is unique to our service. It’s not mandatory in this
particular scenario because everything works with the default, but a
temporary-looking URI doesn’t look entirely professional.
[28] It could be worse. See http://www.neopoleon.com/home/blogs/neo/archive/2003/09/29/5458.aspx.
[29] In general, the WS-* family of web service protocols avoids depending on HTTP. This may seem like a peculiar tendency for web service standards, but a lot of the organizations involved in creating these specifications wanted the message formats to be useful in message-queue-based systems as well as HTTP. So in general, they tend to avoid transport-specific mechanisms.
[30] If it’s a multithreaded application, it’s usually OK to call a blocking API on a worker thread. It’s a bad idea only if you’re on the UI thread, but that’s the thread that all the interesting UI stuff happens on, so it’s an easy mistake to make.
[31] Atom is a common format for representing sets of items, such as blog entries or news articles. It’s similar to RSS, but tries to avoid some of RSS’s inconsistencies and limitations.
[32] Cookies are so widely supported that although they’re not technically part of the HTTP specification, they might as well be.
[33] Silverlight applications are an exception. They rely on the web browser to make HTTP requests, and so your requests will send whatever cookies the containing browser would normally send.