
Chapter 34
Manipulating XML
WHAT’S IN THIS CHAPTER?
- XML standards
- XmlReader and XmlWriter
- XmlDocument
- XPathDocument
- XmlNavigator
- LINQ to XML
- Working with objects in the System.Xml.Linq namespace
- Querying XML documents using LINQ
- Using LINQ to SQL and LINQ to XML together
WROX.COM CODE DOWNLOADS FOR THIS CHAPTER
The wrox.com code downloads for this chapter are found at http://www.wrox.com/remtitle.cgi?isbn=1118314425 on the Download Code tab. The code for this chapter is divided into the following major examples:
- XmlReaderSample
- ConsoleApplication1
- XmlSample
- XmlSample01
XML
XML plays a significant role in the .NET Framework. Not only does the .NET Framework allow you to use XML in your application, the .NET Framework itself uses XML for configuration files and source code documentation, as do SOAP, web services, and ADO.NET, to name just a few.
To accommodate this extensive use of XML, the .NET Framework includes the System.Xml namespace. This namespace is loaded with classes that can be used for the processing of XML, and many of these classes are discussed in this chapter.
This chapter discusses how to use the XmlDocument class, which is the implementation of the Document Object Model (DOM), as well as what .NET offers as a replacement for SAX (the XmlReader and XmlWriter classes). It also discusses the class implementations of XPath and XSLT and demonstrates how XML and ADO.NET work together, as well as how easy it is to transform one to the other. You also learn how you can serialize your objects to XML and create an object from (or deserialize) an XML document by using classes in the System.Xml.Serialization namespace. More to the point, you learn how you can incorporate XML into your C# applications.
Note that the XML namespace enables you to get similar results in a number of different ways. It is impossible to include all these variations in one chapter, so while exploring one possible way to do something, we’ll try our best to mention alternatives that will yield the same or similar results.
Because it’s beyond the scope of this book to teach you XML from scratch, we assume that you are already somewhat familiar with it. For example, you should be familiar with elements, attributes, and nodes, and you should understand what is meant by a well-formed document. Similarly, you should be familiar with SAX and DOM.
In addition to general XML usage, the .NET Framework also includes the capability to work with XML by using LINQ to XML. This can be a good alternative to using XPath for searching in an XML document.
The discussion begins with a brief overview of the current status of XML standards.
XML STANDARDS SUPPORT IN .NET
The World Wide Web Consortium (W3C) has developed a set of standards that give XML its power and potential. Without these standards, XML would not have the impact on the development world that it does. The W3C website (www.w3.org) is a valuable source for all things XML.
The .NET Framework supports the following W3C standards:
- XML 1.0 (www.w3.org/TR/1998/REC-xml-19980210), including DTD support
- XML namespaces (www.w3.org/TR/REC-xml-names), both stream level and DOM
- XML schemas (www.w3.org/2001/XMLSchema)
- XPath expressions (www.w3.org/TR/xpath)
- XSLT transformations (www.w3.org/TR/xslt)
- DOM Level 1 Core (www.w3.org/TR/REC-DOM-Level-1)
- DOM Level 2 Core (www.w3.org/TR/DOM-Level-2-Core)
- SOAP 1.1 (www.w3.org/TR/SOAP)
The level of standards support will change as the framework matures and the W3C updates the recommended standards. Therefore, you need to make sure that you stay up to date with the standards and the level of support provided by Microsoft.
INTRODUCING THE SYSTEM.XML NAMESPACE
Support for processing XML is provided by the classes in the System.Xml namespace in .NET. This section looks (in no particular order) at some of the more important classes that the System.Xml namespace provides. The following table lists the main XML reader and writer classes.
| CLASS NAME | DESCRIPTION |
| XmlReader | An abstract reader class that provides fast, noncached XML data. XmlReader is forward-only, like the SAX parser. |
| XmlWriter | An abstract writer class that provides fast, noncached XML data in stream or file format |
| XmlTextReader | Extends XmlReader and provides fast forward-only stream access to XML data |
| XmlTextWriter | Extends XmlWriter and provides fast forward-only generation of XML streams. |
The following table lists some other useful classes for handling XML.
| CLASS NAME | DESCRIPTION |
| XmlNode | An abstract class that represents a single node in an XML document. It is the base class for several classes in the XML namespace. |
| XmlDocument | Extends XmlNode. This is the W3C DOM implementation. It provides a tree representation in memory of an XML document, enabling navigation and editing. |
| XmlDataDocument | Extends XmlDocument. This is a document that can be loaded from XML data or from relational data in an ADO.NET DataSet. It enables the mixing of XML and relational data in the same view. |
| XmlResolver | An abstract class that resolves external XML-based resources such as DTD and schema references. Also used to process <xsl:include> and <xsl:import> elements. |
| XmlNodeList | A list of XmlNodes that can be iterated through |
| XmlUrlResolver | Extends XmlResolver. Resolves external resources named by a uniform resource identifier (URI). |
Many of the classes in the System.Xml namespace provide a means to manage XML documents and streams, whereas others (such as the XmlDataDocument class) provide a bridge between XML data stores and the relational data stored in DataSets.
USING SYSTEM.XML CLASSES
The following examples use books.xml as the source of data. You can download this file and the other code samples for this chapter from the Wrox website (www.wrox.com), but it is also included in several examples in the .NET SDK. The books.xml file is a book catalog for an imaginary bookstore. It includes book information such as genre, author name, price, and ISBN number.
This is what the books.xml file looks like:
<?xml version='1.0'?>
<!-–This file represents a fragment of a book store inventory database-–>
<bookstore>
   <book genre="autobiography" publicationdate="1991" ISBN="1-861003-11-0">
      <title>The Autobiography of Benjamin Franklin</title>
      <author>
         <first-name>Benjamin</first-name>
         <last-name>Franklin</last-name>
      </author>
      <price>8.99</price>
   </book>
   <book genre="novel" publicationdate="1967" ISBN="0-201-63361-2">
      <title>The Confidence Man</title>
      <author>
         <first-name>Herman</first-name>
         <last-name>Melville</last-name>
      </author>
      <price>11.99</price>
   </book>
   <book genre="philosophy" publicationdate="1991" ISBN="1-861001-57-6">
      <title>The Gorgias</title>
      <author>
         <name>Plato</name>
      </author>
      <price>9.99</price>
   </book>
</bookstore>
READING AND WRITING STREAMED XML
The XmlReader and XmlWriter classes will feel familiar if you have ever used SAX. XmlReader-based classes provide a very fast, forward-only, read-only cursor that streams the XML data for processing. Because it is a streaming model, the memory requirements are not very demanding. However, you don’t have the navigation flexibility and the read or write capabilities that would be available from a DOM-based model. XmlWriter-based classes produce an XML document that conforms to the W3C’s XML 1.0 Namespace Recommendations.
XmlReader and XmlWriter are both abstract classes. The following classes are derived from XmlReader:
- XmlNodeReader
- XmlTextReader
- XmlValidatingReader
The following classes are derived from XmlWriter:
- XmlTextWriter
- XmlQueryOutput
XmlTextReader and XmlTextWriter work with either a stream-based object from the System.IO namespace or TextReader/TextWriter objects. XmlNodeReader uses an XmlNode as its source, rather than a stream. The XmlValidatingReader adds DTD and schema validation and therefore offers data validation. You look at these a bit more closely later in this chapter.
Using the XmlReader Class
XmlReader is a lot like SAX in the MSXML SDK. One of the biggest differences, however, is that whereas SAX is a push type of model (that is, it pushes data out to the application, and the developer has to be ready to accept it), the XmlReader is a pull model, whereby data is pulled into an application requesting it. This provides an easier and more intuitive programming model. Another advantage to this is that a pull model can be selective about the data that is sent to the application: it isn’t necessary to process any data you don’t need. In a push model, all the XML data has to be processed by the application, whether it is needed or not.
The following is a very simple example of reading XML data; later you will take a closer look at the XmlReader class. You’ll find the code in the XmlReaderSample folder. Here is the code for reading in the books.xml document. As each node is read, the NodeType property is checked. If the node is a text node, the value is appended to the text box (code file XMLReaderSample.sln):
using System.Xml;

private void button3_Click(object sender, EventArgs e)
{
  richTextBox1.Clear();
  XmlReader rdr = XmlReader.Create("books.xml");
  while (rdr.Read())
  {
    if (rdr.NodeType == XmlNodeType.Text)
      richTextBox1.AppendText(rdr.Value + "
");
  }
}
As previously discussed, XmlReader is an abstract class. Therefore, in order to use the XmlReader class directly, a Create static method has been added. The Create method returns an XmlReader object. The overload list for the Create method contains nine entries. In the preceding example, a string that represents the filename of the XmlDocument is passed in as a parameter. Stream-based objects and TextReader-based objects can also be passed in.
An XmlReaderSettings object can also be used. XmlReaderSettings specifies the features of the reader. For example, a schema can be used to validate the stream. Set the Schemas property to a valid XmlSchemaSet object, which is a cache of XSD schemas. Then the XsdValidate property on the XmlReaderSettings object can be set to true.
You can use several Ignore properties to control the way the reader processes certain nodes and values. These properties include IgnoreComments, IgnoreIdentityConstraints, IgnoreInlineSchema, IgnoreProcessingInstructions, IgnoreSchemaLocation, and IgnoreWhitespace. You can use these properties to strip certain items from the document.
Read Methods
Several ways exist to move through the document. As shown in the previous example, Read takes you to the next node. You can then verify whether the node has a value (HasValue) or, as you will see shortly, whether the node has any attributes (HasAttributes). You can also use the ReadStartElement method, which verifies whether the current node is the start element and then positions you on the next node. If you are not on the start element, an XmlException is raised. Calling this method is the same as calling the IsStartElement method followed by a Read method.
ReadElementString is similar to ReadString, except that you can optionally pass in the name of an element. If the next content node is not a start tag, or if the Name parameter does not match the current node Name, an exception is raised.
Here is an example showing how ReadElementString can be used. Notice that it uses FileStreams, so you need to ensure that you include the System.IO namespace via a using statement (code file XMLReaderSample.sln):
private void button6_Click(object sender, EventArgs e)
{
  richTextBox1.Clear();
        XmlReader rdr = XmlReader.Create("books.xml");
  while (!rdr.EOF)
  {
    //if we hit an element type, try and load it in the listbox
    if (rdr.MoveToContent() == XmlNodeType.Element && rdr.Name == "title")
    {
      richTextBox1.AppendText(rdr.ReadElementString() + "
");
    }
    else
    {
      //otherwise move on
      rdr.Read();
    }
  }
}
In the while loop, you use MoveToContent to find each node of type XmlNodeType.Element with the name title. You use the EOF property of the XmlTextReader as the loop condition. If the node is not of type Element or not named title, the else clause will issue a Read method to move to the next node. When you find a node that matches the criteria, you add the result of a ReadElementString to the list box. This should leave you with just the book titles in the list box. Note that you don’t have to issue a Read call after a successful ReadElementString because ReadElementString consumes the entire Element and positions you on the next node.
If you remove && rdr.Name=="title" from the if clause, you have to catch the XmlException when it is thrown. Looking at the data file, the first element that MoveToContent will find is the <bookstore> element. Because it is an element, it will pass the check in the if statement. However, because it does not contain a simple text type, it will cause ReadElementString to raise an XmlException. One way to work around this is to put the ReadElementString call in a function of its own. Then, if the call to ReadElementString fails inside this function, you can deal with the error and return to the calling function.
Go ahead and do that; call this new method LoadTextBox and pass in the XmlTextReader as a parameter. This is what the LoadTextBox method looks like with these changes:
private void LoadTextBox(XmlReader reader)
{
   try
   {
      richTextBox1.AppendText (reader.ReadElementString() + "
");
   }
   // if an XmlException is raised, ignore it.
   catch(XmlException er){}
}
The following section from the previous example,
if (tr.MoveToContent() == XmlNodeType.Element && tr.Name == "title")
{
  richTextBox1.AppendText(tr.ReadElementString() + "
");
}
else
{
  //otherwise move on
  tr.Read();
}
will have to be changed to this:
if (tr.MoveToContent() == XmlNodeType.Element)
{
  LoadTextBox(tr);
}
else
{
  //otherwise move on
  tr.Read();
}
After running this example, the results should be the same as before. What this demonstrates is that there is more than one way to accomplish the same goal. This is where the flexibility of the classes in the System.Xml namespace starts to become apparent.
The XmlReader can also read strongly typed data. There are several ReadElementContentAs methods, such as ReadElementContentAsDouble, ReadElementContentAsBoolean, and so on. The following example shows how to read in the values as a decimal and do some math on the value. In this case, the value from the price element is increased by 25 percent:
private void button5_Click(object sender, EventArgs e)
{
  richTextBox1.Clear();
  XmlReader rdr = XmlReader.Create("books.xml");
  while (rdr.Read())
  {
    if (rdr.NodeType == XmlNodeType.Element)
    {
      if (rdr.Name == "price")
      {
        decimal price = rdr.ReadElementContentAsDecimal();
        richTextBox1.AppendText("Current Price = " + price + "
");
        price += price * (decimal).25;
        richTextBox1.AppendText("New Price = " + price + "

");
      }
      else if(rdr.Name== "title")
        richTextBox1.AppendText(rdr.ReadElementContentAsString() + "
");
    }
  }
}
If the value cannot be converted to a decimal value, a FormatException is raised. This is a much more efficient method than reading the value as a string and casting it to the proper data type.
Retrieving Attribute Data
As you play with the sample code, you might notice that when the nodes are read in, you don’t see any attributes. This is because attributes are not considered part of a document’s structure. When you are on an element node, you can check for the existence of attributes and optionally retrieve the attribute values.
For example, the HasAttributes property returns true if there are any attributes; otherwise, it returns false. The AttributeCount property tells you how many attributes there are, and the GetAttribute method gets an attribute by name or by index. If you want to iterate through the attributes one at a time, you can use the MoveToFirstAttribute and MoveToNextAttribute methods.
The following example iterates through the attributes of the books.xml document:
private void button7_Click(object sender, EventArgs e)
{
  richTextBox1.Clear();
  XmlReader tr = XmlReader.Create("books.xml");
  //Read in node at a time
  while (tr.Read())
  {
    //check to see if it's a NodeType element
    if (tr.NodeType == XmlNodeType.Element)
    {
      //if it's an element, then let's look at the attributes.
      for (int i = 0; i < tr.AttributeCount; i++)
      {
        richTextBox1.AppendText(tr.GetAttribute(i) + "
");
      }
    }
  }
}
This time you are looking for element nodes. When you find one, you loop through all the attributes and, using the GetAttribute method, load the value of the attribute into the list box. In the preceding example, those attributes would be genre, publicationdate, and ISBN.
Validating with XmlReader
Sometimes it’s important to know not only that the document is well formed but also that it is valid. An XmlReader can validate the XML according to an XSD schema by using the XmlReaderSettings class. The XSD schema is added to the XmlSchemaSet that is exposed through the Schemas property. The XsdValidate property must also be set to true; the default for this property is false.
The following example demonstrates the use of the XmlReaderSettings class. It is the XSD schema that will be used to validate the books.xml document (code file books.xsd):
<?xml version="1.0" encoding="utf-8"?>
<xs:schema attributeFormDefault="unqualified"
        elementFormDefault="qualified" xmlns:xs="http://www.w3.org/2001/XMLSchema">
  <xs:element name="bookstore">
    <xs:complexType>
      <xs:sequence>
        <xs:element maxOccurs="unbounded" name="book">
          <xs:complexType>
            <xs:sequence>
              <xs:element name="title" type="xs:string" />
              <xs:element name="author">
                <xs:complexType>
                  <xs:sequence>
                    <xs:element minOccurs="0" name="name"
                                              type="xs:string" />
                    <xs:element minOccurs="0" name="first-name"
                                              type="xs:string" />
                    <xs:element minOccurs="0" name="last-name"
                                              type="xs:string" />
                  </xs:sequence>
                </xs:complexType>
              </xs:element>
              <xs:element name="price" type="xs:decimal" />
            </xs:sequence>
            <xs:attribute name="genre" type="xs:string" use="required" />
            <!-–<xs:attribute name="publicationdate"
                               type="xs:unsignedShort" use="required" />-–>
            <xs:attribute name="ISBN" type="xs:string" use="required" />
          </xs:complexType>
        </xs:element>
      </xs:sequence>
    </xs:complexType>
  </xs:element>
</xs:schema>
This schema was generated from books.xml in Visual Studio. Notice that the publicationdate attribute has been commented out. This will cause the validation to fail.
The following code uses the schema to validate the books.xml document: (Code file XMLReaderSample.sln)
private void button8_Click(object sender, EventArgs e)
{

 richTextBox1.Clear();
  XmlReaderSettings settings = new XmlReaderSettings();
  settings.Schemas.Add(null, "books.xsd");
  settings.ValidationType = ValidationType.Schema;
  settings.ValidationEventHandler +=
    new System.Xml.Schema.ValidationEventHandler(settings_ValidationEventHandler);
  XmlReader rdr = XmlReader.Create("books.xml", settings);
  while (rdr.Read())
  {
    if (rdr.NodeType == XmlNodeType.Text)
      richTextBox1.AppendText(rdr.Value + "
");
  }
}
After the XmlReaderSettings object setting is created, the schema books.xsd is added to the XmlSchemaSet object. The Add method for XmlSchemaSet has four overloads. One takes an XmlSchema object. The XmlSchema object can be used to create a schema on the fly, without having to create the schema file on disk. Another overload takes another XmlSchemaSet object as a parameter. The third overload takes two string values: the target namespace and the URL for the XSD document. If the target namespace parameter is null, the targetNamespace of the schema will be used. The last overload takes the targetNamespace as the first parameter as well, but it uses an XmlReader-based object to read in the schema. The XmlSchemaSet preprocesses the schema before the document to be validated is processed.
After the schema is referenced, the XsdValidate property is set to one of the ValidationType enumeration values. These valid values are DTD, Schema, or None. If the value selected is set to None, then no validation will occur.
Because the XmlReader object is being used, if there is a validation problem with the document, it will not be found until that attribute or element is read by the reader. When the validation failure does occur, an XmlSchemaValidationException is raised. This exception can be handled in a catch block; however, handling exceptions can make controlling the flow of the data difficult. To help with this, a ValidationEvent is available in the XmlReaderSettings class. This way, the validation failure can be handled without your having to use exception handling. The event is also raised by validation warnings, which do not raise an exception. The ValidationEvent passes in a ValidationEventArgs object that contains a Severity property. This property determines whether the event was raised by an error or a warning. If the event was raised by an error, the exception that caused the event to be raised is passed in as well. There is also a message property. In the example, the message is displayed in a MessageBox.
Using the XmlWriter Class
The XmlWriter class allows you to write XML to a stream, a file, a StringBuilder, a TextWriter, or another XmlWriter object. Like XmlTextReader, it does so in a forward-only, noncached manner. XmlWriter is highly configurable, enabling you to specify such things as whether or not to indent content, the amount to indent, what quote character to use in attribute values, and whether namespaces are supported. Like the XmlReader, this configuration is done using an XmlWriterSettings object.
Here’s a simple example that shows how the XmlTextWriter class can be used:
private void button9_Click(object sender, EventArgs e)
{
  XmlWriterSettings settings = new XmlWriterSettings();
  settings.Indent = true;
  settings.NewLineOnAttributes = true;
  XmlWriter writer = XmlWriter.Create("newbook.xml", settings);
  writer.WriteStartDocument();
  //Start creating elements and attributes
  writer.WriteStartElement("book");
  writer.WriteAttributeString("genre", "Mystery");
  writer.WriteAttributeString("publicationdate", "2001");
  writer.WriteAttributeString("ISBN", "123456789");
  writer.WriteElementString("title", "Case of the Missing Cookie");
  writer.WriteStartElement("author");
  writer.WriteElementString("name", "Cookie Monster");
  writer.WriteEndElement();
  writer.WriteElementString("price", "9.99");
  writer.WriteEndElement();
  writer.WriteEndDocument();
  //clean up
  writer.Flush();
  writer.Close();
}
Here, you are writing to a new XML file called newbook.xml, adding the data for a new book. Note that XmlWriter overwrites an existing file with a new one. You will look at inserting a new element or node into an existing document later in this chapter. You are instantiating the XmlWriter object by using the Create static method. In this example, a string representing a filename is passed as a parameter, along with an instance of an XmlWriterSetting class.
The XmlWriterSettings class has properties that control how the XML is generated. The CheckedCharacters property is a Boolean that raises an exception if a character in the XML does not conform to the W3C XML 1.0 recommendation. The Encoding class sets the encoding used for the XML being generated; the default is Encoding.UTF8. The Indent property is a Boolean value that determines whether elements should be indented. The IndentChars property is set to the character string that it is used to indent. The default is two spaces. The NewLine property is used to determine the characters for line breaks. In the preceding example, the NewLineOnAttribute is set to true. This will put each attribute in a separate line, which can make the XML generated a little easier to read.
WriteStartDocument adds the document declaration. Now you start writing data. First is the book element; next, you add the genre, publicationdate, and ISBN attributes. Then you write the title, author, and price elements. Note that the author element has a child element name.
When you click the button, you produce the booknew.xml file, which looks like this:
<?xml version="1.0" encoding="utf-8"?>
<book
  genre="Mystery"
  publicationdate="2001"
  ISBN="123456789">
  <title>Case of the Missing Cookie</title>
  <author>
    <name>Cookie Monster</name>
  </author>
  <price>9.99</price>
</book>
The nesting of elements is controlled by paying attention to when you start and finish writing elements and attributes. You can see this when you add the name child element to the authors element. Note how the WriteStartElement and WriteEndElement method calls are arranged and how that arrangement produces the nested elements in the output file.
Along with the WriteElementString and WriteAttributeString methods, there are several other specialized write methods. WriteCData outputs a CData section (<!CDATA[.]]>), writing out the text it takes as a parameter. WriteComment writes out a comment in proper XML format. WriteChars writes out the contents of a char buffer. This works in a similar fashion to the ReadChars method shown earlier; they both use the same type of parameters. WriteChars needs a buffer (an array of characters), the starting position for writing (an integer), and the number of characters to write (an integer).
Reading and writing XML using the XmlReader- and XmlWriter-based classes are surprisingly flexible and simple to do. Next, you’ll learn how the DOM is implemented in the System.Xml namespace through the XmlDocument and XmlNode classes.
USING THE DOM IN .NET
The DOM implementation in .NET supports the W3C DOM Level 1 and Core DOM Level 2 specifications. The DOM is implemented through the XmlNode class, which is an abstract class that represents a node of an XML document.
There is also an XmlNodeList class, which is an ordered list of nodes. This is a live list of nodes, and any changes to any node are immediately reflected in the list. XmlNodeList supports indexed access or iterative access.
The XmlNode and XmlNodeList classes make up the core of the DOM implementation in the .NET Framework. The following table lists some of the classes that are based on XmlNode.
| CLASS NAME | DESCRIPTION |
| XmlLinkedNode | Returns the node immediately before or after the current node. Adds NextSibling and PreviousSibling properties to XmlNode. |
| XmlDocument | Represents the entire document. Implements the DOM Level 1 and Level 2 specifications. |
| XmlDocumentFragment | Represents a fragment of the document tree |
| XmlAttribute | Represents an attribute object of an XmlElement object |
| XmlEntity | Represents a parsed or unparsed entity node |
| XmlNotation | Contains a notation declared in a DTD or schema |
The following table lists classes that extend XmlCharacterData.
| CLASS NAME | DESCRIPTION |
| XmlCDataSection | Represents a CData section of a document |
| XmlComment | Represents an XML comment object |
| XmlSignificantWhitespace | Represents a node with whitespace. Nodes are created only if the PreserveWhiteSpace flag is true. |
| XmlWhitespace | Represents whitespace in element content. Nodes are created only if the PreserveWhiteSpace flag is true. |
| XmlText | Represents the textual content of an element or attribute |
The following table lists classes that extend the XmlLinkedNode.
| CLASS NAME | DESCRIPTION |
| XmlDeclaration | Represents the declaration node (e.g., <?xml version=‘1.0’.>) |
| XmlDocumentType | Represents data relating to the document type declaration |
| XmlElement | Represents an XML element object |
| XmlEntityReferenceNode | Represents an entity reference node |
| XmlProcessingInstruction | Contains an XML processing instruction |
As you can see, .NET makes available a class to fit just about any XML type that you might encounter, which means you end up with a very flexible and powerful tool set. This section can’t look at every class in detail, but you will see several examples to give you an idea of what you can accomplish.
Using the XmlDocument Class
XmlDocument and its derived class XmlDataDocument (discussed later in this chapter) are the classes that you will be using to represent the DOM in .NET. Unlike XmlReader and XmlWriter, XmlDocument provides read and write capabilities as well as random access to the DOM tree. XmlDocument resembles the DOM implementation in MSXML. If you have experience programming with MSXML, you will feel comfortable using XmlDocument.
This example introduced in this section creates an XmlDocument object, loads a document from disk, and loads a text box with data from the title elements. This is similar to one of the examples that you constructed in the section, “Using the XmlReader Class.” The difference here is that you will be selecting the nodes you want to work with, instead of going through the entire document as in the XmlReader-based example.
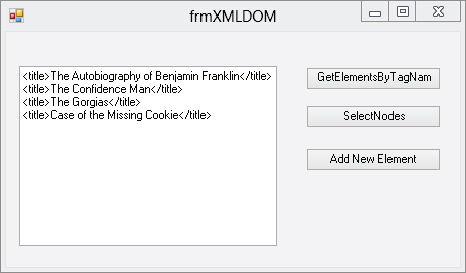
Here is the code to create an XmlDocument object. Note how simple it looks in comparison to the XmlReader example (code file frmXMLDOM.cs):
private void button1_Click(object sender, System.EventArgs e)
{
      //doc is declared at the module level
      //change path to match your path structure
      _doc.Load("books.xml");
      //get only the nodes that we want.
      XmlNodeList nodeLst = _doc.GetElementsByTagName("title");
      //iterate through the XmlNodeList
      textBox1.Text = "";
      foreach (XmlNode node in nodeLst)
      {
          textBox1.Text += node.OuterXml + "
";
      }
}
You also add the following declaration at the module level for the examples in this section:
private XmlDocument doc=new XmlDocument();If this is all that you wanted to do, using the XmlReader would have been a much more efficient way to load the text box, because you just go through the document once and then you are finished with it. This is exactly the type of work that XmlReader was designed for. However, if you want to revisit a node, using XmlDocument is a better way.
Here is an example of using the XPath syntax to retrieve a set of nodes from the document:
private void button2_Click(object sender, EventArgs e)
{
  //doc is declared at the module level
  //change path to match your path structure
  doc.Load("books.xml");
  //get only the nodes that we want.
  XmlNodeList nodeLst = _doc.SelectNodes("/bookstore/book/title");
  textBox1.Text = "";
  //iterate through the XmlNodeList
  foreach (XmlNode node in nodeLst)
  {
      textBox1.Text += node.OuterXml + "
";
  }
}
SelectNodes returns a NodeList, or a collection of XmlNodes. The list contains only nodes that match the XPath statement passed in as the parameter SelectNodes. In this example, all you want to see are the title nodes. If you had made the call to SelectSingleNode, then you would have received a single node object that contained the first node in the XmlDocument that matched the XPath criteria.
A quick comment regarding the SelectSingleNode method: this is an XPath implementation in the XmlDocument class. Both the SelectSingleNode and SelectNodes methods are defined in XmlNode, which XmlDocument is based on. SelectSingleNode returns an XmlNode, and SelectNodes returns an XmlNodeList. However, the System.Xml.XPath namespace contains a richer XPath implementation, which you will look at later in the chapter.
Inserting Nodes
Earlier, you looked at an example using XmlTextWriter that created a new document. The limitation was that it would not insert a node into a current document. With the XmlDocument class, you can do just that. Change the button1_Click event handler from the last example to the following:
private void button4_Click(object sender, System.EventArgs e)
{
      //change path to match your structure
      _doc.Load("books.xml");
      //create a new 'book' element
      XmlElement newBook = _doc.CreateElement("book");
      //set some attributes
      newBook.SetAttribute("genre", "Mystery");
      newBook.SetAttribute("publicationdate", "2001");
      newBook.SetAttribute("ISBN", "123456789");
      //create a new 'title' element
      XmlElement newTitle = _doc.CreateElement("title");
      newTitle.InnerText = "Case of the Missing Cookie";
      newBook.AppendChild(newTitle);
      //create new author element
      XmlElement newAuthor = _doc.CreateElement("author");
      newBook.AppendChild(newAuthor);
      //create new name element
      XmlElement newName = _doc.CreateElement("name");
      newName.InnerText = "Cookie Monster";
      newAuthor.AppendChild(newName);
      //create new price element
      XmlElement newPrice = _doc.CreateElement("price");
      newPrice.InnerText = "9.95";
      newBook.AppendChild(newPrice);
      //add to the current document
      _doc.DocumentElement.AppendChild(newBook);
      //write out the doc to disk
      XmlTextWriter tr = new XmlTextWriter("booksEdit.xml", null);
      tr.Formatting = Formatting.Indented;
      _doc.WriteContentTo(tr);
      tr.Close();
      //load listBox1 with all of the titles, including new one
      XmlNodeList nodeLst = _doc.GetElementsByTagName("title");
      textBox1.Text = "";
      foreach (XmlNode node in nodeLst)
      {
          textBox1.Text += node.OuterXml + "
";
      }
}
After executing this code, you end up with the same functionality as in the previous example, but there is one additional book in the text box, The Case of the Missing Cookie (a soon-to-be classic). If you look closely at the code, you can see that this is actually a fairly simple process. The first thing that you do is create a new book element:
XmlElement newBook = doc.CreateElement("book");CreateElement has three overloads that enable you to specify the following:
- The element name
- The name and namespace URI
- The prefix, localname, and namespace
Once the element is created, you need to add attributes:
newBook.SetAttribute("genre","Mystery");
newBook.SetAttribute("publicationdate","2001");
newBook.SetAttribute("ISBN","123456789");
Now that you have the attributes created, you need to add the other elements of a book:
XmlElement newTitle = doc.CreateElement("title");
newTitle.InnerText = "The Case of the Missing Cookie";
newBook.AppendChild(newTitle);
Again, you create a new XmlElement-based object (newTitle). Then you set the InnerText property to the title of our new classic and append the element as a child to the book element. You repeat this for the rest of the elements in this book element. Note that you add the name element as a child to the author element. This will give you the proper nesting relationship, as in the other book elements.
Finally, you append the newBook element to the doc.DocumentElement node. This is the same level as all of the other book elements. You have now updated an existing document with a new element.
The last thing to do is write the new XML document to disk. In this example, you create a new XmlTextWriter and pass it to the WriteContentTo method. WriteContentTo and WriteTo both take an XmlTextWriter as a parameter. WriteContentTo saves the current node and all of its children to the XmlTextWriter, whereas WriteTo just saves the current node. Because doc is an XmlDocument-based object, it represents the entire document, so that is what is saved. You could also use the Save method. It will always save the entire document. Save has four overloads. You can specify a string with the filename and path, a Stream-based object, a TextWriter-based object, or an XmlWriter-based object.
You also call the Close method on XmlTextWriter to flush the internal buffers and close the file. Figure 34-1 shows what you get when you run this example. Notice the new entry at the bottom of the list.
Earlier in the chapter, you saw how to create a document using the XmlTextWriter class. You can also use XmlDocument. Why would you use one in preference to the other? If the data that you want streamed to XML is available and ready to write, then the XmlTextWriter class is the best choice. However, if you need to build the XML document a little at a time, inserting nodes into various places, then creating the document with XmlDocument might be the better choice. You can accomplish this by changing the line,
doc.Load("books.xml");to the following:
   //create the declaration section
   XmlDeclaration newDec = doc.CreateXmlDeclaration("1.0",null,null);
   doc.AppendChild(newDec);
   //create the new root element
   XmlElement newRoot = doc.CreateElement("newBookstore");
   doc.AppendChild(newRoot);
First, you create a new XmlDeclaration. The parameters are the version (always 1.0 for now), the encoding, and the standalone flag. The encoding parameter should be set to a string that is part of the System.Text.Encoding class if null is not used (null defaults to UTF-8). The standalone flag can be either yes, no, or null. If it is null, the attribute is not used and will not be included in the document.
The next element that is created will become the DocumentElement. In this case, it is called newBookstore so that you can see the difference. The rest of the code is the same as in the previous example and works in the same way. This is booksEdit.xml, which is generated from the following code:
<?xml version="1.0"?>
<newBookstore>
   <book genre="Mystery" publicationdate="2001" ISBN="123456789">
      <title>The Case of the Missing Cookie</title>
      <author>
         <name>C. Monster</name>
      </author>
      <price>9.95</price>
   </book>
</newBookstore>
You should use the XmlDocument class when you want to have random access to the document. Use the XmlReader-based classes when you want a streaming-type model instead. Remember that there is a cost for the flexibility of the XmlNode-based XmlDocument class — memory requirements are higher and the performance of reading the document is not as good as when using XmlReader. There is another way to traverse an XML document: the XPathNavigator.
USING XPATHNAVIGATORS
An XPathNavigator is used to select, iterate through, and sometimes edit data from an XML document. An XPathNavigator can be created from an XmlDocument to allow editing capabilities or from an XPathDocument for read-only use. Because the XPathDocument is read-only, it performs very well. Unlike the XmlReader, the XPathNavigator is not a streaming model, so the document is read and parsed only once.
The XPathNavigaor is part of the System.Xml.XPath namespace. XPath is a query language used to select specific nodes or elements from an XML document for processing.
The System.Xml.XPath Namespace
The System.Xml.XPath namespace is built for speed. It provides a read-only view of your XML documents, so there are no editing capabilities. Classes in this namespace are built for fast iteration and selections on the XML document in a cursory fashion.
The following table lists the key classes in System.Xml.XPath and gives a short description of the purpose of each class.
| CLASS NAME | DESCRIPTION |
| XPathDocument | Provides a view of the entire XML document. Read-only. |
| XPathNavigator | Provides the navigational capabilities to an XPathDocument |
| XPathNodeIterator | Provides iteration capabilities to a node set |
| XPathExpression | Represents a compiled XPath expression. Used by SelectNodes, SelectSingle Nodes, Evaluate, and Matches. |
| XPathException | An XPath exception class |
XPathDocument
XPathDocument does not offer any of the functionality of the XmlDocument class. Its sole purpose is to create XPathNavigators. In fact, that is the only method available on the XPathDocument class (other than those provided by Object).
You can create an XPathDocument in a number of different ways. You can pass in an XmlReader, a filename of an XML document, or a Stream-based object to the constructor. This provides a great deal of flexibility. For example, you can use the XmlValidatingReader to validate the XML and then use that same object to create the XPathDocument.
XPathNavigator
XPathNavigator contains all the methods for moving and selecting elements that you need. The following table lists some of the “move” methods defined in this class.
| METHOD NAME | DESCRIPTION |
| MoveTo() | Takes XPathNavigator as a parameter. Moves the current position to be the same as that passed in to XPathNavigator. |
| MoveToAttribute() | Moves to the named attribute. Takes the attribute name and namespace as parameters. |
| MoveToFirstAttribute() | Moves to the first attribute in the current element. Returns true if successful. |
| MoveToNextAttribute() | Moves to the next attribute in the current element. Returns true if successful. |
| MoveToFirst() | Moves to the first sibling in the current node. Returns true if successful. |
| MoveToLast() | Moves to the last sibling in the current node. Returns true if successful. |
| MoveToNext() | Moves to the next sibling in the current node. Returns true if successful. |
| MoveToPrevious() | Moves to the previous sibling in the current node. Returns true if successful. |
| MoveToFirstChild() | Moves to the first child of the current element. Returns true if successful. |
| MoveToId() | Moves to the element with the ID supplied as a parameter. There must be a schema for the document, and the data type for the element must be of type ID. |
| MoveToParent() | Moves to the parent of the current node. Returns true if successful. |
| MoveToRoot() | Moves to the root node of the document |
To select a subset of the document, you can use one of the Select methods listed in the following table.
| METHOD NAME | DESCRIPTION |
| Select() | Selects a node set using an XPath expression |
| SelectAncestors() | Selects all the ancestors of the current node based on an XPath expression |
| SelectChildren() | Selects all the children of the current node based on an XPath expression |
| SelectDescendants() | Selects all the descendants of the current node based on an XPath expression |
| SelectSingleNode() | Selects one node based on an XPath expression |
If the XPathNavigator was created from an XPathDocument, it is read-only. If it is created from an XmlDocument, the XPathNavigator can be used to edit the document. This can be verified by checking the CanEdit property. If it is true, you can use one of the Insert methods. InsertBefore and InsertAfter will create a new node either before or after the current node, respectively. The source of the new node can be an XmlReader or a string. Optionally, an XmlWriter can be returned and used to write the new node information.
Strongly typed values can be read from the nodes by using the ValueAs properties. Notice that this is different from XmlReader, which uses ReadValue methods.
XPathNodeIterator
XPathNodeIterator can be thought of as the equivalent of a NodeList or a NodeSet in XPath. This object has two properties and three methods:
- Clone() — Creates a new copy of itself
- Count — Specifies the number of nodes in the XPathNodeIterator object
- Current — Returns an XPathNavigator pointing to the current node
- CurrentPosition() — Returns an integer with the current position
- MoveNext() — Moves to the next node that matches the XPath expression that created the XPathNodeIterator
The XPathNodeIterator is returned by the XPathNavigator Select methods. You use it to iterate over the set of nodes returned by a Select method of the XPathNavigator. Using the MoveNext method of the XPathNodeIterator does not change the location of the XPathNavigator that created it.
Using Classes from the XPath Namespace
The best way to see how these classes are used is to look at some code that iterates through the books.xml document. This will enable you to see how the navigation works. In order to use the examples, first add a reference to the System.Xml.Xsl and System.Xml.XPath namespaces:
using System.Xml.XPath;
using System.Xml.Xsl;
For this example, you use the file booksxpath.xml. It is similar to the books.xml file that you have been using, except that a couple of extra books are added. Here’s the form code, which is part of the XmlSample project (code file frmNavigator.cs):
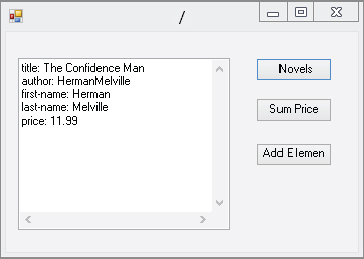
private void button1_Click(object sender, EventArgs e)
{
  //modify to match your path structure
  XPathDocument doc = new XPathDocument("books.xml");
  //create the XPath navigator
  XPathNavigator nav = ((IXPathNavigable)doc).CreateNavigator();
  //create the XPathNodeIterator of book nodes
  // that have genre attribute value of novel
  XPathNodeIterator iter = nav.Select("/bookstore/book[@genre='novel']");
  textBox1.Text = "";
  while (iter.MoveNext())
  {
    XPathNodeIterator newIter =
       iter.Current.SelectDescendants(XPathNodeType.Element, false);
    while (newIter.MoveNext())
    {
      textBox1.Text += newIter.Current.Name + ": " +
          newIter.Current.Value + "
";
    }
  }
}
The first thing you do in the button1_Click method is create the XPathDocument (called doc), passing in the file and path string of the document you want opened. The next line creates the XPathNavigator:
XPathNavigator nav = doc.CreateNavigator();In this example, you use the Select method to retrieve a set of nodes that all have novel as the value of the genre attribute. You then use the MoveNext method to iterate through all the novels in the book list.
To load the data into the list box, you use the XPathNodeIterator.Current property. This creates a new XPathNavigator object based on just the node to which the XPathNodeIterator is pointing. In this case, you are creating an XPathNavigator for one book node in the document.
The next loop takes this XPathNavigator and creates another XPathNodeIterator by issuing another type of select method, the SelectDescendants method. This gives you an XPathNodeIterator of all of the child nodes and children of the child nodes of the book node.
Then, you do another MoveNext loop on the XPathNodeIterator and load the text box with the element names and element values. Figure 34-2 shows what the screen looks like after running the code. Note that the novel is the only book listed.
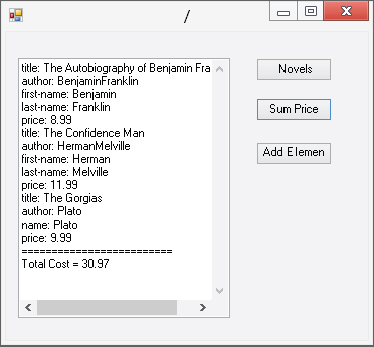
What if you wanted to add up the cost of these books? XPathNavigator includes the Evaluate method for just this reason. Evaluate has three overloads. The first one contains a string that is the XPath function call. The second overload uses the XPathExpression object as a parameter, and the third uses XPathExpression and an XPathNodeIterator as parameters. The following code is similar to the previous example, except that this time all the nodes in the document are iterated through. The Evaluate method call at the end totals the cost of all the books:
private void button2_Click(object sender, EventArgs e)
{
  //modify to match your path structure
  XPathDocument doc = new XPathDocument("books.xml");
  //create the XPath navigator
  XPathNavigator nav = ((IXPathNavigable)doc).CreateNavigator();
  //create the XPathNodeIterator of book nodes
  XPathNodeIterator iter = nav.Select("/bookstore/book");
  textBox1.Text = "";
  while (iter.MoveNext())
  {
    XPathNodeIterator newIter =
       iter.Current.SelectDescendants(XPathNodeType.Element, false);
    while (newIter.MoveNext())
    {
      textBox1.Text += newIter.Current.Name + ": " + newIter.Current.Value +
          "
";
    }
  }
  textBox1.Text += "=========================" + "
";
  textBox1.Text += "Total Cost = " + nav.Evaluate("sum(/bookstore/book/price)");
}
This time, you see the total cost of the books evaluated in the text box (see Figure 34-3).
Now let’s say that you need to add a node for discount. You can use the InsertAfter method to do this fairly easily. Here is the code:
private void button3_Click(object sender, EventArgs e)
{
  XmlDocument doc = new XmlDocument();
  doc.Load("books.xml");
  XPathNavigator nav = doc.CreateNavigator();

  if (nav.CanEdit)
  {
    XPathNodeIterator iter = nav.Select("/bookstore/book/price");
    while (iter.MoveNext())
    {
      iter.Current.InsertAfter("<disc>5</disc>");
    }
  }
  doc.Save("newbooks.xml");
}
Here, you have added the <disc>5</disc> element after the price elements. First, all the price nodes are selected. The XPathNodeIterator is used to iterate over the nodes, and the new node is inserted. The modified document is saved with a new name, newbooks.xml. The new version looks as follows:
<?xml version="1.0"?>
<!-–This file represents a fragment of a book store inventory database-–>
<bookstore>
  <book genre="autobiography" publicationdate="1991" ISBN="1-861003-11-0">
    <title>The Autobiography of Benjamin Franklin</title>
    <author>
      <first-name>Benjamin</first-name>
      <last-name>Franklin</last-name>
    </author>
    <price>8.99</price>
    <disc>5</disc>
  </book>
  <book genre="novel" publicationdate="1967" ISBN="0-201-63361-2">
    <title>The Confidence Man</title>
    <author>
      <first-name>Herman</first-name>
      <last-name>Melville</last-name>
    </author>
    <price>11.99</price>
    <disc>5</disc>
  </book>
  <book genre="philosophy" publicationdate="1991" ISBN="1-861001-57-6">
    <title>The Gorgias</title>
    <author>
      <name>Plato</name>
    </author>
    <price>9.99</price>
    <disc>5</disc>
  </book>
</bookstore>
Nodes can be inserted before or after a selected node. Nodes can also be changed and deleted. If you need to change a large numbers of nodes, using the XPathNavigator created from an XmlDocument may be your best choice.
The System.Xml.Xsl Namespace
The System.Xml.Xsl namespace contains the classes that the .NET Framework uses to support XSL transforms. The contents of this namespace are available to any store whose classes implement the IXPathNavigable interface. In the .NET Framework, that would currently include XmlDocument, XmlDataDocument, and XPathDocument. As with XPath, use the store that makes the most sense. If you plan to create a custom store, such as one using the file system, and you want to be able to do transforms, be sure to implement the IXPathNavigable interface in your class.
XSLT is based on a streaming pull model. Therefore, you can chain several transforms together. You could even apply a custom reader between transforms if needed. This provides a great deal of design flexibility.
Transforming XML
The first example you will look at takes the books.xml document and transforms it into a simple HTML document for display, using the XSLT file books.xsl. (This code is in the XSLSample01 folder.) You need to add the following using statements:
using System.IO;
using System.Xml.Xsl;
using System.Xml.XPath;
Here is the code to perform the transform (code file XslSample01.sln):
private void button1_Click(object sender, EventArgs e)
{
  XslCompiledTransform trans = new XslCompiledTransform();
  trans.Load("books.xsl");
  trans.Transform("books.xml", "out.html");
  webBrowser1.Navigate(AppDomain.CurrentDomain.BaseDirectory + "out.html");
}
A transform doesn’t get any simpler than this. First, a new XmlCompiledTransform object is created. It loads the books.xsl transform document and then performs the transform. In this example, a string with the filename is used as the input. The output is out.html. This file is then loaded into the web browser control used on the form. Instead of using the filename books.xml as the input document, you can use an IXPathNavigable-based object. This would be any object that can create an XPathNavigator.
After the XmlCompiledTransform object is created and the stylesheet is loaded, the transform is performed. The Transform method can take just about any combination of IXPathNavigable objects, Streams, TextWriters, XmlWriters, and URIs as parameters. This gives you a great deal of flexibility for transform flow. You can pass the output of one transform as the input to the next transform.
XsltArgumentLists and XmlResolver objects are also included in the parameter options. You will look at the XsltArgumentList object in the next section. XmlResolver-based objects are used to resolve items that are external to the current document. This could include schemas, credentials, or, of course, stylesheets.
The books.xsl document is a fairly straightforward stylesheet. It looks like this:
<xsl:stylesheet version="1.0"
 xmlns:xsl="http://www.w3.org/1999/XSL/Transform">
<xsl:template match="/">
   <html>
      <head>
         <title>Price List</title>
      </head>
      <body>
         <table>
            <xsl:apply-templates/>
         </table>
      </body>
   </html>
    </xsl:template>
   <xsl:template match="bookstore">
      <xsl:apply-templates select="book"/>
   </xsl:template>
   <xsl:template match="book">
      <tr><td>
         <xsl:value-of select="title"/>
      </td><td>
         <xsl:value-of select="price"/>
      </td></tr>
   </xsl:template>
</xsl:stylesheet>
Using XsltArgumentList
XsltArgumentList provides a way to bind an object with methods to a namespace. Once this is done, you can invoke the methods during the transform. Here is an example:
private void button3_Click(object sender, EventArgs e)
{
  //new XPathDocument
  XPathDocument doc = new XPathDocument("books.xml");
  //new XslTransform
  XslCompiledTransform trans = new XslCompiledTransform();
  trans.Load("booksarg.xsl");
  //new XmlTextWriter since we are creating a new xml document
  XmlWriter xw = new XmlTextWriter("argSample.xml", null);
  //create the XslArgumentList and new BookUtils object
  XsltArgumentList argBook = new XsltArgumentList();
  BookUtils bu = new BookUtils();
  //this tells the argumentlist about BookUtils
  argBook.AddExtensionObject("urn:XslSample", bu);
  //new XPathNavigator
  XPathNavigator nav = doc.CreateNavigator();
  //do the transform
  trans.Transform(nav, argBook, xw);
  xw.Close();
  webBrowser1.Navigate(AppDomain.CurrentDomain.BaseDirectory + "argSample.xml");
}
The following is the code for the BooksUtils class, which is the class that will be called from the transform (code file BookUtils.cs):
class BookUtils
{
  public BookUtils() { }

  public string ShowText()
  {
    return "This came from the ShowText method!";
  }
}
Here is the output of the transform, formatted for easier viewing (code file argSample.xml):
<books>
   <discbook>
      <booktitle>The Autobiography of Benjamin Franklin</booktitle>
      <showtext>This came from the ShowText method!</showtext>
   </discbook>
   <discbook>
      <booktitle>The Confidence Man</booktitle>
      <showtext>This came from the ShowText method!</showtext>
   </discbook>
   <discbook>
      <booktitle>The Gorgias</booktitle>
      <showtext>This came from the ShowText method!</showtext>
   </discbook>
   <discbook>
      <booktitle>The Great Cookie Caper</booktitle>
      <showtext>This came from the ShowText method!</showtext>
   </discbook>
   <discbook>
      <booktitle>A Really Great Book</booktitle>
      <showtext>This came from the ShowText method!</showtext>
   </discbook>
</books>
In this example, you define a new class, BookUtils, which has one rather useless method that returns the string This came from the ShowText method! In the button3_Click event, you create the XPathDocument and XslTransform objects. In a previous example, you loaded the XML document and the transform document directly into the XslCompiledTransform object. This time, you use the XPathNavigator to load the documents.
Next, you need to write the following:
XsltArgumentList argBook=new XsltArgumentList();
BookUtils bu=new BookUtils();
argBook.AddExtensionObject("urn:XslSample",bu);
This is where you create the XsltArgumentList object. You create an instance of the BookUtils object, and when you call the AddExtensionObject method, you pass in a namespace for your extension and the object from which you want to be able to call methods. When you make the Transform call, you pass in the XsltArgumentList (argBook), along with the XPathNavigator and the XmlWriter object you made.
The following is the booksarg.xsl document (based on books.xsl):
<xsl:stylesheet version="1.0" xmlns:xsl="http://www.w3.org/1999/XSL/Transform"
   xmlns:bookUtil="urn:XslSample">
   <xsl:output method="xml" indent="yes"/>
   <xsl:template match="/">
      <xsl:element name="books">
         <xsl:apply-templates/>
      </xsl:element>
   </xsl:template>
   <xsl:template match="bookstore">
      <xsl:apply-templates select="book"/>
   </xsl:template>
   <xsl:template match="book">
      <xsl:element name="discbook">
         <xsl:element name="booktitle">
            <xsl:value-of select="title"/>
         </xsl:element>
         <xsl:element name="showtext">
            <xsl:value-of select="bookUtil:ShowText()"/>
         </xsl:element>
      </xsl:element>
   </xsl:template>
</xsl:stylesheet>
The two important new lines are highlighted. First, you add the namespace that you created when you added the object to XsltArgumentList. Then, when you want to make the method call, you use standard XSLT namespace-prefixing syntax and make the method call.
Another way you could have accomplished this is with XSLT scripting. You can include C#, Visual Basic, and JavaScript code in the stylesheet. The great thing about this is that unlike current non-.NET implementations, the script is compiled at the XslTransform.Load call; this way, you are executing already compiled scripts.
Go ahead and modify the previous XSLT file in this way. First, you add the script to the stylesheet. You can see the following changes in booksscript.xsl:
<xsl:stylesheet version="1.0" xmlns:xsl="http://www.w3.org/1999/XSL/Transform"
                              xmlns:msxsl="urn:schemas-microsoft-com:xslt"
                              xmlns:user="http://wrox.com">
   <msxsl:script language="C#" implements-prefix="user">
      string ShowText()
         {
            return "This came from the ShowText method!";
         }
   </msxsl:script>
   <xsl:output method="xml" indent="yes"/>
      <xsl:template match="/">
   <xsl:element name="books">
      <xsl:apply-templates/>
   </xsl:element>
      </xsl:template>
   <xsl:template match="bookstore">
      <xsl:apply-templates select="book"/>
   </xsl:template>
      <xsl:template match="book">
      <xsl:element name="discbook">
      <xsl:element name="booktitle">
         <xsl:value-of select="title"/>
      </xsl:element>
      <xsl:element name="showtext">
        <xsl:value-of select="user:ShowText()"/>
      </xsl:element>
    </xsl:element>
   </xsl:template>
</xsl:stylesheet>
As before, the changes are highlighted. You set the scripting namespace, add the code (which was copied and pasted in from the Visual Studio .NET IDE), and make the call in the stylesheet. The output is the same as that of the previous example.
Debugging XSLT
Visual Studio 2012 has the capability to debug transforms. You can actually step through a transform line by line, inspect variables, access the call stack, and set breakpoints just as if you were debugging C# source code. You can debug a transform in two ways: by just using the stylesheet and input XML file or by running the application to which the transform belongs.
Debugging without the Application
When you first start creating the transforms, sometimes you don’t want to run through the entire application. You may just want to get a stylesheet working. Visual Studio 2012 enables you to do this using the XSLT editor.
Load the books.xsl stylesheet into the Visual Studio 2012 XSLT editor. Set a breakpoint on the following line:
<xsl:value-of select="title"/>Next, select the XML menu and then Debug XSLT. You will be asked for the input XML document. This is the XML that you want transformed. Under the default configuration, the next thing you will see is shown in Figure 34-4.
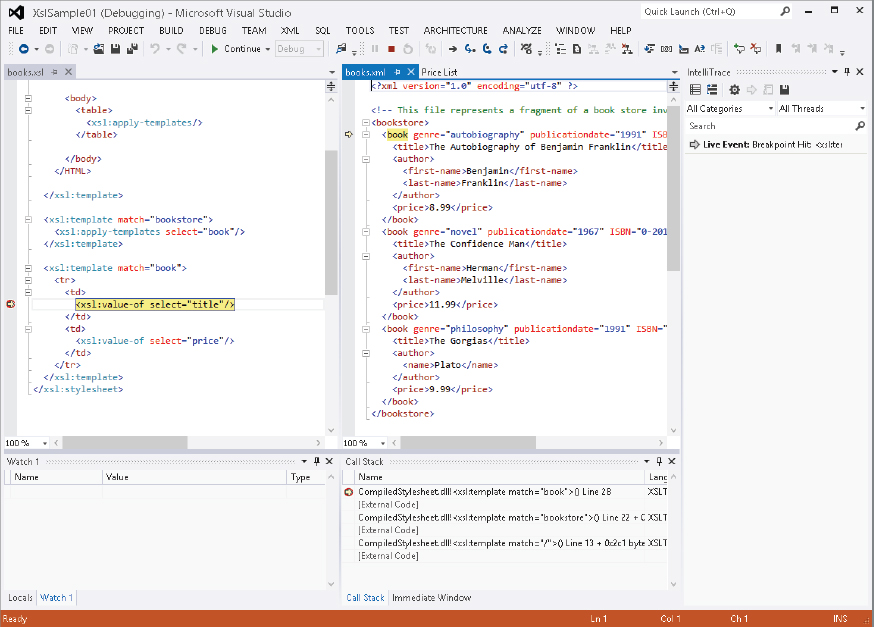
Now that the transform has been paused, you can explore almost all the same debug information you can when debugging source code. Notice that the debugger is displaying the XSLT, the input document with the current element highlighted, and the output of the transform. Now you can step through the transform line by line. If your XSLT had any scripting, you could also set breakpoints in the scripts and have the same debugging experience.
Debugging with the Application
If you want to debug a transform and the application at the same time, then you have to make one small change when you create the XslCompiledTransform object. The constructor has an overload that takes a Boolean as a parameter. This parameter is enableDebug. The default is false, which means that even if you have a breakpoint set in the transform, if you run the application code that calls the transform, it will not break. If you set the parameter to true, the debug information for the XSLT is generated and the breakpoint will be hit. Therefore, in the previous example, the line of code that created the XslCompiledTransform would change to this:
XslCompiledTransform trans = new XslCompiledTransform(true);Now when the application is run in debug mode, even the XSLT will have debug information and you again have the full Visual Studio debugging experience in your stylesheets.
To summarize, the key thing to keep in mind when performing transforms is to remember to use the proper XML data store. Use XPathDocument if you do not need editing capabilities, XmlDataDocument if you are getting your data from ADO.NET, and XmlDocument if you need to be able to edit the data. In each case, you are dealing with the same process.
XML AND ADO.NET
XML is the glue that binds ADO.NET to the rest of the world. ADO.NET was designed from the ground up to work within the XML environment. XML is used to transfer the data to and from the data store and the application or web page. Because ADO.NET uses XML as the transport in remoting scenarios, data can be exchanged with applications and systems that are not even aware of ADO.NET. Because of the importance of XML in ADO.NET, some powerful features in ADO.NET allow the reading and writing of XML documents. The System.Xml namespace also contains classes that can consume or utilize ADO.NET relational data.
The database used for the examples is from the AdventureWorksLT sample application. The sample database can be downloaded from codeplex.com/SqlServerSamples. Note that there are several versions of the AdventureWorks database. Most will work, but the LT version is simplified and more than adequate for the purposes of this chapter.
Converting ADO.NET Data to XML
The first example uses ADO.NET, streams, and XML to pull some data from the database into a DataSet, load an XmlDocument object with the XML from the DataSet, and load the XML into a text box. To run the next few examples, you need to add the following using statements:
using System.Data;
using System.Xml;
using System.Data.SqlClient;
using System.IO;
The connection string is defined as a module-level variable:
string _connectString = "Server=.SQLExpress;
                            Database=adventureworkslt;Trusted_Connection=Yes";
The ADO.NET samples have a DataGrid object added to the forms. This enables you to see the data in the ADO.NET DataSet because it is bound to the grid, as well as the data from the generated XML documents that you load in the text box. The code for the first example follows. The first step in the examples is to create the standard ADO.NET objects to produce a DataSet object. After the data set has been created, it is bound to the grid (frmADOXML.cs):
private void button1_Click(object sender, EventArgs e)
{
  XmlDocument doc = new XmlDocument();
  DataSet ds = new DataSet("XMLProducts");
  SqlConnection conn = new SqlConnection(_connectString);
  SqlDataAdapter da = new SqlDataAdapter
                     ("SELECT Name, StandardCost FROM SalesLT.Product", conn);
  //fill the dataset
  da.Fill(ds, "Products");
  //load data into grid
  dataGridView1.DataSource = ds.Tables["Products"];
After you create the ADO.NET objects and bind to the grid, you instantiate a MemoryStream object, a StreamReader object, and a StreamWriter object. The StreamReader and StreamWriter objects will use the MemoryStream to move the XML around:
   MemoryStream memStrm=new MemoryStream();
   StreamReader strmRead=new StreamReader(memStrm);
   StreamWriter strmWrite=new StreamWriter(memStrm);
You use a MemoryStream so that you don’t have to write anything to disk; however, you could have used any object that was based on the Stream class, such as FileStream.
This next step is where the XML is generated. You call the WriteXml method from the DataSet class. This method generates an XML document. WriteXml has two overloads: one takes a string with the file path and name, and the other adds a mode parameter. This mode is an enumeration, with the following possible values:
- IgnoreSchema
- WriteSchema
- DiffGram
IgnoreSchema is used if you do not want WriteXml to write an inline schema at the start of your XML file; use the WriteSchema parameter if you do want one. A DiffGram shows the data before and after an edit in a DataSet.
//write the xml from the dataset to the memory stream
  ds.WriteXml(strmWrite, XmlWriteMode.IgnoreSchema);
  memStrm.Seek(0, SeekOrigin.Begin);
  //read from the memory stream to a XmlDocument object
  doc.Load(strmRead);
  //get all of the products elements
  XmlNodeList nodeLst = doc.SelectNodes("//XMLProducts/Products");
  textBox1.Text = "";

  foreach (XmlNode node in nodeLst)
  {
    textBox1.Text += node.InnerXml + "
";
  }
Figure 34-5 shows the data in the list as well as the bound data grid.

Had you wanted only the schema, you could have called WriteXmlSchema instead of WriteXml. This method has four overloads. One takes a string, which is the path and filename of the location to which the XML document is written. The second overload uses an object that is based on the XmlWriter class. The third overload uses an object based on the TextWriter class. The fourth overload is derived from the Stream class.
In addition, if you wanted to persist the XML document to disk, you would have used something like this:
string file = "c:	estproduct.xml";
ds.WriteXml(file);
This would give you a well-formed XML document on disk that could be read in by another stream or by a DataSet or used by another application or website. Because no XmlMode parameter is specified, this XmlDocument would include the schema. In this example, you use the stream as a parameter to the XmlDocument.Load method.
You now have two views of the data, but more important, you can manipulate the data using two different models. You can use the System.Data namespace to use the data, or you can use the System.Xml namespace on the data. This enables very flexible designs in your applications, because now you are not tied to programming with just one object model. This is the real power of the ADO.NET and System.Xml combination. You have multiple views of the same data and multiple ways to access the data.
The following example simplifies the process by eliminating the three streams and using some of the ADO capabilities built into the System.Xml namespace. You need to change the module-level line of code,
private XmlDocument doc = new XmlDocument();to:
private XmlDataDocument doc;You need this because you are now using the XmlDataDocument. Here is the code:
private void button3_Click(object sender, EventArgs e)
{
  XmlDataDocument doc;
  //create a dataset
  DataSet ds = new DataSet("XMLProducts");
  //connect to the northwind database and
  //select all of the rows from products table
  SqlConnection conn = new SqlConnection(_connectString);
  SqlDataAdapter da = new SqlDataAdapter
                     ("SELECT Name, StandardCost FROM SalesLT.Product", conn);
  //fill the dataset
  da.Fill(ds, "Products");
  ds.WriteXml("sample.xml", XmlWriteMode.WriteSchema);
  //load data into grid
  dataGridView1.DataSource = ds.Tables[0];
  doc = new XmlDataDocument(ds);
  //get all of the products elements
  XmlNodeList nodeLst = doc.GetElementsByTagName("Products");
  textBox1.Text = "";
  foreach (XmlNode node in nodeLst)
  {
    textBox1.Text += node.InnerXml + "
";
  }
}
As you can see, the code to load the DataSet object into the XML document has been simplified. Instead of using the XmlDocument class, you are using the XmlDataDocument class. This class was built specifically for using data with a DataSet object.
The XmlDataDocument is based on the XmlDocument class, so it has all the functionality of the XmlDocument class. One of the main differences is the overloaded constructor of XmlDataDocument. Note the line of code that instantiates XmlDataDocument (doc):
doc = new XmlDataDocument(ds);It passes in the DataSet object that you created, ds, as a parameter. This creates the XML document from the DataSet, and you do not have to use the Load method. In fact, if you instantiate a new XmlDataDocument object without passing in a DataSet as the parameter, it will contain a DataSet with the name NewDataSet that has no DataTables in the tables collection. There is also a DataSet property, which you can set after an XmlDataDocument-based object is created.
Suppose that you add the following line of code after the DataSet.Fill call:
ds.WriteXml("c: estsample.xml", XmlWriteMode.WriteSchema);In this case, the following XML file, sample.xml, is produced in the folder c: est:
<?xml version="1.0" standalone="yes"?>
<XMLProducts>
  <xs:schema id="XMLProducts" xmlns="" xmlns:xs="http://www.w3.org/2001/XMLSchema"
   xmlns:msdata="urn:schemas-microsoft-com:xml-msdata">
    <xs:element name="XMLProducts" msdata:IsDataSet="true"
     msdata:UseCurrentLocale="true">
      <xs:complexType>
        <xs:choice minOccurs="0" maxOccurs="unbounded">
          <xs:element name="Products">
            <xs:complexType>
              <xs:sequence>
                <xs:element name="Name" type="xs:string" minOccurs="0" />
                <xs:element name="StandardCost" type="xs:decimal" minOccurs="0" />
              </xs:sequence>
            </xs:complexType>
          </xs:element>
        </xs:choice>
      </xs:complexType>
    </xs:element>
  </xs:schema>
  <Products>
    <Name>HL Road Frame-Black, 58</Name>
    <StandardCost>1059.3100</StandardCost>
  </Products>
  <Products>
    <Name>HL Road Frame-Red, 58</Name>
    <StandardCost>1059.3100</StandardCost>
  </Products>
  <Products>
    <Name>Sport-100 Helmet, Red</Name>
    <StandardCost>13.0863</StandardCost>
  </Products>
</XMLProducts>
Only the first couple of Products elements are shown. The actual XML file would contain all the products in the Products table of the Northwind database.
Converting Relational Data
That looks simple enough for a single table, but what about relational data, such as multiple DataTables and Relations in the DataSet? It all still works the same way. Here is an example using two related tables (code file frmADOXML.cs):
private void button5_Click(object sender, EventArgs e)
{
  XmlDocument doc = new XmlDocument();
  DataSet ds = new DataSet("XMLProducts");
  SqlConnection conn = new SqlConnection(_connectString);
  SqlDataAdapter daProduct = new SqlDataAdapter
  ("SELECT Name, StandardCost, ProductCategoryID FROM SalesLT.Product", conn);
  SqlDataAdapter daCategory = new SqlDataAdapter
        ("SELECT ProductCategoryID, Name from SalesLT.ProductCategory", conn);
  //Fill DataSet from both SqlAdapters
  daProduct.Fill(ds, "Products");
  daCategory.Fill(ds, "Categories");
  //Add the relation
  ds.Relations.Add(ds.Tables["Categories"].Columns["ProductCategoryID"],
  ds.Tables["Products"].Columns["ProductCategoryID"]);
  //Write the Xml to a file so we can look at it later
  ds.WriteXml("Products.xml", XmlWriteMode.WriteSchema);
  //load data into grid
  dataGridView1.DataSource = ds.Tables[0];
  //create the XmlDataDocument
  doc = new XmlDataDocument(ds);
  //Select the productname elements and load them in the grid
  XmlNodeList nodeLst = doc.SelectNodes("//XMLProducts/Products");
  textBox1.Text = "";
  foreach (XmlNode node in nodeLst)
  {
    textBox1.Text += node.InnerXml + "
";
  }
}
In the sample you are creating, there are two DataTables in the XMLProducts DataSet: Products and Categories. You create a new relation on the ProductCategoryID column in both tables.
By using the same WriteXml method call that you did in the previous example, you get the following XML file (code file SuppProd.xml):
<?xml version="1.0" standalone="yes"?>
<XMLProducts>
  <xs:schema id="XMLProducts" xmlns="" xmlns:xs="http://www.w3.org/2001/XMLSchema"
   xmlns:msdata="urn:schemas-microsoft-com:xml-msdata">
    <xs:element name="XMLProducts" msdata:IsDataSet="true"
     msdata:UseCurrentLocale="true">
      <xs:complexType>
        <xs:choice minOccurs="0" maxOccurs="unbounded">
          <xs:element name="Products">
            <xs:complexType>
              <xs:sequence>
                <xs:element name="Name" type="xs:string" minOccurs="0" />
                <xs:element name="StandardCost" type="xs:decimal" minOccurs="0" />
                <xs:element name="ProductCategoryID" type="xs:int" minOccurs="0" />
              </xs:sequence>
            </xs:complexType>
          </xs:element>
          <xs:element name="Categories">
            <xs:complexType>
              <xs:sequence>
                <xs:element name="ProductCategoryID" type="xs:int" minOccurs="0" />
                <xs:element name="Name" type="xs:string" minOccurs="0" />
              </xs:sequence>
            </xs:complexType>
          </xs:element>
        </xs:choice>
      </xs:complexType>
      <xs:unique name="Constraint1">
        <xs:selector xpath=".//Categories" />
        <xs:field xpath="ProductCategoryID" />
      </xs:unique>
      <xs:keyref name="Relation1" refer="Constraint1">
        <xs:selector xpath=".//Products" />
        <xs:field xpath="ProductCategoryID" />
      </xs:keyref>
    </xs:element>
  </xs:schema>
  <Products>
    <Name>HL Road Frame-Black, 58</Name>
    <StandardCost>1059.3100</StandardCost>
    <ProductCategoryID>18</ProductCategoryID>
  </Products>
  <Products>
    <Name>HL Road Frame-Red, 58</Name>
    <StandardCost>1059.3100</StandardCost>
    <ProductCategoryID>18</ProductCategoryID>
  </Products>
</XMLProducts>
The schema includes both DataTables that were in the DataSet. In addition, the data includes all the data from both tables. For the sake of brevity, only the first Products and ProductCategory records are shown here. As before, you could have saved just the schema or just the data by passing in the correct XmlWriteMode parameter.
Converting XML to ADO.NET Data
Suppose that you have an XML document that you would like to convert into an ADO.NET DataSet. You might want to do this so that you could load the XML into a database, or perhaps bind the data to a .NET data control such as a DataGrid. This way, you could actually use the XML document as your data store and eliminate the overhead of the database altogether. If your data is reasonably small, this is an attractive possibility. Here is some code to get you started:
private void button7_Click(object sender, EventArgs e)
{
   //create the DataSet
   DataSet ds = new DataSet("XMLProducts");

   //read in the xml document
   ds.ReadXml("Products.xml");

   //load data into grid
   dataGridView1.DataSource = ds.Tables[0];

   textBox1.Text = "";

   foreach (DataTable dt in ds.Tables)
   {
      textBox1.Text += dt.TableName + "
";
      foreach (DataColumn col in dt.Columns)
      {
         textBox1.Text += "	" + col.ColumnName + "-" + col.DataType.FullName +
          "
";
      }
   }
}
It’s that easy. In this example, you instantiate a new DataSet object. From there, you call the ReadXml method and you have XML in a DataTable in your DataSet. As with the WriteXml methods, ReadXml has an XmlReadMode parameter. ReadXml has a few more options in the XmlReadMode, as shown in the following table.
| VALUE | DESCRIPTION |
| Auto | Sets the XmlReadMode to the most appropriate setting. If the data is in DiffGram format, DiffGram is selected. If a schema has already been read, or an inline schema is detected, then ReadSchema is selected. If no schema has been assigned to the DataSet and none is detected inline, then IgnoreSchema is selected. |
| DiffGram | Reads in the DiffGram and applies the changes to the DataSet. |
| Fragment | Reads documents that contain XDR schema fragments, such as the type created by SQL Server. |
| IgnoreSchema | Ignores any inline schema that may be found. Reads data into the current DataSet schema. If data does not match DataSet schema, it is discarded. |
| InferSchema | Ignores any inline schema. Creates the schema based on data in the XML document. If a schema exists in the DataSet, that schema is used, and extended with additional columns and tables if needed. An exception is thrown if a column exists but is of a different data type. |
| ReadSchema | Reads the inline schema and loads the data. Will not overwrite a schema in the DataSet but will throw an exception if a table in the inline schema already exists in the DataSet. |
There is also a ReadXmlSchema method. This reads in a standalone schema and creates the tables, columns, and relations. You use this if your schema is not inline with your data. ReadXmlSchema has the same four overloads: a string with filename and pathname, a Stream-based object, a TextReader-based object, and an XmlReader-based object.
To confirm that the data tables are being created properly, you can iterate through the tables and columns and display the names in the text box, and then compare this to the database to verify that all is well. The last foreach loops perform this task. Figure 34-6 shows the output.
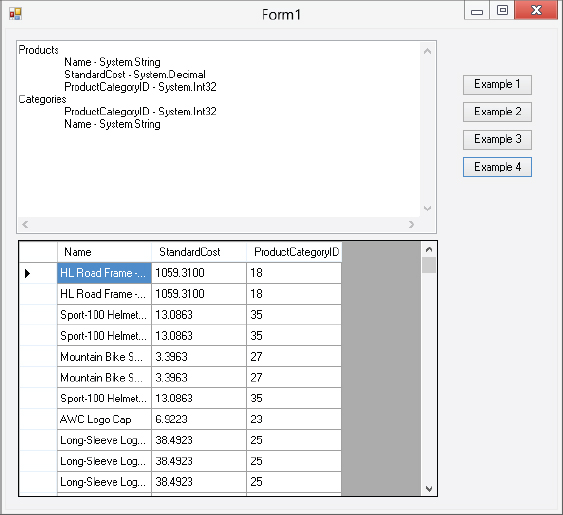
Looking at the list box, you can confirm that in the data tables that were created, all the columns have the correct names and data types.
Something else you might want to note is that, because the previous two examples did not transfer any data to or from a database, no SqlDataAdapter or SqlConnection was defined. This shows the real flexibility of both the System.Xml namespace and ADO.NET: you can look at the same data in multiple formats. Whether you need to do a transform and show the data in HTML format, or whether you need to bind the data to a grid, you can take the same data and, with just a method call, have it in the required format.
SERIALIZING OBJECTS IN XML
Serializing is the process of persisting an object to disk. Another part of your application, or even a separate application, can deserialize the object, and it will be in the same state it was in prior to serialization. The .NET Framework includes a couple of ways to do this.
This section looks at the System.Xml.Serialization namespace, which contains classes used to serialize objects into XML documents or streams. This means that an object’s public properties and public fields are converted into XML elements, attributes, or both.
The most important class in the System.Xml.Serialization namespace is XmlSerializer. To serialize an object, you first need to instantiate an XmlSerializer object, specifying the type of the object to serialize. Then you need to instantiate a stream/writer object to write the file to a stream/document. The final step is to call the Serialize method on the XMLSerializer, passing it the stream/writer object and the object to serialize.
Data that can be serialized can be primitive types, fields, arrays, and embedded XML in the form of XmlElement and XmlAttribute objects. To deserialize an object from an XML document, you reverse the process in the previous example. You create a stream/reader and an XmlSerializer object and then pass the stream/reader to the Deserialize method. This method returns the deserialized object, although it needs to be cast to the correct type.
Some of the other tasks that you can accomplish with System.Xml.Serialization classes are as follows:
- Determine whether the data should be an attribute or element
- Specify the namespace
- Change the attribute or element name
The links between your object and the XML document are the custom C# attributes that annotate your classes. These attributes are what are used to determine how the serializer writes out the data. The xsd.exe tool, which is included with the .NET Framework, can help create these attributes for you. xsd.exe can do the following:
- Generate an XML schema from an XDR schema file
- Generate an XML schema from an XML file
- Generate DataSet classes from an XSD schema file
- Generate runtime classes that have the custom attributes for XmlSerialization
- Generate an XSD file from classes that you have already developed
- Limit which elements are created in code
- Determine the programming language of the generated code (C#, Visual Basic .NET, or JScript .NET)
- Create schemas from types in compiled assemblies
See the .NET Framework documentation for details about command-line options for xsd.exe.
Despite these capabilities, you don’t have to use xsd.exe to create the classes for serialization. The process is quite simple. The following is a simple application that serializes a class. At the beginning of the example, you have very simple code that creates a new Product object, pd, and fills it with some data (code file frmSerial.cs):
private void button1_Click(object sender, EventArgs e)
{
  //new products object
  Product pd = new Product();
  //set some properties
  pd.ProductID = 200;
  pd.CategoryID = 100;
  pd.Discontinued = false;
  pd.ProductName = "Serialize Objects";
  pd.QuantityPerUnit = "6";
  pd.ReorderLevel = 1;
  pd.SupplierID = 1;
  pd.UnitPrice = 1000;
  pd.UnitsInStock = 10;
  pd.UnitsOnOrder = 0;

}
The Serialize method of the XmlSerializer class actually performs the serialization, and it has nine overloads. One of the parameters required is a stream to which the data should be written. It can be a Stream, a TextWriter, or an XmlWriter parameter. In the example, you create a TextWriter-based object, tr. Next, you create the XmlSerializer-based object, sr. The XmlSerializer needs to know type information for the object that it is serializing, so you use the typeof keyword with the type that is to be serialized. After the sr object is created, you call the Serialize method, passing in the tr (Stream-based object) and the object that you want serialized, in this case pd. Be sure to close the stream when you are finished with it:
  //new TextWriter and XmlSerializer
  TextWriter tr = new StreamWriter("serialprod.xml");
  XmlSerializer sr = new XmlSerializer(typeof(Product));
  //serialize object
  sr.Serialize(tr, pd);
  tr.Close();
  webBrowser1.Navigate(AppDomain.CurrentDomain.BaseDirectory + "serialprod.xml");
Next is the Product class, the class to be serialized. The only differences between this and any other class that you may write are the C# attributes that have been added. The XmlRootAttribute and XmlElementAttribute classes in the attributes inherit from the System.Attribute class. Don’t confuse these attributes with the attributes in an XML document. A C# attribute is simply some declarative information that can be retrieved at runtime by the CLR. In this case, the attributes describe how the object should be serialized:
//class that will be serialized.
//attributes determine how object is serialized
[System.Xml.Serialization.XmlRootAttribute()]
  public class Product {
    private int prodId;
    private string prodName;
    private int suppId;
    private int catId;
    private string qtyPerUnit;
    private Decimal unitPrice;
    private short unitsInStock;
    private short unitsOnOrder;
    private short reorderLvl;
    private bool discont;
    private int disc;
    //added the Discount attribute
    [XmlAttributeAttribute(AttributeName="Discount")]
    public int Discount {
      get {return disc;}
      set {disc=value;}
    }
    [XmlElementAttribute()]
    public int  ProductID {
      get {return prodId;}
      set {prodId=value;}
    }
    [XmlElementAttribute()]
    public string ProductName {
      get {return prodName;}
      set {prodName=value;}
    }
    [XmlElementAttribute()]
    public int SupplierID {
      get {return suppId;}
      set {suppId=value;}
    }
    [XmlElementAttribute()]
    public int CategoryID {
      get {return catId;}
      set {catId=value;}
    }
    [XmlElementAttribute()]
    public string QuantityPerUnit {
      get {return qtyPerUnit;}
      set {qtyPerUnit=value;}
    }
    [XmlElementAttribute()]
    public Decimal UnitPrice {
      get {return unitPrice;}
      set {unitPrice=value;}
    }
    [XmlElementAttribute()]
    public short UnitsInStock {
      get {return unitsInStock;}
      set {unitsInStock=value;}
    }
    [XmlElementAttribute()]
    public short UnitsOnOrder {
      get {return unitsOnOrder;}
      set {unitsOnOrder=value;}
    }
    [XmlElementAttribute()]
    public short ReorderLevel {
      get {return reorderLvl;}
      set {reorderLvl=value;}
    }
    [XmlElementAttribute()]
    public bool Discontinued {
      get {return discont;}
      set {discont=value;}
    }
    public override string ToString()
    {
      StringBuilder outText = new StringBuilder();
      outText.Append(prodId);
      outText.Append(" ");
      outText.Append(prodName);
      outText.Append(" ");
      outText.Append(unitPrice);
      return outText.ToString();
    }
  }
The XmlRootAttribute invocation in the attribute above the Products class definition identifies this class as a root element (in the XML file produced upon serialization). The attribute containing XmlElementAttribute indicates that the member below the attribute represents an XML element.
Notice that the ToString method has been overridden. This provides the string that the message box will show when you run the deserialize example.
If you look at the XML document created during serialization, you will see that it looks like any other XML document that you might have created, which is the point of the exercise:
<?xml version="1.0" encoding="utf-8"?>
<Products xmlns:xsi=http://www.w3.org/2001/XMLSchema-instance
  xmlns:xsd="http://www.w3.org/2001/XMLSchema"
  Discount="0">
  <ProductID>200</ProductID>
  <ProductName>Serialize Objects</ProductName>
  <SupplierID>1</SupplierID>
  <CategoryID>100</CategoryID>
  <QuantityPerUnit>6</QuantityPerUnit>
  <UnitPrice>1000</UnitPrice>
  <UnitsInStock>10</UnitsInStock>
  <UnitsOnOrder>0</UnitsOnOrder>
  <ReorderLevel>1</ReorderLevel>
  <Discontinued>false</Discontinued>
</Products>
There is nothing out of the ordinary here. You could use this any way that you would use an XML document — transform it and display it as HTML, load it into a DataSet using ADO.NET, load an XmlDocument with it, or, as shown in the example, deserialize it and create an object in the same state that pd was in prior to serializing it (which is exactly what you’re doing with the second button).
Next, you add another button event handler to deserialize a new Products-based object, newPd. This time you use a FileStream object to read in the XML:
private void button2_Click(object sender, EventArgs e)
    {
      //create a reference to product type
      Product newPd;
      //new filestream to open serialized object
      FileStream f = new FileStream("serialprod.xml", FileMode.Open);
Again, you create a new XmlSerializer, passing in the type information of Product. You can then make the call to the Deserialize method. Note that you still need to do an explicit cast when you create the newPd object. At this point, newPd is in exactly the same state that pd was:
//new serializer
      XmlSerializer newSr = new XmlSerializer(typeof(Product));
      //deserialize the object
      newPd = (Product)newSr.Deserialize(f);
      f.Close();
      MessageBox.Show(newPd.ToString());
    }
The message box should display the product ID, the product name, and the unit price of the object you just deserialized. This results from the ToString override that you implemented in the Product class.
What about situations in which you have derived classes and possibly properties that return an array? XmlSerializer has that covered as well. Here’s a slightly more complex example that deals with these issues.
First, you define three new classes, Product, BookProduct (derived from Product), and Inventory (which contains both of the other classes). Notice that again you have overridden the ToString method. This time you’re just going to list the items in the Inventory class:
public class BookProduct: Product
{
   private string isbnNum;
   public BookProduct() {}
   public string ISBN
   {
      get {return isbnNum;}
      set {isbnNum=value;}
   }
}

public class Inventory
{
   private Product[] stuff;
   public Inventory() {}
   //need to have an attribute entry for each data type
   [XmlArrayItem("Prod",typeof(Product)),
   XmlArrayItem("Book",typeof(BookProduct))]
   public Product[] InventoryItems
   {
      get {return stuff;}
      set {stuff=value;}
   }
   public override string ToString()
   {
     StringBuilder outText = new StringBuilder();
     foreach (Product prod in stuff)
     {
       outText.Append(prod.ProductName);
       outText.Append("
");
     }
     return outText.ToString();
   }
}
The Inventory class is the one of interest here. To serialize this class, you need to insert an attribute containing XmlArrayItem constructors for each type that can be added to the array. Note that XmlArrayItem is the name of the .NET attribute represented by the XmlArrayItemAttribute class.
The first parameter supplied to these constructors is what you would like the element name to be in the XML document that is created during serialization. If you omit the ElementName parameter, the elements will be given the same name as the object type (Product and BookProduct in this case). The second parameter that must be specified is the type of the object.
There is also an XmlArrayAttribute class that you would use if the property were returning an array of objects or primitive types. Because you are returning different types in the array, you use XmlArrayItemAttribute, which enables the higher level of control.
In the button4_Click event handler, you create a new Product object and a new BookProduct object (newProd and newBook). You add data to the various properties of each object, and add the objects to a Product array. You next create a new Inventory object and pass in the array as a parameter. You can then serialize the Inventory object to re-create it later:
private void button4_Click(object sender, EventArgs e)
{
  //create the XmlAttributes object
  XmlAttributes attrs = new XmlAttributes();
  //add the types of the objects that will be serialized
  attrs.XmlElements.Add(new XmlElementAttribute("Book", typeof(BookProduct)));
  attrs.XmlElements.Add(new XmlElementAttribute("Product", typeof(Product)));
  XmlAttributeOverrides attrOver = new XmlAttributeOverrides();
  //add to the attributes collection
  attrOver.Add(typeof(Inventory), "InventoryItems", attrs);
  //create the Product and Book objects
  Product newProd = new Product();
  BookProduct newBook = new BookProduct();
  newProd.ProductID = 100;
  newProd.ProductName = "Product Thing";
  newProd.SupplierID = 10;
  newBook.ProductID = 101;
  newBook.ProductName = "How to Use Your New Product Thing";
  newBook.SupplierID = 10;
  newBook.ISBN = "123456789";
  Product[] addProd ={ newProd, newBook };
  Inventory inv = new Inventory();
  inv.InventoryItems = addProd;
  TextWriter tr = new StreamWriter("inventory.xml");
  XmlSerializer sr = new XmlSerializer(typeof(Inventory), attrOver);
  sr.Serialize(tr, inv);
  tr.Close();
  webBrowser1.Navigate(AppDomain.CurrentDomain.BaseDirectory + "inventory.xml");
}
The XML document looks like this:
<?xml version="1.0" encoding="utf-8"?>
<Inventory xmlns:xsi="http://www.w3.org/2001/XMLSchema-instance"
 xmlns:xsd="http://www.w3.org/2001/XMLSchema">
  <Product Discount="0">
    <ProductID>100</ProductID>
    <ProductName>Product Thing</ProductName>
    <SupplierID>10</SupplierID>
    <CategoryID>0</CategoryID>
    <UnitPrice>0</UnitPrice>
    <UnitsInStock>0</UnitsInStock>
    <UnitsOnOrder>0</UnitsOnOrder>
    <ReorderLevel>0</ReorderLevel>
    <Discontinued>false</Discontinued>
  </Product>
  <Book Discount="0">
    <ProductID>101</ProductID>
    <ProductName>How to Use Your New Product Thing</ProductName>
    <SupplierID>10</SupplierID>
    <CategoryID>0</CategoryID>
    <UnitPrice>0</UnitPrice>
    <UnitsInStock>0</UnitsInStock>
    <UnitsOnOrder>0</UnitsOnOrder>
    <ReorderLevel>0</ReorderLevel>
    <Discontinued>false</Discontinued>
    <ISBN>123456789</ISBN>
  </Book>
</Inventory>
The button2_Click event handler implements deserialization of the Inventory object. Note that you iterate through the array in the newly created newInv object to show that it is the same data:
private void button2_Click(object sender, System.EventArgs e)
{
   Inventory newInv;
   FileStream f=new FileStream("order.xml",FileMode.Open);
   XmlSerializer newSr=new XmlSerializer(typeof(Inventory));
   newInv=(Inventory)newSr.Deserialize(f);
   foreach(Product prod in newInv.InventoryItems)
      listBox1.Items.Add(prod.ProductName);
   f.Close();
}
Serialization without Source Code Access
Well, this all works great, but what if you don’t have access to the source code for the types that are being serialized? You can’t add the attribute if you don’t have the source. There is another way: You can use the XmlAttributes class and the XmlAttributeOverrides class. Together these classes enable you to accomplish exactly what you just did, but without adding the attributes. This section demonstrates how this works.
For this example, imagine that the Inventory, Product, and derived BookProduct classes are in a separate DLL and that you do not have the source. The Product and BookProduct classes are the same as in the previous example, but note that now no attributes are added to the Inventory class:
public class Inventory
{
   private Product[] stuff;
   public Inventory() {}
   public Product[] InventoryItems
   {
      get {return stuff;}
      set {stuff=value;}
   }
}
Next, you deal with the serialization in the button1_Click event handler:
private void button1_Click(object sender, System.EventArgs e)
{
The first step in the serialization process is to create an XmlAttributes object and an XmlElementAttribute object for each data type that you will be overriding:
   XmlAttributes attrs=new XmlAttributes();
   attrs.XmlElements.Add(new XmlElementAttribute("Book",typeof(BookProduct)));
   attrs.XmlElements.Add(new XmlElementAttribute("Product",typeof(Product)));
Here you can see that you are adding new XmlElementAttribute objects to the XmlElements collection of the XmlAttributes class. The XmlAttributes class has properties that correspond to the attributes that can be applied; XmlArray and XmlArrayItems, which you looked at in the previous example, are just a couple of these. You now have an XmlAttributes object with two XmlElementAttribute-based objects added to the XmlElements collection.
Now you create an XmlAttributeOverrides object:
   XmlAttributeOverrides attrOver=new XmlAttributeOverrides();
   attrOver.Add(typeof(Inventory),"InventoryItems",attrs);
The Add method of this class has two overloads. The first one takes the type information of the object to override and the XmlAttributes object that you created earlier. The other overload, which is the one you are using, also takes a string value that is the member in the overridden object. In this case, you want to override the InventoryItems member in the Inventory class.
When you create the XmlSerializer object, you add the XmlAttributeOverrides object as a parameter. Now the XmlSerializer knows which types you want to override and what you need to return for those types:
//create the Product and Book objects
   Product newProd=new Product();
   BookProduct newBook=new BookProduct();
   newProd.ProductID=100;
   newProd.ProductName="Product Thing";
   newProd.SupplierID=10;
   newBook.ProductID=101;
   newBook.ProductName="How to Use Your New Product Thing";
   newBook.SupplierID=10;
   newBook.ISBN="123456789";
   Product[] addProd={newProd,newBook};

   Inventory inv=new Inventory();
   inv.InventoryItems=addProd;
   TextWriter tr=new StreamWriter("inventory.xml");
   XmlSerializer sr=new XmlSerializer(typeof(Inventory),attrOver);
   sr.Serialize(tr,inv);
   tr.Close();
}
If you execute the Serialize method, you get the following XML output:
<?xml version="1.0" encoding="utf-8"?>
<Inventory xmlns:xsi="http://www.w3.org/2001/XMLSchema-instance"
 xmlns:xsd="http://www.w3.org/2001/XMLSchema">
  <Product Discount="0">
    <ProductID>100</ProductID>
    <ProductName>Product Thing</ProductName>
    <SupplierID>10</SupplierID>
    <CategoryID>0</CategoryID>
    <UnitPrice>0</UnitPrice>
    <UnitsInStock>0</UnitsInStock>
    <UnitsOnOrder>0</UnitsOnOrder>
    <ReorderLevel>0</ReorderLevel>
    <Discontinued>false</Discontinued>
  </Product>
  <Book Discount="0">
    <ProductID>101</ProductID>
    <ProductName>How to Use Your New Product Thing</ProductName>
    <SupplierID>10</SupplierID>
    <CategoryID>0</CategoryID>
    <UnitPrice>0</UnitPrice>
    <UnitsInStock>0</UnitsInStock>
    <UnitsOnOrder>0</UnitsOnOrder>
    <ReorderLevel>0</ReorderLevel>
    <Discontinued>false</Discontinued>
    <ISBN>123456789</ISBN>
  </Book>
</Inventory>
As you can see, you get the same XML you did with the earlier example. To deserialize this object and re-create the Inventory-based object that you started out with, you need to create all the same XmlAttributes, XmlElementAttribute, and XmlAttributeOverrides objects that you created when you serialized the object. After you do that, you can read in the XML and re-create the Inventory object just as you did before. Here is the code to deserialize the Inventory object:
private void button2_Click(object sender, System.EventArgs e)
{
   //create the new XmlAttributes collection
   XmlAttributes attrs=new XmlAttributes();
   //add the type information to the elements collection
   attrs.XmlElements.Add(new XmlElementAttribute("Book",typeof(BookProduct)));
   attrs.XmlElements.Add(new XmlElementAttribute("Product",typeof(Product)));

   XmlAttributeOverrides attrOver=new XmlAttributeOverrides();
   //add to the Attributes collection
   attrOver.Add(typeof(Inventory),"InventoryItems",attrs);

   //need a new Inventory object to deserialize to
   Inventory newInv;

   //deserialize and load data into the listbox from deserialized object
   FileStream f=new FileStream("...inventory.xml",FileMode.Open);
   XmlSerializer newSr=new XmlSerializer(typeof(Inventory),attrOver);

   newInv=(Inventory)newSr.Deserialize(f);
   if(newInv!=null)
   {
      foreach(Product prod in newInv.InventoryItems)
      {
         listBox1.Items.Add(prod.ProductName);
      }
   }
   f.Close();
}
Note that the first few lines of code are identical to the code you used to serialize the object.
The System.Xml.XmlSerialization namespace provides a very powerful toolset for serializing objects to XML. By serializing and deserializing objects to XML instead of to binary format, you have the option to do something else with this XML, greatly adding to the flexibility of your designs.
LINQ TO XML AND .NET
With the introduction of LINQ to the .NET Framework, the focus was on easy access to the data that you want to use in your applications. One of the main data stores in the application space is XML, so it was a natural evolution to create the LINQ to XML implementation.
Prior to the LINQ to XML release, working with XML using System.Xml was not an easy task. With the inclusion of System.Xml.Linq, you now have a set of capabilities that make the process of working with XML in your code much easier.
Many developers previously turned to the XmlDocument object to create XML within their application code. This object enables you to create XML documents that allow you to append elements, attributes, and other items in a hierarchical fashion. With LINQ to XML and the inclusion of the System.Xml.Linq namespace, you have the tools that make the creation of XML documents a much simpler process.
WORKING WITH DIFFERENT XML OBJECTS
In addition to the LINQ querying ability included in .NET 4.5, the .NET Framework includes XML objects that work so well they can stand on their own outside of LINQ. You can use these objects in place of working directly with the DOM. The System.Xml.Linq namespace includes a series of LINQ to XML helper objects that make working with an XML document in memory much easier.
The following sections describe the objects that are available within this namespace.
XDocument
The XDocument is a replacement for the XmlDocument object from the pre-.NET 3.5 world; it is easier to work with in dealing with XML documents. The XDocument object works with the other new objects in this space, such as the XNamespace, XComment, XElement, and XAttribute objects.
One of the more important members of the XDocument object is the Load method:
XDocument xdoc = XDocument.Load(@"C:Hamlet.xml");This operation loads the Hamlet.xml contents as an in-memory XDocument object. You can also pass a TextReader or XmlReader object into the Load method. From here, you can programmatically work with the XML (code file ConsoleApplication1.sln):
XDocument xdoc = XDocument.Load(@"C:Hamlet.xml");
Console.WriteLine(xdoc.Root.Name.ToString());
Console.WriteLine(xdoc.Root.HasAttributes.ToString());
This produces the following results:
PLAY
False
Another important member to be aware of is the Save method, which, like the Load method, allows you to save to a physical disk location or to a TextWriter or XmlWriter object:
XDocument xdoc = XDocument.Load(@"C:Hamlet.xml");

xdoc.Save(@"C:CopyOfHamlet.xml");
XElement
One object that you will work with frequently is the XElement object. With XElement objects, you can easily create single-element objects that are XML documents themselves, as well as fragments of XML. For instance, here is an example of writing an XML element with a corresponding value:
XElement xe = new XElement("Company", "Lipper");
Console.WriteLine(xe.ToString());
In the creation of a XElement object, you can define the name of the element as well as the value used in the element. In this case, the name of the element will be <Company>, and the value of the <Company> element will be Lipper. Running this in a console application with a System.Xml.Linq reference produces the following result:
<Company>Lipper</Company>You can create an even more complete XML document using multiple XElement objects, as shown in the following example:
using System;
using System.Linq;
using System.Xml.Linq;

namespace ConsoleApplication1
{
    class Class1
    {
        static void Main()
        {
            XElement xe = new XElement("Company",
                new XElement("CompanyName", "Lipper"),
                new XElement("CompanyAddress",
                    new XElement("Address", "123 Main Street"),
                    new XElement("City", "St. Louis"),
                    new XElement("State", "MO"),
                    new XElement("Country", "USA")));

            Console.WriteLine(xe.ToString());

            Console.ReadLine();
        }
    }
}
Running this application produces the results shown in Figure 34-7.
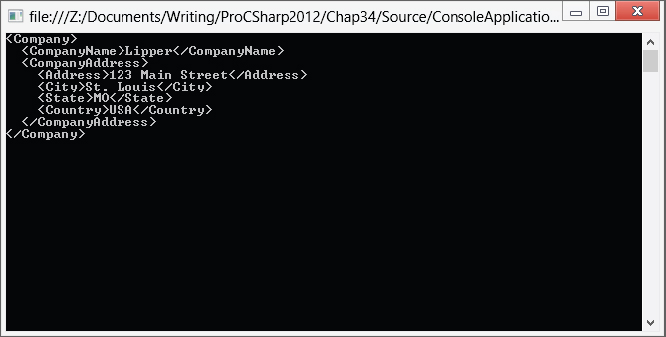
XNamespace
The XNamespace is an object that represents an XML namespace, and it is easily applied to elements within your document. For instance, you can take the previous example and easily apply a namespace to the root element:
using System;
using System.Linq;
using System.Xml.Linq;

namespace ConsoleApplication1
{
    class Class1
    {
        static void Main()
        {
            XNamespace ns = "http://www.lipperweb.com/ns/1";

            XElement xe = new XElement(ns + "Company",
                new XElement("CompanyName", "Lipper"),
                new XElement("CompanyAddress",
                    new XElement("Address", "123 Main Street"),
                    new XElement("City", "St. Louis"),
                    new XElement("State", "MO"),
                    new XElement("Country", "USA")));

            Console.WriteLine(xe.ToString());

            Console.ReadLine();
        }
    }
}
In this case, an XNamespace object is created by assigning it a value of http://www.lipperweb.com/ns/1. From there, it is actually used in the root element <Company> with the instantiation of the XElement object:
XElement xe = new XElement(ns + "Company", // .This produces the results shown in Figure 34-8.

In addition to dealing with only the root element, you can also apply namespaces to all your elements, as shown in the following example:
using System;
using System.Linq;
using System.Xml.Linq;

namespace ConsoleApplication1
{
    class Class1
    {
        static void Main()
        {
            XNamespace ns1 = "http://www.lipperweb.com/ns/root";
            XNamespace ns2 = "http://www.lipperweb.com/ns/sub";

            XElement xe = new XElement(ns1 + "Company",
                new XElement(ns2 + "CompanyName", "Lipper"),
                new XElement(ns2 + "CompanyAddress",
                    new XElement(ns2 + "Address", "123 Main Street"),
                    new XElement(ns2 + "City", "St. Louis"),
                    new XElement(ns2 + "State", "MO"),
                    new XElement(ns2 + "Country", "USA")));

            Console.WriteLine(xe.ToString());

            Console.ReadLine();
        }
    }
}
This produces the results shown in Figure 34-9.

In this case, you can see that the subnamespace was applied to everything you specified except for the <Address>, <City>, <State>, and the <Country> elements because they inherit from their parent, <CompanyAddress>, which has the namespace declaration.
XComment
The XComment object enables you to easily add XML comments to your XML documents. The following example shows the addition of a comment to the top of the document:
using System;
using System.Linq;
using System.Xml.Linq;

namespace ConsoleApplication1
{
    class Class1
    {
        static void Main(string[] args)
        {
            XDocument xdoc = new XDocument();

            XComment xc = new XComment("Here is a comment.");
            xdoc.Add(xc);

            XElement xe = new XElement("Company",
                new XElement("CompanyName", "Lipper"),
                new XElement("CompanyAddress",
                    new XComment("Here is another comment."),
                    new XElement("Address", "123 Main Street"),
                    new XElement("City", "St. Louis"),
                    new XElement("State", "MO"),
                    new XElement("Country", "USA")));
            xdoc.Add(xe);

            Console.WriteLine(xdoc.ToString());

            Console.ReadLine();
        }
    }
}
Here, an XDocument object that contains two XML comments is written to the console, one at the top of the document and another within the <CompanyAddress> element. The output of this is presented in Figure 34-10.

XAttribute
In addition to elements, another important factor of XML is attributes. Adding and working with attributes is done through the use of the XAttribute object. The following example shows the addition of an attribute to the root <Company> node:
using System;
using System.Linq;
using System.Xml.Linq;

namespace ConsoleApplication1
{
    class Class1
    {
        static void Main()
        {
            XElement xe = new XElement("Company",
                new XAttribute("MyAttribute", "MyAttributeValue"),
                new XElement("CompanyName", "Lipper"),
                new XElement("CompanyAddress",
                    new XElement("Address", "123 Main Street"),
                    new XElement("City", "St. Louis"),
                    new XElement("State", "MO"),
                    new XElement("Country", "USA")));

            Console.WriteLine(xe.ToString());

            Console.ReadLine();
        }
    }
}
Here, the attribute MyAttribute with a value of MyAttributeValue is added to the root element of the XML document, producing the results shown in Figure 34-11.

USING LINQ TO QUERY XML DOCUMENTS
Now that you can get your XML documents into an XDocument object and work with the various parts of this document, you can also use LINQ to XML to query your XML documents and work with the results.
Querying Static XML Documents
You will notice that querying a static XML document using LINQ to XML takes almost no work at all. The following example makes use of the hamlet.xml file and queries to get all the players (actors) who appear in the play. Each of these players is defined in the XML document with the <PERSONA> element:
using System;
using System.Linq;
using System.Xml.Linq;

namespace ConsoleApplication1
{
    class Class1
    {
        static void Main(string[] args)
        {
            XDocument xdoc = XDocument.Load(@"C:hamlet.xml");

            var query = from people in xdoc.Descendants("PERSONA")
                        select people.Value;

            Console.WriteLine("{0} Players Found", query.Count());
            Console.WriteLine();

            foreach (var item in query)
            {
                Console.WriteLine(item);
            }

            Console.ReadLine();
        }
    }
}
In this case, an XDocument object loads up a physical XML file (hamlet.xml) and then performs a LINQ query over the contents of the document:
var query = from people in xdoc.Descendants("PERSONA")
            select people.Value;
The people object is a representation of all the <PERSONA> elements found in the document. Then the select statement gets the values of these elements. From there, a Console.WriteLine method is used to write out a count of all the players found using query.Count. Next, each of the items is written to the screen in a foreach loop. The results you should see are presented here:
26 Players Found

CLAUDIUS, king of Denmark.
HAMLET, son to the late king, and nephew to the present king.
POLONIUS, lord chamberlain.
HORATIO, friend to Hamlet.
LAERTES, son to Polonius.
LUCIANUS, nephew to the king.
VOLTIMAND
CORNELIUS
ROSENCRANTZ
GUILDENSTERN
OSRIC
A Gentleman
A Priest.
MARCELLUS
BERNARDO
FRANCISCO, a soldier.
REYNALDO, servant to Polonius.
Players.
Two Clowns, grave-diggers.
FORTINBRAS, prince of Norway.
A Captain.
English Ambassadors.
GERTRUDE, queen of Denmark, and mother to Hamlet.
OPHELIA, daughter to Polonius.
Lords, Ladies, Officers, Soldiers, Sailors, Messengers, and other Attendants.
Ghost of Hamlet's Father.
Querying Dynamic XML Documents
A lot of dynamic XML documents are available online these days. You will find blog feeds, podcast feeds, and more that provide an XML document by sending a request to a specific URL endpoint. These feeds can be viewed either in the browser, through an RSS-aggregator, or as pure XML. This example demonstrates how to work with an RSS feed directly from your code:
using System;
using System.Linq;
using System.Xml.Linq;

namespace ConsoleApplication1
{
    class Class1
    {
        static void Main()
        {
            XDocument xdoc =
               XDocument.Load(@"http://geekswithblogs.net/evjen/Rss.aspx");

            var query = from rssFeed in xdoc.Descendants("channel")
                        select new
                        {
                          Title = rssFeed.Element("title").Value,
                          Description = rssFeed.Element("description").Value,
                          Link = rssFeed.Element("link").Value,
                        };

            foreach (var item in query)
            {
               Console.WriteLine("TITLE: " + item.Title);
                Console.WriteLine("DESCRIPTION: " + item.Description);
                Console.WriteLine("LINK: " + item.Link);
            }

            Console.WriteLine();

            var queryPosts = from myPosts in xdoc.Descendants("item")
                             select new
                             {
                                Title = myPosts.Element("title").Value,
                                Published =
                                   DateTime.Parse(
                                     myPosts.Element("pubDate").Value),
                                Description =
                                   myPosts.Element("description").Value,
                                Url = myPosts.Element("link").Value,
                                Comments = myPosts.Element("comments").Value
                             };

            foreach (var item in queryPosts)
            {
                Console.WriteLine(item.Title);
            }

            Console.ReadLine();
        }
    }
}
Here, you can see that the Load method of the XDocument object points to a URL where the XML is retrieved. The first query pulls out all the main sub-elements of the <channel> element in the feed and creates new objects called Title, Description, and Link to get the values of these sub-elements. From there, a foreach statement is run to iterate through all the items found in the query.
The results are as follows:
TITLE: Bill Evjen's Blog
DESCRIPTION: Code, Life and Community
LINK: http://geekswithblogs.net/evjen/Default.aspx
The second query works through all the <item> elements and the various sub-elements it finds (these are all the blog entries found in the blog). Although a lot of the items found are rolled up into properties, in the foreach loop, only the Title property is used. You will see something similar to the following results from this query:
AJAX Control Toolkit Controls Grayed Out-HOW TO FIX
Welcome .NET 4.5!
Visual Studio
IIS 7.0 Rocks the House!
Word Issue-Couldn't Select Text
Microsoft Releases XML Schema Designer CTP1
Silverlight Book
Microsoft Tafiti as a beta
ReSharper on Visual Studio
Windows Vista Updates for Performance and Reliability Issues
First Review of Professional XML
Go to MIX07 for free!
Microsoft Surface and the Future of Home Computing?
Alas my friends-I'm *not* TechEd bound
MORE QUERY TECHNIQUES FOR XML DOCUMENTS
If you have been working with the XML document hamlet.xml, you will notice that it is quite large. So far, you’ve seen a couple of ways to query into the XML document in this chapter; this section takes a look at reading and writing to the XML document.
Reading from an XML Document
Earlier you saw just how easy it is to query into an XML document using the LINQ query statements, as shown here:
var query = from people in xdoc.Descendants("PERSONA")
            select people.Value;
This query returns all the players found in the document. Using the Element method of the XDocument object, you can also access specific values of the XML document that you are working with. For instance, the following XML fragment shows you how the title is represented in the hamlet.xml document:
<?xml version="1.0"?>

<PLAY>
   <TITLE>The Tragedy of Hamlet, Prince of Denmark</TITLE>

   <!-XML removed for clarity->

</PLAY>
As you can see, the <TITLE> element is a nested element of the <PLAY> element. You can easily get the title by using the following bit of code in your console application:
XDocument xdoc = XDocument.Load(@"C:hamlet.xml");

Console.WriteLine(xdoc.Element("PLAY").Element("TITLE").Value);
This bit of code will output the title, The Tragedy of Hamlet, Prince of Denmark, to the console screen. In the code, you were able to work down the hierarchy of the XML document by using two Element method calls — first calling the <PLAY> element and then the <TITLE> element found nested within the <PLAY> element.
Looking again at the hamlet.xml document, you will see a large list of players who are defined with the use of the <PERSONA> element:
<?xml version="1.0"?>

<PLAY>
   <TITLE>The Tragedy of Hamlet, Prince of Denmark</TITLE>

   <!-–XML removed for clarity-–>

   <PERSONAE>
      <TITLE>Dramatis Personae</TITLE>

      <PERSONA>CLAUDIUS, king of Denmark.</PERSONA>
      <PERSONA>HAMLET, son to the late king,
       and nephew to the present king.</PERSONA>
      <PERSONA>POLONIUS, lord chamberlain.</PERSONA>
      <PERSONA>HORATIO, friend to Hamlet.</PERSONA>
      <PERSONA>LAERTES, son to Polonius.</PERSONA>
      <PERSONA>LUCIANUS, nephew to the king.</PERSONA>

      <!-–XML removed for clarity-–>

   </PERSONAE>

</PLAY>
Now look at this C# query:
XDocument xdoc = XDocument.Load(@"C:hamlet.xml");

Console.WriteLine(
   xdoc.Element("PLAY").Element("PERSONAE").Element("PERSONA").Value);
This bit of code starts at <PLAY>, works down to the <PERSONAE> element, and then makes use of the <PERSONA> element. However, using this produces the following results:
CLAUDIUS, king of DenmarkThe reason for this is that although there is a collection of <PERSONA> elements, you are dealing only with the first one that is encountered using the Element().Value call.
Writing to an XML Document
In addition to reading from an XML document, you can write to the document just as easily. For instance, if you wanted to change the name of the first player of the Hamlet play file, you could use the following code:
using System;
using System.Linq;
using System.Xml.Linq;

namespace ConsoleApplication1
{
    class Class1
    {
        static void Main()
        {
            XDocument xdoc = XDocument.Load(@"C:hamlet.xml");

            xdoc.Element("PLAY").Element("PERSONAE").
               Element("PERSONA").SetValue("Bill Evjen, king of Denmark");

            Console.WriteLine(xdoc.Element("PLAY").
               Element("PERSONAE").Element("PERSONA").Value);

            Console.ReadLine();
        }
    }
}
In this case, the first instance of the <PERSONA> element is overwritten with the value of Bill Evjen, king of Denmark using the SetValue method of the Element object. After the SetValue is called and the value is applied to the XML document, the value is then retrieved using the same approach as before. When you run this bit of code, you can indeed see that the value of the first <PERSONA> element has been changed.
Another way to change the document, by adding items to it in this example, is to create the elements you want as XElement objects and then add them to the document:
using System;
using System.Linq;
using System.Xml.Linq;

namespace ConsoleApplication1
{
    class Class1
    {
        static void Main()
        {
            XDocument xdoc = XDocument.Load(@"C:hamlet.xml");

            XElement xe = new XElement("PERSONA",
               "Bill Evjen, king of Denmark");

            xdoc.Element("PLAY").Element("PERSONAE").Add(xe);

            var query = from people in xdoc.Descendants("PERSONA")
                        select people.Value;

            Console.WriteLine("{0} Players Found", query.Count());
            Console.WriteLine();

            foreach (var item in query)
            {
                Console.WriteLine(item);
            }

            Console.ReadLine();
        }
    }
}
In this case, an XElement document is created called xe. The construction of xe will produce the following XML output:
<PERSONA>Bill Evjen, king of Denmark</PERSONA>Then using the Element().Add method from the XDocument object, you are able to add the created element:
xdoc.Element("PLAY").Element("PERSONAE").Add(xe);Now when you query all the players, you will find that instead of 26 as before, you now have 27, with the new one at the bottom of the list. In addition to Add, you can also use AddFirst, which does just that — adds it to the beginning of the list instead of the end (which is the default).
SUMMARY
This chapter explored many aspects of the System.Xml namespace of the .NET Framework. You looked at how to read and write XML documents using the very fast XmlReader- and XmlWriter-based classes. You saw how the DOM is implemented in .NET and how to use the power of DOM, and you saw that XML and ADO.NET are indeed very closely related. A DataSet and an XML document are just two different views of the same underlying architecture. In addition, you visited XPath, XSL transforms, and the debugging features added to Visual Studio. Finally, you serialized objects to XML and were able to bring them back with just a couple of method calls.
XML will be an important part of your application development for years to come. The .NET Framework has made available a very rich and powerful toolset for working with XML.
This chapter also focused on using LINQ to XML and some of the options available to you in reading and writing from XML files and XML sources, whether the source is static or dynamic.
Using LINQ to XML, you can have a strongly typed set of operations for performing CRUD operations against your XML files and sources. However, you can still use your XmlReader and XmlWriter code along with the LINQ to XML capabilities.
This chapter also introduced the LINQ to XML helper objects XDocument, XElement, XNamespace, XAttribute, and XComment. You will find these to be outstanding objects that make working with XML easier than ever before.