
Chapter 32
Core ADO.NET
WHAT’S IN THIS CHAPTER?
- Connecting to the database
- Executing commands
- Calling stored procedures
- The ADO.NET object model
- Using XML and XML schemas
WROX.COM CODE DOWNLOADS FOR THIS CHAPTER
The wrox.com code downloads for this chapter are found at http://www.wrox.com/remtitle.cgi?isbn=1118314425 on the Download Code tab. The code for this chapter is divided into the following major examples:
- ExecutingCommands
- StoredProcs
- DataReader
- IndexerTesting
- AsyncDataReaders
- SimpleDataset
- ManufacturedDataset
- DataAdapter
- DataAdapterUpdate
- Auditing
ADO.NET OVERVIEW
This chapter discusses how to access data from your C# programs using ADO.NET. It shows you how to use the SqlConnection and OleDbConnection classes to connect to and disconnect from the database. You learn the various command object options and see how commands can be used for each of the options presented by the Sql and OleDB classes; how to call stored procedures with command objects; and how the results of those stored procedures can be integrated into the data cached on the client.
The ADO.NET object model is significantly different from the objects available with ADO. This chapter covers the DataSet, DataTable, DataRow, and DataColumn classes as well as the relationships between tables and constraints that are part of DataSet. The class hierarchy has changed significantly since the release of the .NET Framework 2.0, and some of these changes are also described. Finally, you examine the XML framework on which ADO.NET is built.
The chapter begins with a brief tour of ADO.NET.
ADO.NET is more than just a thin veneer over an existing API. The similarity to ADO is fairly minimal — the classes and methods for accessing data are quite a bit different.
ADO (ActiveX Data Objects) is a library of COM components that has had many incarnations over the past few years. ADO consists primarily of the Connection, Command, Recordset, and Field objects. Using ADO, a connection is opened to the database and data is selected and placed into a record set consisting of fields; that data is then manipulated and updated on the database server, and the connection is closed. ADO also introduced what is termed a disconnected record set, which is used when keeping the connection open for long periods of time is not desirable.
There were several problems that ADO did not address satisfactorily, most notably the unwieldiness (in physical size) of a disconnected record set. Support for disconnected scenarios was more necessary than ever with the evolution of web-centric computing, so a fresh approach was required. Migrating to ADO.NET from ADO should not be too difficult because there are some similarities between the two. Moreover, if you are using SQL Server, there is a fantastic set of managed classes that are tuned to squeeze maximum performance out of the database. This alone should be reason enough to migrate to ADO.NET.
ADO.NET ships with three database client namespaces: one for SQL Server, another for Open Database Connectivity (ODBC) data sources, and a third for any database exposed through OLE DB. If your database of choice is not SQL Server, search online for a dedicated .NET provider, and if one cannot be found use the OLE DB route unless you have no other choice than to use ODBC. If you are using Oracle as your database, you can visit the Oracle .NET Developer site and get their .NET provider, ODP.NET, at http://www.oracle.com/technetwork/topics/dotnet/whatsnew/index.html.
Namespaces
All the examples in this chapter access data in one way or another. The namespaces in the following table expose the classes and interfaces used in .NET data access.
| NAMESPACE | BRIEF DESCRIPTION |
| System.Data | All generic data access classes |
| System.Data.Common | Classes shared (or overridden) by individual data providers |
| System.Data.EntityClient | Entity Framework classes |
| System.Data.Linq.SqlClient | LINQ to SQL provider classes |
| System.Data.Odbc | ODBC provider classes |
| System.Data.OleDb | OLE DB provider classes |
| System.Data.ProviderBase | New base classes and connection factory classes |
| System.Data.Sql | New generic interfaces and classes for SQL Server data access |
| System.Data.SqlClient | SQL Server provider classes |
| System.Data.SqlTypes | SQL Server data types |
The main classes in ADO.NET are listed in the following subsections.
Shared Classes
ADO.NET contains a number of classes that are used regardless of whether you are using the SQL Server classes or the OLE DB classes. The following table lists the classes contained in the System.Data namespace:
| CLASS | DESCRIPTION |
| DataSet | This object is designed for disconnected use and can contain a set of DataTables and relationships between these tables. |
| DataTable | A container of data that consists of one or more DataColumns and, when populated, will have one or more DataRows containing data. |
| DataRow | A number of values, akin to a row from a database table or a row from a spreadsheet. |
| DataColumn | This object contains the definition of a column, such as the name and data type. |
| DataRelation | A link between two DataTable classes within a DataSet class; used for foreign key and master/detail relationships. |
| Constraint | This class defines a rule for a DataColumn class (or set of data columns), such as unique values. |
| DataColumnMapping | Maps the name of a column from the database to the name of a column within a DataTable. |
| DataTableMapping | Maps a table name from the database to a DataTable within a DataSet. |
Database-Specific Classes
In addition to the shared classes introduced in the previous section, ADO.NET contains a number of database-specific classes. These classes implement a set of standard interfaces defined within the System.Data namespace, enabling the classes to be used in a generic manner if necessary. For example, both the SqlConnection and OleDbConnection classes derive from the DbConnection class, which implements the IDbConnection interface. The following table lists the database-specific classes:
| CLASSES | DESCRIPTION |
| SqlCommand, OleDbCommand, and ODBCCommand | Used as wrappers for SQL statements or stored procedure calls. Examples for the SqlCommand class are shown later in the chapter. |
| SqlCommandBuilder, OleDbCommandBuilder, and ODBCCommandBuilder | Used to generate SQL commands (such as INSERT, UPDATE, and DELETE statements) from a SELECT statement. |
| SqlConnection, OleDbConnection, and ODBCConnection | Used to connect to the database, this is similar to an ADO connection. Examples are shown later in the chapter. |
| SqlDataAdapter, OleDbDataAdapter, and ODBCDataAdapter | Used to hold select, insert, update, and delete commands, which are then used to populate a DataSet and update the database. Examples of the SqlDataAdapter are presented in this chapter. |
| SqlDataReader, OleDbDataReader, and ODBCDataReader | Used as a forward-only connected data reader. Some examples of the SqlDataReader are shown in this chapter. |
| SqlParameter, OleDbParameter, and ODBCParameter | Used to define a parameter to a stored procedure. Examples of how to use the SqlParameter class are shown in this chapter. |
| SqlTransaction, OleDbTransaction, and ODBCTransaction | Used for a database transaction, wrapped in an object. |
The most important feature of the ADO.NET classes is that they are designed to work in a disconnected manner, which is important in today’s highly web-centric world. It is now common practice to design a service (such as an online bookshop) to connect to a server, retrieve some data, and then work on that data on the client before reconnecting and passing the data back for processing. The disconnected nature of ADO.NET enables this type of behavior.
Classic ADO 2.1 introduced the disconnected record set, which permits data to be retrieved from a database, passed to the client for processing, and then reattached to the server. This used to be cumbersome to use because disconnected behavior was not part of the original design. The ADO.NET classes are different — in all but one case (the [provider]DataReader), they are designed for use offline from the database.
USING DATABASE CONNECTIONS
To access the database, you need to provide connection parameters, such as the machine on which the database is running and possibly your login credentials. Anyone who has worked with ADO will be familiar with the .NET connection classes: OleDbConnection and SqlConnection. Figure 32-1 shows two of the connection classes and includes the class hierarchy.

The examples in this chapter use the Northwind database, which you can find online by searching for Northwind and pubs Sample Databases for SQL Server. The following code snippet illustrates how to create, open, and close a connection to the Northwind database:
using System.Data.SqlClient;

string source = "server=(local);" +
                "integrated security=SSPI;" +
                "database=Northwind";
SqlConnection conn = new SqlConnection(source);
conn.Open();

// Do something useful

conn.Close();
The connection string should be very familiar to you if you have used ADO or OLE DB before — indeed, you should be able to cut and paste from your old code if you use the OleDb provider. In the example connection string, the parameters used are as follows (the parameters are delimited by a semicolon in the connection string):
- server=(local) — This denotes the database server to connect to. SQL Server permits a number of separate database server instances to be running on the same machine. Here, you are connecting to the default SQL Server instance. If you are using SQL Express, change the server part to server=./sqlexpress.
- integrated security=SSPI — This uses Windows Authentication to connect to the database, which is highly recommended over using a username and password within the source code.
- database=Northwind — This describes the database instance to connect to; each SQL Server process can expose several database instances.
The Northwind example opens a database connection using the defined connection string and then closes that connection. Once the connection has been opened, you can issue commands against the data source; and when you are finished, the connection can be closed.
SQL Server has another mode of authentication: It can use Windows integrated security, so that the credentials supplied at logon are passed to SQL Server. This is accomplished by removing the uid and pwd portions of the connection string and adding Integrated Security=SSPI.
In the download code available for this chapter is the file login.cs, which simplifies the examples in this chapter. It is linked to all the sample code and includes database connection information used for the examples; you can alter this to supply your own server name, user, and password as appropriate. This, by default, uses Windows integrated security; however, you can change the username and password as appropriate.
Managing Connection Strings
In the initial release of .NET, it was up to the developer to manage the database connection strings, which was often done by storing a connection string in the application configuration file or, more commonly, hard-coding it somewhere within the application itself.
Beginning with .NET 2.0, you have a predefined way to store connection strings and even use database connections in a type-agnostic manner — for example, you can write an application and then plug in various database providers, all without altering the main application.
To define a database connection string, you should use the <connectionStrings> section of the configuration file. Here, you can specify a name for the connection and the actual database connection string parameters; in addition, you can specify the provider for the connection type. Here is an example:
<configuration>
  ...
  <connectionStrings>
    <add name="Northwind"
         providerName="System.Data.SqlClient"
         connectionString="server=(local);integrated security=SSPI;database=Northwind" />
  </connectionStrings>
</configuration>
You use this same connection string in the other examples in this chapter.
Once the database connection information has been defined within the configuration file, you need to utilize it within the application. You will most likely want to create a method such as the following to retrieve a database connection based on the name of the connection:
private DbConnection GetDatabaseConnection ( string name )
{
  ConnectionStringSettings settings =
    ConfigurationManager.ConnectionStrings[name];

  DbProviderFactory factory = DbProviderFactories.GetFactory
    ( settings.ProviderName );

  DbConnection conn = factory.CreateConnection ( );
  conn.ConnectionString = settings.ConnectionString;

  return conn;
}
This code reads the named connection string section (using the ConnectionStringSettings class), and then requests a provider factory from the base DbProviderFactories class. This uses the ProviderName property, which was set to "System.Data.SqlClient" in the application configuration file. You might be wondering how this maps to the actual factory class used to generate a database connection for SQL Server — in this case, it should utilize the SqlClientFactory class from System.Data.SqlClient. You need to add a reference to the System.Configuration assembly in order to resolve the ConfigurationManager class used in the preceding code.
This may seem like a lot of unnecessary work to obtain a database connection, and indeed it is if your application is never going to run on any database other than the one for which it was designed. If, however, you use the preceding factory method and also use the generic Db* classes (such as DbConnection, DbCommand, and DbDataReader), you will future-proof the application, ensuring that any move later to another database system will be fairly simple.
Using Connections Efficiently
In general, when using scarce resources in .NET such as database connections, windows, or graphics objects, it is good practice to ensure that each resource is closed after use. Although the designers of .NET have implemented automatic garbage collection which will tidy up eventually, it is necessary to release resources as early as possible to avoid resource starvation.
This is all too apparent when writing code that accesses a database because keeping a connection open for slightly longer than necessary can affect other sessions. In extreme circumstances, not closing a connection can lock other users out of an entire set of tables, hurting application performance considerably. Closing database connections should be considered mandatory, so this section shows how to structure your code to minimize the risk of leaving a resource open. You have two main ways to ensure that database connections and the like are released after use, as described in the following sections.
Option One: try . . . catch . . . finally
The first option to ensure that resources are cleaned up is to use try...catch...finally blocks, closing any open connections within the finally block. Here is a short example:
try
{
   // Open the connection
   conn.Open();
   // Do something useful
}
catch ( SqlException ex )
{
   // Log the exception
}
finally
{
   // Ensure that the connection is freed
   conn.Close ( );
}
Within the finally block, you can release any resources you have used. The only trouble with this method is that you have to ensure that you close the connection — it is all too easy to forget to add the finally clause, so something less prone to vagaries in coding style might be worthwhile.
In addition, you might open a number of resources (for example, two database connections and a file) within a given method, so the cascade of try...catch...finally blocks can sometimes become less easy to read. There is, however, another way to guarantee resource cleanup: the using statement.
Option Two: The using Block Statement
During development of C#, the debate about how .NET uses nondeterministic destruction became very heated. In C++, as soon as an object goes out of scope, its destructor is automatically called. This was great news for designers of resource-based classes because the destructor was the ideal place to close the resource if the user had forgotten to do so. A C++ destructor is called whenever an object goes out of scope — so, for instance, if an exception were raised and not caught, all destructors would be called.
With C# and the other managed languages, there is no concept of automatic, deterministic destruction. Instead, there is the garbage collector, which disposes of resources at some point in the future. What makes this nondeterministic is that you have little say over when this process actually happens. Forgetting to close a database connection could cause all sorts of problems for a .NET executable. Luckily, help is on hand. The following code demonstrates how to use the using clause to ensure that objects that implement the IDisposable interface (see Chapter 14, “Memory Management and Pointers”) are cleared up immediately after the block exits:
string source = "server=(local);" +
                "integrated security=SSPI;" +
                "database=Northwind";

using ( SqlConnection conn = new SqlConnection ( source ) )
{
   // Open the connection
   conn.Open ( );

   // Do something useful
}
In this instance, the using clause ensures that the database connection is closed, regardless of how the block is exited.
Looking at the IL code for the Dispose method of the connection classes, you can see that all of them check the current state of the connection object; if it is open, the Close method is called. A great tool for browsing .NET assemblies is Reflector (available at http://www.reflector.net). This tool enables you to view the IL code for any .NET method and will also reverse-engineer the IL into C# source code, so you can easily see what a given method is doing.
When programming, you should use at least one of these methods, and probably both. Wherever you acquire resources, it is good practice to use the using statement; even though we all mean to write the Close statement, sometimes we forget, and in the case of mistakes the using clause does the right thing. There is no substitute for good exception handling either, so in most cases it is best to use both methods together, as in the following example:
try
{
   using (SqlConnection conn = new SqlConnection ( source ))
   {
      // Open the connection
      conn.Open ( );

      // Do something useful

      // Close it myself
      conn.Close ( );
   }
}
catch (SqlException e)
{
   // Log the exception & rethrow
    throw;
}
Note that this example called Close, which is not strictly necessary, because the using clause handles that anyway. However, you should ensure that any resources such as this are released as soon as possible — you might have more code in the rest of the block, so there is no point locking a resource unnecessarily.
In addition, if an exception is raised within the using block, the IDisposable.Dispose method will be called on the resource guarded by the using clause, which, in this example, ensures that the database connection is always closed. This produces easier-to-read code, rather than ensuring you close a connection within an exception clause. Note also that the exception is defined as a SqlException, rather than the catch-all Exception type — always try to catch as specific an exception as possible, and let all others that are not explicitly handled rise up the execution stack. You really should catch this exception only if your specific data class can handle the error and do something with it.
In conclusion, if you are writing a class that wraps a resource, whatever that resource may be, always implement the IDisposable interface to close the resource. That way, anyone coding with your class can use the using()statement and guarantee that the resource will be cleared up.
Transactions
Often, when more than one update needs to be made to the database, these updates must be performed within the scope of a transaction. It is common in code to find a transaction object being passed around to many methods that update the database; however, since the release of .NET Framework 2.0, the TransactionScope class has been available. This class, found within the System.Transactions assembly, vastly simplifies writing transactional code because you can compose several transactional methods within a transaction scope and the transaction will flow to each of these methods as necessary.
The following sequence of code initiates a transaction on a SQL Server connection:
string source = "server=(local);" +
                "integrated security=SSPI;" +
                "database=Northwind";

using (TransactionScope scope = new
   TransactionScope(TransactionScopeOption.Required))
{
    using (SqlConnection conn = new SqlConnection(source))
    {
        // Do something in SQL
        .

        // Then mark complete
        scope.Complete();
    }
}
Here, the transaction is explicitly marked as complete by using the scope.Complete method. In the absence of this call, the transaction will be rolled back so that no changes are made to the database.
When you use a transaction scope, you can choose the isolation level for commands executed within that transaction. The level determines how changes made in one database session are viewed by another. Not all database engines support all of the four levels described in the following table:
| ISOLATION LEVEL | DESCRIPTION |
| ReadCommitted | This is the default for SQL Server. This level ensures that data written by one transaction will be accessible in a second transaction only after the first transaction is committed. |
| ReadUncommitted | This permits your transaction to read data within the database, even data that has not yet been committed by another transaction. For example, if two users were accessing the same database and the first inserted some data without concluding the transaction (by means of a Commit or Rollback), the second user with an isolation level set to ReadUncommitted could read the data. |
| RepeatableRead | This level, which extends the ReadCommitted level, ensures that if the same statement is issued within the transaction, regardless of other potential updates made to the database, the same data will always be returned. This level requires extra locks to be held on the data, which could adversely affect performance. This level guarantees that for each row in the initial query, no changes can be made to that data. It does, however, permit “phantom” rows to show up — these are completely new rows that another transaction might have inserted while your transaction was running. |
| Serializable | This is the most “exclusive” transaction level, which, in effect, serializes access to data within the database. With this isolation level, phantom rows can never appear, so a SQL statement issued within a serializable transaction always retrieves the same data. The negative performance impact of a Serializable transaction should not be underestimated — if you don’t absolutely need to use this level of isolation, avoid it. |
The SQL Server default isolation level, ReadCommitted, is a good compromise between data coherence and data availability because fewer locks are required on data than in RepeatableRead or Serializable modes. However, in some situations the isolation level should be increased, and so within .NET you can begin a transaction with a level other than the default. There are no fixed rules as to which levels to pick — that comes with experience.
COMMANDS
The “Using Database Connections” section briefly touched on the idea of issuing commands against a database. A command is, in its simplest form, a string of text containing SQL statements to be issued to the database. A command could also be a stored procedure or the name of a table that will return all columns and all rows from that table (in other words, a SELECT *–style clause).
A command can be constructed by passing the SQL clause as a parameter to the constructor of the Command class, as shown in this example:
string source = "server=(local);" +
                "integrated security=SSPI;" +
                "database=Northwind";
string select = "SELECT ContactName,CompanyName FROM Customers";
SqlConnection conn = new SqlConnection(source);
conn.Open();
SqlCommand cmd = new SqlCommand(select, conn);
The <provider>Command classes have a property called CommandType, which is used to define whether the command is a SQL clause, a call to a stored procedure, or a full table statement (which simply selects all columns and rows from a given table). The following table summarizes the CommandType enumeration:
| COMMANDTYPE | EXAMPLE |
| Text (default) | String select = “SELECT ContactName FROM Customers”;SqlCommand cmd = new SqlCommand(select, conn); |
| StoredProcedure | SqlCommand cmd = new SqlCommand(“CustOrderHist”, conn);cmd.CommandType = CommandType.StoredProcedure;cmd.Parameters.AddWithValue(“@CustomerID”, “QUICK”); |
| TableDirect | OleDbCommand cmd = new OleDbCommand(“Categories”, conn); cmd.CommandType = CommandType.TableDirect; |
When executing a stored procedure, it might be necessary to pass parameters to that procedure. The previous example sets the @CustomerID parameter directly although there are other methods to set the parameter value. Note that since .NET 2.0, the AddWithValue method is included in the command parameters collection, and the Add(name, value) member was attributed as Obsolete. If you have used this original method of constructing parameters for calling a stored procedure, you will receive compiler warnings when you recompile your code. We suggest altering your code now because Microsoft will most likely remove the older method in a subsequent release of .NET.
Executing Commands
After you have defined the command, you need to execute it. There are several ways to issue the statement, depending on what, if anything, you expect to be returned from that command. The <provider>Command classes provide the following execute methods:
- ExecuteNonQuery — Executes the command but does not return any output
- ExecuteReader — Executes the command and returns a typed IDataReader
- ExecuteScalar — Executes the command and returns the value from the first column of the first row of any result set
In addition to these methods, the SqlCommand class exposes the following method:
- ExecuteXmlReader — Executes the command and returns an XmlReader object, which can be used to traverse the XML fragment returned from the database
ExecuteNonQuery()
The ExecuteNonQuery method is commonly used for UPDATE, INSERT, or DELETE statements, for which the only returned value is the number of records affected. This method can, however, return results if you call a stored procedure that has output parameters:
static void ExecuteNonQuery()
{
    string select = "UPDATE Customers " +
                    "SET ContactName = 'Bob' " +
                    "WHERE ContactName = 'Bill'";
    SqlConnection conn = new SqlConnection(GetDatabaseConnection());
    conn.Open();
    SqlCommand cmd = new SqlCommand(select, conn);
    int rowsReturned = cmd.ExecuteNonQuery();
    Console.WriteLine("{0} rows returned.", rowsReturned);
    conn.Close();
}
ExecuteNonQuery returns the number of rows affected by the command as an int.
ExecuteReader()
The ExecuteReader method executes the command and returns a typed data reader object, depending on the provider in use. The object returned can be used to iterate through the record(s) returned, as shown in the following code:
static void ExecuteReader()
{
    string select = "SELECT ContactName,CompanyName FROM Customers";
    SqlConnection conn = new SqlConnection(GetDatabaseConnection());
    conn.Open();
    SqlCommand cmd = new SqlCommand(select, conn);
    SqlDataReader reader = cmd.ExecuteReader();
    while (reader.Read())
    {
        Console.WriteLine("Contact: {0,-20} Company: {1}",
                            reader[0], reader[1]);
    }
}
Figure 32-2 shows the output of this code.

The <provider>DataReader objects are discussed in the section entitled “Fast Data Access: The Data Reader.”
ExecuteScalar()
On many occasions it is necessary to return a single result from a SQL statement, such as the count of records in a given table or the current date/time on the server. The ExecuteScalar method can be used in such situations:
static void ExecuteScalar()
{
    string select = "SELECT COUNT(*) FROM Customers";
    SqlConnection conn = new SqlConnection(GetDatabaseConnection());
    conn.Open();
    SqlCommand cmd = new SqlCommand(select, conn);
    object o = cmd.ExecuteScalar();
    Console.WriteLine(o);
}
The method returns an object, which you can cast to the appropriate type if required. If the SQL you are calling returns only one column, it is preferable to use ExecuteScalar over any other method of retrieving that column. That also applies to stored procedures that return a single value.
ExecuteXmlReader() (SqlClient Provider Only)
As its name implies, the ExecuteXmlReader method executes a SQL statement and returns an XmlReader object to the caller. SQL Server permits a SQL SELECT statement to be extended with a FOR XML clause. This clause can include one of three options:
- FOR XML AUTO — Builds a tree based on the tables in the FROM clause
- FOR XML RAW — Maps result set rows to elements with columns mapped to attributes
- FOR XML EXPLICIT — Requires that you specify the shape of the XML tree to be returned
This example uses AUTO:
static void ExecuteXmlReader()
{
    string select = "SELECT ContactName,CompanyName " +
                    "FROM Customers FOR XML AUTO";
    SqlConnection conn = new SqlConnection(GetDatabaseConnection());
    conn.Open();
    SqlCommand cmd = new SqlCommand(select, conn);
    XmlReader xr = cmd.ExecuteXmlReader();
    xr.Read();
    string data;
    do
    {
        data = xr.ReadOuterXml();
        if (!string.IsNullOrEmpty(data))
            Console.WriteLine(data);
    } while (!string.IsNullOrEmpty(data));
    conn.Close();

}
Note that you have to import the System.Xml namespace in order to output the returned XML. This namespace and other XML capabilities of the .NET Framework are explored in more detail in Chapter 34, “Manipulating XML.” Here, you include the FOR XML AUTO clause in the SQL statement, then call the ExecuteXmlReader method. Figure 32-3 shows the output of this code.

The SQL clause specified FROM Customers, so an element of type Customers is shown in the output. To this are added attributes, one for each column selected from the database. This builds an XML fragment for each row selected from the database.
Calling Stored Procedures
Calling a stored procedure with a command object is just a matter of defining the name of the stored procedure, adding a definition for each parameter of the procedure, and then executing the command with one of the methods presented in the previous section.
To make the examples in this section more useful, a set of stored procedures has been defined that can be used to insert, update, and delete records from the Region table in the Northwind sample database. Despite its small size, the Region table is a good candidate for an example because it can be used to define examples for each of the types of stored procedures you will commonly write.
Calling a Stored Procedure That Returns Nothing
The simplest examples of calling a stored procedure are ones that do not need to return anything to the caller. Two such procedures are defined in the following subsections: one for updating a preexisting Region record and one for deleting a given Region record.
Record Update
Updating a Region record is fairly trivial because only one column can be modified (assuming primary keys cannot be updated). The stored procedures used in this example are inserted into the database by the code, an example being the RegionUpdate procedure shown next. The stored procedures are defined as a string resource, which can be found in the Strings.resx file of the 02_StoredProcs project.
CREATE PROCEDURE RegionUpdate (@RegionID INTEGER,
                               @RegionDescription NCHAR(50)) AS
   SET NOCOUNT OFF
   UPDATE Region
      SET RegionDescription = @RegionDescription
      WHERE RegionID = @RegionID
GO
An update command on a real-world table might need to reselect and return the updated record in its entirety. This stored procedure takes two input parameters (@RegionID and @RegionDescription), and issues an UPDATE statement against the database.
To run this stored procedure from within .NET code, you need to define a SQL command and execute it:
SqlCommand cmd = new SqlCommand("RegionUpdate", conn);

cmd.CommandType = CommandType.StoredProcedure;
cmd.Parameters.AddWithValue ( "@RegionID", 23 );
cmd.Parameters.AddWithValue ( "@RegionDescription", "Something" );
This code creates a new SqlCommand object named aCommand and defines it as a stored procedure. You then add each parameter in turn using the AddWithValue method. This constructs a parameter and sets its value — you can also manually construct SqlParameter instances and add these to the Parameters collection if appropriate.
The stored procedure takes two parameters: the unique primary key of the Region record being updated and the new description to be given to this record. After the command has been created, you can execute it by issuing the following command:
cmd.ExecuteNonQuery();Because the procedure returns nothing, ExecuteNonQuery will suffice. Command parameters can be set directly, using the AddWithValue method, or by constructing SqlParameter instances. Note that the parameter collection is indexable by position or parameter name.
Record Deletion
The next stored procedure required is one that can be used to delete a Region record from the database:
CREATE PROCEDURE RegionDelete (@RegionID INTEGER) AS
   SET NOCOUNT OFF
   DELETE FROM Region
   WHERE       RegionID = @RegionID
GO
This procedure requires only the primary key value of the record. The code uses a SqlCommand object to call this stored procedure as follows:
SqlCommand cmd = new SqlCommand("RegionDelete", conn);
cmd.CommandType = CommandType.StoredProcedure;
cmd.Parameters.Add(new SqlParameter("@RegionID", SqlDbType.Int, 0,
                                         "RegionID"));
cmd.UpdatedRowSource = UpdateRowSource.None;
This command accepts only a single parameter, as shown in the following code, which executes the RegionDelete stored procedure; here, you see an example of setting the parameter by name. If you have many similar calls to make to the same stored procedure, constructing SqlParameter instances and setting the values as shown in the following code may lead to better performance than reconstructing the entire SqlCommand for each call:
cmd.Parameters["@RegionID"].Value= 999;
cmd.ExecuteNonQuery();
Calling a Stored Procedure That Returns Output Parameters
Both of the previous examples execute stored procedures that return nothing. If a stored procedure includes output parameters, they need to be defined within the .NET client so that they can be filled when the procedure returns. The following example shows how to insert a record into the database and return the primary key of that record to the caller.
The Region table consists of only a primary key (RegionID) and a description field (RegionDescription). To insert a record, this numeric primary key must be generated and then a new row needs to be inserted into the database. The primary key generation in this example has been simplified by creating a key within the stored procedure. The method used is exceedingly crude, which is why there is a section on key generation later in this chapter. For now, this primitive example will suffice:
CREATE PROCEDURE RegionInsert(@RegionDescription NCHAR(50),
                              @RegionID INTEGER OUTPUT)AS
   SET NOCOUNT OFF
   SELECT @RegionID = MAX(RegionID)+ 1
   FROM Region
   INSERT INTO Region(RegionID, RegionDescription)
   VALUES(@RegionID, @RegionDescription)
GO
The insert procedure creates a new Region record. Because the primary key value is generated by the database itself, this value is returned as an output parameter from the procedure (@RegionID). This is sufficient for this simple example; for a more complex table (especially one with default values), it is more common not to use output parameters and instead to select the entire inserted row and return this to the caller. The .NET classes can handle either scenario. The code below shows how we would call the RegionInsert stored procedure:
SqlCommand  cmd = new SqlCommand("RegionInsert", conn);
cmd.CommandType = CommandType.StoredProcedure;
cmd.Parameters.Add(new SqlParameter("@RegionDescription",
                                     SqlDbType.NChar,
                                     50,
                                     "RegionDescription"));
cmd.Parameters.Add(new SqlParameter("@RegionID",
                                     SqlDbType.Int,
                                     0,
                                     ParameterDirection.Output,
                                     false,
                                     0,
                                     0,
                                     "RegionID",
                                     DataRowVersion.Default,
                                     null));
cmd.UpdatedRowSource = UpdateRowSource.OutputParameters;
Here, the definition of the parameters is much more complex. The second parameter, @RegionID, is defined to include its parameter direction, which in this example is Output. In addition to this direction flag, on the last line of the code the UpdateRowSource enumeration is used to indicate that data will be returned from this stored procedure via output parameters. This parameter is mainly used when issuing stored procedure calls from a DataTable.
Calling this stored procedure is similar to the previous examples, except in this instance the output parameter is read after executing the procedure:
cmd.Parameters.AddWithValue("@RegionDescription","South West");
cmd.ExecuteNonQuery();
int newRegionID = (int) cmd.Parameters["@RegionID"].Value;
After executing the command, the value of the @RegionID parameter is read and cast to an integer. A shorthand version of the preceding is the ExecuteScalar method, which will return (as an object) the first value returned from the stored procedure.
You might be wondering what to do if the stored procedure you call returns output parameters and a set of rows. In that case, define the parameters as appropriate and, rather than call ExecuteNonQuery, call one of the other methods (such as ExecuteReader) that permit you to traverse any record(s) returned.
FAST DATA ACCESS: THE DATA READER
A data reader is the simplest and fastest way to select data from a data source, but it is also the least capable. You cannot directly instantiate a data reader object — an instance is returned from the appropriate database’s command object (such as SqlCommand) after having called the ExecuteReader method.
The following code demonstrates how to select data from the Customers table in the Northwind database. The example connects to the database, selects a number of records, loops through these selected records, and outputs them to the console.
This example uses the OLE DB provider, as a brief respite from the SQL provider. In most cases, the classes have a one-to-one correspondence with their SqlClient cousins; for example, the OleDbConnection object is similar to the SqlConnection object used in the previous examples.
To execute commands against an OLE DB data source, the OleDbCommand class is used. The following code shows an example of executing a simple SQL statement and reading the records by returning an OleDbDataReader object. Note the second using directive, which makes the OleDb classes available.
using System;
using System.Data.OleDb;
Most of the data providers currently available are shipped within the same assembly, so it is only necessary to reference the System.Data.dll assembly to import all classes used in this section.
The following code includes many familiar aspects of C# already covered in this chapter:
public class DataReaderExample
{
   public static void Main(string[] args)
   {
      string source = "Provider=SQLOLEDB;" +
                      "server=(local);" +
                      "integrated security=SSPI;" +
                      "database=northwind";
      string select = "SELECT ContactName,CompanyName FROM Customers";
      OleDbConnection conn = new OleDbConnection(source);
      conn.Open();
      OleDbCommand cmd = new OleDbCommand(select, conn);
      OleDbDataReader aReader = cmd.ExecuteReader();
      while(aReader.Read())
         Console.WriteLine("'{0}' from {1}",
                           aReader.GetString(0), aReader.GetString(1));
      aReader.Close();
      conn.Close();
   }
}
These three lines from the example create a new OLE DB .NET database connection, based on the source connection string:
OleDbConnection conn = new OleDbConnection(source);
conn.Open();
OleDbCommand cmd = new OleDbCommand(select, conn);
The third line in the previous code creates a new OleDbCommand object based on a particular SELECT statement and the database connection to be used when the command is executed. When you have a valid command, you need to execute it, which returns an initialized OleDbDataReader:
OleDbDataReader aReader = cmd.ExecuteReader();An OleDbDataReader is a forward-only “connected” reader. That is, you can traverse the records returned in one direction only and the database connection used is kept open until the data reader is closed.
The OleDbDataReader class cannot be instantiated directly — it is always returned by a call to the ExecuteReader method of the OleDbCommand class. Once you have an open data reader, there are various ways to access the data contained within it.
When the OleDbDataReader object is closed (via an explicit call to Close or the object being garbage collected), the underlying connection may also be closed, depending on which of the ExecuteReader methods is called. If you call ExecuteReader and pass CommandBehavior.CloseConnection, you can force the connection to be closed when the reader is closed.
The OleDbDataReader class has an indexer that permits access (although not type-safe access) to any field using the familiar array style syntax:
   object o = aReader[0];
or
   object o = aReader["CategoryID"];
Assuming that the CategoryID field was the first in the SELECT statement used to populate the reader, these two lines are functionally equivalent, although the second is slower than the first; to verify this, a test application was written that performs one million iterations of accessing the same column from an open data reader, just to get some numbers that were big enough to read. You probably don’t read the same column one million times in a tight loop, but every (micro) second counts, so you should write code that is as optimal as possible.
There is one other option when accessing data from a DataReader — you can use the type-safe GetInt32, GetDouble, or other similar methods. When the first edition of this book was written, GetInt32 was the fastest way to read an integer from an open data reader object. On a six-core AMD box, the figures are now as follows:
| ACCESS METHOD | TIME FOR 1 MILLION ITERATIONS |
| Numeric indexer – reader[0] | 23ms |
| String indexer – reader["field"] | 109ms |
| Method call – reader.GetInt32) | 177ms |
These figures are surprising. In previous versions of this code (on older framework versions), GetInt32 has always beaten the other versions hands down (by a factor of nearly 10).
In the current version, however, Microsoft has definitely made some optimizations, as now it’s the slowest of the three methods — most probably due to better JIT compilation, function inlining, and better optimizations by the x64 processor. Even if you spent a good deal of time looking at the IL code emitted in each case to see if you could spot an obvious reason for this about-face, you probably couldn’t find one.
The following example is almost the same as the previous one, except that in this instance the OLE DB provider and all references to OLE DB classes have been replaced with their SQL counterparts. The example is located in the 04_DataReaderSql project on this book’s website:
using System;
using System.Data.SqlClient;

public class DataReaderSql
{
   public static int Main(string[] args)
   {
      string source = "server=(local);" +
                      "integrated security=SSPI;" +
                      "database=northwind";
      string select = "SELECT ContactName,CompanyName FROM Customers";
      SqlConnection conn = new SqlConnection(source);
      conn.Open();
      SqlCommand cmd = new SqlCommand(select, conn);
      SqlDataReader aReader = cmd.ExecuteReader();
      while(aReader.Read())
         Console.WriteLine("'{0}' from {1}", aReader.GetString(0),
                            aReader.GetString(1));
      aReader.Close();
      conn.Close();
      return 0;
   }
}
Notice the difference? If you’re typing this, do a global replace on OleDb with Sql, change the data source string, and recompile. It’s that easy!
The same performance tests were run on the indexers for the SQL provider, and this time GetInt32 was the fastest method — the results are shown in the following table:
| ACCESS METHOD | TIME TO COMPLETE 1 MILLION ITERATIONS |
| Numeric indexer — reader[0] | 59 ms |
| String indexer — reader["field"] | 153 ms |
| Method call — reader.GetInt32) | 38 ms |
This suggests that you should use the type-safe GetXXX methods when using a SqlDataReader and the numeric indexer when using an OleDbDataReader.
ASYNCHRONOUS DATA ACCESS: USING TASK AND AWAIT
Now that you’ve seen the most performant methods for accessing individual parts of a data reader, it’s time to move on to tuning another aspect of the data access — making it asynchronous.
When accessing data you are almost always going out of process for that data, and most of the time you’ll be accessing data on another machine, so it makes sense to limit the amount of data being passed across these boundaries; and, to provide the illusion that the system is responsive, you’ll probably want to make data access asynchronous, too.
The primary way you can asynchronously request data is by using the SqlCommand (or OleDbCommand) classes, as these classes contain methods that use the Asynchronous Programming Model (APM), which exposes methods such as BeginExecuteReader and EndExecuteReader, and that use the IAsyncResult interface. These methods have been available in .NET since version 1.0, but with .NET 4.0 Microsoft added the Task class and updated the APIs for many of the inbuilt classes. Using the Task class makes accessing data asynchronously much easier than before.
To use the Task class to access data, you’ll typically write code as shown in the following example function:
public static Task<int> GetEmployeeCount()
{
    using (SqlConnection conn = new SqlConnection(GetDatabaseConnection()))
    {
        SqlCommand cmd = new SqlCommand("WAITFOR DELAY '0:0:02';select count(*) from           employees", conn);
        conn.Open();

        return cmd.ExecuteScalarAsync().ContinueWith(t => Convert.ToInt32(t.Result));
    }
}
This code creates a Task object that can then be waited upon by a caller; and, you could, for example, construct tasks that read data from different tables and execute these as separate tasks. The syntax here may seem strange at first but it shows some of the power of the Task class. After creating a SqlCommand that runs slowly (by using a 2-second delay in the SQL code), it uses ExecuteScalarAsync to call this command. This returns an object, so ContinueWith is used to convert the return value of the first task to an integer. Therefore, the code now contains two tasks: one selecting an object and the second one converting that object to an integer.
While this pattern may seem odd at first it comes into its own when using a method such as ExecuteReaderAsync which returns a SqlDataReader object, as in the continuation task you can convert this to a list of object instances constructed from the data returned from the data reader.
A fairly common use for asynchronous tasks is fork and join, which forks the flow off to a set of asynchronous tasks, and then joins back together at the end of all the tasks. In .NET, this is accomplished using the Task class. You can fork calls off to several methods, like in the preceding example, which return tasks; then join the results together by calling Task.WaitAll and passing the set of tasks to the method. The example code for this section can be found in the 06_AsyncDataReaders project on this book’s website.
var t1 = GetEmployeeCount();
var t2 = GetOrderCount();

Task.WaitAll(t1, t2);
Added to C# in .NET version 4.5 are the async and await keywords, which can be used to simplify executing tasks asynchronously. You can update the preceding example by adding the async modifier on the function declaration and adding await to the code, like this:
public async static Task<int> GetEmployeeCount()
{
    using (SqlConnection conn = new SqlConnection(GetDatabaseConnection()))
    {
        SqlCommand cmd = new SqlCommand("WAITFOR DELAY '0:0:02';select count(*) from           employees", conn);
        conn.Open();

        return await cmd.ExecuteScalarAsync().ContinueWith(t => Convert.ToInt32(t.Result));
    }
}
In the calling code you can now simply write the following in order to call the async methods:
public async static Task GetEmployeesAndOrders()
{
    int employees = await GetEmployeeCount();
    int orders = await GetOrderCount();

    Console.WriteLine("Number of employes: {0}, Number of orders: {1}", employees, orders);
}
You must indicate that this is an asynchronous method ( one that uses await) by adding the async keyword to the method declaration. Then you can call the other asynchronous methods using await; the code looks like you’re calling simple methods but the compiler is constructing all of the asynchronous coordination code for you.
Note in the preceding example that the two await calls will effectively run the two tasks after each other, so if you want to truly asynchronously call these methods, you will need to drop down a level and use the Task class directly.
MANAGING DATA AND RELATIONSHIPS: THE DATASET CLASS
The DataSet class has been designed as an offline container of data. It has no notion of database connections. In fact, the data held within a DataSet does not necessarily need to have come from a database — it could just as easily be records from a CSV file, an XML file, or points read from a measuring device.
A DataSet class consists of a set of data tables, each of which has a set of data columns and data rows (see Figure 32-4). In addition to defining the data, you can also define links between tables within the DataSet class. One common scenario is defining a parent-child relationship (commonly known as master/detail). One record in a table (say Order) links to many records in another table (say Order_Details). This relationship can be defined and navigated within the DataSet.
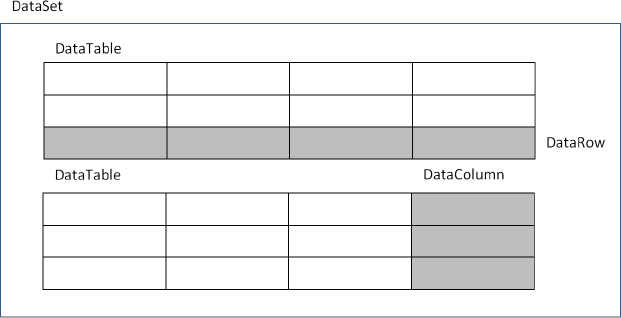
It is important to remember that, basically, the DataSet class is an in-memory database that includes all the tables, relationships, and constraints. The following sections describe the classes that are used with a DataSet class.
Data Tables
A data table is very similar to a physical database table. It consists of a set of columns with particular properties and might have zero or more rows of data. A data table might also define a primary key, which can be one or more columns, and it might contain constraints on columns. The generic term for this information used throughout the rest of the chapter is schema.
Several ways exist to define the schema for a particular data table (and indeed the DataSet class as a whole). These are discussed after introducing data columns and data rows. Figure 32-5 shows some of the objects that are accessible through the data table.
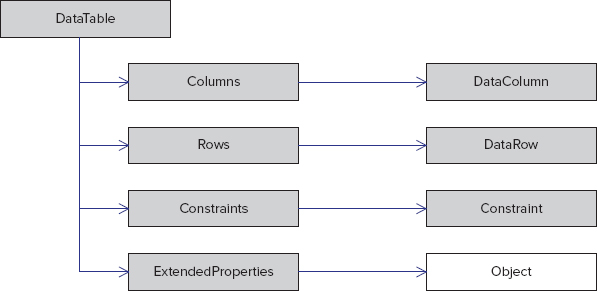
A DataTable (or DataColumn) object has an arbitrary number of extended properties associated with it. This collection can be populated with any user-defined information pertaining to the object. For example, a given column might have an input mask used to validate the contents of that column; a typical example is the U.S. Social Security number. Extended properties are especially useful when the data is constructed within a middle tier and returned to the client for processing. You could, for example, store validation criteria (such as min and max) for numeric columns in extended properties and use this in the UI tier when validating user input.
When a data table has been populated — by selecting data from a database, reading data from a file, or manually populating it within code — the Rows collection will contain this retrieved data.
The Columns collection contains DataColumn instances that have been added to this table. These define the schema of the data, such as the data type, nullability, default values, and so on. The Constraints collection can be populated with either unique or primary key constraints.
One example of when the schema information for a data table is used is when displaying that data in a DataGrid. The DataGrid control uses properties such as the data type of the column to determine which control to use for each column. A bit field within the database will be displayed as a check box within the DataGrid. If a column is defined within the database schema as NOT NULL, this fact is stored within the DataColumn so that it can be tested when the user attempts to move off a row.
Data Columns
A DataColumn object defines properties of a column within the DataTable, such as the data type of that column, whether the column is read-only, and various other facts. A column can be created in code or it can be automatically generated at runtime.
When creating a column, it is useful to give it a name; otherwise, the runtime generates a name for you in the form Columnn, where n is an incrementing number.
The data type of the column can be set either by supplying it in the constructor or by setting the DataType property. Once you have loaded data into a data table, you cannot alter the type of a column — doing so will result in an ArgumentException.
Data columns can be created to hold the following .NET Framework data types:
| Boolean | Decimal |
| Int64 | TimeSpan |
| Byte | Double |
| Sbyte | UInt16 |
| Char | Int16 |
| Single | UInt32 |
| DateTime | Int32 |
| String | UInt64 |
Once a DataColumn object is created, the next thing to do with it is set up other properties, such as the nullability of the column or the default value. The following code fragment shows a few of the more common options that can be set on a DataColumn object:
DataColumn customerID = new DataColumn("CustomerID", typeof(int));
customerID.AllowDBNull = false;
customerID.ReadOnly = false;
customerID.AutoIncrement = true;
customerID.AutoIncrementSeed = 1000;
DataColumn name = new DataColumn("Name", typeof(string));
name.AllowDBNull = false;
name.Unique = true;
The following table describes the properties that can be set on a DataColumn object:
| PROPERTY | DESCRIPTION |
| AllowDBNull | If true, permits the column to be set to DBNull |
| AutoIncrement | Indicates that the column value is automatically generated as an incrementing number |
| AutoIncrementSeed | Defines the initial seed value for an AutoIncrement column |
| AutoIncrementStep | Defines the step between automatically generated column values, with a default of one |
| Caption | Can be used for displaying the name of the column onscreen |
| ColumnMapping | Defines how a column is mapped into XML when a DataSet class is saved by calling DataSet.WriteXml |
| ColumnName | The name of the column; auto-generated by the runtime if not set in the constructor |
| DataType | Defines the System.Type value of the column |
| DefaultValue | Can define a default value for a column |
| Expression | Defines the expression to be used in a computed column |
Data Rows
This class makes up the other part of the DataTable class. The columns within a data table are defined in terms of the DataColumn class. The actual data within the table is accessed by using the DataRow object. The following example shows how to access rows within a data table. First, the connection details:
string source = "server=(local);" +
                " integrated security=SSPI;" +
                "database=northwind";
string select = "SELECT ContactName,CompanyName FROM Customers";
SqlConnection  conn = new SqlConnection(source);
The following code introduces the SqlDataAdapter class, which is used to place data into a DataSet class. SqlDataAdapter issues the SQL clause and fills a table in the DataSet class called Customers with the output of the following query. (For more details on the SqlDataAdapter class, see the section “Populating a DataSet” later in this chapter.)
SqlDataAdapter da = new SqlDataAdapter(select, conn);
DataSet ds = new DataSet();
da.Fill(ds, "Customers");
In the following code, you might notice the use of the DataRow indexer to access values from within that row. The value for a given column can be retrieved by using one of the several overloaded indexers. These permit you to retrieve a value knowing the column number, name, or DataColumn:
foreach(DataRow row in ds.Tables["Customers"].Rows)
   Console.WriteLine("'{0}' from {1}", row[0],row[1]);
One of the most appealing aspects of DataRow is that it is versioned. This enables you to receive various values for a given column in a particular row. These versions are described in the following table:
| DATAROW VERSION VALUE | DESCRIPTION |
| Current | The value existing at present within the column. If no edit has occurred, this will be the same as the original value. If an edit (or edits) has occurred, the value will be the last valid value entered. |
| Default | The default value (in other words, any default set up for the column). |
| Original | The value of the column when originally selected from the database. If the DataRow’s AcceptChanges method is called, this value will update to the Current value. |
| Proposed | When changes are in progress for a row, it is possible to retrieve this modified value. If you call BeginEdit on the row and make changes, each column will have a proposed value until either EndEdit or CancelEdit is called. |
The version of a given column could be used in many ways. One example is when updating rows within the database, in which case it is common to issue a SQL statement such as the following:
UPDATE Products
SET    Name = Column.Current
WHERE  ProductID = xxx
AND    Name = Column.Original;
Obviously, this code would never compile, but it shows one use for original and current values of a column within a row.
To retrieve a versioned value from the DataRow indexer, use one of the indexer methods that accepts a DataRowVersion value as a parameter. The following snippet shows how to obtain all values of each column in a DataTable object:
foreach (DataRow row in ds.Tables["Customers"].Rows )
{
  foreach ( DataColumn dc in ds.Tables["Customers"].Columns )
  {
    Console.WriteLine ("{0} Current  = {1}", dc.ColumnName,
                                              row[dc,DataRowVersion.Current]);
    Console.WriteLine ("    Default  = {0}", row[dc,DataRowVersion.Default]);
    Console.WriteLine ("    Original = {0}",
                       row[dc,DataRowVersion.Original]);
  }
}
The whole row has a state flag called RowState, which can be used to determine what operation is needed on the row when it is persisted back to the database. The RowState property is set to keep track of all changes made to the DataTable, such as adding new rows, deleting existing rows, and changing columns within the table. When the data is reconciled with the database, the row state flag is used to determine what SQL operations should occur. The following table provides an overview of the flags that are defined by the DataRowState enumeration:
| DATAROWSTATE VALUE | DESCRIPTION |
| Added | Indicates that the row has been newly added to a DataTable’s Rows collection. All rows created on the client are set to this value and will ultimately issue SQL INSERT statements when reconciled with the database. |
| Deleted | Indicates that the row has been marked as deleted from the DataTable by means of the DataRow.Delete method. The row still exists within the DataTable but will not normally be viewable onscreen (unless a DataView has been explicitly set up). Rows marked as deleted in the DataTable are deleted from the database when reconciled. |
| Detached | Indicates that a row is in this state immediately after it is created, and can also be returned to this state by calling DataRow.Remove. A detached row is not considered to be part of any data table, thus, no SQL for rows in this state will be issued. |
| Modified | Indicates that a row will be Modified if the value in any column has been changed. |
| Unchanged | Indicates that the row has not been changed since the last call to AcceptChanges. |
The state of the row also depends on what methods have been called on the row. The AcceptChanges method is generally called after successfully updating the data source — that is, after persisting changes to the database.
The most common way to alter data in a DataRow is to use the indexer; however, if you have a number of changes to make, you should also consider the BeginEdit and EndEdit methods.
When an alteration is made to a column within a DataRow, the ColumnChanging event is raised on the row’s DataTable. That enables you to override the ProposedValue property of the DataColumnChangeEventArgs class and change it as required. This is one way of performing some data validation on column values. If you call BeginEdit before making changes, the ColumnChanging event will not be raised, enabling you to make multiple changes and then call EndEdit to persist those changes. If you want to revert to the original values, call CancelEdit.
A DataRow can be linked in some way to other rows of data. This enables the creation of navigable links between rows, which is common in master/detail scenarios. The DataRow contains a GetChildRows method that will return an array of associated rows from another table in the same DataSet as the current row. These are discussed in the “Data Relationships” section later in this chapter.
Schema Generation
You can create the schema for a DataTable in three ways:
- Let the runtime do it for you.
- Write code to create the table(s).
- Use the XML schema generator.
The following sections describe these three alternatives.
Runtime Schema Generation
The DataRow example shown earlier presented the following code for selecting data from a database and populating a DataSet class:
SqlDataAdapter da = new SqlDataAdapter(select, conn);
DataSet ds = new DataSet();
da.Fill(ds, "Customers");
This is easy to use but has a few drawbacks. For example, you have to make do with the default column names, which might work for you; but in certain instances, you might want to rename a physical database column (for example, PKID) to something more user-friendly. To work around this, you could alias columns within your SQL clause, as in SELECT PID AS PersonID FROM PersonTable; it’s best to not rename columns within SQL, though, because a column only really needs to have a “pretty” name onscreen.
Another potential problem with automated DataTable/DataColumn generation is that you have no control over the column types that the runtime chooses for your data. It does a fairly good job of deciding the correct data type for you but, as usual, there are scenarios in which you need more control. For example, you might have defined an enumerated type for a given column to simplify user code written against your class. If you accept the default column types that the runtime generates, the column will likely be an integer with a 32-bit range, as opposed to an enum with your predefined options.
The last, and probably most problematic, drawback is that when using automated table generation, you have no type-safe access to the data within the DataTable — you are at the mercy of indexers, which return instances of object rather than derived data types. If you like sprinkling your code with typecast expressions, skip the following sections.
Hand-Coded Schema
Generating the code to create a DataTable, replete with associated DataColumns, is fairly easy. The examples in this section access the Products table, shown in Figure 32-6, from the Northwind database.
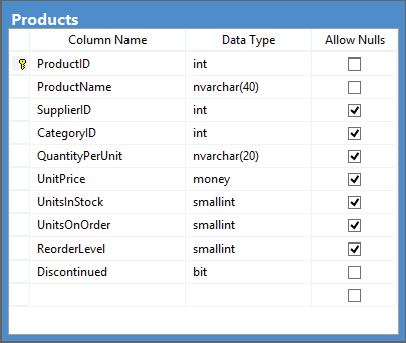
The following code manufactures a DataTable that corresponds to the schema shown in Figure 32-6 (but does not cover the nullability of columns):
public static void ManufactureProductDataTable(DataSet ds)
{
   DataTable   products = new DataTable("Products");
   products.Columns.Add(new DataColumn("ProductID", typeof(int)));
   products.Columns.Add(new DataColumn("ProductName", typeof(string)));
   products.Columns.Add(new DataColumn("SupplierID", typeof(int)));
   products.Columns.Add(new DataColumn("CategoryID", typeof(int)));
   products.Columns.Add(new DataColumn("QuantityPerUnit", typeof(string)));
   products.Columns.Add(new DataColumn("UnitPrice", typeof(decimal)));
   products.Columns.Add(new DataColumn("UnitsInStock", typeof(short)));
   products.Columns.Add(new DataColumn("UnitsOnOrder", typeof(short)));
   products.Columns.Add(new DataColumn("ReorderLevel", typeof(short)));
   products.Columns.Add(new DataColumn("Discontinued", typeof(bool)));
   ds.Tables.Add(products);
}
You can alter the code in the DataRow example to use this newly generated table definition as follows:
string source = "server=(local);" +
                "integrated security=sspi;" +
                "database=Northwind";
string select = "SELECT * FROM Products";
SqlConnection conn = new SqlConnection(source);
SqlDataAdapter cmd = new SqlDataAdapter(select, conn);
DataSet ds = new DataSet();
ManufactureProductDataTable(ds);
cmd.Fill(ds, "Products");
foreach(DataRow row in ds.Tables["Products"].Rows)
   Console.WriteLine("'{0}' from {1}", row[0], row[1]);
The ManufactureProductDataTable method creates a new DataTable, adds each column in turn, and appends the table to the list of tables within the DataSet. The DataSet has an indexer that takes the name of the table and returns that DataTable to the caller.
The previous example is still not type-safe because indexers are being used on columns to retrieve the data. What would be better is a class (or set of classes) derived from DataSet, DataTable, and DataRow that defines type-safe accessors for tables, rows, and columns. You can generate this code yourself; it is not particularly tedious and you end up with type-safe data access classes.
If you don’t like generating these type-safe classes yourself, help is at hand. The .NET Framework includes support for the third method listed at the start of this section: using XML schemas to define a DataSet class, a DataTable class, and the other classes that we have described here. (For more details on this method, see the section “XML Schemas: Generating Code with XSD” later in this chapter.)
Data Relationships
When writing an application, it is often necessary to obtain and cache various tables of information. The DataSet class is the container for this information. With regular OLE DB, it was necessary to provide a strange SQL dialect to enforce hierarchical data relationships, and the provider itself was not without its own subtle quirks.
The DataSet class, however, has been designed from the start to easily establish relationships between data tables. The code in this section shows how to generate data manually and populate two tables with data. Therefore, if you don’t have access to SQL Server or the Northwind database, you can run this example anyway:
DataSet ds = new DataSet("Relationships");
ds.Tables.Add(CreateBuildingTable());
ds.Tables.Add(CreateRoomTable());
ds.Relations.Add("Rooms",
                  ds.Tables["Building"].Columns["BuildingID"],
                  ds.Tables["Room"].Columns["BuildingID"]);
The tables used in this example are shown in Figure 32-7. They contain a primary key and a name field, with the Room table having BuildingID as a foreign key.

These tables have been kept simple deliberately. The following code shows how to iterate through the rows in the Building table and traverse the relationship to list all the child rows from the Room table:
foreach(DataRow theBuilding in ds.Tables["Building"].Rows)
{
   DataRow[] children = theBuilding.GetChildRows("Rooms");
   int roomCount = children.Length;
   Console.WriteLine("Building {0} contains {1} room{2}",
                     theBuilding["Name"],
                     roomCount,
                     roomCount > 1 ? "s": "");
   // Loop through the rooms
   foreach(DataRow theRoom in children)
      Console.WriteLine("Room: {0}", theRoom["Name"]);
}
The key difference between the DataSet class and the old-style hierarchical Recordset object is the way the relationship is presented. In a hierarchical Recordset object, the relationship was presented as a pseudo-column within the row. This column itself was a Recordset object that could be iterated through. Under ADO.NET, however, a relationship is traversed simply by calling the GetChildRows method:
DataRow[] children = theBuilding.GetChildRows("Rooms");This method has a number of forms but the preceding simple example uses just the name of the relationship to traverse between parent and child rows. It returns an array of rows that can be updated as appropriate by using the indexers, as shown in earlier examples.
What’s more interesting with data relationships is that they can be traversed both ways. Not only can you go from a parent to the child rows, but you can also find a parent row (or rows) from a child record simply by using the ParentRelations property on the DataTable class. This property returns a DataRelationCollection, which can be indexed by using the [] array syntax (for example, ParentRelations["Rooms"]); or, alternatively, the GetParentRows method can be called, as shown here:
foreach(DataRow theRoom in ds.Tables["Room"].Rows)
{
   DataRow[] parents = theRoom.GetParentRows("Rooms");
   foreach(DataRow theBuilding in parents)
      Console.WriteLine("Room {0} is contained in building {1}",
                        theRoom["Name"],
                        theBuilding["Name"]);
}
Two methods with various overrides are available for retrieving the parent row(s): GetParentRows (which returns an array of zero or more rows) and GetParentRow (which retrieves a single parent row, given a relationship).
Data Constraints
Changing the data type of columns created on the client is not the only thing for which a DataTable is well suited. ADO.NET enables you to create a set of constraints on a column (or columns), which are then used to enforce rules within the data.
The following table lists the constraint types that are currently supported by the runtime, embodied as classes in the System.Data namespace.
| CONSTRAINT | DESCRIPTION |
| ForeignKeyConstraint | Enforces a link between two DataTables within a DataSet |
| UniqueConstraint | Ensures that entries in a given column are unique |
Setting a Primary Key
As is common with a table in a relational database, you can supply a primary key, which can be based on one or more columns from the DataTable.
The following code creates a primary key for the Products table, whose schema was constructed by hand earlier. Note that a primary key on a table is just one form of constraint. When a primary key is added to a DataTable, the runtime also generates a unique constraint over the key column(s). This is because there isn’t actually a constraint type of PrimaryKey — a primary key is simply a unique constraint over one or more columns.
public static void ManufacturePrimaryKey(DataTable dt)
{
   DataColumn[] pk = new DataColumn[1];
   pk[0] = dt.Columns["ProductID"];
   dt.PrimaryKey = pk;
}
Because a primary key can contain several columns, it is typed as an array of DataColumns. A table’s primary key can be set to those columns simply by assigning an array of columns to the property.
To check the constraints for a table, you can iterate through the ConstraintCollection. For the auto-generated constraint produced by the preceding code, the name of the constraint is Constraint1. That’s not a very useful name, so to avoid this problem it is always best to create the constraint in code first, then define which column(s) make up the primary key.
The following code names the constraint before creating the primary key:
DataColumn[] pk = new DataColumn[1];
pk[0] = dt.Columns["ProductID"];
dt.Constraints.Add(new UniqueConstraint("PK_Products", pk[0]));
dt.PrimaryKey = pk;
Unique constraints can be applied to as many columns as you want.
Setting a Foreign Key
In addition to unique constraints, a DataTable class can also contain foreign key constraints. These are primarily used to enforce master/detail relationships but can also be used to replicate columns between tables if you set up the constraint correctly. A master/detail relationship is one in which there is commonly one parent record (an order, for example) and many child records (order lines), linked by the primary key of the parent record.
A foreign key constraint can operate only over tables within the same DataSet, so the following example uses the Categories table from the Northwind database (as shown in Figure 32-8), and assigns a constraint between it and the Products table.

The first step is to generate a new data table for the Categories table:
DataTable categories = new DataTable("Categories");
categories.Columns.Add(new DataColumn("CategoryID", typeof(int)));
categories.Columns.Add(new DataColumn("CategoryName", typeof(string)));
categories.Columns.Add(new DataColumn("Description", typeof(string)));
categories.Constraints.Add(new UniqueConstraint("PK_Categories",
                               categories.Columns["CategoryID"]));
categories.PrimaryKey = new DataColumn[1]
                              {categories.Columns["CategoryID"]};
The last line of this code creates the primary key for the Categories table. The primary key in this instance is a single column; however, it is possible to generate a key over multiple columns using the array syntax shown.
Now the constraint can be created between the two tables:
DataColumn parent = ds.Tables["Categories"].Columns["CategoryID"];
DataColumn child = ds.Tables["Products"].Columns["CategoryID"];
ForeignKeyConstraint fk =
   new ForeignKeyConstraint("FK_Product_CategoryID", parent, child);
fk.UpdateRule = Rule.Cascade;
fk.DeleteRule = Rule.SetNull;
ds.Tables["Products"].Constraints.Add(fk);
This constraint applies to the link between Categories.CategoryID and Products.CategoryID. There are four different ForeignKeyConstraints — use a constructor that permits you to name the constraint.
Setting Update and Delete Constraints
In addition to defining that there is some type of constraint between parent and child tables, you can define what should happen when a column in the constraint is updated.
The previous example sets the update rule and the delete rule. These rules are used when an action occurs to a column (or row) within the parent table, and the rule is used to determine what should happen to the row(s) within the child table that could be affected. Four different rules can be applied through the Rule enumeration:
- Cascade — If the parent key has been updated, it copies the new key value to all child records. If the parent record has been deleted, it also deletes the child records. This is the default option.
- None — Takes no action whatsoever. This option leaves orphaned rows within the child data table.
- SetDefault — Each child record affected has the foreign key column(s) set to its default value, if one has been defined.
- SetNull — All child rows have the key column(s) set to DBNull. (Following the naming convention that Microsoft uses, this should really be SetDBNull.)
This section has covered the main classes that make up the constituent parts of the DataSet class and has shown how to manually generate each of these classes in code. You can also define a DataTable, DataRow, DataColumn, DataRelation, and Constraint using the XML schema file(s) and the XSD tool that ships with .NET. The following section describes how to set up a simple schema and generate type-safe classes to access your data.
XML SCHEMAS: GENERATING CODE WITH XSD
XML is firmly entrenched in ADO.NET — indeed, the remoting format for passing data between objects is now XML. With the .NET runtime, it is possible to describe a DataTable class within an XML schema definition (XSD) file. What’s more, you can define an entire DataSet class, with a number of DataTable classes, and a set of relationships between these tables; and you can include various other details to fully describe the data.
When you have defined an XSD file, there is a tool in the runtime that will convert this schema to the corresponding data access class(es), such as the type-safe product DataTable class shown earlier. The following example starts with a simple XSD file (Products.xsd) that describes the same information as the Products sample discussed earlier, and then extends it to include some extra functionality:
<?xml version="1.0" encoding="utf-8" ?>
<xs:schema id="Products" targetNamespace="http://tempuri.org/XMLSchema1.xsd"
 xmlns:mstns="http://tempuri.org/XMLSchema1.xsd"
  xmlns:xs="http://www.w3.org/2001/XMLSchema"
  xmlns:msdata="urn:schemas-microsoft-com:xml-msdata">
  <xs:element name="Product">
    <xs:complexType>
      <xs:sequence>
        <xs:element name="ProductID" msdata:ReadOnly="true"
          msdata:AutoIncrement="true" type="xs:int" />
        <xs:element name="ProductName" type="xs:string" />
        <xs:element name="SupplierID" type="xs:int" minOccurs="0" />
        <xs:element name="CategoryID" type="xs:int" minOccurs="0" />
        <xs:element name="QuantityPerUnit" type="xs:string" minOccurs="0" />
        <xs:element name="UnitPrice" type="xs:decimal" minOccurs="0" />
        <xs:element name="UnitsInStock" type="xs:short" minOccurs="0" />
        <xs:element name="UnitsOnOrder" type="xs:short" minOccurs="0" />
        <xs:element name="ReorderLevel" type="xs:short" minOccurs="0" />
        <xs:element name="Discontinued" type="xs:boolean" />
      </xs:sequence>
    </xs:complexType>
  </xs:element>
</xs:schema>
These options are covered in detail in Chapter 34; for now, this file basically defines a schema with the id attribute set to Products. A complex type called Product is defined, which contains a number of elements, one for each of the fields within the Products table.
These items map to data classes as follows:
- The Products schema maps to a class derived from DataSet.
- The Product complex type maps to a class derived from DataTable.
- Each sub-element maps to a class derived from DataColumn.
- The collection of all columns maps to a class derived from DataRow.
Thankfully, a tool within the .NET Framework produces the code for these classes with the help of the input XSD file. Because its sole job is to perform various functions on XSD files, the tool itself is called XSD.EXE.
Assuming that you saved the preceding file as Product.xsd, you would convert the file into code by issuing the following command in a command prompt:
xsd Product.xsd /dThis creates the file Product.cs.
Various switches can be used with XSD to alter the output generated. Some of the more commonly used switches are described in the following table:
| SWITCH | DESCRIPTION |
| /dataset (/d) | Enables you to generate classes derived from DataSet, DataTable, and DataRow. |
| /language:<language> | Enables you to choose the language in which the output file will be written. C# is the default, but you can choose VB for a Visual Basic .NET file. |
| /namespace:<namespace> | Enables you to define the namespace that the generated code should reside within. The default is no namespace. |
The following is an abridged version of the output from XSD for the Products schema. The output has been altered slightly to fit into a format appropriate for this book. To see the complete output, run XSD.EXE on the Products schema (or another schema of your own making) and look at the .cs file generated. The example includes the entire source code plus the Product.xsd file:
//------------------------------------------------------------------------------
// <auto-generated>
//     This code was generated by a tool.
//     Runtime Version:2.0.50727.5456
//
//     Changes to this file may cause incorrect behavior and will be lost if
//     the code is regenerated.
// </auto-generated>
//------------------------------------------------------------------------------

//
// This source code was auto-generated by xsd, Version=2.0.50727.3238.
//

/// <summary>
///Represents a strongly typed in-memory cache of data.
///</summary>
[global::System.CodeDom.Compiler.GeneratedCodeAttribute("System.Data.Design.TypedDataSetGenerator", "2.0.0.0")]
[global::System.Serializable()]
[global::System.ComponentModel.DesignerCategoryAttribute("code")]
[global::System.ComponentModel.ToolboxItem(true)]
[global::System.Xml.Serialization.XmlSchemaProviderAttribute("GetTypedDataSetSchema")]
[global::System.Xml.Serialization.XmlRootAttribute("Products")]
[global::System.ComponentModel.Design.HelpKeywordAttribute("vs.data.DataSet")]
public partial class Products : global::System.Data.DataSet {

    private ProductDataTable tableProduct;

    private global::System.Data.SchemaSerializationMode _schemaSerializationMode = global::System.Data.SchemaSerializationMode.IncludeSchema;

    [global::System.Diagnostics.DebuggerNonUserCodeAttribute()]
    public Products() {
        this.BeginInit();
        this.InitClass();
        global::System.ComponentModel.CollectionChangeEventHandler schemaChangedHandler = new global::System.ComponentModel.CollectionChangeEventHandler(this.SchemaChanged);
        base.Tables.CollectionChanged += schemaChangedHandler;
        base.Relations.CollectionChanged += schemaChangedHandler;
        this.EndInit();
    }
All private and protected members have been removed in order to concentrate on the public interface. The ProductDataTable and ProductRow definitions show the positions of two nested classes, which will be implemented next. You review the code for these classes after a brief explanation of the DataSet-derived class.
The Products constructor calls a private method, InitClass, which constructs an instance of the DataTable-derived class ProductDataTable, and adds the table to the Tables collection of the DataSet class. The Products data table can be accessed by the following code:
DataSet ds = new Products();
DataTable products = ds.Tables["Products"];
Alternatively, you can simply use the property Product, available on the derived DataSet object:
DataTable products = ds.Product;Because the Product property is strongly typed, you could use ProductDataTable rather than the DataTable reference shown in the previous code.
The ProductDataTable class includes far more code (note that this is an abridged version):
[global::System.CodeDom.Compiler.GeneratedCodeAttribute("System.Data.Design.TypedDataSetGenerator", "2.0.0.0")]
[global::System.Serializable()]
[global::System.Xml.Serialization.XmlSchemaProviderAttribute("GetTypedTableSchema")]
public partial class ProductDataTable : global::System.Data.DataTable, global::System.Collections.IEnumerable {

    private global::System.Data.DataColumn columnProductID;

    private global::System.Data.DataColumn columnProductName;

    private global::System.Data.DataColumn columnSupplierID;

    private global::System.Data.DataColumn columnCategoryID;

    private global::System.Data.DataColumn columnQuantityPerUnit;

    private global::System.Data.DataColumn columnUnitPrice;

    private global::System.Data.DataColumn columnUnitsInStock;

    private global::System.Data.DataColumn columnUnitsOnOrder;

    private global::System.Data.DataColumn columnReorderLevel;

    private global::System.Data.DataColumn columnDiscontinued;

    [global::System.Diagnostics.DebuggerNonUserCodeAttribute()]
    public ProductDataTable() {
        this.TableName = "Product";
        this.BeginInit();
        this.InitClass();
        this.EndInit();
    }
The ProductDataTable class, derived from DataTable and implementing the IEnumerable interface, defines a private DataColumn instance for each of the columns within the table. These are initialized again from the constructor by calling the private InitClass member. Each column is used by the DataRow class (which is described shortly):
[global::System.Diagnostics.DebuggerNonUserCodeAttribute()]
[global::System.ComponentModel.Browsable(false)]
public int Count {
    get {
        return this.Rows.Count;
    }
}

// Other row accessors removed for clarity — there is one for each column
Adding rows to the table is handled by the two overloaded (and significantly different) AddProductRow methods. The first takes an already-constructed DataRow and returns a void. The second takes a set of values, one for each of the columns in the DataTable, constructs a new row, sets the values within this new row, adds the row to the DataTable object, and returns the row to the caller. Such widely different functions shouldn’t really have the same name!
[global::System.Diagnostics.DebuggerNonUserCodeAttribute()]
public ProductRow AddProductRow(string ProductName, int SupplierID, int CategoryID, string QuantityPerUnit, decimal UnitPrice, short UnitsInStock, short UnitsOnOrder, short ReorderLevel, bool Discontinued) {
    ProductRow rowProductRow = ((ProductRow)(this.NewRow()));
    object[] columnValuesArray = new object[] {
            null,
            ProductName,
            SupplierID,
            CategoryID,
            QuantityPerUnit,
            UnitPrice,
            UnitsInStock,
            UnitsOnOrder,
            ReorderLevel,
            Discontinued};
    rowProductRow.ItemArray = columnValuesArray;
    this.Rows.Add(rowProductRow);
    return rowProductRow;
}
Just like the InitClass member in the DataSet-derived class, which added the table to the DataSet class, the InitClass member in ProductDataTable adds columns to the DataTable class. Each column’s properties are set as appropriate, and the column is then appended to the columns collection:
[global::System.Diagnostics.DebuggerNonUserCodeAttribute()]
private void InitClass() {
    this.columnProductID = new global::System.Data.DataColumn("ProductID", typeof(int), null, global::System.Data.MappingType.Element);
    base.Columns.Add(this.columnProductID);
    this.columnProductName = new global::System.Data.DataColumn("ProductName", typeof(string), null, global::System.Data.MappingType.Element);
    base.Columns.Add(this.columnProductName);
    this.columnSupplierID = new global::System.Data.DataColumn("SupplierID", typeof(int), null, global::System.Data.MappingType.Element);
    base.Columns.Add(this.columnSupplierID);
    this.columnCategoryID = new global::System.Data.DataColumn("CategoryID", typeof(int), null, global::System.Data.MappingType.Element);
    base.Columns.Add(this.columnCategoryID);
    this.columnQuantityPerUnit = new global::System.Data.DataColumn("QuantityPerUnit", typeof(string), null, global::System.Data.MappingType.Element);
    base.Columns.Add(this.columnQuantityPerUnit);
    this.columnUnitPrice = new global::System.Data.DataColumn("UnitPrice", typeof(decimal), null, global::System.Data.MappingType.Element);
    base.Columns.Add(this.columnUnitPrice);
    this.columnUnitsInStock = new global::System.Data.DataColumn("UnitsInStock", typeof(short), null, global::System.Data.MappingType.Element);
    base.Columns.Add(this.columnUnitsInStock);
    this.columnUnitsOnOrder = new global::System.Data.DataColumn("UnitsOnOrder", typeof(short), null, global::System.Data.MappingType.Element);
    base.Columns.Add(this.columnUnitsOnOrder);
    this.columnReorderLevel = new global::System.Data.DataColumn("ReorderLevel", typeof(short), null, global::System.Data.MappingType.Element);
    base.Columns.Add(this.columnReorderLevel);
    this.columnDiscontinued = new global::System.Data.DataColumn("Discontinued", typeof(bool), null, global::System.Data.MappingType.Element);
    base.Columns.Add(this.columnDiscontinued);
    this.columnProductID.AutoIncrement = true;
    this.columnProductID.AllowDBNull = false;
    this.columnProductID.ReadOnly = true;
    this.columnProductName.AllowDBNull = false;
    this.columnDiscontinued.AllowDBNull = false;
}
NewRowFromBuilder is called internally from the DataTable class’s NewRow method. Here, it creates a new strongly typed row. The DataRowBuilder instance is created by the DataTable class, and its members are accessible only within the System.Data assembly:
[global::System.Diagnostics.DebuggerNonUserCodeAttribute()]
protected override global::System.Data.DataRow NewRowFromBuilder(global::System.Data.DataRowBuilder builder) {
    return new ProductRow(builder);
}
The last class to discuss is the ProductRow class, derived from DataRow. This class is used to provide type-safe access to all fields in the data table. It wraps the storage for a particular row, and provides members to read (and write) each of the fields in the table.
In addition, for each nullable field, there are functions to set the field to null and to check if the field is null. The following example shows the functions for the SupplierID column:
[global::System.CodeDom.Compiler.GeneratedCodeAttribute("System.Data.Design.TypedDataSetGenerator", "2.0.0.0")]
public partial class ProductRow : global::System.Data.DataRow {

    private ProductDataTable tableProduct;

    [global::System.Diagnostics.DebuggerNonUserCodeAttribute()]
    internal ProductRow(global::System.Data.DataRowBuilder rb) :
            base(rb) {
        this.tableProduct = ((ProductDataTable)(this.Table));
    }

    [global::System.Diagnostics.DebuggerNonUserCodeAttribute()]
    public int ProductID {
        get {
            return ((int)(this[this.tableProduct.ProductIDColumn]));
        }
        set {
            this[this.tableProduct.ProductIDColumn] = value;
        }
    }
The following code uses this class’s output from the XSD tool to retrieve data from the Products table and display that data to the console:
using System;
using System.Data.SqlClient;

namespace _10_XSDDataset
{
    class Program
    {
        static void Main(string[] args)
        {
            string select = "SELECT * FROM Products";

            using (SqlConnection conn = new SqlConnection(GetDatabaseConnection()))
            {
                SqlDataAdapter da = new SqlDataAdapter(select, conn);

                Products ds = new Products();

                da.Fill(ds, "Product");

                foreach (Products.ProductRow row in ds.Product)
                    Console.WriteLine("'{0}' from {1}",
                        row.ProductID,
                        row.ProductName);

                conn.Close();
            }
        }

        private static string GetDatabaseConnection()
        {
            return "server=(local);" +
                "integrated security=SSPI;" +
                "database=Northwind";
        }
    }
}
The output of the XSD file contains a class derived from DataSet called Products, which is created and then filled using the data adapter. The foreach statement uses the strongly typed ProductRow and the Product property, which returns the Product data table.
To compile the .XSD used in this example, issue the following command in a Visual Studio command prompt:
xsd product.xsd /dThis converts the .XSD to code so that it can be accessed more easily within Visual Studio.
POPULATING A DATASET
After defining the schema of your data set (replete with DataTable and DataColumn), Constraint classes, and whatever else is necessary, you need to be able to populate the DataSet class with information. You have two main methods of reading data from an external source and inserting it into the DataSet class:
- Use a data adapter
- Read XML into the DataSet class
The following sections discuss both of these methods.
Populating a DataSet Class with a Data Adapter
The section on data rows briefly introduced the SqlDataAdapter class, as shown in the following code:
string select = "SELECT ContactName,CompanyName FROM Customers";
SqlConnection conn = new SqlConnection(source);
SqlDataAdapter da = new SqlDataAdapter(select, conn);
DataSet ds = new DataSet();
da.Fill(ds, "Customers");
The bold line shows the SqlDataAdapter class in use; the other data adapter classes are again virtually identical in functionality to the SQL Server equivalent.
To retrieve data into a DataSet, it is necessary to execute a command to select that data. The command in question could be a SQL SELECT statement, a call to a stored procedure, or, for the OLE DB provider, a TableDirect command. The preceding example uses one of the constructors available on SqlDataAdapter that converts the passed SQL SELECT statement into a SqlCommand, and issues this select statement when the Fill method is called on the adapter.
The stored procedures example earlier in this chapter, defined the INSERT, UPDATE, and DELETE procedures but did not cover the SELECT procedure. That knowledge gap is covered in the next section, which also covers how to call a stored procedure from a SqlDataAdapter class to populate data in a DataSet class.
Using a Stored Procedure in a Data Adapter
The first step in this example is to define the stored procedure. The stored procedure to SELECT data is as follows:
CREATE PROCEDURE RegionSelect AS
  SET NOCOUNT OFF
  SELECT * FROM Region
GO
This stored procedure is created within the database by the InitialiseDatabase method in the code.
Next, you need to define the SqlCommand that executes this stored procedure. Again, the code is very simple, and most of it was presented presented earlier:
private static SqlCommand GenerateSelectCommand(SqlConnection conn)
{
   SqlCommand  aCommand = new SqlCommand("RegionSelect", conn);
   aCommand.CommandType = CommandType.StoredProcedure;
   aCommand.UpdatedRowSource = UpdateRowSource.None;
   return aCommand;
}
This method generates the SqlCommand that calls the RegionSelect procedure when executed. All that remains is to hook this command up to a SqlDataAdapter class and call the Fill method:
DataSet ds = new DataSet();
// Create a data adapter to fill the DataSet
SqlDataAdapter da = new SqlDataAdapter();
// Set the data adapter's select command
da.SelectCommand = GenerateSelectCommand (conn);
da.Fill(ds, "Region");
Here, the SqlDataAdapter class is created and the generated SqlCommand is assigned to the SelectCommand property of the data adapter. Subsequently, Fill is called, which executes the stored procedure and inserts all rows returned into the Region DataTable (which, in this instance, is generated by the runtime).
There is more to a data adapter than just selecting data by issuing a command, as discussed shortly in the “Persisting DataSet Changes” section.
Populating a DataSet from XML
In addition to generating the schema for a given DataSet, associated tables, and so on, a DataSet class can read and write data in native XML, such as files on a disk, a stream, or a text reader.
To load XML into a DataSet class, simply call one of the ReadXML methods to read data from a disk file, as shown in this example:
DataSet ds = new DataSet();
ds.ReadXml(".MyData.xml");
The ReadXml method attempts to load any inline schema information from the input XML. If a schema is found, the method uses this schema in the validation of any data loaded from that file. If no inline schema is found, the DataSet will extend its internal structure as data is loaded. This is similar to the behavior of Fill in the previous example, which retrieves the data and constructs a DataTable based on the data selected.
PERSISTING DATASET CHANGES
After editing data within a DataSet, it is usually necessary to persist these changes. The most common example is selecting data from a database, displaying it to the user, and returning those updates to the database.
In a less “connected” application, changes might be persisted to an XML file, transported to a middle-tier application server, and then processed to update several data sources.
You can use a DataSet class for either of these examples; it’s easy to do.
Updating with Data Adapters
In addition to the SelectCommand that a SqlDataAdapter most likely includes, you can also define an InsertCommand, UpdateCommand, and DeleteCommand. As the names imply, these objects are instances of the command object appropriate for your provider, such as SqlCommand and OleDbCommand.
With this level of flexibility, you are free to tune the application by judicious use of stored procedures for frequently used commands (such as SELECT and INSERT), and use straight SQL code for less commonly used commands (such as DELETE). In general, it is recommended to provide stored procedures for all database interaction because they are faster and easier to tune.
This example uses the stored procedure code from the “Calling Stored Procedures” section for inserting, updating, and deleting Region records, as well as using the RegionSelect procedure written previously in the section on Using a Stored Procedure in a Data Adaptor, which produces an example that uses each of these commands to retrieve and update data in a DataSet class. The main body of the code for this task is shown in the following section.
Inserting a New Row
You can add a new row to a DataTable in one of two ways. The first way is to call the NewRow method, which returns a blank row that you then populate and add to the Rows collection, as follows:
DataRow r = ds.Tables["Region"].NewRow();
r["RegionID"]=999;
r["RegionDescription"]="North West";
ds.Tables["Region"].Rows.Add(r);
The second way to add a new row is to pass an array of data to the Rows.Add method as shown in the following code:
DataRow r = ds.Tables["Region"].Rows.Add
             (new object [] { 999, "North West" });
Each new row within the DataTable will have its RowState set to Added. The example dumps out the records before each change is made to the database, so after adding a row to the DataTable (using either method), the rows will look something like the following. Note that the column on the right shows the row’s state:
New row pending inserting into database
  1   Eastern                                            Unchanged
  2   Western                                            Unchanged
  3   Northern                                           Unchanged
  4   Southern                                           Unchanged
  999 North West                                         Added
To update the database from the DataAdapter, call one of the Update methods as shown here:
da.Update(ds, "Region");For the new row within the DataTable, this executes the stored procedure (in this instance RegionInsert). The example then dumps the state of the data, so you can see that changes have been made to the database:
New row updated and new RegionID assigned by database
  1   Eastern                                            Unchanged
  2   Western                                            Unchanged
  3   Northern                                           Unchanged
  4   Southern                                           Unchanged
  5   North West                                         Unchanged
Note the last row in the DataTable. The RegionID had been set in code to 999, but after executing the RegionInsert stored procedure, the value has been changed to 5. This is intentional — the database often generates primary keys for you and the updated data in the DataTable appears because the SqlCommand definition within the source code has the UpdatedRowSource property set to UpdateRowSource.OutputParameters:
SqlCommand aCommand = new SqlCommand("RegionInsert", conn);

aCommand.CommandType = CommandType.StoredProcedure;
aCommand.Parameters.Add(new SqlParameter("@RegionDescription",
                            SqlDbType.NChar,
                            50,
                            "RegionDescription"));
aCommand.Parameters.Add(new SqlParameter("@RegionID",
                            SqlDbType.Int,
                            0,
                            ParameterDirection.Output,
                            false,
                            0,
                            0,
                            "RegionID",   // Defines the SOURCE column
                            DataRowVersion.Default,
                            null));
aCommand.UpdatedRowSource = UpdateRowSource.OutputParameters;
This means that whenever a data adapter issues this command, the output parameters should be mapped to the source of the row, which in this instance was a row in a DataTable. The flag specifies what data should be updated — in this case, the stored procedure has an output parameter that is mapped to the DataRow. The column it applies to is RegionID; this is defined within the command definition.
The following table describes the values for UpdateRowSource:
| UPDATEROWSOURCE VALUE | DESCRIPTION |
| Both | This indicates that a stored procedure has returned both output parameters and a complete database record. Both of these data sources are used to update the source row. |
| FirstReturnedRecord | This indicates that the command returns a single record and that the contents of that record should be merged into the original source DataRow. This is useful where a given table has a number of default (or computed) columns, because after an INSERT statement these need to be synchronized with the DataRow on the client. An example might be “INSERT (columns) INTO (table) WITH (primarykey),” then “SELECT (columns) FROM (table) WHERE (primarykey).” The returned record would then be merged into the original row. |
| None | All data returned from the command is discarded. |
| OutputParameters | Any output parameters from the command are mapped onto the appropriate column(s) in the DataRow. |
Updating an Existing Row
Updating an existing row within the DataTable is just a case of using the DataRow class’s indexer with either a column name or a column number, as shown in the following code:
r["RegionDescription"]="North West England";
r[1] = "North West England";
Both of the preceding statements are equivalent (in this example):
Changed RegionID 5 description
  1   Eastern                                            Unchanged
  2   Western                                            Unchanged
  3   Northern                                           Unchanged
  4   Southern                                           Unchanged
  5   North West England                                 Modified
Prior to updating the database, the row you are updating has its state set to Modified, as shown above. When the changes are persisted to the database this state will then revert to Unchanged.
Deleting a Row
Deleting a row is a matter of calling the Delete method:
r.Delete();A deleted row has its row state set to Deleted, but you cannot read columns from the deleted DataRow because they are no longer valid. When the adapter’s Update method is called, all deleted rows will use the DeleteCommand, which in this instance executes the RegionDelete stored procedure.
Writing XML Output
As you have seen already, the DataSet class provides great support for defining its schema in XML; and, just as you can read data from an XML document, you can also write data to an XML document.
The DataSet.WriteXml method enables you to output various parts of the data stored within the DataSet. You can elect to output just the data or to include the data and the schema. The following code demonstrates an example of both for the Region example shown earlier:
ds.WriteXml(".WithoutSchema.xml");
ds.WriteXml(".WithSchema.xml", XmlWriteMode.WriteSchema);
The first file, WithoutSchema.xml, is shown here:
<?xml version="1.0" standalone="yes"?>
<NewDataSet>
   <Region>
      <RegionID>1</RegionID>
      <RegionDescription>Eastern</RegionDescription>
   </Region>
   <Region>
      <RegionID>2</RegionID>
      <RegionDescription>Western</RegionDescription>
   </Region>
   <Region>
      <RegionID>3</RegionID>
      <RegionDescription>Northern</RegionDescription>
   </Region>
   <Region>
      <RegionID>4</RegionID>
      <RegionDescription>Southern</RegionDescription>
   </Region>
</NewDataSet>
The closing tag on RegionDescription is over to the right of the page because the database column is defined as NCHAR(50), which is a 50-character string padded with spaces.
The output produced in the WithSchema.xml file includes the XML schema for the DataSet as well as the data itself:
<?xml version="1.0" standalone="yes"?>
<NewDataSet>
  <xs:schema id="NewDataSet" xmlns="" xmlns:xs="http://www.w3.org/2001/XMLSchema"    xmlns:msdata="urn:schemas-microsoft-com:xml-msdata">
    <xs:element name="NewDataSet" msdata:IsDataSet="true"       msdata:UseCurrentLocale="true">
      <xs:complexType>
        <xs:choice minOccurs="0" maxOccurs="unbounded">
          <xs:element name="Region">
            <xs:complexType>
              <xs:sequence>
                <xs:element name="RegionID" msdata:AutoIncrement="true"                  msdata:AutoIncrementSeed="1" type="xs:int" />
                <xs:element name="RegionDescription" type="xs:string" />
              </xs:sequence>
            </xs:complexType>
          </xs:element>
        </xs:choice>
      </xs:complexType>
    </xs:element>
  </xs:schema>
  <Region>
    <RegionID>1</RegionID>
    <RegionDescription>Eastern</RegionDescription>
  </Region>
  <Region>
    <RegionID>2</RegionID>
    <RegionDescription>Western</RegionDescription>
  </Region>
  <Region>
    <RegionID>3</RegionID>
    <RegionDescription>Northern</RegionDescription>
  </Region>
  <Region>
    <RegionID>4</RegionID>
    <RegionDescription>Southern</RegionDescription>
  </Region>
</NewDataSet>
Note the use of the msdata schema in this file, which defines extra attributes for columns within a DataSet, such as AutoIncrement and AutoIncrementSeed — these attributes correspond directly to the properties definable on a DataColumn class.
WORKING WITH ADO.NET
This section addresses some common scenarios when developing data access applications with ADO.NET such as how to use ADO.NET in an application that is delivered using multiple tiers, and how to generate SQL Keys efficiently. The topics covered here don’t naturally fit into other sections of this chapter.
Tiered Development
Producing an application that interacts with data is often done by splitting up the application into tiers. A common model is to have an application tier (the front end), a data services tier, and the database itself (the back end).
One of the difficulties with this model is deciding what data to transport between your tiers, as well as figuring out the format in which the data should be transported. With ADO.NET, these wrinkles have been ironed out and support for this style of architecture is part of the design.
One of the things that are much better in ADO.NET than OLE DB is ADO.NET’s support for copying an entire record set. In .NET, it is easy to copy a DataSet; simply use the following code:
DataSet source = {some dataset};
DataSet dest = source.Copy();
This creates an exact copy of the source DataSet. Each DataTable, DataColumn, DataRow, and Relation will be copied and all the data will be in exactly the same state as it was in the source. If the only part you want to copy is the schema of the DataSet, you can use the following code:
DataSet source = {some dataset};
DataSet dest = source.Clone();
This copies all tables, relations, and so on, but each copied DataTable will be empty. This process really could not be more straightforward.
A common requirement when writing a tiered system, whether based on a Windows client application or on the web, is to be able to ship as little data as possible between tiers. This reduces the amount of resources consumed in transmitting the data set.
To handle this requirement, the DataSet class uses the GetChanges method. This simple method performs a huge amount of work and returns a DataSet with only the changed rows from the source data set. This is ideal for passing data between tiers because it only passes the essential set of data along.
The following example shows how to generate a DataSet consisting of just the changes:
DataSet source = {some dataset};
DataSet dest = source.GetChanges();
Again, this is trivial, but if you delve deeper you’ll find things that are a little more interesting.
There are two overloads of the GetChanges method. One overload takes a value of the DataRowState enumeration and returns only rows that correspond to that state (or states). GetChanges simply calls GetChanges(Deleted | Modified | Added) and ensures that there really are changes by calling HasChanges. If no changes have been made, null is returned to the requestor immediately.
The next operation is to clone the current DataSet. Once this is done, the new DataSet is set up to ignore constraint violations (EnforceConstraints = false), and then each changed row for every table is copied into the new DataSet.
When you have a DataSet that contains just changes, you can then move these off to the data services tier for processing. After the data has been updated in the database, the “changes” DataSet can be returned to the requestor; for example, there might be some output parameters from the stored procedures that have updated values in the columns. These changes can then be merged into the original DataSet using the Merge method. Figure 32-9 depicts this sequence of operations.

Key Generation with SQL Server
The RegionInsert stored procedure presented earlier in this chapter is one example of generating a primary key value on insertion into the database. The method for generating the key in that particular example is fairly crude and wouldn’t scale well, so for a real application you should use some other strategy for generating keys.
Your first instinct might be to define an identity column and return the @@IDENTITY value from the stored procedure. The following stored procedure shows how this might be defined for the Categories table in the Northwind example database from earlier in this chapter. Type this stored procedure into the SQL Query Analyzer or run the StoredProcs.sql file that is part of the code download for this chapter:
CREATE PROCEDURE CategoryInsert(@CategoryName NVARCHAR(15),
                                  @Description NTEXT,
                                  @CategoryID INTEGER OUTPUT) AS
   SET NOCOUNT OFF
   INSERT INTO Categories (CategoryName, Description)
      VALUES(@CategoryName, @Description)
   SELECT @CategoryID = @@IDENTITY
GO
This inserts a new row into the Category table and returns the generated primary key (the value of the CategoryID column) to the caller. You can test the procedure by typing the following in the SQL Query Analyzer:
DECLARE @CatID int;
EXECUTE CategoryInsert 'Pasties', 'Heaven Sent Food', @CatID OUTPUT;
PRINT @CatID;
When executed as a batch of commands, this inserts a new row into the Categories table and returns the identity of the new record, which is then displayed to the user.
Suppose that some months down the line, someone decides to add a simple audit trail which will record all insertions and modifications made to the category name. In that case, you need to define a table similar to the one shown in Figure 32-10, which will record the old and new values of the category.
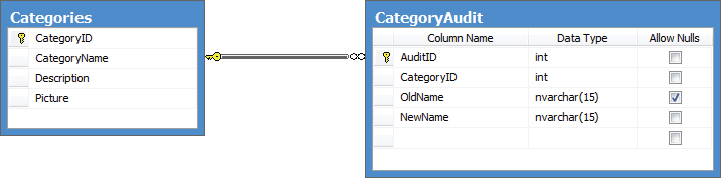
The script for this table is included in the StoredProcs.sql file on this book’s website. The AuditID column is defined as an IDENTITY column. You then construct a couple of database triggers that will record changes to the CategoryName field using the following code:
CREATE TRIGGER CategoryInsertTrigger
   ON Categories
   AFTER UPDATE
AS
   INSERT INTO CategoryAudit(CategoryID, OldName, NewName )
      SELECT old.CategoryID, old.CategoryName, new.CategoryName
      FROM Deleted AS old,
           Categories AS new
      WHERE old.CategoryID = new.CategoryID;
GOThe insert trigger is an in-memory table called Inserted, and for deletes and updates the old rows are available within the Deleted table. The CategoryInsertTrigger retrieves the CategoryID of the record(s) affected and stores this information together with the old and new value of the CategoryName column.
When you call your original stored procedure to insert a new CategoryID, you receive an identity value; however, this is no longer the identity value from the row inserted into the Categories table — it is now the new value generated for the row in the CategoryAudit table.
To view the problem firsthand, open a copy of SQL Server Enterprise Manager and look at the contents of the Categories table (see Figure 32-11). This lists all the categories in the Northwind database.

The next identity value for the Categories table should be 9, so a new row can be inserted by executing the following code, to see what ID is returned:
DECLARE @CatID int;
EXECUTE CategoryInsert 'Pasties', 'Heaven Sent Food', @CatID OUTPUT;
PRINT @CatID;
The output value of this on a test PC was 1. If you look at the CategoryAudit table shown in Figure 32-12, you will find that this is the identity of the newly inserted audit record, not the identity of the category record created.
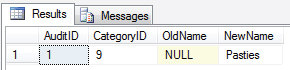
The problem lies in the way that @@IDENTITY actually works. It returns the LAST identity value created by your session so, as shown in Figure 32-12, it isn’t completely reliable.
Two other identity functions can be used instead of @@IDENTITY, but neither is free from problems. The first, SCOPE_IDENTITY, returns the last identity value created within the current scope. SQL Server defines scope as a stored procedure, trigger, or function. This may work most of the time, but if for, some reason, someone adds another INSERT statement to the stored procedure, you can receive this other value rather than the one you expected.
The other identity function, IDENT_CURRENT, returns the last identity value generated for a given table in any scope. For example, if two users were accessing SQL Server at exactly the same time, it might be possible to receive the other user’s generated identity value.
As you might imagine, tracking down a problem of this nature is not easy. The moral of the story is to beware when using IDENTITY columns in SQL Server.
Naming Conventions
The following tips and conventions are not directly .NET-related, but they are worth sharing and following, especially when naming constraints. Feel free to skip this section if you already have your own views on this subject.
Conventions for Database Tables
- Use singular, rather than plural, names — For example, use Product rather than Products. This recommendation stems from explaining a database schema to customers; it is much better grammatically to say, “the Product table contains products” than “the Products table contains products.” Check out the Northwind database to see an example of how not to do this.
- Adopt some form of naming convention for the fields of a table — An obvious one is <Table>_Id for the primary key of a table (assuming that the primary key is a single column), Name for the field considered to be the user-friendly name of the record, and Description for any textual information about the record itself. Having a good table convention means that you can look at virtually any table in the database and easily understand what the fields are used for.
Conventions for Database Columns
- Use singular, rather than plural, names — See the explanation in the previous section.
- Any columns that link to another table should be given the same name as the primary key of that table — For example, a link to the Product table would be Product_Id, and one to the Sample table Sample_Id. This is not always possible, however, especially if one table has multiple references to another. In that case, use your own judgment.
- Date fields should have a suffix of _On — Examples include Modified_On and Created_On. This makes it easy to read SQL output and infer what a column means just by its name.
- Fields that record activities from the user should have a suffix of _By — Examples include Modified_By and Created_By. This promotes comprehension.
Conventions for Constraints
- If possible, include the name of the constraint, the table, and column name — One example would be CK_<Table>_<Field>. You would then use CK_Person_Sex for a check constraint on the Sex column of the Person table. A foreign key example would be FK_Product_Supplier_Id, for the foreign key relationship between product and supplier.
- Show the type of constraint with a prefix — For example, use CK for a check constraint or FK for a foreign key constraint. Feel free to be more specific, as in CK_Person_Age_GT0 for a constraint on the age column indicating that the age should be greater than zero.
- If you have to trim the length of the constraint, do so on the table name part rather than the column name — When you get a constraint violation, it is usually easy to infer which table was in error, but sometimes it’s not so easy to check which column caused the problem. Oracle has a 30-character limit on names, which is easy to surpass.
Stored Procedures
Just like the obsession many have developed over the past few years with putting a C in front of each and every class they declare (you know you have!), many SQL Server developers feel compelled to prefix every stored procedure with sp_ or something similar. This is not a good idea.
SQL Server uses the sp_ prefix for nearly all system stored procedures. Therefore, you risk confusing users into thinking that sp_widget is something included as standard with SQL Server. In addition, when looking for a stored procedure, SQL Server treats procedures with the sp_ prefix differently from those without it.
If you use this prefix and do not qualify the database/owner of the stored procedure, SQL Server looks in the current scope and then jumps into the master database to search for the stored procedure there. Without the sp_ prefix, your users would get an error a little earlier. Even worse is creating a local stored procedure (one within your database) that has the same name and parameters as a system stored procedure. Avoid this at all costs. When in doubt, do not prefix.
When calling stored procedures, always prefix them with the owner of the procedure, as in dbo.selectWidgets. This is slightly faster than not using the prefix, because SQL Server has less work to do to find the stored procedure. Something like this is not likely to have a huge impact on the execution speed of your application, but it is a free tuning trick.
Above all, when naming entities, whether within the database or within code, be consistent.
SUMMARY
Data access is an extensive subject — especially in .NET, which has an abundance of material to cover. This chapter has provided an outline of the main classes in the ADO.NET namespaces and has demonstrated how to use the classes when manipulating data from a data source.
You first looked at the Connection object using both SqlConnection (SQL Server–specific) and OleDbConnection (for any OLE DB data sources). The programming model for these two classes is so similar that one can normally be substituted for the other and the code will continue to run.
This chapter also explained how to use connections properly so that they can be closed as early as possible, preserving valuable resources. All the connection classes implement the IDisposable interface, called when the object is placed within a using clause. If there is one thing you should take away from this chapter, it is the importance of closing database connections as early as possible.
In addition, this chapter discussed database commands using both examples that executed with no returned data and examples that called stored procedures with input and output parameters. It described various execute methods, including the ExecuteXmlReader method available only on the SQL Server provider. This vastly simplifies the selection and manipulation of XML-based data.
The generic classes within the System.Data namespace were described in detail, from the DataSet class through DataTable, DataColumn, DataRow, including relationships and constraints. The DataSet class is an excellent data container and various methods make it ideal for cross-tier data flow. The data within a DataSet is represented in XML for transport and methods are available that pass a minimal amount of data between tiers. The capability to have many tables of data within a single DataSet can greatly increase its usability.
Having the schema stored within a DataSet is useful, but .NET also includes the data adapter that, along with various Command objects, can be used to select data for a DataSet and subsequently update data in the data store. One of the beneficial aspects of a data adapter is that a distinct command can be defined for each of the four actions: SELECT, INSERT, UPDATE, and DELETE. The system can create a default set of commands based on database schema information and a SELECT statement. For the best performance, however, a set of stored procedures can be used that have the DataAdapter’s commands defined appropriately to pass only the necessary information to these stored procedures.
The XSD tool (XSD.EXE) was also described, using an example that showed how to work with classes based on an XML schema from within .NET. The classes produced using this tool are ready to be used within an application and their automatic generation can save many hours of laborious typing.
Finally, this chapter discussed some best practices and naming conventions for database development. Further information about accessing SQL Server databases is provided in Chapter 33 “ADO.NET Entity Framework.”