
Chapter 18
Deployment
What’s in this Chapter?
- Deployment requirements
- Deployment scenarios
- Deployment using ClickOnce
- Deployment of web applications
- Windows 8 app deployment
WROX.COM CODE DOWNLOADS FOR THIS CHAPTER
The wrox.com code downloads for this chapter are found at http://www.wrox.com/remtitle.cgi?isbn=1118314425 on the Download Code tab. The code for this chapter is found in the following examples:
- WPFSampleApp
- WebSampleApp
- Win8SplitApp
- Win8PackageSample
DEPLOYMENT AS PART OF THE APPLICATION LIFE CYCLE
The development process does not end when the source code is compiled and the testing is complete. At that stage, the job of getting the application into the user’s hands begins. Whether it’s an ASP.NET application, a WPF client application, or an application built for Windows 8, the software must be deployed to a target environment.
Deployment should be considered very early in the design of the application, as this can influence the technology to be used for the application itself.
The .NET Framework has made deployment much easier than it was in the past. The pains of registering COM components and writing new hives to the registry have been eliminated.
This chapter looks at the options that are available for application deployment, both from an ASP.NET perspective and from the rich client perspective including Windows 8 Apps.
PLANNING FOR DEPLOYMENT
Often, deployment is an afterthought in the development process that can lead to nasty, if not costly, surprises. To avoid grief in deployment scenarios, you should plan the deployment process during the initial design stage. Any special deployment considerations — such as server capacity, desktop security, or where assemblies will be loaded from — should be built into the design from the start, resulting in a much smoother deployment process.
Another issue that you should address early in the development process is the environment in which to test the deployment. Whereas unit testing of application code and deployment options can be done on the developer’s system, the deployment must be tested in an environment that resembles the target system. This is important to eliminate the dependencies that don’t exist on a targeted computer. An example of this might be a third-party library that has been installed on the developer’s computer early in the project. The target computer might not have this library on it. It can be easy to forget to include it in the deployment package. Testing on the developer’s system would not uncover the error because the library already exists. Documenting dependencies can help to eliminate this potential problem.
Deployment processes can be complex for a large application. Planning for the deployment can save time and effort when the deployment process is actually implemented.
Choosing the proper deployment option must be done with the same care and planning as any other aspect of the system being developed. Choosing the wrong option makes the process of getting the software into the users’ hands difficult and frustrating.
Overview of Deployment Options
This section provides an overview of the deployment options that are available to .NET developers. Most of these options are discussed in greater detail later in this chapter:
- xcopy — The xcopy utility lets you copy an assembly or group of assemblies to an application folder, reducing your development time. Because assemblies are self-discovering (that is, the metadata that describes the assembly is included in the assembly), you do not need to register anything in the registry.
Each assembly keeps track of what other assemblies it requires to execute. By default, the assembly looks in the current application folder for the dependencies. The process of moving (or probing) assemblies to other folders is discussed later in this chapter.
- ClickOnce — The ClickOnce technology offers a way to build self-updating Windows-based applications. ClickOnce enables an application to be published to a website, a file share, or even a CD. As updates and new builds are made to the application, they can be published to the same location or site by the development team. As the application is used by the end user, it can automatically check the location to see if an update is available. If so, an update is attempted.
- Windows Installer — There are some restrictions when ClickOnce doesn’t work. If the installation requires administrative privileges (e.g., for deploying Windows Services), Windows Installer can be the best option.
- Deploying web applications — When a website is deployed, a virtual site is created with IIS, and the files needed to run the application are copied to the server. With Visual Studio you have different options to copy the files: using the FTP protocol, accessing a network share, or using a commonly used option in previous years, FrontPage Server Extensions (FPSE). A newer technology is creating Web Deploy packages, which are discussed later in this chapter.
- Windows 8 apps — These apps can be deployed from the Windows Store, or by using PowerShell scripts from an enterprise environment. Creating packages from Windows 8 apps is covered later in this chapter.
Deployment Requirements
It is instructive to look at the runtime requirements of a .NET-based application. The CLR has certain requirements on the target platform before any managed application can execute.
The first requirement that must be met is the operating system. Currently, the following operating systems can run .NET 4.5–based applications:
- Windows Vista SP2
- Windows 7
- Windows 8 (.NET 4.5 is already included)
The following server platforms are supported:
- Windows Server 2008 SP2
- Windows Server 2008 R2
- Windows Server 2012 (.NET 4.5 is already included)
For Windows 8 apps, Windows 8 is the required operating system.
You also must consider hardware requirements when deploying .NET applications. The minimum hardware requirements for both the client and the server are a CPU with 1GHz and 512MB of RAM.
For best performance, increase the amount of RAM — the more RAM the better your .NET application runs. This is especially true for server applications. You can use the Performance Monitor to analyze the RAM usage of your applications.
Deploying the .NET Runtime
When an application is developed using .NET, there is a dependency on the .NET runtime. This may seem rather obvious, but sometimes the obvious can be overlooked. The following table shows the version number and the filename that would have to be distributed. With Windows 8 and Windows Server 2012, .NET 4.5 is already included.
| .NET VERSION | FILENAME |
| 2.0.50727.42 | dotnetfx.exe |
| 3.0.4506.30 | dotnetfx3.exe (includes x86 and x64) |
| 3.5.21022.8 | dotnetfx35.exe (includes x86, x64, and ia64) |
| 4.0.0.0 | dotnetfx40.exe (includes x86, x64, and ia64) |
| 4.5.50501 | dotnetFx45.exe (includes x86 and x64) |
TRADITIONAL DEPLOYMENT
If deployment is part of an application’s original design considerations, deployment can be as simple as copying a set of files to the target computer. This section discusses simple deployment scenarios and different options for deployment.
To see the first deployment option in action, you must have an application to deploy. At first, the ClientWPF solution is used, which requires the library AppSupport.
ClientWPF is a rich client application using WPF. AppSupport is a class library containing one simple class that returns a string with the current date and time.
The sample applications use AppSupport to fill a label with a string containing the current date. To use the examples, first load and build AppSupport. Then, in the ClientWPF project, set a reference to the newly built AppSupport.dll.
Here is the code for the AppSupport assembly:
using System;

namespace AppSupport
{
  public class DateService
  {
    public string GetLongDateInfoString()
    {
      return string.Format("Today's date is {0:D}", DateTime.Today);
    }

    public string GetShortDateInfoString()
    {
      return string.Format("Today's date is {0:d}", DateTime.Today);
    }
  }
}
This simple assembly suffices to demonstrate the deployment options available to you.
xcopy Deployment
xcopy deployment is a term used for the process of copying a set of files to a folder on the target machine and then executing the application on the client. The term comes from the DOS command xcopy.exe. Regardless of the number of assemblies, if the files are copied into the same folder, the application will execute — rendering the task of editing the configuration settings or registry obsolete.
To see how an xcopy deployment works, execute the following steps:
That’s all there is to it; xcopy deployment provides the capability to deploy a fully functional application simply by copying the assemblies to the target machine. Although the example used here is simple, you can use this process for more complex applications. There really is no limit to the size or number of assemblies that can be deployed using this method.
Scenarios in which you might not want to use xcopy deployment are when you need to place assemblies in the global assembly cache (GAC) or add icons to the Start menu. Also, if your application still relies on a COM library of some type, you will not be able to register the COM components easily.
xcopy and Web Applications
xcopy deployment can also work with web applications, with the exception of the folder structure. You must establish the virtual directory of your web application and configure the proper user rights. This process is generally accomplished with the IIS administration tool.
After the virtual directory is set up, the web application files can be copied to the virtual directory. Copying a web application’s files can be a bit tricky. A couple of configuration files, as well as any images that the pages might be using, need to be accounted for.
Windows Installer
ClickOnce is Microsoft’s preferred technology for installing Windows applications; it is discussed later in more depth. However, ClickOnce has some restrictions. ClickOnce installation doesn’t require administrator rights and installs applications in a directory where the user has rights. If multiple users are working on one system, the application needs to be installed for all users. Also, it is not possible to install shared COM components and configure them in the registry, install assemblies to the GAC, and register Windows services. All these tasks require administrative privileges.
To do these administrative tasks, you need to create a Windows installer package. Installer packages are MSI files (which can be started from setup.exe) that make use of the Windows Installer technology.
Creating Windows installer packages is no longer part of Visual Studio 2012 (it was part of Visual Studio 2010). You can use InstallShield Limited Edition, which is free, with Visual Studio 2012. A project template includes information for the download and registration with Flexera Software.
InstallShield Limited Edition offers a simple wizard to create an installation package based on application information (name, website, version number); installation requirements (supported operating systems and prerequisite software before the installation can start); application files and their shortcuts on the Start menu and the desktop; and, settings for the registry. You can optionally prompt the user for a license agreement.
If this is all that you need, and you don’t need to add custom dialogs to the installation experience, InstallShield Limited Edition can provide an adequate deployment solution. Otherwise, you need to install another product such as the full version of InstallShield (www.flexerasoftware.com/products/installshield.htm), or the free WiX toolset (http://wix.codeplex.com).
ClickOnce, Web Deploy packages, and deployment of Windows 8 apps are discussed in detail later in this chapter.
CLICKONCE
ClickOnce is a deployment technology that enables applications to be self-updating. Applications are published to a file share, website, or media such as a CD. When published, ClickOnce apps can be automatically updated with minimal user input.
ClickOnce also solves the security permission problem. Normally, to install an application the user needs Administrative rights. With ClickOnce, a user without admin rights can install and run the application. However, the application is installed in a user-specific directory. In case multiple users log in to the same system, every user needs to install the application.
ClickOnce Operation
ClickOnce applications have two XML-based manifest files associated with them. One is the application manifest, and the other is the deployment manifest. These two files describe everything that is required to deploy an application.
The application manifest contains information about the application such as permissions required, assemblies to include, and other dependencies. The deployment manifest contains details about the application’s deployment, such as settings and location of the application manifest. The complete schemas for the manifests are in the .NET SDK documentation.
As mentioned earlier, ClickOnce has some limitations, such as assemblies cannot be added to the GAC, and Windows Services cannot be configured in the registry. In such scenarios, Windows Installer is clearly a better choice. ClickOnce can still be used for a large number of applications, however.
Publishing a ClickOnce Application
Because everything that ClickOnce needs to know is contained in the two manifest files, the process of publishing an application for ClickOnce deployment is simply generating the manifests and placing the files in the proper location. The manifest files can be generated in Visual Studio 2012. There is also a command-line tool (mage.exe) and a version with a GUI (mageUI.exe).
You can create the manifest files in Visual Studio 2012 in two ways. At the bottom of the Publish tab on the Project Properties dialog are two buttons: Publish Wizard and Publish Now. The Publish Wizard asks several questions about the deployment of the application and then generates the manifest files and copies all the needed files to the deployment location. The Publish Now button uses the values that have been set in the Publish tab to create the manifest files and copies the files to the deployment location.
To use the command-line tool, mage.exe, the values for the various ClickOnce properties must be passed in. Manifest files can be both created and updated using mage.exe. Typing mage.exe -help at the command prompt gives the syntax for passing in the values required.
The GUI version of mage.exe (mageUI.exe) is similar in appearance to the Publish tab in Visual Studio 2012. An application and deployment manifest file can be created and updated using the GUI tool.
ClickOnce applications appear in the Install/Uninstall Programs control panel applet just like any other installed application. One big difference is that the user is presented with the choice of either uninstalling the application or rolling back to the previous version. ClickOnce keeps the previous version in the ClickOnce application cache.
Let’s start with the process of creating a ClickOnce installation. As a prerequisite for this process, you need to have IIS installed on the system, and Visual Studio must be started with elevated privileges. The ClickOnce installation program will be directly published to the local IIS, which requires administrative privileges.
Open the ClientWPF project with Visual Studio, select the Publish tab in the Project properties, and click the Publish Wizard button. The first screen, shown in Figure 18-1, asks for the publish location. Use the local IIS http://localhost/ProCSharpSample.

The next screen provides the option to place a shortcut on the Start menu to make the application available online or offline. Leave the default option. Then you are ready to publish, and a browser window is opened to install the application (see Figure 18-2).
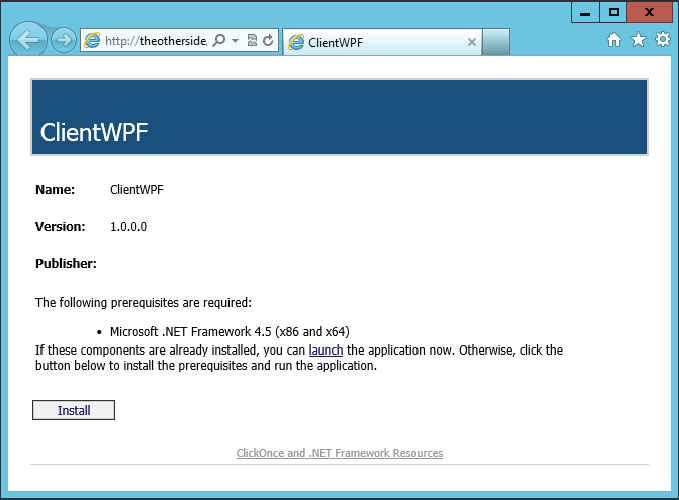
Before clicking the Install button, we’ll have a look at the ClickOnce settings that have been made by the wizard.
ClickOnce Settings
Several properties are available for both manifest files. You can configure many of these properties with the Publish tab (see Figure 18-3) within the Visual Studio project settings. The most important property is the location from which the application should be deployed. We’ve used IIS with the sample, but a network share or CD could be used as well.
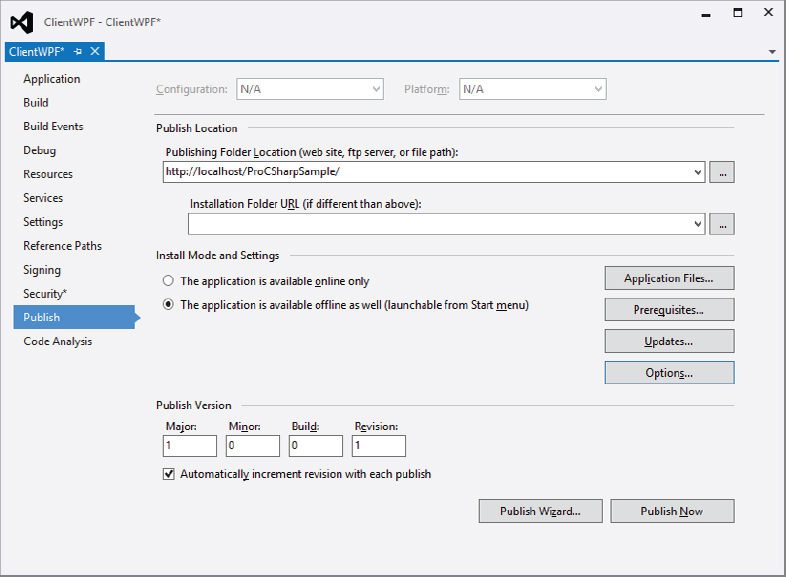
The Publish tab has an Application Files button that invokes a dialog that lists all assemblies and configuration files required by the application. The Prerequisite button displays a list of common prerequisites that can be installed along with the application. These prerequisites are defined by Microsoft Installer packages and need to be installed before the ClickOnce application can be installed. Referring back to Figure 18-2, you can see the .NET Framework 4.5 listed as a prerequisite before the application can be installed using the web page. You have the choice of installing the prerequisites from the same location from which the application is being published or from the vendor’s website.
The Updates button displays a dialog (see Figure 18-4) containing information about how the application should be updated. As new versions of an application are made available, ClickOnce can be used to update the application. Options include checking for updates every time the application starts or checking in the background. If the background option is selected, a specified period of time between checks can be entered. Options for allowing the user to be able to decline or accept the update are available. This can be used to force an update in the background so that users are never aware that the update is occurring. The next time the application is run, the new version is used instead of the older version. A separate location for the update files can be used as well. This way, the original installation package can be located in one location and installed for new users, and all the updates can be staged in another location.

You can set the application up so that it will run in either online or offline mode. In offline mode the application can be run from the Start menu and acts as if it were installed using the Windows Installer. Online mode means that the application will run only if the installation folder is available.
Using the Publish Wizard made more changes with the project settings than you can see in the Publish tab. With the Signing tab, you can see that the ClickOnce manifest is signed. For the current deployment, a test certificate was created. The test certificate is only good for testing. Before changing to production you need to get an application signing certificate from a certification authority, and sign the manifest with this. Looking at the Security tab, you can see that ClickOnce security has been enabled, and by default the application is configured as a full-trust application. This configuration gives the application the same rights the user has, and it can do all the things the user is allowed to do. Users are prompted with the installation regarding whether they trust the application. The configuration can be changed to a partial-trust application, which applies lower ClickOnce security permissions. For example, with the Internet zone the application can only read and write from isolated storage instead of accessing the complete file system. You can read more about the .NET code access security in Chapter 22.
Application Cache for ClickOnce Files
Applications distributed with ClickOnce are not installed in the Program Files folder. Instead, they are placed in an application cache that resides in the Local Settings folder under the current user’s Documents And Settings folder. Controlling this aspect of the deployment means that multiple versions of an application can reside on the client PC at the same time. If the application is set to run online, every version that the user has accessed is retained. For applications that are set to run locally, the current and previous versions are retained.
This makes it a very simple process to roll back a ClickOnce application to its previous version. If the user selects the Install/Uninstall Programs control panel applet, the dialog presented contains the options to remove the ClickOnce application or roll back to the previous version (see Figure 18-5). An administrator can change the manifest file to point to the previous version. If the administrator does this, the next time the user runs that application, a check is made for an update. Instead of finding new assemblies to deploy, the application will restore the previous version without any interaction from the user.

Application Installation
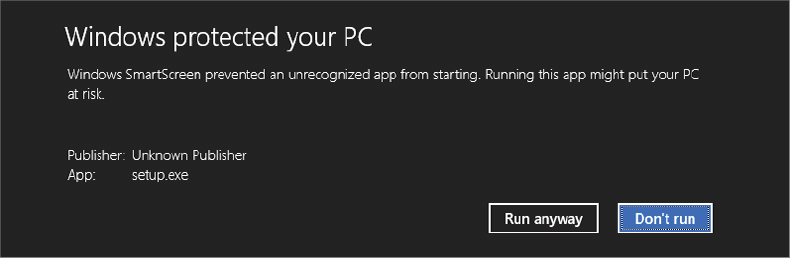
Now let’s start the application installation from the browser screen shown earlier (refer to Figure 18-2). Running on Windows 8, you will get a message from Windows SmartScreen as shown in Figure 18-6. Because the certificate that is used does not come from a trusted certification authority, and thus the publisher is unknown, a warning is shown for the user: Windows protected your PC. To continue the installation you need to click on the Run Anyway button.
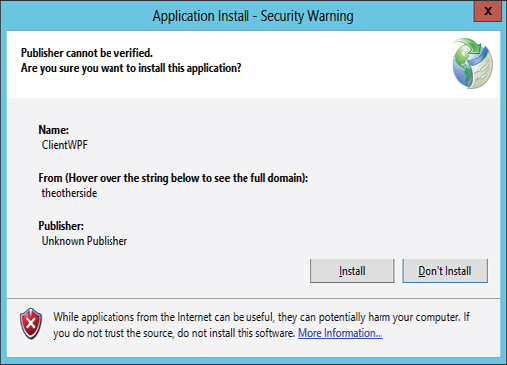
Next, you will see the dialog as shown in Figure 18-7, which that is also appears on Windows 7 and older systems. It’s the same issue with the certificate, the publisher is unknown. Clicking on the More Information link, the user can get more information about the certificate, and see that the application wants full-trust access. If the user trusts the application, he or she can click the Install button to install the application.
After the installation, you can find the application with the Start menu, and it’s also listed with Programs And Features in the control panel.
ClickOnce Deployment API
With the ClickOnce settings you can configure the application to automatically check for updates as discussed earlier, but often. Often this is not a practical approach. Maybe some super-users should get a new version of the application earlier. If they are happy with the new version, other users should be privileged to receive the update as well. With such a scenario, you can use your own user-management information database, and update the application programmatically.
For programmatic updates, the assembly System.Deployment and classes from the System.Deployment namespace can be used to check application version information and do an update. The following code snippet (code file MainWindow.xaml.cs) contains a click handler for an Update button in the application. It first checks whether the application is a ClickOnce-deployed application by checking the IsNetworkDeployed property from the ApplicationDeployment class. Using the CheckForUpdateAsync method, it determines whether a newer version is available on the server (in the update directory specified by the ClickOnce settings). On receiving the information about the update, the CheckForUpdateCompleted event is fired. With this event handler, the second argument (type CheckForUpdateCompletedEventArgs) contains information on the update, the version number, and whether it is a mandatory update. If an update is available, it is installed automatically by calling the UpdateAsync method:
    private void OnUpdate(object sender, RoutedEventArgs e)
    {
      if (ApplicationDeployment.IsNetworkDeployed)
      {
        ApplicationDeployment.CurrentDeployment.CheckForUpdateCompleted +=
          (sender1, e1) =>
          {
            if (e1.UpdateAvailable)
            {
              ApplicationDeployment.CurrentDeployment.UpdateCompleted +=
                (sender2, e2) =>
                {
                  MessageBox.Show("Update completed");
                };
              ApplicationDeployment.CurrentDeployment.UpdateAsync();
            }
            else
            {
              MessageBox.Show("No update available");
            }

          };
        ApplicationDeployment.CurrentDeployment.CheckForUpdateAsync();
      }
    }
Using the Deployment API code, you can manually test for updates directly from the application.
WEB DEPLOYMENT
With web applications, binaries for controllers (MVC) or code-behind (Web Forms), as well as HTML, JavaScript files, style sheets, and configuration files need to be deployed.
The easiest way to deploy a web application is to use Web Deploy. This feature is available both with on-premises IIS as well as Windows Azure websites. With Web Deploy, a package is created that can be directly uploaded with IIS. This package is a zip file that contains all the content needed for a web application, including database files.
Web Application
To demonstrate Web Deploy, a new ASP.NET MVC 4 project using the template Internet Application is created. This automatically creates an application with Home and About pages, including login and registration, as shown in Figure 18-8.

Configuration Files
One important part of the web application is the configuration file. In terms of deployment, you have to consider different versions of this file. For example, if you are using a different database for the web application that is running on the local system, there’s a special testing database for the staging server, and of course a live database for the production server. The connection string is different for these servers, just as the debug configuration differs. If you create separate Web.config files for these scenarios and then add a new configuration value to the local Web.config file, it would be easy to overlook changing the other configuration files.
Visual Studio offers a special feature to deal with that. You can create one configuration file, and define how the file should be transformed to the staging and deployment servers. By default, with an ASP.NET web project, in the Solution Explorer you can see a Web.config file alongside Web.debug.config and Web.release.config. These two later files contain only transformations. You can also add other configuration files, e.g., for a staging server, as well. This can be done by selecting the solution in Solution Explorer, opening the Configuration Manager, and adding a new configuration (e.g., a Staging configuration). As soon as a new configuration is available, you can select the Web.config file, and choose the Add Config Transform option from the context menu. This then adds a config transformation file with the name of the configuration, e.g., Web.Staging.config.
The content of the transformation configuration files just defines transformations from the original configuration file, e.g., the compilation element below system.web is changed to remove the debug attribute as follows:
  <system.web>
    <compilation xdt:Transform="RemoveAttributes(debug)" />
Creating a Web Deploy Package
To define the deployment for a web application, the project properties provide the Package/Publish Web settings (see Figure 18-9). With the configuration, you can select to publish only the files needed to run the application. This excludes all the C# source code files. Other options are to publish all files in the project, or all files in the project folder.
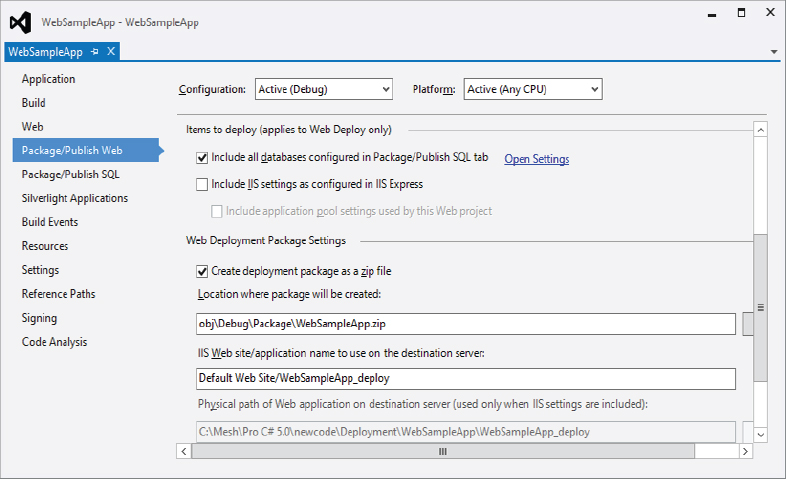
With the items to deploy, you can specify including databases with the package that are defined with the separate Package/Publish SQL tab. There you can import databases from the configuration file, and create SQL scripts to create the schema and also load data. These scripts can be included with the package to create a database on the target system.
The other configuration options with Package/Publish Web are the name of the zip file and the name of the IIS application. When deploying the package to IIS, the name defined with the package is the default unless the proposed. The administrator deploying the web application overrides it with a different name.
After the package is configured, the Publish menu in the context menu of the Solution Explorer can be selected to create a package. The first dialog enables creating or selecting a profile. Profiles can be used to deploy packages to different servers, e.g., you can define one profile to deploy to the staging server, and one profile for the production server. If you are running your site on Windows Azure websites, you can download a profile from Windows Azure that can be imported with the Publish Web tool. This profile contains a URL for the server as well as a username and password. The the second dialog of this wizard enables to specify the publish method. Valid options are to create a Web Deploy Package (which you do now), directly perform a Web Deploy to a server, or use FTP, the file system, or the FrontPage Server Extensions. Figure 18-10 shows the Web Deploy Package selected, and thus allows defining the package location and the name of the website. The third dialog enables you to specify the configuration that should be deployed to the package. If you created the Staging configuration earlier, now Debug, Release, and Staging configurations are available.

After completing the wizard and clicking the Publish button, the Web Deploy package is created. You can open it to see the files in the package. If you have IIS running, you can open the IIS Manager to deploy the zip file and create a new web application.
WINDOWS 8 APPS
Installing Windows 8 apps is a completely different story. With normal .NET applications, copying the executable with the DLLs as shown earlier with xcopy deployment is one way to go. This is not an option with Windows 8 apps. Unpackaged apps can only be used on systems with a developer license.
Windows 8 apps need to be packaged. This enables the app in the Windows Store to make the application broadly available in the Windows Store. There’s also a different option to deploy Windows 8 apps in an environment without adding it to the Windows Store. This is known as sideloading. With all these options it is necessary to create an app package, so let’s start with that.
Creating an App Package
A Windows 8 app package is a file with the .appx file extension, which that is really just a zip file. This file contains all the XAML files, binaries, pictures, and configurations. You can create a package with either Visual Studio or the command-line utility MakeAppx.exe.
A simple Windows 8 app that already contains some core functionality can be created with the Visual Studio application template Split App (XAML) that is in the Windows Store category. This template includes two pages that can be navigated. The sample app has the name Win8SplitApp.
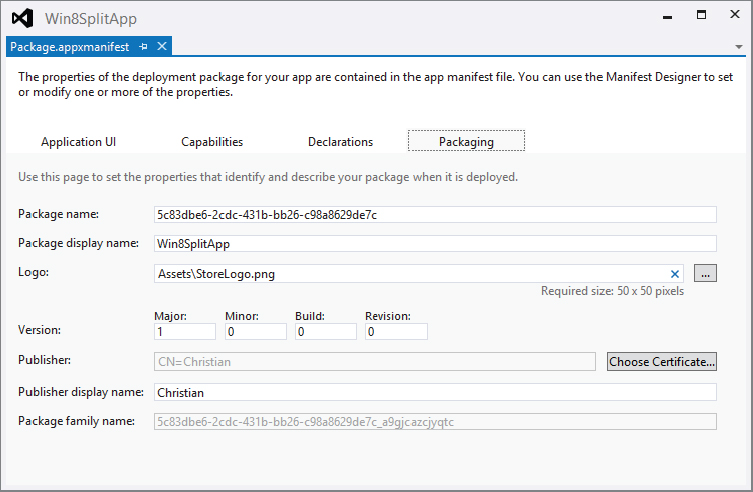
What’s important for the packaging are images in the Assets folder. The files Logo, SmallLogo, and StoreLogo represent logos of the application that should be replaced by custom application logos. The file Package.appxmanifest is a XML file that contains all the definitions needed for the app package. Opening this file invokes the Package Editor, which contains four tabs: Application UI, Capabilities, Declarations, and Packaging. The Packaging dialog is shown in Figure 18-11. Here you can configure the package name, the logo for the store, the version number and the certificate. By default, only just a certificate for testing purposes is created. Before deploying the application, the certificate must be replaced with a certificate from a certification authority that is trusted by Windows.
The Application UI tab enables configuration of the application name, a description of the application, and small and wide logos. Configurable capabilities vary according to the system features and the devices the application is using, e.g., the Music Library, or the webcam, etc. The user is informed about which capabilities the application is using. If the application does not specify the capabilities it needs, during runtime the application is not allowed to use it. With the Declarations tab, the application can register more features, e.g., to use it as a share target, or to specify whether some functionality should run in the background.
Using Visual Studio, you can create a package by clicking the project in Solution Explorer, and selecting the Store ⇒ Create App Package context menu. The first selection with this Create App Package wizard is to specify whether the application should be uploaded to the Windows Store. If that’s not the case, sideloading can be used to deploy the package, as discussed later. In case you didn’t register your account with the Windows Store yet, select the sideloading option. In the second dialog of the wizard, select Release instead of Debug Code for the package; you can also select the platforms for which the package should be generated: x86, x64, and ARM CPUs. This is all that’s needed to build the package. To view what’s in the package you can rename the .appx file to a .zip file extension, and find all the images, metadata, and binaries.
Windows App Certification Kit
Upon creation of the app package, the last dialog of the wizard enables the Windows App Certification Kit. The command line for this tool is appcertui.exe. You can use this command line and pass the package for testing.
When you deploy your application to the Windows Store, it is necessary for the application to fulfill some requirements. You can check most of the requirements beforehand.
Running this tool you should give the application some time. It requires several minutes to test the application and get the results. During this time you shouldn’t interact with the tool or your running application. The following table shows what is tested with the application:
| TEST | DESCRIPTION |
| Crashes and hangs test | The application may not crash or stop responding. Long-running tasks should be done asynchronously to prevent blocking the application. |
| App manifest compliance test | Verifies that the app manifest content is correct. Also, the application might only have one tile after the installation. The user can add additional tiles while configuring the application, but for the start only one tile is allowed. |
| Windows security features test | Verifies that the application does not delete the user’s data without consent, and it won’t be an entry point for viruses or malware. |
| Supported API test | The app may only use Windows 8 APIs (Windows Runtime and a subset of .NET), and cannot depend on libraries that don’t have this limitation. The app may only depend on software from the Windows Store. |
| Performance test | The app must launch in 5 seconds or less, and suspend in 2 seconds or less. |
| App manifest resources test | The app must contain localized resources for all the languages it supports. |
Figure 18-12 shows a partial result of a successful run of the tests.

Sideloading
For the broadest set of customers, you should publish the app to the Windows Store. With the store you have flexibility in terms of licensing; that is, you can have a version for sale to individuals, or volume licensing whereby you can identify who is running the app based on a unique ID and device.
For enterprise scenarios, when the application shouldn’t be in the Windows Store, sideloading can be used.
Sideloading has some requirements for the participating systems: the PC needs to be joined with an Active Directory, and a group policy that allows all trusted apps to be installed needs to be in place. This group policy adds the registry key HKEY_LOCAL_MACHINESoftwarePoliciesMicrosoftWindowsAppxAllowAllTrustedApps with a value of 1. The last requirement is that the application must be signed with a certificate that is trusted. This can also be a custom certificate whereby the certification server is listed as a trusted root certification authority.
Custom applications can be preinstalled for all users on an initial Windows 8 image that is distributed to all client systems, or installed with the following PowerShell cmdlet:
add-appxpackage Package.appxWindows Deployment API
The new Windows Runtime defines the namespace Windows.Management.Deployment, which contains the PackageManager class, which can be used to deploy Windows 8 packages programmatically. The AddPackageAsync method adds a package to the system, RemovePackageAsync removes it.
The following code snippet (code file Win8PackageSample/Program.cs) demonstrates the use of the PackageManager class. The PackageManager can only be used from desktop applications, which is why a .NET console application was created:
using System;
using System.Collections.Generic;
using System.IO;
using Windows.ApplicationModel;
using Windows.Management.Deployment;

namespace Win8PackageSample
{
  class Program
  {
    static void Main()
    {
      var pm = new PackageManager();
      IEnumerable<Package> packages = pm.FindPackages();
      foreach (var package in packages)
      {
        try
        {
          Console.WriteLine("Architecture: {0}",
            package.Id.Architecture.ToString());
          Console.WriteLine("Family: {0}", package.Id.FamilyName);
          Console.WriteLine("Full name: {0}", package.Id.FullName);
          Console.WriteLine("Name: {0}", package.Id.Name);
          Console.WriteLine("Publisher: {0}", package.Id.Publisher);
          Console.WriteLine("Publisher Id: {0}", package.Id.PublisherId);
          if (package.InstalledLocation != null)
            Console.WriteLine(package.InstalledLocation.Path);
          Console.WriteLine();
        }
        catch (FileNotFoundException ex)
        {
          Console.WriteLine("{0}, file: {1}", ex.Message, ex.FileName);
        }
      }
      Console.ReadLine();
    }
  }
}Because the PackageManager class requires administrator rights, an application manifest with the requestedExecutionLevel requireAdministrator is added to the project. This automatically starts the application in elevated mode:
<?xml version="1.0" encoding="utf-8"?>
<asmv1:assembly manifestVersion="1.0" xmlns="urn:schemas-microsoft-com:asm.v1" xmlns:asmv1="urn:schemas-microsoft-com:asm.v1" xmlns:asmv2="urn:schemas-microsoft-com:asm.v2" xmlns:xsi="http://www.w3.org/2001/XMLSchema-instance">
  <assemblyIdentity version="1.0.0.0" name="MyApplication.app" />
  <trustInfo xmlns="urn:schemas-microsoft-com:asm.v2">
    <security>
      <requestedPrivileges xmlns="urn:schemas-microsoft-com:asm.v3">
        <requestedExecutionLevel level="requireAdministrator"
          uiAccess="false" />
      </requestedPrivileges>
    </security>
  </trustInfo>
</asmv1:assembly>
Running the application provides information about all the packages installed on the system. This is an extract of the output:
Architecture: Neutral
Family: windows.immersivecontrolpanel_cw5n1h2txyewy
Full name: windows.immersivecontrolpanel_6.2.0.0_neutral_neutral_cw5n1h2txyewy
Name: windows.immersivecontrolpanel
Publisher: CN=Microsoft Windows, O=Microsoft Corporation, L=Redmond, S=Washington, C=US
Publisher Id: cw5n1h2txyewy
C:WindowsImmersiveControlPanel

Architecture: Neutral
Family: WinStore_cw5n1h2txyewy
Full name: WinStore_1.0.0.0_neutral_neutral_cw5n1h2txyewy
Name: WinStore
Publisher: CN=Microsoft Windows, O=Microsoft Corporation, L=Redmond, S=Washington, C=US
Publisher Id: cw5n1h2txyewy
C:WindowsWinStore

Architecture: X64
Family: Microsoft.BingFinance_8wekyb3d8bbwe
Full name: Microsoft.BingFinance_1.1.1.43_x64__8wekyb3d8bbwe
Name: Microsoft.BingFinance
Publisher: CN=Microsoft Corporation, O=Microsoft Corporation, L=Redmond, S=Washington, C=US
Publisher Id: 8wekyb3d8bbwe
C:Program FilesWindowsAppsMicrosoft.BingFinance_1.1.1.43_x64__8wekyb3d8bbwe

Architecture: Neutral
Family: Microsoft.WinJS.1.0.RC_8wekyb3d8bbwe
Full name: Microsoft.WinJS.1.0.RC_1.0.8377.0_neutral__8wekyb3d8bbwe
Name: Microsoft.WinJS.1.0.RC
Publisher: CN=Microsoft Corporation, O=Microsoft Corporation, L=Redmond, S=Washington, C=US
Publisher Id: 8wekyb3d8bbwe
C:Program FilesWindowsAppsMicrosoft.WinJS.1.0.RC_1.0.8377.
0_neutral__8wekyb3d8bbwe

Architecture: X64
Family: Microsoft.BingMaps_8wekyb3d8bbwe
Full name: Microsoft.BingMaps_1.1.1.41_x64__8wekyb3d8bbwe
Name: Microsoft.BingMaps
Publisher: CN=Microsoft Corporation, O=Microsoft Corporation, L=Redmond, S=Washi
ngton, C=US
Publisher Id: 8wekyb3d8bbwe
C:Program FilesWindowsAppsMicrosoft.BingMaps_1.1.1.41_x64__8wekyb3d8bbwe

Architecture: X64
Family: Microsoft.BingNews_8wekyb3d8bbwe
Full name: Microsoft.BingNews_1.1.1.41_x64__8wekyb3d8bbwe
Name: Microsoft.BingNews
Publisher: CN=Microsoft Corporation, O=Microsoft Corporation, L=Redmond, S=Washington, C=US
Publisher Id: 8wekyb3d8bbwe
C:Program FilesWindowsAppsMicrosoft.BingNews_1.1.1.41_x64__8wekyb3d8bbwe
SUMMARY
Deployment is an important part of the application life cycle that should be thought about from the beginning of the project, as it also influences the technology used. Deploying different application types have been shown in this chapter.
You’ve seen the deployment of Windows applications using ClickOnce. ClickOnce offers an easy automatic update capability that can also be triggered directly from within the application, as you’ve seen with the System.Deployment API. In the section on deploying web applications, you looked at the Web Deploy package, which can be deployed easily with a custom managed IIS as well as Windows Azure websites.
You also learned how to deploy Windows 8 applications, which you can publish in the Windows Store, but also deploy using PowerShell in an enterprise environment without using the store.
The next chapter is the first of a group covering the foundations of the .NET Framework, assemblies.