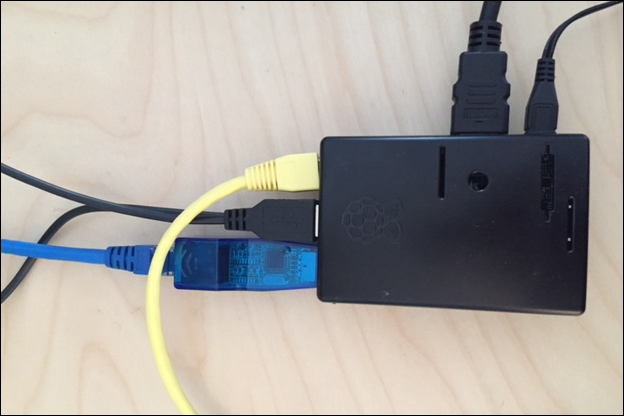
There are a few methods to get data to your Raspberry Pi. One method is placing the Raspberry Pi in line between two systems using two Ethernet ports. This requires a USB to Ethernet adapter and the ability to physically connect the Raspberry Pi in this fashion. In the following example, we are connecting a windows laptop to one end of our Raspberry Pi and the network switch to the other. One of the Ethernet ports is a USB adapter.
For live penetration testing, you can customize the Raspberry Pi's protective case, as shown in the following image, to mimic anything from a power plug to a network hub to hide your attack system. We found that the average person won't mess with a small box attached to a network device if it looks like it belongs there. Once, we also placed a Raspberry Pi in office stationery, such as a hollow alarm clock, to conceal it during an authorized penetration test.
The Raspberry Pi needs to be configured to bridge the target system's Ethernet port to the network-facing port and vice versa in order to see traffic. Without doing this, traffic will die once it hits the Pi. Before doing this, you will need to install the bridge utility that will be used to bridge the two ports together. To install this, use the apt-get install bridge-utils command. Once installed, here is the procedure to turn your Raspberry Pi into a network bridge for network taping purposes.
Tip
Setting up a Raspberry Pi in this manner is also ideal to use it as an intrusion detection/prevention asset. We will cover this in Chapter 6, Other Raspberry Pi Projects.
- You will need to configure both Ethernet ports as open IP addresses, which is also known as setting them to
0.0.0.0. To do this. use theifconfig eth[interface number] 0.0.0.0command for both interfaces in the following manner:Ifconfig eth0 0.0.0.0 Ifconfig eth1 0.0.0.0
Note
Make sure that you download the
bridge-utilsutility before doing this, or you will have to reset the Internet-facing interface back to a working state to download the utility prior to proceeding. Another work around is installing a USB to Wi-Fi adapter or another USB to Ethernet adapter temporarily to get back online and download the missing application. - Next, we will bridge the interfaces to a
bridge0interface using thebrctlcommand and add both the Ethernet interfaces:brctl addbr bridge0 brctl addif bridge0 eth0 brctl addif bridge0 eth1
This command won't work if you haven't installed the
bridge-utilsutility. - The last step is turning on the new bridge containing both the Ethernet interfaces using the following command:
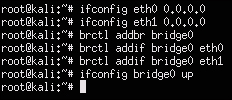
Ifconfig bridge0 upThe following screenshot shows what all the commands look like:
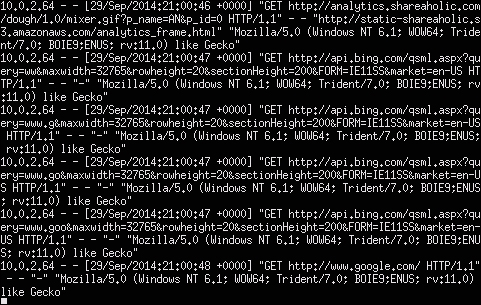
The following screenshot shows the output of tcpdump viewing traffic as the target laptop surfs the Internet:

Another approach to get data through the Raspberry Pi is to redirect traffic from a system on the same network subnet using a man-in-the-middle approach so that you don't have to mess with the physical connection of that target. Let's look at how this works.
The second method to capture data with your Raspberry Pi is identifying a target system on the same network and ARP spoofing its traffic through your Raspberry Pi. To do this, you will need to download the dsniff package since it doesn't come preinstalled on the Kali Linux ARM image. Use the sudo apt-get install dsniff command to install the package prior to launching the ARP spoofing exercise. Once you install dsniff, you are ready to start your ARP spoofing attack using the following steps:
- Enable IP forwarding to enable ARP spoofing to pass packets to and fro between the target to the Raspberry Pi using the following command:
echo 1 > /proc/sys/net/ipv4/ip_forward - Now, you need to find the default gateway and subnet mask of the network to which your Raspberry Pi is connected. You can find this using the following command:
netstat –nrThe following screenshot shows our default gateway as
10.0.2.1on a class C network, also known as network mask255.255.255.0: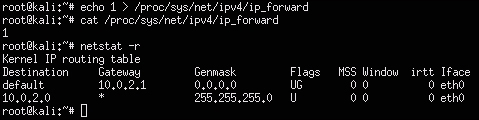
- Next, let's identify a target to attack. As mentioned earlier in this chapter,
nmapis a great tool for identifying what systems are on the network. In this case, we want to do a reverse lookup using–Rand includesnto avoid port scanning since we are just looking for a target. The previous screenshot showed that the default gateway network is a class C, so we can scan the entire subnet for a target withnmapusing the following command:nmap –Rsn 10.0.2.0/24
Our scan shows a
Delllaptop with the IP address10.0.2.63that is available for our attack. The other devices look likeCiscoandMerakinetwork devices. Let's target the host laptop. - Now its time to start ARP cache poisoning the traffic between our target and the default gateway so that we can tap into that traffic. Our interface is
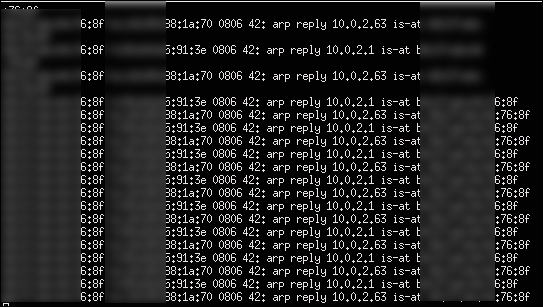
eth0that is represented by the–ioption, the target is10.0.2.63that is represented by the–toption, and the default route that is also known as a gateway is10.0.2.1. This is represented by the-roption. The command is as follows:arpspoof –i eth0 –t 10.0.2.63 –r 10.0.2.1 - You should start to see traffic from the ARP cache poisoning running in the window as shown in the following screenshot. Leave this open and run a tool such as Wireshark to view the traffic for a data capture. We will cover this later in this chapter.
There are utilities available that simplify the ARP spoofing or the port bridging process. Ettercap is a very popular man-in-the-middle attack suite that includes handling the ARP spoofing steps previously described. Its other key features include sniffing live connections, filtering content on the fly, and various other attacks on victims. Go to ettercap.github.io/ettercap/ for more information on this tool.
The Kali Linux ARM image does not include Ettercap. There are two options to install Ettercap, as shown in the following screenshot, after you run the apt-get install ettercap command. We will start by using the Ettercap GUI option and use the apt-get ettercap-graphical command to install it.

To run Ettercap once it is installed, type sudo ettercap -G. This will bring up the Ettercap GUI as shown in the following screenshot:
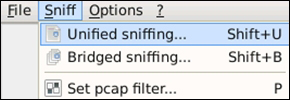
Ettercap has two sniffing options. Option one is Unified sniffing, which means sniffing all packets that pass on the cable via one interface. This method has options such as using promiscuous mode, which means packets that are not directed to the host are automatically forwarded to it using layer three routing. Ettercap will disable the kernel ip-forwarding to avoid sending the packets twice via the kernel and Ettercap.
Option two is Bridged sniffing, which means using two network interfaces and forwarding traffic between them. This is similar to how we used the brctl command to bridge two ports earlier in this chapter. Using this sniffing method is recommended over ARP poisoning since it is stealthier and more likely to be successful. This is due to the fact that advanced switches have methods to battle ARP poisoning attacks. The downside of this approach is to physically connect a Raspberry Pi in this fashion.
Tip
Setting up a Raspberry Pi in this manner is also ideal to use your Raspberry Pi as an intrusion detection/prevention asset. We will cover this in Chapter 5, Ending the Penetration Test.
For our example, we will use Unified sniffing since our Raspberry Pi is using one eth0 port for the attack. Click on the Sniff menu and select Unified sniffing... as shown in the following screenshot:
Ettercap will ask you to select an interface from your Raspberry Pi. We are only using the standard eth0 port for this attack so we have selected that, as shown in the following screenshot:

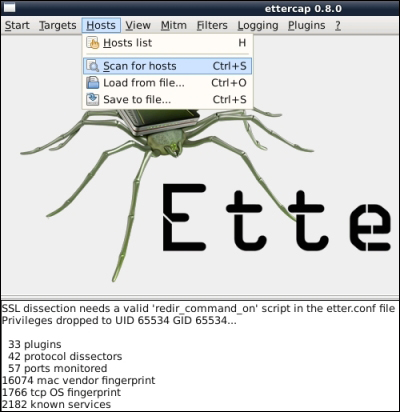
Ettercap will display some details about the plugs and ports that it has in the bottom window. You will also notice in the following screenshot that some new options will appear in the top menu. Now, we need to scan for hosts on the network to attack. You can do this by clicking on Hosts from the menu and selecting Scan for hosts. You will see a progress bar while Ettercap scans the network for targets.
You will see that the results appear at the bottom of the text box. In our example, we found four hosts. You can view the hosts by clicking on Hosts and choosing Host list. The following screenshot shows the Host List with four hosts:

You will need to select which hosts you want to place in your Target 1 and Target 2 areas in order for things to work. For our example, we will select 10.0.2.1, which is the default gateway, as Target 2. We will use the victim system 10.0.2.64 as Target 1. This will place our Raspberry Pi between both these targets.
To add an IP address to a target, click on it in the IP Address section in the Host List and click on Add to Target X, where X is the target that you are adding. You will see Ettercap display in the bottom window that the IP address you selected was added to the target you selected. You can also verify this by selecting Targets from the menu and choosing Current Targets. The following screenshot shows the addition of host 10.0.2.64 as Target 1:

To ARP spoof our selected targets, we can select Mitm and choose Arp Poisoning.... This will bring up a window asking you to select between two additional options of Sniff remote connections or Only poison one-way as shown in the following screenshot. Select Sniff remote connections and click on the OK button.

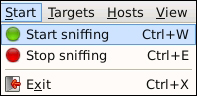
Once you click on the OK button, Ettercap should display in the bottom window that it's ARP poisoning all victims in Group 1 and Group 2 lists that we selected as Target 1 and Target 2 from the host scan. The final step is to select Start sniffing from the Start menu, as shown in the following screenshot:
The Raspberry Pi should now be placed in the middle between the target system and the default gateway, and let you to view the traffic with a sniffing software such as Wireshark. Ettercap has a sniffing option but it is not as good as other tools such as Wireshark, which we will cover later in this chapter. To monitor the ARP spoofing attack in Ettercap while it's running, click on View and select Connections.
Ettercap also offers a command-line flavor of the software that consumes less resources than the GUI. You can download this version of Ettercap by using the apt-get install ettercap-text-only command.
Let's say you want to perform all the steps covered in the GUI example and attack all devices on the same network as the Raspberry Pi. The following command string will quickly accomplish this:
ettercap –Tqi eth0 –M arp:remote //
The following screenshot shows an output similar to the GUI approach:

However, for this example, we are attacking all the hosts in Group 1 and Group 2, which means everybody on the network. You can see that we're listening on eth0 as specified in the command, and Ettercap has found four hosts and added them to both groups. You will also notice that we couldn't decrypt SSL traffic; however, this will be covered later in this chapter.
You can verify whether this Ettercap is working with any network monitoring software such as the urlsnarf part of the dsniff package. To do this, use the urlsnarf –i [the network interface] command, as shown in the following screenshot:
You will start seeing network traffic in a terminal window representing what is being captured while your attack is in progress, as shown in the following screenshot: