
Until this point, we have covered how to build a Raspberry Pi, install Kali Linux, and prepare your Raspberry Pi for a penetration test through various forms of remote access techniques. Now you are ready to learn how to use the Raspberry Pi to capture data on a target network. This chapter will provide you with various LAN- and wireless-based attack scenarios, using tools found in Kali Linux that are optimized for a Raspberry Pi or tools that you can download using the apt-get command. There are other tools that are available in Kali Linux as well as online; however, we will focus on applications that we have found to function properly on a Raspberry Pi.
The following topics will be covered in this chapter:
- Network scanning
- Nmap
- Wireless security
- Cracking WPA/WPA2
- Creating wordlists
- Capturing traffic on the network
- Getting data to the Pi
- Tuning your network capture
- Scripting tcpdump for future access
- Wireshark and TShark
- Beating HTTPS with SSLstrip
Network reconnaissance is typically time-consuming, yet it is the most important step when performing a penetration test. The more you know about your target, the more likely it is that you will find the fastest and easiest path to success. The best practice is starting with reconnaissance methods that do not require you to interact with your target; however, you will need to make contact eventually. Upon making contact, you will need to identify any open ports on a target system as well as map out the environment to which it's connected. Once you breach a system, typically there are other networks that you can scan to gain deeper access to your target's network. We will cover breaching systems in Chapter 4, Raspberry Pi Attacks.
One huge advantage of the Raspberry Pi is its size and mobility. Typically, Kali Linux is used from an attack system outside a target's network; however, tools such as PWNIE Express and small systems that run Kali Linux, such as a Raspberry Pi, can be placed inside a network and be remotely accessed as explained in Chapter 2, Preparing the Raspberry Pi, of this book. This gives an attacker a system inside the network, bypassing typical perimeter defenses while performing internal reconnaissance. This approach brings the obvious risks of having to physically place the system on the network as well as create a method to communicate with it remotely without being detected; however, if successful, this can be very effective.
Let's look at a few popular methods to scan a target network. We'll continue forward assuming that you have established a foothold on a network and now want to understand the current environment that you have connected to.
The most popular open source tool used to scan hosts and services on a network is Nmap (short for Network Mapper). Nmap's advanced features can detect different applications running on systems as well as offer services such as the OS fingerprinting features. Nmap can be very effective; however, it can also be easily detected unless used properly. We recommend using Nmap in very specific situations to avoid triggering a target's defense systems.
Note
For more information on how to use Nmap, visit http://nmap.org/.
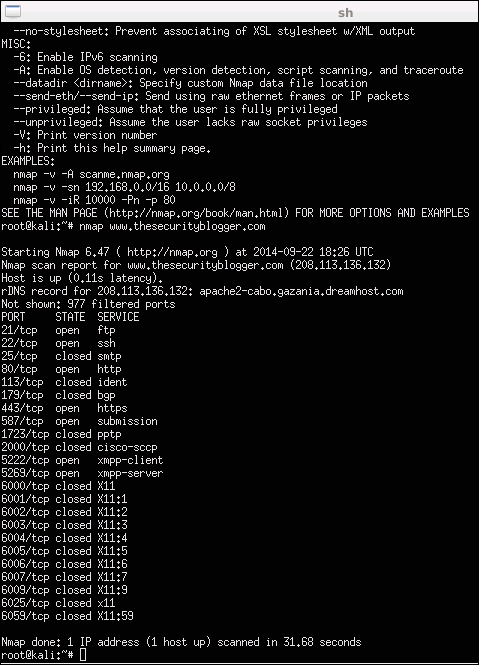
To use Nmap to scan a local network, open a terminal window and type nmap (target), for example, nmap www.somewebsite.com or nmap 192.168.1.2. There are many other commands that can be used to tune your scan. For example, you can tune how stealthy you want to be or specify to store the results in a particular location. The following screenshot shows the results after running Nmap against www.thesecurityblogger.com. Note that this is an example and is considered a noisy scan. If you simply type in either of the preceding two commands, it is most likely that your target will easily recognize that you are performing an Nmap scan.
There are plenty of online resources available to learn how to master the various features for Nmap. We will show other examples of using Nmap later in this chapter. Here is a reference list of popular nmap commands:
nmap 192.168.1.0/24: This scans the entire class C rangenmap -p <port ranges>: This scans specific portsnmap -sP 192.168.1.0/24: This scans the network/find servers and devices that are runningnmap –iflist: This shows host interfaces and routesnmap –sV 192.168.1.1: This detects remote services' version numbersnmap –sS 192.168.1.1: This performs a stealthy TCP SYN scannmap –sO 192.168.1.1: This scans for the IP protocolnmap -192.168.1.1 > output.txt: This saves the output from the scan to the text filenmap –sA 192.168.1.254: This checks whether the host is protected by a firewallnmap –PN 192.168.1.1: This scans the host when it is protected by a firewallnmap --reason 192.168.1.1: This displays the reason a port is in a particular statenmap --open 192.168.1.1: This only shows open or possibly open ports
Another attack vector that can be leveraged on a Raspberry Pi with a Wi-Fi adapter is targeting wireless devices such as mobile tablets and laptops. Scanning wireless networks, once they are connected, is similar to how scanning is done on a LAN; however, typically a layer of password decryption is required before you can connect to a wireless network. Also, wireless network identifier known as Service Set Identifier (SSID) might not be broadcasted but will still be visible when you use the right tools. This section will cover how to bypass wireless onboarding defenses so that you can access a target's Wi-Fi network and perform the penetration testing steps described in this book.
Looking at a Raspberry Pi with Kali Linux, one of the use cases is hiding the system inside or near a target's network and launching wireless attacks remotely. The goal will be to enable the Raspberry Pi to access the network wirelessly and provide a remote connection back to the attacker. The attacker can be nearby using wireless to control the Raspberry Pi until it gains wireless access. Once on the network, a backdoor can be established so that the attacker can communicate with the Raspberry Pi from anywhere in the world and launch attacks, as explained in Chapter 2, Preparing the Raspberry Pi. We will cover the building of this attack example using a rogue access point in the Rogue access honeypots section of Chapter 4, Raspberry Pi Attacks.