
When data warehouses were first built, they were considered as a repository for historical data to be used for business analysis by a chosen few. However, as technology and business practices have evolved, businesses now need to use daily business intelligence at all levels of the organization to stay competitive. The data warehouse, being the central repository of information about the business, thus plays a key role in the day-to-day operation of the business. This means that, as with OLTP systems, the data warehouse system must also be extremely reliable and nearly always available. Depending on how the data warehouse is used in the business, a short downtime could severely hamper the functioning of the business and an extended downtime could mean serious financial consequences. Therefore, when building a data warehouse, it is crucial to have a plan in place to ensure that the data warehouse is always available if needed.
Due to its key role in the business, the data stored in the data warehouse is an important corporate asset and hence must be protected from damage due to system failures and from disasters such as fire or an earthquake. September 11, 2001, highlighted the need to have a business continuity plan in place. It can take months to create a data warehouse, but only a few minutes to lose it! Thus, in addition to normal backup and recovery procedures, you may also need a disaster recovery plan for critical data stored in the data warehouse.
In this chapter, we will discuss how to build a highly available data warehouse based on features in Oracle Database 10g, such as Real-Application Clusters (RAC), Automatic Storage Management (ASM), Recovery Manager (RMAN), and Data Guard. Once the data warehouse has been built, it cannot remain a static entity and must constantly evolve to meet the changing needs of the business. You may need planned downtime because the data is being reorganized or the system hardware or software is being upgraded. This chapter will also discuss mechanisms in Oracle Database 10g, such as Rolling Patch Upgrades and Online Reorganization, which can reduce the planned downtime for the warehouse.
The right architecture for your data warehouse will be determined not only by the role the data plays in your business and the desired level of availability of the data warehouse, but also by the costs associated with that architecture. We will discuss techniques that can help maintain a balance between the costs and the availability and protection of the data.
We will begin this chapter by exploring the key features of a highly available system.
In simple terms, a highly available system is one where there is very little downtime. In reality, however, availability is measured by its impact on the users of the system. In other words, if the system were to go down, would it make a significant difference in the perceived user experience? In an online store, a 30-second delay may be tolerable; however, in a stock trading system, this could be disastrous.
To achieve high availability, a system must have the three key features: reliability, recoverability, and continuous operation.
A reliable system is resilient to failures due to hardware or software problems. In order to be so, it is critical that the all hardware components used are reliable, including disks, CPUs, memory, interconnects, network, and so on. A system with built-in redundancy can be useful to protect against individual component failure. Software reliability encompasses the database, application, and Web servers, as well as the applications themselves.
Recoverability means that the system is capable of recovering from any type of failure. Despite the best design, hardware and software components can fail. No matter how reliable, disks will crash and so it is important to have regular backups and a recovery procedure for data. Failures can also be due to human error, where someone accidentally deletes some critical files or tables. Finally, failures can be due to manmade or natural disasters, such as fire, earthquake, flood, electrical shutdown, or a terrorist attack. It is not only important for the system to be recoverable but also that the recovery occurs within a reasonable period of time. In order to do so, the system must be able to quickly identify failures and possibly automate the recovery process. Thus, monitoring and error detection form important components of a highly available system.
Continuous operation is the most obvious characteristic definition of a highly available system: the system downtime should be minimal or within the acceptable limits. The ability of the system to recover from unplanned failures in a timely manner is crucial for continuous operation. Another aspect is to be able to handle planned expansions, such as adding new hardware, upgrading software, or reorganizing the data without interruption in service to the users.
In order to provide these three characteristics, a highly available system not only requires technology infrastructure but also operational best practices. No amount of technology will help if you end up scrambling to find the DBA when the database goes down, because it will take longer than you think to restore the operation back to normal. And you will end up with lost business and unhappy users.
It is therefore important to put in place procedures and plans that dictate how to react when an unplanned failure occurs. Who will respond to the failure? How will they be notified? How long will the expected recovery time be? Is there an alternative system that users can access during the outage? How often can failure be tolerated? How much data can you afford to lose? Finally, it is extremely important to track and document the unplanned outages in the past to identify any recurring problems and to take steps to prevent failures in the first place!
No system, once designed, is ever static, and therefore you should also be thinking about procedures to handle planned downtime. Does the system have enough capacity to handle the user workload? How long can the system operate before you will need to expand the hardware? What is the anticipated growth of data volumes? How will you handle minor software patches and major software upgrades? How often does data need to be reorganized? Can the users query the data while it is being reorganized? What time of year or day is (not) a good time for planned downtime?
To summarize, before you settle on the technology for your highly available system, it is important to have clear answers to these operational questions.
In the following section, we will provide an overview of the Oracle Database 10g for building a highly available system.
Oracle Database 10g provides features that can be used to build an effective high-availability solution for any database system, including a data warehouse.
Some of these features include:
Real-Application Clusters (RAC)
Automatic Storage Management (ASM)
Flashback Table, Database, and Query
Oracle Data Guard
Online Reorganization of Data
Dynamic Reconfiguration of the Oracle Instance
Figure 17.1 shows where each of these features fit in supporting the three characteristics a highly available system.
In any system, there are two causes for downtime—planned and unplanned. Unplanned downtime includes hardware, software, and disk failures. Oracle features such as Real Application Clusters and Data Guard provide protection against unplanned downtimes. Human error is also another possible cause of downtime, and Oracle provides a feature called flashback to help correct problems caused by human errors. Planned downtime includes system maintenance and data reorganization and can be minimized by using features such as Rolling Patch Upgrades and Online Redefinition in Oracle Database 10g. The Oracle Enterprise Manager Grid Control framework provides a centralized management and monitoring interface, which makes it possible to anticipate failure conditions in advance, detect failures, and recover from them in a timely fashion.
In the next few sections, we will discuss each aspect of high availability, shown by the boxes in Figure 17.1, in the context of a data warehouse and how to use the relevant features in Oracle Database 10g for this purpose.
If you are designing a highly available data warehouse, the first question that must be answered is: What is the impact to the business if the data warehouse system is down? This will ultimately determine how many minutes or hours of downtime you can tolerate and how frequent your outages can be. If you cannot tolerate unplanned outages, then you must ensure that all hardware and software components are fault tolerant. If you use a three-tier architecture, then your application, Web-servers, and the network infrastructure must be fault tolerant as well. And, finally, the end-user applications that access the data warehouse must be robust. Most importantly, the database server used for the data warehouse must be protected against hardware and software failures.
Let us look at the various features in Oracle Database 10g that can be of use in ensuring continuous operation of the warehouse database.
The Real-Application Clusters (RAC) technology is at the core of most high-availability solutions using Oracle Database 10g. Chapter 3 discussed the concepts involved in clustering a database and the technology behind RAC. In a data warehouse, RAC provides the dual benefits of improving the scalability and performance of the system and making it highly available in the event of failure.
In an architecture using RAC, if there is a hardware failure in a node of the cluster or if the Oracle instance running on a node dies, the entire system does not become unavailable. The surviving nodes (or instances) will automatically take over the work of the failed node (or instance) within a matter of seconds. This means that while the system will not perform at its full capacity, at the least, the data is still available and user operation is not interrupted.
A key part of a fault-tolerant system is the storage architecture. For uninterrupted operation it is important to ensure that the storage components provide redundancy and fault tolerance or that an architecture incorporating redundancy is utilized—for example, mirrored disks. In Chapter 3, we discussed in detail architectures using RAID systems, which could be used to provide redundancy for storage. We also discussed the SAME (Stripe and Mirror Everything) methodology to ensure high availability for storage.
The Automatic Storage Management (ASM) feature in Oracle Database 10g, which was described in Chapter 3, provides data mirroring and striping capability, thereby providing protection against disk crashes. Further, ASM has a concept of failure groups, which allows disks to be classified according to their common points of failure. ASM will mirror data such that the mirrored copies will be in different failure groups, thereby providing storage redundancy. This ensures that no single failure can cause complete unavailability or loss of data. For example, if two disks that share a single SCSI controller are used to store the primary data and its mirrored copy, then failure of the controller could cause the data on the disk to be unavailable. In this case, the two disks are said to be in the same failure group. If these disks are managed by ASM, it will automatically ensure that the data and its mirrored copy will not be stored on these two disks in the same failure group.
Occasionally, a problem with the storage hardware can cause data corruption, which could be disastrous for a database. There are many ways to recover from such data corruptions, including RMAN’s Block-Level Media Recovery, restoring the data from a backup, and so on. However, the ideal situation is when the storage subsystem can be smart enough to identify that a block is corrupt and return an error instead of writing it to disk. Oracle has started an initiative known as Hardware-Assisted Resilient Data (HARD) in association with several leading storage vendors to integrate special checking for Oracle data block corruptions into the storage subsystem. In order to use HARD validation, the datafiles and log files need to be placed on special HARD-compliant storage devices. This technique can also detect corrupted writes due to errors made by the operating system or third-party backup products.
One of the important features of any highly available system is to quickly identify where the failure is. Oracle Enterprise Manager Grid Control provides a complete monitoring framework for monitoring the health of all components of the system. This can be used to monitor hosts, clusters, ASM storage, and databases and has a comprehensive system of alerts to notify the administrator in case of a failure.
By proactively monitoring your system, it is possible to become aware of a potential problem before it occurs. For example, an alert that a certain tablespace is running out of space can avoid a failed load job in the future. As described in Chapter 11, Enterprise Manager provides a mechanism for a DBA to define alerts; however, in addition, it has a built-in set of best-practice policies, and any violations get reported on the Targets page.
As the data warehouse is made accessible to more and more users in a corporation, the load on the system rises. If the system goes down because the load is too much, a user may perceive it no differently than an unplanned outage due to a disk failure. Therefore, it is important to plan for the peak load capacity. The Oracle Database 10g Resource Manager is a valuable tool to manage allocation of resources between different tiers of users of the system.
It is also important to ensure that the system has sufficient expansion capabilities so that you don’t need a wholesale redesign to accommodate an increase in users or data. In the future, the emerging Oracle Database 10g Grid Control framework may allow multiple systems to virtually share resources and provision additional resources as needed.
Building a data warehouse can take a significant amount of time, and it could only take a few failures to lose it all, so it is important to consider the impact of data loss. There are several ways in which data can be lost: media failure, such as disk crash; a human error, such as an operator inadvertently dropping a table; and a disaster, such as a fire, flood, or earthquake. We will discuss each of these aspects.
One very important consideration in the case of a data warehouse is to identify how much data loss can be tolerated in the case of a media failure such as a disk crash. An interesting point to note is that before getting to the data warehouse, the data usually goes through a staging process, and so there is already some built-in redundancy in the data. Perhaps it would be possible to retrieve some of the lost data from the staging areas, using the datafiles used for loading the warehouse, or from the operational data store, if you have one. However, if you are going to rely on any of these techniques, you need to test the process, and document how this will be done. On the other hand, it may be acceptable if the last few minutes of data were lost, because it did not make much difference to the analyses performed using the data warehouse.
The amount of data loss you can tolerate will ultimately determine the strategy for recovery from media failure. There are several options to consider:
Using archived redo logs allows you to recover the database after media failures. The Flash Recovery Area, described in Chapter 12, should be used to simplify the management of backup- and recovery-related files. The Recovery Manager (RMAN), which was also discussed in Chapter 12, provides sophisticated backup and recovery capabilities.
Techniques such as striping and mirroring, discussed in Chapter 3, can be used to provide data redundancy.
Physical design techniques such as partitioning, discussed in Chapter 4 can also be useful to protect against complete data loss: by splitting partitions across multiple disks, you may only lose one or more partitions and not the entire table.
Although most data loss is due to hardware failures, occasionally it may be due to a human error. In a data warehouse, individual changes to the tables are not very common except during the ETL process, and hence you may think that there is not much need for error correction. It is true that you may rarely have to retrieve an individual deleted record; however, accidents happen—for example, someone may inadvertently drop a table or a partition. More commonly, a batch job may get run twice, causing duplicate data to get loaded into the data warehouse. It can be very time consuming to recover from these simple mistakes. In these cases, the flashback features in Oracle can be used to restore the data, often significantly faster than restoring from backup or repeating the ETL process.
The flashback features work by allowing data to be viewed as of a time in the past. It is possible to recover past data at the level of a row, transaction, table, or the entire database. Thus, if you knew that the error occurred roughly at 3:15 P.M. today, you can look at the data as of a few minutes earlier and identify the changes done during this period.
Oracle Database 10g provides several flashback features:
Flashback Table
Flashback Drop
Flashback Query
Flashback Database
The point in time to flashback is specified using either a TIMESTAMP or an SCN. The TIMESTAMP is just a date and time expression and you are most likely to use this form. However, Oracle actually internally uses a number called the SCN to mark a “timestamp” for committed transactions. You can flashback up to a specific transaction, provided you know the SCN for that transaction. The SCN can be mapped to a timestamp to within a three second margin, so unless you need this level of accuracy, a time stamp is usually sufficient.
Flashback table allows you to restore a table as of a certain point in time, along with all its indexes, triggers, and constraints, without shutting down the database. This is done by issuing a FLASHBACK TABLE command from SQL*Plus. For minor error correction, this is a much faster method than restoring from a backup. For example, suppose we had incorrectly deleted a new special offer for product SP1300 to the TODAYS_ SPECIAL_OFFER table, around July 7, 2004, 1:01 P.M. Querying the table indicates the row is not present.
SELECT * FROM todays_special_offers WHERE PRODUCT_ID = 'SP1300';

no rows selected
To recover the data before this time, say to 1:00 P.M., the following statement can be issued:
FLASHBACK TABLE todays_special_offers TO TIMESTAMP
          TO_TIMESTAMP('2004-JUL-07 13:00:00',
                       'YYYY-MON-DD HH24:MI:SS'),

Flashback complete.
The flashback table command rolls back the entire table to the time or SCN specified. Now, if we issue the same query again, we will see that the row is restored.
SELECT * FROM todays_special_offers WHERE PRODUCT_ID = 'SP1300';

PRODUCT_ID   OFFER_DAT   SPECIAL_PRICE OFFER_PRICE
--------     ---------   ------------- -----------
SP1300       07-JUL-04            200            0
Note that in order to perform a flashback table operation, the table must have ROW MOVEMENT ENABLED, because the physical location of any row may need to change—during the flashback. To enable row movement, for example in the TODAYS_SPECIAL_OFFERS table, we had to issue the following SQL:
ALTER TABLE todays_special_offers ENABLE ROW MOVEMENT;
At the time of writing, flashback table is not supported if the table has any materialized views defined on it.
Flashback drop can be used to quickly recover from an accidental drop of a table. In Oracle Database 10g, when you issue a DROP command to drop a table, index, materialized view, and so on, the object does not get dropped altogether but is placed in a recycle bin. The object can then be recovered back from the recycle bin.
Hint
Note that objects in the recycle bin appear under names such as BIN$, and you can find its original name in the RECYCLEBIN view.
Suppose we had accidentally dropped the YEAR table from the data warehouse. The table will appear in the recycle bin and can be seen by querying the RECYCLEBIN view, as follows:
SELECT object_name as recycle_name
FROM recyclebin
WHERE original_name = 'YEAR' AND type = 'TABLE';

RECYCLE_NAME
------------------------------
BIN$3yV4u7YNbG7gNAgAIOXDhA==$0
Now, you can use the FLASHBACK TABLE statement to restore the table, along with any indexes or other items. You can use either the original name or the recycle bin name to restore the object.
FLASHBACK TABLE easydw.year TO BEFORE DROP;
If you do not want objects to go into the recycle bin, you must use the PURGE option when issuing the DROP—for example, if you truly wanted to purge the YEAR table, you would issue the following statement:
DROP TABLE easydw.year PURGE;
Once the object is placed in the recycle bin, it is only purged automatically if the tablespace is getting close to full and Oracle needs the space for other purposes. However, if you would like to reclaim the space earlier—for example, if you wanted to purge the YEAR table—you could issue the following statement:
PURGE TABLE easydw.year;
Thus, using Flashback Drop you can easily recover from an accidental drop of a table without having to go to a backup
Flashback query is an extension of flashback table, which provides the ability to query the database as of a certain point in time by using a SELECT statement. With flashback query it is possible look at the data as it existed yesterday, a week ago, and so on. This allows you to have a historical perspective on the data. You can also use flashback query to recover and reinsert old data into the table using an INSERT SELECT statement.
To use flashback query, you must use an AS OF TIMESTAMP or AS OF SCN clause for a table in the FROM clause.
Suppose we have the following simple query, which shows the current value of total sales (on July 7, 9:00 A.M.) from the PURCHASES table:
SELECT SUM(ps.purchase_price)
FROM purchases ps;

SUM(PS.PURCHASE_PRICE)
----------------------
            19319852.7
Now, suppose we deleted records worth $1,000 from the PURCHASES table, at around 10:00 A.M., with the result of the query as follows:
SELECT SUM(ps.purchase_price)
FROM purchases ps;
SUM(PS.PURCHASE_PRICE)
----------------------
            19318852.7
If we wanted to see the data as of, say, this morning, around 9:30 A.M., we could issue the following query. The result shows that the deletion of $1,000 is not included in the result of this query and so we are looking at a historical view of this table.
SELECT SUM(ps.purchase_price)
FROM purchases AS OF TIMESTAMP ('2004-JUL-07 9:30:00',
                                'YYYY-MM-DD HH24:MI:SS') ps;

SUM(PS.PURCHASE_PRICE)
----------------------
            19319852.7
You can also use the DBMS_FLASHBACK package to set a flashback time and then perform a whole sequence of queries as of that time, without using any special AS OF syntax. This is shown in the following example. First we use the DBMS_FLASHBACK.ENABLE_AT_TIME procedure to set flashback to 12:00pm July 7, 2004, then issue our query (in fact you could issue several) and finally issue DBMS_FLASHBACK.DISABLE procedure to turn off flashback.
--Step 1. enable flashback
execute  DBMS_FLASHBACK.ENABLE_AT_TIME( -
  TO_TIMESTAMP('2004-JUL-07 9:30:00', 'YYYY-MM-DD HH24:MI:SS'));

--Step 2. issue the query
SELECT SUM(ps.purchase_price)
FROM purchases;

SUM(PS.PURCHASE_PRICE)
----------------------
            19319852.7

--Step 3. disable flashback
execute DBMS_FLASHBACK.DISABLE;
Note that it is only possible to do a flashback query up to the point where no DDL has been done to the table. Thus, in the preceding example, if you had added a new column to the table, at 9:45 A.M. before doing the deletion, then you will not be able to flashback to the data as of 9:30 A.M.
Hint
The flashback query and flashback table features requires the Automatic Undo Management feature of Oracle Database 10g, to be enabled by setting the initialization parameter UNDO_MANAGEMENT to AUTO. Further, the UNDO_RETENTION parameter must be set to a value (in seconds) large enough to include the oldest data you may need to flashback to. For example, if you expect you may need to see 30-minutes old data, set UNDO_RETENTION to 1800.
Flashback database quickly rewinds an Oracle database to a previous point in time to correct any problems caused by logical data corruptions or user errors. Flashback database provides granular database recovery, down to a SCN.
To enable flashback database, follow these steps:
Make sure that your database has media recovery enabled by archiving the redo logs. To do this, you need to issue the following SQL command.
ALTER DATABASE ARCHIVELOG;
Ensure that you have set up a Flash Recovery Area, as discussed in Chapter 12.
Set the initialization parameter, DB_FLASHBACK_ RETENTION_TARGET, to indicate how far back into the past in minutes you want to be able to restore your database.
Execute the ALTER DATABASE FLASHBACK ON statement to enable flashback, as follows:
STARTUP MOUNT EXCLUSIVE;
ALTER DATABASE FLASHBACK ON;
When the flashback database feature is enabled, Oracle will periodically write the current versions of data blocks to a flashback log. These logs are saved in the flash recovery area and are used to flashback the database.
To flashback a database to any point in time, say 12:00 P.M., July 7, 2004, issue a FLASHBACK DATABASE command from SQL*Plus.
FLASHBACK DATABASE TO TIMESTAMP
TO_TIMESTAMP('2004-JUL-07 12:00:00','YYYY-MON-DD HH24:MI:SS'),
Once a flashback database operation has been completed, the database is not yet open for data access. At this point, the database can be opened in read-only mode. You can verify if this is the point in time that is desired and, if not, you can simply roll further back or forward in time. Once you have determined it is the correct point in time to flashback to, open the database with the RESETLOGS option, as follows:
ALTER DATABASE OPEN RESETLOGS;
To disable the flashback database feature, issue ALTER DATABASE FLASHBACK OFF, which will disable creation of the flashback logs.
Hint
The flash recovery area should be large enough to hold all required files, such as archived redo logs and backups; otherwise, you may not be able to do flashback to the desired point in time.
In a data warehouse, depending on your change volume, the space requirements for flashback logs may become prohibitive, so you may not be able to use this to recover from errors. However, one use for this feature is in a test system when trying out potential schema changes. Rather than writing lengthy undo scripts to undo the schema changes, you can simply flashback the database.
The importance of your data warehouse to the business will determine whether you need a disaster recovery plan, such as in case of a fire, flood, or earthquake. It may be that you decide that the business can do without the warehouse for a while. However, great care should be taken if you make this decision, because it may take much longer than you think to return to normal working conditions. Chances are that if you have a major failure, especially something that relates to a building, it could be many months before the site is back in operation. Another aspect of disaster recovery is recovering the data itself in the case of a disaster. One technique may be to keep a recent set of backup tapes off-site in a fireproof safe, and then use these to restore the database. A major issue with the data warehouse is its sheer size. Your recovery procedures should take into account the size of the database and the hardware required to rebuild it. Depending on how often the backups are synchronized, you must be prepared to lose data in this process.
If the data warehouse is indeed very critical to the business, you may want to consider having a standby database at a different location, using Oracle Data Guard.
Oracle Data Guard creates and maintains a copy of a database as a standby database at another site. If the primary database becomes unavailable, applications can be restarted and run on the standby. The standby is initially created from a backup of the primary database. As changes are made on the primary database, the redo that is generated is transmitted to the standby, where it is applied, keeping the databases synchronized. Data Guard can be configured to ensure that no data is lost in the event of a failure. It can also be used to support planned maintenance operations, such as hardware or operating system upgrades. Both the primary and standby systems can use Real Application Clusters.
There are two types of standby databases for use with Data Guard:
Physical Standby
Logical Standby
A physical standby database is an identical copy, block for block, of the primary database. It is kept synchronized with the primary database by recovering the redo data from the primary database (called Redo Apply) using the same process that is used for media recovery. When the standby is not performing recovery, it can be open for read-only queries. However, while the standby is open for queries, the redo cannot be applied.
A physical standby database can also be used to offload backup processing from the primary database. RMAN can back up the physical standby database while redo is being applied. Since the primary and the standby databases are block for block copies of each other, a standby backup can be used to recover the primary database in case of a failure
Physical standby databases have been available for several releases of the Oracle database and are currently used to protect many OLTP systems, data warehouses, and operational data stores.
A logical standby database contains the same logical data as the primary database, but its physical structure may be different. It is kept synchronized with the primary database by converting the redo data to SQL and then executing the SQL statements against the standby database (called SQL Apply). Data can be queried at the same time SQL apply is applying changes; however, it cannot be updated. Unlike in a physical standby, it is possible to create additional tables on logical standby databases and these tables may be updated at any time. Logical standby databases can be effectively used for reporting or testing purposes, thereby offloading some of the work from the primary database. Additional indexes and materialized views can be added to improve query performance. At the time of writing, there are a number of restrictions on the data types, types of tables, and operations supported on a logical standby.
Apart from disaster recovery, there are a number of ways in which logical standby database could be used to support the overall data warehouse architecture.
The logical standby database could be used as a source of data for the warehouse. Since it contains a copy of the data from the production system, it could be used as the source for the ETL process, thereby offloading the operational systems.
The logical standby database could be used to offload reporting tasks from the primary database. It could also be used as the operational data store. Data could then be moved into a staging area on a different system, where it is transformed into a star schema and is ready for warehouse queries.
The logical standby database could contain the warehouse tables. The tables maintained by logical standby must have the same logical structure as the tables on the primary database; however, additional tables could be created in the logical standby database to create a star schema for the warehouse. It is possible to update these tables as with any normal database tables.
While these techniques do not serve to protect the data warehouse against disasters, they allow a data warehouse to be incorporated into the larger enterprise disaster recovery plan, thereby reducing the overall costs.
Let us now look at the details of using Data Guard and how to set up standby databases.
A data guard configuration can be made up of one primary database and up to nine logical or physical standby databases. A typical configuration is shown in Figure 17.2. The primary database transmits the redo to both a physical and logical standby database, located at a site different from the primary database. The physical standby is used for disaster recovery, and the logical is used primarily for reporting but can also be used for disaster recovery.
There are a number of components that actually make up Data Guard, which are listed as follows:
Redo Transport Services: This component is responsible for shipping the redo data from the primary site to the standby site(s). These services also detect and resolve problems with missing archived logs (also referred to as gaps in the redo). Note that redo transport services are also used in the Auto Log mode of Asynchronous Change Data Capture, which was discussed in Chapter 5.
Redo Apply Services: This component is responsible for maintaining the standby database to keep it consistent with the primary database. In case of physical standby, the redo apply services use the normal database recovery mechanisms to apply the redo logs to the standby database. In case of logical standby, the redo information is first transformed into equivalent SQL statements, which are then executed on the standby database. This is illustrated in Figure 17.2. In Oracle Database 10g, the redo apply can either be done from archived redo logs on the standby database as they become available or in a real-time apply mode directly from the standby redo logs.
Role Management Services: Typically, in order to perform maintenance on the primary database, you may temporarily transform the standby database to be the primary database, and transform the old primary database to be the standby database. This operation can be done as a planned operation and is called a switchover. On the other hand, in the event of a catastrophic failure of the primary database, you may transform the standby to be the primary database. This is called a fail-over operation. Role Management Services provide switchover and fail-over capabilities in a Data Guard configuration.
Data Guard Broker is a distributed management framework that automates and centralizes the creation, maintenance, and monitoring of Data Guard configurations. While a Data Guard configuration can be managed using SQL*Plus, management operations are considerably simplified if they are performed using the Data Guard Broker, with the graphical user interface in Oracle Enterprise Manager. The Data Guard Broker also has a specialized command-line interface available as a standalone executable called DGMGRL.
The Data Guard Broker is integrated with Oracle Database 10g and uses a special process, known as the Data Guard Monitor (DMON), to perform its various tasks. The graphical user interface to Data Guard Broker in Oracle Enterprise Manager can be used to create new logical and physical standby databases from backups of the primary database, establish communication between the primary and standby databases, perform role transitions between the primary and standby, and so on. The command-line interface cannot be used to create a standby; however, it can be used to configure standby databases, perform role transitions, and various other maintenance and management tasks.
Hint
Please note that to use the Data Guard GUI you must use the Grid Control version of Oracle Enterprise Manager and not the Database Control version.
In the following section, we will discuss how to set up a Data Guard configuration using the Grid Control interface and, along the way, explain some more concepts and requirements for using this feature.
The Data Guard graphical user interface can be reached from the Administration page in Grid Control (shown in Figure 17.3) under the High Availability section.
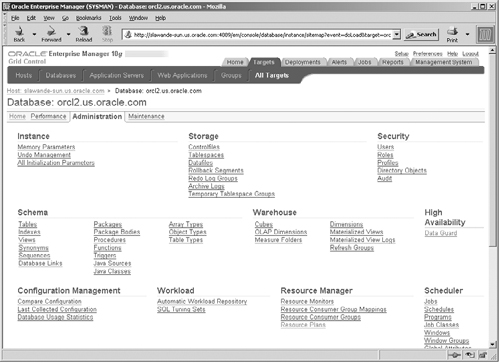
Assuming no Data Guard configuration exists, clicking on the Data Guard link will bring up the page shown in Figure 17.4.

At this point, there are no physical or logical standby databases present; clicking on the Add Standby Database link will start the wizard to create a standby database, as shown in Figure 17.5.
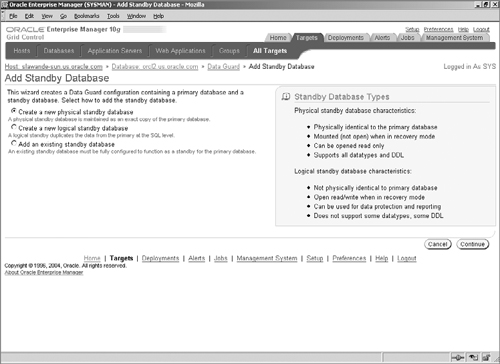
In this example, we are creating a physical standby database; however, the steps to create a logical standby are mostly identical. Before continuing on, you must be aware of some requirements that the primary database must satisfy in order to use Data Guard. In fact, if these requirements are not met, you will be prompted to fix them, when using the wizard.
SPFILE: The SPFILE (Server Parameter File) is a mechanism to manage initialization parameters, first introduced in Oracle 9i. When the initialization parameters are changed, unlike with a regular init.ora file, the SPFILE is updated automatically by the database server. In order to use Data Guard Broker, the primary database must use an SPFILE because it automatically configures some initialization parameters. Note that if you used the default database installed in Oracle Database 10g, SPFILE would already be enabled for you.
ARCHIVELOG mode: In order to use Data Guard, the primary database must be in the archive log mode, which means that before the redo log is overwritten, a copy of it is automatically archived. Recall that the standby database is maintained using the redo logs of the primary, and hence this is very crucial.
FORCE LOGGING mode: Some operations, such as Direct Path inserts (or loads using SQL*Loader), may optionally be instructed to not log redo data, using the NOLOGGING clause. This could be detrimental to the correct operation of a standby database, especially in the case of a failure. To protect against the use of the NOLOGGING mode, it is recommended that the primary database be set in the FORCE LOGGING mode. Note that this is not mandatory and you will get a warning when using the GUI, but the standby can still be created.
Hint
If you fail to satisfy any key requirements for Data Guard, such as ARCHIVELOG mode, you will not be able to proceed beyond this point.
Recall that the standby is initially created using a backup of the primary database. Pressing the Continue button in Figure 17.5 will bring you to the screen shown in Figure 17.6, where you must specify which type of backup to use—a new backup or one that had been previously created by Data Guard. Since this is the first standby database, we will create a live backup of the primary database.

If you are creating a logical standby and the primary database has any tables not currently supported, the offending tables will be indicated to you at this time. Also, in our example, the primary database is not in FORCE LOGGING mode, which is indicated as a warning on this screen (we can still proceed, since this is not mandatory).
The Next button brings up the page shown in Figure 17.7, where you must specify the directory where the backup files are stored. The backup can be retained and used to populate additional standby databases later. Note that in this step, you must specify appropriate operating system user credentials to create the backup directory.
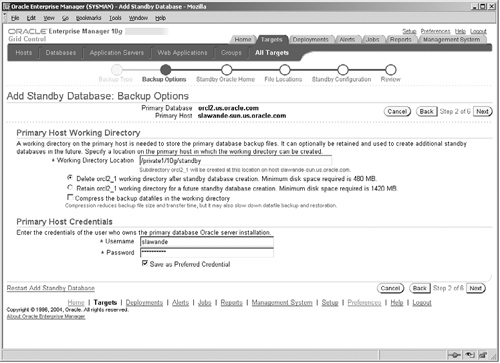
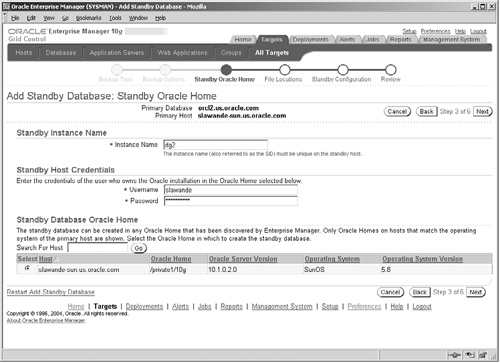
The next step, shown in Figure 17.8, is to specify the Oracle Home where the standby database must be created. The Oracle Home must be one managed as a Grid Control target. In our example, we have the standby database on the same host machine as the primary, but, typically, the standby will reside on a different machine and likely at a different location. Here you can appreciate the huge benefits of using Grid Control, in that it provides a single centralized mechanism to monitor databases and hosts at widely dispersed locations. You must also specify the instance name to use (in our example dg2).
Pressing the Next button will bring up the screen shown in Figure 17.9, where you specify the location for various files for the standby, such as data files, control files, redo log files, and so on.
Note that if the primary and standby are on different host machines, you should use an identical file system structure on both the standby and primary databases. However, in our example, they are both on the same machine and hence we must have a different structure. Fortunately, the wizard automatically figures this out, so you do not need to worry about the details. If you are curious, you could press the Customize button to see the various file locations. Also, in Figure 17.9, you must specify the location of the listener.ora and tnsnames.ora, where entries will be added to allow SQL*Net connections to the standby database.

The Next button brings up the penultimate screen of the wizard, shown in Figure 17.10, where, first, you must specify the Database Unique Name for the standby database and the Target Name, which is used by Grid Control to list the database under its targets listing. Second, you must specify the location (on the standby site) where the archived redo logs from the primary are placed. It is recommended that you use the Flash Recovery Area, described in Chapter 12, for this purpose, because this allows Oracle to automatically manage the space used by these logs and delete them when no longer necessary.

Hint
Set DB_FLASHBACK_RETENTION_TARGET for the Flash Recovery Area to be the same for both primary and standby databases.
The Next button will bring up a review screen (not shown here), where you can review your choices. The Back button can be used to change the options on any screen. Once you are satisfied with the settings, press the Finish button to start the creation of the standby database, which will bring up the screen shown in Figure 17.11.

The standby creation will be issued as an Oracle Enterprise Manager job, and once the job has been submitted, you will be presented with a screen similar to that shown in Figure 17.12, which is the central page to manage a Data Guard Configuration. While the standby database is in progress, the Status column will show Creation in progress, and, once it has finished, the status will appear as Normal. On this page, you will see all existing standby databases in the Data Guard Configuration and also the progress of the Redo Apply. The standby we just created, site1, is shown on this page. Press the Add Standby Database button to add additional standby databases.

One of the items of interest in Figure 17.12 is the Protection Mode. Data Guard provides three operating modes, which give different levels of performance, availability, and data protection. These modes are:
Maximum Protection Mode
Maximum Performance Mode (default)
Maximum Availability Mode
This mode guarantees that there will be no data loss in the event of failure of the primary database. In this mode a transaction cannot be committed until its redo information is written both to the redo logs on the primary and at least one standby site. If a failure prevents the redo from being written to the last standby site available in this protection mode, the primary database will be shut down. This level of protection is recommended to protect only the most critical data. It is also recommended that when using the maximum protection mode, you should have at least two standby databases so that hopefully one of them will be reachable at any given time, thereby avoiding a shutdown of the primary database.
This mode will provide data protection without impacting the performance of the transactions on the primary database. In this mode, the writing of redo to the standby site is done asynchronously with the transaction commit. Thus, the redo logs on the standby will lag the primary database. If the primary database fails, you may lose the data corresponding to this missing redo portion. Depending on the network bandwidth, the missing redo may be minimal.
This mode is a compromise between the other two modes. Similar to the maximum protection mode, this mode also requires that the redo be written to at least one standby site prior to transaction commit. However, if the redo could not be written to the standby site, the primary database will not shutdown but will instead operate in the maximum performance mode. This means that there may be temporary durations where the standby site does not have all the redo from the primary. This mode operates on the premise that eventually the missing redo will get written to the standby site, after which the database will resume operation in the maximum availability mode. As long as there were no gaps in the redo, this mode ensures no data loss if the primary database fails. However, in the event of a failure, if some redo was not yet written to the standby site, then you will lose this data, just as in the maximum performance mode.
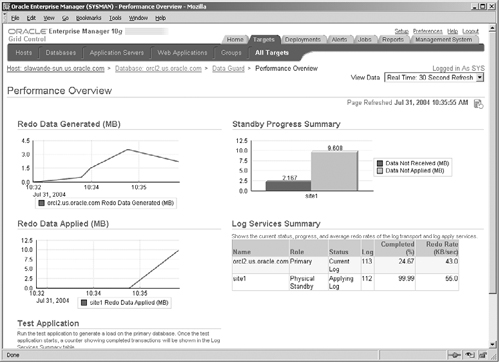
Note that it is important to understand the difference between redo shipping and redo apply in the context of the protection mode. In the maximum protection and availability mode, the redo shipping is synchronous with the transaction commit; however, the standby may still take some time before the redo is applied. This guarantees no data loss, because as long as the redo is available at the standby site, it can be applied at any time to synchronize the standby to the primary. On the other hand, in the maximum performance mode, the redo shipping may lag behind the actual generation of the redo on the primary. To appreciate this, click the Performance Overview link in Figure 17.12, which will bring up the screen shown in Figure 17.13. Here you can see the details regarding the redo data generated by the primary and the progress of the redo shipping services and the redo apply on the standby database. In the graph on the upper-right corner, the dark bar shows the volume of data not yet received by the standby and the light bar shows the volume of data not yet applied.
It is possible to switch between the modes of protection by clicking on the Protection Mode link in Figure 17.12. Note that when switching the mode to a higher level of protection, the primary database must be restarted, so you should carefully consider your availability and data protection requirements before deciding on the mode.
One of the major reasons to have a standby is so that it can be used in lieu of the primary database either when performing a scheduled maintenance or during an unplanned failure of the primary. The Switchover and Fail-over buttons in Figure 17.12 allow you to perform these two functions. In this section, we will illustrate the switchover operation; however, the steps for a fail-over are the same.
Suppose we needed to perform a hardware upgrade on the primary database but would like to have minimal interruption in data access for the application users. In this case, we would like to perform a switchover operation. Selecting a target standby and pressing the Switchover button will bring up the screen shown in Figure 17.14, where you must confirm that you would like to switchover. When a switchover occurs, the current primary database will be shut down and any connected user sessions will be disconnected.

Once the Yes button is pressed, you will see a progress screen (not shown here). Once the switchover is complete, you can now see (as shown in Figure 17.15) that the original primary database, orcl2.us.oracle.com, is now the standby, and site1 is now the primary database.

We can see how easy it is to set up a disaster recovery solution, if you need one, using Data Guard and Grid Control. In a Data Guard configuration the primary and standby databases can either be single-instance databases or they can use RAC. Oracle recommends that the primary and standby databases have identical hardware and software configuration.
In order to assist the design of highly available systems, Oracle provides a detailed blueprint, called the Maximum Availability Architecture (MAA), which gives guidelines for technology and best practices to set up a highly available architecture. This architecture, illustrated in Figure 17.16, is designed to provide maximum protection against both unplanned failures and disasters. In this architecture, redundancy is included at every level, including the network components, application server, database server, and storage. Due to limitations of space, we have only discussed Oracle Database 10g in this chapter; however, a key component of MAA is an application server farm running Oracle Database 10g Application Server, with a load-balancer providing fail-over capabilities. RAC and Data Guard are integral parts of this architecture, with an RAC database used for both the primary and standby. A WAN traffic manager is used to direct network traffic from the primary to the standby site in the event of a disaster. The entire configuration is centrally managed using the Oracle Enterprise Manager Grid Control console.

Along with the technical details, MAA also suggests best practices that can be followed to ensure continuous operation and quick recovery from failures. Detailed information on MAA is available in the Oracle documentation and at OTN (http://otn.oracle.com/deploy/availability/htdocs/maa.htm), and we would encourage you to consult this when designing your data warehouse for high availability.
In designing the warehouse, in addition to the data, you may have collected a lot of metadata in the form of schema design, DDL scripts, loading scripts, and so on. Loss of a crucial script can be as disruptive to a data warehouse operation as loss of a critical table. Thus, care must be taken to also include metadata in your high-availability solution. This means all critical files and scripts must be backed up on a regular basis or, alternatively, stored in the database itself. The Oracle Database 10g is capable of storing data in all formats, and so, by using the database, you can ensure protection for all critical files just as if they were data. Further, as your business processes evolve, so will your processes for loading and managing your data warehouse. Hence, it is also important to put a change management infrastructure in place to track all changes to the schema and loading procedures over time. Thus, in case there is a problem, you can quickly identify the source and revert back to an older version if necessary.
As with any computer system, the data warehouse typically needs to be periodically upgraded with new hardware and software. When choosing hardware for a data warehouse, it is important to choose hardware that can be expanded online. You should be able to add disks, memory, and CPUs without needing to bring down the entire data warehouse. Similarly, it is important to consider the impact of software upgrades on the system. The upgrade may be as simple as applying a patch or as major as changing the database version. In all cases, you must have adequate testing done before unleashing the new software on users.
Oracle Database 10g provides several features to help in this area, which we will discuss now.
Prior to Oracle Database 10g, if you were experiencing an increased user workload and needed to increase the size of the SGA, you had to shut down the database. This can be an annoying interruption to users and can be a significant financial hit to the business. In Oracle Database 10g, many of the initialization parameters for the Oracle instance, including SGA and PGA memory settings, can be dynamically altered, using the ALTER SYSTEM SET command, without shutting down the database.
The initialization parameters can be easily reconfigured using Oracle Enterprise Manager. Further, Oracle will also automatically adjust values of other internal derived parameters whose values are based on the settings of the modified initialization parameter.
Usually, data warehouses have a regular maintenance window where data is loaded and all auxiliary structures refreshed. This could happen weekly, daily, or even multiple times in a day. By partitioning data you can perform maintenance on part of the data, while the remaining data is still available for use. Many other operations in Oracle Database 10g can be performed in an online fashion, such as rebuilding indexes, reclaiming space for objects (Online Segment Shrink), and allocating additional space (Resumable Space Allocation). Thus, the data warehouse can be made fully or partially available during normal maintenance operations.
No database design is ever static, and, as business requirements or performance goals change, the data warehouse schema must evolve to meet these requirements. For instance, you may decide to split a large dimension table into a snowflake for improved load performance, or add a new measure column to the fact table. Also, occasionally you may need to physically reorganize the data—for example, to change the partitioning structure or to move it to a different tablespace on a different disk. Traditionally, these types of changes would require a significant scheduled downtime for the entire database. Oracle Database 10g provides Online Data Redefinition capabilities to physically or logically reorganize data. This makes it possible to change the data warehouse schema, or reorganize data, while users may still be accessing and even modifying it.
Oracle Enterprise Manager Redefinition wizard and the DBMS_ REDEFINITION package, which were discussed in Chapter 11, can be used to reorganize tables.
One of the common maintenance activities on any software system is that you periodically need to apply a patch to fix outstanding issues, especially security issues, or to upgrade the database version. The Oracle Database provides two mechanisms to do this without downtime—using RAC and using Data Guard.
In addition to transparent fail-over after an unplanned outage, Oracle RAC also provides the ability for planned shutdown of one or more nodes. This is used by the Rolling Patch Upgrade feature, which allows you to apply an Oracle database or operating system patch to one of the nodes in a RAC cluster, without affecting the other nodes. Thus, you can patch all nodes one, by one shutting down the entire cluster, which means that users can continue to use the database while the software is being patched.
There are two steps to perform a Rolling Patch Upgrade:
The node where the patch is to be applied is quiesced, which will mean that all users are automatically directed to one of the other nodes.
The patch is applied to this node, the node is reactivated, and joins the cluster.
Thus, the RAC system now has different nodes operating at different software levels. You can also use this as an effective way to test the patch, because if there is a problem, you can roll back the patch. Thus, you can apply a patch to the entire cluster in a phased manner without any downtime.
Oracle Enterprise Manager can be used to monitor availability of new software patches for the database by configuring access to the MetaLink Web site and can be used to apply the patches on an ongoing basis. However, not all patches can be upgraded in a rolling fashion, and hence the alternative technique using Data Guard can prove beneficial.
With Data Guard, you can either apply patches or perform database software upgrades (from Oracle Database 10g, Release 1, Patch Set 1 onward) with near-zero downtime by using a logical standby database. Unlike the RAC Rolling Patch Upgrade, which can only be used for select patches, the logical standby database can be used for any Oracle patch set or major release.
This is done using the following steps:
The logical standby database is upgraded to the next release. At this point, the Data Guard configuration is running in a mixed mode. In this mode, the upgrade can be aborted and the software downgraded, without any data loss. Also, additional standby databases may be used to protect against unplanned failures at this time.
Once the new software version is tested and validated, a switchover operation is done now to make the logical standby the primary database, and all applications must now use the new primary database.
The old primary database can then be upgraded to the newer version as well.
Thus, with Data Guard, it is possible to perform database software upgrades and tests with minimal disruption in service for the end users.
Throughout this chapter, we have illustrated the technology Oracle Database 10g provides to build a highly available warehouse. Ideally, you would like to keep as much data online and available at all times. However, despite the availability of technology, the sheer size of data involved in a data warehouse could throw any high-availability solution out the window because the costs could be prohibitive! The answer to this dilemma lies in understanding which data is hot and which is not—only the data that is critical and constantly in use needs to be kept in a highly protected and available system. As data gets old or obsolete, it could be moved to cheaper disks or compressed and/or archived to a slower medium such as tape. Thus, it is still available if you need it for some long-term analysis or regulatory purposes; however, it does not cost as much to keep it accessible and protected, if it is not in active use. This is known as Information Lifecycle Management and can be the critical success factor in balancing the cost and availability of data in a growing data warehouse.
In order to manage resources effectively, you need to classify data into different categories, based on the age, access frequency, or importance to the business. Typically, the age of the data is the most common criterion for how frequently it is accessed. For example, if the data warehouse stores five years of data, only the last two years of data may be used in daily operations of the business. An effective mechanism to place data in different categories by age is to use range partitioning. However, you could also perform the classification based on some application-specific data value, such as a frequent customer tag, which could then be used as a partition key with list partitioning.
Therefore, data may be classified into active current data, less active, historical, and archival data. Different policies regarding type of storage and protection levels may be used for each class of data. Thus, the cost of storing that data can be controlled based on which category the data falls into. This is illustrated in Figure 17.17. For example, the most current active data could be placed in a highly redundant, enterprise-class storage system. At this stage, the data can be kept in a maximum protection RAID system and backed up nightly. As updates to the data become infrequent, the partitions could be compressed. Later, as the activity on the data decreases, it could be moved on to a lower-cost storage tier consisting of off-the-shelf cheap (and potentially slower) disks. Eventually, the data may be obsolete from the business point of view but may need to be kept for regulatory purposes—such archived data could be kept off-line on tape. As time passes and current data becomes older, the data is continuously reclassified, and Oracle Database 10g features such as Data Pump and transportable tablespaces can be used to rapidly move the older data into the next, cheaper tier of storage.
We have barely touched on this topic, but hopefully you can appreciate how effective life-cycle management makes it possible to provide adequate protection to critical data, while at the same time keeping the cost of storage and data protection under control.
In this chapter, we have discussed various aspects of improving the availability of the data warehouse. Oracle Database 10g provides features such as RAC to provide fault-tolerant operation in the face of hardware and software failures and allows logical and physical reorganization of data without requiring downtime. We discussed the role of disaster recovery in a data warehouse and also how the data warehouse fits into an enterprise disaster recovery strategy using Data Guard. Finally, we also touched upon the subject of information life-cycle management, which ensures that the data warehouse will continue to be cost effective even as data sizes grow.