
One of the most important management tasks for any database is taking backups of the data. It may seem obvious, but you will be surprised how many companies jeopardize their business by taking backups infrequently, by not taking care of their backup tapes, or by not testing their backup and recovery strategy.
A data warehouse has a couple of major characteristics that influence the backup strategy:
The size of the data warehouse
The historical, and therefore static, nature of most of the data in the warehouse.
A data warehouse by its very nature is a repository of historical records, which, generally, once loaded, are not subsequently altered. Therefore, once this load has been performed and backed up, it is unnecessary for it to participate in any subsequent backup operation. For example, if our data warehouse holds five years of data, it may be only the partitions for the current month that are updated on a nightly basis. This is less than 2 percent of the warehouse data that is changing and therefore needs to be backed up.
In addition, the problems with scheduling the backup of a data warehouse are slightly different from backing up a typical production system. Since warehouses usually receive large loads of data at scheduled times, typically overnight, backups have to be scheduled along with this work. Plus, we have the added complication of deciding how to back up the database.
Why is this a problem? Well, normally, a database is backed up in its entirety, but that may not be possible with your data warehouse, especially if it is particularly large (multiple terabyte size). Therefore, incremental backups and backups of one or more tablespaces may be more practical. Careful management of your backup location, or of the backup tapes, is critical; otherwise, you could find yourself unable to rebuild the data warehouse.
In the next sections, we are going to look at the common backup and recovery strategies and their applicability to the data warehouse; we will also discuss a new feature in Oracle Database 10g, called the Flash Recovery Area, which is a disk backup area.
In this section, we will look at the different forms of backup and recovery that are possible on the Oracle database and their business implications.
There are a number of types of backup that can be performed on an Oracle database.
A logical backup is an export to an operating system file of the database or objects in the database, such as schema object definitions, and the contents of the objects, such as tables and indexes. It provides a snapshot of the schema and its data at the time of the export, and reimporting can be used to restore that snapshot.
However, using export and import is not advised as the sole basis of a warehouse backup strategy on any but the smallest of data warehouses. For example, exporting the whole database would be prohibitively time consuming for a large data warehouse and would use a lot of disk space. In addition, recovery by reimport could also take an inordinate amount of time. Furthermore, it is not possible to easily export just the changed data for either the fact tables or the dimensions. This could result in the scripts to control a backup, which must be selective on the data being exported, being complex and difficult to write.
However, a logical backup can still play a very useful role. It can still be necessary or convenient to take an export snapshot of part of our data warehouse schema. For example, the dimension tables, which tend to be significantly smaller than the fact tables, could be exported more conveniently and may provide a supplement to the other backup mechanisms. If we know that a dimension table has not changed appreciably, it may be markedly quicker and easier to reimport the table from the logical backup and rerun the processes to reapply any changes to the data.
During a logical backup, we do not want changes occurring to the data that may result in a transactionally inconsistent backup. If Data Pump export is used, as discussed in Chapter 5, the use of the flashback feature ensures that a transactionally consistent view of the data is obtained.
A physical backup involves backing up the actual files that form the database and are necessary for its recovery (i.e., the datafiles, control files, and redo log files).
There are two modes of physical backup that can be performed:
Cold, or off-line, backup, which is performed when the database has been shut down in a consistent state or is not operating in archive log mode. The database must be shut down consistently (i.e. using shutdown modes immediate or normal); the database files and control file are backed up and then the database is restarted. During a cold backup, the database is not accessible to the users and this can be a major limiting factor.
Hot, or on-line, backup, which is performed while the database is in archive log mode, open to read and write activity, and accessible to the users.
Furthermore, there are two other considerations when performing a physical backup concerning how copies of the datafiles are made.
Full backup, which backs up all used blocks in the database data files
Incremental backups, which backs up only those blocks in the database that have changed since the last full or incremental backup
We mentioned earlier that a type of backup that is very useful for a data warehouse is one that does not have to back up all of the datafiles. The incremental backup allows us to back up only the parts of the database datafiles that have changed.
Oracle incremental backups have the concept of backup levels, of which there are two: level 0 and level 1. A level 0 incremental backup acts as the base for subsequent incremental backups and is similar to a full backup in that it copies all blocks that contain data. (The only difference between a level 0 incremental backup and a full backup is that a full backup cannot act as the base of an incremental backup strategy.)
The level 1 backup has two types:
Differential, which copies all blocks changed since the last level 0 or level 1 backup
Cumulative, which copies all blocks changed since the last level 0 backup
Cumulative level 1 incremental backups, therefore, contain all of the previous level 1 backups back to the last level 0 incremental backup. They are better for recovery purposes, because only the one incremental backup needs to be applied.
Figure 12.1 shows how each of the differential incremental level 1 backups only backs up the changes occurring since the preceding level 1 or level 0 backup.
A level 0 incremental backup (i.e., a full backup of all used blocks to use as a baseline) is taken on Saturday, and then each day at close of business up to Friday, a level 1 differential backup is taken. This backs up all of the blocks that have changed since the preceding day’s level 1 backup. Therefore, after Friday’s backup, all of the changed blocks are held on six incremental backup files. On the following Saturday, a new full level 0 backup is taken and the cycle repeats.
Now, let’s compare this with using a cumulative incremental backup strategy. A level 1 cumulative backup taken on the same schedule will incorporate all of the changes back to the preceding level 0 backup. To clarify how this is different from the differential level 0 backup, refer to Figure 12.2.
A cumulative backup on Sunday backs up the changes since the preceding level 0 incremental backup on Saturday. The cumulative backup on Monday backs up the changes on Monday and the changes on Sunday. On each day, the cumulative incremental backup will back up all changes since the last level 0. Therefore, after Friday’s backup, all of the changed blocks are held on just one incremental backup file. On Saturday, a new level 0 incremental backup is taken and the cycle repeats.
In order to track which blocks have changed for an incremental backup, Oracle tracks the system change number (SCN). Each block in an Oracle database contains the system change number (SCN) of the most recent change to a block. When performing an incremental backup, Oracle must read each block in a file and compare the block’s SCN with the SCN of the preceding backup. If the SCN is greater, then the block has changed and is backed up. This method does rely on reading every block to get its SCN number and hence can be slow. However, one of the new features in Oracle Database 10g is block change tracking, which uses a special tracking file to record the location of all changed blocks in the database. The backup process can then use this file when performing an incremental backup rather than reading all of the datafiles. The file enables the backup to more quickly identify the location of the changed blocks and back them up resulting in a much more efficient incremental backup.
Hint
Block change tracking records changed blocks even if no redo log is generated. It should, therefore, be used after performing NOLOGGING operations—for example, during data load operations, for which you may still want to backup incrementally.
Another particularly important new feature in Oracle Database 10g is the ability to merge the incremental backup into the full backup copy of the database, so that the full backup files then contain the up-to-date backup. Full backups are a lengthy process, because they are backing up all blocks that have ever been used; incremental backups usually take a significantly shorter amount of time, because they are backing up just the changed blocks. Effectively, this new feature means that we can obtain a full backup in about the same time that is taken to perform an incremental backup of our database.
Considering the size of a typical data warehouse, copying the entire datafile every time that a backup is required can be a significant overhead in terms of time, processing requirements, and space requirements of the backup media. To only have to back up the datafiles for the partitions that have changed or, even better, the blocks in those files that have changed, can result in considerable savings.
To restore a database or parts of the database, such as a tablespace, is to retrieve the backed up files from the backup media and make them available to the database. For example, the whole database can be restored from a full backup by restoring the datafiles and control files. It will, therefore, still have the same data as it had at the time the backup was taken.
We could also restore the database by restoring the level 0 backup and then restoring and applying the incremental differential level 1 backups. This will update the blocks in the correct sequence and therefore result in the database files being brought up-to-date. Applying a single cumulative level 1 backup will be quicker than applying the multiple differential level 1 backups. For example, if we have to perform a restore due to some form of system failure and get the database back quickly, then time is our enemy and this is when we least need a lengthy process. Consider the backup strategy that involves a weekly full backup on Saturday night with daily differential incremental backups, as shown in Figure 12.1. If the system fails on a Friday, then to restore the database would necessitate restoring the level 0 backup and then restoring and applying each of the five differential incremental backups in turn, which could take a considerable amount of time.
This is where the new incremental merge option in Oracle Database 10g is a very important feature. Now, our base level 0 backup files contain an up-to-date backup so that all that is required is to restore the most recent merged level 0 backup. In our weekly backup strategy example, just the merged level 0 backup must be restored, and this method removes the need to apply the incremental backups. A considerable saving on both the speed of the backup and the speed of the restore!
However, restoring the database only resets it to the state at the time that the backup was made. In our example backup strategy, this means the time that the incremental or full backup was actually taken at the end of the day. This would result in losing any transactions that occurred during the day after the backup. This is where databases that operate in archive redo log mode have the advantage of being able to be recovered.
To recover the database, or part of the database, is to recover to a point in time using the archived redo logs. By applying the transaction changes in the redo logs to the restored database files, the datafiles are rolled forward to a required point in time.
Applying the redo logs in this fashion effectively repeats the transactions contained in the log files. We can roll forward to a selected point in time and then open the recovered files to make them accessible and usable on the database again. We do not necessarily have to perform a complete recovery, which would be to the most recent point in time. For example, if we are recovering due to a faulty program writing incorrect data into our tables, then we will want to recover to just before that program commences its transaction. This is known as an incomplete recovery or point-in-time recovery.
Running the database in archive log mode provides significant advantages. The data warehouse could still have other transactions, which we want to preserve, occurring at other times on the database. For example, the database may also be used for a number of other repositories, such as Oracle Enterprise Manager, Oracle Discoverer and Oracle Warehouse Builder. If we run the database in archive log mode, then changes to the data in these repositories can be recovered without needing to reenter any of the transactions.
Oracle backup and recovery is performed using Recovery Manager (RMAN). RMAN handles the administrative work associated with the backup and recovery operations and catalogs the metadata about the backup files and the activities performed. We will now look at the new Flash Recovery Area feature for performing backups to disk; in the remainder of the chapter, we will discuss how backup and recovery are managed and performed via Oracle Enterprise Manager using RMAN.
Traditionally, backup was done to a slow medium such as tape. However, with the advent of low-cost disk storage devices, it is much easier and faster to do backups to disk. Unlike with a tape backup, restoring data from a disk backup can be a very quick operation. However, the process of managing the disk space for backups and determining which files to keep and discard can be an onerous task for a DBA. Oracle Database 10g has a new feature called the Flash Recovery Area, which can greatly simplify the management of all recovery related files. By setting up the Flash Recovery Area and some simple policies, RMAN can now automatically manage all of the backup and recovery files with no DBA intervention.
The Flash Recovery Area is a unified storage area that contains all the recovery related files for the Oracle database, including redo logs, RMAN backups, and data and control file backups. Creating a Flash Recovery Area simplifies the process of managing recovery related files, such as naming backup files, determining which ones to keep and removing files when they are no longer necessary. In addition, the Flash Recovery Area is used to contain a new type of file, called the flashback logs, which are used by the new Oracle Database 10g flashback feature discussed in more detail in Chapter 17. The Flash Recovery Area uses the Oracle Managed Files (OMF) feature, discussed in Chapter 3, to manage the files.
At this point it is worth reiterating a golden rule of backup, which is particularly relevant when we are backing up to disk. What is being backed up (i.e., the database data, control, and redo log files) must reside on separate disks to the backup destination—that is the Flash Recovery Area. This prevents any form of media failure causing the loss of both the source database files and the backup files. Furthermore, also backing up to tape, which is then held off site, enables recovery from any disaster that affects the whole data center, such as fire or flood.
The Flash Recovery Area can be set up by simply setting up two initialization parameters, as follows:
DB_RECOVERY_FILE_DEST: This parameter specifies the default location for all recovery-related files, which can be a directory on a file system or an ASM disk group (see Chapter 3). By using ASM, you can automatically provide redundancy for files stored in the Flash Recovery Area.
DB_RECOVERY_FILE_DEST_SIZE: Specifies (in bytes) the maximum space to be used by the recovery files created in the recovery area location. The Flash Recovery Area size should be large enough to include a copy of all the datafiles, control files, any incremental backups (created using RMAN), on-line redo logs, and archive logs that have not yet been archived to tape.
Hint
When creating a database using the Database Configuration Assistant, you will be asked if you would like to set up the Flash Recovery Area, as shown in Chapter 2, Figure 2.10.
Use of the Flash Recovery Area for backups to disk has the advantage that you set the location, size to be used, and retention policy; Oracle manages the storage area on disk. Files no longer needed are eligible for deletion. If you don’t use a Flash Recovery Area, then you must manage the disk area manually.
In this section, we will discuss the various techniques you can use to back up your data warehouse. However, it is important to realize that, if your data warehouse is very large, taking a full backup of it may be almost impossible due to time and other constraints.
The following types of backups will be discussed:
Full backups
Incremental backups performed as a custom backup
Tablespace backups
The first step toward defining our backup environment is to create a backup configuration. The backup configuration is a set of defaults used for backup operations. It determines where the backup is to be stored and what the backup medium is to be (tape or disk). It enables customizations to be defined and saved for reuse.
In Enterprise Manager, on the Maintenance screen in the Backup/Recovery section, there are a number of options for performing and managing your backup and recovery. Start by selecting Configure Backup Settings, where you can specify default values for your backup operations, as shown in Figure 12.3.

This screen contains three sections for defining the defaults for your backup, and they are used when you create the backup job if you don’t specifically override them. The three groups of settings that can be defined are:
Device
Backup set
Policy
On the Device screen, shown in Figure 12.3, there are check boxes in the disk and tape sections for an important option in Oracle Database 10g: to instruct RMAN to compress the backup files as they are archived to the destination area. This feature assists in the management of large volumes and enables better space utilization and more backup files to be stored.
Another new and important option in Oracle Database 10g is the option to compress the backup set as it is being written to disk or tape. With writing to the disk-based Flash Recovery Area, being able to compress the backup set can have significant benefits in saving and managing the space.
Also on the Device screen, you can define the degree of parallelism to be used when the backup is performed, as well as the disk location for the backup. By default the disk location is the Flash Recovery Area, but here you can override the default to use a different disk location. Similarly, you can provide default settings if you are backing up directly to tape.
In our examples in this section, the backup will go to disk, but, in a data warehouse, it will probably also have to go to tape. For example, a disaster recovery plan may mandate off-site storage on tape. To store backups on tape, RMAN requires the installation of a media management library available from another company such as Legato or Veritas. Refer to Oracle’s Backup Solutions Partners Program for the current list of certified vendors.
When backing up to tape, it is extremely important to ensure that the physical labels placed on the tapes match the contents. Too many times we have seen customer problems, where it is impossible to recreate the database from the backups because the labels on the tapes do not match the actual tape contents. Sloppy management practices such as this could mean that you lose your entire data warehouse.
Whenever you take a full backup of the system, do not discard the previous full backup set, because, if there were a problem with the current backup, you would lose your entire data warehouse. Therefore, save as many full backup sets as is possible before you recycle the tapes.
On the Configure Backup Settings screen, use the appropriate test button to test the disk or tape device’s configuration. For example, for a disk-based backup, clicking the Test Disk Backup creates a BACKUPSET directory. This is created under the named directory for your database in the Flash Recovery Area. In the BACKUPSET directory, the new directory is named by the current date (e.g., 2004_07_18). Once tested, we know our configuration is correct.
On the Policy screen, shown in Figure 12.4, you can define various additional settings for your backup, such as how long the backup sets are to be retained.

This screen provides a good indication of changes that have been implemented with Oracle Database 10g to ease the backup management task. For example, under the Retention Policy section, there are options to define which backup sets must be kept in order to meet the backup and recovery strategy for your system; these are then automatically used when a backup is performed.
Note the Optimize check box in the Backup Policy section. If this is selected so that backups are executed using the optimization feature, then RMAN avoids creating identical copies of files that have not changed since the last backup. However, if backup files are aged out by the retention policy, then RMAN will take a new copy.
The size of your data warehouse will determine how frequently a full backup is taken. Even if your warehouse is huge, a backup should always be taken periodically.
One of the tools provided in Oracle Enterprise Manager is the backup wizard, where you can:
Define a predefined backup strategy
Customize your own strategy
To start a backup, go to the Backup/Recovery section on the Maintenance screen and click on the Perform Backup link.
Here we will see how to set up a predefined backup strategy. The first question asked by the wizard, illustrated in Figure 12.5, is where is the destination of the backup is disk, tape, or both.

The next screen (not shown) summarizes the Oracle suggested backup policy. This is first to perform a full backup followed by an incremental daily backup.
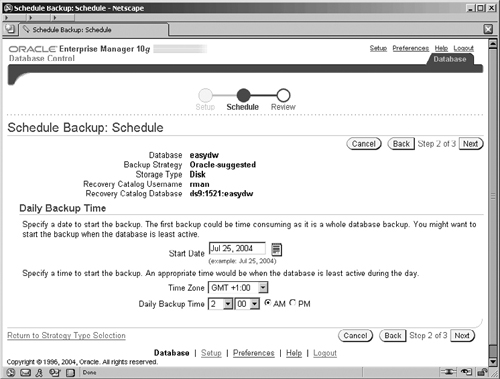
Moving on to the next screen in the wizard, shown in Figure 12.6, enables the schedule for the backup job to be set. Don’t forget that the first backup performed as part of the schedule is a full backup, which could be a very lengthy operation on a warehouse-sized database.
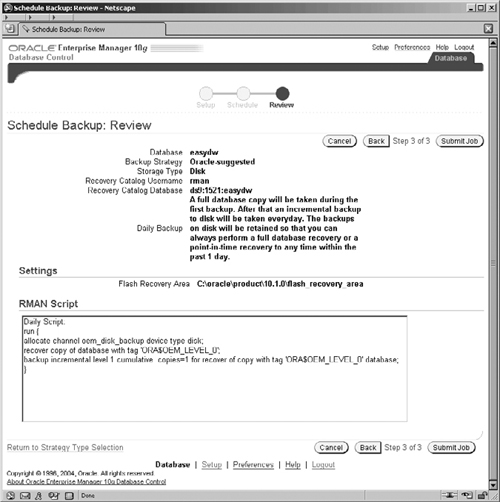
The definition of the backup procedure is almost complete. Click on Next and the screen in Figure 12.7 is displayed shown where we can review all of the options that we have selected. To change any of the values, press the Back key to return to the appropriate screen, and make the necessary modifications. At this point we can also view the RMAN script that has been generated.
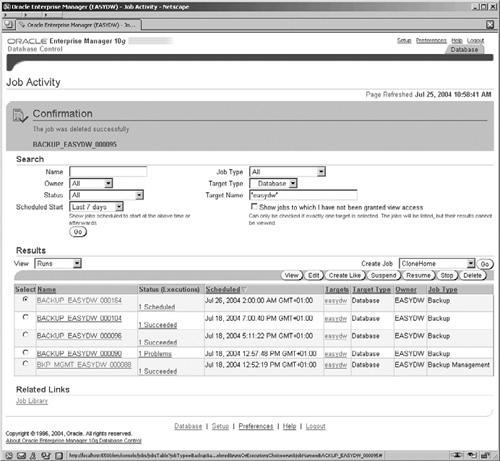
Clicking on the Submit Job button completes the definition of the backup and submits the job, which will be placed on the Enterprise Manager job queue until it is time for it to run. Monitoring the job can be performed by going to the EM Home pages and clicking on the Jobs link in the Related Links section, where the screen illustrated in Figure 12.8 is displayed.
An alternative to the Oracle suggested backup is to create a custom backup strategy. We will use the customized option to show how to perform a level 1 incremental backup.
Again, we start at the Schedule Backup Strategy screen shown in Figure 12.9, where a backup strategy of Customized is selected.

The first question asked by the wizard is the type of backup that you require. If Whole Database is selected, you will then have the choice of either backing up the entire database or taking an incremental backup. As we have already discussed, an incremental backup is very likely to be of interest to a data warehouse administrator, because it allows you to back up only the data that has changed, instead of the entire data warehouse.
Depending on whether or not the database is running in archive log mode will determine the types of backup options available. In Figure 12.9, more options are available because archive log mode is enabled. With archive logging disabled, it is only possible to perform an off-line (cold) backup of the whole database which will necessitate it being automatically shut down first. Enabling archive logging means that the database, selected tablespaces, datafiles, or the archived logs can be backed up in on-line mode with the database still open to the users.
The steps in a custom backup are very similar to those we have seen previously; it uses a four-step wizard, so we won’t show all screens because most of these are self-explanatory. However, in Figure 12.10 we show the Options screen for the customized approach.
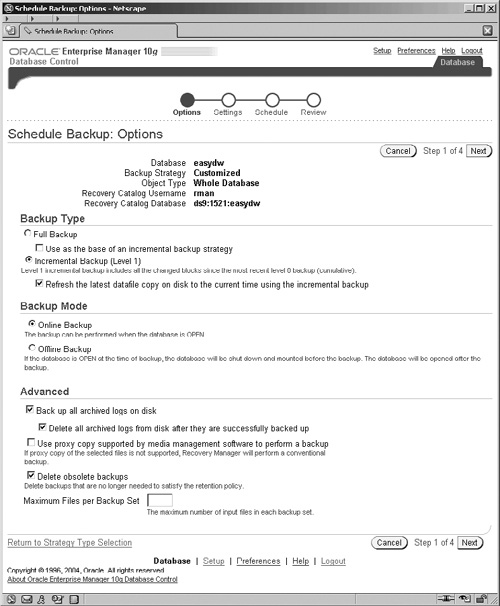
Here we can control the type of backup that we want to perform. As we have already mentioned, a typical warehouse is going to be too large to perform a full backup following every single refresh, so normally we will want to perform incremental backups. However, to perform an incremental backup we must start with a baseline full backup position. The Backup Type field provides us with the ability to specify which backup we want to perform.
Full backup
Incremental backup
We can perform a full backup by selecting the Full Backup option and leaving the check box clear for use as the base of an incremental backup. This will just perform the full backup. However, if we select the check box as well, then a level 0 incremental backup is performed. It is the same full backup of all of the used database blocks, but, because it is the base of an incremental backup strategy, this is what we have previously defined as a level 0 incremental backup.
We have chosen the level 1 incremental backup on the basis that a prior backup operation has performed the full backup to use as a baseline. Note the check box under the Incremental Backup option; it specifies that the incremental backup is to be merged into the full backup image held in the Flash Recovery Area.
The other options we can specify on this screen are:
Backup mode, for whether the backup is performed when the database is open or whether it is shut down first. The database must be in ARCHIVELOG mode for an on-line backup to be performed.
Advanced options, which control the backup and retention policy for our archived logs and for the obsolete backups on disk.
Here we are backing up the archived redo logs and specifying that RMAN manage the logs by deleting those that are no longer required once they have been backed up. Similarly, we want any backups that are no longer required to be deleted. These options automate and simplify the backup procedure and the associated management tasks.
The remaining screens in the custom backup wizard enable us to specify the backup destination, disk or tape (which is step 2 and not shown), and specify the backup job name and schedule, as shown in Figure 12.11. Finally, there is a review screen (also not shown).
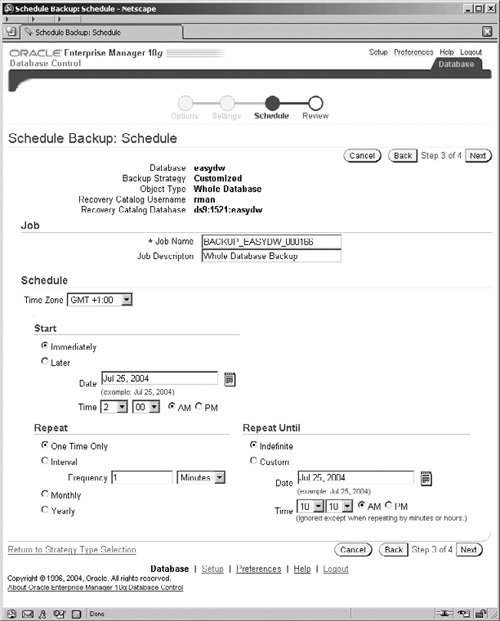
In Figure 12.11, we can rename the backup job to something that is more meaningful on our system, and we have full control of the start, stop, and frequency of operation of the job by the Scheduler. Once we have submitted the job in step 4 then, as before, we can always access it from the Related Links section of the OEM pages and click on the Jobs link.
Another technique for backing up the database is a tablespace backup. Using this technique, you have the ability to back up a specific tablespace, which, in a data warehouse, could make for a very nice backup strategy.
This time, when we schedule a backup, as shown in Figure 12.9, we will choose Customized and select the Tablespaces radio button. The first step is to select the tablespaces that we want to back up. In Figure 12.12, we see one of the screens from the backup wizard asking us which tablespaces we want to back up. Tablespaces are added to the list using a separate screen, accessed via the Add button. In our example, we have selected the tablespace that contains the January 2005 data.
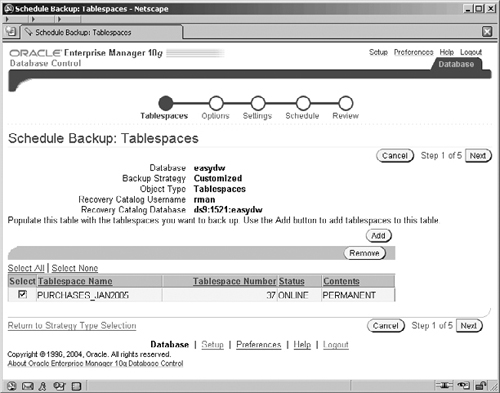
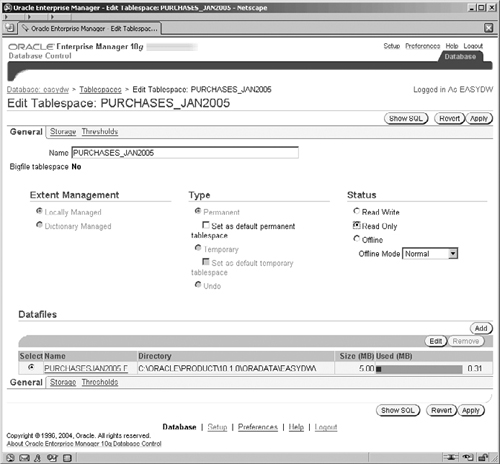
This screen is a good example of where designing the database for management should be considered during the initial construction process. If we can group our updates to the database by date, and we know that after a given point in time there will be no changes made within this tablespace, then, if we set the tablespace to be read-only and back it up, we can rest assured that we have captured the data in that tablespace. Since it will never change, we won’t have to back it up again.
Changing the status of a tablespace to read-only is very simple. You can enter this SQL command:
ALTER TABLESPACE purchases_jan2005 READ ONLY;
Alternatively, go to the Maintenance screen and select Tablespaces from the Storage area, select the tablespace, and then click on the box on the right of the screen marked Read Only, as shown in Figure 12.13. Finally, clicking on the Apply button will make this a read-only tablespace. You can change it back to a read/write tablespace at any time.
Of course, it makes sense to periodically take full backups, just in case there are any problems with the backup files you have taken. Taking only tablespace backups is okay, but it still makes it possible for somebody to accidentally overwrite the tape containing all of the data for a given month.
When a database is being built, designers are constantly aware of the size of the database. However, that information seems to get lost when people start thinking about backing up the database. Everyone tends to say, “Well it’s 300 gigabytes so it will take x minutes to back up.” What they forget to add is that the backup file will need y gigabytes of space.
In the examples shown here, we have used disks to store our backups. For a real data warehouse, however, you will be storing them on tape; so don’t forget how many tapes you will require for the backup strategy you will be implementing. It has been known for sites to actually run out of tapes! Our Easy Shopping Inc. database is small, and the datafiles occupy approximately 1.5 gigabytes on a Windows XP system. In Figure 12.14, we can see the different sizes for the full backup files.

A full backup occupies a little less than 1GB, which is about 66 percent of the full size of the database. Therefore, you can see that you can save a significant amount of storage space by using the backup provided by Oracle Database 10g. If a backup were taken using the Operating System backup utility, which may or may not compress the file, then 1.5GB of storage would be needed, instead of 1GB.
The files resulting from an incremental backup will be even smaller than the full backup files, though the size will be dependent upon the update activity that has occurred in the database. Obviously, we can see that there is a big advantage in using the RMAN utility for backups.
It is easy to see that even for the incremental backups, the size of the files is going to be significantly less than that for the full warehouse. By taking incremental backups, you can make backups of your warehouse more frequently and not have to worry about when you are going to find the time to back up the entire warehouse. By using the new option to merge the incremental backup into the full backup files, you can significantly improve the recovery times.
One final reminder on this topic: during the testing of the data warehouse, don’t forget to test your backup procedures and obtain some estimates of possible run times for backups. Then you can discuss your requirements with the operations department so that your management tasks can be included with all of the other work that has to be done.
Information describing your RMAN backups can be stored in the target database’s control file or in a recovery catalog. The recovery catalog is a separate repository of information stored in a database schema; it contains backup and recovery information for one or more databases. The catalog schema should always reside in a database different from the data warehouse. You will recall that when EM Grid Control is used, it uses its own database, which contains the EM repository, and this database can also be used for the recovery catalog. Using a recovery catalog is a safer alternative than storing it in the control file alone, since the information is stored separately from the database. It also allows you to store information about all of your backups in a central place, which is a particularly flexible configuration when administering multiple databases using Grid Control.
A recovery catalog should be stored in its own tablespace. In our example, the RMANREP tablespace is used. A new user, who will own the recovery catalog schema in the recovery catalog database, should be created. In the following example we have created a user called RMAN and granted it the appropriate privileges.
CREATE USER rman IDENTIFIED BY rmanrep
  DEFAULT TABLESPACE rmanrep TEMPORARY TABLESPACE temp
  QUOTA UNLIMITED ON rmanrep;
GRANT connect, resource TO rman;
GRANT recovery_catalog_owner TO rman;
The next step is to actually create the recovery catalog, which is achieved by running the RMAN utility. As soon as the RMAN prompt appears, as illustrated, connect to the database that will hold the catalog. Since you are using the syntax CONNECT CATALOG, an error message will appear saying that the recovery catalog is not installed. Ignore this message. Then issue the CREATE CATALOG command. Once complete, you are now ready to use the catalog.
C:>rman

Recovery Manager: Release 10.1.0.2.0 - Production

Copyright (c) 1995, 2004, Oracle. All rights reserved.

RMAN> connect CATALOG rman/rmanrep

connected to recovery catalog database
recovery catalog is not installed

RMAN> CREATE CATALOG

recovery catalog created
Before a database can be included in the recovery catalog, it must be registered. Otherwise, you may see the message “RMAN-20001 Target database not found in recovery catalog.” Do not be alarmed by the message.
To register the EASYDW database in the catalog, go to the Backup/Recovery section on the Maintenance page and click on the Configure Recovery Catalog Settings link; you will see the screen shown in Figure 12.15.
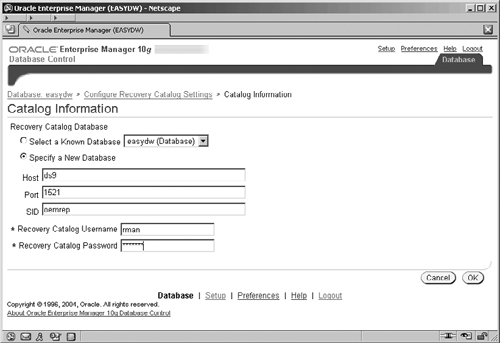
Here you must specify where the recovery catalog is located (i.e., either on a known database or by entering the database access information directly) and you must also provide the catalog repository account username and password. In our example, the account is RMAN, which can be found on the OEMREP database on server DS9. On the next screen (not shown), it is simply a case of clicking the Register Database button to register our EASYDW database in the RMAN catalog.
As mentioned previously, the recovery catalog should always be placed in a database different from the one being backed up. Also, don’t forget that the recovery catalog must also be backed up regularly because it is stored inside a database.
Oracle Enterprise Manager can be used to access the catalog to report on various backup information. The example in Figure 12.16 shows the Manage Current Backups screen accessed from the Maintenance home page, which lists the backup information stored in the catalog. A very pertinent piece of information is whether the backup is obsolete due to being replaced by a more recent backup.

From the screen in Figure 12.16, we are able to perform additional tasks to manage our backup sets by pressing the following buttons.
Catalog Additional Files enables other backup pieces that have been made to disk to be registered in the catalog.
Crosscheck All enables a job to be scheduled that will resynchonize the information about backups on disk with the information in the catalog.
Delete All Obsolete enables a job to be scheduled that will delete any obsolete backup sets—that is, both the actual backup set files on disk and the records within the catalog.
By clicking on the links in the Contents column, you can get more information from the catalog about the contents of what that backup set contains. For example, clicking on the datafile link for Key 2736 results in the screen shown in Figure 12.17.

Although this has been a brief introduction to the recovery catalog and how it is used by OEM, hopefully you can begin to see some of the benefits of using it, especially being able to see which backups exist. Using this information, you will see later how automatic recovery is possible, although, for a data warehouse, we may prefer to do it manually.
Restoring a database from a backup is a task that most DBAs probably fear. They are always concerned that the backup may fail, leaving them with no database. Unfortunately, unless you test every backup, you can never be sure that a backup file will actually work. If you can, it is a good idea to periodically restore your backup files onto a test system, so that you know that the files and your procedures are good.
Hint
If you are restoring during a serious database problem, try to restore to another location, so that, if the restore operation fails, you still have the original database.
One of the first problems you encounter when restoring a database is identifying which backup files to use. If you have been using the recovery catalog, then it is very simple, since it will automatically figure it out; otherwise, you will have to check your records to determine the correct backup file.
Don’t forget that restoring a database could require a number of full and incremental backup files. This is when the RMAN recovery wizard is extremely useful, especially if you want to recover to the latest point in time. But, if we have been using the new Oracle Database 10g feature of rolling our incremental backups into our full backup, then only the full backup files are required.
The recovery wizard can be started by clicking on the Perform Recovery link in the Backup/Recovery section of the Maintenance home screen. The screen shown in Figure 12.18 will appear, and you will be asked for the type of restoration that is required.

In Figure 12.18, we have the option of restoring the following by choosing from the Object Type drop-down list.
The whole database
Tablespaces
Datafiles
Archived logs
Tables
The other parameter fields on the screen will alter, depending on the type of object chosen to be specific to restoring that object type. For example, for the Datafiles option, the additional fields become a radio button selection, allowing you to choose whether to:
Restore datafiles, possibly to a new location
Recover to a point in time (i.e., roll forward)
Restore datafiles and recover
Recover datafile blocks that are marked as corrupted
If Tablespaces is chosen, then one of the options shown in Figure 12.18 is the ability to recover to a specific point in time, such as to Monday at 11:30 A.M. Usually this type of recovery is unnecessary. If a specific problem corrupted the database, however, then you may want to restore to just prior to the job running against the database. In this example, we have chosen to restore a tablespace.
After selecting Tablespaces from the drop-down list, click on the radio button Restore Tablespace, then click the Next button and you will navigate to the Tablespaces screen. Here you will create the list of tablespaces that you want to restore.
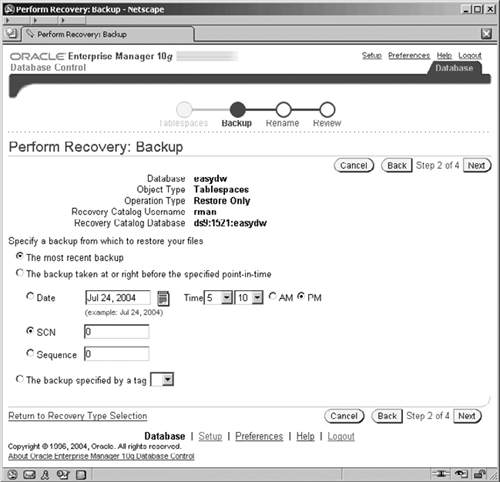
The subsequent step illustrates the reason why you should be familiar with your backup and restoration procedure, because, after selecting which tablespaces should be restored, the Perform Recovery screen will appear, as shown in Figure 12.19. The wizard automatically selects the most recent backup.
Using this configuration, the wizard knows where the backup files are located and is given the information to access the recovery catalog.
The next screen in the wizard asks where the files are to be restored to, as illustrated in Figure 12.20, where a separate directory is being used that is not the directory containing the database files. Depending on the reason for the restore, you may want them to go to another location, which can be specified here. The other advantage of this screen is that it provides an opportunity to check which files are going to be restored.

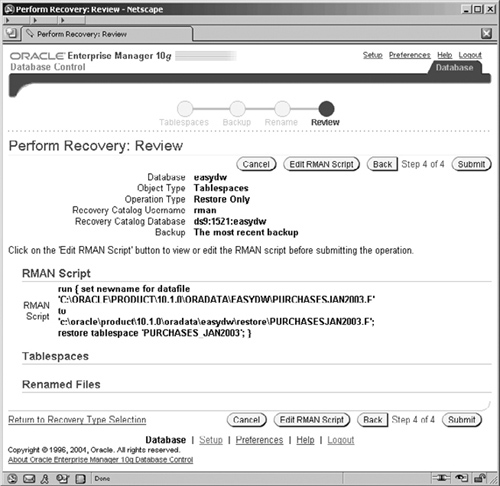
Finally, you will see the Review screen, shown in Figure 12.21. Here you have the opportunity to perform a final check on all of the options that you have specified and to examine, and even alter, the generated RMAN script.
When you click the Submit button, your RMAN job is executed to perform the restore; when completed, you will see the status screen shown in Figure 12.22, where you can examine the RMAN log file

In this example we can see only a portion of the log, and the utility has automatically worked out which backup files were required. Here we used the recovery catalog to determine the required backup files, but the backup information is also recorded in the database control file, which can be used for some recovery operations. Although we have illustrated how to recover a tablespace, the procedure is almost the same for a datafile or the entire database.
In this chapter, we have taken a look at some of the approaches and tasks required to protect our warehouse by backing it up. We have seen how RMAN is integral to the ease of performing this operation and how Enterprise Manager integrates with the recovery catalog to provide information on our backups.
Hopefully, this section has given you some idea of how to back up and recover an Oracle Database 10g data warehouse. This is such an extensive subject that it is highly recommended that you read the Oracle Database 10g Backup and Recovery Manual for detailed information on functionality, as well as many more ideas on how to design, create, and run backup-and-recovery operations.
Remember that deciding on, implementing, and testing the backup and recovery strategy is very important and should be performed at the outset of the warehouse project. Failure to back up the database could have disastrous results, usually when you can least afford the time.