
In Chapter 7, we described materialized views, which can be used to precompute and store results of frequently used queries. A major benefit of doing this is that you can use query rewrite to transparently rewrite queries to use these materialized views, thus significantly reducing the query response time. One important type of metadata for query rewrite is a database object called a dimension, which allows you to declare relationships in your data warehouse and allows the optimizer to rewrite more queries to use materialized views. In this chapter, we will discuss how to create dimensions as part of the logical design of your data warehouse. In Chapter 9, we will then discuss how these dimensions can be used by query rewrite.
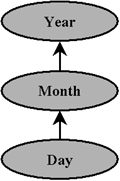
In Chapter 2, we discussed the logical design of a data warehouse, using a schema based on a dimensional model such as a star or a snowflake. The relationships between tables in this logical model are typically represented in the data warehouse using referential integrity constraints. Constraints usually signify join relationships between fact and dimension tables, with primary keys on the dimension tables and foreign keys on the fact tables. Another type of a logical relationship in a dimensional model is a hierarchy, which expresses rollup or aggregation relationships within the columns of a dimension table. The concept of a hierarchy is commonly used by analysis tools to roll up data from a finer to a coarser level of granularity and to drill down to see more detail. For example, a time hierarchy, shown in Figure 8.1, may indicate that data at a daily grain can be aggregated to a monthly level and from the monthly to the yearly level.
The dimension database object can be used to define logical relationships within and across dimension tables, such as hierarchies, which often cannot be expressed using referential integrity constraints.
In particular, dimensions are used to define the following types of relationships:
The hierarchical relationships among the columns within dimension tables, such as the one in Figure 8.1. The hierarchy may be contained within a single dimension table in case of a star schema and within multiple dimension tables in a normalized snowflake schema. For example, in a snowflake schema, there may be separate dimension tables for day and month. The dimension object supports both these models. Each column that participates in a hierarchy is called a level.
Functional dependencies between two columns in a dimension table. A functional dependency from column A to B means that for every value of A, there is only one value of B. So if you know the value of A, then you can determine the value of B. This is useful for looking up the value of one column based on the value of another column in the table. For example, given a state, we can determine the tax rate. This type of relationship is also referred to as an attribute relationship.
Defining a dimension to declare hierarchical relationships in the data makes it possible for the optimizer to rewrite more queries to use materialized views. It also allows tuning tools, such as the SQL Access Advisor, to recommend the best set of materialized views to create and the best OLAP analysis tools to perform rollup and drill-down operations.
Note that a dimension is a metadata object, such as a constraint, and should not be confused with a dimension table, which stores data. However, unlike a constraint, which can be automatically checked and validated, relationships declared by a dimension are not automatically verified when the dimension is created. They are assumed to be “trusted” information supplied by the DBA. The significance of this will become clearer in Chapter 9, when we discuss how dimensions are used by query rewrite. In the remainder of this chapter, when we say dimension or dimension object, we refer to the metadata object and not to a dimension table.
Designing dimensions should be part of the logical design of your data warehouse. Once the dimension tables have been created, you can create DIMENSION objects, using the CREATE DIMENSION SQL statement. Within the CREATE DIMENSION statement, hierarchical relationships are described using the HIERARCHY clause, and functional dependencies are defined using the ATTRIBUTE clause.
As with other database objects, you need certain privileges to manage dimensions. To create a dimension in your own schema, you must have the CREATE DIMENSION privilege, and to create one in someone else’s schema, you must have the CREATE ANY DIMENSION privilege. You must also have SELECT access to any tables referenced in the dimension. We assume that the EASYDW user has been granted the following privileges, allowing it to create, alter, and drop dimensions.
GRANT create any dimension to easydw;
GRANT alter any dimension to easydw;
GRANT drop any dimension to easydw;
We will now look at the specifics of the CREATE DIMENSION statement and how it can be used to define hierarchies and attributes.
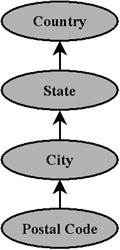
In the EASYDW schema, we have a geography hierarchy within the CUSTOMER table, where postal codes roll up into cities, which roll up into states, which, in turn, roll up into countries. One technique that makes it easy to construct the CREATE DIMENSION statement is to draw a bubble diagram, such as the one in Figure 8.2, showing these rollup relationships within a hierarchy. The direction of the arrows indicates how rollup can be done.
To convert the diagram in Figure 8.2 into a SQL dimension definition, each bubble in the diagram becomes a LEVEL in the dimension, as shown in the following example:
CREATE DIMENSION geography_dim
LEVEL postal_code IS customer.postal_code
LEVEL city        IS customer.city
LEVEL state       IS customer.state
LEVEL country     IS customer.country
HIERARCHY loc_rollup (
          postal_code      CHILD OF
          city             CHILD OF
          state            CHILD OF
          country
         );
Each level is specified using a name and the underlying column in the dimension table. For example, the level named CITY corresponds to the column CITY in the CUSTOMER table. The relationships between the levels are described with the HIERARCHY clause. The hierarchy is also given a name, LOC_ROLLUP in our example. The bubbles with arrows coming out of them in Figure 8.2 are described with the CHILD OF clause. In our example, postal code rolls up into city; therefore, postal_code is a CHILD OF city. City rolls up into state; therefore, city is a CHILD OF state and so on.
Hint
Note that in the HIERARCHY clause you must use level names rather than the underlying column names.
Note that the definition of a hierarchy signifies that for any value of a child column in a hierarchy, there must be one and only one value of its parent column. In our customer table, a postal code is unique to any given city; therefore, it satisfies this rule. For example, postal code 02134 is in the city of Boston. The code 02134 refers to addresses in Boston only; it cannot also be used to refer to addresses in San Francisco.
Sometimes it may be possible to logically roll up the same data in different ways. In our sample schema, EASYDW, as in many businesses, we use both a regular calendar and a fiscal calendar. In the regular calendar, days roll up into months, which roll up into years. In the fiscal calendar, days roll up into weeks, which roll up into fiscal quarters. This type of a logical model can also be represented in the dimension object by defining multiple hierarchies.
Figure 8.3 shows a diagram for this TIME dimension. It contains two hierarchies, describing the two ways by which the data can be rolled up from the TIME_KEY (i.e., daily) level, using the regular and the fiscal calendars.

In the CREATE DIMENSION statement, each way of rolling up the data will be described using a HIERARCHY clause, as shown in the following example. The two hierarchies are called CALENDAR_ROLLUP and FISCAL_ROLLUP. Each arrow coming out of a bubble in Figure 8.3 is described in a CHILD OF clause. There are two arrows coming out of the TIME_KEY bubble, and hence there are two CHILD OF statements, one in each hierarchy. From a given date (TIME_KEY), the FISCAL_ROLLUP hierarchy tells us the week and fiscal quarter this date is in and the other, CALENDAR_ROLLUP, tells us the month and year.
CREATE DIMENSION time_dim
 LEVEL time_key    IS time.time_key
 LEVEL month       IS time.month
 LEVEL quarter     IS time.quarter
 LEVEL year        IS time.year
 LEVEL week_number IS time.week_number
 HIERARCHY calendar_rollup (
                time_key  CHILD OF
                month     CHILD OF
                year
           )
 HIERARCHY fiscal_rollup (
                time_key    CHILD OF
                week_number CHILD OF
                quarter
           );
At the top of every bubble diagram is the special level “ALL,” representing the “grand total” level for that dimension. All levels of a hierarchy can be rolled up to ALL. We don’t always define the ALL level in the CREATE DIMENSION statement explicitly.
Again, for each value of a child column in a hierarchy, there is only one parent value. Any given date—for example, 21-Mar-2003—falls into one and only one fiscal week and in a specific quarter.
In a dimension definition, the ATTRIBUTE clause is used to define any functional dependencies between columns within the same table that are not hierarchical in nature.
In the EASYDW schema, in the PRODUCT table we have two columns, PRODUCT_ID and PRODUCT_NAME, such that given a PRODUCT_ID, there is only one PRODUCT_NAME. The following example shows the definition of a dimension with the attribute clause, representing this relationship. Note, however, that this relationship is true only in one direction (i.e., it does not mean that given the PRODUCT_NAME we can determine the PRODUCT_ID).
CREATE DIMENSION product_dim
 LEVEL product_id   IS product.product_id
 LEVEL category     IS product.category
 HIERARCHY merchandise_rollup (
                   product_id    CHILD OF
                   category
                  )
 ATTRIBUTE product_id DETERMINES (product_name)
 ATTRIBUTE prod_manufacturer
           LEVEL product_id DETERMINES (manufacturer);
In the ATTRIBUTE clause, the name on the left side of the DETERMINES keyword should be a level name—for example, PRODUCT_ID. To the right of the DETERMINES keyword are the dependent columns—for example, PRODUCT_NAME. Note that you can either specify multiple dependent columns within the same attribute clause or specify different attribute clauses for each one—both ways convey equivalent semantics.
Note that you can also specify a name for the attribute relationship; however, this is optional. To do this, you need to use the extended clause with the LEVEL keyword. For example, in the preceding example, the relationship between PRODUCT_ID and MANUFACTURER is given a name, PROD_MANUFACTURER.
If you have a snowflake or other normalized schema, then your hierarchy may refer to columns in multiple dimension tables. The CREATE DIMENSION statement allows you to declare such relationships as well. Figure 8.4 shows a bubble diagram for a normalized TIME dimension. The bubbles and bold arrows define the rollup relationships as before. The dotted rectangles represent the tables where the levels come from. The dotted arrows show how the tables join to each other. In this example, there is a separate table for time, week, month, quarter, and year. The TIME table joins to the WEEK table using the join condition time.week_number = week.week_number and to the MONTH table using the condition time.month = month.month.

To convert this diagram to a CREATE DIMENSION statement, you would first define a level for each of the bubbles, specifying both the table name and column name for that level. For example, the level WEEK corresponds to the column WEEK.WEEK_NUMBER, which is the WEEK_NUMBER column from the WEEK table. Next, you would define your hierarchy using the level names as before. Finally, you would specify any joins that must be performed when traversing up the hierarchy using the JOIN KEY clause. Thus, you would get the following CREATE DIMENSION statement:
CREATE DIMENSION time_dim
 LEVEL time_key IS time.time_key
 LEVEL month    IS month.month
 LEVEL quarter  IS quarter.quarter
 LEVEL year     IS year.year
 LEVEL week     IS week.week_number
 HIERARCHY calendar_rollup (
                    time_key CHILD OF
                    month     CHILD OF
                    year
                    JOIN KEY time.month REFERENCES month
                    JOIN KEY month.year REFERENCES year
           )
 HIERARCHY fiscal_rollup  (
                    time_key CHILD OF
                    week     CHILD OF
                    quarter
                    JOIN KEY time.week_number  REFERENCES week
                    JOIN KEY week.quarter REFERENCES quarter
           )
 ATTRIBUTE time_key DETERMINES time.day_of_the_week
 ATTRIBUTE time_key DETERMINES month.month_name;
In the fiscal_rollup hierarchy in this example, the join key, TIME.WEEK_NUMBER column, is used to join the table TIME to the WEEK level in the WEEK table.
Hint
In a normalized dimension, remember to qualify column names with the table name; otherwise, you may get an error.
You can also specify attribute clauses in a normalized dimension. For example, the level TIME_KEY determines the column DAY_OF_THE_WEEK from the TIME table and the column MONTH_NAME from the MONTH table.
As discussed in Chapter 2, normalized dimension tables incur the overhead of extra joins during query processing and hence must be used with care.
You can use Oracle Enterprise Manager as an alternative to SQL to manage dimensions. To create a new dimension, from the Administration page, select the Dimensions link and click the Create button. You will see a screen such as the one shown in Figure 8.5. You need to name the dimension and identify which schema it will reside in. In our example, we are creating a dimension, EASYDW.TIME_DIM. We recommend that you use an appropriate naming convention to easily identify dimensions in the database and to differentiate them from dimension tables.

The screen in Figure 8.5 has several tabs for creating levels, hierarchies, and attributes for the dimension. Each tab will have an Add button, which you can use to create the requisite levels, hierarchies, and attributes. For example, Figure 8.6 shows the levels tab, where you can see several levels we have created.

At any stage, you can see the current SQL statement for the dimension by pressing the Show SQL button. Figure 8.7 shows the screen for adding a new level.
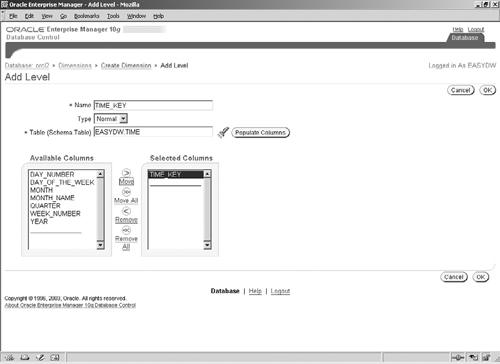
You must name the level and choose a table, which must be in the form of schema.tablename—for example, EASYDW.TIME. If you are creating a normalized dimension, then different levels could come from different tables. Once you pick a table, press the Populate Columns button to see the table columns in the Available Columns list. Click on the Move arrow keys to choose the columns for the level. In Figure 8.7, we are creating a level named TIME_KEY, based on the TIME_KEY column from the EASYDW.TIME table. Once you are done filling in all the information and press the OK button, the newly created level will now show up.
Once you have added all the levels, you can move on to creating hierarchies. Figure 8.8 shows the screen to create a new hierarchy, where we are adding a hierarchy named CALENDAR_ROLLUP.

To build the hierarchy, use the Move keys to move levels from the Available Levels list to the Selected Levels list. One important point to note is that you must correctly order the levels in the Selected Levels list to reflect the hierarchy. The columns in the Selected Levels list are ordered from the highest to the lowest level in the hierarchy.
Hint
You must ensure that the levels in the hierarchy are in the correct order; otherwise, you may get unexpected results when you use this dimension with query rewrite. Before creating the dimension, you can use the Show SQL button in Figure 8.5 to see the SQL statement with the hierarchy definition.
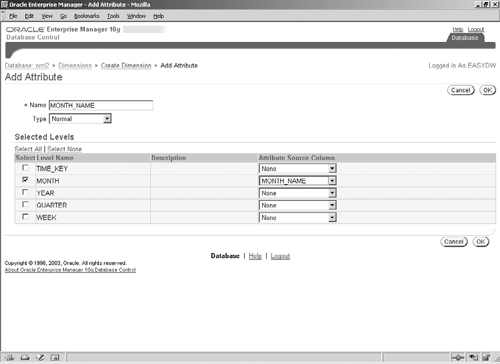
Finally, if you would like to create any attributes, click on the Attributes tab in Figure 8.5 and you will get a screen such as that in Figure 8.9. In this example, we are creating an attribute named MONTH_NAME. You must choose the level for which the attribute is being defined (MONTH in our example) and choose, from the drop-down box, the column the attribute determines (MONTH_NAME in our example).
Note that when you first go to the Attributes tab, you will find two predefined attributes, called long-description and short-description, which are used by the OLAP Option. You can edit these attributes from the OLAP Options tab, which we will discuss in Chapter 15.
Once you have created all the levels, hierarchies, and attributes, press the OK button in Figure 8.5 to create the dimension.
As we can see, a dimension definition can be quite involved, and before Oracle Database 10g, there was no easy way to examine the structure of a dimension from SQL*Plus. This has been rectified in Oracle Database 10g, which provides a convenient way to view a dimension with a call to the procedure DBMS_DIMENSION.DESCRIBE_DIMENSION. The following example shows the PRODUCT_DIM dimension we had defined earlier:
set serveroutput on;
execute dbms_dimension.describe_dimension('EASYDW.product_dim'),

DIMENSION EASYDW.PRODUCT_DIM
LEVEL CATEGORY IS EASYDW.PRODUCT.CATEGORY
LEVEL PRODUCT_ID IS EASYDW.PRODUCT.PRODUCT_ID
HIERARCHY MERCHANDISE_ROLLUP (
PRODUCT_ID CHILD OF
CATEGORY
)
ATTRIBUTE PROD_MANUFACTURER LEVEL PRODUCT_ID
          DETERMINES EASYDW.PRODUCT.MANUFACTURER
ATTRIBUTE PRODUCT_ID LEVEL PRODUCT_ID
          DETERMINES EASYDW.PRODUCT.PRODUCT_NAME

PL/SQL procedure successfully completed.One of the major differences between referential integrity constraints and dimensions is that the relationships declared by the dimension are not automatically checked or enforced by Oracle. In order to get accurate results with query rewrite, you must ensure that these relationships are correct. For example, if you incorrectly defined a dimension to indicate that weeks roll up into months, when they actually did not, you may get incorrect data when rolling up data from weekly to the monthly level. To help ensure that the data in the dimension table actually conforms to the dimension definition, Oracle provides a procedure named DBMS_DIMENSION.VALIDATE_DIMENSION. This procedure should be run every time new data is loaded into your dimension tables to ensure data integrity.
Hint
Prior to Oracle Database 10g, the dimension validation procedure was in the DBMS_OLAP package. This has now been subsumed by the VALIDATE_DIMENSION procedure in the new DBMS_DIMENSION package.
For example, suppose we had the following customer dimension.
CREATE DIMENSION customer_dim
  LEVEL customer IS customer.customer_id
  LEVEL city     IS customer.city
  LEVEL state    IS customer.state
  HIERARCHY  customer_zone (
                     customer CHILD OF
                     city     CHILD OF
                     state
              )
  ATTRIBUTE city DETERMINES postal_code
  ATTRIBUTE customer DETERMINES (gender, occupation);
According to this dimension, town determines the postal_code, and every city should have a unique postal code. Now suppose some bad data got inserted into the customer table. The postal code for Boston was mistyped as 01210 instead of 01201.
INSERT INTO customer (customer_id, city, state,
                      postal_code, gender, region,
                      country, tax_rate, occupation)
VALUES ('AB130000', 'Boston', 'MA',
        '01210', 'F', 'AmerNorthEast', 'USA', 0.05, 'Doctor'),

INSERT INTO customer (customer_id, city, state,
                      postal_code, gender, region,
                      country, tax_rate, occupation)
VALUES ('AB130001', 'Boston', 'MA',
        '01210', 'F', 'AmerNorthEast', 'USA', 0.05, 'Doctor'),

COMMIT;
If we run DBMS_DIMENSION.VALIDATE_DIMENSION, it will verify the integrity of the data and detect that there is a discrepancy in the HIERARCHY and ATTRIBUTE relationships declared by the CUSTOMER_DIM dimension.
variable stmt_id varchar2(30);

execute :stmt_id := 'CUST_DIM_VAL';
execute dbms_dimension.validate_dimension ('EASYDW.CUSTOMER_DIM',
                                           FALSE, TRUE, :stmt_id);
Any exceptions found are placed in the DIMENSION_EXCEPTIONS table. You must create this table prior to running the procedure, by executing the script utldim.sql from the rdbms/admin directory.
SELECT distinct owner,table_name,dimension_name,relationship
FROM dimension_exceptions
WHERE statement_id = :stmt_id;

OWNER      TABLE_NAME DIMENSION_NAME       RELATIONSHIP
---------- ---------- -------------------- -------------------
EASYDW     CUSTOMER   CUSTOMER_DIM         ATTRIBUTE
The BAD_ROWID column of DIMENSION_EXCEPTIONS gives the table rowids with the discrepancy (i.e., all rows corresponding to the violated relationship). In our example, it would return all rows corresponding to the city of Boston. We can now look at the actual data values by looking up the customer table, as follows. We can see that the CUSTOMER_ID values, AB130000 and AB130001, have mismatched values for CITY and POSTAL_CODE with respect to the remaining data.
SELECT customer_id, city, state, postal_code FROM customer
WHERE rowid IN (SELECT bad_rowid FROM dimension_exceptions
                WHERE statement_id = :stmt_id);

CUSTOMER_I CITY            STATE      POSTAL_COD
---------- --------------- ---------- ----------
AB123410   Boston          MA         01201
AB123420   Boston          MA         01201
AB123440   Boston          MA         01201
AB123450   Boston          MA         01201
AB123470   Boston          MA         01201
...
AB130000   Boston          MA         01210   <- bad data
AB130001   Boston          MA         01210
It is extremely important that the relationships declared by the dimension are valid; otherwise, you may see unexpected results when using query rewrite.
In this chapter, we have discussed a new metadata object called a dimension, which allows you to declare logical relationships between columns of your dimension tables. With dimensions, you can represent hierarchies and attribute relationships in your data. We also discussed procedures to validate a dimension to ensure that the underlying data conforms to the dimension definition.
In the next chapter, we will look at how query rewrite can be used to transparently rewrite queries with materialized views. We will also see how dimension objects can significantly enhance the ability of the optimizer to rewrite a large number of queries using few materialized views.