 Using OpenStack Dashboard to launch instances
by Tony Campbell, Egle Sigler, Cody Bunch, Kevin Jackson, Sunil Sarat, Alok Shrivas
OpenStack: Building a Cloud Environment
Using OpenStack Dashboard to launch instances
by Tony Campbell, Egle Sigler, Cody Bunch, Kevin Jackson, Sunil Sarat, Alok Shrivas
OpenStack: Building a Cloud Environment
- OpenStack: Building a Cloud Environment
- Table of Contents
- OpenStack: Building a Cloud Environment
- OpenStack: Building a Cloud Environment
- Credits
- Preface
- 1. Module 1
- 1. An Introduction to OpenStack
- 2. Authentication and Authorization Using Keystone
- Identity concepts in Keystone
- Architecture and subsystems
- Installing common components
- Installing Keystone
- Verifying the installation
- Troubleshooting the installation and configuration
- Summary
- 3. Storing and Retrieving Data and Images using Glance, Cinder, and Swift
- Introducing storage services
- Working with Glance
- Working with Cinder
- Working with Swift
- Troubleshooting steps
- Summary
- 4. Building Your Cloud Fabric Controller Using Nova
- 5. Technology-Agnostic Network Abstraction Using Neutron
- The software-defined network paradigm
- Neutron
- Installing Neutron
- Troubleshooting Neutron
- Summary
- 6. Building Your Portal in the Cloud
- 7. Your OpenStack Cloud in Action
- 8. Taking Your Cloud to the Next Level
- Working with Heat
- Ceilometer
- Installing Ceilometer
- Installing Ceilometer on the compute node
- Installing Ceilometer on the storage node
- Testing the installation
- Billing and usage reporting
- Summary
- 9. Looking Ahead
- A. New Releases
- 2. Module 2
- 1. Keystone – OpenStack Identity Service
- Introduction
- Installing the OpenStack Identity Service
- Configuring OpenStack Identity for SSL communication
- Creating tenants in Keystone
- Configuring roles in Keystone
- Adding users to Keystone
- Defining service endpoints
- Creating the service tenant and service users
- Configuring OpenStack Identity for LDAP Integration
- 2. Glance – OpenStack Image Service
- Introduction
- Installing OpenStack Image Service
- Configuring OpenStack Image Service with OpenStack Identity Service
- Configuring OpenStack Image Service with OpenStack Object Storage
- Managing images with OpenStack Image Service
- Registering a remotely stored image
- Sharing images among tenants
- Viewing shared images
- Using image metadata
- Migrating a VMware image
- Creating an OpenStack image
- 3. Neutron – OpenStack Networking
- Introduction
- Installing Neutron and Open vSwitch on a dedicated network node
- Configuring Neutron and Open vSwitch
- Installing and configuring the Neutron API service
- Creating a tenant Neutron network
- Deleting a Neutron network
- Creating an external floating IP Neutron network
- Using Neutron networks for different purposes
- Configuring Distributed Virtual Routers
- Using Distributed Virtual Routers
- 4. Nova – OpenStack Compute
- Introduction
- Installing OpenStack Compute controller services
- Installing OpenStack Compute packages
- Configuring database services
- Configuring OpenStack Compute
- Configuring OpenStack Compute with OpenStack Identity Service
- Stopping and starting nova services
- Installation of command-line tools on Ubuntu
- Using the command-line tools with HTTPS
- Checking OpenStack Compute services
- Using OpenStack Compute
- Managing security groups
- Creating and managing key pairs
- Launching our first cloud instance
- Fixing a broken instance deployment
- Terminating your instances
- Using live migration
- Working with nova-schedulers
- Creating flavors
- Defining host aggregates
- Launching instances in specific Availability Zones
- Launching instances on specific Compute hosts
- Removing Nova nodes from a cluster
- 5. Swift – OpenStack Object Storage
- Introduction
- Configuring Swift services and users in Keystone
- Installing OpenStack Object Storage services – proxy server
- Configuring OpenStack Object Storage – proxy server
- Installing OpenStack Object Storage services – storage nodes
- Configuring physical storage for use with Swift
- Configuring Object Storage replication
- Configuring OpenStack Object Storage – storage services
- Making the Object Storage rings
- Stopping and starting OpenStack Object Storage
- Setting up SSL access
- 6. Using OpenStack Object Storage
- 7. Administering OpenStack Object Storage
- 8. Cinder – OpenStack Block Storage
- 9. More OpenStack
- Introduction
- Using cloud-init to run post-installation commands
- Using cloud-config to run the post-installation configuration
- Installing OpenStack Telemetry
- Using OpenStack Telemetry to interrogate usage statistics
- Installing Neutron LBaaS
- Using Neutron LBaaS
- Configuring Neutron FWaaS
- Using Neutron FWaaS
- Installing the Heat OpenStack Orchestration service
- Using Heat to spin up instances
- 10. Using the OpenStack Dashboard
- Introduction
- Installing OpenStack Dashboard
- Using OpenStack Dashboard for key management
- Using OpenStack Dashboard to manage Neutron networks
- Using OpenStack Dashboard for security group management
- Using OpenStack Dashboard to launch instances
- Using OpenStack Dashboard to terminate instances
- Using OpenStack Dashboard to connect to instances using a VNC
- Using OpenStack Dashboard to add new tenants – projects
- Using OpenStack Dashboard for user management
- Using OpenStack Dashboard with LBaaS
- Using OpenStack Dashboard with OpenStack Orchestration
- 11. Production OpenStack
- Introduction
- Installing the MariaDB Galera cluster
- Configuring HA Proxy for the MariaDB Galera cluster
- Configuring HA Proxy for high availability
- Installing and configuring Pacemaker with Corosync
- Configuring OpenStack services with Pacemaker and Corosync
- Bonding network interfaces for redundancy
- Automating OpenStack installations using Ansible – host configuration
- Automating OpenStack installations using Ansible – Playbook configuration
- Automating OpenStack installations using Ansible – running Playbooks
- 1. Keystone – OpenStack Identity Service
- 3. Module 3
- 1. The Troubleshooting Toolkit
- 2. Troubleshooting OpenStack Identity
- 3. Troubleshooting the OpenStack Image Service
- 4. Troubleshooting OpenStack Networking
- 5. Troubleshooting OpenStack Compute
- 6. Troubleshooting OpenStack Block Storage
- 7. Troubleshooting OpenStack Object Storage
- 8. Troubleshooting the OpenStack the Orchestration Service
- 9. Troubleshooting the OpenStack Telemetry Service
- 10. OpenStack Performance, Availability, and Reliability
- A. Bibliography
- Index
Launching instances is easily done using the OpenStack Dashboard. We simply select our chosen image, choose the size of the instance, and then launch it.
Load a web browser, point it to our OpenStack Dashboard address at http://192.168.100.200/, and log in as a user, such as the demo user created in the Adding users to Keystone recipe of Chapter 1, Keystone – OpenStack Identity Service, with the password openstack.
To launch an instance by using the OpenStack Dashboard interface, carry out the following steps:
- Navigate to the Images tab under the Compute section and select an appropriate image to launch—for example, the
trusty-imageserver image:
- Click on the Launch button under the Actions column applying to the image to be launched.
- A dialog box appears requesting a name for the instance (for example,
horizon1). Choose a flavor type ofm1.tinyfor the instance: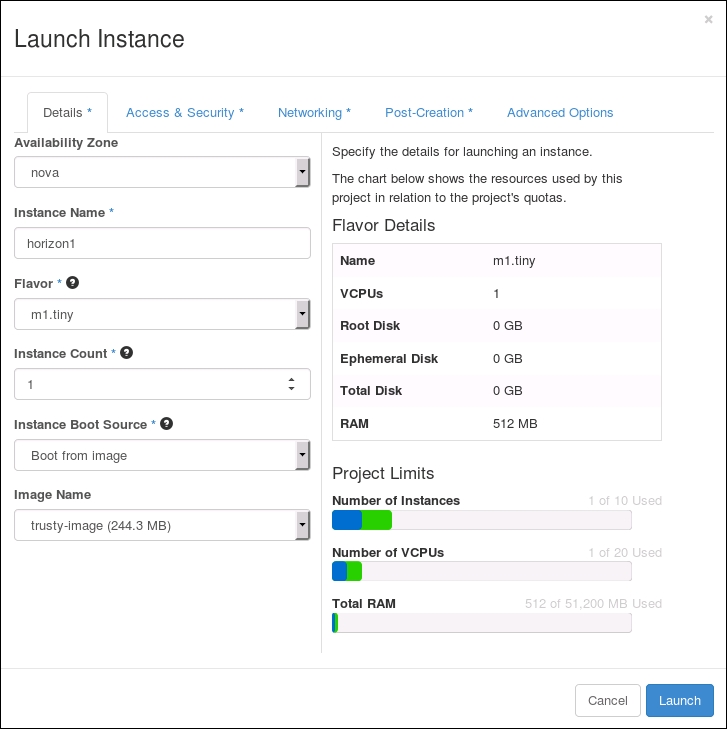
- Next select the Access & Security tab and choose the key pair and security groups for this image:

- With Neutron configured in our environment, selecting the Networking tab allows us to choose the networks that our instance will be attached to by dragging the networks listed under Available networks into the Selected networks box:

- Once selected, we can click on the Launch Instance button.
- We will be returned to the Instances Tab that shows the instance in a Build status, which will eventually change to Active:

-
No Comment
..................Content has been hidden....................
You can't read the all page of ebook, please click here login for view all page.