
Chapter 2. Using OpenGL
WHAT YOU’LL LEARN IN THIS CHAPTER:
• Where OpenGL came from and where it’s going
• Which headers need to be included in your project
• How to use GLUT with OpenGL to create a window and draw in it
• How to set colors using RGB (red, green, blue) components
• How viewports and viewing volumes affect image dimensions
• How to perform a simple animation using double buffering
• How the OpenGL state machine works
• How to check for OpenGL errors
• How to make use of OpenGL extensions
Now that you have had an introduction to the basic terminology and the ideas behind 3D graphics, it’s time to get down to business. Before using OpenGL, we will need to talk about what OpenGL is and what it is not so that you have an understanding of both and the power and the limits of this API. This chapter is about the “Big Picture” of how OpenGL operates and how to set up the rendering framework for your 3D masterpieces.
What Is OpenGL?
OpenGL is strictly defined as “a software interface to graphics hardware.” In essence, it is a 3D graphics and modeling library that is highly portable and very fast. Using OpenGL, you can create elegant and beautiful 3D graphics with exceptional visual quality. The greatest advantage to using OpenGL is that it is orders of magnitude faster than a ray tracer or software rendering engine. Initially, it used algorithms carefully developed and optimized by Silicon Graphics, Inc. (SGI), an acknowledged world leader in computer graphics and animation. Over time, OpenGL has evolved as other vendors have contributed their expertise and intellectual property to develop high-performance implementations of their own.
OpenGL is not a programming language like C or C++. It is more like the C runtime library, which provides some prepackaged functionality. There really is no such thing as an “OpenGL program” (okay, maybe with shaders there is, but that comes much later in this book!) but rather a program the developer wrote that “happens” to use OpenGL as one of its Application Programming Interfaces (APIs). You might use the C runtime library to access a file or the Internet, and you might use OpenGL to create real-time 3D graphics.
OpenGL is intended for use with computer hardware that is designed and optimized for the display and manipulation of 3D graphics. Software-only implementations of OpenGL are also possible, and the older Microsoft implementations, and Mesa3D (www.mesa3d.org) fall into this category. Apple also makes a software implementation available on OS X. With these software-only implementations, rendering may not be performed as quickly, and some advanced special effects may not be available at all. However, using a software implementation means that your program can potentially run on a wider variety of computer systems that may not have a 3D accelerated graphics card installed.
OpenGL is used for various purposes, from CAD engineering and architectural applications to modeling programs used to create computer-generated monsters in blockbuster movies. The introduction of an industry-standard 3D API to mass-market operating systems such as Microsoft Windows and the Macintosh OS X has some exciting repercussions. With hardware acceleration and fast PC microprocessors becoming commonplace, 3D graphics are now typical components of consumer and business applications, not only of games and scientific applications.
Evolution of a Standard
The forerunner of OpenGL was IRIS GL from Silicon Graphics. Originally a 2D graphics library, it evolved into the 3D programming API for that company’s high-end IRIS graphics workstations. These computers were more than just general-purpose computers; they had specialized hardware optimized for the display of sophisticated graphics. The hardware provided ultra-fast matrix transformations (a prerequisite for 3D graphics), hardware support for depth buffering, and other features.
Sometimes, however, the evolution of technology is hampered by the need to support legacy systems. IRIS GL had not been designed from the onset to have a vertex-style geometry processing interface, and it became apparent that to move forward SGI needed to make a clean break.
OpenGL is the result of SGI’s efforts to evolve and improve IRIS GL’s portability. The new graphics API would offer the power of GL but would be an “open” standard, with input from other graphics hardware vendors, and would allow for easier adaptability to other hardware platforms and operating systems. OpenGL would be designed from the ground up for 3D geometry processing.
The OpenGL ARB
An open standard is not really open if only one vendor controls it. SGI’s business at the time was high-end computer graphics. Once you’re at the top, you find that the opportunities for growth are somewhat limited. SGI realized that it would also be good for the company to do something good for the industry to help grow the market for high-end computer graphics hardware. A truly open standard embraced by a number of vendors would make it easier for programmers to create applications and content that is available for a wider variety of platforms. Software is what really sells computers, and if SGI wanted to sell more computers, it needed more software that would run on its computers. Other vendors realized this, too, and the OpenGL Architecture Review Board (ARB) was born.
Although SGI originally controlled licensing of the OpenGL API, the founding members of the OpenGL ARB were SGI, Digital Equipment Corporation, IBM, Intel, and Microsoft. On July 1, 1992, version 1.0 of the OpenGL specification was introduced. Over time, the ARB grew to consist of many more members, many from the PC hardware community, and it met four times a year to maintain and enhance the specification and to make plans to promote the OpenGL standard.
Over time, SGI’s business fortunes declined for reasons well beyond the scope of this book. In 2006, an essentially bankrupt SGI transferred control of the OpenGL standard from the ARB to a new working group at The Khronos Group (www.khronos.org). The Khronos Group is a member-funded industry consortium focused on the creation and maintenance of open media standards. Most ARB members were already members of Khronos, and the transition was essentially painless. Today, the Khronos Group continues to evolve and promote OpenGL and its sibling API, OpenGL ES, which is covered in Chapter 22, “OpenGL ES—OpenGL on the Small.”
OpenGL exists in two forms. The industry standard is codified in the OpenGL Specification. The specification describes OpenGL in very complete and specific (the similarity in words here is not an accident!) terms. The API is completely defined, as is the entire state machine, and how various features work and operate together. Hardware vendors such as ATI, NVIDIA, or Apple then take this specification and implement it. This implementation, then, is the embodiment of OpenGL in a form that software developers and customers can use to generate real-time graphics. For example, a software driver and a graphics card in your PC together make up an OpenGL implementation.
Licensing and Conformance
An implementation of OpenGL is either a software library that creates three-dimensional images in response to the OpenGL function calls or a driver for a hardware device (usually a display card) that does the same. Hardware implementations are many times faster than software implementations and are now common even on inexpensive PCs.
A vendor who wants to create and market an OpenGL implementation must first license OpenGL from The Khronos Group. They provide the licensee with a sample implementation (entirely in software) and a device driver kit if the licensee is a PC hardware vendor. The vendor then uses this to create its own optimized implementation and can add value with its own extensions. Competition among vendors typically is based on performance, image quality, and driver stability.
In addition, the vendor’s implementation must pass the OpenGL conformance tests. These tests are designed to ensure that an implementation is complete (it contains all the necessary function calls) and produces 3D rendered output that is reasonably acceptable for a given set of functions.
Software developers do not need to license OpenGL or pay any fees to make use of OpenGL drivers. OpenGL is natively supported by most operating systems, and licensed drivers are provided by the hardware vendors themselves.
The API Wars
Standards are good for everyone, except for vendors who think that they should be the only vendors customers can choose from because they know best what customers need. We have a special legal word for vendors who manage to achieve this status: monopoly. Most companies recognize that competition is good for everyone in the long run and will endorse, support, and even contribute to industry standards. An interesting diversion from this ideal occurred during OpenGL’s youth on the Windows platform.
When low-cost 3D graphics accelerators began to become available for the PC, many hardware vendors and game developers were attracted to OpenGL for its ease of use compared to Microsoft’s Direct 3D. Microsoft provided a driver kit that made it very easy to make an OpenGL driver for Windows 98. This kit saved literally years of effort in creating a robust OpenGL driver for Windows NT and Windows 98. Microsoft discouraged vendors from using a more rigorous driver model, and every PC graphics card vendor had created OpenGL drivers ready to ship with Windows 98.
This attention to OpenGL by game developers created quite a political stir at the 1997 SigGraph and Game Developers conferences. Just before Windows 98 was released, Microsoft announced that it would not extend the OpenGL driver code license beyond the Windows 98 beta period, and that hardware vendors were forbidden to release their drivers.
Virtually every PC hardware vendor had a robust and fast OpenGL driver ready to roll for consumer PCs, but couldn’t ship them. To further complicate things, shortly thereafter a struggling SGI announced a new Windows NT–based workstation. SGI simultaneously pledged to discontinue promoting OpenGL for consumer applications, and to work with Microsoft on a new API called Fahrenheit. OpenGL was as good as dead.
The Future of OpenGL
A funny thing happened on the way to oblivion, and even without SGI, OpenGL began to take on a life of its own. Hardware vendors with some help from SGI (pre-Fahrenheit) continued to support OpenGL with new drivers. Games aren’t the only application that OpenGL was well suited for, and most developers wanted their Windows NT software to be able to run on the consumer version of Windows, too. When OpenGL was again widely available on consumer hardware, developers didn’t really need SGI or anyone else touting the virtues of OpenGL. OpenGL was easy to use and had been around for years. This meant there was an abundance of documentation (including the first edition of this book), sample programs, SigGraph papers, and so on. OpenGL began to flourish.
As more developers began to use OpenGL, it became clear who was really in charge of the industry: the developers. The more applications that shipped with OpenGL support, the more pressure mounted on hardware vendors to produce better OpenGL hardware and high-quality drivers. Consumers don’t really care about API technology. They just want software that works, and they will buy whatever graphics card runs their favorite game or application the best. Developers care about time to market, portability, and code reuse. (Go ahead. Try to recompile that old Direct3D 4.0 program. I dare you!) Using OpenGL enabled many developers to meet customer demand better, and in the end it’s the customers who pay the bills.
As time passed, Fahrenheit fell solely into Microsoft’s hands and was eventually discontinued altogether. Direct3D has evolved further to include more and more OpenGL features, functionality, and ease of use. Ten years later, today’s Direct3D bears little resemblance to the tortured API it once was. OpenGL’s popularity, however, has continued to grow as an alternative to Windows-specific rendering technology and is now widely supported across all major operating systems and hardware devices. Even cellphones with 3D graphics technology support a subset of OpenGL, called OpenGL ES. Today, all new 3D accelerated graphics cards for the PC ship with both OpenGL and Direct3D drivers. This is largely due to the fact that many developers continue to prefer OpenGL for new development. OpenGL today is widely recognized and accepted as the industry-standard API for real-time 3D and 2D graphics. Yes, even 2D! The OpenGL imaging subset and fragment processing programmability has made it the darling of hardware accelerated image and video processing applications as well.
This momentum will carry OpenGL into the foreseeable future as the API of choice for a wide range of applications and hardware platforms. All this also makes OpenGL well positioned to take advantage of future 3D graphics innovations. Because of OpenGL’s extension mechanism, vendors can expose new hardware features without waiting on Microsoft or some industry committee, and cutting-edge developers can exploit them as soon as updated drivers are available. With the addition of the OpenGL shading language (see Part II, “The New Testament”), OpenGL has shown its continuing adaptability to meet the challenge of an evolving 3D graphics programming pipeline. Finally, OpenGL is a specification that has shown that it can be applied to a wide variety of programming paradigms. From C/C++ to Java and Visual Basic, even newer languages such as C# are now being used to create PC games and applications using OpenGL. OpenGL is here to stay.
How Does OpenGL Work?
OpenGL is a procedural rather than a descriptive graphics API. Instead of describing the scene and how it should appear, the programmer actually prescribes the steps necessary to achieve a certain appearance or effect. These “steps” involve calls to the many OpenGL commands. These commands are used to draw graphics primitives such as points, lines, and polygons in three dimensions. In addition, OpenGL supports lighting and shading, texture mapping, blending, transparency, animation, and many other special effects and capabilities.
OpenGL does not include any functions for window management, user interaction, or file I/O. Each host environment (such as Mac OS X or Microsoft Windows) has its own functions for this purpose and is responsible for implementing some means of handing over to OpenGL the drawing control of a window.
There is no “OpenGL file format” for models or virtual environments. Programmers construct these environments to suit their own high-level needs and then carefully program them using the lower-level OpenGL commands.
Generic Implementations
As mentioned previously, a generic implementation is a software implementation. Hardware implementations are created for a specific hardware device, such as a graphics card or game console. A generic implementation can technically run just about anywhere as long as the system can display the generated graphics image.
Figure 2.1 shows the typical place that OpenGL and a generic implementation occupy when a Windows application is running. The typical program calls many functions, some of which the programmer creates and some of which are provided by the operating system or the programming language’s runtime library. Windows applications wanting to create output onscreen usually call a Windows API called the graphics device interface (GDI). The GDI contains methods that allow you to write text in a window, draw simple 2D lines, and so on.
Figure 2.1. OpenGL’s place in a typical application program.

Usually, graphics-card vendors supply a hardware driver that the operating system interfaces with to create output on your monitor. A software implementation of OpenGL takes graphics requests from an application and constructs (rasterizes) a color image of the 3D graphics. It then supplies this image for display on the monitor. On other operating systems, the process is reasonably equivalent, but you replace the GDI with that operating system’s native display services.
OpenGL has a couple of common generic implementations. Microsoft has shipped its software implementation with every version of Windows NT since version 3.5 and Windows 95 (Service Release 2 and later). Windows 2000 and XP also contain support for a generic implementation of OpenGL. These versions of OpenGL are typically slow, and only support OpenGL functionality up to version 1.1. This by no means limits the capabilities or efficiency of native vendor-provided OpenGL drivers. We’ll discuss this in more detail in Chapter 19, “Wiggle: OpenGL on Windows.”
During the height of the so-called “API Wars,” SGI released a software implementation of OpenGL for Windows that greatly outperformed Microsoft’s implementation. This implementation is not officially supported but is still occasionally used by a few developers in niche markets. MESA 3D is another “unofficial” OpenGL software implementation that is widely supported in the open-source community. Mesa 3D is not an OpenGL license, so it is an “OpenGL work-alike” rather than an official implementation. In any respect other than legal, you can essentially consider it to be an OpenGL implementation nonetheless. The Mesa contributors even make a good attempt to pass the OpenGL conformance tests.
Hardware Implementations
A hardware implementation of OpenGL usually takes the form of a graphics card driver. Figure 2.2 shows its relationship to the application much as Figure 2.1 did for software implementations. Note that OpenGL API calls are passed to a hardware driver. This driver does not pass its output to the Windows GDI for display; the driver interfaces directly with the graphics display hardware.
Figure 2.2. Hardware-accelerated OpenGL’s place in a typical application program.

A hardware implementation is often referred to as an accelerated implementation because hardware-assisted 3D graphics usually far outperform software-only implementations. What isn’t shown in Figure 2.2 is that sometimes part of the OpenGL functionality is still implemented in software as part of the driver, and other features and functionality can be passed directly to the hardware. This idea brings us to our next topic: the OpenGL pipeline.
The Pipeline
The word pipeline is used to describe a process that can take two or more distinct stages or steps. Figure 2.3 shows a simplified version of the OpenGL pipeline. As an application makes OpenGL API function calls, the commands are placed in a command buffer. This buffer eventually fills with commands, vertex data, texture data, and so on. When the buffer is flushed, either programmatically or by the driver’s design, the commands and data are passed to the next stage in the pipeline.
Figure 2.3. A simplified version of the OpenGL pipeline.

Vertex data is usually transformed and lit initially. In subsequent chapters, you’ll find out more about what this means. For now, you can consider “transform and lighting” to be a mathematically intensive stage where points used to describe an object’s geometry are recalculated for the given object’s location and orientation. Lighting calculations are performed as well to indicate how bright the colors should be at each vertex.
When this stage is complete, the data is fed to the rasterization portion of the pipeline. The rasterizer actually creates the color image from the geometric, color, and texture data. The image is then placed in the frame buffer. The frame buffer is the memory of the graphics display device, which means the image is displayed on your screen.
This diagram provides a simplistic view of the OpenGL pipeline, but it is sufficient for your current understanding of 3D graphics rendering. At a high level, this view is accurate, so we aren’t compromising your understanding, but at a low level, many more boxes appear inside each box shown here. There are also some exceptions, such as the arrow in the figure indicating that some commands skip the transform and lighting stage altogether (such as displaying raw image data on the screen).
Early OpenGL hardware accelerators were nothing more than fast rasterizers. They accelerated only the rasterization portion of the pipeline. The host system’s CPU did transform and lighting in a software implementation of that portion of the pipeline. Higher-end (more expensive) accelerators had transform and lighting on the graphics accelerator. This arrangement put more of the OpenGL pipeline in hardware and thus provided for higher performance.
Even most low-end consumer hardware today has the transform and lighting stage in hardware. The net effect of this arrangement is that higher detailed models and more complex graphics are possible at real-time rendering rates on inexpensive consumer hardware. Games and applications developers can capitalize on this effect, yielding far more detailed and visually rich environments.
OpenGL: An API, Not a Language
For the most part, OpenGL is not a programming language; it is an application programming interface (API). Whenever we say that a program is OpenGL-based or an OpenGL application, we mean that it was written in some programming language (such as C or C++) that makes calls to one or more of the OpenGL libraries. We are not saying that the program uses OpenGL exclusively to do drawing. It might combine the best features of two different graphics packages. Or it might use OpenGL for only a few specific tasks and environment-specific graphics (such as the Windows GDI) for others. The only exception to this rule of thumb is, of course, the OpenGL Shading Language, which is covered in Part II.
As an API, the OpenGL library follows the C calling convention. As it turns out, this choice of calling convention makes it possible to easily call OpenGL directly from most other languages as well. In this book, the sample programs are written in C++. C++ programs can easily access C functions and APIs in the same manner as C, with only some minor considerations. C++ is the modern language of choice for most performance-minded applications. Very basic C++ classes can dramatically simplify most programming tasks as well. We promise to keep the object usage to a minimum, no STL/Template/Operator Overloaded/Meta blah blah...we promise!
Other programming languages—such as Visual Basic—that can call functions in C libraries can also make use of OpenGL, and OpenGL bindings are available for many other programming languages. Using OpenGL from these other languages is, however, outside the scope of this book and can be somewhat tedious to explain. To keep things simple and easily portable, we’ll stick with C++ for our examples.
Standard Libraries and Headers
Although OpenGL is a “standard” programming library, this library has many implementations and versions. On Microsoft Windows, for example, the actual Microsoft software implementation is in the opengl32.dll dynamic link library, located in the Windows system directory. On most platforms, the OpenGL library is accompanied by the OpenGL utility library (GLU), which on Windows is in glu32.dll, also located in the system directory. The utility library is a set of utility functions that perform common (but sometimes complex) tasks, such as special matrix calculations, or provide support for common types of curves and surfaces. On Mac OS X, OpenGL and the GLU libraries are both included in the OpenGL Framework. Frameworks on OS X are similar in many respects to Windows DLLs.
The steps for setting up your compiler tools to use the correct OpenGL headers and to link to the correct OpenGL libraries vary from tool to tool and from platform to platform. They also change over time as newer versions of these tools are released. It is usually safe to assume that if you are reading a book on programming 3D graphics, you already know how to actually compile programs with your preferred development environment. Note the italics on the word usually! For this reason, in the source code distribution, you’ll find preconfigured projects for Visual Studio on Windows, XCode on Mac OS X, and some generic “make” files for Linux. On our Web site (www.opengl.org/superbible) you’ll find some more detailed tutorials to walk you through this if necessary.
On all platforms, the prototypes for all OpenGL functions, types, and macros are contained (by convention) in the header file gl.h. The utility library functions are prototyped in a different file, glu.h. These files are usually located in a special directory in your include path, set up automatically when you install your development tools. For example, the following code shows the initial header inclusions for a basic Windows program that uses OpenGL:
#include<windows.h>
#include<gl/gl.h>
#include<gl/glu.h>
On an Apple OS X system, your include files might look more like this:
#include <Carbon/Carbon.h>
#include <OpenGL/gl.h>
#include <OpenGL/glu.h>
Some Header Customizations
To keep things from getting too complicated, all the examples in the book (with the exception being those in Part III, “The Apocrypha,” all on platform-specific code) include one header file that takes care of all the platform-specific variations:
#include "../../shared/gltools.h" // OpenGL toolkit
This file is in the /shared folder, and all the sample programs have the same relative position to this folder. If you look in this header, near the top, you’ll find the platform-specific code broken out like this:

You’ll also notice a few other headers we haven’t discussed yet. The first is glee.h. This header belongs to the GLEE library, which stands for OpenGL Easy Extension library. This library (or accompanying glee.c source file in our examples) transparently adds OpenGL extensions to your projects. The basic Microsoft headers include only OpenGL 1.1 functionality, and GLEE adds the rest of the API to your project. Apple keeps their headers more up-to-date, but still there may be some extensions or later functions you may need. GLEE works almost like magic!
Finally you’ll see glut.h. We’ll explain what GLUT is soon (all our samples use it). GLUT is natively supported on OS X and is supplied by Apple with their development tools. On Windows, we have used freeglut, which is an open-source implementation of the GLUT library. In addition to this header, on Windows builds, you need to add freeglut_static.lib. On Mac OS X with XCode, you add the GLUT Framework, and on Linux, GLUT is included in the library list in the make files.
If you look in the /examples/src/shared folder where gltools.h is located, you’ll also find gltools.cpp. This source file is also added to many of the sample projects. This contains a collection of useful and frequently used functions written and used regularly by the authors in their own OpenGL-based work. A few other headers contain some simple C++ classes as well, and we’ll discuss these in more detail as they come up.
API Specifics
OpenGL was designed by some clever people who had a lot of experience designing graphics programming APIs. They applied some standard rules to the way functions were named and variables were declared. The API is simple and clean and easy for vendors to extend. OpenGL tries to avoid as much policy as possible. Policy refers to assumptions that the designers make about how programmers will use the API. Examples of policies include assuming that you always specify vertex data as floating-point values, assuming that fog is always enabled before any rendering occurs, or assuming that all objects in a scene are affected by the same lighting parameters. Making these kinds of assumptions would eliminate many of the popular rendering techniques that have developed over time.
This philosophy has contributed to the longevity and evolution of OpenGL. Still, as time marches on, unanticipated advances in hardware capabilities, and the creativity of developers and hardware vendors, has taken its toll on OpenGL as it has progressed through the years. Despite this, OpenGL’s basic API has shown surprising resilience to new unanticipated features. The ability to compile ten-year-old source code with little to no changes is a substantial advantage to application developers, and OpenGL has managed for years to add new features with as little impact on old code as possible. Future versions of OpenGL are in the works with “lean and mean” profiles, where some older features and models may eventually be dropped.
Data Types
To make it easier to port OpenGL code from one platform to another, OpenGL defines its own data types. These data types map to normal C/C++ data types that you can use instead, if you want. The various compilers and environments, however, have their own rules for the size and memory layout of various variable types. By using the OpenGL defined variable types, you can insulate your code from these types of changes.
Table 2.1 lists the OpenGL data types, their corresponding C/C++ data types under most 32-bit environments (Win32/OS X, etc.), and the appropriate suffix for literals. In this book, we use the suffixes for all literal values. You will see later that these suffixes are also used in many (but not all) OpenGL function names. The internal representation is the same on all platforms (even 64-bit OSs), regardless of machine size or compiler used (provided you have an appropriate SDK!).
Table 2.1. OpenGL Variable Types’ Corresponding C Data Types
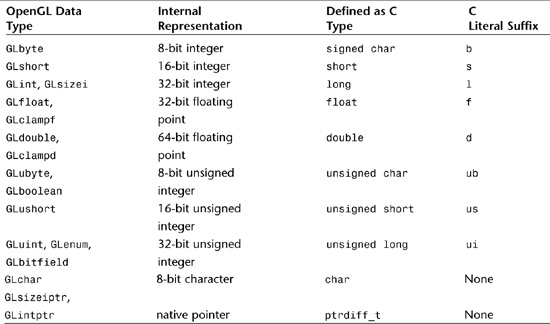
All data types start with a GL to denote OpenGL. Most are followed by their corresponding C data types (byte, short, int, float, and so on). Some have a u first to denote an unsigned data type, such as ubyte to denote an unsigned byte. For some uses, a more descriptive name is given, such as size to denote a value of length or depth. For example, GLsizei is an OpenGL variable denoting a size parameter that is represented by an integer. The clamp designation is a hint that the value is expected to be “clamped” to the range 0.0–1.0. The GLboolean variables are used to indicate true and false conditions; GLenum, for enumerated variables; and GLbitfield, for variables that contain binary bit fields.
Pointers and arrays are not given any special consideration. An array of 10 GLshort variables is simply declared as
GLshort shorts[10];
and an array of 10 pointers to GLdouble variables is declared with
GLdouble *doubles[10];
Some other pointer object types are used for NURBS and quadrics. They require more explanation and are covered in later chapters.
Function-Naming Conventions
Most OpenGL functions follow a naming convention that tells you which library the function is from and often how many and what types of arguments the function takes. All functions have a root that represents the function’s corresponding OpenGL command. For example, glColor3f has the root Color. The gl prefix represents the gl library, and the 3f suffix means the function takes three floating-point arguments. All OpenGL functions take the following format:
<Library prefix><Root command><Optional argument count><Optional argument type>
Figure 2.4 illustrates the parts of an OpenGL function. This sample function with the suffix 3f takes three floating-point arguments. Other variations take three integers (glColor3i), three doubles (glColor3d), and so forth. This convention of adding the number and types of arguments (see Table 2.1) to the end of OpenGL functions makes it easy to remember the argument list without having to look it up. Some versions of glColor take four arguments to specify an alpha component (transparency) as well.
Figure 2.4. A dissected OpenGL function.

In the reference section (Appendix C) of this book, these “families” of functions are listed by their library prefix and root. All the variations of glColor (glColor3f, glColor4f, glColor3i, and so on) are listed under a single entry—glColor.
Any conformant C/C++ compiler will assume that any floating-point literal value is of type double unless explicitly told otherwise via the suffix mechanism. When you’re using literals for floating-point arguments, if you don’t specify that these arguments are of type float instead of double, many compilers will issue a warning while compiling because it detects that you are passing a double to a function defined to accept only floats, resulting in a possible loss of precision, not to mention a costly runtime conversion from double to float. As OpenGL programs grow, these warnings quickly number in the hundreds and make it difficult to find any real syntax errors. You can turn off these warnings using the appropriate compiler options, but we advise against doing so. It’s better to write clean, portable code the first time. So clean up those warning messages by cleaning up the code (in this case, by explicitly using the float type)—not by disabling potentially useful warnings.
Additionally, you might be tempted to use the functions that accept double-precision floating-point arguments rather than go to all the bother of specifying your literals as floats. However, OpenGL uses floats internally, and using anything other than the single-precision floating-point functions adds a performance bottleneck because the values are converted to floats anyhow before being processed by OpenGL—not to mention that every double takes up twice as much memory as a float. For a program with a lot of numbers “floating” around, these performance hits can add up pretty fast!
Platform Independence
OpenGL is a powerful and sophisticated API for creating 3D graphics, with more than 300 commands that cover everything from setting material colors and reflective properties to doing rotations and complex coordinate transformations. You might be surprised that OpenGL does not have a single function or command relating to window or screen management. In addition, there are no functions for keyboard input or mouse interaction. Consider, however, that one of the OpenGL designers’ primary goals was for OpenGL to be a platform independent abstraction of graphics hardware. Creating and managing windows and polling for user input are inherently operating system related tasks. You do not ask your graphics card if the user has pressed the enter key! There are, of course, some other very good platform independent abstractions of this sort, too, but these tasks fall outside the scope of graphics rendering. Remember the first sentence of this chapter, “OpenGL is a software interface to graphics hardware.”
Using GLUT
In the beginning, there was AUX, the OpenGL auxiliary library. The AUX library was created to facilitate the learning and writing of OpenGL programs without the programmer being distracted by the minutiae of any particular environment, be it UNIX, Windows, or whatever. You wouldn’t write “final” code when using AUX; it was more of a preliminary staging ground for testing your ideas. A lack of basic GUI features limited the library’s use for building useful applications.
AUX has since been replaced by the GLUT library for cross-platform programming examples and demonstrations. GLUT stands for OpenGL utility toolkit (not to be confused with the standard GLU—OpenGL utility library). Mark Kilgard, while at SGI, wrote GLUT as a more capable replacement for the AUX library and included some GUI features to at least make sample programs more usable under X Windows. This replacement includes using pop-up menus, managing other windows, and even providing joystick support. GLUT is not public domain, but it is free and free to redistribute. GLUT is widely available on most UNIX distributions (including Linux), and is natively supported by Mac OS X, where Apple maintains and extends the library. On Windows, GLUT development has been discontinued. Since GLUT was originally not licensed as open source, a new GLUT implementation, freeglut, has sprung up to take its place. All the Windows GLUT-based samples in this book make use of the freeglut library, which is also available on our Web site.
For most of this book, we use GLUT as our program framework. This decision serves two purposes. The first is that it makes most of the book accessible to a wider audience. With a little effort, experienced Windows, Linux, or Mac programmers should be able to set up GLUT for their programming environments and follow most of the examples in this book.
The second point is that using GLUT eliminates the need to know and understand basic GUI programming on any specific platform. Although we explain the general concepts, we do not claim to write a book about GUI programming, but rather about OpenGL. Using GLUT for the basic coverage of the API, we make life a bit easier for Windows/Mac/Linux novices as well.
It’s unlikely that all the functionality of a commercial application will be embodied entirely in the code used to draw in 3D. Although GLUT does have some limited GUI functionality, it is very simple and abbreviated as far as GUI toolkits go. Thus you can’t rely entirely on the GLUT library for everything. Nevertheless, the GLUT library excels in its role for learning and demonstration exercises, and hiding all the platform specific details of window creation and OpenGL context initialization. Even for an experienced programmer, it is still easier to employ the GLUT library to iron out 3D graphics code before integrating it into a complete application.
Your First Program
To understand the GLUT library better, look at possibly the world’s shortest OpenGL program, which was written using the GLUT library. Listing 2.1 presents the SIMPLE program. Its output is shown in Figure 2.5. You’ll also learn just a few things about OpenGL along the way!
Listing 2.1. Source Code for SIMPLE: A Very Simple OpenGL Program

Figure 2.5. Output from the SIMPLE program.

The SIMPLE program doesn’t do much. When run from the command line (or development environment), it creates a standard GUI window with the caption Simple and a clear blue background. If you are running Visual C++, when you terminate the program, you see the message Press any key to continue in the console window. You need to press a key to terminate the program. This standard feature of the Microsoft IDE for running a console application ensures that you can see whatever output your program places onscreen (the console window) before the window vanishes. If you run the program from the command line, you don’t get this behavior. If you double-click on the program file from Explorer, you see the console window, but it vanishes when the program terminates.
This simple program contains four GLUT library functions (prefixed with glut) and three “real” OpenGL functions (prefixed with gl). Let’s examine the program line by line, after which we will introduce some more functions and substantially improve on the first example.
The Header
Listing 2.1 contains only one include file:
#include "../../shared/gltools.h" // OpenGL toolkit
This file, which we mentioned earlier, includes the gl.h and glut.h headers, which bring in the function prototypes used by the program.
The Body
Next, we skip down to the entry point of all C programs:
int main(int argc, char* argv[])
{
glutInit(&argc, argv);
Console-mode C and C++ programs always start execution with the function main. If you are an experienced Windows nerd, you might wonder where WinMain is in this example. It’s not there because we start with a console-mode application, so we don’t have to start with window creation and a message loop. With Win32, you can create graphical windows from console applications, just as you can create console windows from GUI applications. These details are buried within the GLUT library. (Remember, the GLUT library is designed to hide just these kinds of platform details.)
The first line of code in main is a call to glutInit, which simply passes along the command-line parameters and initializes the GLUT library.
Display Mode: Single Buffered
Next we must tell the GLUT library what type of display mode to use when creating the window:
glutInitDisplayMode(GLUT_SINGLE | GLUT_RGBA);
The flags here tell it to use a single-buffered window (GLUT_SINGLE) and to use RGBA color mode (GLUT_RGBA). A single-buffered window means that all drawing commands are performed on the window displayed. An alternative is a double-buffered window, where the drawing commands are actually executed on an offscreen buffer and then quickly swapped into view on the window. This method is often used to produce animation effects and is demonstrated later in this chapter. In fact, we use double-buffered mode for the rest of the book. RGBA color mode means that you specify colors by supplying separate intensities of red, green, blue, and alpha components. The alternative is color index mode, which is now largely obsolete, in which you specify colors by using an index into a color palette.
Creating the OpenGL Window
The next call to the GLUT library actually creates the window on the screen. The following code creates the window and sets the caption to Simple:
glutCreateWindow("Simple");
The single argument to glutCreateWindow is the caption for the window’s title bar.
Displaying Callback
The next line of GLUT-specific code is
glutDisplayFunc(RenderScene);
This line establishes the previously defined function RenderScene as the display callback function. This means that GLUT calls the function pointed to here whenever the window needs to be drawn. This call occurs when the window is first displayed or when the window is resized or uncovered, for example. This is the place where we put our OpenGL rendering function calls.
Set Up the Context and Go!
The next line is neither GLUT- nor OpenGL-specific but is a convention that we follow throughout the book:
SetupRC();
In this function, we do any OpenGL initialization that should be performed before rendering. Many of the OpenGL states need to be set only once and do not need to be reset every time you render a frame (a screen full of graphics).
The last GLUT function call comes at the end of the program:
glutMainLoop();
This function starts the GLUT framework running. After you define callbacks for screen display and other functions (coming up), you turn GLUT loose. glutMainLoop never returns after it is called until the main window is closed, and needs to be called only once from an application. This function processes all the operating system–specific messages, keystrokes, and so on until you terminate the program.
OpenGL Graphics Calls
The SetupRC function contains a single OpenGL function call:
glClearColor(0.0f, 0.0f, 1.0f, 1.0f);
This function sets the color used for clearing the window. The prototype for this function is
void glClearColor(GLclampf red, GLclampf green, GLclampf blue, GLclampf alpha);
GLclampf is defined as a float under most implementations of OpenGL. In OpenGL, a single color is represented as a mixture of red, green, and blue components. The range for each component can vary from 0.0 to 1.0. This is similar to the Windows specification of colors using the RGB macro to create a COLORREF value. The difference is that in Windows each color component in a COLORREF can range from 0 to 255, giving a total of 256×256×256—or more than 16 million colors. With OpenGL, the values for each component can be any valid floating-point value between 0 and 1, thus yielding a virtually infinite number of potential colors. Practically speaking, color output is limited on most devices to 24 bits (16 million colors) total.
Naturally, OpenGL takes this color value and converts it internally to the nearest possible exact match with the available video hardware. Table 2.2 lists some common colors and their component values. You can use these values with any of the OpenGL color-related functions.
Table 2.2. Some Common Composite Colors

The last argument to glClearColor is the alpha component, which is used for blending and special effects such as transparency. Transparency refers to an object’s capability to allow light to pass through it. Suppose you would like to create a piece of red stained glass, and a blue light happens to be shining behind it. The blue light affects the appearance of the red in the glass (blue + red = purple). You can use the alpha component value to generate a red color that is semitransparent so that it works like a sheet of glass—an object behind it shows through. There is more to this type of effect than just using the alpha value, and in Chapter 6, “More on Colors and Materials,” you’ll learn more about this topic; until then, you should leave the alpha value as 1.
Clearing the Color Buffer
All we have done at this point is set OpenGL to use blue for the clearing color. In our RenderScene function, we need an instruction to do the actual clearing:
glClear(GL_COLOR_BUFFER_BIT);
The glClear function clears a particular buffer or combination of buffers. A buffer is a storage area for image information. The red, green, and blue components of a drawing are usually collectively referred to as the color buffer or pixel buffer.
More than one kind of buffer (color, depth, stencil, and accumulation) is available in OpenGL, and these buffers are covered in more detail later in the book. For the next several chapters, all you really need to understand is that the color buffer is the place where the displayed image is stored internally and that clearing the buffer with glClear removes the last drawing from the window. You will also see the term framebuffer, which refers to all these buffers collectively since they work in tandem.
Flushing That Queue
The final OpenGL function call comes last:
glFlush();
This line causes any unexecuted OpenGL commands to be executed. We have one at this point: glClear.
Internally, OpenGL uses a rendering pipeline that processes commands sequentially. OpenGL commands and statements often are queued up until the OpenGL driver processes several “commands” at once. This setup improves performance because communication with hardware is inherently slow. Making one trip to the hardware with a truckload of data is much faster than making several smaller trips for each command or instruction. We’ll discuss this feature of OpenGL’s operation further in Chapter 11, “It’s All About the Pipeline: Faster Geometry Throughput.” In the short program in Listing 2.1, the glFlush function simply tells OpenGL that it should proceed with the drawing instructions supplied thus far before waiting for any more drawing commands.
SIMPLE might not be the most interesting OpenGL program in existence, but it demonstrates the basics of getting a window up using the GLUT library, and it shows how to specify a color and clear the window. Next, we want to spruce up our program by adding some more GLUT library and OpenGL functions.
Drawing Shapes with OpenGL
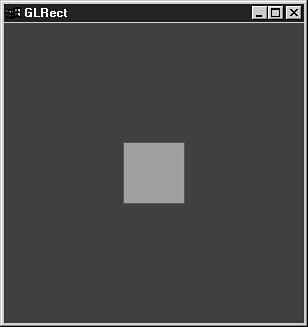
The SIMPLE program made an empty window with a blue background. Now, let’s do some drawing in the window. In addition, we want to be able to move and resize the window and have our rendering code respond appropriately. In Listing 2.2, you can see the modifications. Figure 2.6 shows the output of this program (GLRect).
Listing 2.2. Drawing a Centered Rectangle with OpenGL


Figure 2.6. Output from the GLRect program.
Drawing a Rectangle
Previously, all our program did was clear the screen. We’ve now added the following lines of drawing code:
// Set current drawing color to red
// R G B
glColor3f(1.0f, 0.0f, 0.0f);
// Draw a filled rectangle with current color
glRectf(-25.0f, 25.0f, 25.0f, -25.0f);
These lines set the color used for future drawing operations (lines and filling) with the call to glColor3f. Then glRectf draws a filled rectangle.
The glColor3f function selects a color in the same manner as glClearColor, but no alpha translucency component needs to be specified (the default value for alpha is 1.0 for completely opaque):
void glColor3f(GLfloat red, GLfloat green, GLfloat blue);
The glRectf function takes floating-point arguments, as denoted by the trailing f. The number of arguments is not used in the function name because all glRect variations take four arguments. The four arguments of glRectf, shown here, represent two coordinate pairs, (x1, y1) and (x2, y2):
void glRectf(GLfloat x1, GLfloat y1, GLfloat x2, GLfloat y2);
The first pair represents the upper-left corner of the rectangle, and the second pair represents the lower-right corner.
How does OpenGL map these coordinates to actual window positions? This is done in the callback function ChangeSize. This function is set as the callback function for whenever the window changes size (when it is stretched, maximized, and so on). This is set by the glutReshapeFunc in the same way that the display callback function is set:
glutReshapeFunc(ChangeSize);
Any time the window size or dimensions change, you need to reset the coordinate system.
Scaling to the Window
In nearly all windowing environments, the user can at any time change the size and dimensions of the window. Even if you are writing a game that always runs in full-screen mode, the window is still considered to change size once—when it is created. When this happens, the window usually responds by redrawing its contents, taking into consideration the window’s new dimensions. Sometimes, you might want to simply clip the drawing for smaller windows or display the entire drawing at its original size in a larger window. For our purposes, we usually want to scale the drawing to fit within the window, regardless of the size of the drawing or window. Thus, a very small window would have a complete but very small drawing, and a larger window would have a similar but larger drawing. You see this effect in most drawing programs when you stretch a window as opposed to enlarging the drawing. Stretching a window usually doesn’t change the drawing size, but magnifying the image makes it grow.
Setting the Viewport and Clipping Volume
In Chapter 1 we discussed how the viewport and viewing volume affect the coordinate range and scaling of 2D and 3D drawings in a 2D window on the computer screen. Now, we examine the setting of viewport and clipping volume coordinates in OpenGL.
Although our drawing is a 2D flat rectangle, we are actually drawing in a 3D coordinate space. The glRectf function draws the rectangle in the xy plane at z = 0. Your perspective is along the positive z-axis to see the square rectangle at z = 0. (If you’re feeling lost here, review this material in Chapter 1, “Introduction to 3D Graphics and OpenGL.”)
Whenever the window size changes, the viewport and clipping volume must be redefined for the new window dimensions. Otherwise, you see an effect like the one shown in Figure 2.7, where the mapping of the coordinate system to screen coordinates stays the same regardless of the window size.
Figure 2.7. The effects of changing the window size but not the coordinate system.

Because window size changes are detected and handled differently under various environments, the GLUT library provides the function glutReshapeFunc, which registers a callback that the GLUT library will call whenever the window dimensions change. The function you pass to glutReshapeFunc is prototyped like this:
void ChangeSize(GLsizei w, GLsizei h);
We have chosen ChangeSize as a descriptive name for this function, and we will use that name for our future examples.
The ChangeSize function receives the new width and height whenever the window size changes. We can use this information to modify the mapping of our desired coordinate system to real screen coordinates, with the help of two OpenGL functions: glViewport and glOrtho.
Defining the Viewport
To understand how the viewport definition is achieved, let’s look more carefully at the ChangeSize function. It first calls glViewport with the new width and height of the window. The glViewport function is defined as
void glViewport(GLint x, GLint y, GLsizei width, GLsizei height);
The x and y parameters specify the lower-left corner of the viewport within the window, and the width and height parameters specify these dimensions in pixels. Usually, x and y are both 0, but you can use viewports to render more than one drawing in different areas of a window. The viewport defines the area within the window in actual screen coordinates that OpenGL can use to draw in (see Figure 2.8). The current clipping volume is then mapped to the new viewport. If you specify a viewport that is smaller than the window coordinates, the rendering is scaled smaller, as you see in Figure 2.8.
Figure 2.8. Viewport-to-window mapping.

Defining the Clipped Viewing Volume
The last requirement of our ChangeSize function is to redefine the clipping volume so that the aspect ratio remains square. The aspect ratio is the ratio of the number of pixels along a unit of length in the vertical direction to the number of pixels along the same unit of length in the horizontal direction. In English, this just means the width of the window divided by the height. An aspect ratio of 1.0 defines a square aspect ratio. An aspect ratio of 0.5 specifies that for every two pixels in the horizontal direction for a unit of length, there is one pixel in the vertical direction for the same unit of length.
If you specify a viewport that is not square and it is mapped to a square clipping volume, the image will be distorted. For example, a viewport matching the window size and dimensions but mapped to a square clipping volume would cause images to appear tall and thin in tall and thin windows and wide and short in wide and short windows. In this case, our square would appear square only when the window was sized to be a square.
In our example, an orthographic projection is used for the clipping volume. The OpenGL command to create this projection is glOrtho:
void glOrtho(GLdouble left, GLdouble right, GLdouble bottom,
GLdouble top, GLdouble near, GLdouble far );
In 3D Cartesian space, the left and right values specify the minimum and maximum coordinate value displayed along the x-axis; bottom and top are for the y-axis. The near and far parameters are for the z-axis, generally with negative values extending away from the viewer (see Figure 2.9). Many drawing and graphics libraries use window coordinates (pixels) for drawing commands. Using a real floating-point (and seemingly arbitrary) coordinate system for rendering is one of the hardest things for many beginners to get used to. After you work through a few programs, though, it quickly becomes second nature.

Just before the code using glOrtho, notice these two function calls:
// Reset coordinate system
glMatrixMode(GL_PROJECTION);
glLoadIdentity();
The subject of matrices and the OpenGL matrix stacks comes up in Chapter 4, “Geometric Transformations: The Pipeline,” where we discuss this topic in more detail. The projection matrix is the place where you actually define your viewing volume. The single call to glLoadIdentity is needed because glOrtho doesn’t really establish the clipping volume, but rather modifies the existing clipping volume. It multiplies the matrix that describes the current clipping volume by the matrix that describes the clipping volume described in its arguments. For now, you just need to know that glLoadIdentity serves to “reset” the coordinate system before any matrix manipulations are performed. Without this “reset,” every time glOrtho is called, each successive call to glOrtho could result in a further corruption of the intended clipping volume, which might not even display the rectangle.
The last two lines of code, shown here, tell OpenGL that all future transformations will affect our models (what we draw):
glMatrixMode(GL_MODELVIEW);
glLoadIdentity();
We purposely do not cover model transformation until Chapter 4. You do need to know now, however, how to set up these things with their default values. Otherwise, if you become adventurous and start experimenting, your output might not match what you expect.
Keeping a Square Square
The following code does the actual work of keeping our square square:
// Establish clipping volume (left, right, bottom, top, near, far)
aspectRatio = (GLfloat)w / (GLfloat)h;
if (w <= h)
glOrtho (-100.0, 100.0, -100 / aspectRatio, 100.0 / aspectRatio,
1.0, -1.0);
else
glOrtho (-100.0 * aspectRatio, 100.0 * aspectRatio,
-100.0, 100.0, 1.0, -1.0);
Our clipping volume (visible coordinate space) is modified so that the left side is always at x = –100 and the right side extends to 100 unless the window is wider than it is tall. In that case, the horizontal extent is scaled by the aspect ratio of the window. In the same manner, the bottom is always at y = –100 and extends upward to 100 unless the window is taller than it is wide. In that case, the upper coordinate is scaled by the inverse of the aspect ratio. This serves to keep a square coordinate region 200×200 available (with 0,0 in the center) regardless of the shape of the window. Figure 2.10 shows how this works.
Figure 2.10. The clipping region for three different windows.

Animation with OpenGL and GLUT
So far, we’ve discussed the basics of using the GLUT library for creating a window and using OpenGL commands for the actual drawing. You will often want to move or rotate your images and scenes, creating an animated effect. Let’s take the previous example, which draws a square, and make the square bounce off the sides of the window. You could create a loop that continually changes your object’s coordinates before calling the RenderScene function. This would cause the square to appear to move around within the window.
The GLUT library enables you to register a callback function that makes it easier to set up a simple animated sequence. This function, glutTimerFunc, takes the name of a function to call and the amount of time to wait before calling the function:
void glutTimerFunc(unsigned int msecs, void (*func)(int value), int value);
This code sets up GLUT to wait msecs milliseconds before calling the function func. You can pass a user-defined value in the value parameter. The function called by the timer has the following prototype:
void TimerFunction(int value);
When the time expires, this function is fired only once. To effect a continuous animation, you must reset the timer again in the timer function.
In our GLRect program, we can change the hard-coded values for the location of our rectangle to variables and then constantly modify those variables in the timer function. This causes the rectangle to appear to move across the window. Let’s look at an example of this kind of animation. In Listing 2.3, we modify Listing 2.2 to bounce around the square off the inside borders of the window. We need to keep track of the position and size of the rectangle as we go along and account for any changes in window size.
Listing 2.3. Animated Bouncing Square


Double Buffering
One of the most important features of any graphics package is support for double buffering. This feature allows you to execute your drawing code while rendering to an offscreen buffer. Then a swap command places your drawing onscreen instantly.
Double buffering can serve two purposes. The first is that some complex drawings might take a long time to draw, and you might not want each step of the image composition to be visible. Using double buffering, you can compose an image and display it only after it is complete. The user never sees a partial image; only after the entire image is ready is it shown onscreen.
A second use for double buffering is animation. Each frame is drawn in the offscreen buffer and then swapped quickly to the screen when ready. The GLUT library supports double-buffered windows. In Listing 2.3 note the following line:
glutInitDisplayMode(GLUT_DOUBLE | GLUT_RGBA);
We have changed GLUT_SINGLE to GLUT_DOUBLE. This change causes all the drawing code to render in an offscreen buffer.
Next, we also changed the end of the RenderScene function:
. . .
// Flush drawing commands and swap
glutSwapBuffers();
}
No longer are we calling glFlush. This function is no longer needed because when we perform a buffer swap, we are implicitly performing a flush operation.
These changes cause a smoothly animated bouncing rectangle, shown in Figure 2.11. The function glutSwapBuffers still performs the flush, even if you are running in single-buffered mode. Simply change GLUT_DOUBLE back to GLUT_SINGLE in the bounce sample to see the animation without double buffering. As you’ll see, the rectangle constantly blinks and stutters, a very unpleasant and poor animation with single buffering.
Figure 2.11. Follow the bouncing square.

The GLUT library is a reasonably complete framework for creating sophisticated sample programs and perhaps even full-fledged commercial applications (assuming you do not need to use OS-specific or GUI features). It is not the purpose of this book to explore GLUT in all its glory and splendor, however. Here and in the reference section to come, we restrict ourselves to the small subset of GLUT needed to demonstrate the various features of OpenGL.
The OpenGL State Machine
Drawing 3D graphics is a complicated affair. In the chapters ahead, we will cover many OpenGL functions. For a given piece of geometry, many things can affect how it is drawn. Is a light shining on it? What are the properties of the light? What are the properties of the material? Which, if any, texture should be applied? The list could go on and on.
We call this collection of variables the state of the pipeline. A state machine is an abstract model of a collection of state variables, all of which can have various values, be turned on or off, and so on. It simply is not practical to specify all the state variables whenever we try to draw something in OpenGL. Instead, OpenGL employs a state model, or state machine, to keep track of all the OpenGL state variables. When a state value is set, it remains set until some other function changes it. Many states are simply on or off. Lighting, for example (see Chapter 5, “Color, Materials, and Lighting: The Basics”), is either turned on or turned off. Geometry drawn without lighting is drawn without any lighting calculations being applied to the colors set for the geometry. Any geometry drawn after lighting is turned back on is then drawn with the lighting calculations applied.
To turn these types of state variables on and off, you use the following OpenGL function:
void glEnable(GLenum capability);
You turn the variable back off with the corresponding function:
void glDisable(GLenum capability);
For the case of lighting, for instance, you can turn it on by using the following:
glEnable(GL_LIGHTING);
And you turn it back off with this function:
glDisable(GL_LIGHTING);
If you want to test a state variable to see whether it is enabled, OpenGL again has a convenient mechanism:
Glboolean glIsEnabled(GLenum capability);
Not all state variables, however, are simply on or off. Many of the OpenGL functions yet to come set up values that “stick” until changed. You can query what these values are at any time as well. A set of query functions allows you to query the values of Booleans, integers, floats, and double variables. These four functions are prototyped thus:
void glGetBooleanv(GLenum pname, GLboolean *params);
void glGetDoublev(GLenum pname, GLdouble *params);
void glGetFloatv(GLenum pname, GLfloat *params);
void glGetIntegerv(GLenum pname, GLint *params);
Each function returns a single value or a whole array of values, storing the results at the address you supply. The various parameters are documented in the reference section in Appendix C, “API Reference” (there are a lot of them!). Most may not make much sense to you right away, but as you progress through the book, you will begin to appreciate the power and simplicity of the OpenGL state machine.
Saving and Restoring States
OpenGL also has a convenient mechanism for saving a whole range of state values and restoring them later. The stack is a convenient data structure that allows values to be pushed on the stack (saved) and popped off the stack later to retrieve them. Items are popped off in the opposite order in which they were pushed on the stack. We call this a Last In First Out (LIFO) data structure. It’s an easy way to just say, “Hey, please save this” (push it on the stack), and then a little later say, “Give me what I just saved” (pop it off the stack). You’ll see that the concept of the stack plays a very important role in matrix manipulation when you get to Chapter 4.
A single OpenGL state value or a whole range of related state values can be pushed on the attribute stack with the following command:
void glPushAttrib(GLbitfield mask);
Values are correspondingly restored with this command:
void glPopAttrib(GLbitfield mask);
Note that the argument to these functions is a bit field. This means that you use a bitwise mask, which allows you to perform a bitwise OR (in C using the | operator) of multiple state values with a single function call. For example, you could save the lighting and texturing state with a single call like this:
glPushAttrib(GL_TEXTURE_BIT | GL_LIGHTING_BIT);
A complete list of all the OpenGL state values that can be saved and restored with these functions is located in the reference section in Appendix C, for the glPushAttrib function listing.
OpenGL Errors
In any project, you want to write robust and well-behaved programs that respond politely to their users and have some amount of flexibility. Graphical programs that use OpenGL are no exception, and if you want your programs to run smoothly, you need to account for errors and unexpected circumstances. OpenGL provides a useful mechanism for you to perform an occasional sanity check in your code. This capability can be important because, from the code’s standpoint, it’s not really possible to tell whether the output was the Space Station Freedom or the Space Station Melted Crayons!
When Bad Things Happen to Good Code
Internally, OpenGL maintains a set of six error flags. Each flag represents a different type of error. Whenever one of these errors occurs, the corresponding flag is set. To see whether any of these flags is set, call glGetError:
Glenum glGetError(void);
The glGetError function returns one of the values listed in Table 2.3. The GLU library defines three errors of its own, but these errors map exactly to two flags already present. If more than one of these flags is set, glGetError still returns only one distinct value. This value is then cleared when glGetError is called, and glGetError again will return either another error flag or GL_NO_ERROR. Usually, you want to call glGetError in a loop that continues checking for error flags until the return value is GL_NO_ERROR.

You can use another function in the GLU library, gluErrorString, to get a string describing the error flag:
const GLubyte* gluErrorString(GLenum errorCode);
This function takes as its only argument the error flag (returned from glGetError) and returns a static string describing that error. For example, the error flag GL_INVALID_ENUM returns this string:
invalid enumerant
You can take some peace of mind from the assurance that if an error is caused by an invalid call to OpenGL, the command or function call is ignored. The only exceptions to this are any OpenGL functions that take pointers to memory (that may cause a program to crash if the pointer is invalid).
Identifying the Version
As mentioned previously, sometimes you want to take advantage of a known behavior in a particular implementation. If you know for a fact that you are running on a particular vendor’s graphics card, you may rely on some known performance characteristics to enhance your program. You may also want to enforce some minimum version number for particular vendors’ drivers. What you need is a way to query OpenGL for the vendor and version number of the rendering engine (the OpenGL driver). Both the GL library and the GLU library can return version- and vendor-specific information about themselves.
For the GL library, you can call glGetString:
const GLubyte *glGetString(GLenum name);
This function returns a static string describing the requested aspect of the GL library. The valid parameter values are listed under glGetString in Appendix C, along with the aspect of the GL library they represent.
The GLU library has a corresponding function, gluGetString:
const GLubyte *gluGetString(GLenum name);
It returns a string describing the requested aspect of the GLU library.
Getting a Clue with glHint
There is more than one way to skin a cat; so goes the old saying. The same is true with 3D graphics algorithms. Often a trade-off must be made for the sake of performance, or perhaps if visual fidelity is the most important issue, performance is less of a consideration. Often an OpenGL implementation may contain two ways of performing a given task—a fast way that compromises quality slightly and a slower way that improves visual quality. The function glHint allows you to specify certain preferences of quality or speed for different types of operations. The function is defined as follows:
void glHint(GLenum target, GLenum mode);
The target parameter allows you to specify types of behavior you want to modify. These values, listed under glHint in Appendix C, include hints for fog quality, antialiasing accuracy, and so on. The mode parameter tells OpenGL what you care most about—faster render time and nicest output, for instance—or that you don’t care (the only way to get back to the default behavior). Be warned, however, that all implementations are not required to honor calls into glHint; it’s the only function in OpenGL whose behavior is intended to be entirely vendor-specific.
Using Extensions
With OpenGL being a “standard” API, you might think that hardware vendors are able to compete only on the basis of performance and perhaps visual quality. However, the field of 3D graphics is very competitive, and hardware vendors are constantly innovating, not just in the areas of performance and quality, but in graphics methodologies and special effects. OpenGL allows vendor innovation through its extension mechanism. This mechanism works in two ways. First, vendors can add new functions to the OpenGL API that developers can use. Second, new tokens or enumerants can be added that will be recognized by existing OpenGL functions such as glEnable.
Making use of new enumerants or tokens is simply a matter of adding a vendor-supplied header file to your project. Vendors must register their extensions with the OpenGL Working Group (a subset of the Khronos Group), thus keeping one vendor from using a value used by someone else. Conveniently, there is a standard header file glext.h that includes the most common extensions.
Checking for an Extension
Gone are the days when games would be recompiled for a specific graphics card. You have already seen that you can check for a string identifying the vendor and version of the OpenGL driver. You can also get a string that contains identifiers for all OpenGL extensions supported by the driver. One line of code returns a character array of extension names:
const char *szExtensions = glGetString(GL_EXTENSIONS);
This string contains the space-delimited names of all extensions supported by the driver. You can then search this string for the identifier of the extension you want to use. For example, you might do a quick search for a Windows-specific extension like this:
if (strstr(extensions, "WGL_EXT_swap_control" != NULL))
{
wglSwapIntervalEXT =
(PFNWGLSWAPINTERVALEXTPROC)wglGetProcAddress("wglSwapIntervalEXT");
if(wglSwapIntervalEXT != NULL)
wglSwapIntervalEXT(1);
}
If you use this method, you should also make sure that the character following the name of the extension is either a space or a NULL. What if, for example, this extension is superceded by the WGL_EXT_swap_control2 extension? In this case, the C runtime function strstr would still find the first string, but you may not be able to assume that the second extension behaves exactly like the first. A more robust toolkit function is included in the file gltools.cpp in the source distribution from our Web site:
int gltIsExtSupported(const char *extension);
This function returns 1 if the named extension is supported or 0 if it is not. The examples/src/shared directory contains a whole set of helper and utility functions for use with OpenGL, and many are used throughout this book. All the functions are prototyped in the file gltools.h.
This example also shows how to get a pointer to a new OpenGL function under Windows. The windows function wglGetProcAddress returns a pointer to an OpenGL function (extension) name. Getting a pointer to an extension varies from OS to OS; this topic is dealt with in more detail in Part III of this book. Fortunately, 99% of the time you can just use the GLEE library as we have and you “auto-magically” get extension function pointers for whatever functionality is supported by the driver.
The Windows-specific extension and the typedef (PFNWGLSWAPINTERVALEXTPROC) for the function type is located in the wglext.h header file, also included in the examples/src/shared directory. We also discuss this particular important extension in Chapter 19, “Wiggle: OpenGL on Windows.”
In the meantime, again the gltools library comes to the rescue with the following function:
void *gltGetExtensionPointer(const char *szExtensionName);
This function provides a platform-independent wrapper that returns a pointer to the named OpenGL extension.
Whose Extension Is This?
Using OpenGL extensions, you can provide code paths in your code to improve rendering performance and visual quality or even add special effects that are supported only by a particular vendor’s hardware. But who owns an extension? That is, which vendor created and supports a given extension? You can usually tell just by looking at the extension name. Each extension has a three-letter prefix that identifies the source of the extension. Table 2.4 provides a sampling of extension identifiers.
Table 2.4. A Sampling of OpenGL Extension Prefixes

It is not uncommon for one vendor to support another vendor’s extension. For example, some NVIDIA extensions are widely popular and supported on ATI hardware. When this happens, the competing vendor must follow the original vendor’s specification (details on how the extension is supposed to work). Frequently, everyone agrees that the extension is a good thing to have, and the extension has an EXT_ prefix to show that it is (supposed) to be vendor neutral and widely supported across implementations.
Finally, we also have ARB-approved extensions. The specification for these extensions has been reviewed (and argued about) by the OpenGL ARB. These extensions usually signal the final step before some new technique or function finds its way into the core OpenGL specification.
Summary
We covered a lot of ground in this chapter. We introduced you to OpenGL, told you a little bit about its history, introduced the OpenGL utility toolkit (GLUT), and presented the fundamentals of writing a program that uses OpenGL. Using GLUT, we showed you the easiest possible way to create a window and draw in it using OpenGL commands. You learned to use the GLUT library to create windows that can be resized, as well as create a simple animation. You were also introduced to the process of using OpenGL for drawing—composing and selecting colors, clearing the screen, drawing a rectangle, and setting the viewport and clipping volume to scale images to match the window size. We discussed the various OpenGL data types and the headers required to build programs that use OpenGL.
With a little coding finally under your belt, you are ready to dive into some other ideas you need to be familiar with before you move forward. The OpenGL state machine underlies almost everything you do from here on out, and the extension mechanism will make sure you can access all the OpenGL features supported by your hardware driver, regardless of your development tool. You also learned how to check for OpenGL errors along the way to make sure you aren’t making any illegal state changes or rendering commands. With this foundation, you can move forward to the chapters ahead.