
Word Lesson 1: Microsoft Word 2013 Jumpstart
In this lesson, you’ll learn about Microsoft Word 2013 and will put into practice everything you learn. If you prefer a slower-paced introduction to the features of the application, begin with Lesson 2, “Getting Started with Word 2013,” and then return to this lesson when you are more comfortable with the new features.
What you’ll learn in this lesson:
- • Opening and editing a Word 2013 document
- • Working with themes and styles
- • Embedding local images and Web movies
- • Exploring version control and collaboration tools
Starting up
In this lesson, you’ll work with the ready-made templates available for Word 2013 from Microsoft, but for future lessons you’ll work with documents created specifically for the course. Make sure that you have loaded the OfficeLessons folder onto your hard drive from www.digitalclassroombooks.com/Office2013. For more information, see “Loading lesson files” in the Starting up section of this book. Keep in mind that Microsoft might alter the default online Word 2013 templates; if you find that to be the case, choose a comparable Word document to follow along.
The project
You’ll begin this lesson by opening a document that shows several key features of Word 2013; you will then edit the document’s content and layout. Note that this lesson requires you to be connected to the Internet.
1 Launch Word 2013. Note that the new launch screen looks much like the File tab in Word 2013; file-management operations are handled in this separate area of the application, rather than in dialog boxes and pop-up menus.

Word displays a simplified version of Backstage view upon launch.
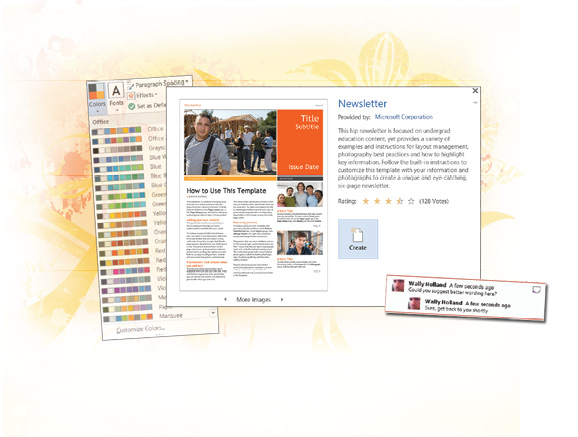
2 At the launch screen, a gallery of templates provided by Microsoft will appear. The gallery is initially populated with templates stored on your hard drive. In the search box, type hip newsletter and press Enter to search for one of Microsoft’s online templates. Click the icon that appears in the list. A preview pane will pop up with information about the template. Click Create to create a new newsletter document.
The resulting document contains placeholder text that serves as a useful introduction to the formatting, style, and layout tools available in Word 2013. We highly recommend that you read it.

The template you select will automatically download from office.com.
Interface conventions
If you’ve used a recent version of Microsoft Office, the Word 2013 interface should be familiar. Instead of drop-down menus, Office features task-specific toolbars in its Ribbon; click any menu item (or tab), except File, to see the tools available in Word 2013. The File tab works differently: it now brings up Word’s Backstage area screen.
1 In the upper left corner of the screen is the Quick Access Toolbar, a customizable dock for frequently-used commands. By default, it contains icons for the Save, Undo, and Redo commands, as well as the application menu and a drop-down menu for customizing the toolbar.
2 Click the image of the student at the top left of the newsletter. Note that a small icon of text wrapping around an image appears to the right of the image. You can click this handle for quick access to the image layout tools.

Click the Layout Options button to choose from common word-wrap settings.
Note that three new context tabs appear above the ribbon: Design and Layout (under the heading Table Tools), and Format (under the heading Picture Tools). The tools for adjusting, styling, and laying out images and tables reside in these tabs.
3 Click the Layout tab and select View Gridlines from the Table group (at the left side of the ribbon). Doing so reveals that the image and surrounding colored panes are laid out as a table with six cells in two columns; the right-hand column is four cells high.
4 Now right-click the image. Note that the context menu includes commands to style and lay out the image, but does not provide any table-layout commands.
Working with words
Text and fields
1 Click the word Title in the large orange cell on the upper-right area of the first page and replace it with the word Frustrum. Note the handle that appears above the text, it’s labeled Title: this indicates that you’re editing the content of the document’s Title field. Fields allow you to reuse data throughout your document.
2 Click anywhere else in the document and observe that the header on each page updates to reflect the changed newsletter title.
You can change the newsletter’s subtitle and tagline in the same manner: select and replace the field you want to change, and then deselect the text to see the updated subtitle in the header (and anywhere else that the Subtitle field appears in the document). Note that when you edit the Subtitle text, you’re changing the stored value of the Subtitle field, but if you select the handle instead, you’re able to delete the field placeholder itself.
3 Select the word Frustrum (either by double-clicking it or by clicking-and-dragging) and note that Word 2013 immediately offers a pop-up menu with oft-used commands for text editing: font, size, emphasis, bullet level, and so forth.

Choosing a font in the formatting minibar.
Applying styles to text
Text Styles in Word 2013 serve two purposes: they let you control the appearance of your text, and they help Word structure your document. We’ll focus on visuals in this chapter; document structure is the focus of Lesson 4, “Structuring Complex Documents.” First, we’ll style some text and use the Live Preview feature of Word 2013.
1 Triple-click the How to Use This Template headline—the text itself, not the field handle. Triple-clicking selects an entire paragraph; in this case, this is just a single line.
2 Open the Home tab; in the Styles group, note that the Heading 1 style is highlighted, indicating the current style of the selected text.
3 Mouse over the other styles in the Styles group without selecting one. Note that the text changes appearance as you do so; when you move the mouse away from the Styles group without selecting a new style, your text reverts to its original appearance. This feature is called Live Preview.
4 Select the Subtitle style to restyle the headline.
As you can see, the headline is now invisible (white on white) and right-justified rather than left-justified. You can change the color and alignment of a single piece of text to make the headline visible again, but it’s also easy to modify the styles themselves.
5 Without deselecting the headline text, click Home > Font > Font Color. The text of the How to Use This Template headline turns red.
6 Right-click Home > Styles > Subtitle. Select Update Subtitle to Match Selection from the context menu.
When you update the Subtitle style in this fashion, any text that uses the Subtitle style in the current document changes to reflect the new style: in this case, the actual newsletter subtitle, next to the front page image of the student, turns red.
7 Finally, double-click the headline below the image of the student, and then click Home > Paragraph > Align Left (or press Ctrl+L). The headline should be flush against the left margin again.
Note that your new color selection is applied to all the text that uses the Subtitle style, but the alignment change is restricted to just the currently selected text. Reformatting a single piece of text doesn’t affect the definition of the Subtitle style itself.
Your document’s look and feel
Working with themes, style sets, and color schemes
Word 2013 gives you a variety of tools for altering the overall look and feel of your document. To see these tools, click the Design tab, which is new to Word 2013. In the Design tab, you’ll find a drop-down menu containing the built-in Themes available for Word 2013, a gallery of Style Sets, drop-down menus for selecting color and font schemes, and a handful of other document-level tools.
Now you’ll make some changes to your document and start to see how Themes, Styles, and Colors interact. A Theme is basically a bundle of Colors, Fonts, and Effects; something like a visual identity for a set of documents. A Style Set is a collection of styles meant to work well together on the page or on the screen. Style Sets may or may not specify colors and fonts. The document’s color scheme and font set can be switched without changing the Theme or Style definitions.
 The best thing about Themes is that they’re portable across the whole Office 2013 suite, so you can develop a visual brand and apply it to all your documents.
Let’s make some changes to show how these design tools work. In particular, we’ll change various aspects of this elegant pre-built template, rendering it an unreadable mess, to see how different features of a document depend on one another.
1 In the Design tab, click the Themes drop-down menu. Note the option to Reset to Theme from Newsletter Template, indicating that the document template itself includes a built-in theme.
2 Mouse over several themes. Note which aspects of the document change and which do not; for instance, the colored panes at the top of the newsletter switch to the new Theme Colors, but the background color for the In This Issue column remains unchanged, indicating that its background color is defined in absolute terms.
Restricting your color choices to your current Theme Colors is a good way to maintain a consistent look-and-feel for your document, and it ensures that, if you change themes, you won’t leave orphaned colors, as in the In This Issue sidebar.

Switching theme sets font, color, style, layout, and effects options with a single click.
3 Choose the Wood Type theme. Scroll down through your document to see the changes this new theme has made.
As you can see, the careful multiple-column format is now broken: the tight fit of the text came from matching each article’s length, layout, and font choice, and the new mix of styles and fonts breaks that arrangement.
Changing the document theme also reveals the difference between absolute and relative placement of images. Several images in the document retain their absolute positioning on the page and can be orphaned when you change the text; but the smaller single-column images are all placed in line with the paragraphs and have avoided being similarly orphaned. When laying out a document in Word, it’s important to keep in mind the relationship between images and the text that surrounds them.
Now let’s see how Themes, Style Sets, and Color Schemes relate.
4 Choose another theme and keep an eye on the Document Formatting group of the Design tab. Note that when you change themes, the gallery refreshes: the fonts and colors of each Style Set change.
Themes give overall visual guidelines; Style Sets define the relationships between styles within those guidelines.
5 Finally, choose another theme and note that the Color Scheme changes.
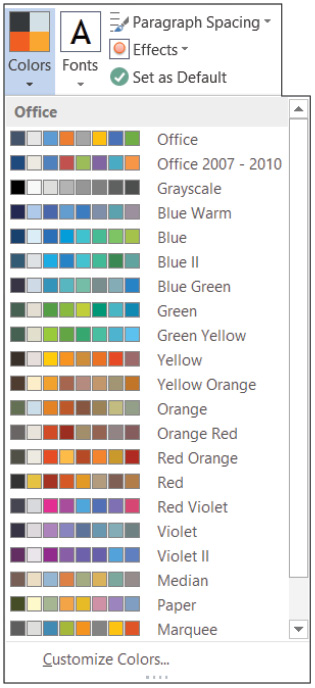
Color Schemes let you choose an overall palette without having to carefully match individual shades.
Feel free to experiment with changing colors, styles, or the document theme, noting the way changes propagate from one part of the document to another. Go ahead and edit any text you want in the document; text entry is very basic functionality, so we won’t spend time on it in this Quick Start lesson. You can also experiment with changing the column layout of the article text; in particular, take note of the way the template’s author makes use of hard column breaks to lay out sidebars, thus avoiding the use of floating text boxes.
Working with images and video
Like the new Windows 8 and Windows RT operating systems, Office 2013 is designed to take advantage of touch interfaces, such as the Microsoft Surface; Office 2013 also treats always-on Internet and online (vs. local hard drive) storage as standard. The way Word 2013 handles visual media reflects these assumptions. Now we’ll make some changes to the visuals in our newsletter to illustrate how Word 2013 handles images and video.
Styling an image
First we’ll tour Word’s layout, format, and retouching tools. Feel free to make drastic changes to the image in this section; you’ll replace it afterward.
1 Click the image of the five smiling interns in the right-hand column of page 1. A horseshoe-shaped handle appears to the side; click it. The image-layout menu in Word 2013 appears. Experiment with changing the word-wrap mode to see how text flows around, behind, and in front of the image.
2 Make sure the image is still selected so the Format tab is available. Open the Format tab. Experiment with choosing different Picture Styles from the visual gallery in the Format tab. Note that the Picture Styles change the image’s size, framing, and orientation, but leave its content unchanged.
3 Finally, use the Format > Adjust > Color, Corrections, and Artistic Effects galleries to make changes to the content of the image.
Note the way the image-related tools of Word 2013 are organized. The image layout context menu contains the most-used commands for placing and wrapping an image; these same tools are available from the Format > Arrange group. Image editing tools are found in the Format > Adjust group. The image’s border is edited with tools in the Picture Styles group.
Word 2013 isn’t really a full-featured image editor, but it does provide some tools for basic image manipulation, for example, Format > Remove Background.
Working with online images and videos
Office 2013 blurs the line between online and local media. In Word, you can still embed local images, and you can drop in pictures and videos you find on the Internet, without ever switching applications.
Now let’s get rid of the interns and find a replacement image online.
1 Right-click the image and choose Change Picture from the context menu. (In Windows RT, tap and hold to bring up the context menu.) An Insert Pictures dialog box appears.
2 In the Bing Image Search box, type the search term happy toad, and choose a replacement image from the gallery. Note that all the images in the gallery carry a Creative Commons license. When you find the one you like, click Insert.
 In general, images with a Creative Commons license (there are several different CC licenses) can be reused for noncommercial purposes, as long as you credit their creators. For the purposes of this lesson, we don’t need to worry about sourcing the images.
The same dialog box lets you search for local files and royalty free clip-art from Microsoft; we’ll explore this tool more in a later lesson.

The image you select from your Bing Image Search will embed in your Word document, just like a local image would.
Any changes you make to an image using the Adjustments tools are lost when you replace the image, but the picture style and arrangement are preserved.
Now let’s embed some online video into our otherwise conventionally static document.
3 Scroll to the bottom of your document and place your cursor. Click Insert > Online Video.
4 In the Search YouTube box, type cute toddler. Select a video from the gallery and click Insert.
A video object will insert into your document; Word 2013 handles online videos exactly like still images, except that you can click an embedded video to launch a built-in video player.
5 Select the video object, and then click Format > Adjust > Color or Artistic Effects to change the look of the embedded video.
Note that the Format tools affect the way the video appears on the page (the preview image) but leave the video itself untouched. If you print a Word 2013 document with an embedded video, only the (modified) preview image makes it to the printed page, but exporting the document as a PDF preserves the video link as a hyperlinked image.
Different views of your document
Word 2013 provides several tools and editing modes to let you work more efficiently with your document, without unnecessary visual clutter and distraction. When you’re comfortable with these tools, you’ll spend less time trying to figure out Word 2013’s interface, and more time improving your work.
Collapsing document sections
Word treats headings as document divisions, and lets you collapse whole sections of your document into a heading; cleaning up your workspace with a single click.
1 Change the newsletter’s front page sidebar headlines, located just below the images on the bottom-right half the of the page, from Article Title to Column Break and View Formatting Breaks, respectively. In the Home > Styles gallery, note that these headlines have the Sidebar Heading style.
2 Change the top sidebar headline’s style to Heading 1, and the bottom headline’s style to Heading 2.
3 Now mouse over the top sidebar headline. A triangular button appears to the left of the headline. Click it; the contents of the sidebar disappear, leaving only the top headline. Click the button again to reveal the rest of the sidebar again.
This triangular button is a useful workflow tool that collapses and expands a section of the document, much like in the old Outline View. Word thinks of each document section as beginning with a Heading, and it hides and reveals the text based on the level of the Heading you’re folding into. Perform the next step to see how this works.
4 Change the style of the second sidebar headline to Heading 1. Both sidebar headlines have the same style (Heading 1). Now collapse the first headline.
Note that the second headline is still visible: if you collapse a top-level heading (Heading 1), Word will treat lower-level headings (Heading 2, Heading 3, etc.) as subsections and assume you’re not currently working with them. Word will then hide text and images until it reaches the next Heading 1 text. When working with complex documents, you’re encouraged to use the built-in heading styles to take advantage of Word’s document-structure features. We’ll cover document structure in detail in Lesson 4, “Structuring Complex Documents.”
Working with Word’s windows
Word 2013 includes a number of features, old and new, to grant you multiple perspectives on a document and foreground your work rather than your workspace. You’ll customize your work environment in later lessons; in this Quick Start you’ll just survey the basic tools.
1 Click the View > Views > Read Mode icon to view your document without any onscreen editing interface. Use the arrow keys to scroll through the document; press Escape to return to your editing window.
Read Mode is optimized for touch; in Windows RT, you can swipe left and right to move through the document. Remember that it’s just a quick overview of the flow and proportions of the document, not a preview of the final print/Web output.
2 Switch between Print Layout (View > Views > Print Layout) and Web Layout to see the different print/Web outputs of the same document. In particular, note that multi-column layouts are preserved in the source file, but will not render properly when you translate your document to HTML.
3 Switch to Draft view to see only the text in your document; note that headers, footers, images, and multi-column layouts do not display in Draft view.
4 Collapse the Ribbon by clicking the caret (^) at its bottom-right corner. To reveal again, open one of the Tabs at the top of the screen. To make the Ribbon permanently visible, click the push pin icon at the far right, where the caret was.
5 Finally, click View > Window > Split to look at two sections of your document simultaneously. Spend a few moments becoming familiar with the screen layout. Click Remove Split to switch back to one-window mode.
A split screen is helpful when you need to move content between parts of your document, or to see one section while you edit another.
Collaboration and tracking changes
Word 2013 includes a variety of collaboration and simple version control features in the Review tab. These tools let you track a document’s state through multiple rounds of revision and editing, and let you communicate with collaborators inside the Word document itself.
1 Click Review > Tracking > Track Changes. The icon turns blue. Word 2013 will now preserve your edits, allowing you to make changes without losing track of your original data.
2 Select Tracking > All Markup from the uppermost drop-down menu.
3 Now make some edits to your document; delete and insert text, tables, and images, or restyle document elements.
Word indicates each edit with a subtle colored bar down the left margin of the document, thus marking its location, and either an information bubble (for formatting changes) or inline markings (for text insertions/deletions).
Note that if you delete an image with All Markup selected, the image will seem to stubbornly remain in the document. That’s not the case; Word is simply indicating where the image was, but it’s not actually in the layout anymore, as the next step reveals.
4 Select Tracking > Simple Markup from the uppermost drop-down menu. This is a new feature in Word 2013. Note that the colored bars that indicate the presence of edits remain, but Word hides the details.
5 Re-select All Markup and experiment with the options under Tracking > Show Markup.
At each stage of document revision, tailor these Markup options to your needs; for instance, if you add a large piece of new text late in a project, considering unmarking Insertions/Deletions to keep your editing window orderly.
Communicating with colleagues in comments
Word also lets you embed comments in a document, and preserve conversations with collaborators using the comments feature.
1 Make sure Review > Comments > Show Comments (or Tracking > All Markup) is enabled. Select a piece of text and click Review > Comments > New Comment. In the speech bubble that appears, type Could you suggest better wording here? and press Escape to return the cursor to the document window.
2 Now mouse over your comment and click the Reply icon that appears in the bubble. Type Sure, get back to you shortly and press Escape to return to editing your document. Note the way Word displays inline conversations between document editors (they’re just like threaded blog comments).

Threaded comments help clarify your document’s editing history.
3 Enable Simple Markup and deselect Comments > Show Comments. Word collapses each conversation into a comic book-style speech bubble.
4 Finally, select your second comment and click Comments > Delete. Note that the response is deleted but the conversation remains.
If you delete the first comment in a thread, the entire thread is deleted along with it.
Word 2013 is also built to support real-time and distributed collaboration: the File > Share group includes tools to post a copy of your document online, inviting colleagues to view or edit the file, or even turn your .docx file into a live presentation that distant users can view using a web browser.
Save always
To complete this Word 2013 Quick Start lesson, save your newsletter to your SkyDrive folder.
1 Click File > Save As.
2 In the Backstage view, select your SkyDrive folder; in the Save box, type My Hip Newsletter, and then click Save.
Note that while you initially opened the newsletter’s template file (.dotx) rather than a document file (.docx), Word 2013 knows to save your document as a .docx, unless you specify otherwise. That said, when you work from a template, double-check to make sure you’re saving a new Word document rather than editing the template itself.
3 Close your document (press Ctrl+W or click File > Close) and click File > Open (or press Ctrl+O).
Your newsletter will appear in the list of Recent Documents. Meanwhile, the Office Upload Center will try to upload your document to the cloud; if you’re working offline, the Upload Center will upload your changes as soon as it detects an Internet connection; ideally, you’ll never even notice.
Self study
1 Create a new document containing a 2 × 2 table (Insert > Table), and in each cell of the table, add an image from your hard drive or from an online search (Insert > Illustrations > Online Pictures).
2 In the Insert menu, locate the tools to automatically number the pages of your new document and experiment with the different places Word can put the page number.
3 From the Backstage View, click through to the Options settings to display the hidden characters for tabs, spaces, and new lines. Under what circumstances would displaying these hidden characters be useful?
Review
Questions
1 What options does Word 2013 display instead of a blank document when you first launch the application?
2 How can you hide a section of your document that you’re not currently working on?
3 What’s the fastest way to change the way text wraps around an image?
Answers
1 Other options displayed when you first launch Word 2013 are Recent Documents and the Template Gallery.
2 To hide a section of the document you’re not currently working on, click to collapse the heading of that section.
3 The fastest way to change the way text wraps around an image is to select the image and select a wrap mode from its Layout Options call-out.