
Word Lesson 8: Blogging in Word
Word 2013 is all about digital publishing and always-on Internet; no surprise, then, that Word can double as a weblog editor. In this short lesson, you’ll learn how to set up a document for blogging with Microsoft SharePoint, or with a blog host such as WordPress or Blogger.
What you’ll learn in this lesson:
- • Configuring Word to work with your blogging service
- • Composing and uploading blog posts
- • Editing posts residing on the server
Starting up
You will not need to work with any files for this lesson.
How blogs work
The difference between blogs and the rest of the Web has disappeared since the first blogs appeared more than a decade ago; almost every website you visit is now a front-end for one or more databases of continually refreshed information, from weather reports to news articles to Wikipedia entries. That’s all Web 2.0 really means: tools for dynamically generating web content. (The social web is just content generated for users, for free.)
A blog is just a database of posts (articles, essays, journal entries, quotations, or links to pictures) turned into HTML and laid out in reverse chronological order by a web server. Blog posts are tagged with a title, one or more categories (Yoga, Toddlers, Recipes), a time/date stamp, and author information (many of the most popular blogs have multiple authors).
If you think of a blog post as a .docx file, the text is just that, text, the post’s other features are just document properties, which can be edited through fields. This is exactly how Word 2013 edits blog posts.
Setting up a blog account
Blogging in Word is similar to editing any other kind of file: you create a document using the Blog Post template, edit a couple of fields, write your text, and save your document. The only unique aspect of blogging (compared to editing any other .docx file) is setting up an account with a blog provider. We’ll do that first.
1 Launch Word 2013. From the Backstage View, click New, and then select the Blog template from the gallery.
2 Click Blog Post > Manage Accounts. At the Register a Blog Account dialog box, click Register Now. In the New Blog Account dialog box, click New. In the Blog Accounts dialog box, click New.
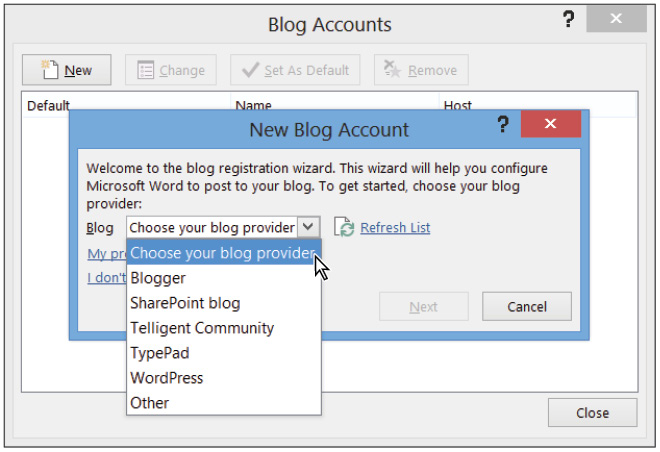
A variety of popular blog services are supported by Word out of the box.
A dialog box appears with a drop-down menu from which you can select a blog provider. Blogger and WordPress are popular free services; Typepad is a venerable pay service; Telligent and Microsoft SharePoint are corporate intranet/groupware services. Regardless of which provider you set up your account with, posting works the same way.
3 Select your blogging service, and then provide a username and password. If you don’t have a blog account and want to set one up, select I don’t have a blog yet.
If you store your images at a separate site (for example, a gallery on your own website), enter that information by clicking Picture Options.
4 Click OK to close the dialog box(es).
Creating a blog post
Word’s blog post editing interface looks much like any other .docx file. The obvious differences are the altered Ribbon (only Blog Post and Insert tabs are present) and the [Enter Post Title Here] field. We’ll set the categories and title for our post, add some text and an image, and upload the post to our blog.
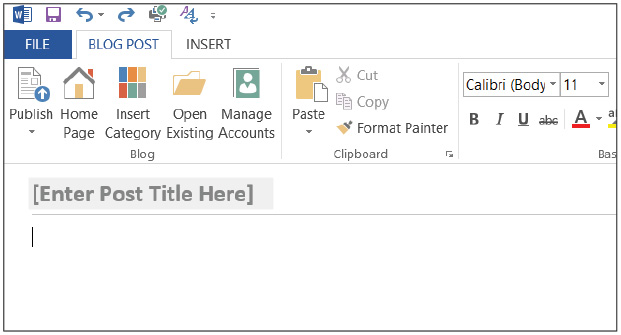
Word 2013’s blog editing interface.
1 Click the title field and type Flop Flip.
2 Click within the main text area and type From space, flip and flop look the same. Press Return.
3 Click Insert > Online Pictures. At the royalty-free clip art prompt, search for flip flop, then select an image from the gallery and click Insert.
4 Select the word space and click Insert > Hyperlink. Type http://nasa.gov in the Address text field. Click ScreenTip..., enter …is the place and click OK. In the Insert Hyperlink dialog, click OK again.

Inserting a hyperlink.
The hyperlink dialog box offers several options to link to files and locations within our document (which will be a webpage in a few moments).
1 Click to insert your cursor below the image of flip flops and then press Enter.
2 Type Further Information and hit enter. On the next line type The title says it all. In the Blog Post tab, apply the Heading 2 style to the Further Information line.
3 Select the words The title and choose Insert > Hyperlink.
4 In the Link to: pane, choose Place in This Document. Select Top of the Document from the outline that appears. Click OK.
You can format your text just as you normally would with any .docx file; Word provides a stripped-down set of character and paragraph formatting tools in Blog Post mode.
Setting your blog post’s categories
The last step before posting is to set the categories of your blog post; these are a form of metadata that your blogging service will use to organize your posts (for example, to display all your blog posts marked with the Alien Visitation category). In Word, categories are set by entering data into one or more fields.
1 Click Blog Post > Blog > Insert Category. When prompted, enter the login and password for your blog.
 You can only insert categories if you have set up a blog account. If so, Word will retrieve the categories from your blog.
2 Select an appropriate category from the Category drop-down menu (which is just a special field).

Word downloads the category listing from your blog.
You can add multiple categories if you want; indeed, that’s smart practice in general. Your post will still appear just once on the front page of your blog, but will be included in multiple category archive listings.
Uploading posts and drafts
When you’re ready to upload your test post, click Publish, and then give your username and password when prompted. To view your post, click Home Page to launch your default web browser and load the front page of your blog.
The Publish button also has a drop-down menu from which you can choose to Publish as Draft. If you do so, your post won’t appear on your blog site, but will be stored on the server for later editing. Your blogging service should offer a web interface for browsing, editing, and publishing drafts.
Editing posts stored on the server
You can also use Word to edit posts that reside on the web server after uploading: click Blog Post > Open Existing, provide login/password information, and select a post from the dialog box. Beyond that, all the commands are the same; when you publish your edited post, you’ll overwrite the one on the server.
Self study
1 Experiment with image placement in your posts. How does Word translate absolute image placement to HTML?
2 Create another test post full of different paragraph Styles. How does Word format Quote, Intense Quote, and Title text for the web? Does editing the Styles in Word make any difference to the eventual output?
Review
Questions
1 What interface element does Word present for you to add a category to your blog post?
2 What happens when you click the Home Page button?
Answers
1 Word 2013 provides a drop-down menu field with a list of available categories for your blog post.
2 Upon clicking the Home Page button, the front page of your blog loads in your default web browser.