
Chapter 3: AppleScript Just Plain Rocks
In This Chapter
![]() Simplifying your life with AppleScript
Simplifying your life with AppleScript
![]() Letting AppleScript create scripts for you
Letting AppleScript create scripts for you
![]() Writing scripts on your own
Writing scripts on your own
![]() Using Automator to create your own applications
Using Automator to create your own applications
![]() Searching for AppleScript help elsewhere
Searching for AppleScript help elsewhere
Using a Macintosh is supposed to make your life easier — and in many ways, it does. But there’s a limit to how much your Mac can do by itself, right? After all, you still have to move the mouse, press keys on the keyboard, and read information on the screen to get things done . . . or do you? Why not let your computer do the dull chores — say, renaming a thousand digital photographs from your family vacation and organizing them into folders based on the subject of each photo — for you? Although most people are familiar with controlling their Macs with the mouse and keyboard, few realize that they can operate their machines without touching a key or a mouse button — or even glancing at the screen.
What’s So Great about AppleScript?
If one word could describe what AppleScript is all about, it’d be automation. AppleScript is a technology for automating practically any action that you perform with your Macintosh, including both common tasks in the Finder and those that you perform in other applications.
Automate common tasks in the Finder
If you’ve ever found yourself repeating some task, you’re an ideal candidate for becoming an AppleScript techno-wizard. AppleScript is particularly good at taking the boredom and tedium out of using your Macintosh by performing all sorts of tasks automatically. To illustrate, consider a few jobs that would take a fair amount of time to do by hand but are a snap with AppleScript:
![]() While writing your next best-selling Great American Novel — or For Dummies book on OS X — you make a mistake and misnumber the chapters. All the chapters have a filename bearing the chapter number, but they’re all off by one. Sure, you could rename each file by hand, but your book is a large tome and renumbering dozens of chapters manually doesn’t sound like much fun. (Take my word for it. Please.) It’ll require several minutes and lots of tedious attention on your part, not to mention introduce the likelihood of human error. But wait, there’s another way! When using a simple AppleScript of only a few lines of code, you can rename the chapters in seconds whilst you go grab another Diet Coke.
While writing your next best-selling Great American Novel — or For Dummies book on OS X — you make a mistake and misnumber the chapters. All the chapters have a filename bearing the chapter number, but they’re all off by one. Sure, you could rename each file by hand, but your book is a large tome and renumbering dozens of chapters manually doesn’t sound like much fun. (Take my word for it. Please.) It’ll require several minutes and lots of tedious attention on your part, not to mention introduce the likelihood of human error. But wait, there’s another way! When using a simple AppleScript of only a few lines of code, you can rename the chapters in seconds whilst you go grab another Diet Coke.
![]() You’re a neat individual and think that your Mac should reflect your penchant for order — in fact, you like your Desktop icons to be placed just so. Being left-handed, you prefer the icons over on the left side of the Desktop, like that other operating system. In this situation, an AppleScript can help you do things that aren’t humanly possible; not only can you rapidly rearrange the icons on your Desktop, but you can do so with pixel-point accuracy. Without AppleScript, it’d be nearly impossible to precisely align dozens of icons. And even if you could, it would take a long time and probably cause you to go blind.
You’re a neat individual and think that your Mac should reflect your penchant for order — in fact, you like your Desktop icons to be placed just so. Being left-handed, you prefer the icons over on the left side of the Desktop, like that other operating system. In this situation, an AppleScript can help you do things that aren’t humanly possible; not only can you rapidly rearrange the icons on your Desktop, but you can do so with pixel-point accuracy. Without AppleScript, it’d be nearly impossible to precisely align dozens of icons. And even if you could, it would take a long time and probably cause you to go blind.
![]() After a font-download binge, you find yourself with hundreds of fonts. You really want to organize them into separate folders based on the date that you downloaded them. AppleScript comes to the rescue again! With a brief script, you could knock out this challenge without ever looking at a single date. Add a couple more lines of code to the script, and AppleScript will take care of creating the folders, too. Right, you know the word: sassy.
After a font-download binge, you find yourself with hundreds of fonts. You really want to organize them into separate folders based on the date that you downloaded them. AppleScript comes to the rescue again! With a brief script, you could knock out this challenge without ever looking at a single date. Add a couple more lines of code to the script, and AppleScript will take care of creating the folders, too. Right, you know the word: sassy.
Automate tasks in other applications
By using AppleScript, you can also often automate your work from beginning to end, despite the fact that you need multiple applications to do so. Look at a few scenarios, and you’ll begin to appreciate why AppleScript is such a powerful technology:
![]() You just completed creating the ultimate library of bagpipe songs in iTunes — no, really! — and you want to share the list with your friends at the next Bagpipers Anonymous meeting. You could easily send everyone in the group an iTunes Playlist, but not everyone in the club has iTunes installed, let alone a computer. This is going to require creating a hard copy for those members without a computer. Because your bagpipe song list contains thousands of songs, you don’t want to retype the name of each song. AppleScript can save the day by extracting the song titles for you and compiling them into a list just in time for your meeting.
You just completed creating the ultimate library of bagpipe songs in iTunes — no, really! — and you want to share the list with your friends at the next Bagpipers Anonymous meeting. You could easily send everyone in the group an iTunes Playlist, but not everyone in the club has iTunes installed, let alone a computer. This is going to require creating a hard copy for those members without a computer. Because your bagpipe song list contains thousands of songs, you don’t want to retype the name of each song. AppleScript can save the day by extracting the song titles for you and compiling them into a list just in time for your meeting.
![]() AppleScript can take care of your computer-owning bagpipe friends, too. With a few extra steps, you can e-mail all of them the list as well.
AppleScript can take care of your computer-owning bagpipe friends, too. With a few extra steps, you can e-mail all of them the list as well.
![]() Being so doggone fond of bagpipes, you want to send your bagpiping friends a special note during the holidays. To help manage your holiday greeting cards, you can create a record in Contacts, FileMaker Pro, or some other database listing the name and address of each person who should receive a card. If you’ve entered their street addresses in the Contacts section of your e-mail application, AppleScript can aid in transferring the addresses from your e-mail application to the database. Never again will your bagpiping friends miss a holiday greeting . . . and the world is a much better place.
Being so doggone fond of bagpipes, you want to send your bagpiping friends a special note during the holidays. To help manage your holiday greeting cards, you can create a record in Contacts, FileMaker Pro, or some other database listing the name and address of each person who should receive a card. If you’ve entered their street addresses in the Contacts section of your e-mail application, AppleScript can aid in transferring the addresses from your e-mail application to the database. Never again will your bagpiping friends miss a holiday greeting . . . and the world is a much better place.
As you can imagine, there are literally thousands of ways that you can use AppleScript to automate your workflow. (Whoops, I just used a BST, or Business Software Term. A workflow is a single document or project that one or more people work on using multiple applications. In other words, your document can be automatically manipulated in multiple applications using the same script.)
Running a Script
The easiest way to get started with AppleScript is to use some scripts that others have written already. Scripts are small files that contain a list of commands that tells your Mac what functions to perform and when. Fortunately, Apple is kind enough to provide you with several completed scripts with your installation of Mountain Lion. You can find a large cache of scripts in the scripts folder, found in the Library folder, under Scripts.
 Many scripts (but not all) end with the extension
 .scpt.
Before you get started running scripts, however, you should know a few things.
Identifying scripts in the field
Each script that you encounter will be in one of these three formats:
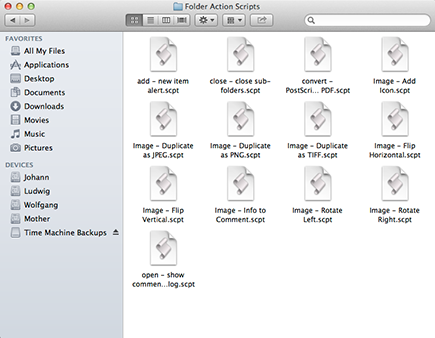
![]() Script application: Some AppleScripts act much like an application. To use one, simply double-click it in the Finder, and off it goes to perform whatever tasks it was meant to do. Depending on an internal setting of the script, it might quit when it’s finished doing its thing. Most often, the script completes its mission and quits. Scripts are typically identified by the icon that you see in Figure 3-1.
Script application: Some AppleScripts act much like an application. To use one, simply double-click it in the Finder, and off it goes to perform whatever tasks it was meant to do. Depending on an internal setting of the script, it might quit when it’s finished doing its thing. Most often, the script completes its mission and quits. Scripts are typically identified by the icon that you see in Figure 3-1.
Figure 3-1: A gaggle of typical script icons caught by the camera.
![]() Compiled script: You might also encounter AppleScripts that won’t run without the aid of another application. Apple calls these compiled scripts. Although they can’t execute on their own, they do have the abilities of a script built-in. They just require a host application to use them.
Compiled script: You might also encounter AppleScripts that won’t run without the aid of another application. Apple calls these compiled scripts. Although they can’t execute on their own, they do have the abilities of a script built-in. They just require a host application to use them.
![]() Text file: The third category of AppleScript that you might encounter is a script stored in a text file. This kind of script also needs a host application before it can do anything. The main difference between a text file script and a compiled script is that you can read a text file script in any application that can open a text file.
Text file: The third category of AppleScript that you might encounter is a script stored in a text file. This kind of script also needs a host application before it can do anything. The main difference between a text file script and a compiled script is that you can read a text file script in any application that can open a text file.
The AppleScript Editor application
As I mention in the preceding list, compiled scripts and text file scripts require some sort of host application before they can perform any action. Luckily, Mountain Lion provides you with just such a host: the AppleScript Editor, which comes with OS X and can execute any AppleScript with ease. With the AppleScript Editor, you can also do much more, including
![]() View or modify an AppleScript.
View or modify an AppleScript.
![]() Create a new AppleScript.
Create a new AppleScript.
![]() Check an AppleScript for errors.
Check an AppleScript for errors.
![]() Save scripts in one of the three possible formats.
Save scripts in one of the three possible formats.
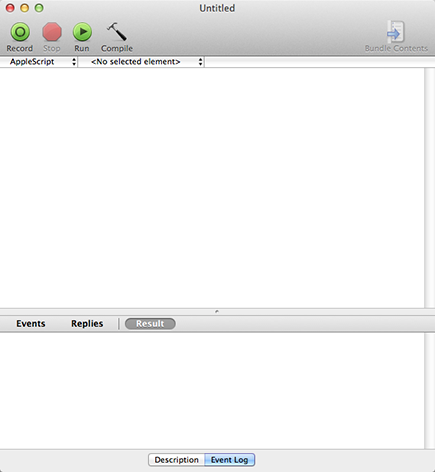
To launch the AppleScript Editor, click the Launchpad icon on the Dock (which bears a rocket icon), click the Utilities folder, and then click the AppleScript Editor icon. The AppleScript Editor application displays an empty, script-editing window, as shown in Figure 3-2.
Figure 3-2: The AppleScript Editor slices and dices . . . and even checks syntax. Order now!
Executing a script
With the AppleScript Editor running, you can run any AppleScript that you can find. To get you started, Apple conveniently provides a handful of useful scripts. Navigate to the Scripts folder, which is located in the Library folder.
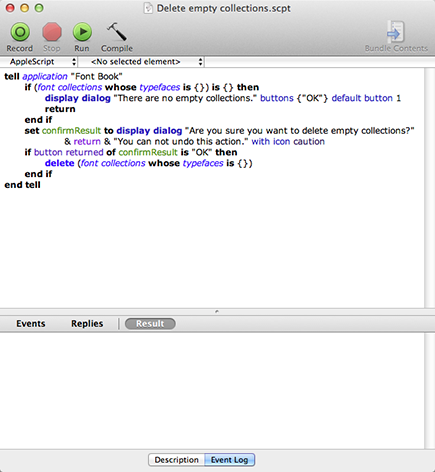
Scripts are divided into folders based on functionality, such as fonts, mail, and navigation. For example, open the Font Book folder, where you’ll find a script named Delete Empty Collections.scpt.
Double-click the script to open it. Because it’s a compiled script and not an application script, the AppleScript Editor automatically loads the script and comes to the foreground (see Figure 3-3). This particular script opens the Font Book application and checks for empty font collections. If it finds any, the script displays a prompt asking for confirmation and then deletes the empty collection if you click the OK button. To see the script in action, click the Run button or press ![]() +R.
+R.
Figure 3-3: Click the Run button on the Editor toolbar to execute a script.
Writing Your Own Simple Scripts
Using someone else’s scripts is fun and all, but the real joy of AppleScript comes when you create your own. Not only can you customize a script to your own needs and desires, but saving all those keystrokes can really produce a feeling of euphoria. (Okay, perhaps just Mountain Lion power users will actually experience a heightened sense of existence . . . you’ll be there soon.)
Create a script without touching a key
You needn’t wear a pocket protector or tape the bridge of your glasses to become proficient with AppleScript. In fact, the AppleScript Editor can get you up and running with AppleScript in no time at all. The secret weapon is the Record function of the AppleScript Editor. Just click the Record button, perform one or more actions in a recordable application, return to the AppleScript Editor, and click the Stop button. The AppleScript Editor stores each action and then compiles the whole list into an AppleScript.
 In theory, this is how it should all work. In reality, though, finding recordable Macintosh applications isn’t always so easy. The Finder is, perhaps, the most recordable application on the Mac. Although some other applications support recording, so few do that the Finder could be the only recordable application most Mac users ever see.
To try it yourself, take the following steps to automate actions in the Finder:
1. Bring AppleScript Editor to the foreground.
If AppleScript Editor isn’t running, double-click its icon in a Finder window. If it is running, click its icon on the Dock (which bears a script scroll and a pen).
2. Create a new script by pressing ![]() +N.
+N.
3. Click the Record button.
The Record button is one of four buttons positioned near the top left of a new script window. Refer to Figure 3-3.
4. Switch to the Finder and perform the actions that you want to automate.
When the Finder is active, you can select some icons on the Desktop and move them around, resize any open Finder windows, or navigate to your home directory. Any action that you perform in the Finder should be acceptable fodder for the AppleScript Editor. As you now perform tasks in the Finder, the AppleScript Editor automatically generates a script that replicates your actions.
5. Return to the AppleScript Editor and click the Stop button.
To reactivate the AppleScript Editor, click its icon on the Dock. Click the Stop button to cease the recording of your script.
When you’re finished, you should be looking at a complete AppleScript. To test your work, return to the Finder and return any icons or windows that you might have moved or repositioned to their original locations. (You don’t want to run a script that doesn’t appear to have any effect.) Then return to the AppleScript Editor and click the Run button to watch your automated Finder tasks being performed.
Building your own scripts
An AppleScript novice can perform all kinds of amazing feats with the recording features of the AppleScript Editor. Because AppleScript uses a kind of pseudo-English language, it’s usually pretty easy to figure out what’s going on behind the scenes. Consider the following script for an example:
tell app “Finder”
activate
set windowList to every window - save open windows list
repeat with theWindow in windowList
tell theWindow
if collapsed is true then
-- do nothing, because the window is collapsed
else
set collapsed to true
end if
end tell
end repeat
end tell
By the way, in the preceding code, I bolded and italicized the commands you’ll be working with, but they don’t have to be bolded for the script to work.
The first thing that you might notice about this script is the first line: the tell command, which indicates that this script relates to the Finder. This script activates the Finder, creates a list of open windows, and then examines the state of each window: Is it collapsed or not collapsed? (By default, a collapsed, or minimized, window appears on the Dock.)
One of two possible results occurs:
![]() If the window is already minimized, nothing happens and the script continues through the list of windows.
If the window is already minimized, nothing happens and the script continues through the list of windows.
![]() If the window isn’t minimized, the script collapses it.
If the window isn’t minimized, the script collapses it.
This continues until the script has examined all open windows. The end result? All open windows end up minimized in the Dock.
Another thing to note about this script is that it has two comments in it (save list and do nothing). Comments can help you remember what you were thinking months later when you open the script again. Although comments help us humans know what’s happening, they don’t really have any other function. An AppleScript comment begins with two dashes (--).
Here’s a big-time Mark’s Maxim that every script author should remember:
 Comments are your friend in any script!
One Step Beyond: AppleScript Programming
Creating AppleScripts can soon become very involved, bordering on programming. Don’t let that term “programming” scare you away, though. You needn’t be a software developer to take advantage of AppleScripts. Apple provides a lot of help to get you started along the AppleScript trail.
Grab the Dictionary
Perhaps the greatest resource for AppleScript novices and experts alike is the AppleScript Dictionary. Although many applications are scriptable, not all are. To be scriptable, an application must contain an AppleScript Dictionary. An AppleScript Dictionary details the various commands and objects of an application that you can access via AppleScript.
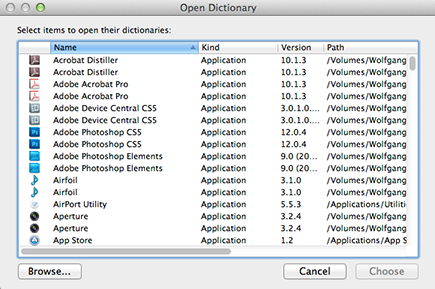
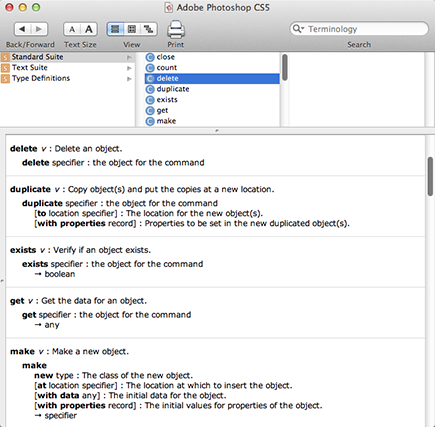
The AppleScript Editor application allows you to peer inside an application and view its AppleScript Dictionary. To open an application’s Dictionary, choose File⇒Open Dictionary. OS X searches through your installed applications and presents you with the Open Dictionary dialog, as shown in Figure 3-4, which lists all applications that have a dictionary — and are therefore scriptable.
Figure 3-4: Viewing the AppleScript Dictionary within the AppleScript Editor.
If you don’t see your favorite application in the list, alas, it’s probably not scriptable. To make certain, click the Browse button and navigate to the application location. If the application is disabled, you’re out of luck.
After you select an application and click Choose, the AppleScript Editor displays that application’s AppleScript Dictionary. An application’s dictionary lists all the features of that application that are scriptable.
Scriptable features are divided into categories — Suites — which you can see on the left side of the AppleScript Dictionary. Every Mac application is supposed to support the Standard Suite, which lists common terms that most applications should support.
Click an item in the Suite on the left side of the Dictionary to view detailed information about its capabilities, as shown in Figure 3-5.
Figure 3-5: Click an item in a Suite to view details about its capabilities and syntax.
Look over the various Suites of an application to see what tasks you can automate. The Finder, with its huge AppleScript Dictionary, is perhaps the most scriptable of all applications, with FileMaker Pro and BBEdit (which I discuss in Book VII, Chapter 5) close behind.
Anatomy of a simple script
Although a full discussion of AppleScript programming is beyond the scope of this book — after all, we have other things to talk about, too — that doesn’t mean that you can’t produce some quick and useful scripts. Most AppleScripts begin with a command that addresses the application that you want to automate. Enter this command into a new AppleScript document, which you create by pressing ![]() +N.
+N.
tell application “Finder”
This is like saying, “Hey, Finder, listen up! I’m going to send commands your way!” The double quotation marks surround the application name that you’re addressing in the command.
Similarly, after you finish instructing the Finder what tasks you want performed, you must also tell it to stop listening. As such, typical scripts end with
end tell
With the shell of a script in place, all you have to do is add commands between the tell and end tell commands of the script. If you want your script to force an application to the foreground, an activate command is usually the first line within the shell of your script.
tell application “Finder”
activate
end tell
Believe it or not, this is technically a complete and valid script! It doesn’t do much, though, so add some more functionality to make it accomplish something worthwhile. For example, suppose you want to perform some housekeeping chores each time you log in to your Macintosh. Some desirable tasks might include
![]() Emptying the Trash
Emptying the Trash
![]() Having your Mac say, “Hello!” to you
Having your Mac say, “Hello!” to you
(Okay, I’ll grant that hearing your Mac say, “Hello!” isn’t a housekeeping chore, but it makes the whole script that much more fun — and really impresses your visitors, too. No one ever said programming had to be boring!)
To add these functions, you can use a language you already know: English. As I mention earlier, Apple tries (and sometimes succeeds) to make AppleScript as English-like as possible. That way, you don’t have to know some silly computer language; just use your native tongue. For example, to empty the Trash, tell the Finder to do so.
empty trash
The trickiest line of code might be the speech, and that’s only because you need to remember to add quotation marks. AppleScript thinks that anything without quotation marks is an AppleScript command.
say “Hello!”
The result is a super-simple script that anyone can read but that performs two powerful functions. The completed script looks like this:
tell app “Finder”
activate
empty trash
say “Hello!”
end tell
After you complete the script, choose File⇒Save to save your script. Because you want the script to execute and then quit, use the File Format field to save it as an Application. Also, make sure that the Stay Open check box and the Startup Screen check box are deselected. And don’t forget to name your script in the Save As text field.
To have the script automatically run each time you log in to your Mac, save the script anywhere you wish. (Assign its location in the Where field of the Save window.) Open System Preferences by clicking its icon on the Dock; click the Users & Groups icon. Make sure that your account is selected (if the pane is locked, click the padlock icon and type your admin password to continue) and then click Login Items. Click the Add button (which proudly bears a plus sign) and navigate to your script in the Open dialog that appears. After you click the Add button of the Open dialog, you see the script in the Login Items pane.
I Summon Automator — the Silicon Programmer!
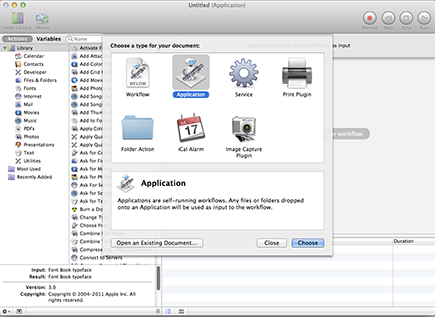
Okay, perhaps I’ve watched too much Iron Chef over the years. Anyway, Mountain Lion features Automator (as shown in Figure 3-6), and he’s your own personal robotic automation assistant. In fact, Automator can help you create custom applications that can handle your repetitive tasks. Again, you’re creating workflows here, which are sequential (and repeatable) operations that are performed on the same files or data, and your Automator application can automatically launch whatever applications are necessary to get the job done.
Figure 3-6: Automator is a dream come true for those who hate repetitive tasks.
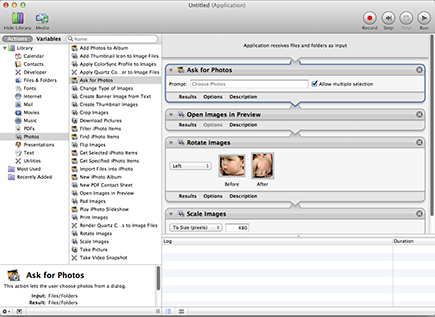
Here’s a great example: You work with a service bureau that sends you a CD every week with new product shots for your company’s Marketing department. Unfortunately, these images are flat-out huge — taken with a 13-megapixel camera — and they’re always in the wrong orientation. Before you move them to the Marketing folder on your server, you have to laboriously resize each image and rotate it, and then save the smaller version.
With Automator’s help, you can build a custom application that automatically reads each image in the folder, resizes it, rotates it, and even generates a thumbnail image or prints the image, and then moves the massaged images to the proper folder. You’d normally have to manually launch Preview to perform the image operations and then use a Finder window to move the new files to the right location. But now, with Automator, double-clicking your custom application icon does the trick.
You can run Automator from Launchpad, of course. Open the Utilities folder and then click the Automator icon — and it’s also located in your Applications folder. Currently, Automator can handle specific tasks within more than 80 applications (including the Finder), but both Apple and third-party developers can add new Automator task support to both new and existing applications.
To create a simple application using Automator, follow these steps:
1. Select Application and click Choose.
2. Click the desired application in the Library list.
Automator displays the actions available within that application.
3. Drag the desired action from the Library pane to the workflow pane.
4. Modify any specific settings provided for the action you chose.
5. Repeat Steps 1–3 to complete the workflow.
6. Click Run (upper right) to test your script.
Use sample files (copies) while you’re fine-tuning your application lest you accidentally do something deleterious to an original (and irreplaceable) file!
Figure 3-7 illustrates a workflow that will take care of the earlier example — resizing and rotating a folder full of images, and then moving them to the Pictures folder.
7. When the application is working as you like, press ![]() +Shift+S to save it.
+Shift+S to save it.
8. In the Save dialog that appears, type a name for your new workflow.
9. Click the Where pop-up menu and specify a location where the file should be saved.
10. Click Save.
To find all the actions of a certain type within the Library list, click in the Search box at the bottom of the Library window and type in a keyword, such as save or burn. You don’t even need to press Return!
Figure 3-7: Now I’m ready to handle 10 or 1,000 images in a folder — my application does the work!
Help Is at Your Fingertips
If you want to explore AppleScript further, you have many resources on hand. Sometimes the easiest way to use AppleScript is to copy existing scripts and modify them as necessary; other times, it’s a good idea to read the documentation included in Apple’s Help system. Whichever approach you use, with a little practice and guidance, you’ll soon be doing stupendous tasks with your Mac.
Built-in AppleScript Help
The most readily available AppleScript reference is built into OS X. From within Automator, choose Help⇒Automator Help to launch the Automator Help Guide, or choose Help⇒AppleScript Help from the AppleScript Editor. The latter is a great place to begin your AppleScript exploration. It includes detailed documentation about the AppleScript language and loads of demonstration scripts for you to try (or alter) yourself.
AppleScript on the web
In addition to the built-in AppleScript help in the Finder, the Internet has much to offer in the way of AppleScript training and examples. Like so many other excellent web resources, AppleScripts are free!
Not all AppleScripts are created equal: When downloading scripts from the Internet, make sure that they’re compatible with Mountain Lion (OS X v. 10.8).
Mac OS X Automation
Although the built-in OS X help offers a lot, the Mac OS X Automation website offers even more scripts, tutorials, and general AppleScript and Automator goodness. Furthermore, the site maintains an extensive list of links to other useful AppleScript/Automator sites.
www.macosxautomation.com/applescript
Automator World
Automator World (http://automatorworld.com
) devotes its site to all Macintosh scripting. Because AppleScript is such a huge part of scripting the Mac OS, you can be certain that there’s something here for you. Besides offering up-to-date news on Automator scripting for the Mac OS, Automator World also gives you access to many scripts, information about scripting books, and details on AppleScripts with interfaces. The sheer volume of information at this site makes it one you shouldn’t skip.